


Build a simple CRM on Airtable in <2 hours
If you’re looking to upgrade your databases from spreadsheet programs like Excel or Google Sheets into more functional, practical software, Airtable is generally a great place to start. It elevates the familiar grid layout of spreadsheets, enabling non-technical users to create personal and business systems without any coding knowledge. By blending this simplicity of spreadsheets with the power and flexibility of a relational database, Airtable fills the gaps left by traditional spreadsheets.
Airtable is particularly well suited to building basic admin systems. With Airtable, project management systems, CRMs, inventory trackers, and business dashboards can streamline small datasets into a more efficient workflow for teams. It’s particularly appealing to small to medium-sized businesses: it’s an invaluable tool for creative teams, agencies, non-profits, startups, and non-technical users who need to organize and manage data efficiently without the complexities of coding or full-scale database systems.
For this first intro to Airtable, we’ll use the universal example of a Customer Relationship Manager (CRM) application. CRMs can be useful for almost all businesses and even for personal use, and Airtable is a great place to get started with building one. Though we’ll focus on the use case of a CRM, these steps will be largely applicable to most straightforward use cases of Airtable.
In this beginner-friendly guide, we’ll walk you through the step-by-step process of creating a CRM application in Airtable, allowing you to explore its core functionalities interactively. In this tutorial, you’ll learn how to:
- Set up multiple databases for contacts, deals and companies with different formatting options for columns and data validation
- Create relational links between databases to pull relevant data into multiple places without duplicating it (e.g. making contact data visible from the company level too)
- Set up multiple views for your data to suit different users
- Build a simple reporting automation to send an email notifying sales managers of new deals over $10k in value.
No coding experience is necessary, and by the end of this tutorial, you’ll have a fully functional Airtable app ready to use for your business.
Why use Airtable over Google Sheets?
Let’s say we’re a small company that needs better oversight into our deals flow, as well as the ability to share information about companies and contacts across a whole team. We don’t have a big enough budget to work with a more complex platform like Salesforce, nor would it suit our small operations, and we don’t need anything overly technical for our team either.
Nevertheless, Google Sheets is currently unsuitable: it’s just too easy to break and overwrite data, (it’s ugly), and the table-only view is too rigid. Put simply, what our team wants is:
- Various ways to view their data (suited to their personal preferences and working styles)
- To know that key data is protected from editing from those with unrestrained fingers.
- We also just want something that feels more like an app than a rigid spreadsheet.
The problem is, we’re not very good at coding… Well, for a non-technical team, Airtable is a great option: we can build a tool ourselves in just a handful of hours, manage our data more effectively and even scale the app to help us perform adjacent workflows even faster.
We talk about the features of Airtable extensively in our What is Airtable article, but here is a quick summary of just some of the ways Airtable stands out, particularly compared to spreadsheets (which is where most people using Airtable started out).
- Better data management and connectivity options for a clearer overview of data
- Enhanced data visualization options compared to solely spreadsheets, such as calendars, kanbans and gantt charts
- More granular permissioning options
- Greater collaboration options for teams
- Options for further integrations and automations
Nevertheless, there are some key limitation to consider when building on Airtable, most notably:
- It’s not suitable for very large datasets and pricing can increase quickly when higher data limits are needed
- The UI builder for more bespoke internal web apps is still very limited
- Per-user pricing is still very high for a platform that only offers small upgrades from spreadsheets, and is expensive for larger teams or lite users
You can read more about Airtable in our full platform guide.
So, without further ado, let’s get building!
Step 1: Set up an account with Airtable
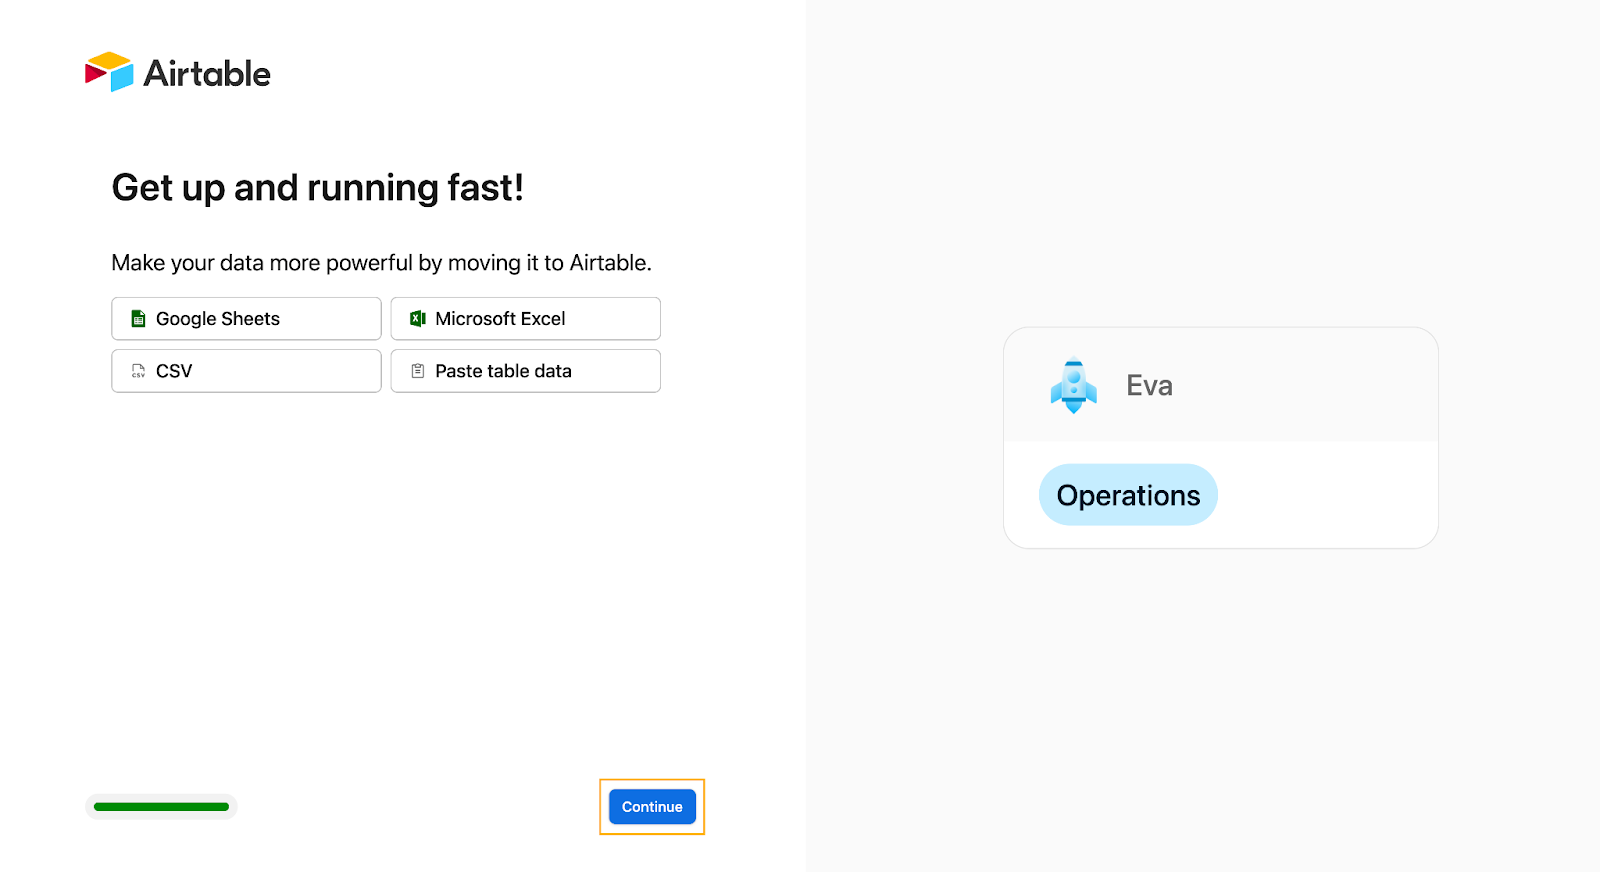
To get started with Airtable, head to their website and click on the Sign up for free button in the top right corner. You'll be taken to a registration page where you can create an account using your Google credentials or email address.
Once you've signed up, Airtable will guide you through a quick onboarding process.
For now, skip the option to import existing data, as we’re focused on building our CRM from scratch. Just click ‘continue’ without selecting any of the suggested options.
Next, you'll be prompted to create your first app. Name it something like "CRM," pick a color, and choose an icon that represents your app. You’ll see a live preview on the right side as you customize these options. Once everything looks good, hit Next.
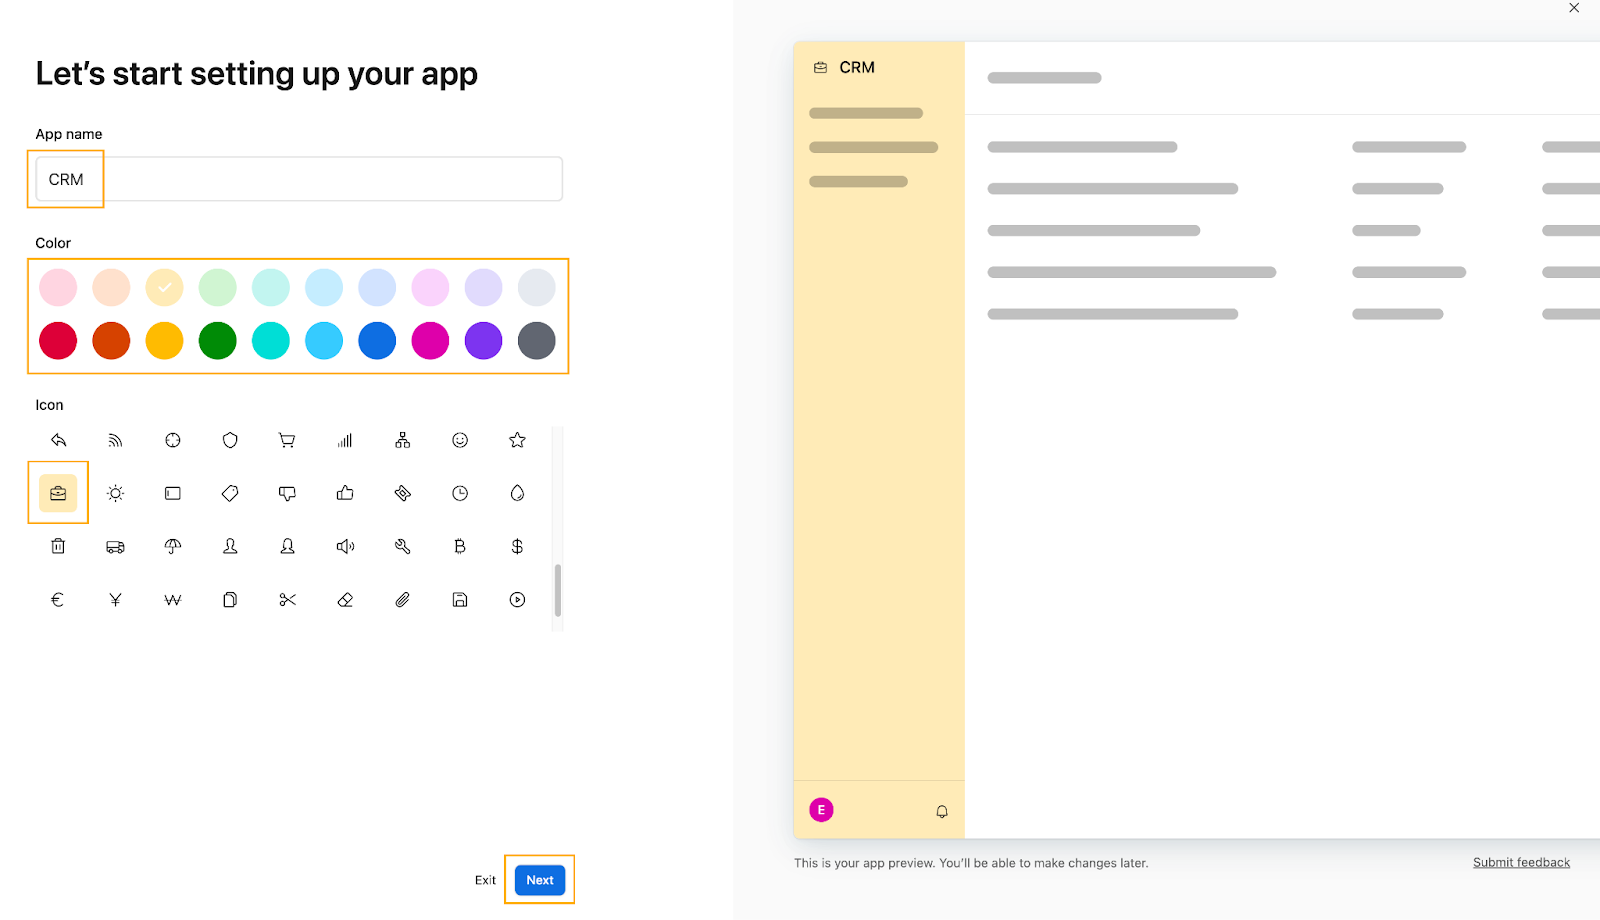
Airtable will then ask you to choose a department on which to base your app, which would generate a sample application for you. Since we’re building this app from the ground up, select Blank table and click Next.

At this point, Airtable will automatically upgrade you to the Team plan trial for free, unlocking advanced customization features like Gantt charts, timeline views, and extended color formatting. These added tools will come in handy as you build and enhance your CRM app, but it’s worth bearing in mind that you’ll lose these features if you choose to not stay on the paid plan after the trial. We talk more about the pricing plans in our guide.
And with that you're ready to start building your Airtable CRM!
Step 2: Customize the basic app settings
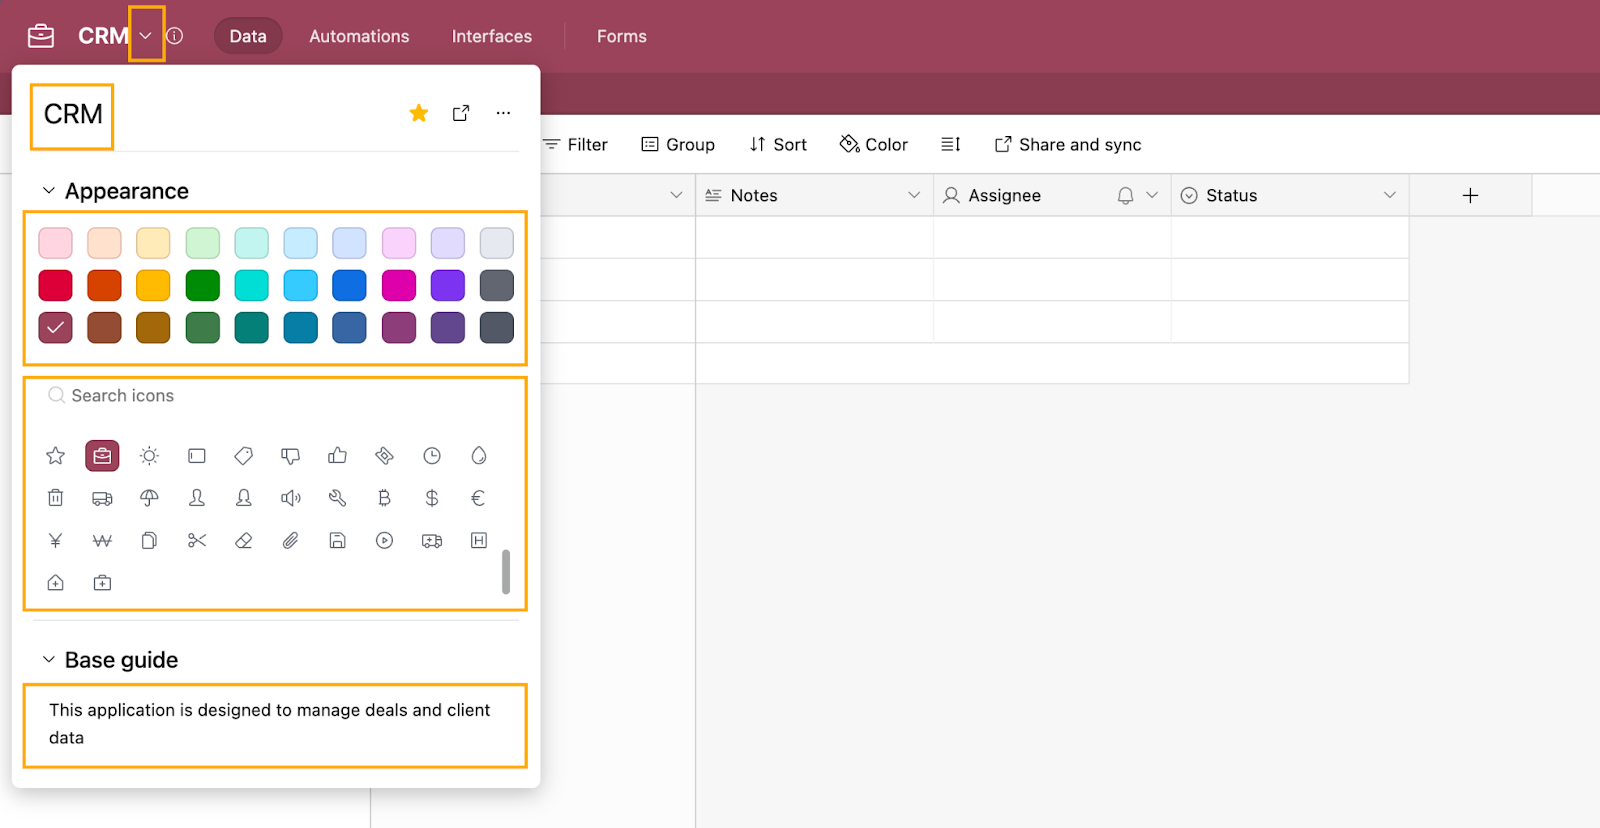
Now you’ll be taken to the main table screen. From there, you can rename the app, change the color, select a new icon, and add a Base guide. The Base guide is a helpful feature that allows you to explain the purpose of the app and provide brief instructions on how to navigate it to the rest of our team.
Step 3: Build a Companies database
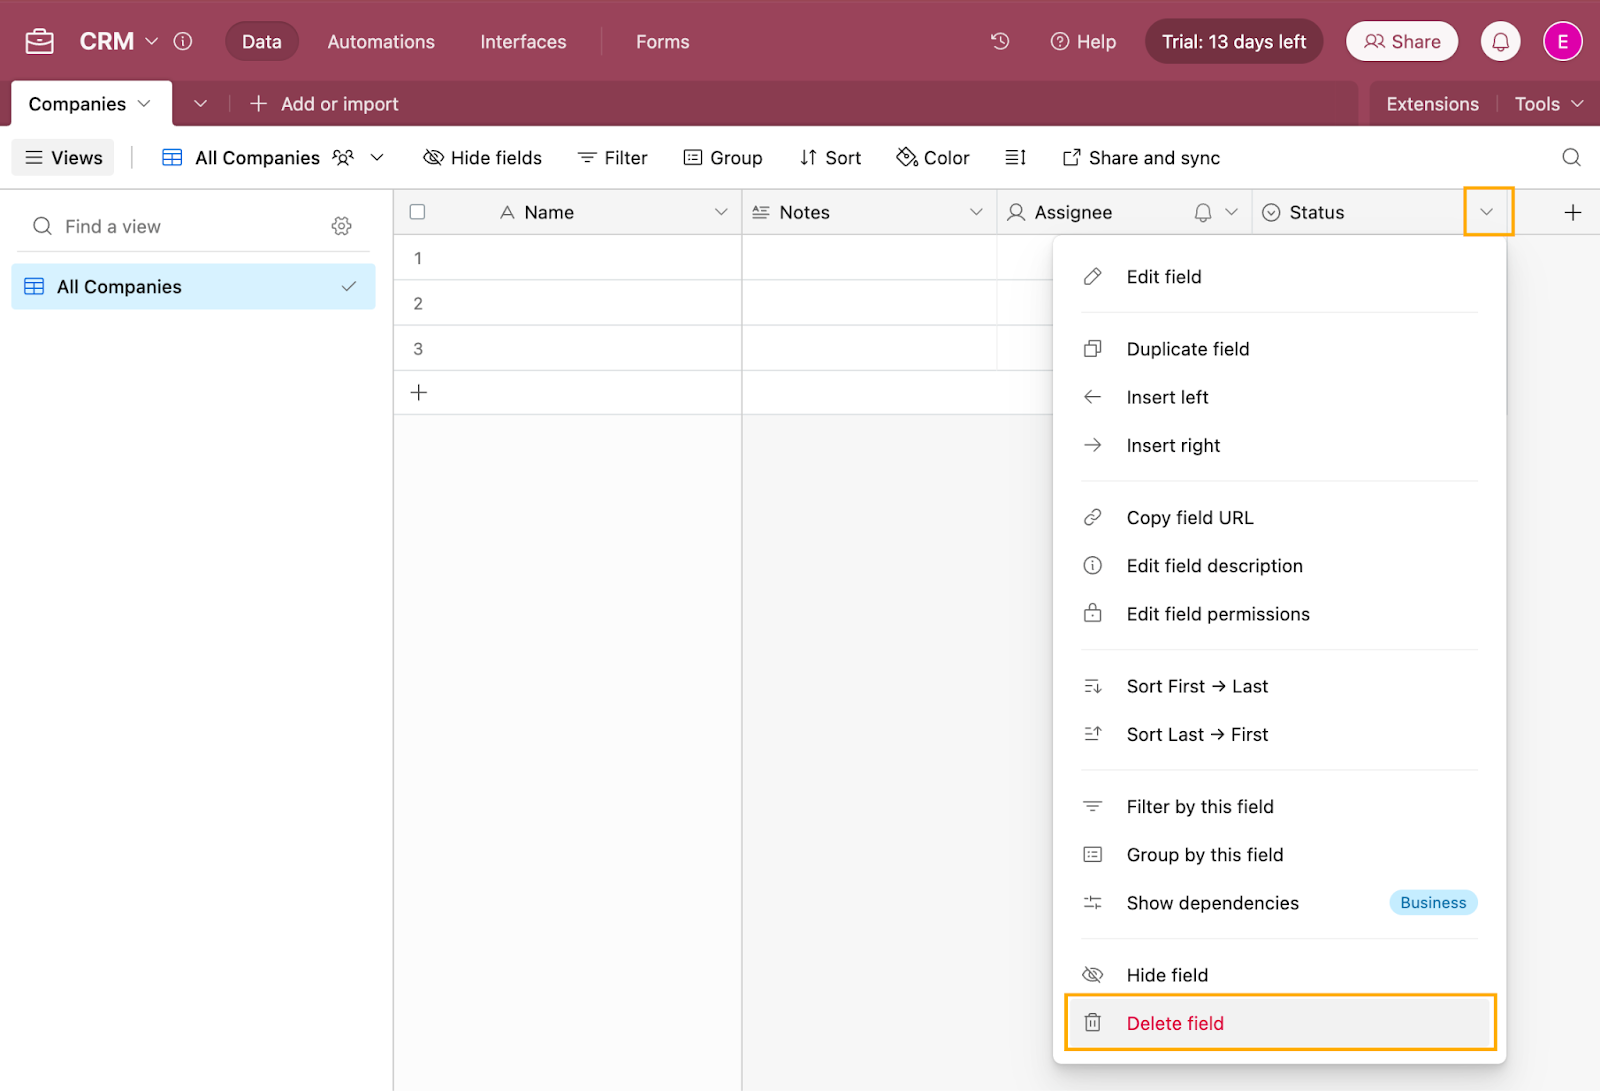
Now, it's time to start building our first CRM database. By default, Airtable creates one database (or "Table" in Airtable terminology) when you start building your application. Let’s start here and rename it as “Companies”. Simply click the ‘down’ arrow next to the database tab and select Rename table. Change the table name to “Companies”, and set Company under What should each record be called?, and click ‘Save’.

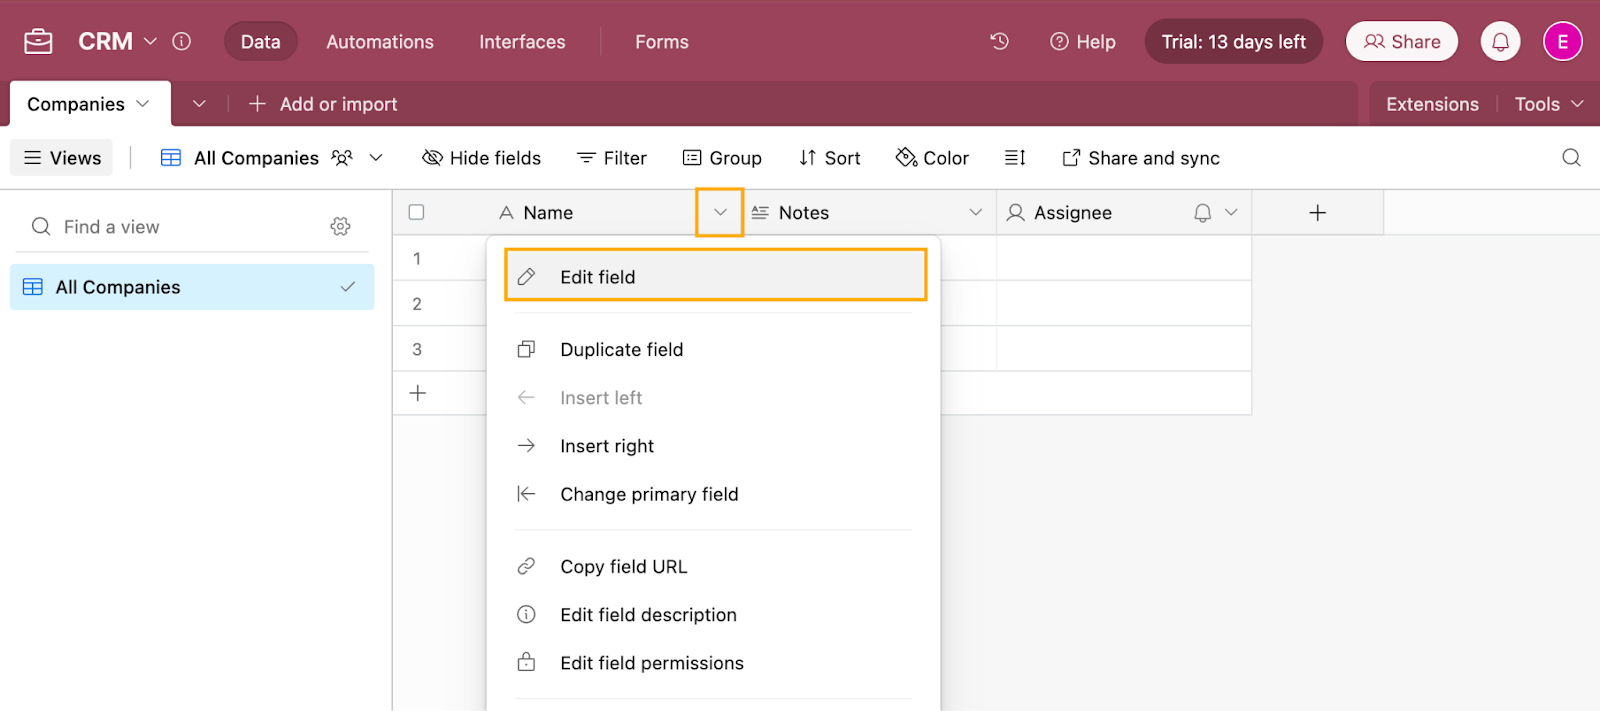
By default when you create a new database, Airtable builds 4 basic properties (the columns) - Name, Notes, Assignee and Status. We don’t need the Status property for the Companies database, so let’s go ahead and delete it. To do that, click on the down arrow next to the Status field, and select Delete field.
We will keep the Notes field as is, but we’ll rename Name and Assignee to better fit our needs:
- Name: rename to “Company”
- Assignee: rename to “Owner”
To rename a field, click the down arrow next to the field name and choose Edit field. Update the field name and click Save.
In Airtable, there are 28 different data types for your columns. These are really important when managing data because they allow you to control the input of data and stop false data from being included in your table. This kind of data validation makes it much easier to manipulate data using formulas and more.
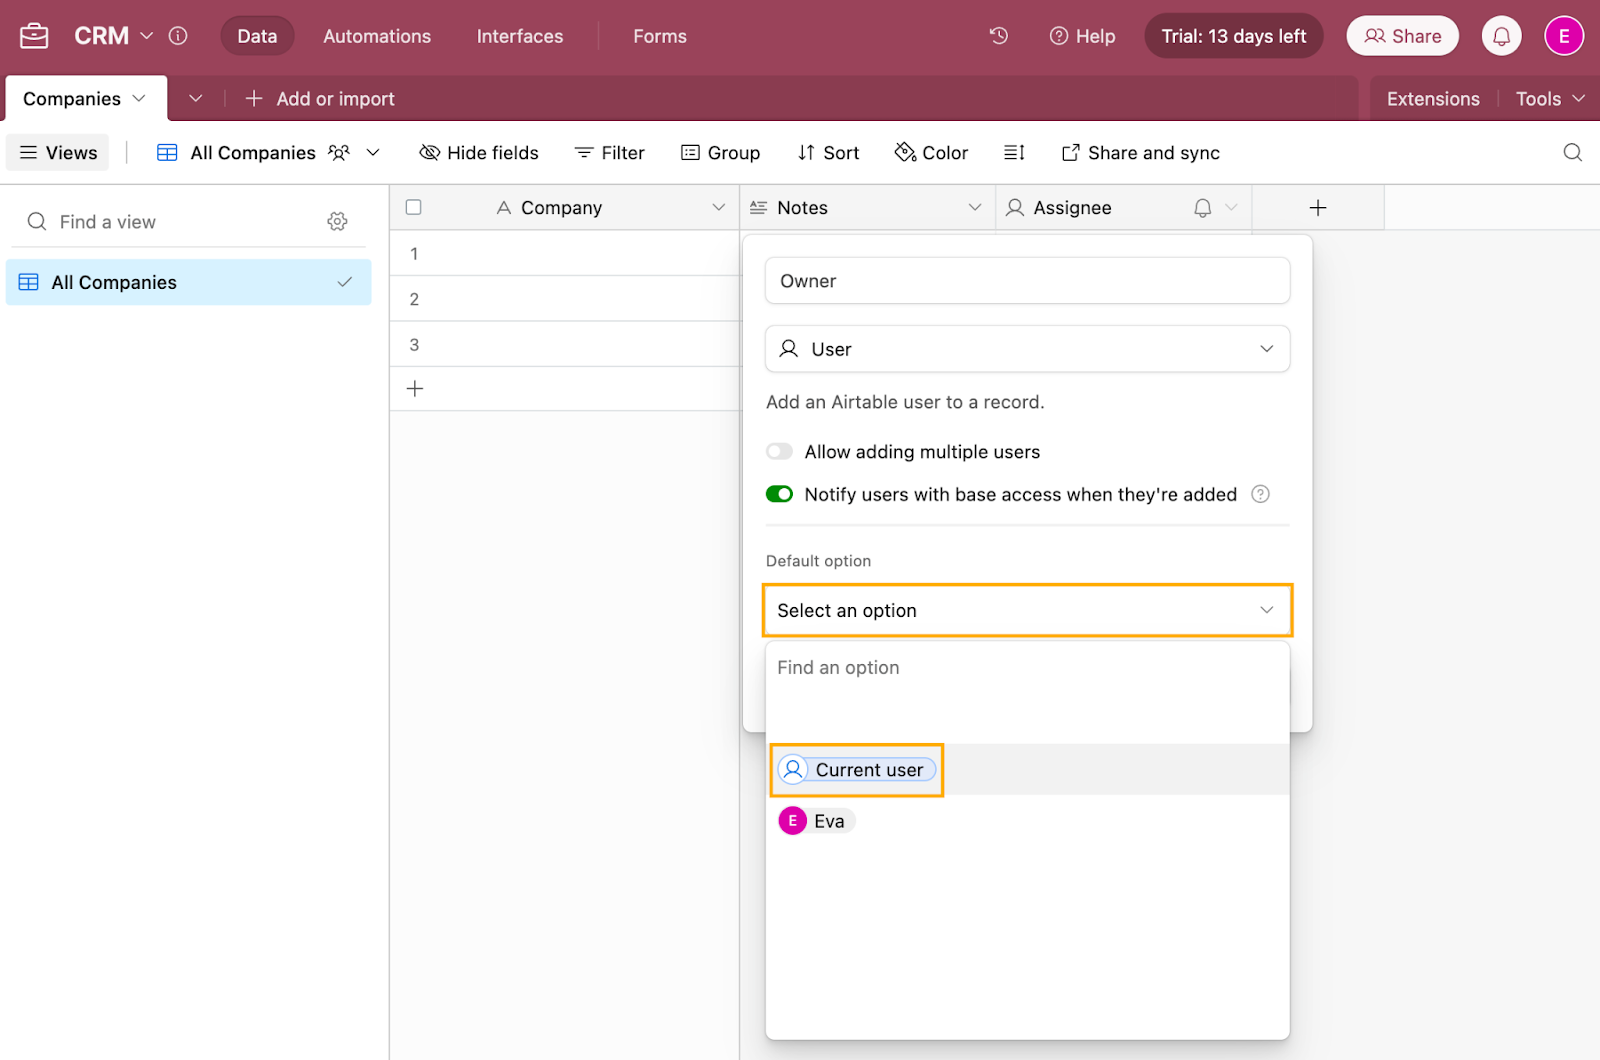
For the Assignee field, open the Edit field form, rename it to “Owner”, and set the default option to Current user. This will automatically assign the user creating the record as the Owner of the company’s account. Click Save to confirm the change.
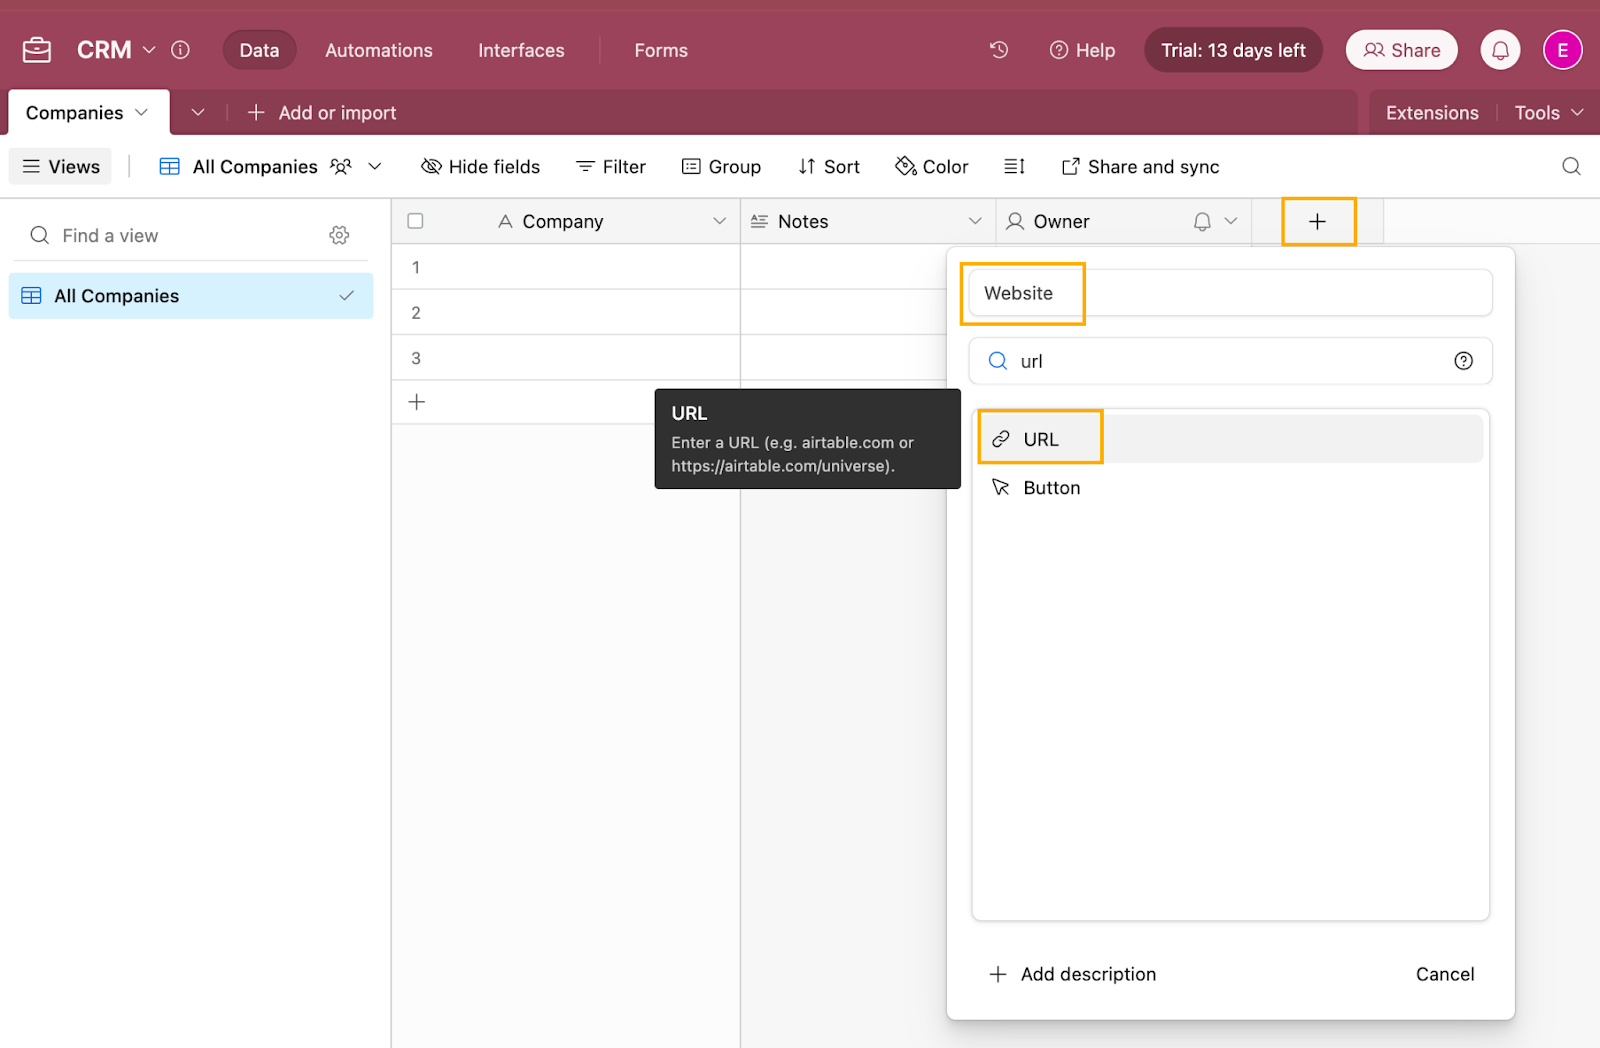
Next, we’ll add a new field called “Website” so we can link through to more info on these companies:
- Click the plus icon at the far right of the fields (next to Owner).
- Name the new field “Website”.
- Select URL from the list of field types.
- Click Create field.
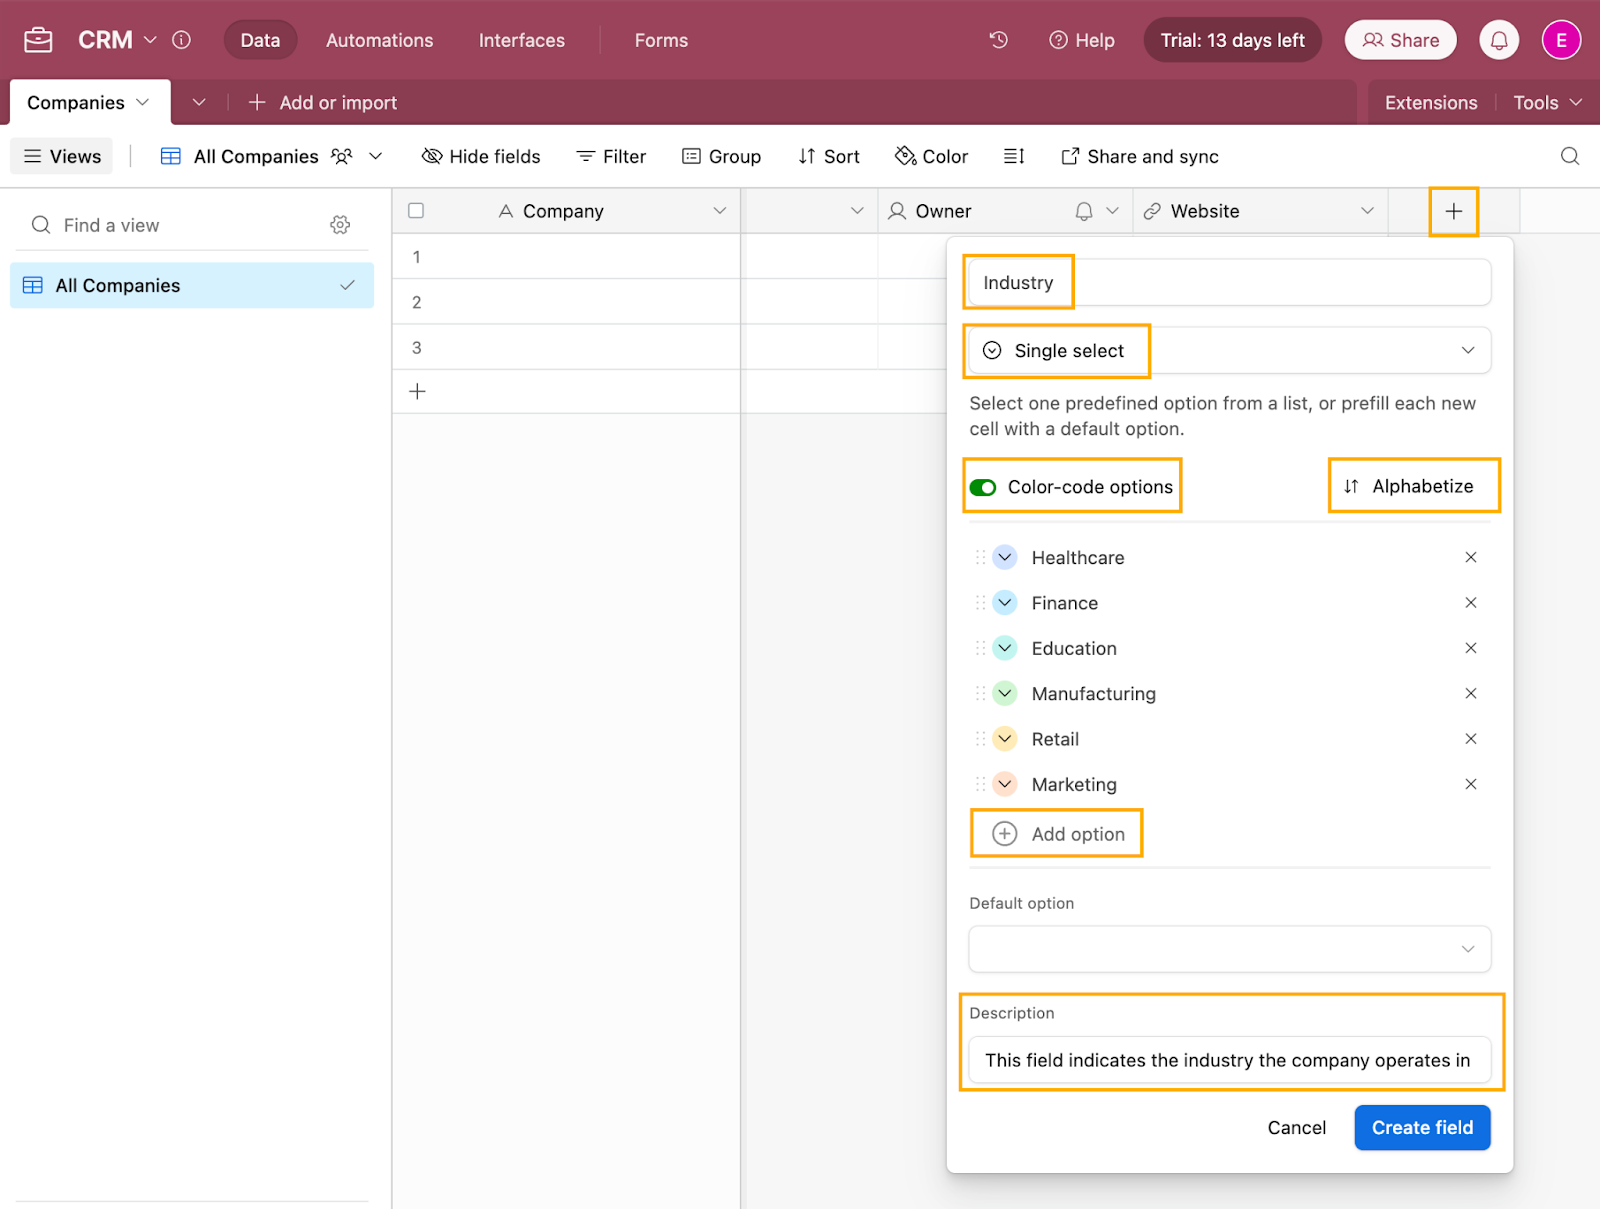
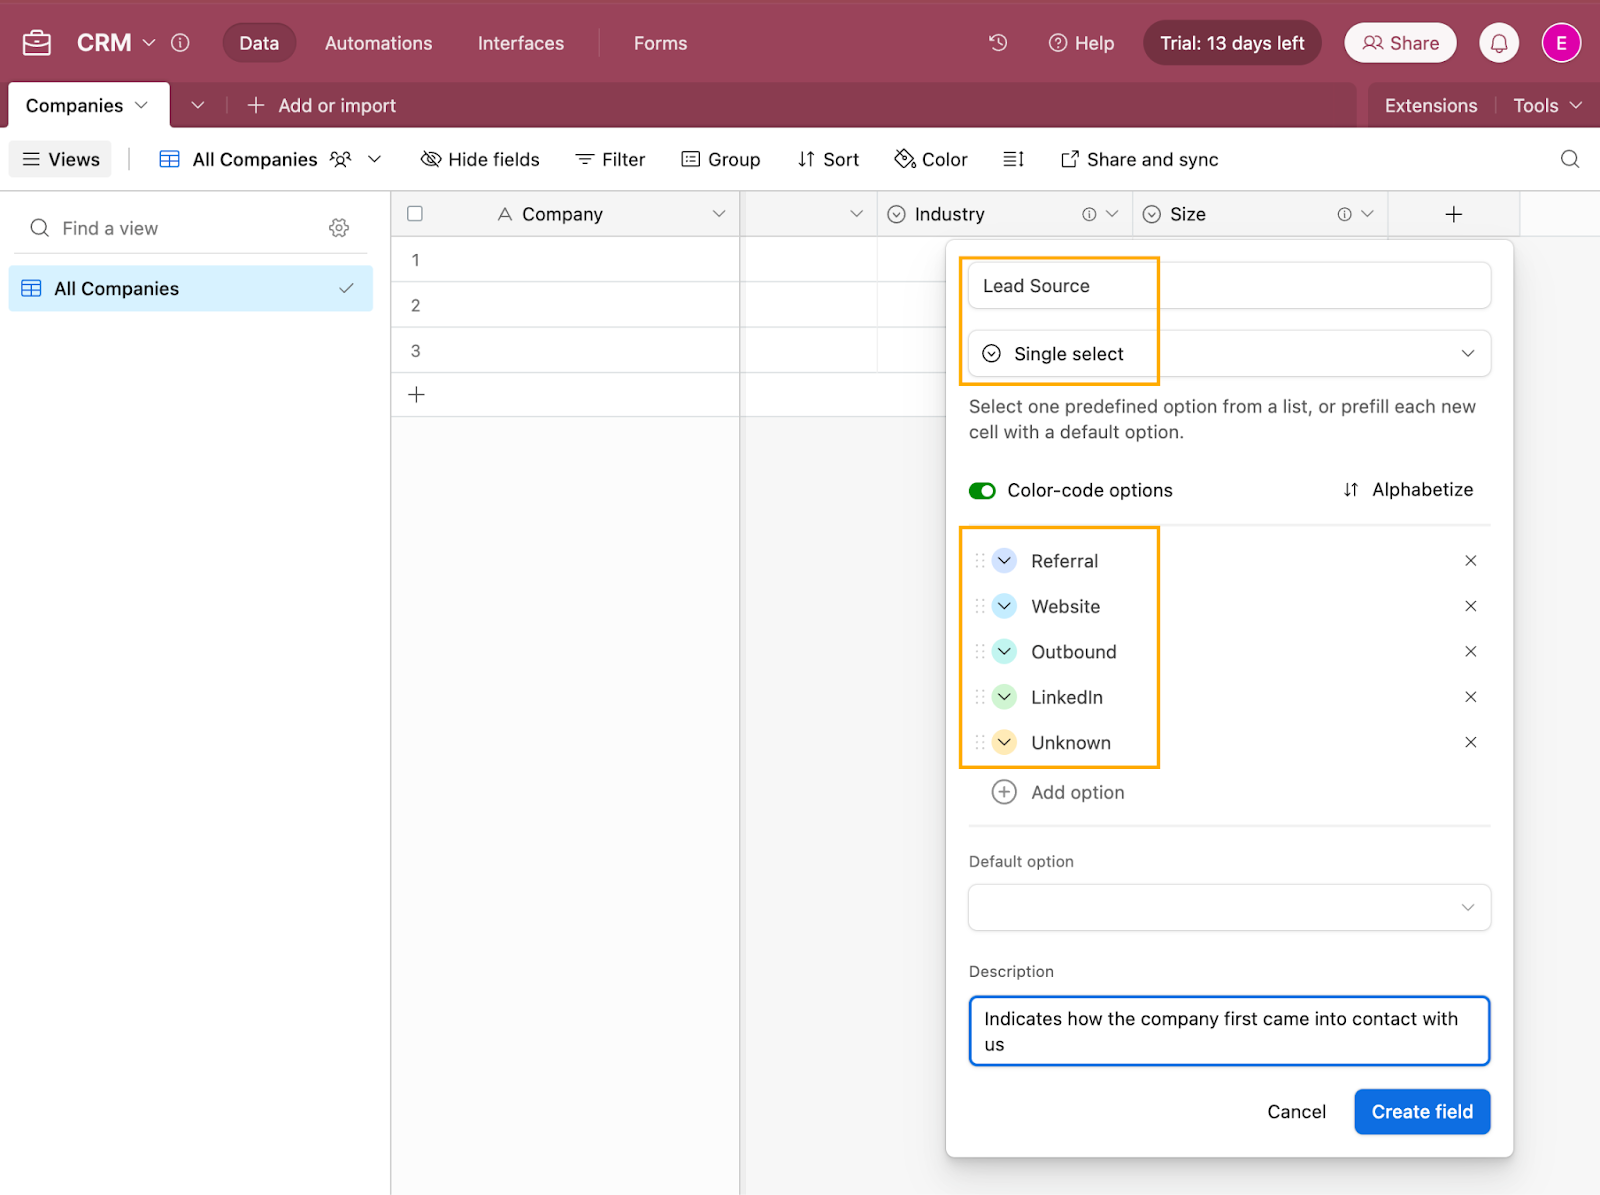
Now, let’s add a Single select field for Industry. This works like a dropdown field and allows users to select a single value:
- Create a new field named “Industry”.
- Choose Single select as the field type.
- Add the select options you want to use (e.g., Tech, Finance, Retail).
- Leave the Default option empty for now, and leave Color-code options on to make your data easier to distinguish visually.
- Click Create field.
Single selects are a great option for creating better data validation: they ensure users aren’t free typing the value each time (and potentially making mistakes). Since all values are selected from a pre-existing list and will hence be more precise, it’s also easier to sort and filter your data by these values.
Now we'll add another Single select field named Size and configure it with the following values to allow users to decide the company size:
Lastly, add one more Single select field called “Lead Sources” and configure it with values like “Website”, “Referral”, “Outbound”, etc.
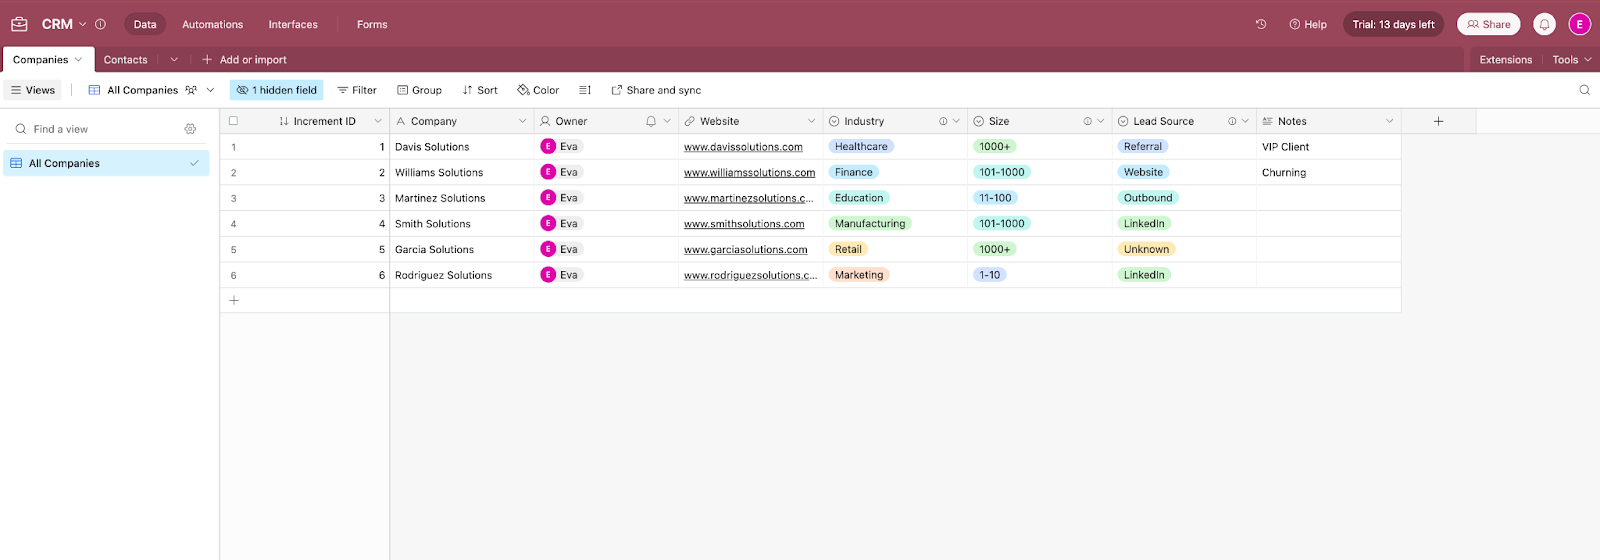
Now, let’s add a field to assign a unique ID to each record. By having unique IDs in your database, you can avoid duplicated fields and ensure your data stays sortable and filterable even when you have repeated values. To do this, add a new field of type Autonumber, which will automatically generate incremental numbers for each company record.
Now we have all our table fields, let’s rearrange them in a more logical manner, to make it easier for users to fill out information for companies. To do this, hover over a field, then drag and drop it to the desired location. Alternatively, you can click Hide fields and rearrange them there.

With the Companies database complete, add some sample data. You can do this quickly by downloading this CSV file and importing it into your Airtable Companies database.
And with that, we’re ready to start building the Contacts database!
Step 4: Build a Contacts database
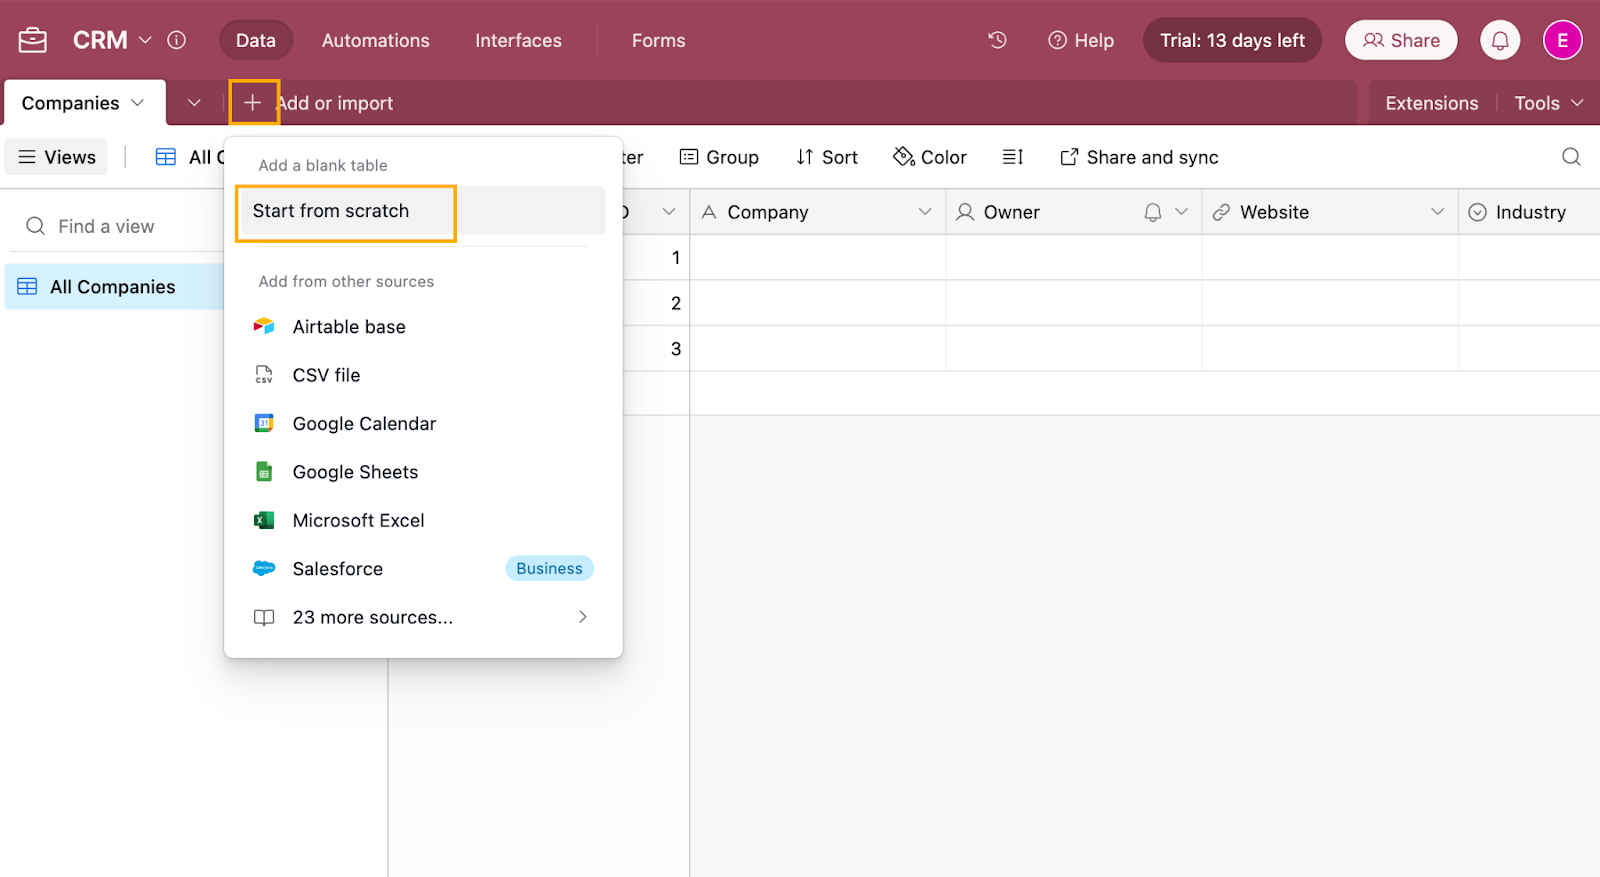
Since we might have multiple contacts associated with the same company, it makes sense to start another table to store contact data rather than create lots of additional columns in our Companies table. To make a new table, click the plus sign next to the Companies database and select Start from scratch. This will generate a new Airtable database. You also have the option to import data from various sources, including other Airtable apps, CSV files, and nearly 30 additional data sources. On the business plan, you can even import from Salesforce.
When prompted to name the new database, type “Contacts” and click Save. By default again, the Notes, Assignee, and Status fields are included in this new database, but we won't need them for this setup. Go ahead and delete these fields.
We will keep the Name field but rename it to “Name and Surname”:
- Click the down arrow next to the Name field.
- Select Edit field.
- Update the name to Name and Surname.
- Click Save.
Now, we’ll add two new fields:
- Email: Choose the Email field type.
- Phone: Select the Number field type.
Once your main contact table schema is set up, go ahead and add some sample data.
Next, since each contact belongs to a company, it makes sense to create a connection between the Contacts and Companies databases. To do this, add a new field with the Link to another record field type.
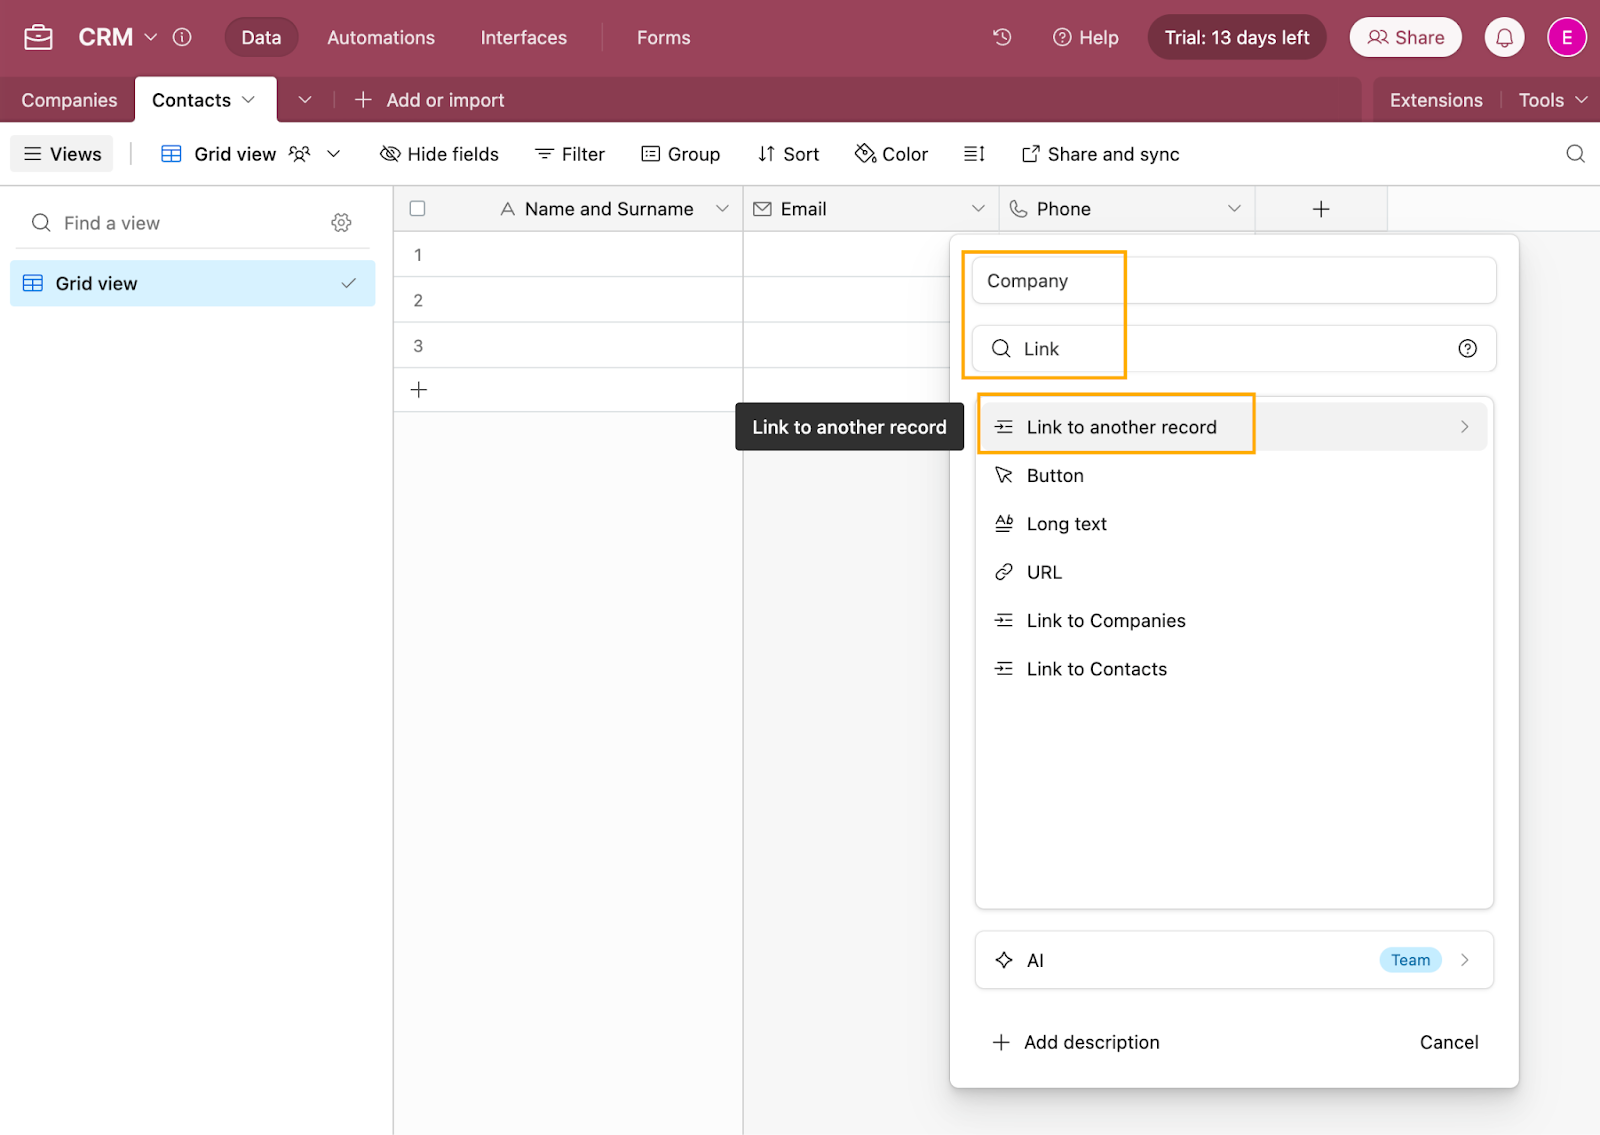
- Name the field “Company”.
- In the new window that appears, select Companies as the table to link to.
- Click Create field.

This linking capability is called a relation and is the reason why Airtable is considered a relational database tool. The relationship allows you to create simple connections between different databases to share information without duplicating it in multiple tables.
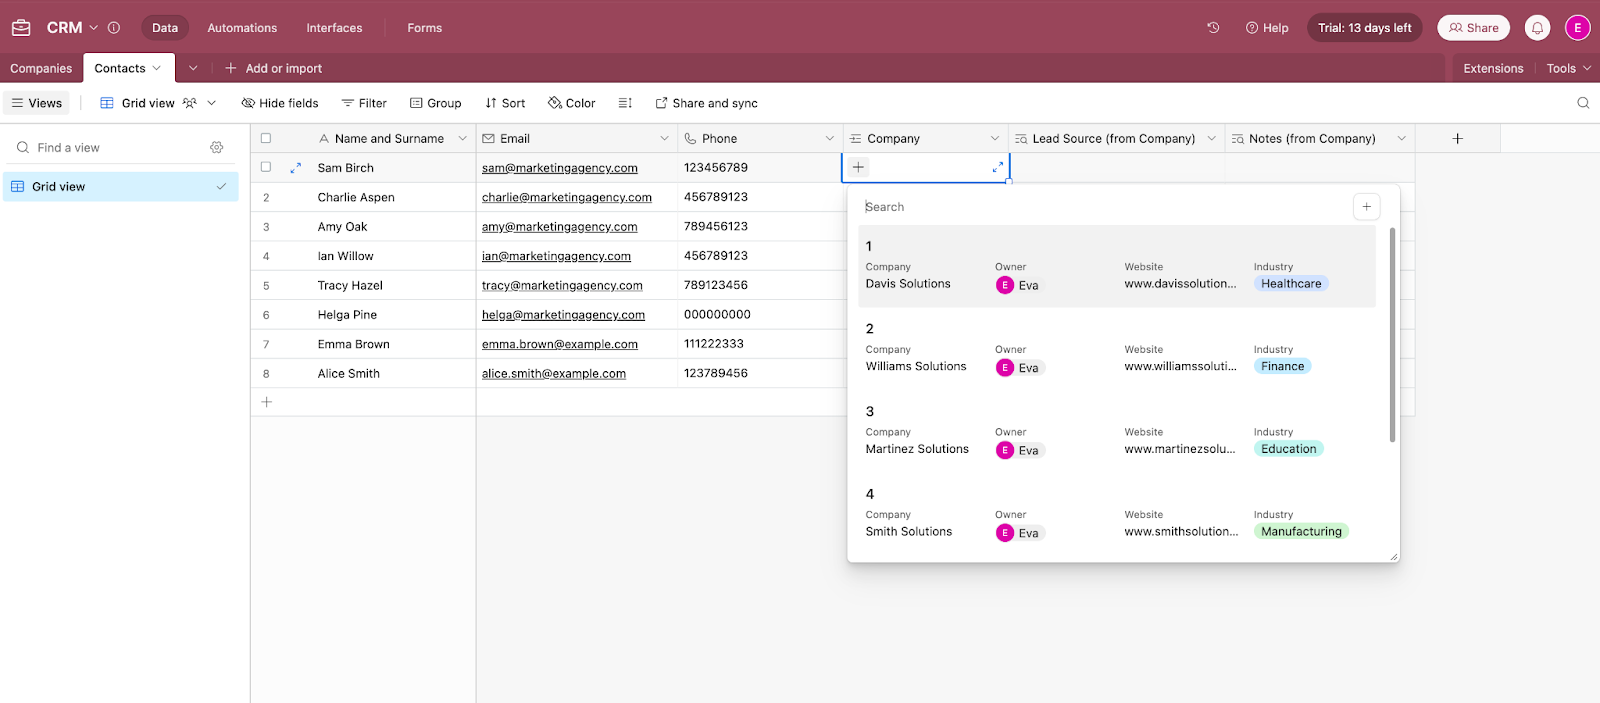
In this case, we use it to assign and view all contacts associated with a company directly from the Companies database.
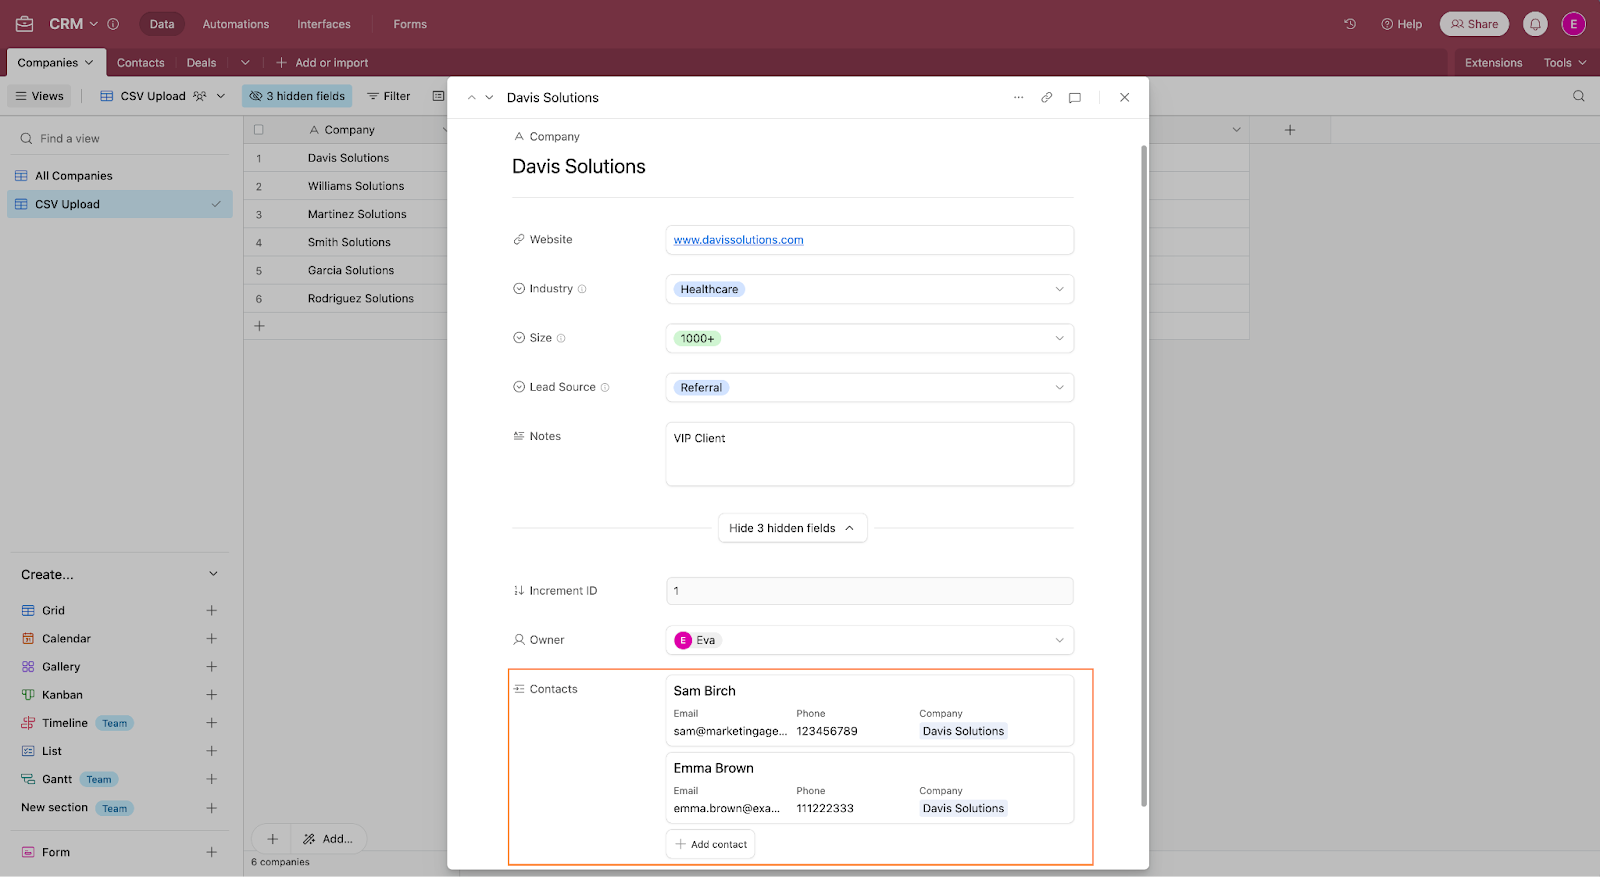
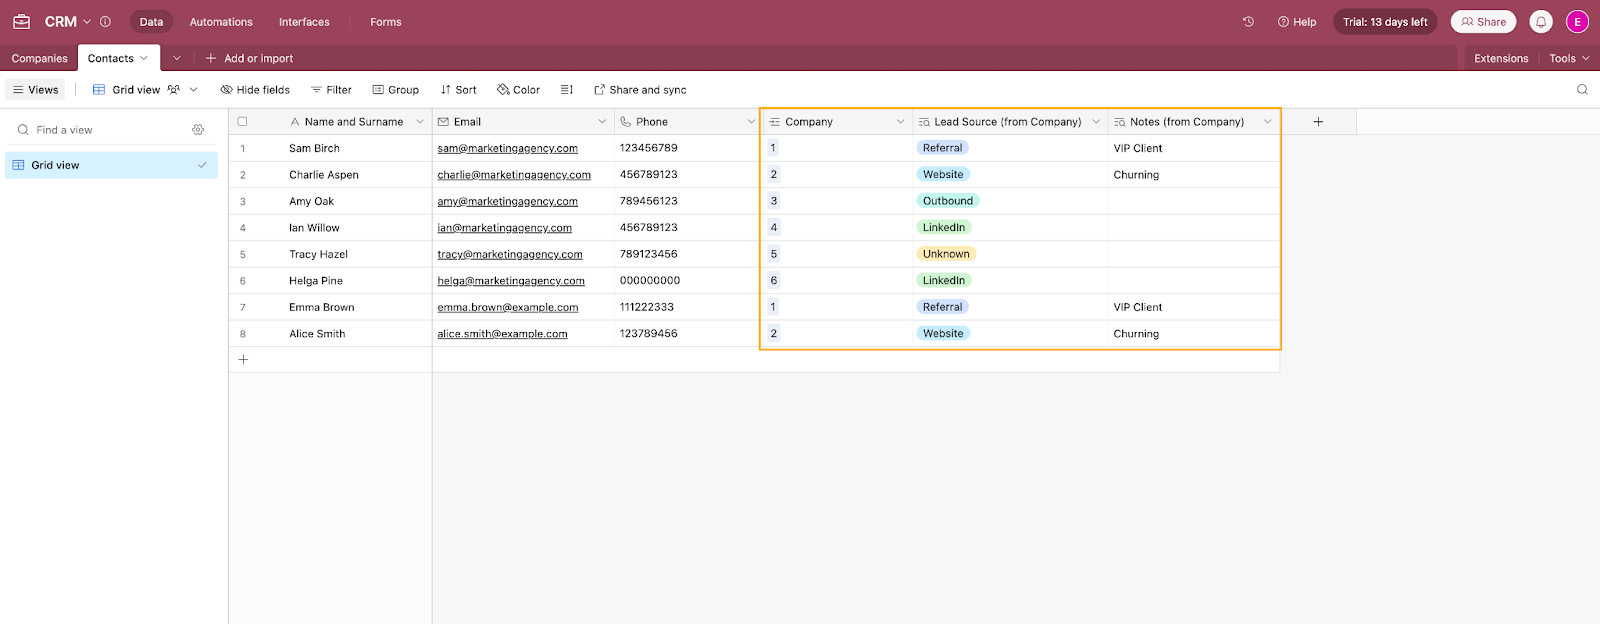
After linking the Contacts table to the Companies table, Airtable will ask if you want to add lookup fields. Lookups allow you to pull related information from one table (database) into another, a lot like a Vlookup would in a spreadsheet. For example, you can also pull in the Lead Source or Notes from the Companies database, thereby saving you from manually copying data and reducing errors.
Let’s do just that to make this information accessible in both the Contacts and related Companies records.
This is what this table would look like with those linked fields pulled in from the Companies table.
You may have noticed while setting up your relations that Airtable offered the option to connect Contacts to Contacts, which might not make sense here, but is actually useful in other cases. For example, in a Tasks database, you would create sub-tasks here. This self-referencing relationship is a powerful feature that sets Airtable apart from tools like Google Sheets. We’ll explore this more in our more intermediate and advanced tutorials.
Finally, let’s rename the default Grid view (the standard view of the table) to All Contacts.
Now we’re ready to move on and create our third and final database: Deals.
Step 5: Build a Deals database
Now we need a way to track the individual deals or projects that we have associated with each of these companies. By saving these in a separate database, it’s again possible to have multiple deals associated with each client, so you can better track any individual projects that might have fallen through, been completed or potential new contracts for the same client.
As you’ve done already, add another new database by clicking on the plus sign next to the Contacts database tab, select Start from scratch, and name the database Deals.
We’ll keep all the prebuilt properties, but we’ll make some changes to make the fields more relevant to our deals details:
- Name: Rename to “Deal”.
- Assignee: Rename to “Owner”, and set Current user as the default option.
- Notes: Rename to “Deal Notes”.
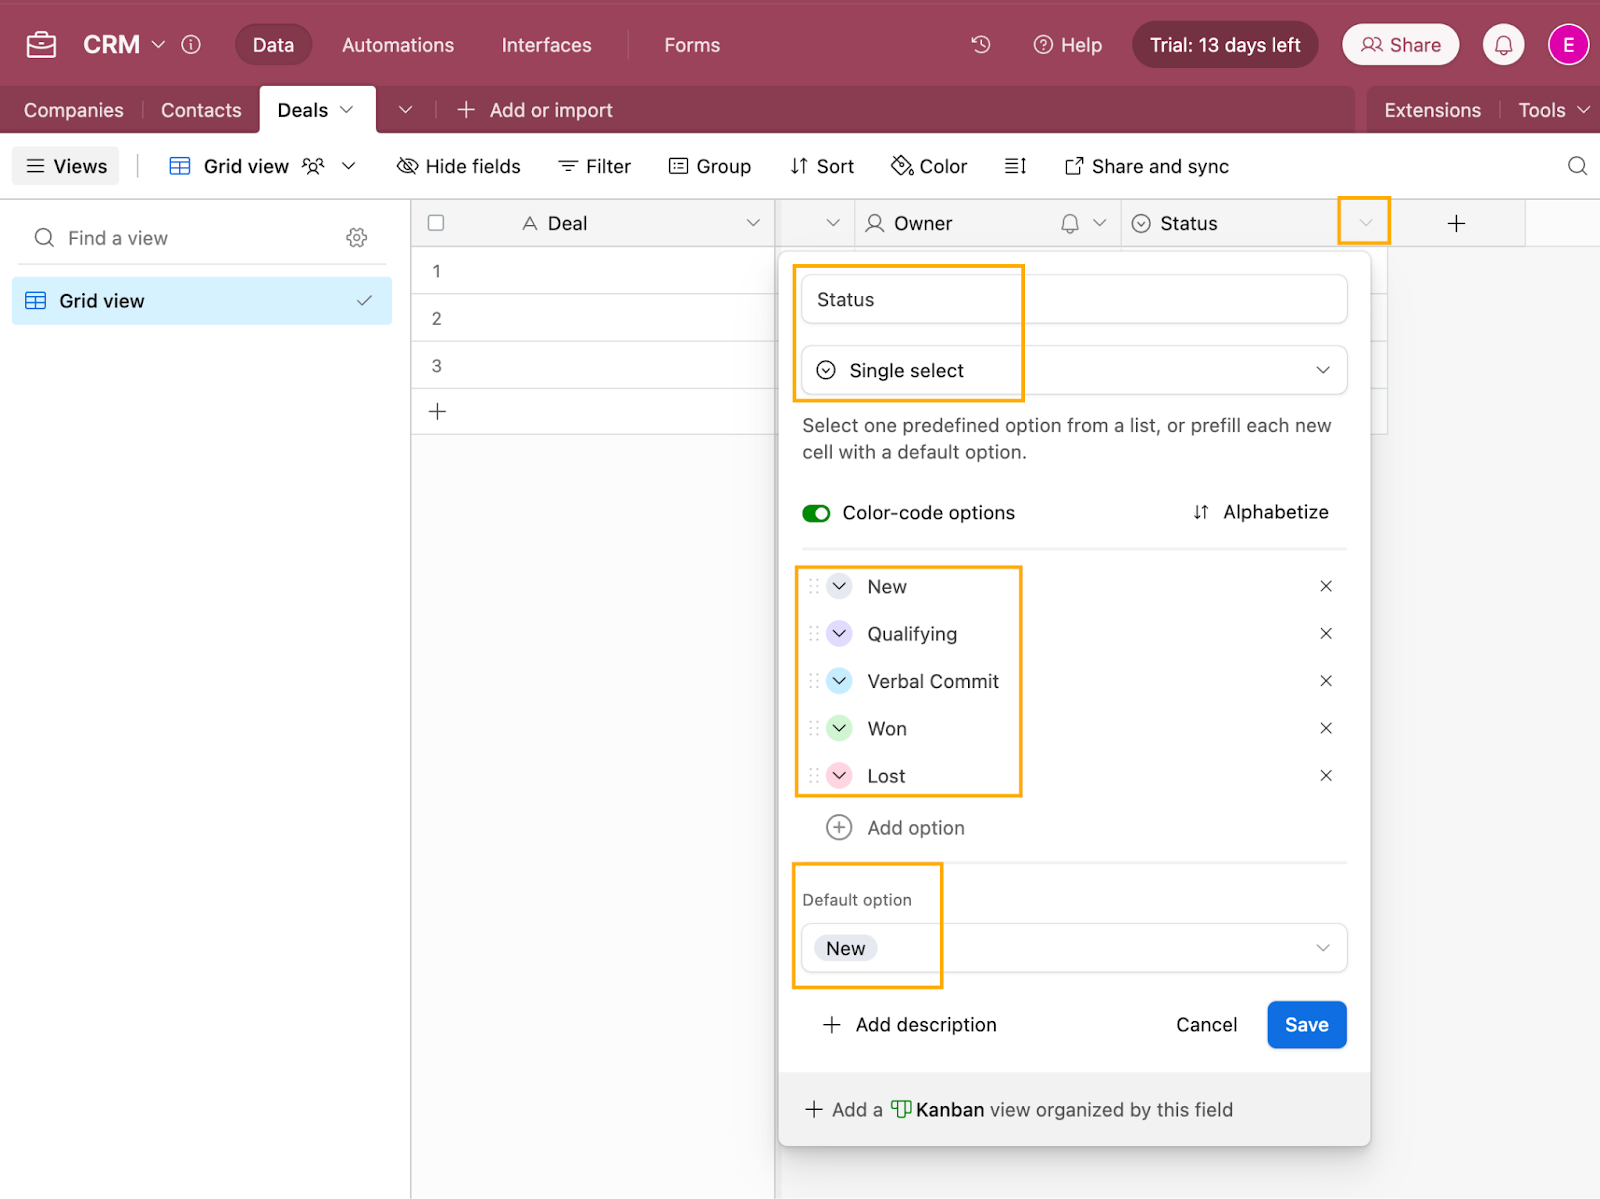
- Status: Update the Single select values to those in the screenshot below (New, Qualifying, Verbal Commit, Won, Lost) and set New as the default option, by clicking on the down arrow next to the Status field, click Edit, and rename the statuses by clicking on the value. Click Save to save the updates.
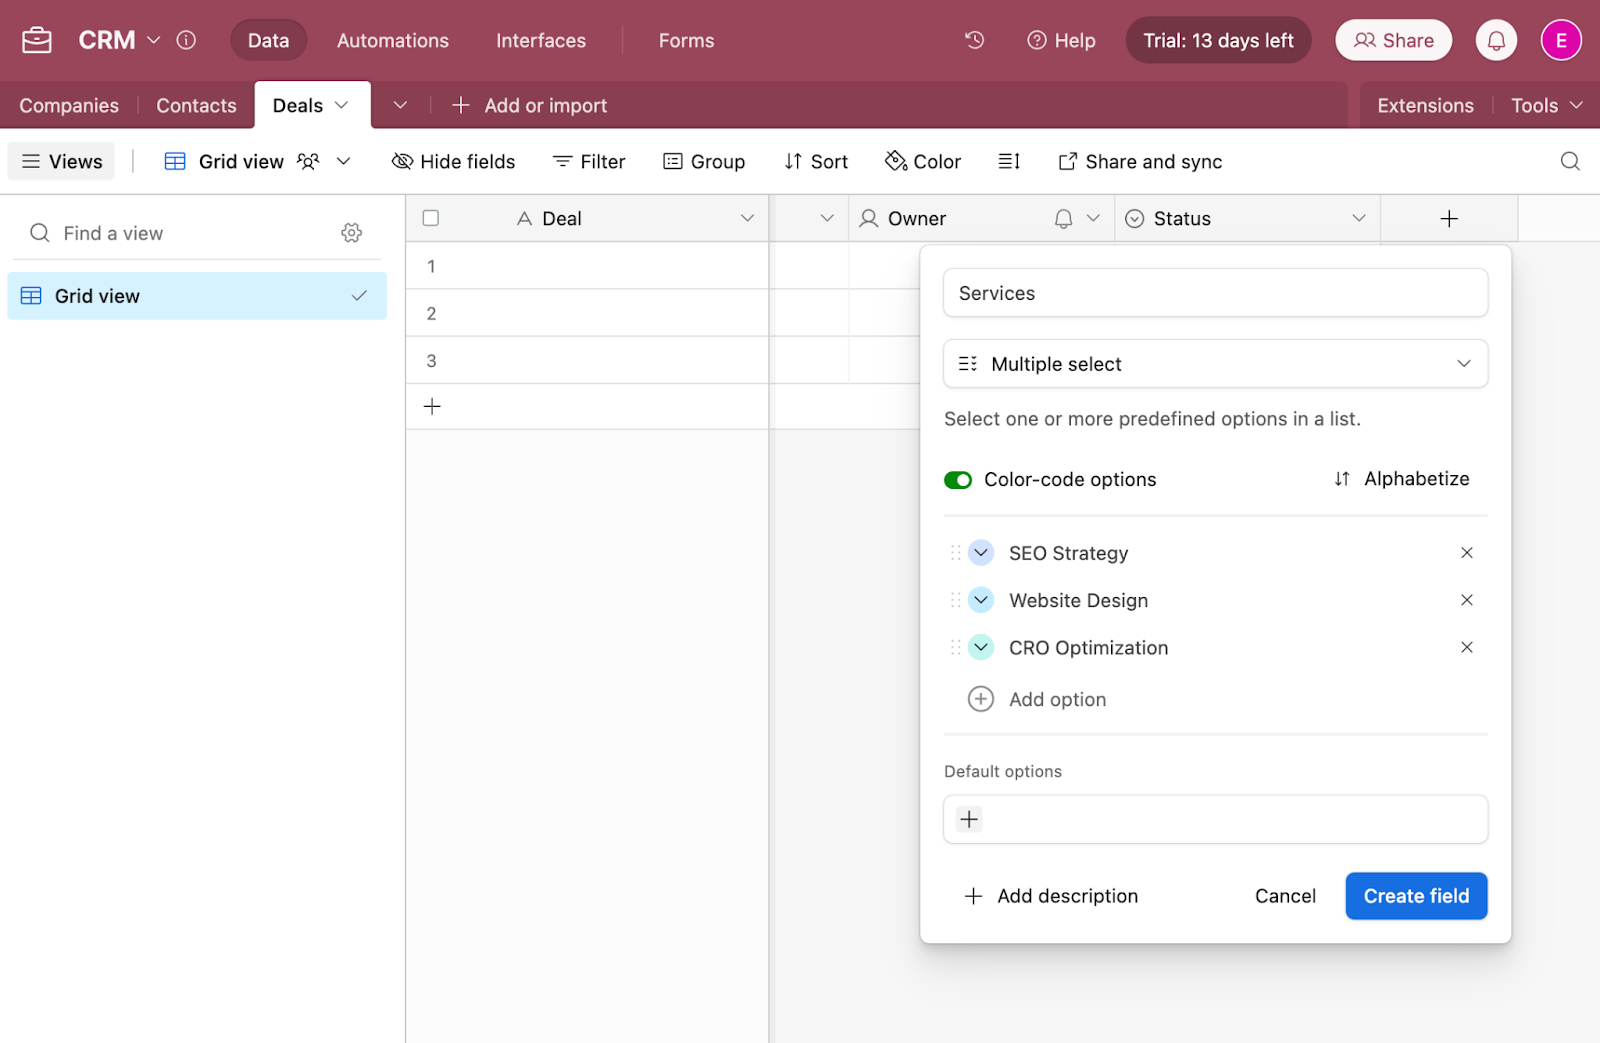
Next, we want to tag our deals with multiple services that they include, so that we can easily filter and sort this data to find similar deals. To facilitate this, we’ll add a Multiple select field, which works similarly to a single select but allows you to select multiple values instead of just a single one - makes sense! Again, this is a much better option than letting users type in custom values each time, which may not match correctly to other values.
We’ll call the field “Services”. Here we’ll add some values like SEO strategy, Website design, CRO optimization.
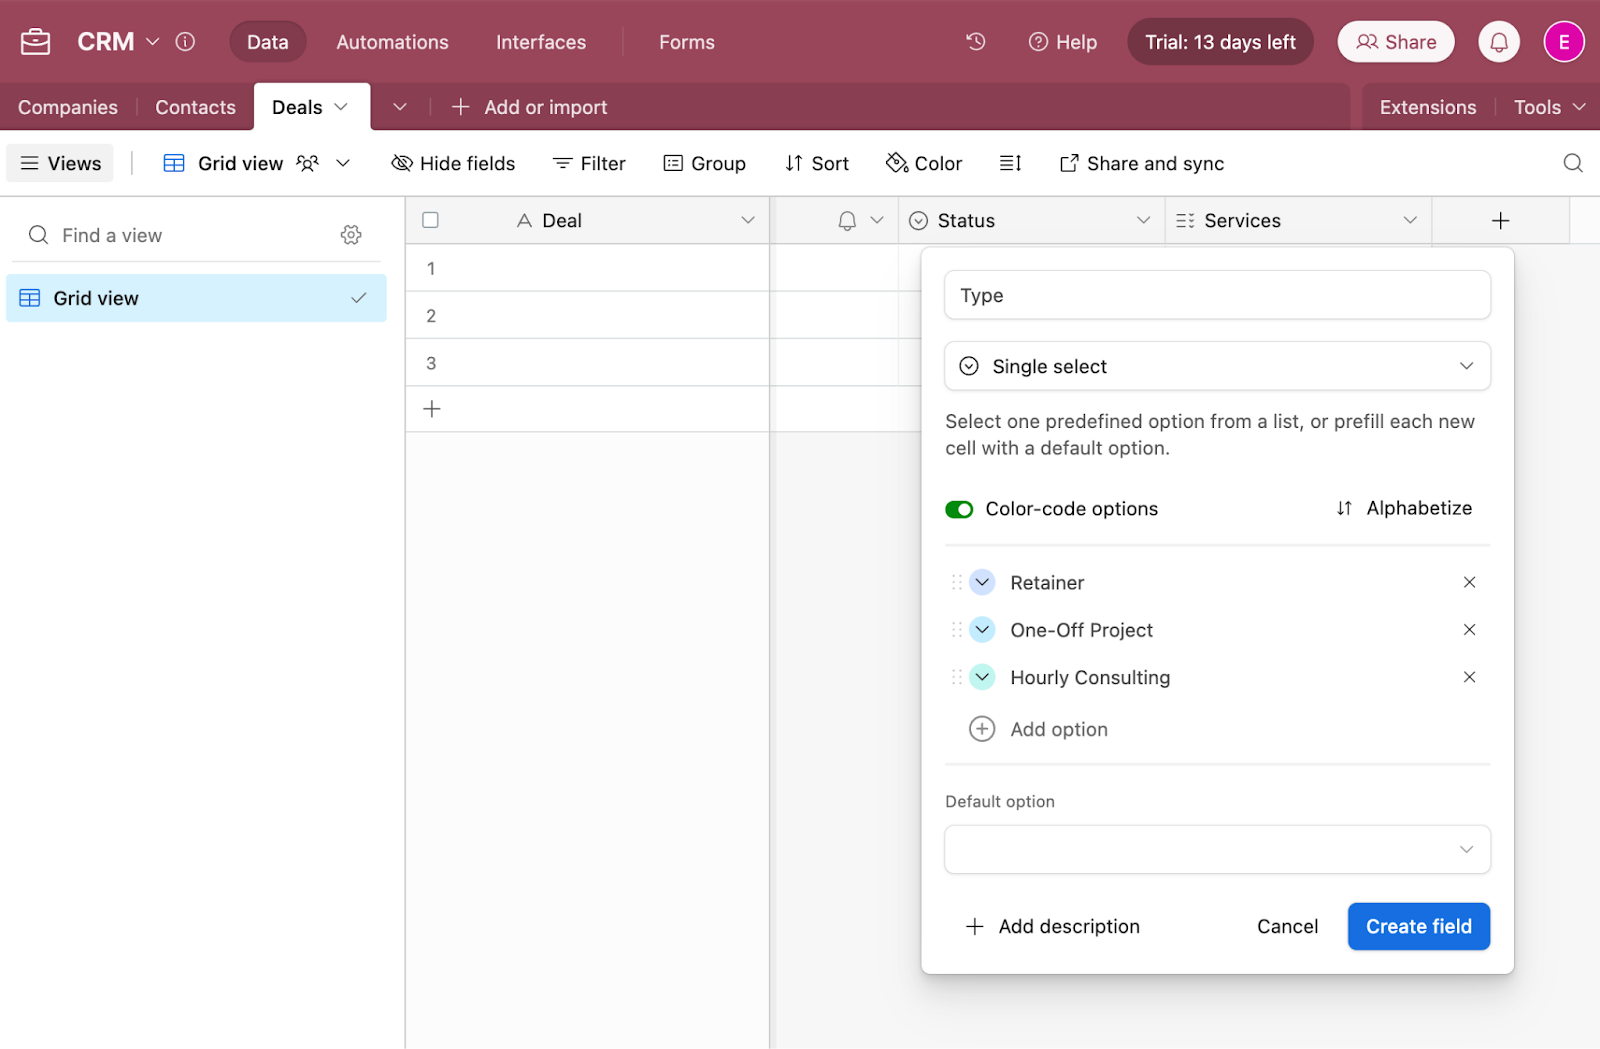
Now, add a Single select field and name it “Type” to track the type of deal we’re looking at. Configure it as shown below with the values “Retainer”, “One-off project” and “Hourly Consulting”.
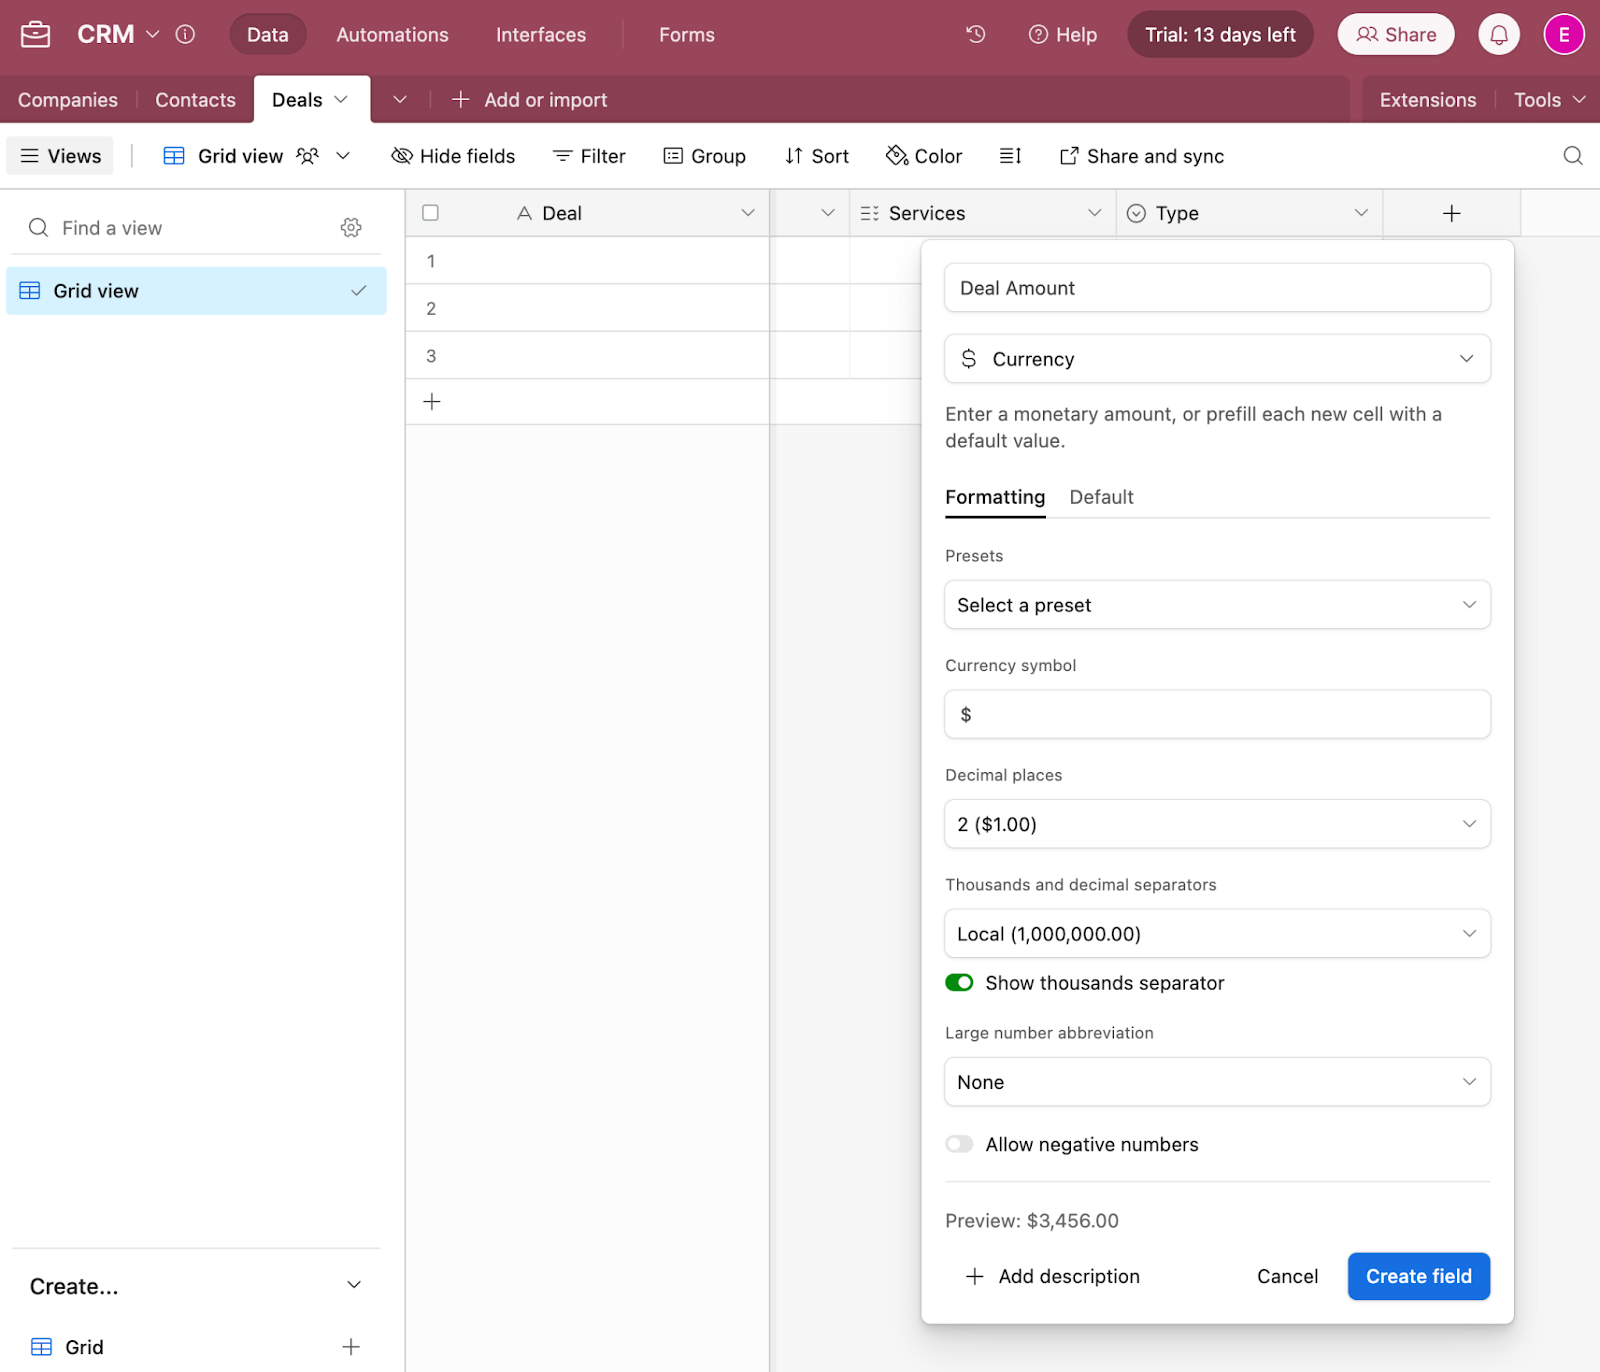
To track the value of the deal, let’s add a new Currency field and name it “Deal Amount”. The currency field is a numerical field that allows you to format numbers and assign a default currency to your numerical values. You can also define the currency symbol, format (like decimal places and separators, large number abbreviation), and whether or not the values should allow negative numbers.
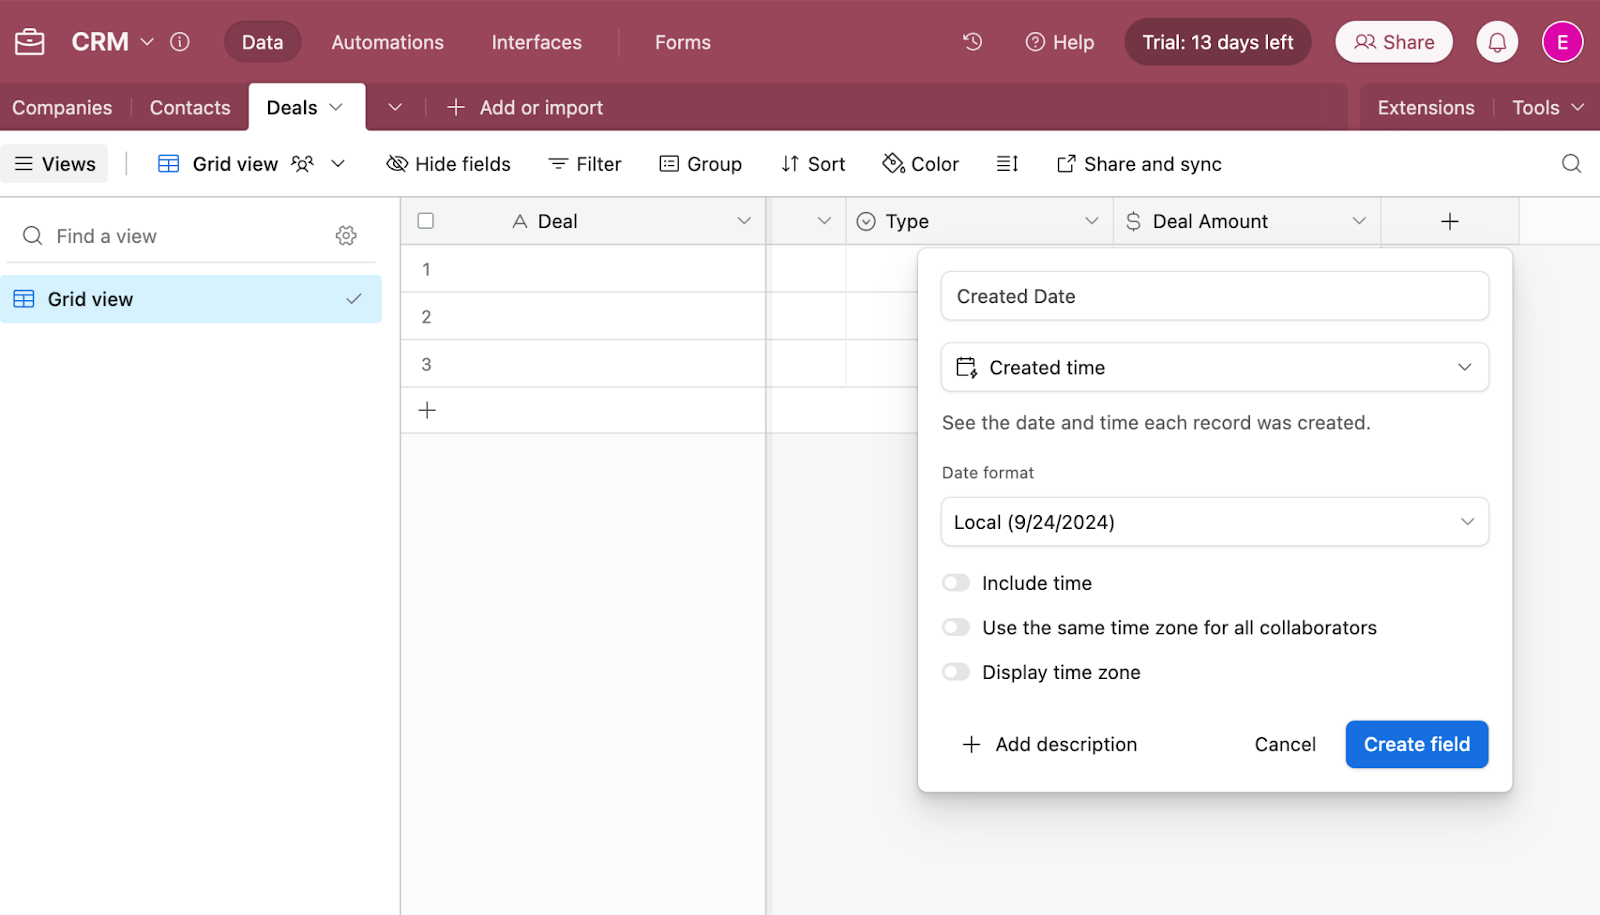
Next, we’ll add a Created Time field and name it “Created Date”. This will automatically track the date and time of the creation of the deal as soon as the user creates it. Even if this may not seem like a necessary field, it can be useful for avoiding duplicates and auditing data entry. Under configuration, set the date format to Local, and toggle Include time off. This property will automatically assign the date the record was added to the database.
Lastly, we want to really leverage the power of Airtable’s relational options and pull some of our contact details in here too. First we’ll connect our Deals database to the Contacts database and create lookup fields to automatically pull in relevant data. Add a new property with the type Link to another record. You’ll notice Airtable will already offer to create a link to the Contacts database, so go ahead and select that.
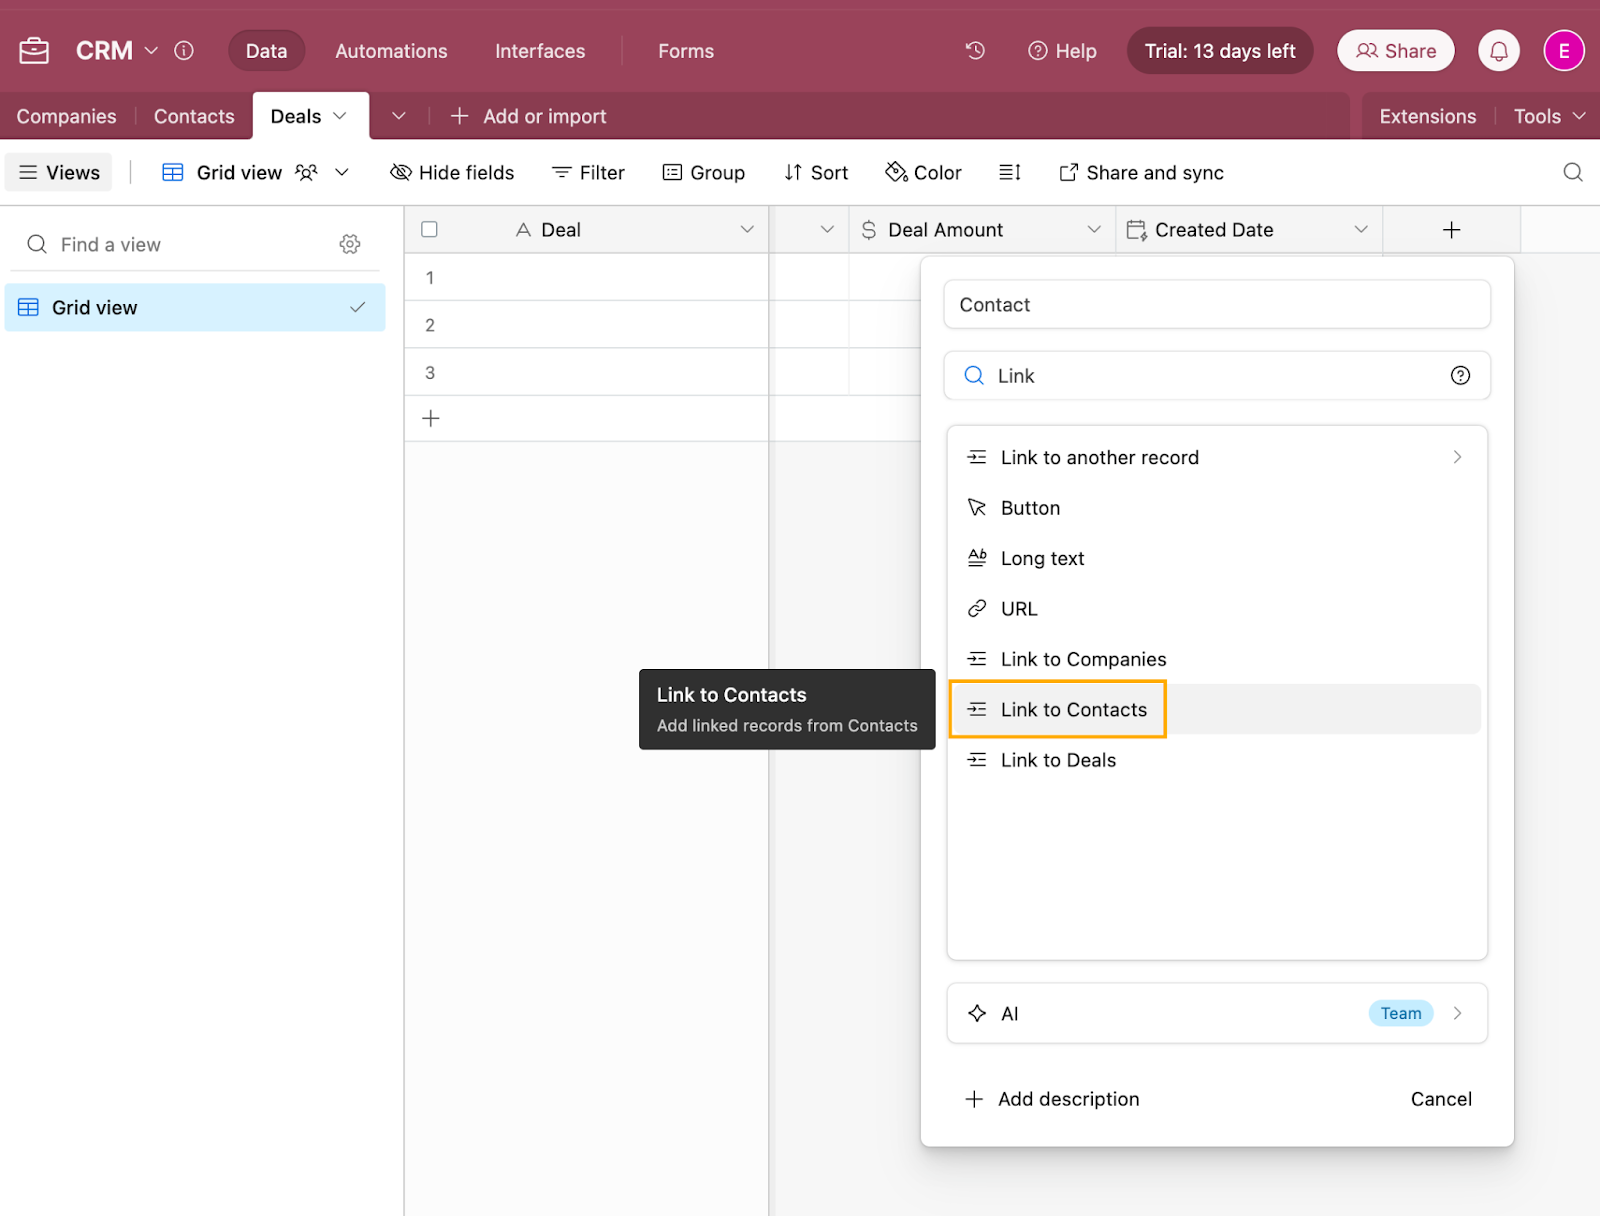
On the “Add lookup fields” popup, select all fields and click Add 6 fields.

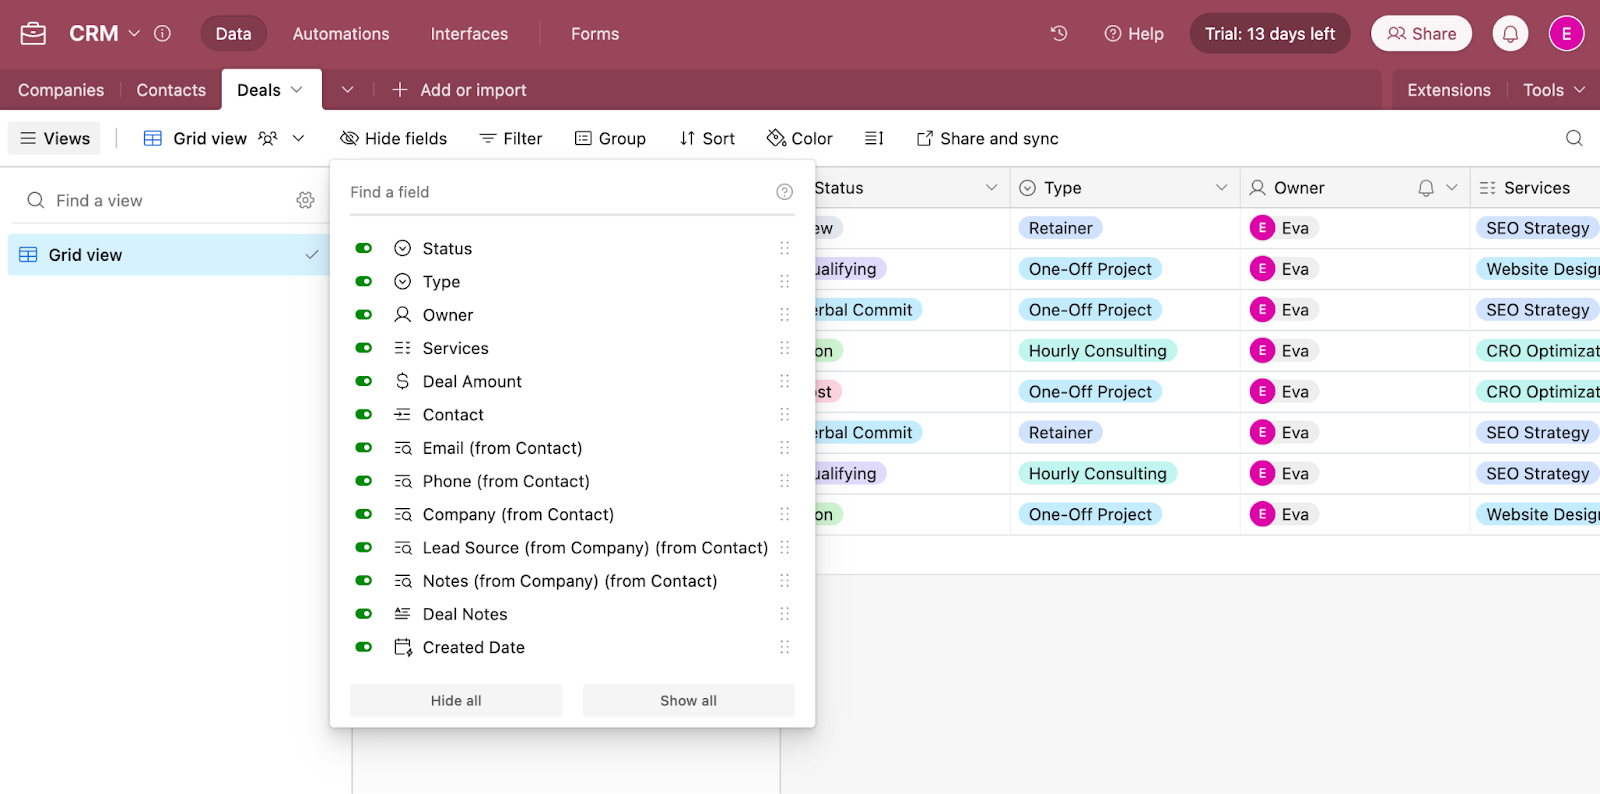
Now, let’s rearrange the properties so the most relevant ones appear on the left, and those that will optionally be filled out or will bring in lookup info appear on the right.
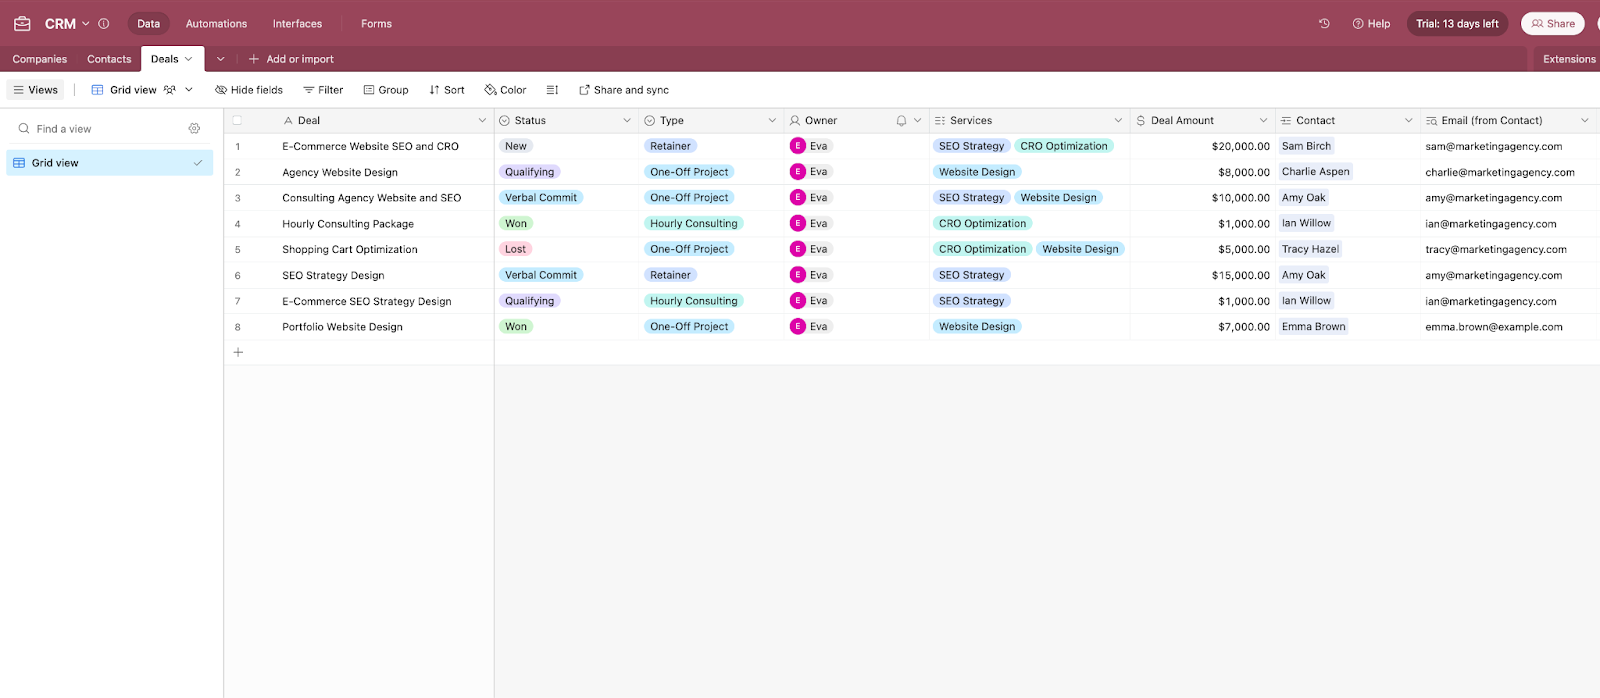
Finally, add some sample data and associate the deals to their respective Contacts.
Step 6: Set up Deal Pipeline Views
Now that we’ve set up our Companies, Contacts, and Deals databases, it’s time to focus on how the Deals database can support your Sales Pipeline workflows and help you visualize the progress of your deals. This is where we can really let Airtable shine in comparison to spreadsheets.
We’ll start with setting up some differing views so that users can work with the data in multiple ways.
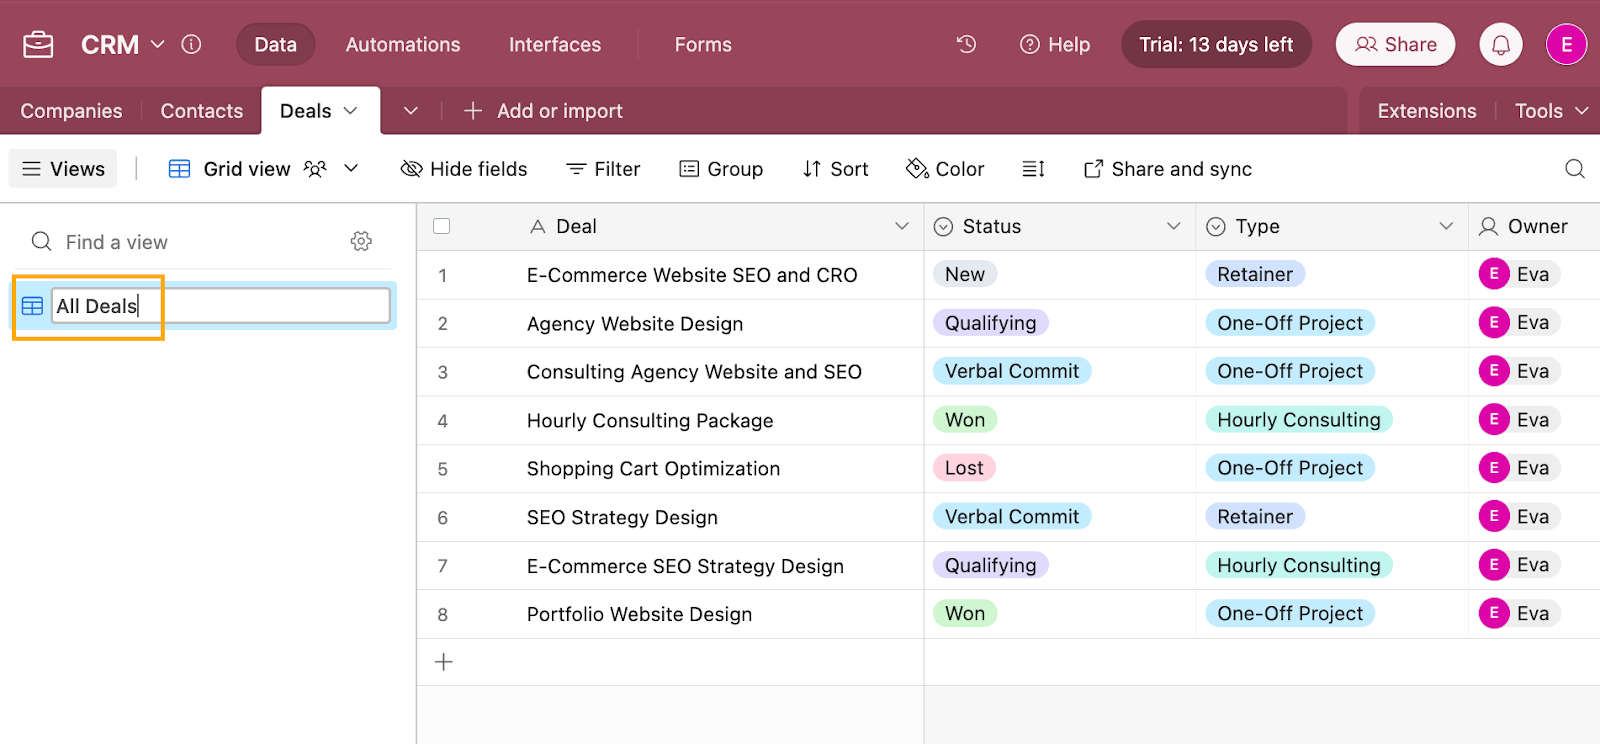
We want to keep this organized, so the first step is to rename the Grid (table) view to “All Deals.” Double-click on the Grid view tab and rename it to All Deals.
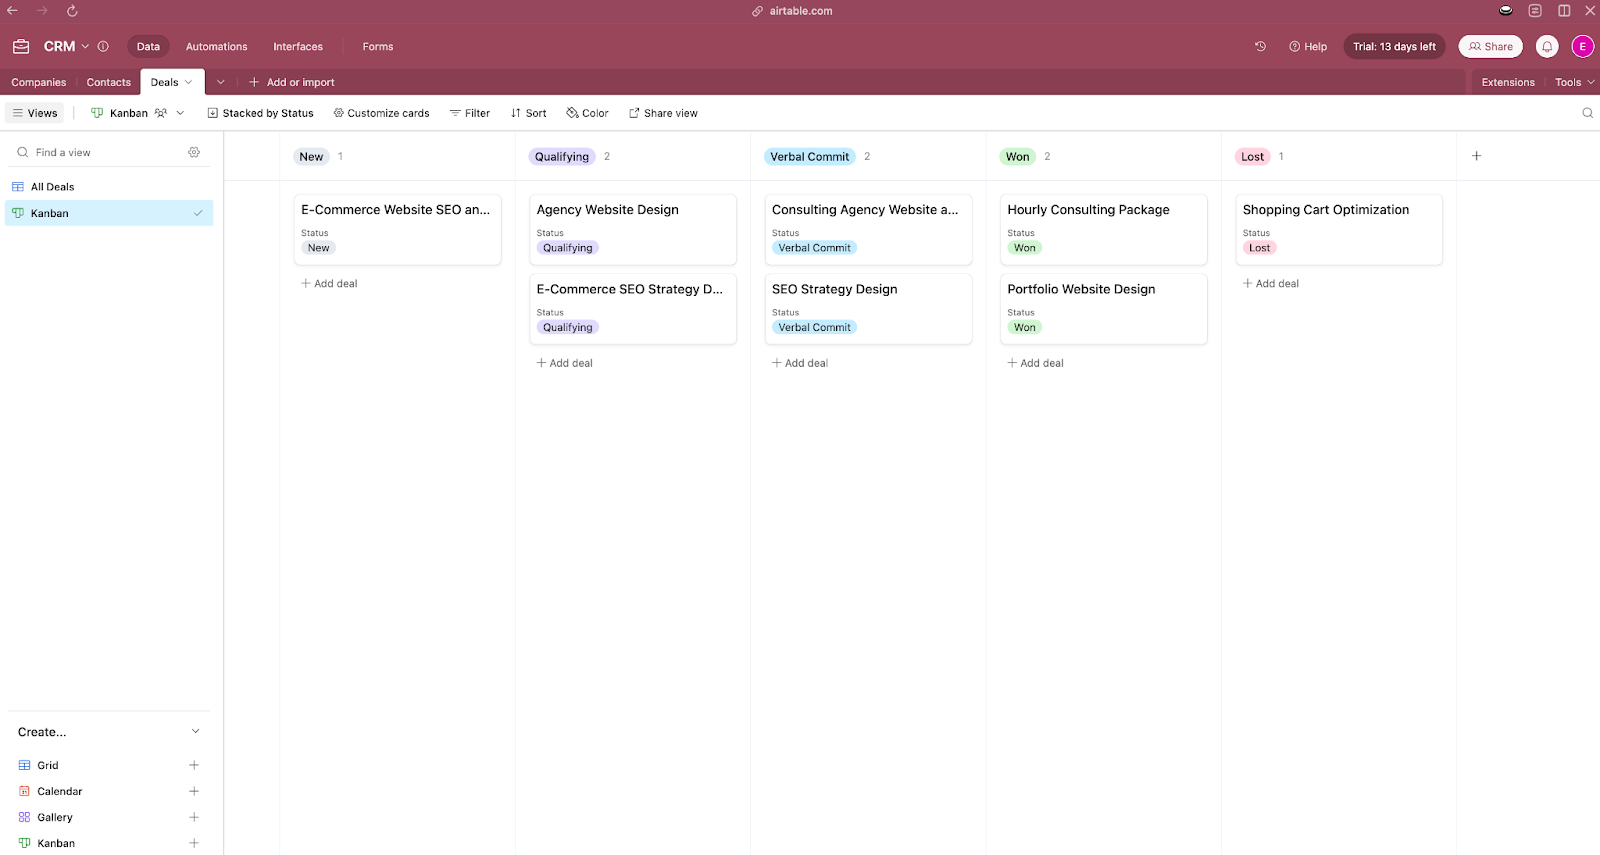
While having all your data in a table view is helpful for a full overview of the data, it can be a little overwhelming, so for Sales Pipeline workflows, Kanban views are typically much more effective as they can help you visualize the process a lot better. With that in mind, let’s add a new Kanban view in the Deals database.
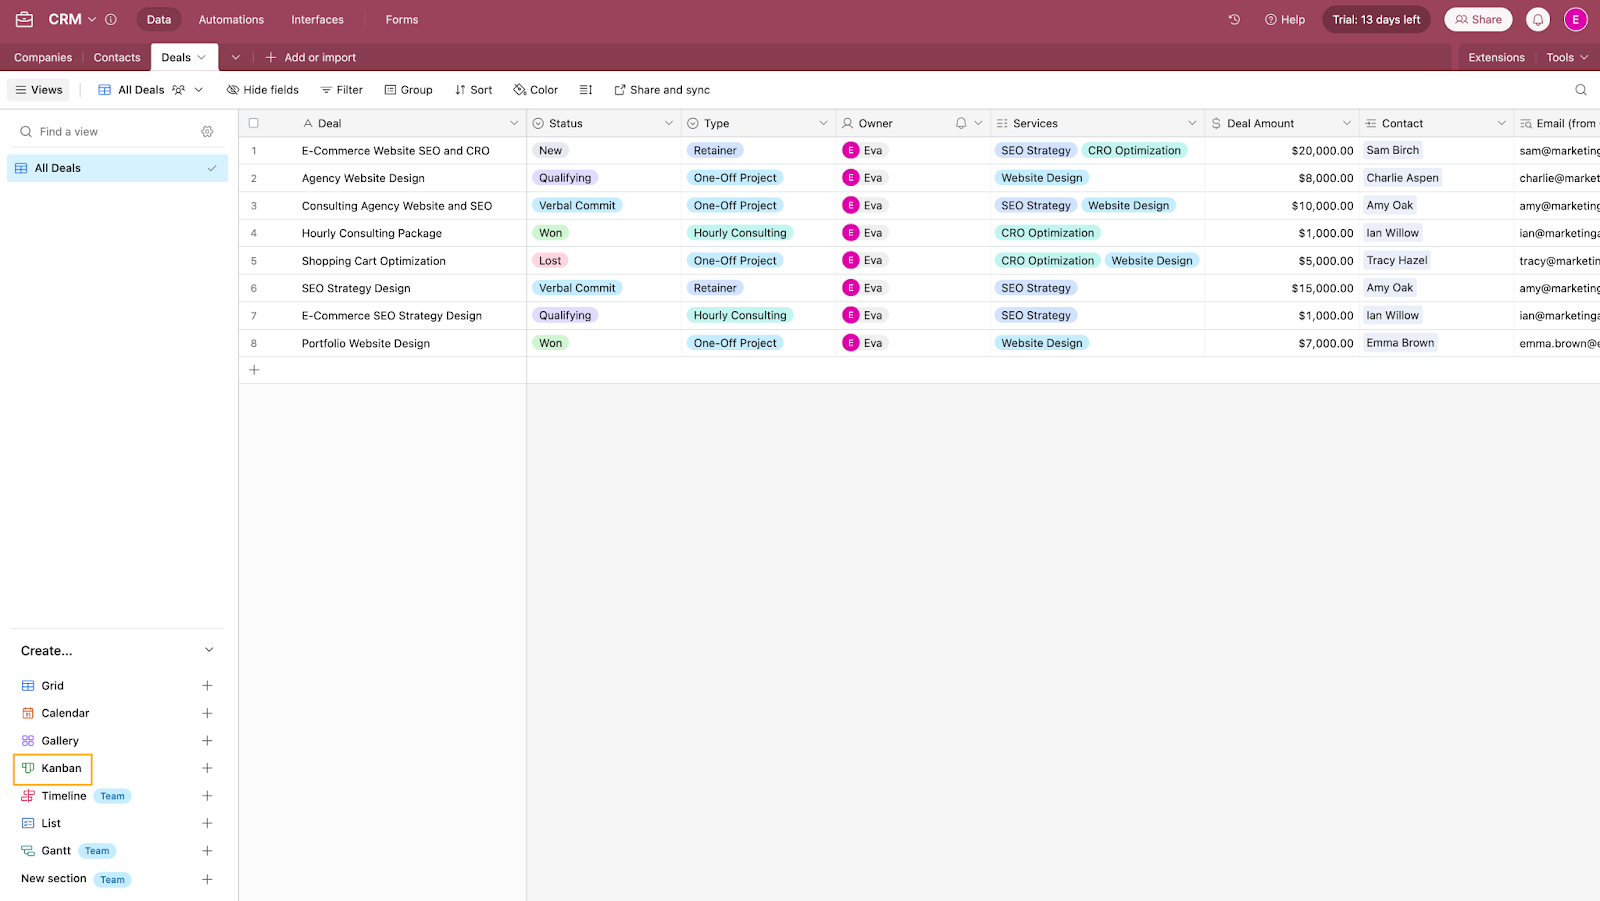
In the Views menu, under Create …, select Kanban view.
In the window that pops up, rename the view from Kanban to Pipeline and under Who can edit, select Collaborative to allow team members to contribute and manage the data. Finally, click Create new view.
Airtable will now prompt you to choose a Stacking field, which will define how your Kanban columns are displayed. In this case, let’s start by selecting Status as the stacking field and click Done. This will create a Kanban board where each column represents a different stage in your sales pipeline, based on the deal's Status. Now it’s really easy to see a quick overview of where each deal is in the sales pipeline.
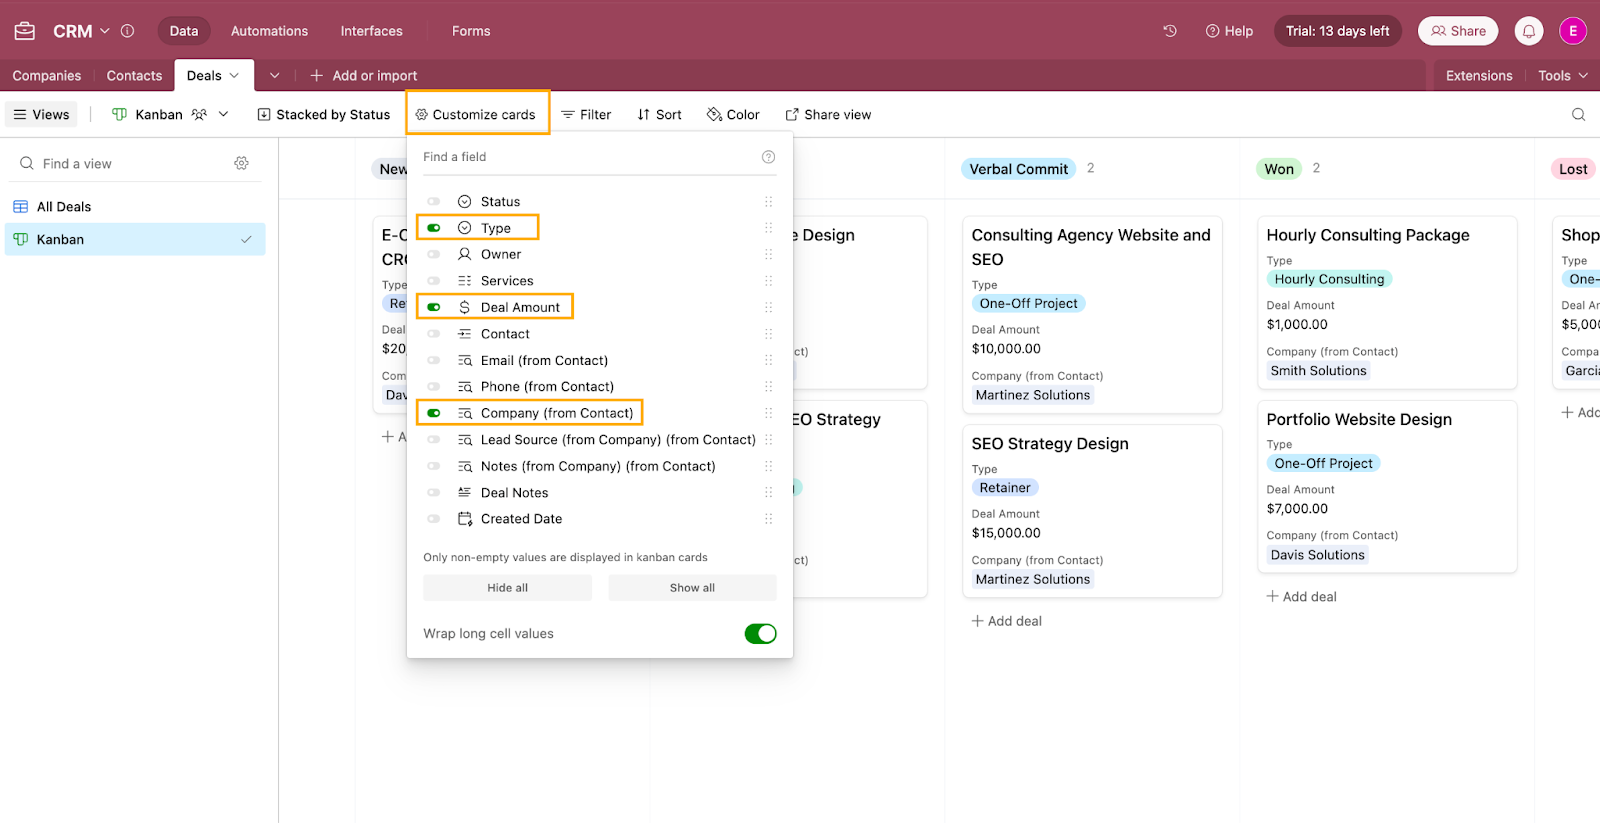
To make this view even more useful, we’ll customize the information shown on each Kanban card.
- Click on Customize cards.
- Unselect Status since it’s already reflected in the Kanban columns.
- Select Type, Deal Amount, and Company to display on the cards.
- Toggle Wrap long cell values on to ensure long text isn’t cut off.
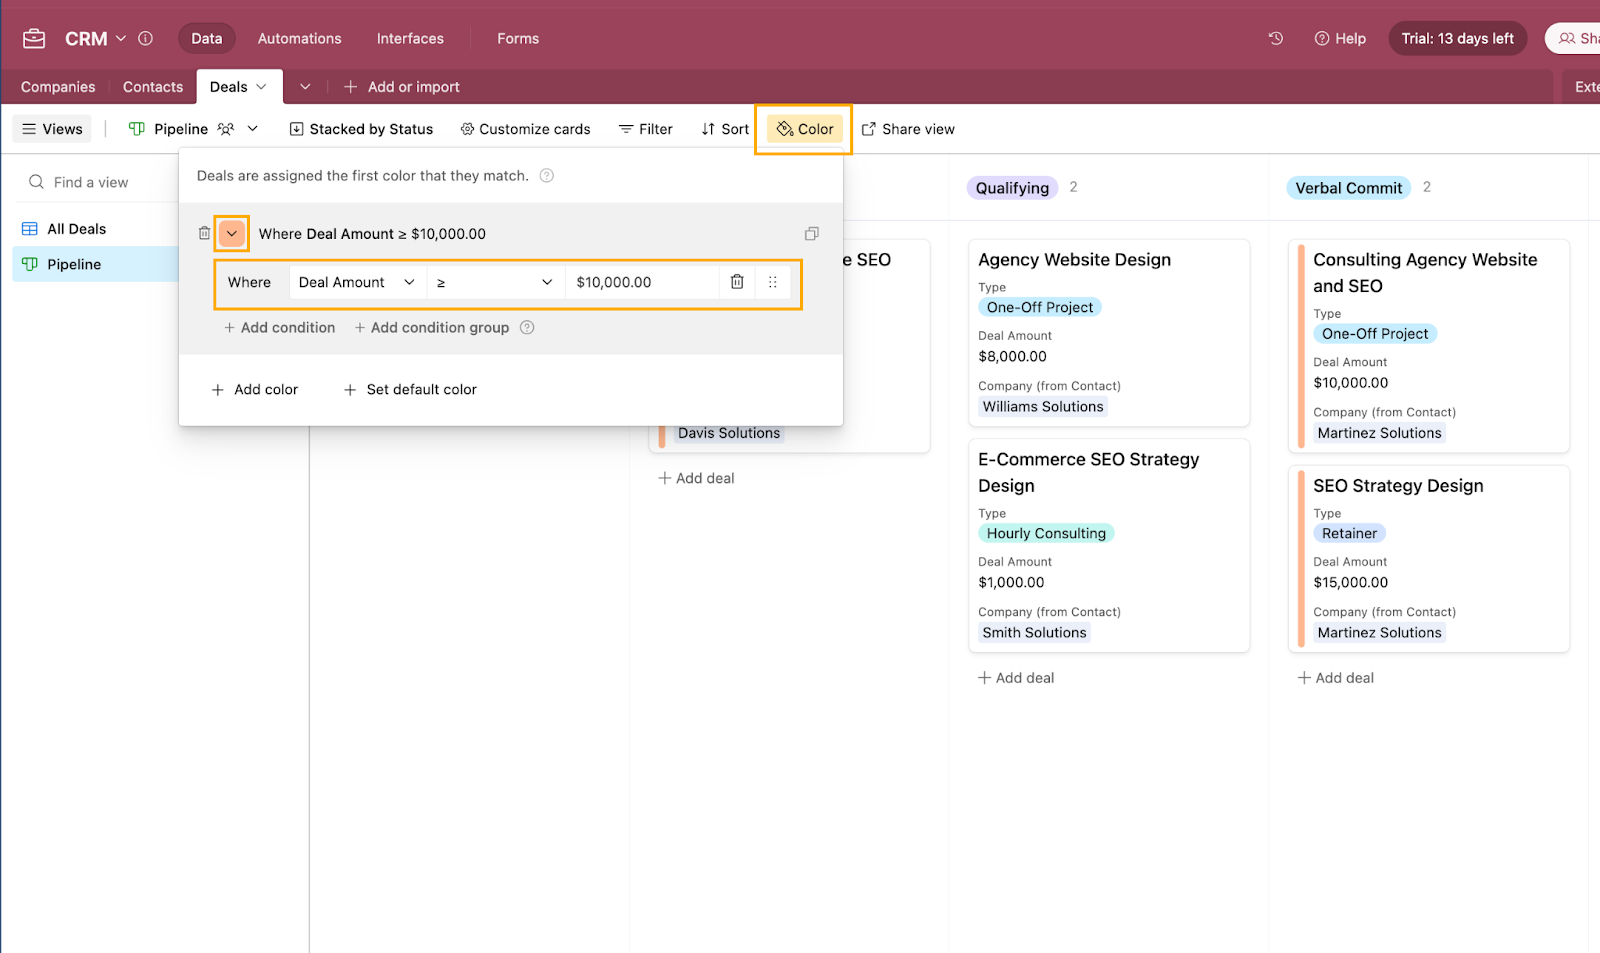
Now let’s make deals over $10,000 stand out a bit more so Deal Owners can prioritize those big deals.
- Click on Color, then select Conditions from the dropdown.
- In the form that opens, define the condition: Where Deal Amount >= 10,000.
- This will color all deals equal to or above $10,000, making them easy to spot.
- You can also change the color for this condition to suit your preference by clicking on the down arrow in the colored box.
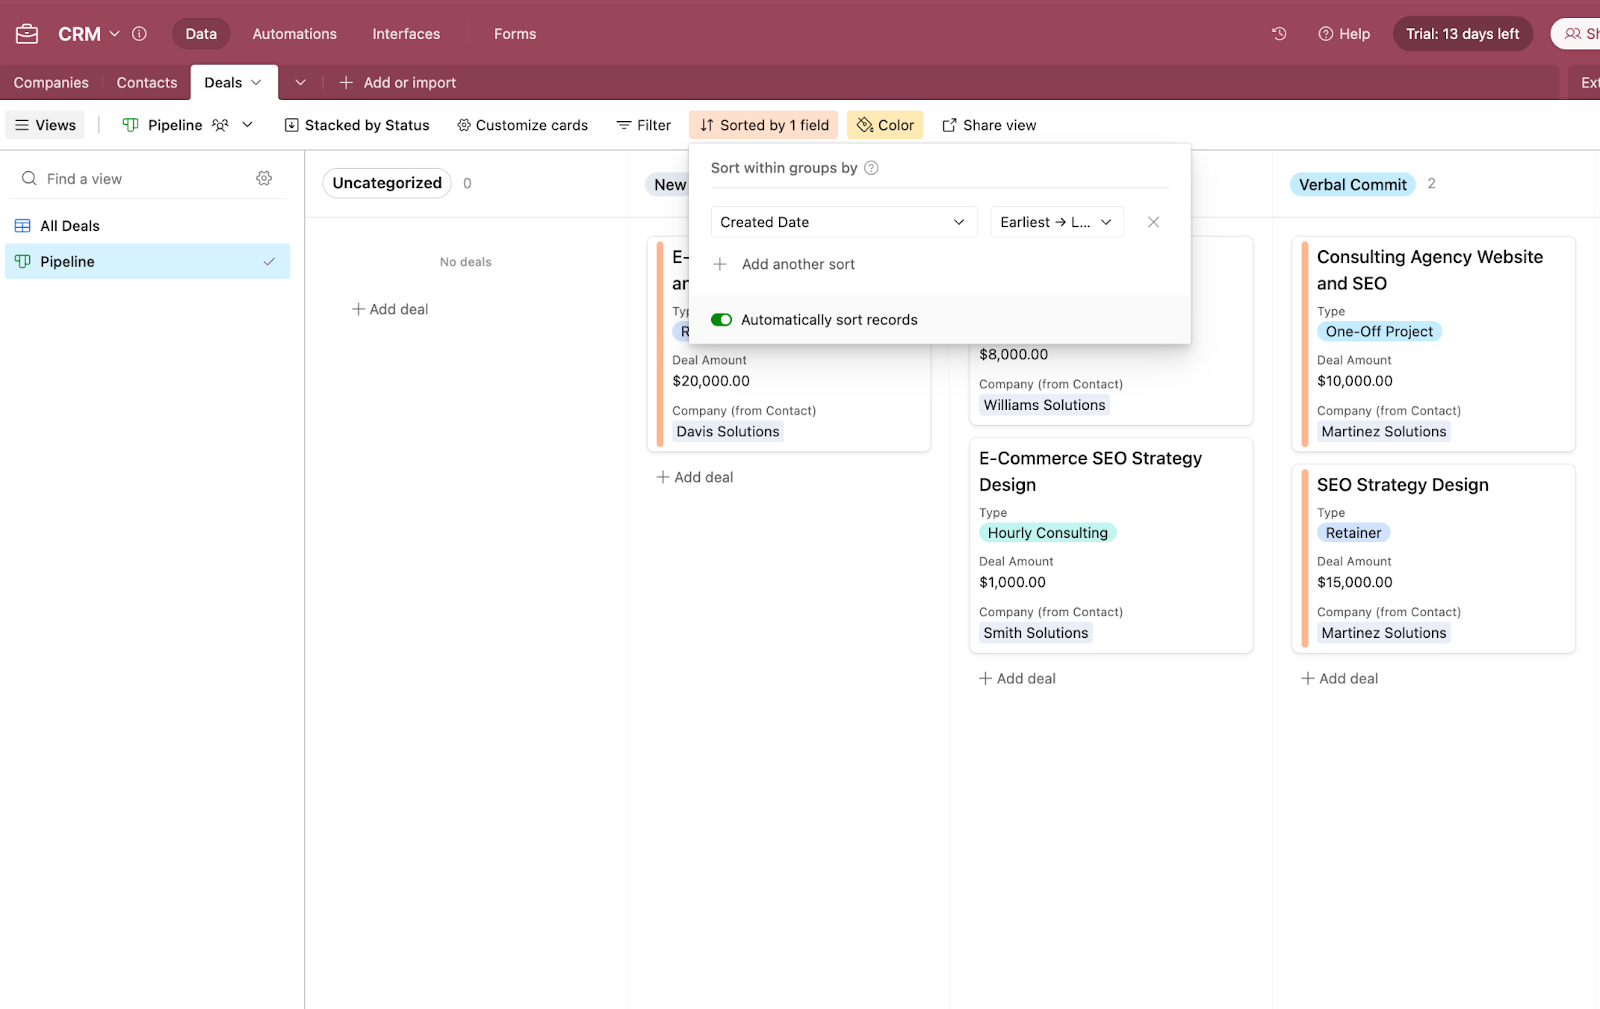
Finally, we’ll sort the cards on the Kanban view by Created Date.
- Click on Sort.
- Select Created Date as the sorting field.
- Leave the sorting order as Earliest -> Latest.
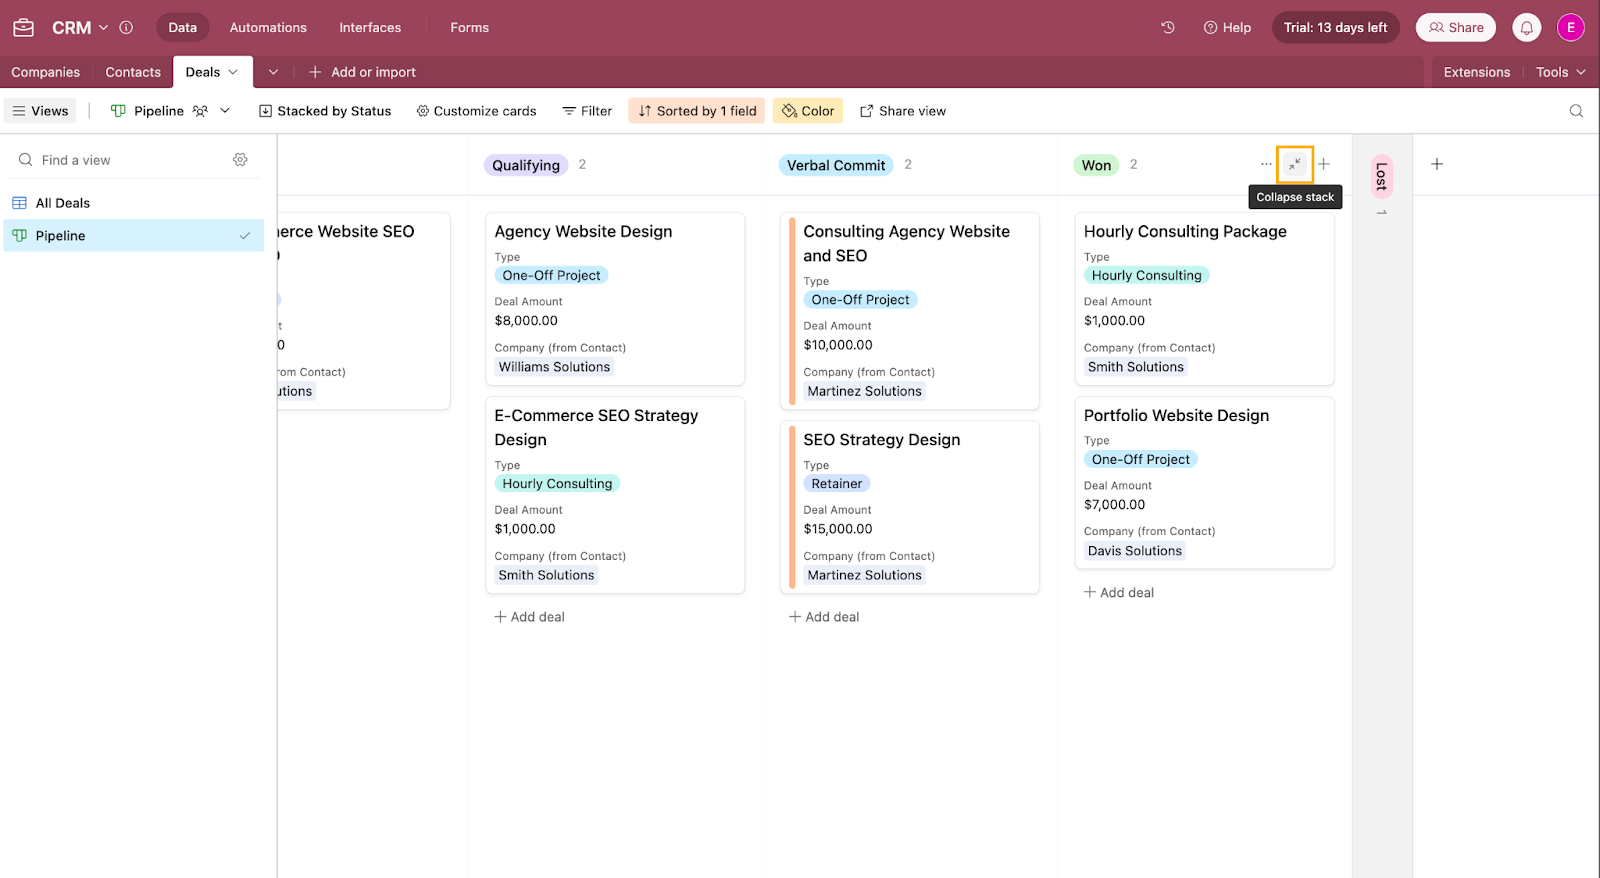
As the list of your deals grows, seeing all the deals in the Won and Lost stages may become overwhelming. Let’s collapse these columns for a cleaner view. Simply click on the Collapse stack icon on the Won and Lost columns. It’s still easy for users to expand these columns when needed, but keeps the interface a little tidier for now.
And that’s it! You’ve successfully built your own Airtable CRM with a functional sales pipeline. Your Kanban Pipeline is now ready to support you in managing your deals and prioritizing high-value opportunities.
But, let’s not finish just yet. We’re going to spend a moment taking this Airtable CRM one step further by setting up an automated email notification to managers when they are assigned a deal worth more than $10k to encourage them to keep a real eye on this one.
Step 7: Build a Simple Reporting Automation
One of Airtable's biggest advantages over Google Sheets is its user-friendly automation capabilities, which make it easy for anyone—even without technical knowledge—to set up automations. Automations might seem like a scary concept, but they are a brilliant way to delegate those simple, repetitive tasks we all get caught up in and even surface brand new information.
To prove this, we’ll create a simple automation that will notify you via email whenever a new deal with a value above $10,000 is added. This is especially helpful for founders or managers who want to keep an eye on high-value deals and step in with personalized outreach, like a Loom video, to boost conversion rates.
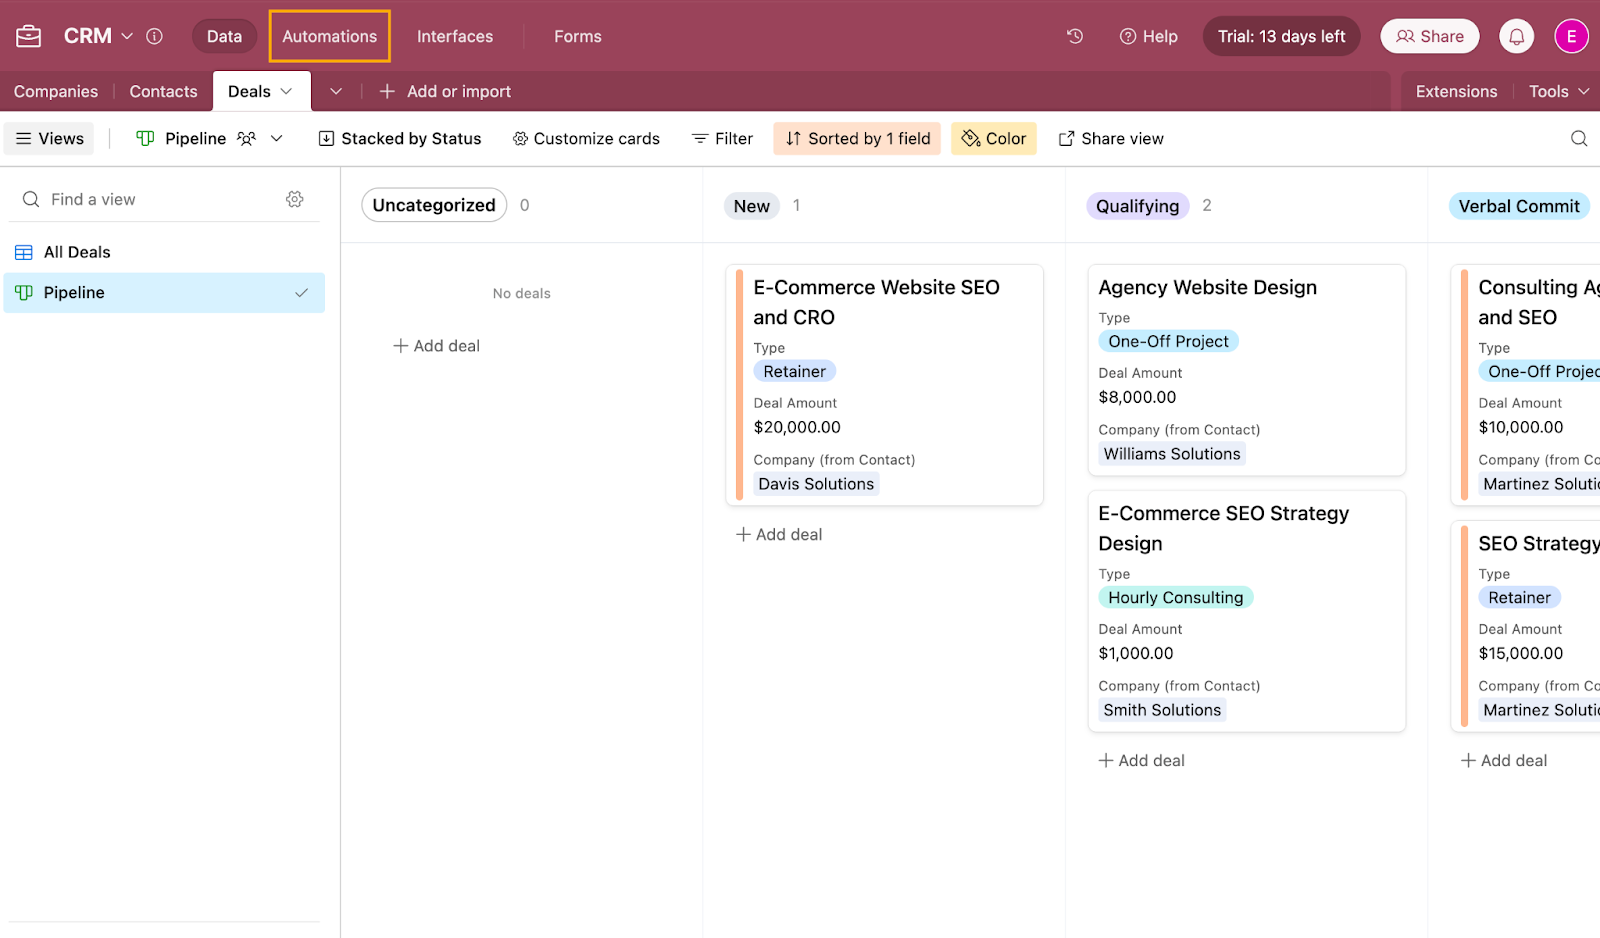
To start building your automation, head over to the Automations tab at the top of your screen. This will open up the Automation Builder.
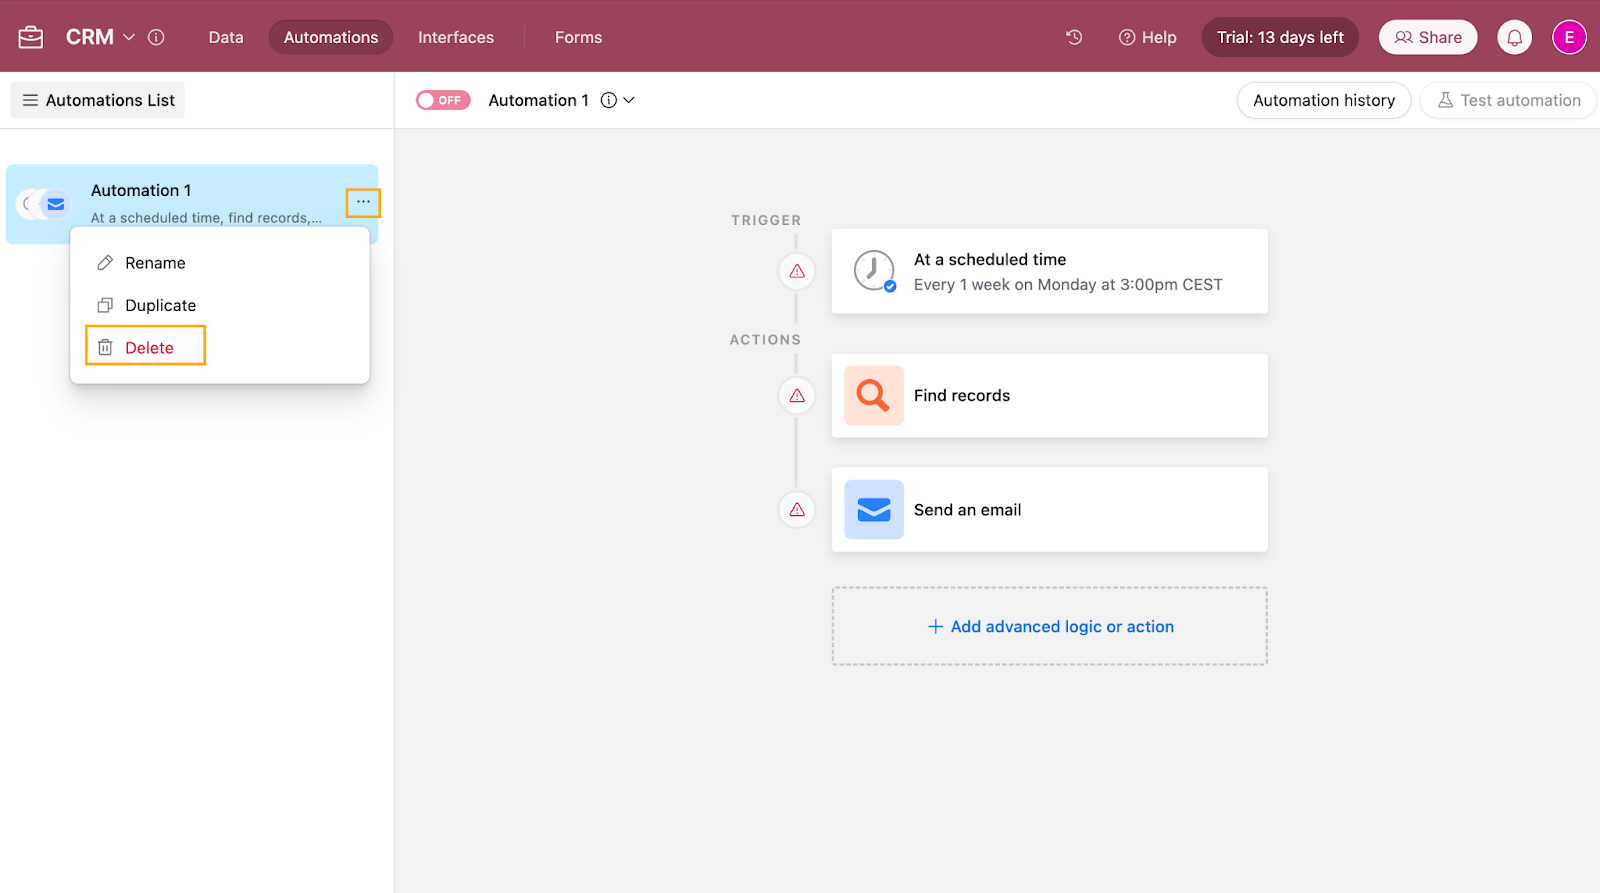
When you land on the Automation builder tab, you’ll see a preconfigured sample automation in the builder. To begin from scratch, click on the three dots next to the existing automation and select Delete to remove the sample.
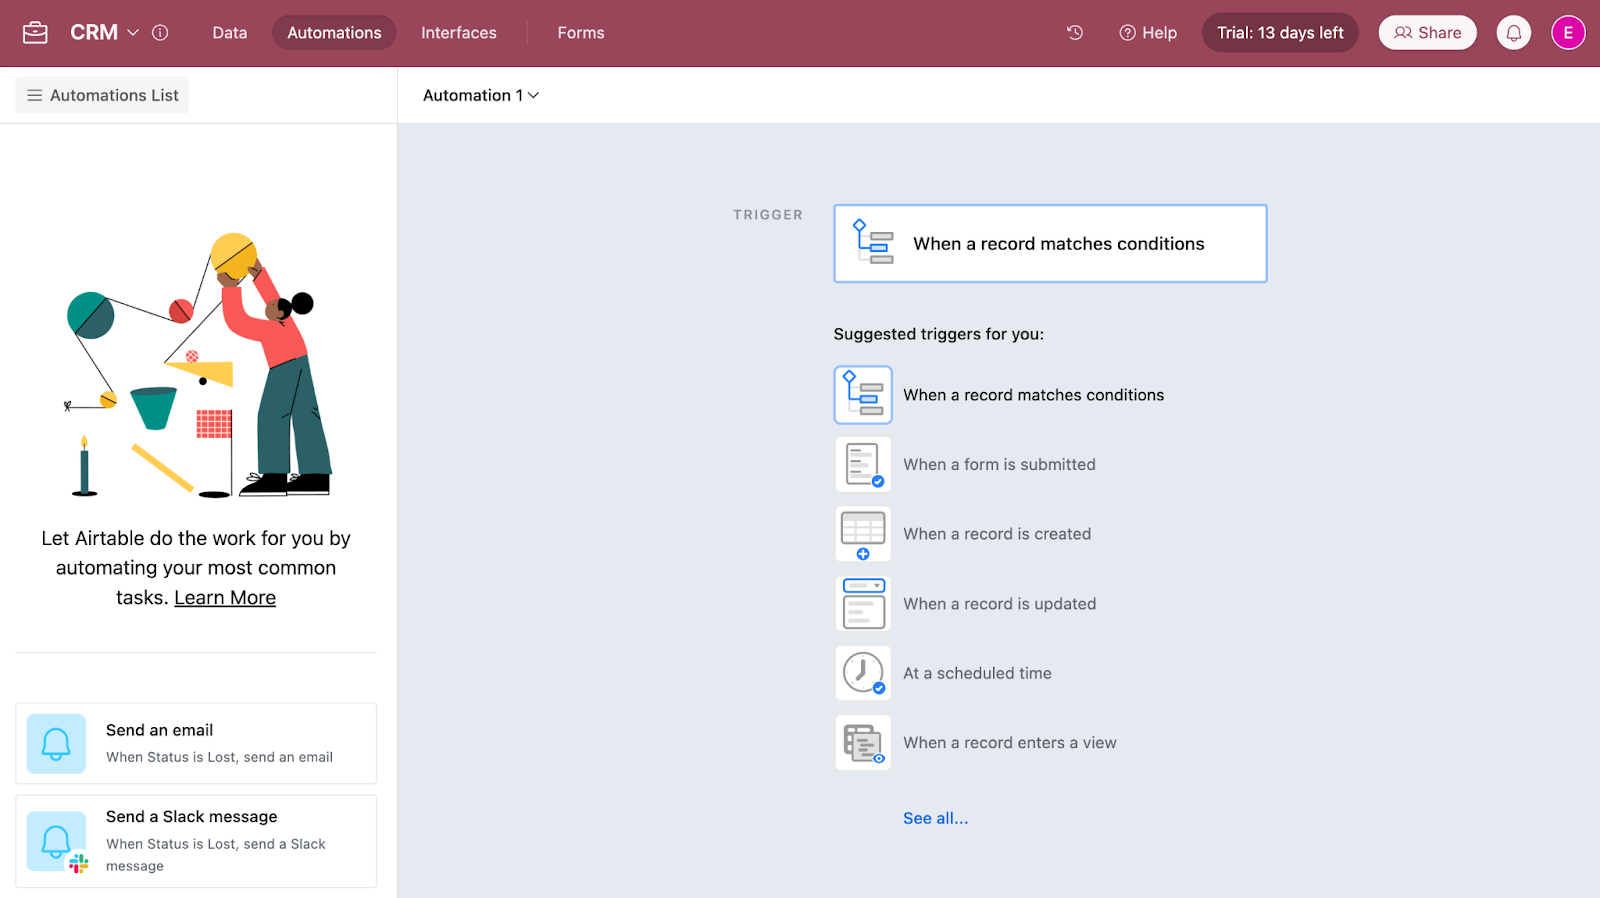
From the options on the right side of the screen, select When a record matches conditions as the trigger. This will open up a Trigger Details sidebar on the right side of your screen.
Now, let’s create the trigger for our automation, which will fire every time a deal over $10,000 is added. From the options on the right side of the screen, choose When a record matches conditions as the trigger.
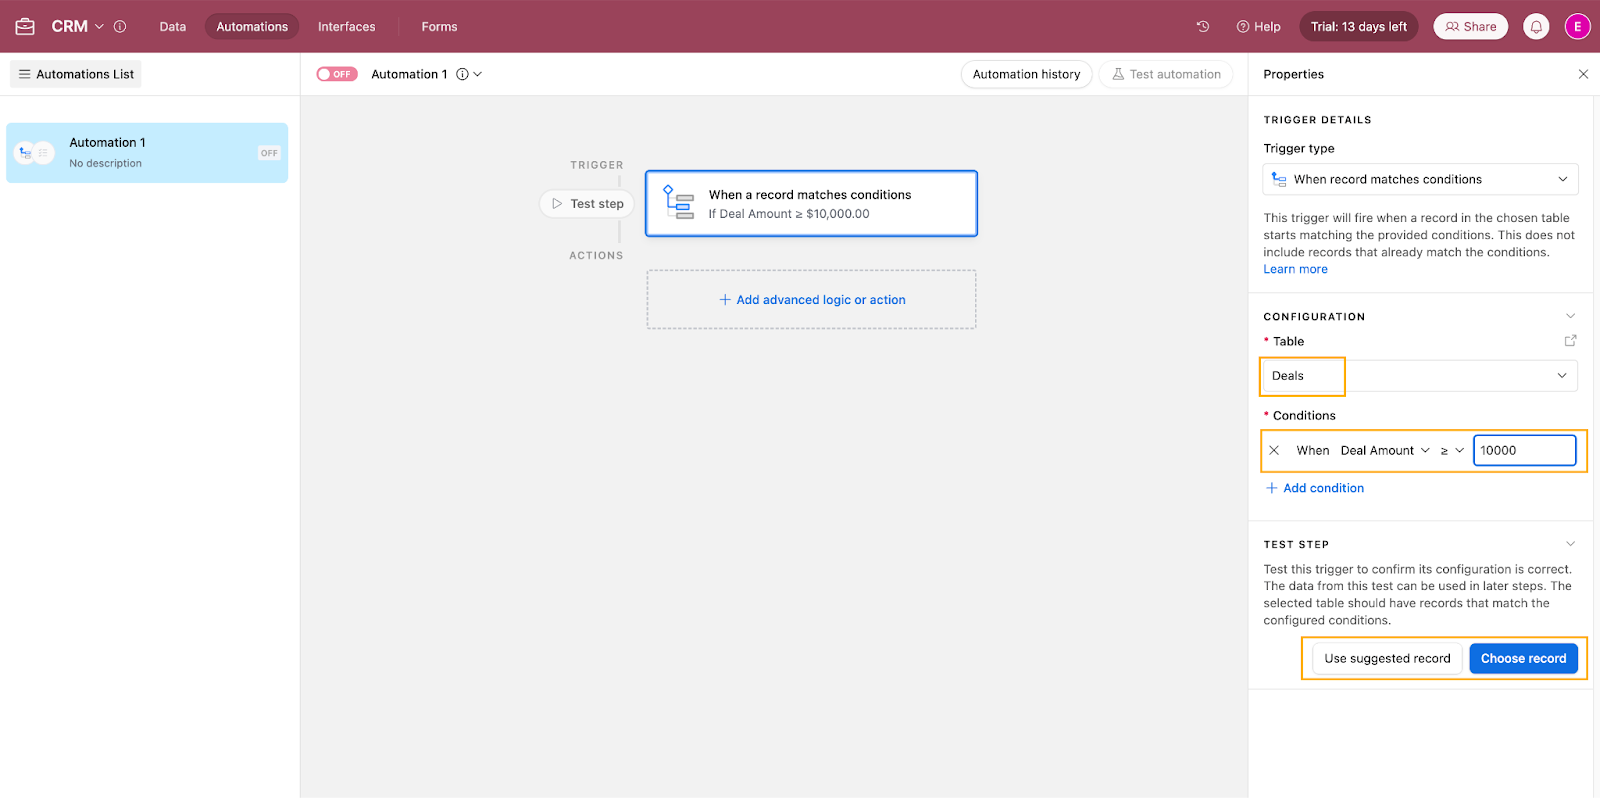
- In the Trigger Details sidebar, under Configuration, select the Deals table.
- Set the condition to Where Deal Amount >= 10,000.
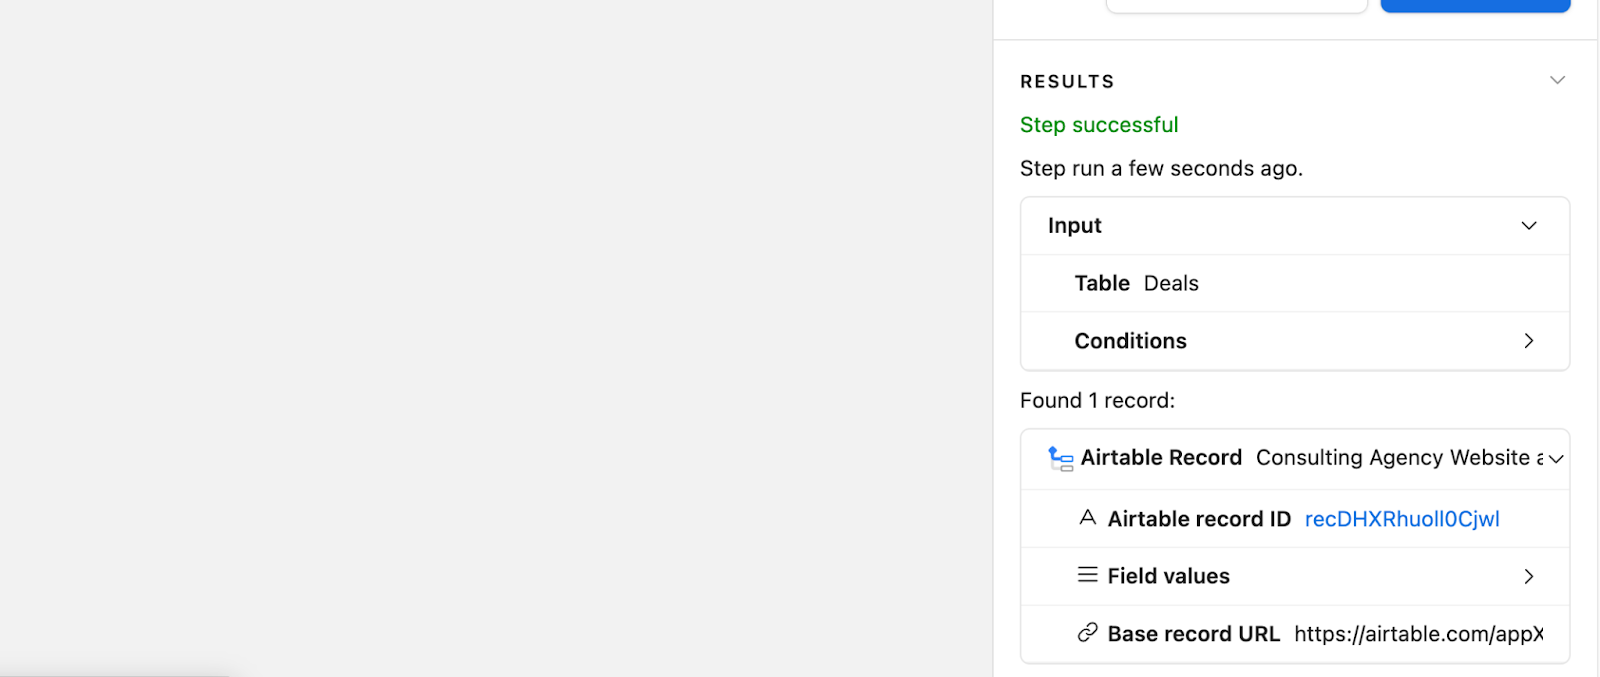
- Choose Use suggested record to find a deal that meets the condition and test your trigger.
This will ensure the trigger is working correctly before moving on to configuring the action.
Once the trigger is working, we’ll continue to configure the action —sending an email notification. In the middle part of the Automation Builder, click Add advanced logic or action and select Send email.
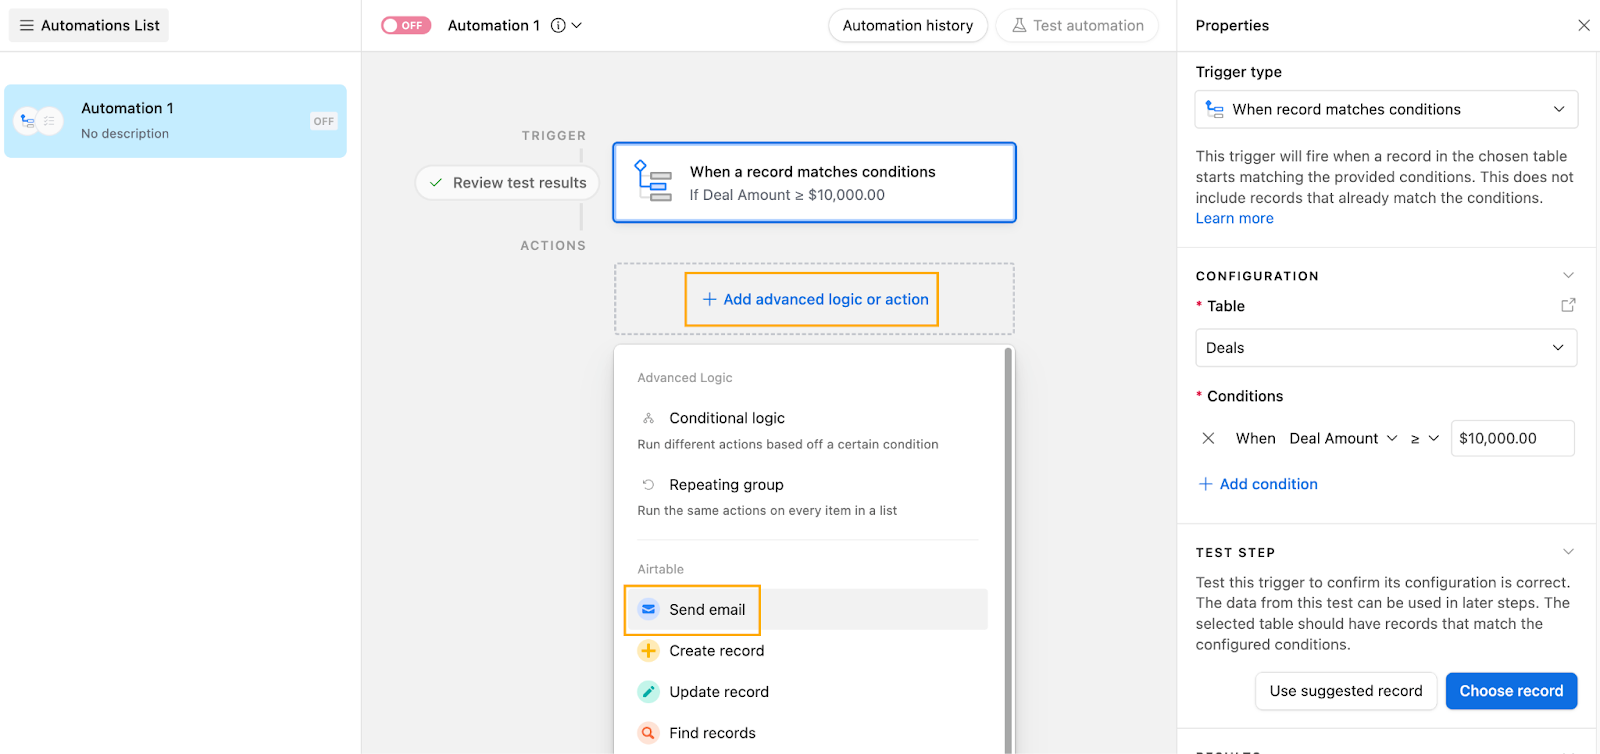
In the Action configurator, under Description, give the action a clear, descriptive name, such as Notify about High-Value Deal. Having meaningful names for your actions will be helpful as you build more complex automations in the future.
Now, let’s set up the email that will be sent when the automation is triggered.
- In the To field, enter your email address.
- In the Subject field, type “**New Deal Over $10K: **”.
- To insert the name of the deal dynamically, click the blue + button next to the Subject field, and select Deal from the dropdown. This will ensure the email includes the specific deal name.

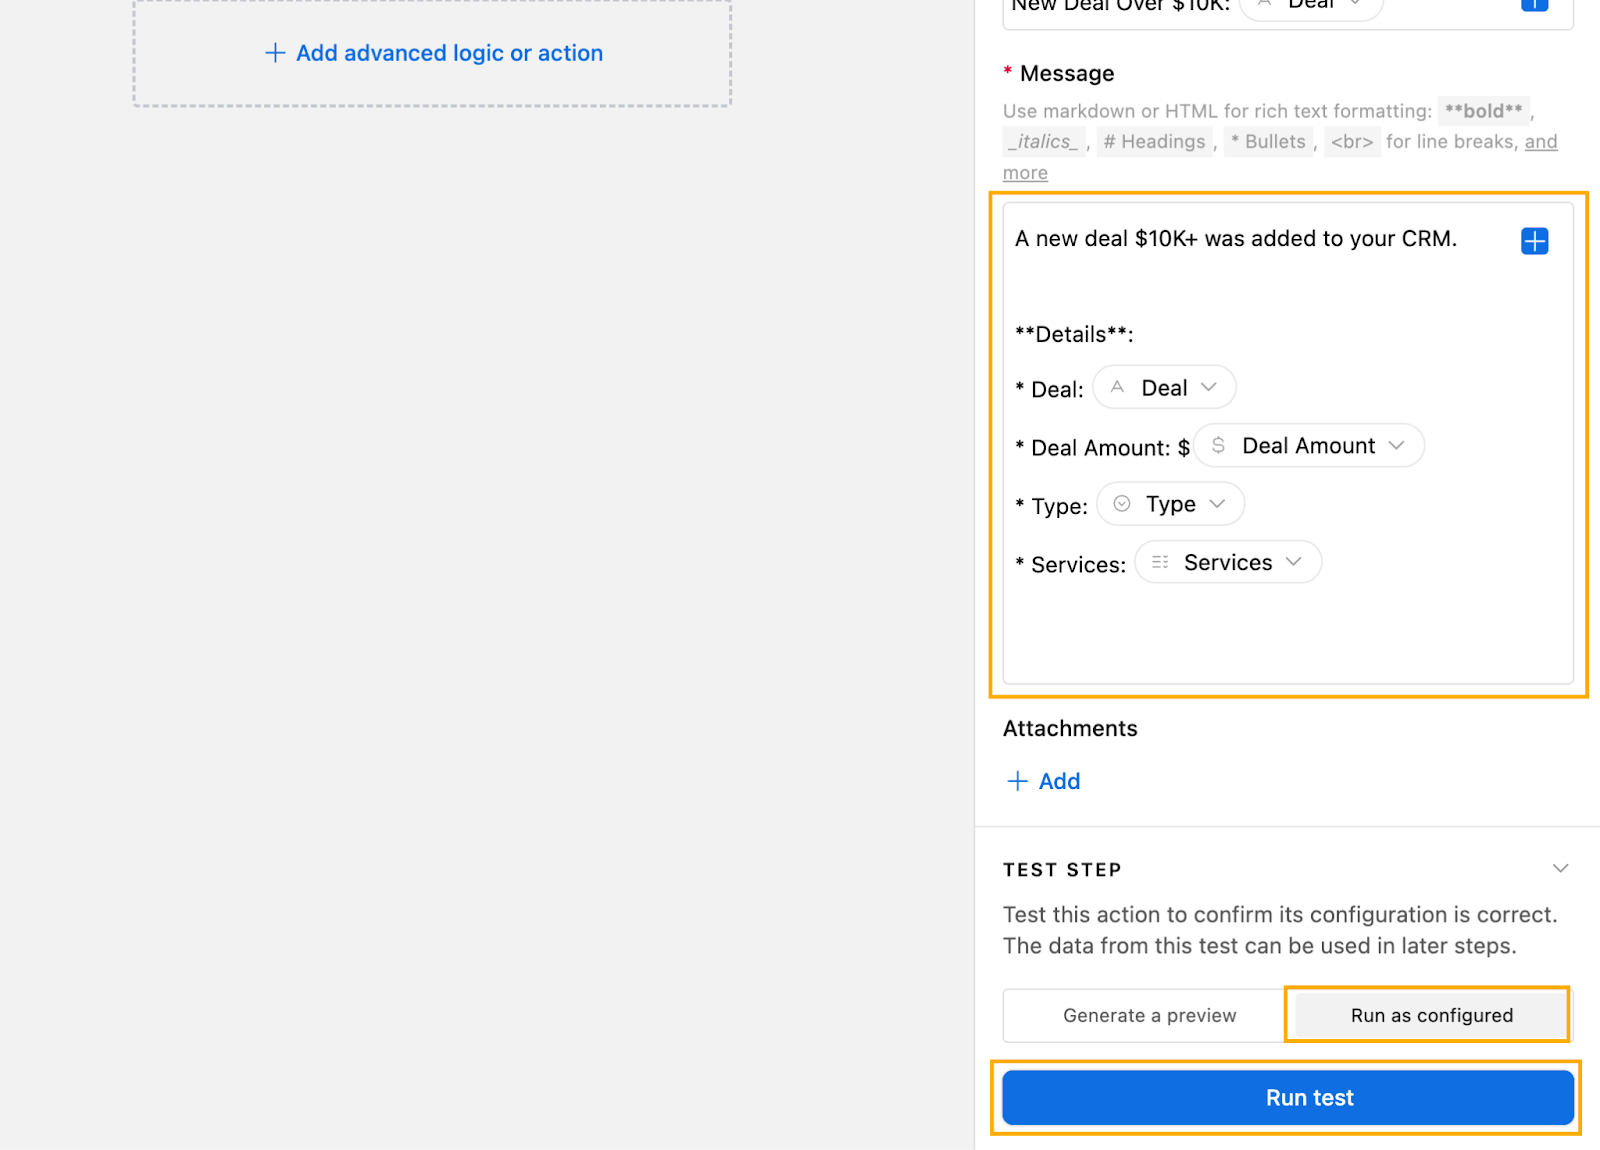
Now let’s structure the email body in the Message field. To add rich text formatting to the body of the email (like bolding text, adding bullets etc.), you can use either HTML or markdown.
In this case, we’re using markdown. Structure the body of the email like you see below. To add dynamic values, position the cursor where the dynamic values should be and click the blue plus icon, then select the dynamic value (similar to how you did in the Subject field).
Here’s how you might structure the email body:
Here’s what the preview of the email looks like:
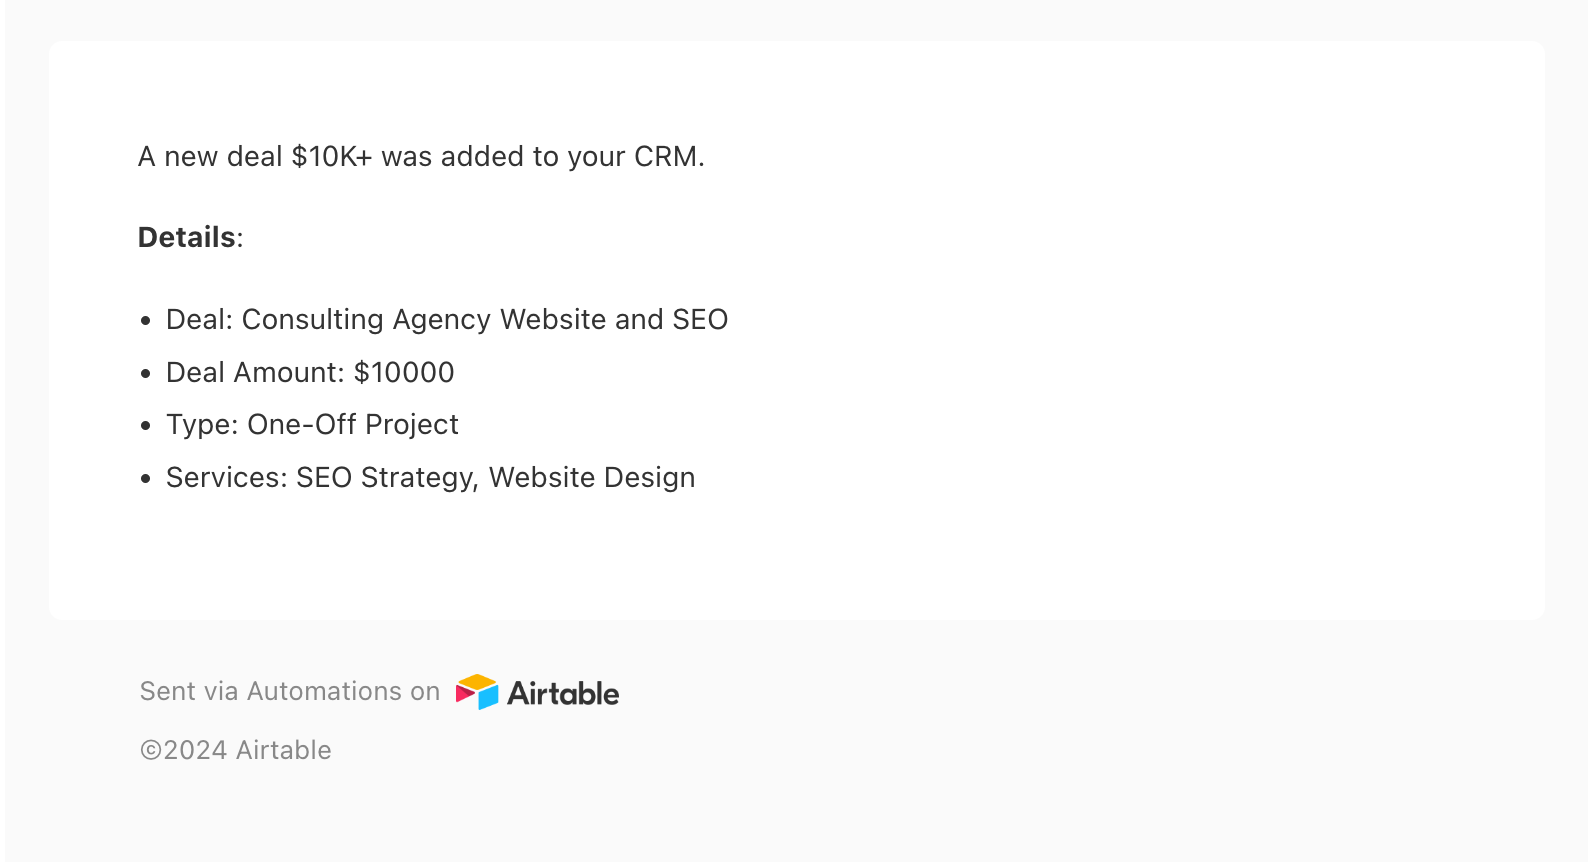
Do note that this email will come with Airtable branding so may not be suitable for sending emails to clients or external contacts.
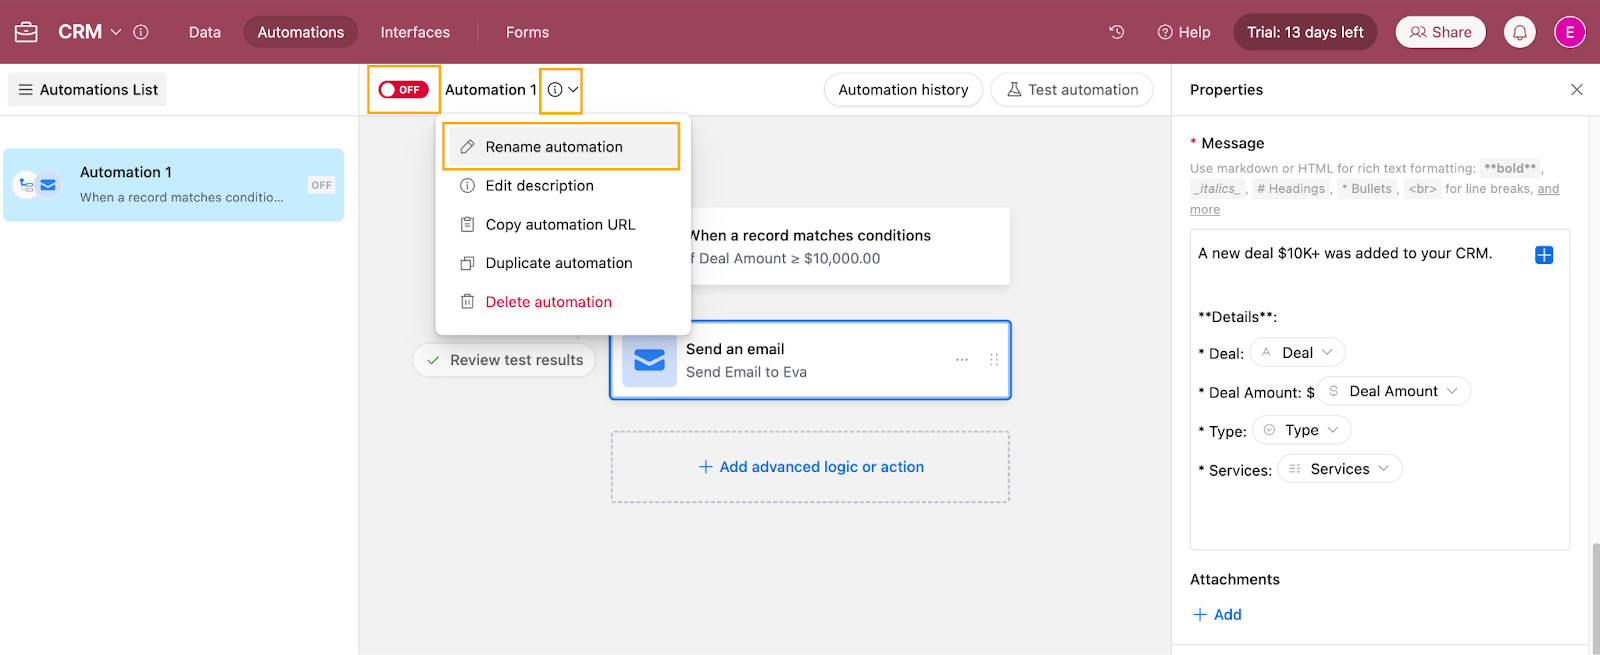
Before wrapping up, you’ll want to rename the automation into something meaningful to help you quickly identify its purpose. To do this, click the down arrow next to Automation 1. Choose Rename automation, and name it something like “Send Email When Deal Amount > 10K”.
Finally, toggle the automation on.
With this automation, you’ll always be informed about high-value deals without any manual reviews, even when one of your team members is working on a deal. This keeps you in the loop about important opportunities, allowing you to engage at the right time and ensure that high-value deals receive the attention they deserve.
You did it!
And there you go! You've built a fully functional Airtable CRM that will help you streamline and visualize your sales pipeline, making it easier to manage companies, contacts, and deals all in one place. You’ve connected your data across tables, adding meaningful context, and you’ve implemented automation to keep you updated on high-value deals.
Your customized views are designed to fit your workflow, enhancing your ability to track deal progress, prioritize opportunities, and stay informed without manual intervention—something Google Sheets can't easily support. Plus, you can always upgrade your CRM by adding more automations or custom dashboards as your needs grow.
Keep an eye out for our more intermediate and advanced guides on the finer intricacies of using Airtable. Alternatively, if you’d like a more basic introduction to the purposes and capabilities of Airtable, check out What is Airtable.
Happy selling!

