


Invoicing is an essential part of running a business. But, more often than not, it’s manual, time-consuming, and prone to error - you’re jumping between apps, copy-pasting payment details, and often having to formulate an email to deliver each invoice! All of these bitty tasks eat up valuable time that could be better spent on more important endeavors (like landing more clients to send those invoices to).
Glide’s Stripe integration saves you the hassle. It enables you to send invoices directly from your Glide apps, keeping everything in one place—automated, efficient, and free of human errors.
This does come at a price, however. It's hard to give a concrete figure, since these will vary depending on factors such as location and currency. But, it's worth considering that though Stripe takes a percentage, you may well make up for this cost through the time your business has saved with automations.
Glide’s Stripe integration makes it possible to:
- Automatically create invoices when customers make a purchase.
- Send and track payments without leaving Glide.
- Keep records organized and linked to your core operational data.
And more!
What you’ll learn
In this tutorial, we’ll walk through how to integrate Glide with Stripe in order to generate invoices with a click of a button and without leaving Glide. We’ll also give you a few ideas on how to upgrade your app with additional automation capabilities.
As a starting point, we’ll use an order management app from one of our previous tutorials - if you’ve been following along, you’ll see just how easy it is to build invoicing right into your app.
Here’s how it’ll look when we’re done.
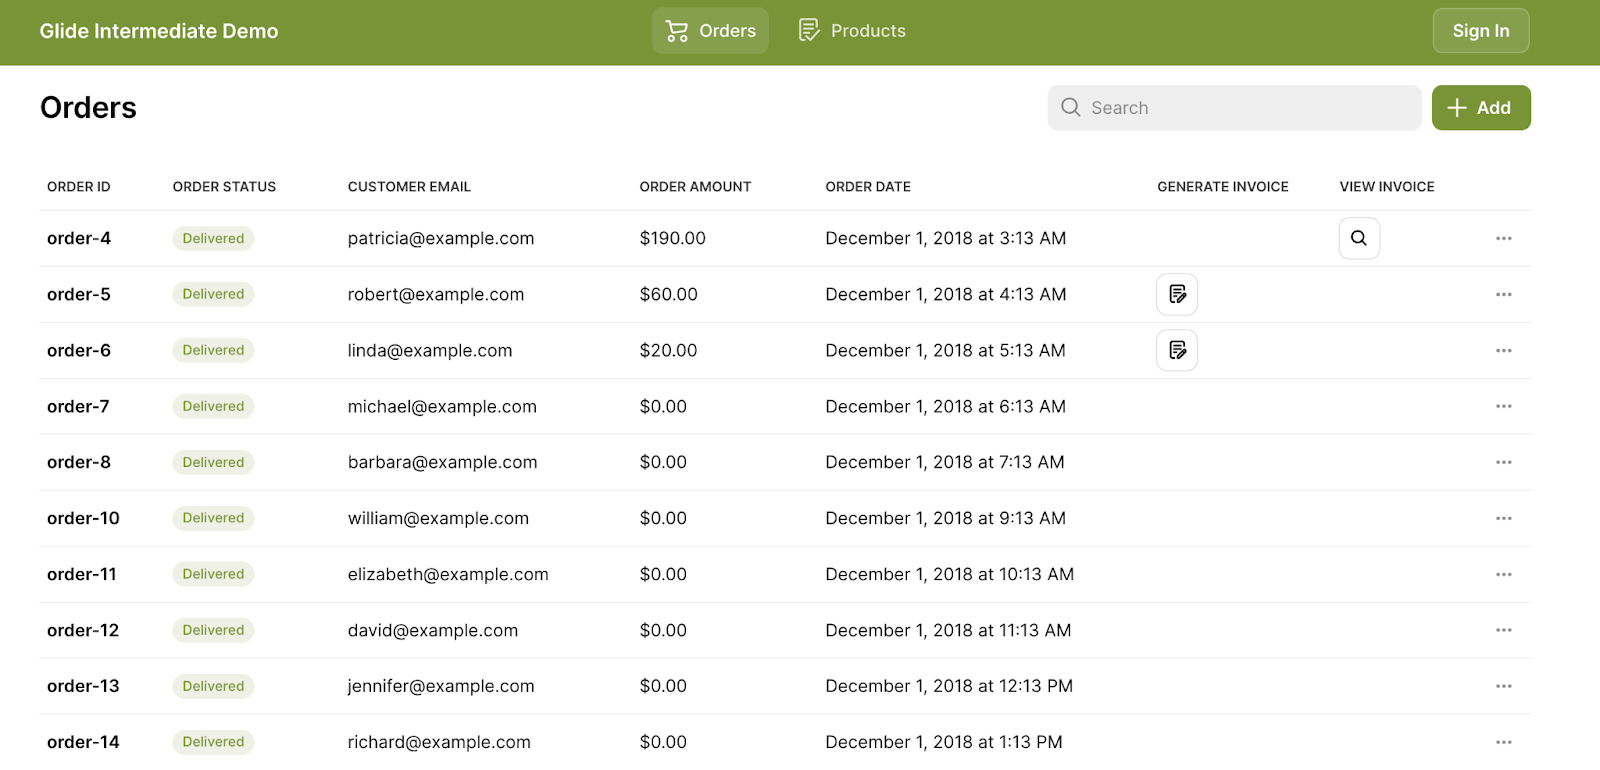
Let’s get started.
Step 1: Create a Stripe API Key
Before you can start generating Stripe invoices from Glide, you'll need to connect the two. The first step is getting your API key from Stripe’s Developer Dashboard.
Once you’re in the Developer Dashboard, we recommend turning on Test Mode. This ensures that no real transactions are processed while you’re setting things up and lets you generate test data before going live.
⚠️Important: Note that if you use the test mode, when you're ready to go live, you'll need to generate a new live API key and update it in your Glide app (more details on Stripe API keys here).
Now, let’s generate your Restricted API Key.
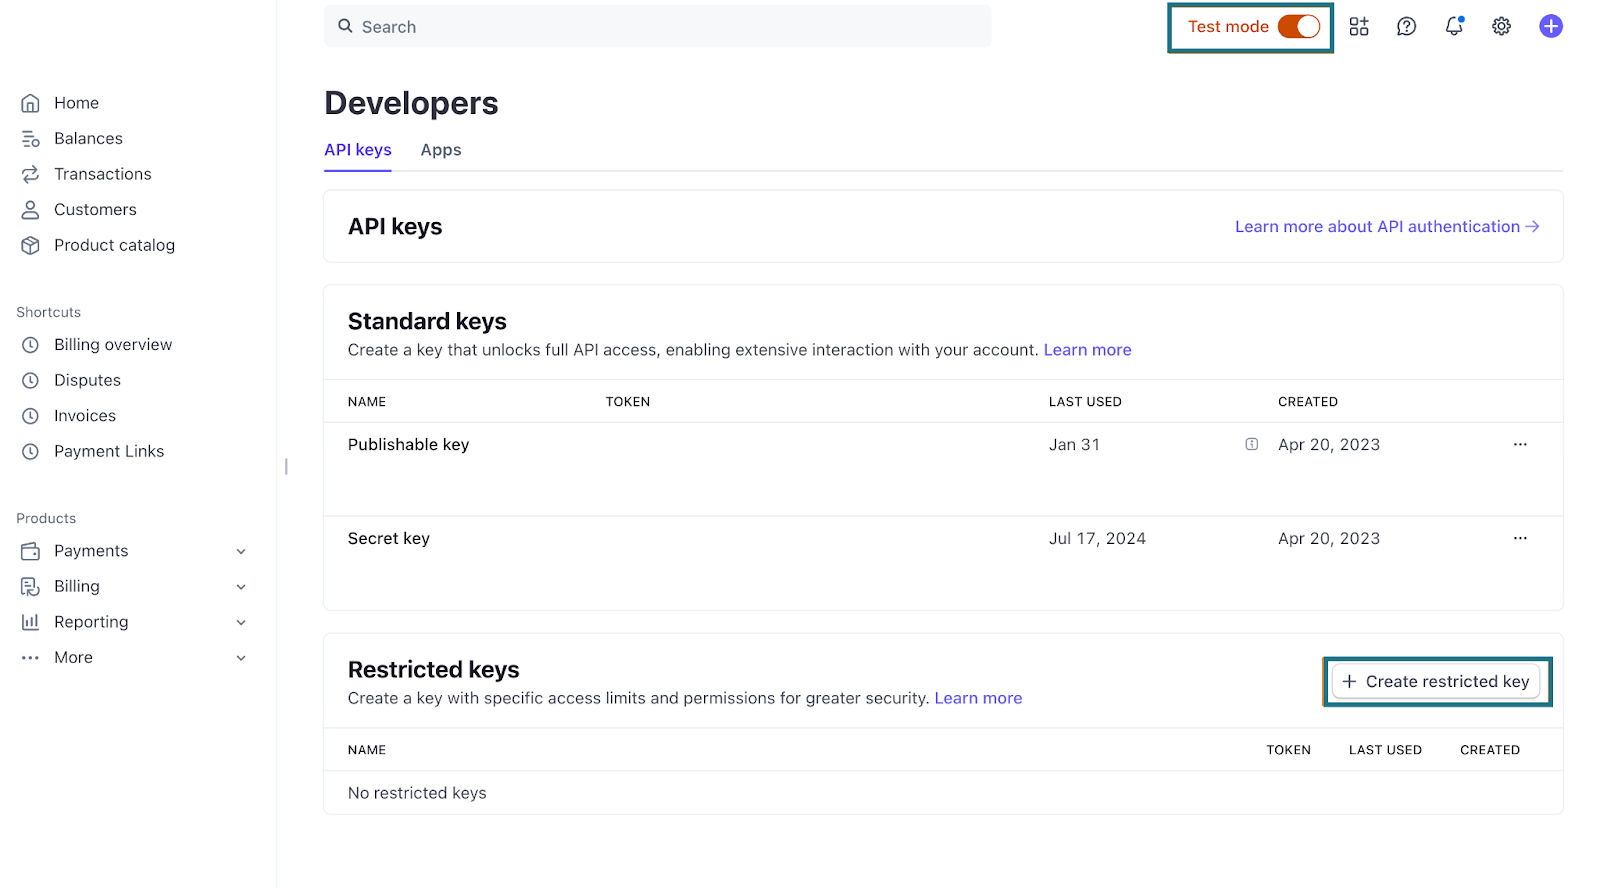
In the Developer Dashboard, scroll down to Restricted Keys and click Create restricted key in the lower right corner.
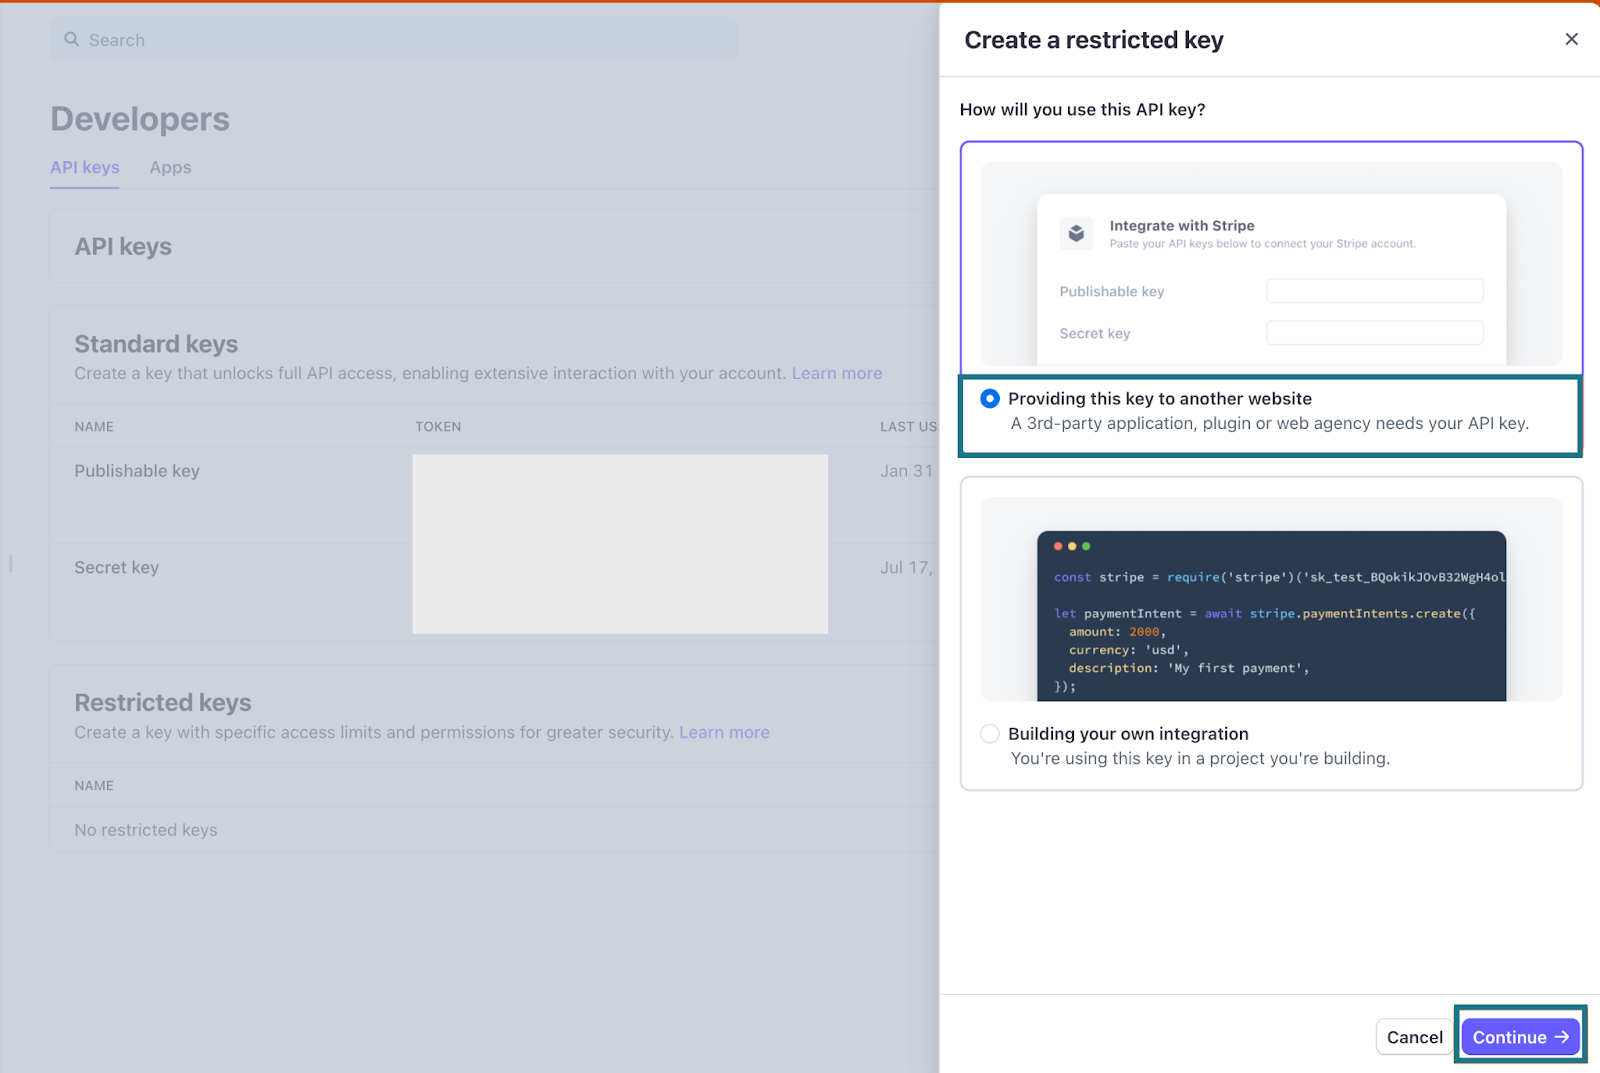
When prompted to configure the key, select Providing this key to another website, then click Continue.
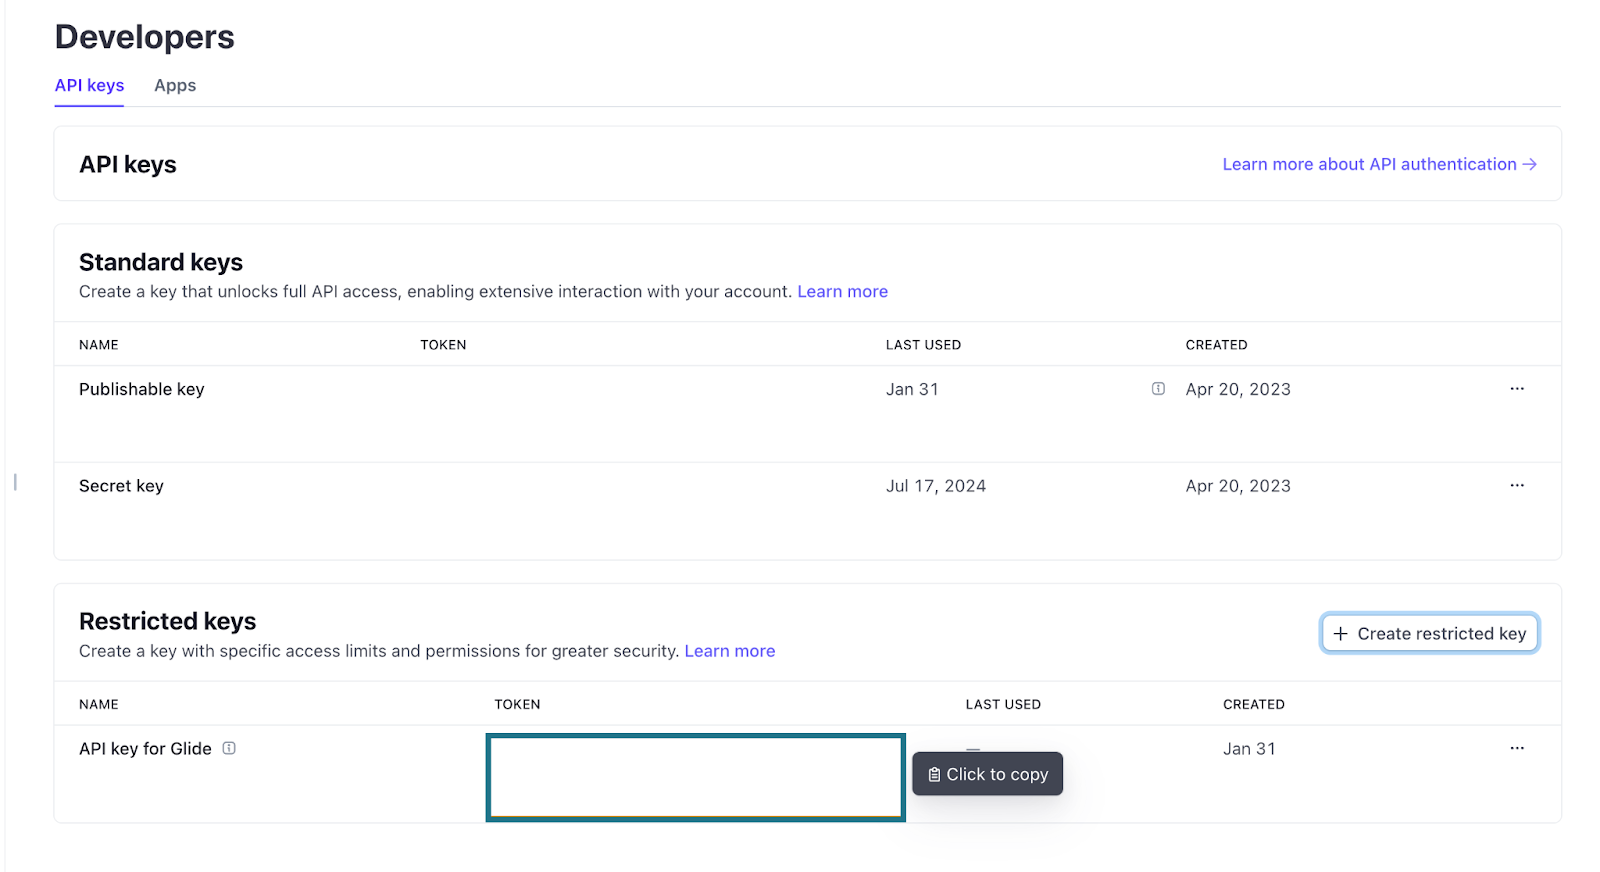
Give the key a descriptive name (we called ours "Glide") and under URL, paste: https://www.glideapps.com/.
Once Stripe generates the key, you’ll see it under Restricted Keys. Hover over it (we hid this part on our screenshot for security), then click on it to copy it.
Step 2: Connect Stripe to your Glide app
Now that you have your Stripe API key, it’s time to connect it to your Glide app. Follow these steps to complete the integration:
- Open your Glide app.
- Click Settings in the top menu.
- Navigate to the Integrations tab and select Stripe.
- Click Add to app.
- Under the integration configuration, paste your API key.

Once the key is added, your Glide app will be linked to Stripe, allowing you to start generating invoices and processing payments from Glide.
Step 3: Preparing the data
Before we can generate Stripe invoices from Glide, we need to make sure the required data is properly formatted. Here are the key pieces of information you’ll need:
- Customer Email – The recipient of the invoice.
- Total – The amount to charge, formatted in the smallest currency unit (e.g., cents for USD).
- Currency – The currency for the invoice (e.g., "usd" for US dollars).
- Invoice ID – The unique identifier Stripe returns when an invoice is created.
Customer Email already exists in our app, so there is no need to add it. Let’s configure the remaining data.
Invoice total
We have a field for the ‘total’ value of the order, but it’s not formatted in cents like Stripe requires. Let’s add another column to format this.
To create your Invoice Total in cents:
- In your Glide app, click on Data in the top menu bar.
- Navigate to your Orders table.
- Click the plus (+) button in the upper right corner of the table to add a new column. This will open the column settings.
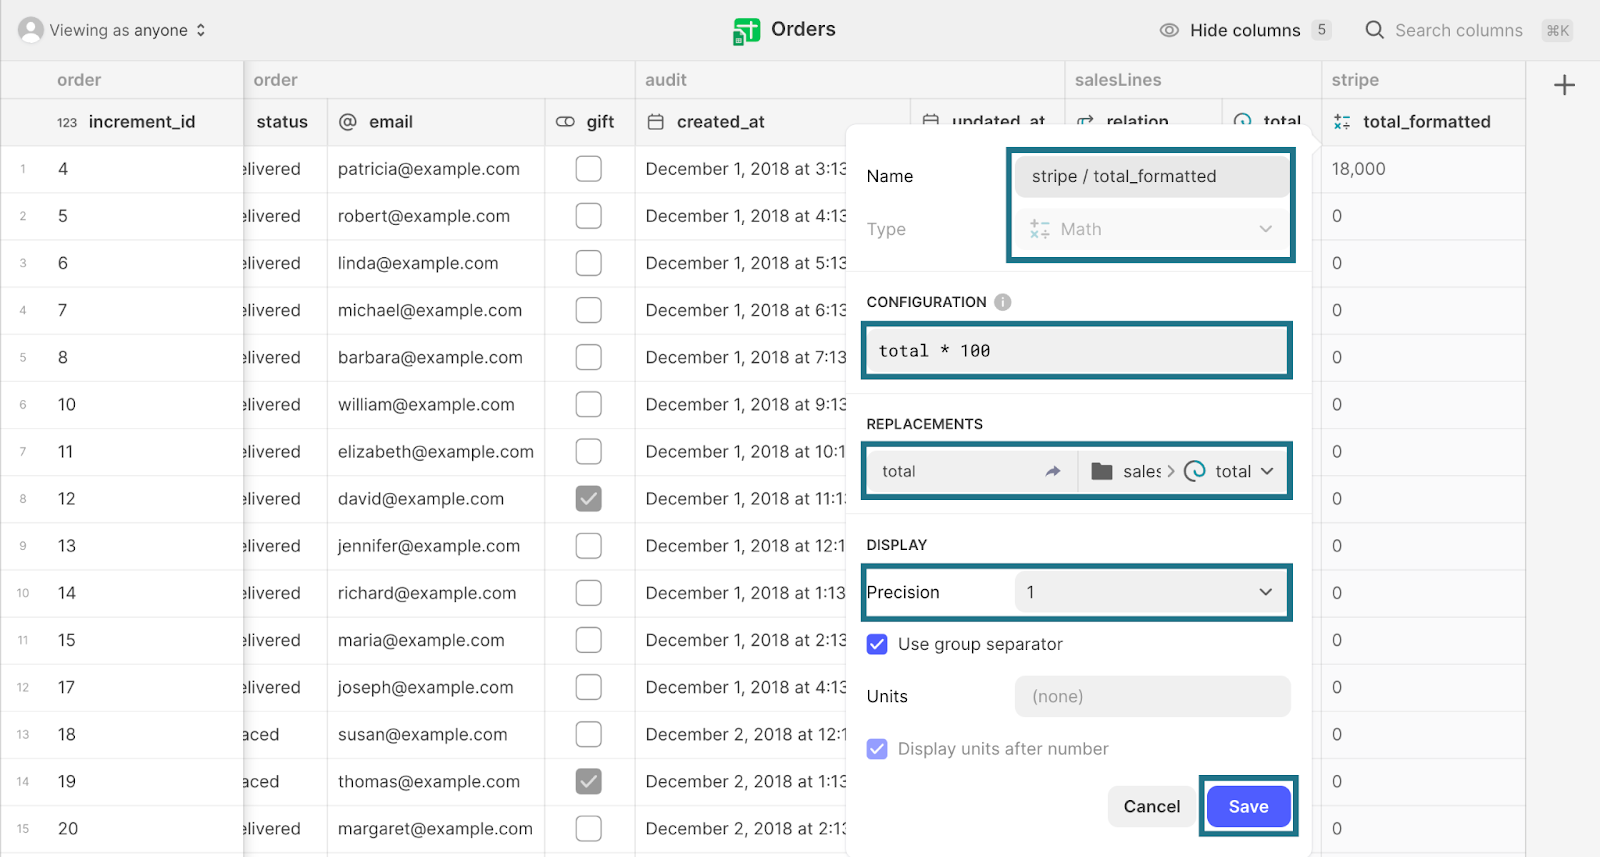
- Name the column something descriptive, such as "stripe / total formatted" (The "/" helps organize columns into logical groups, e.g., Stripe-related fields).
Under Configuration, write “total” and multiply your total order amount with the number that will convert it to its smallest unit (in our example that’s total * 100). If you're invoicing for $14.25, this will store 1425 (since 1425 cents = $14.25).
Then under Replacements, map your "total" variable to the column that reflects your order total. In our example that’s the "sales lines / total" column.
Under Display, set the precision to 1 decimal place and click Save.
Now that your total is formatted correctly for Stripe, let’s set up the remaining fields.
Currency
Stripe requires the currency to be passed via API in lowercase and in the ISO standard (e.g., "usd"). To ensure Stripe receives the currency in the correct format, we need to create a new currency field. You can see the list of supported currencies here.
- Click the plus (+) button in the upper right corner to add a new column.
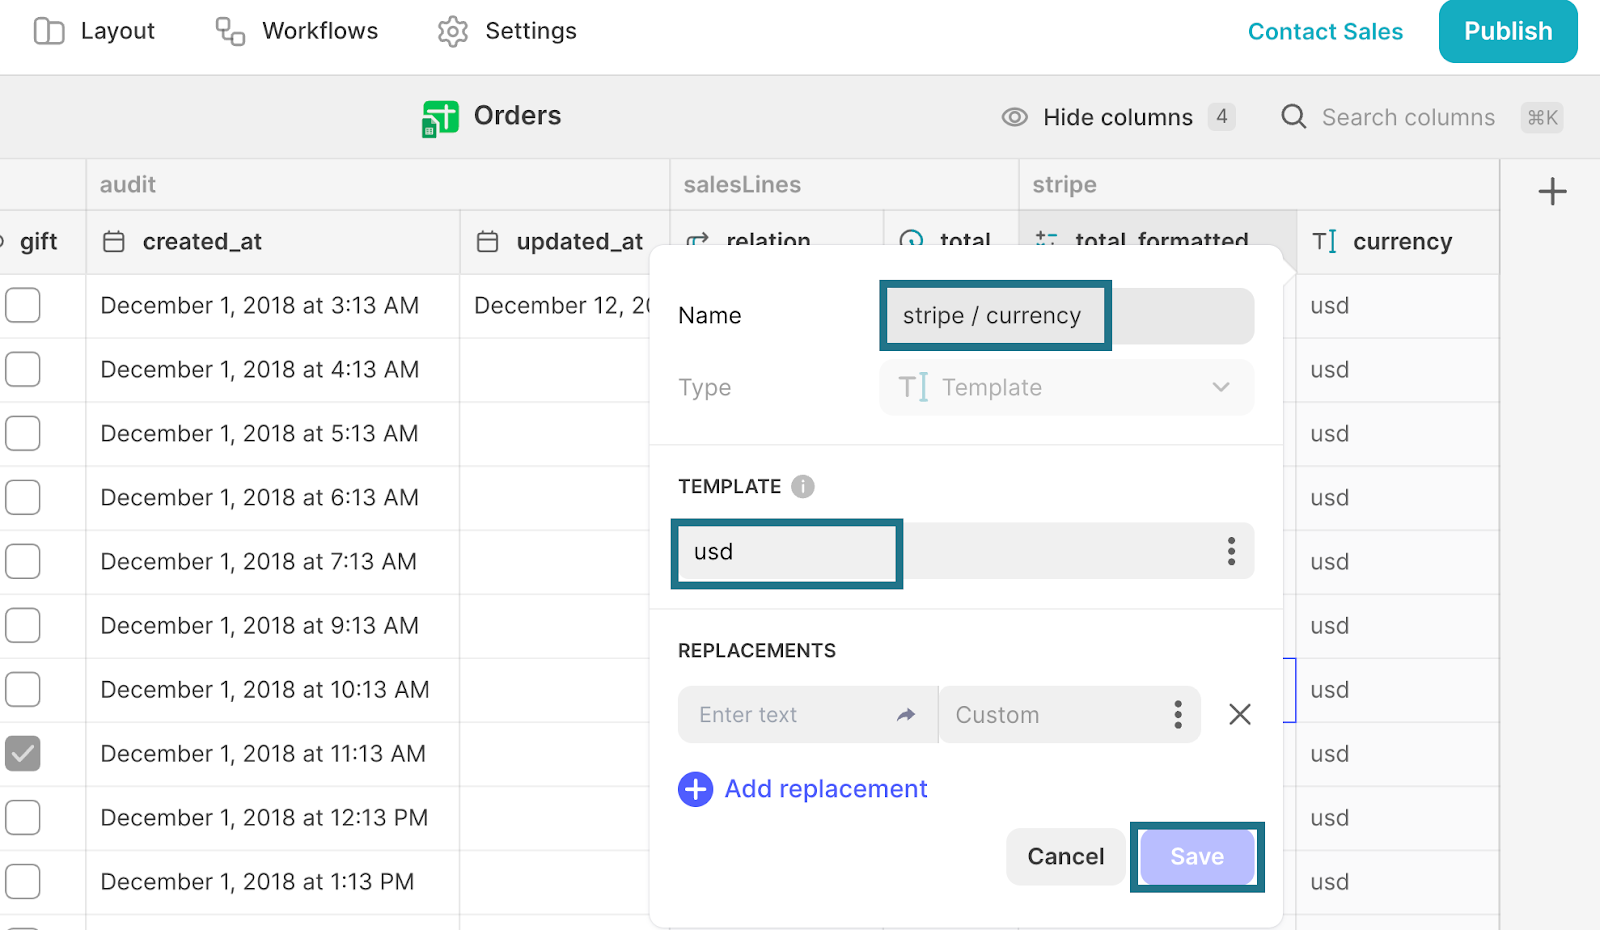
- Set the Column Type to Template.
- Use the following settings:
- Descriptive Name: "stripe / currency"
- Template: Enter "usd" (or your desired currency code in lowercase).
- Replacements: Leave this empty, as the value should be static.
Once everything is set up, click Save.
Invoice Columns
Now, we’ll add two more columns to store the Invoice ID and create a direct link to view the invoice in Stripe. For the former:
- Click the plus (+) button in the upper right corner to add a new column.
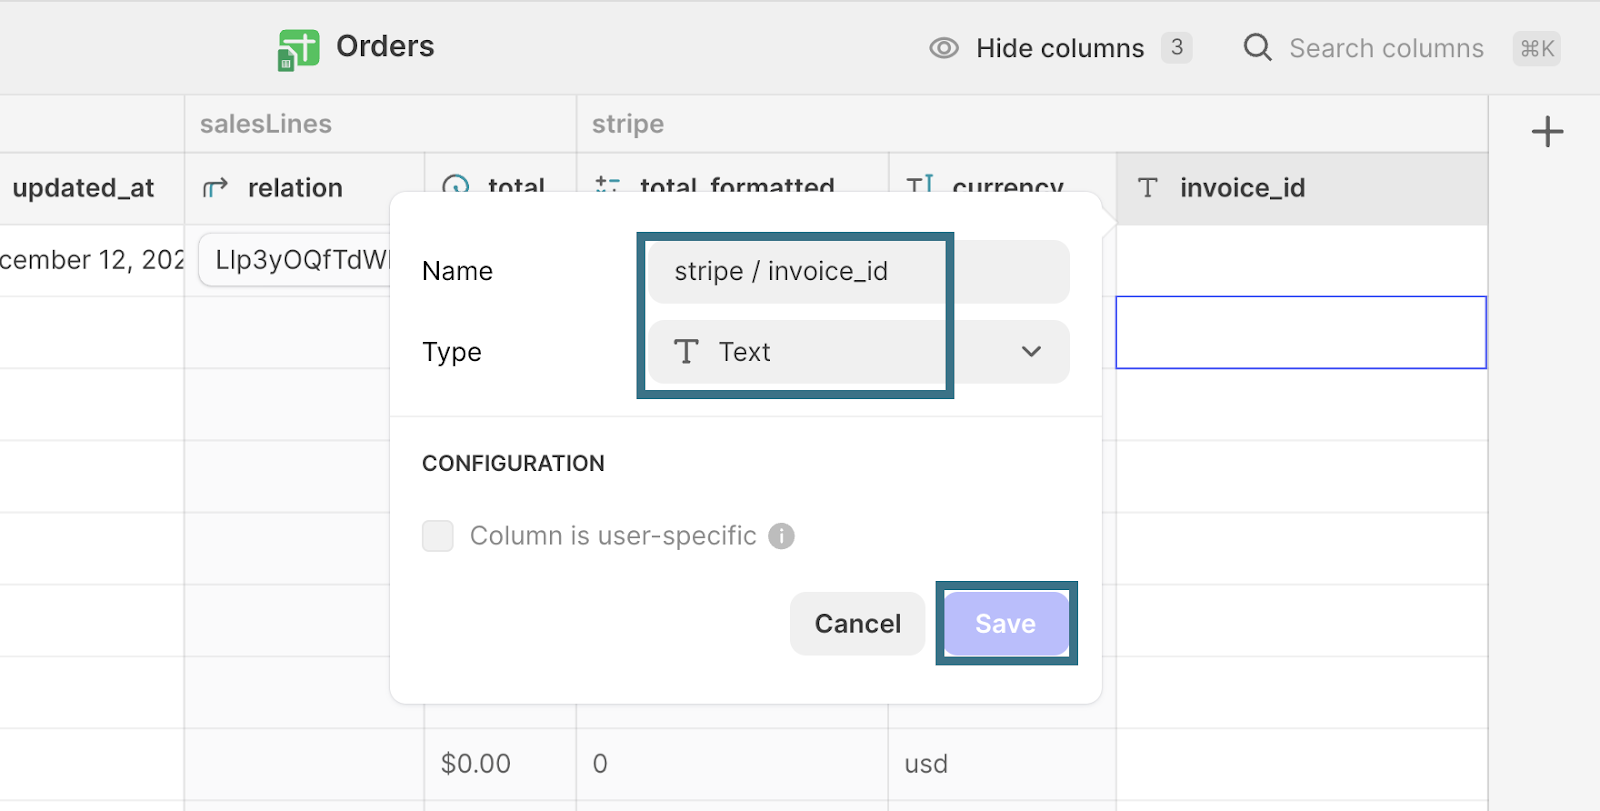
- Set the Column Type to Text.
- Name it "stripe / invoice_id".
- Click Save.
This column will store the Invoice ID returned by Stripe once an invoice is generated.
Finally, let’s create a column that constructs a direct Stripe Invoice URL, so you can easily open invoices from your Glide app.
- Add another column by clicking the plus (+) button.
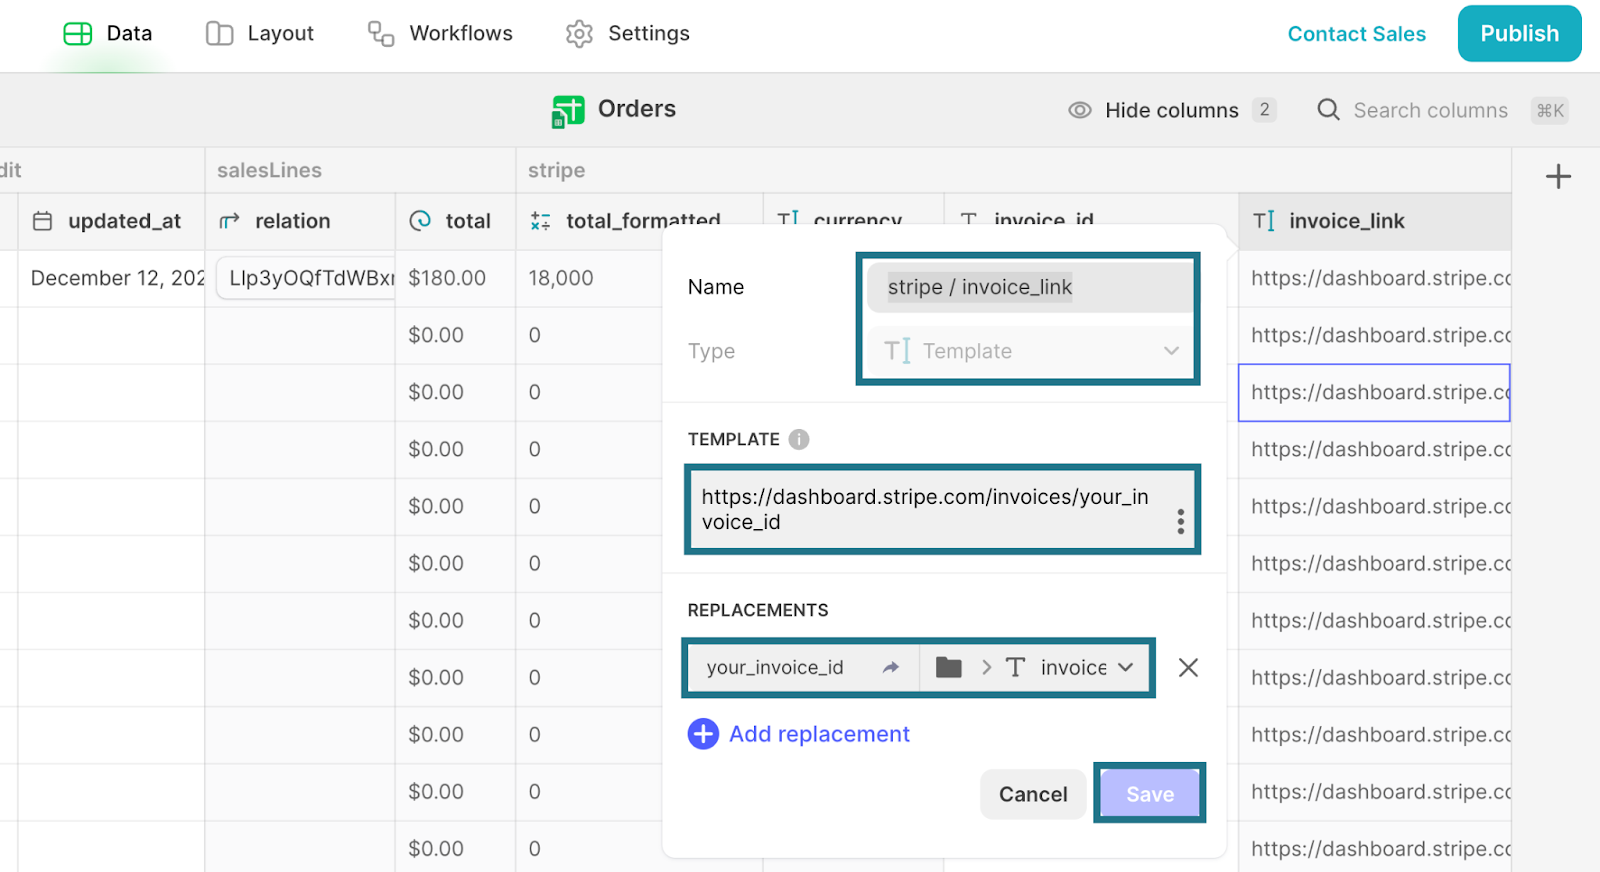
- Set the Column Type to Template.
- Use the following settings:
- Descriptive Name: "stripe / invoice_url"
- Template: Paste the following URL: https://dashboard.stripe.com/invoices/your_invoice_id
- Replacements: Replace "your_invoice_id" with the actual invoice_id column we created in the previous step.
- Click Save.
Once the invoice is generated, we will be able to use this link to access it directly from Glide.
With the backend setup complete, the final step is to create the UI in Glide to generate invoices and view them.
Step 4: Setting up your Stripe invoice automation
In the UI, we will enable two core functionalities: generating a Stripe invoice, and the ability to view the generated invoice directly from Glide.
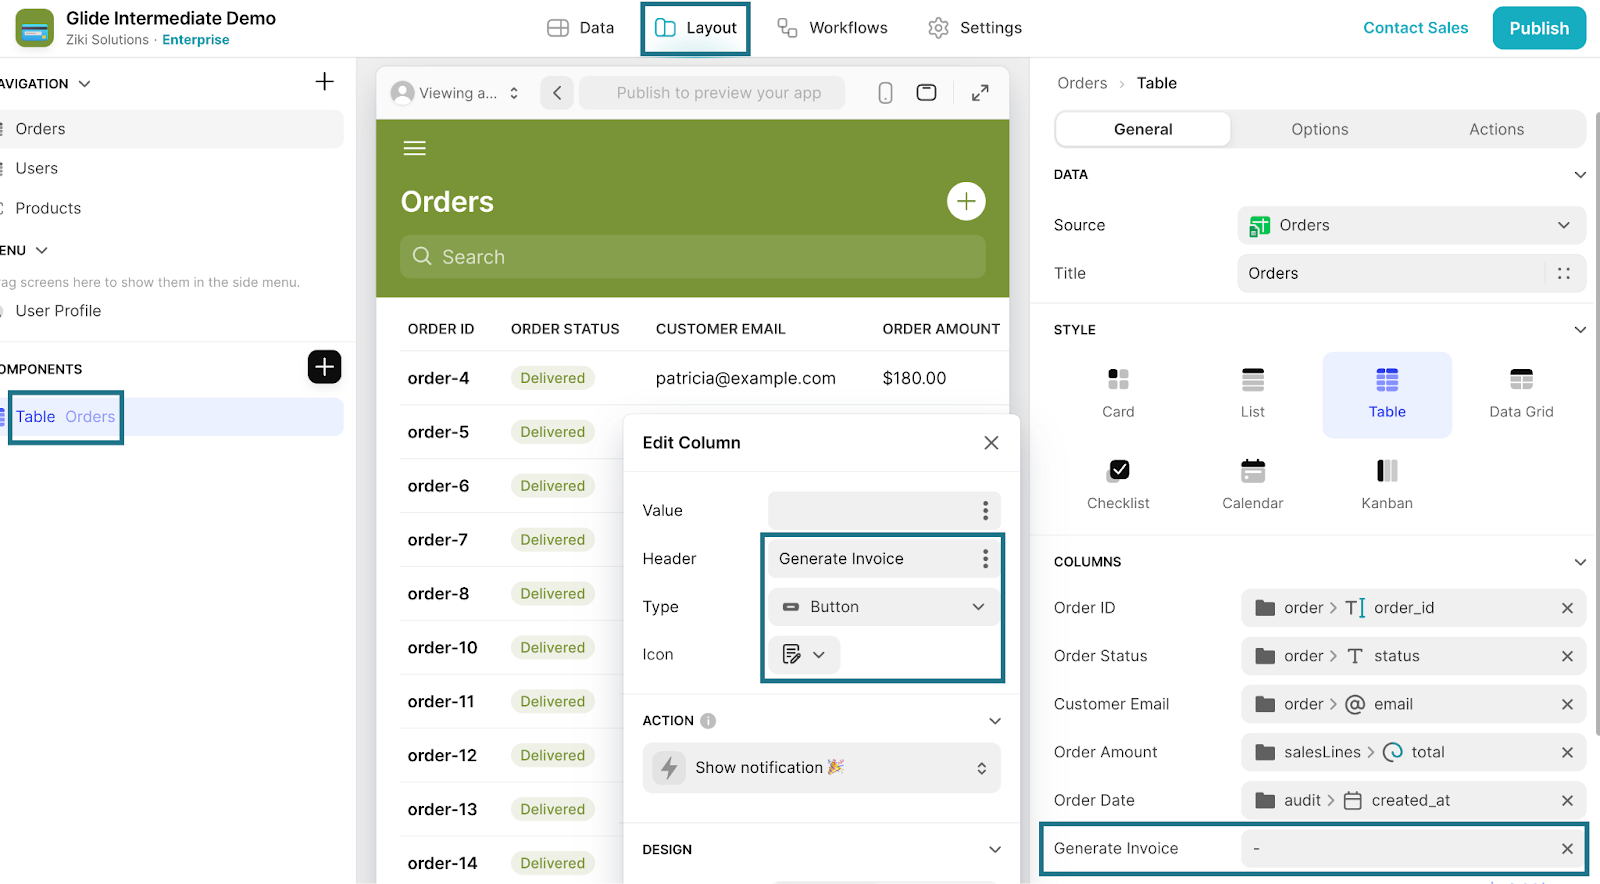
- Navigate to the Layouts tab in the top menu.
- Select the Table component on the left where your orders are listed to open the component’s settings.
- Click Add item under Columns on the right and choose Button as the type.
- Name the button "Generate Invoice".
- Optionally, select an appropriate icon for the button (e.g., a document or invoice icon).
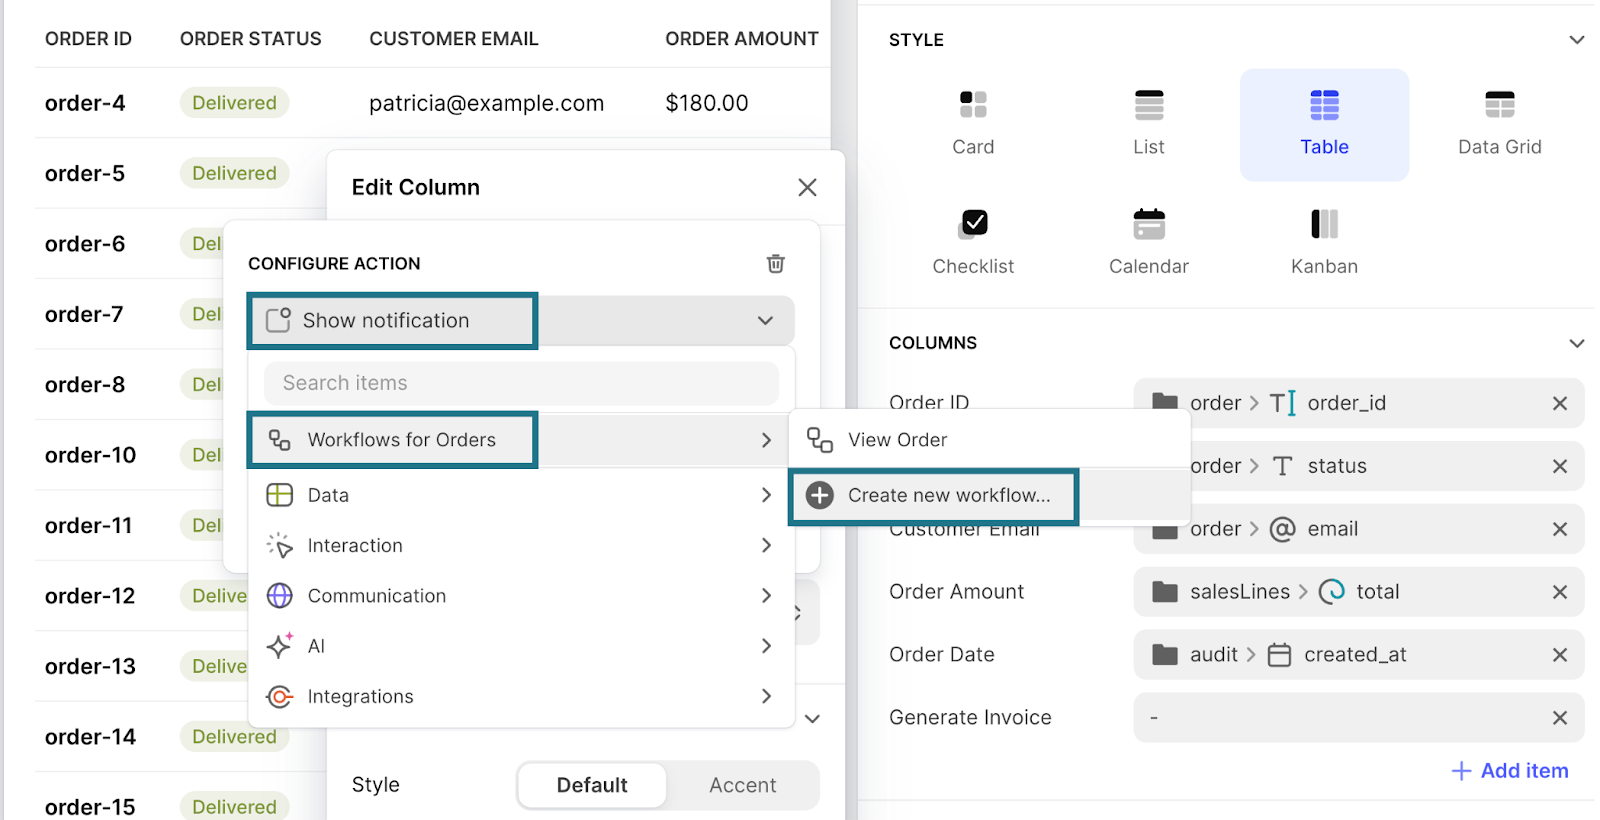
Now that we've added the Generate Invoice button to the UI, let's program its action to trigger a multi-step workflow for generating a Stripe invoice.
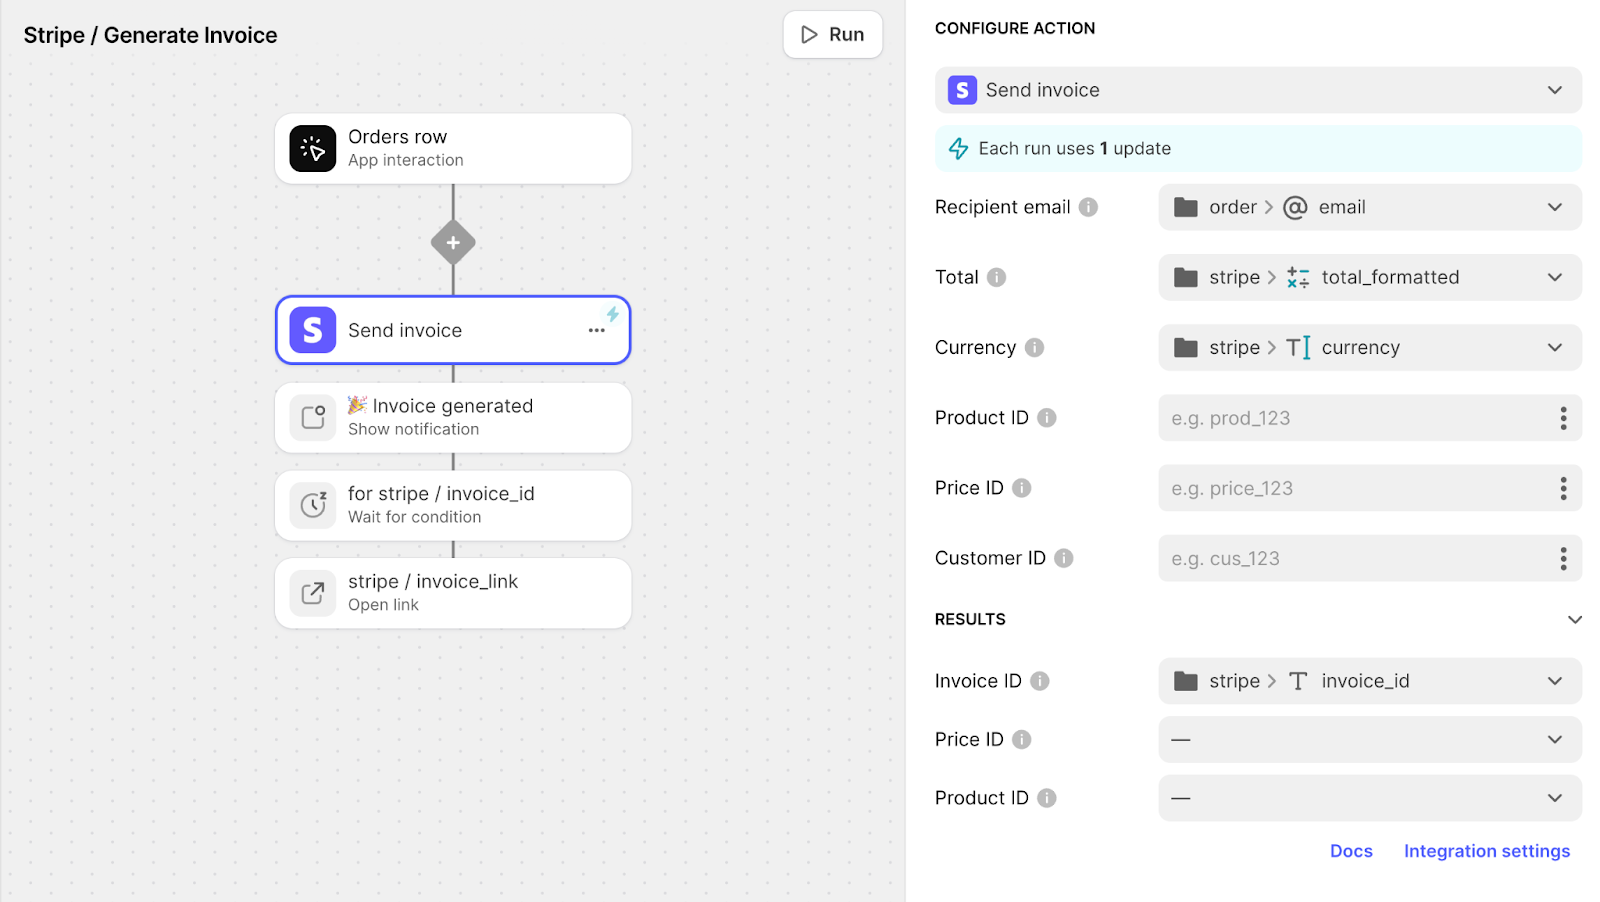
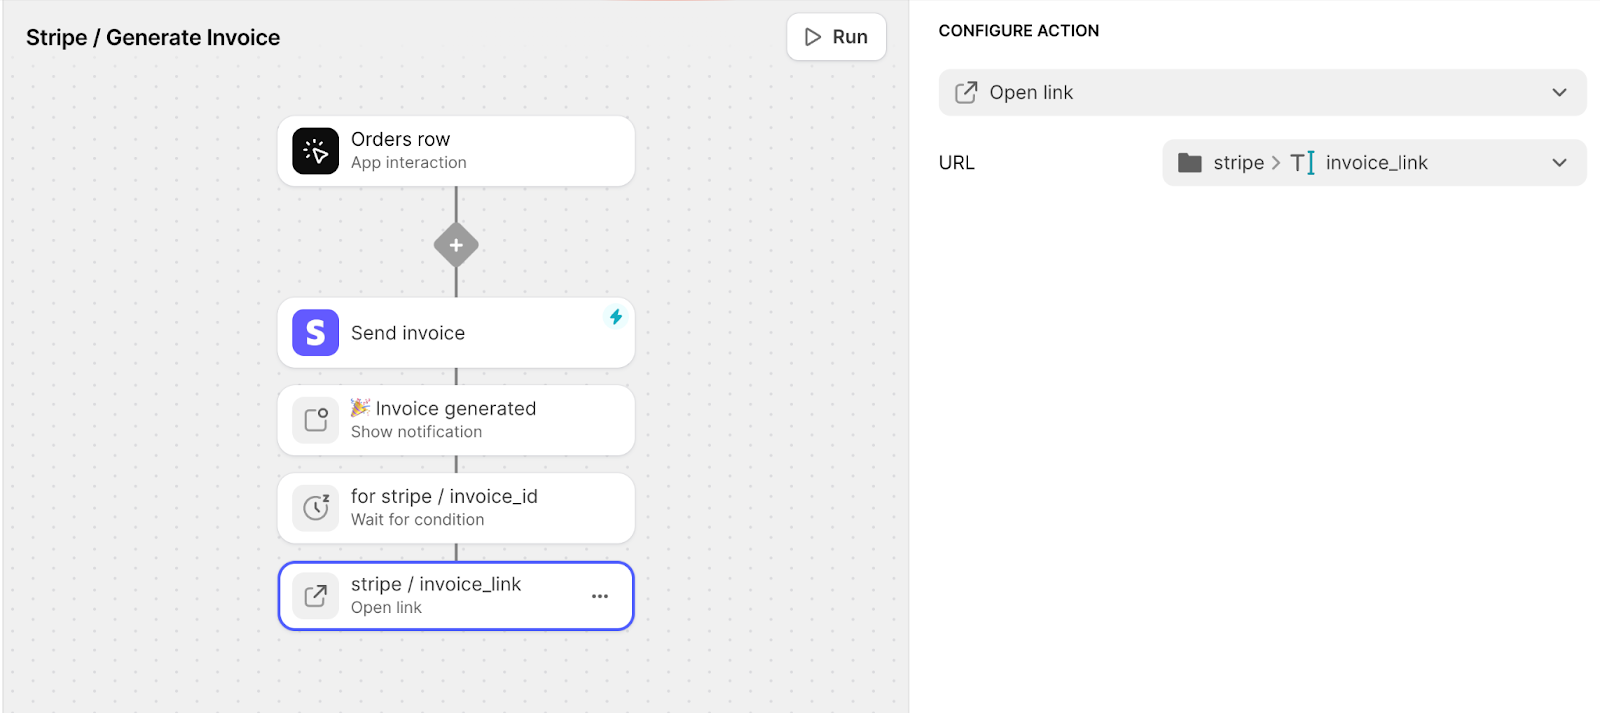
- First, we will generate the invoice using the Stripe Send Invoice action, which is built into Glide. Configure it like this:
- Next, we will show the user a notification that the invoice was generated, using the Show Notification action.
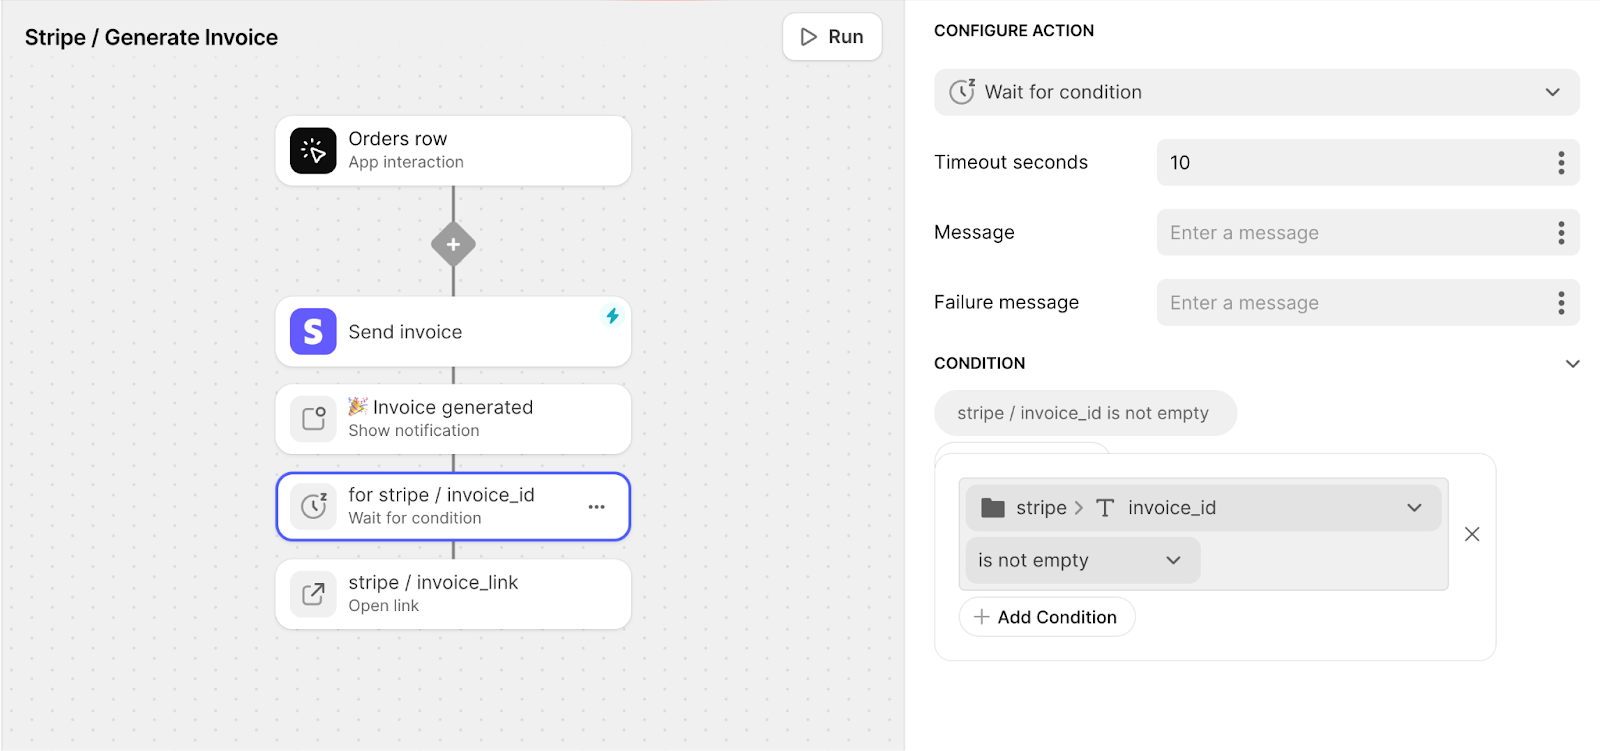
- Then, we will wait until Stripe returns the invoice ID using the Wait for Condition action.
- Finally, once we have the invoice ID, we will also have the invoice URL, which we are constructing from the invoice ID. At this point, we’ll use the Open Link action to open the newly generated invoice.
If you need more guidance, you can watch the arcade.
To return back to the button configuration, click Done in the upper right corner of the workflow editor.
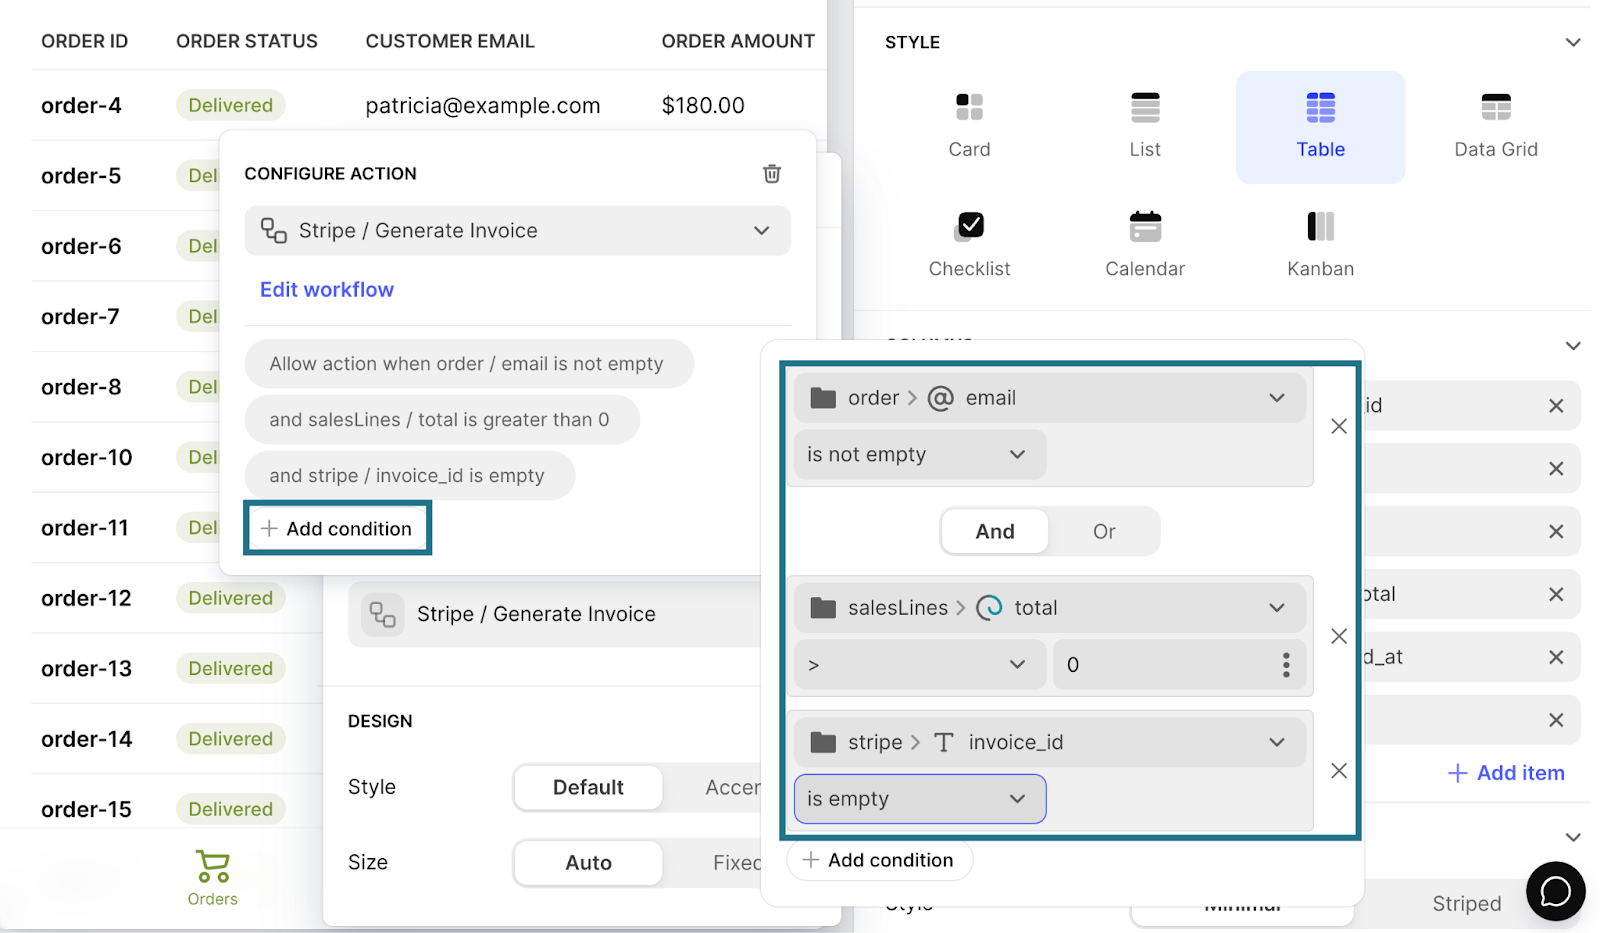
To ensure we don’t make errors when generating the invoice, we will create a simple validation to only allow users to click this button when the following conditions are met:
- email is not empty
- total is greater than 0
- Invoice_id is empty (meaning the invoice has not already been generated—this is important to prevent users from accidentally overriding past invoices)
To set these conditions, click Add Condition and configure them as follows:
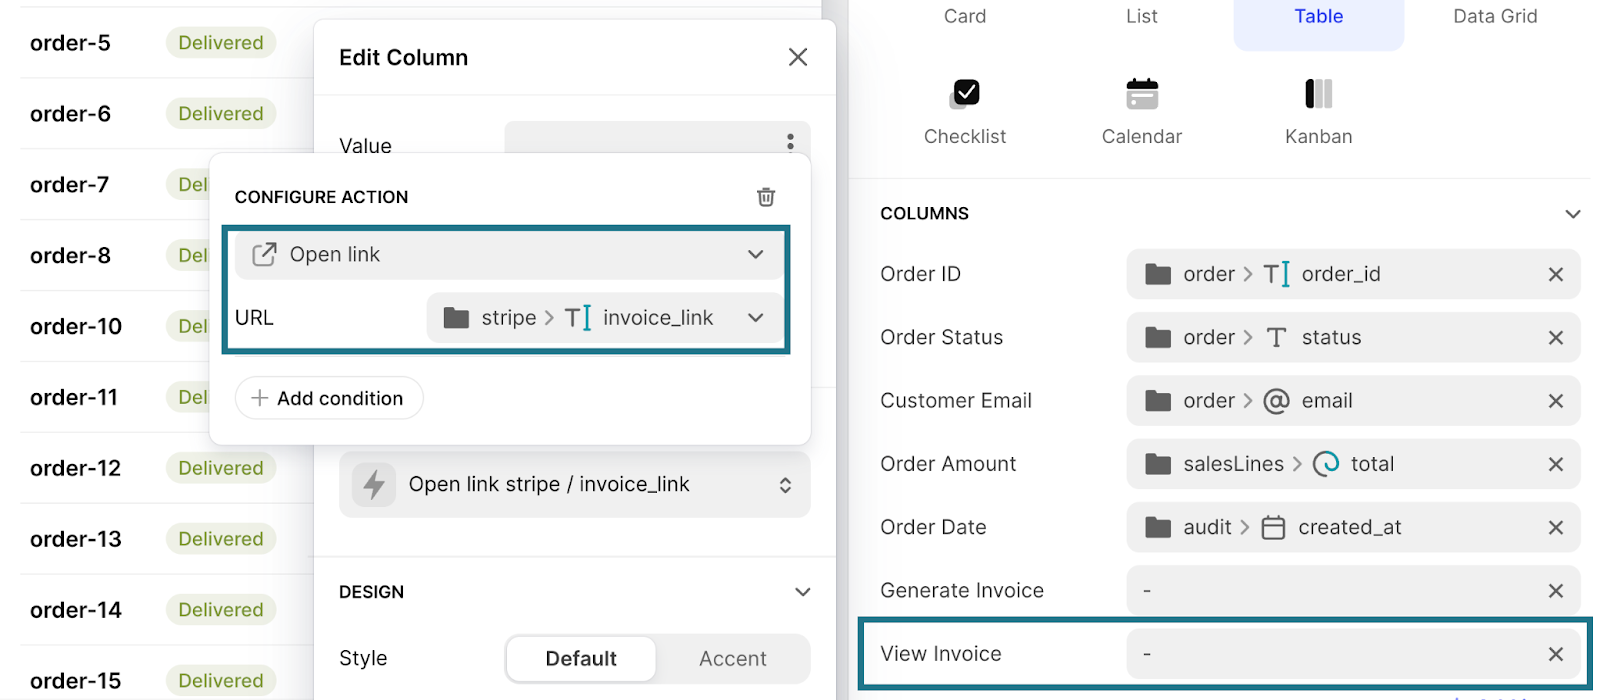
Now we’ll add a second button that allows users to view the invoice once it’s been generated.
- Under Columns on the right side of the configuration, click + Add item.
- Create another Button column.
- Name it "View Invoice" and, if desired, assign an icon.
- Click on the action and select Open Link (since this is a simple action, we can use Glide’s preconfigured actions without needing a dedicated workflow)
- Under URL, point to the column that holds the invoice link (in our case, stripe / invoice_url).
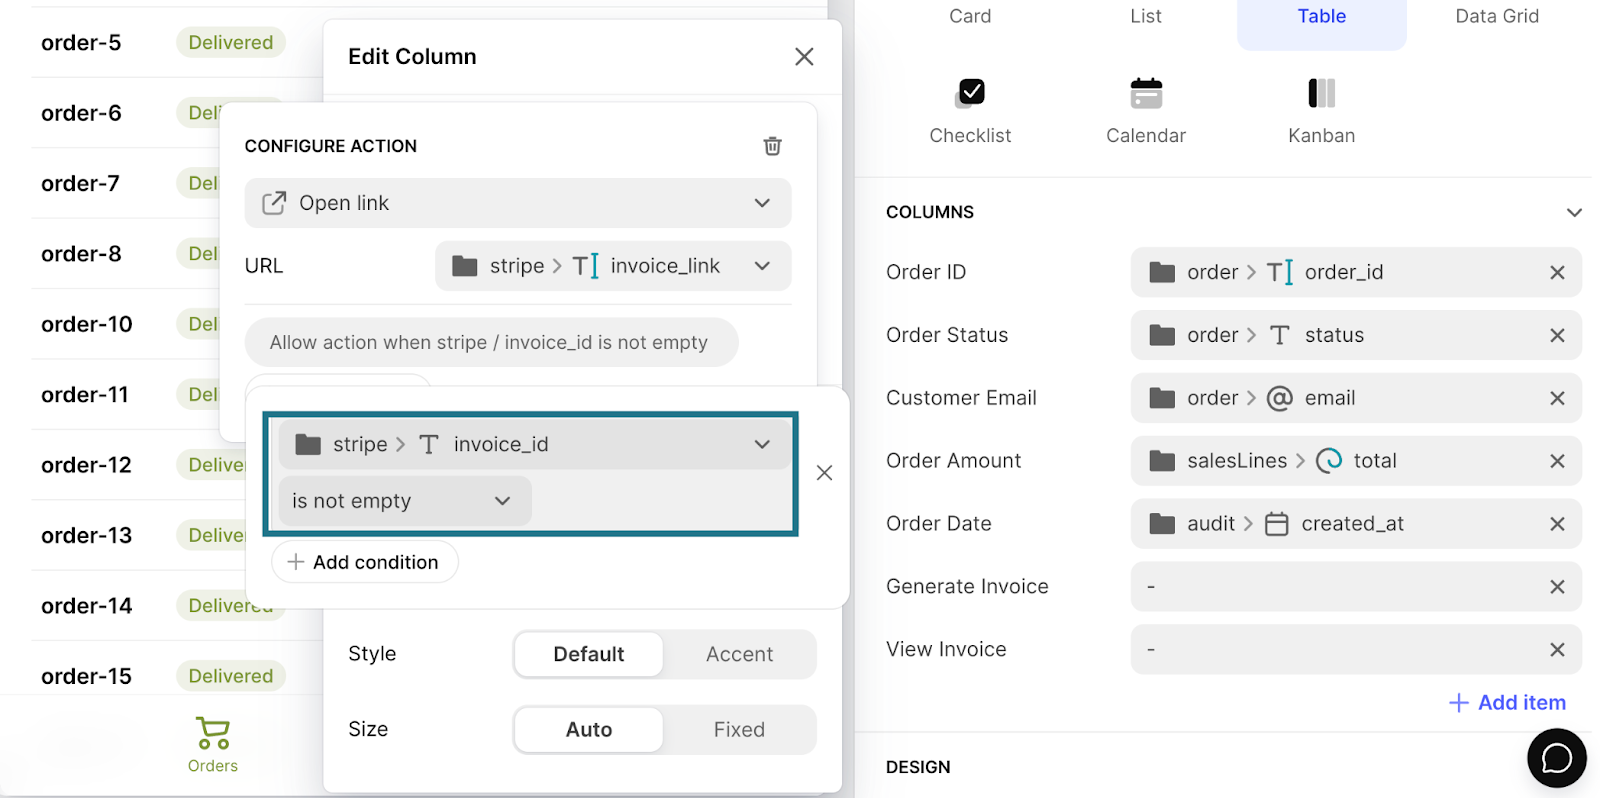
To ensure the user experience is simple and intuitive, we will hide the Open button when the invoice has not yet been generated.
- Click Add Condition under the Visibility settings
- Set the condition as follows: Invoice ID (stripe / invoice_id) is not empty
This ensures that the View Invoice button only appears once an invoice has been created.
Click out of the configuration to save your changes. This is how our app looks now:
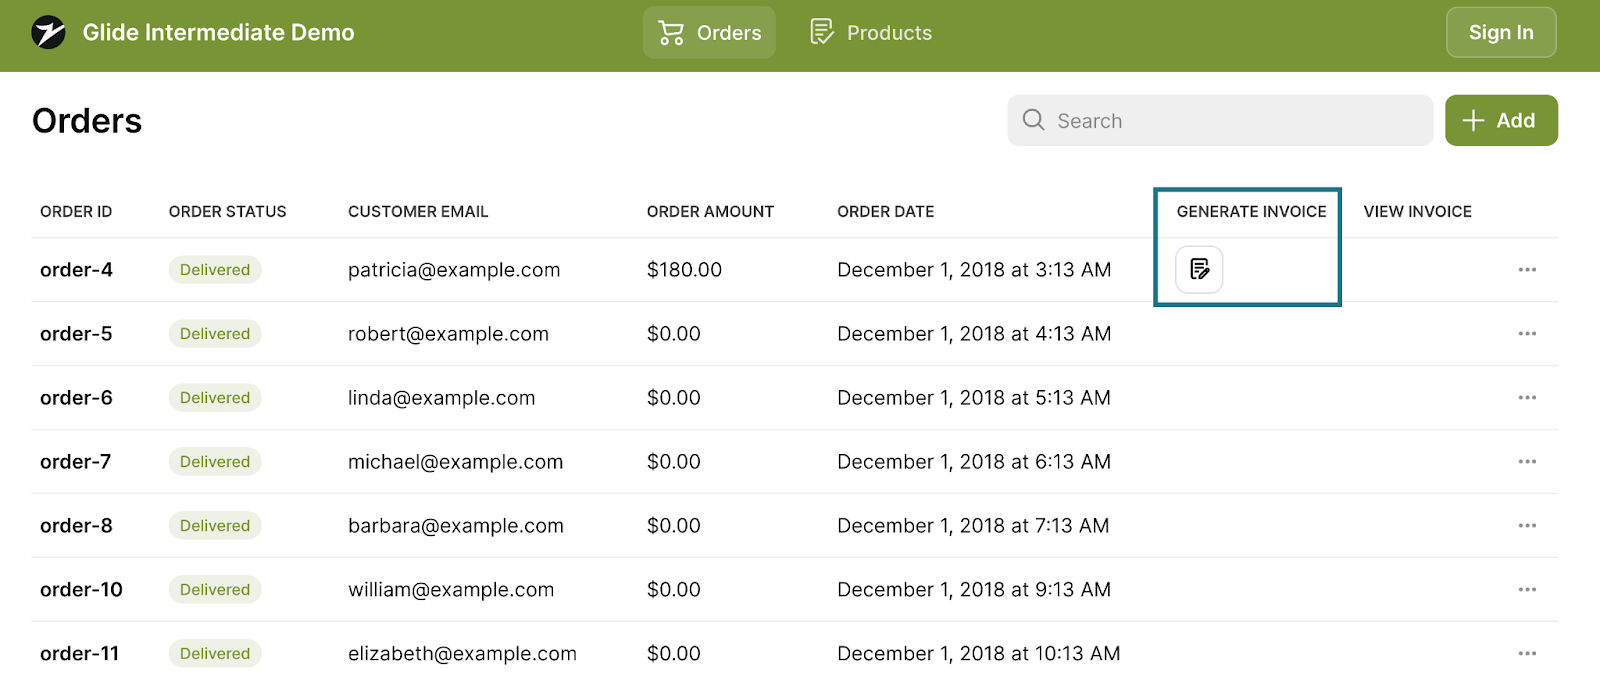
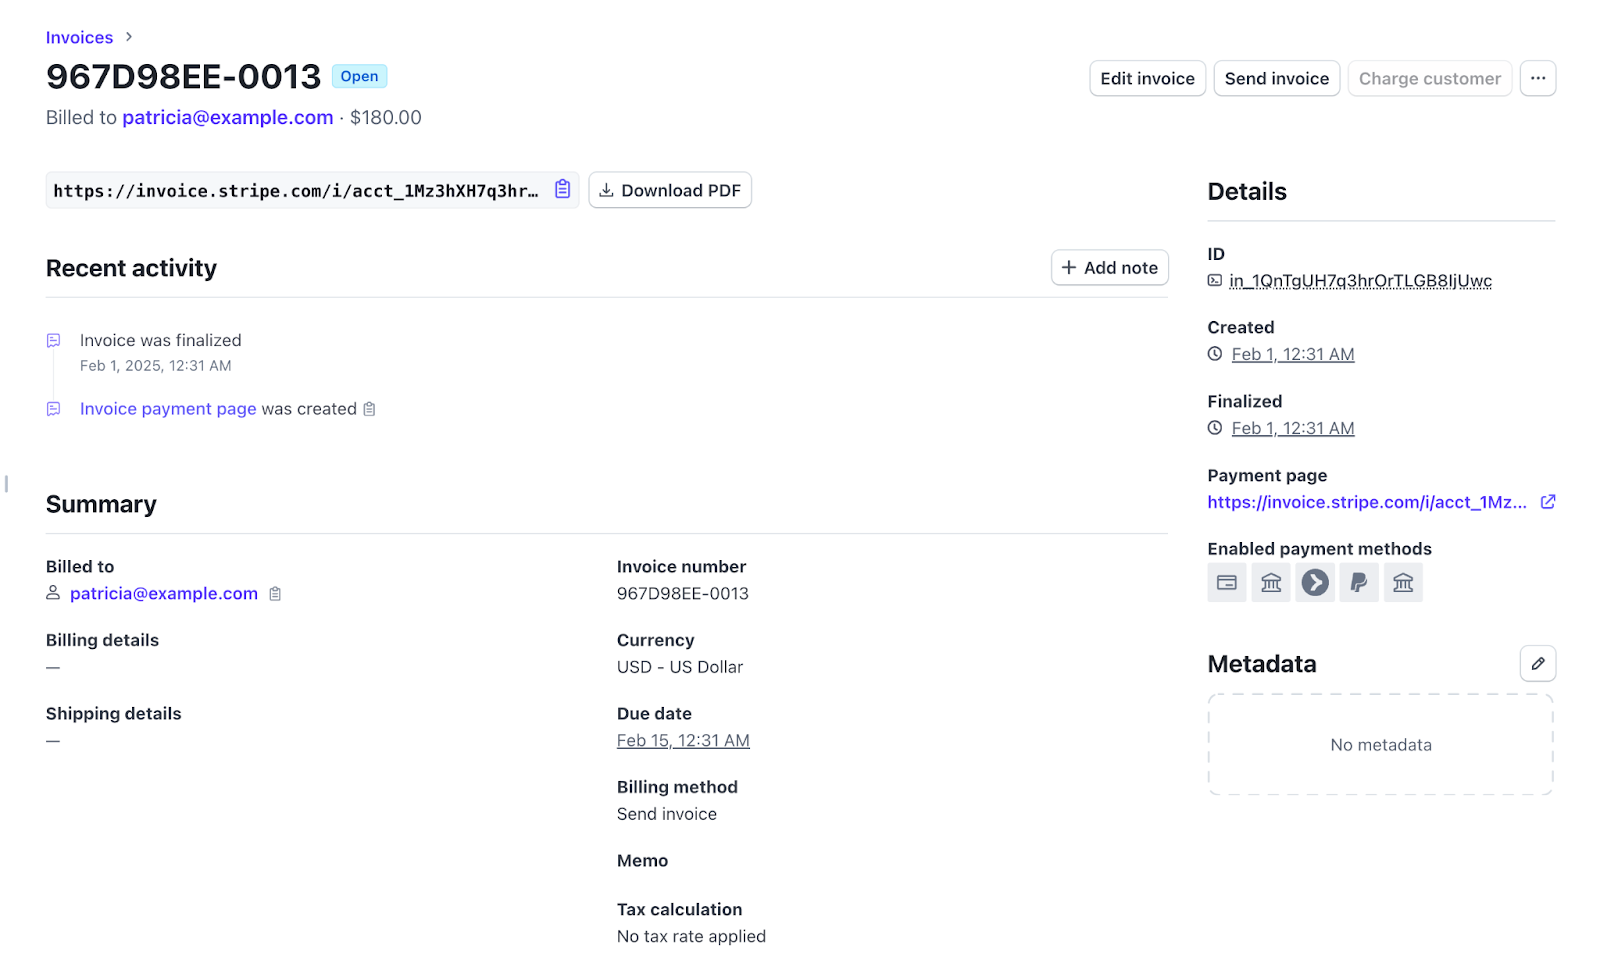
Now let’s test the integration to make sure everything is working correctly. Click the Generate Invoice button in the Generate Invoice column. This should create the invoice and automatically open it in Stripe.
In Stripe, you will need to click View invoice in test mode to see the invoice. This is because the integration is still using test mode. Once you connect Glide with your Live Stripe environment, this extra step will no longer be needed, and invoices will be visible immediately.

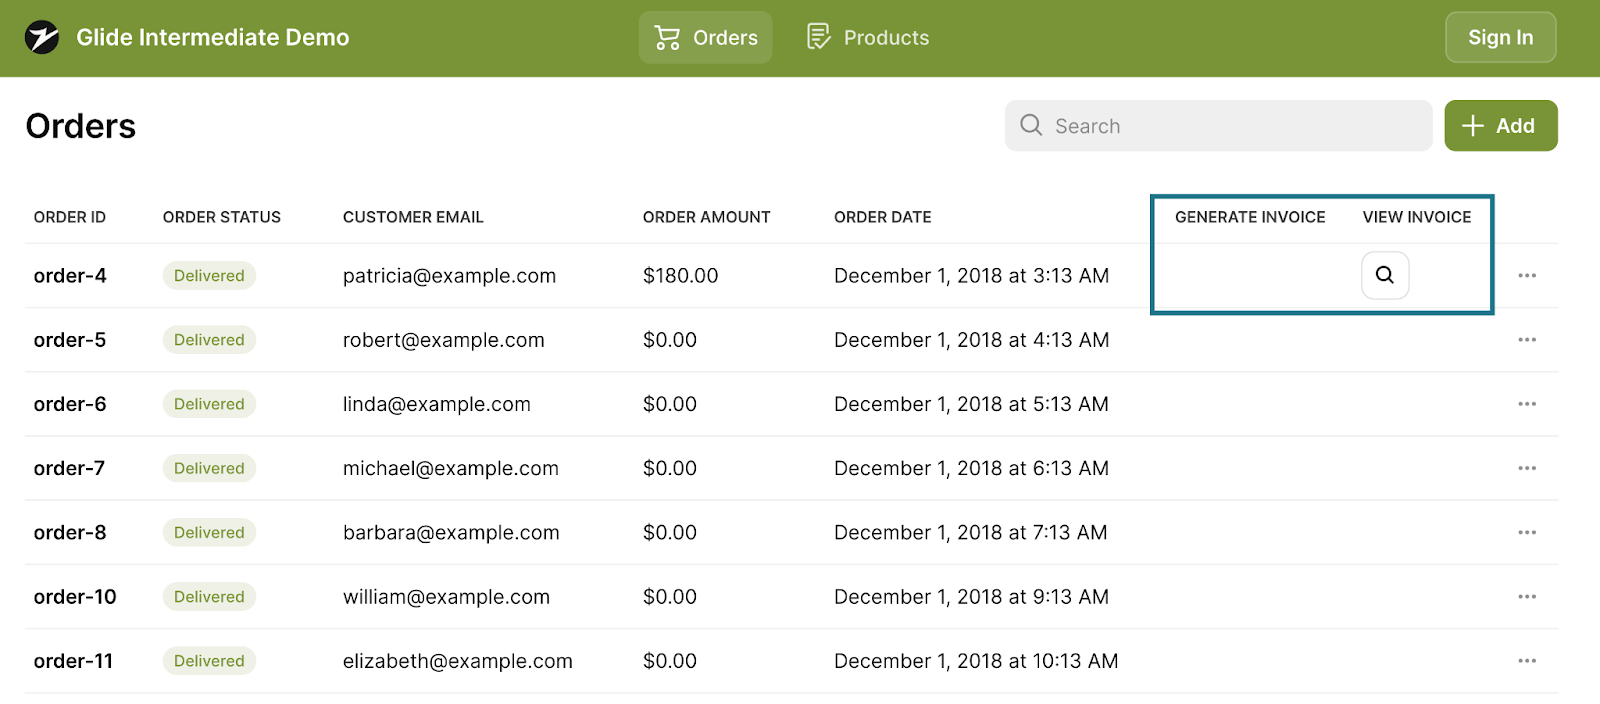
Back in Glide, the Generate Invoice button will disappear for the row where the invoice was created. This prevents users from accidentally generating multiple invoices for the same order. In its place, the View Invoice button will now appear.
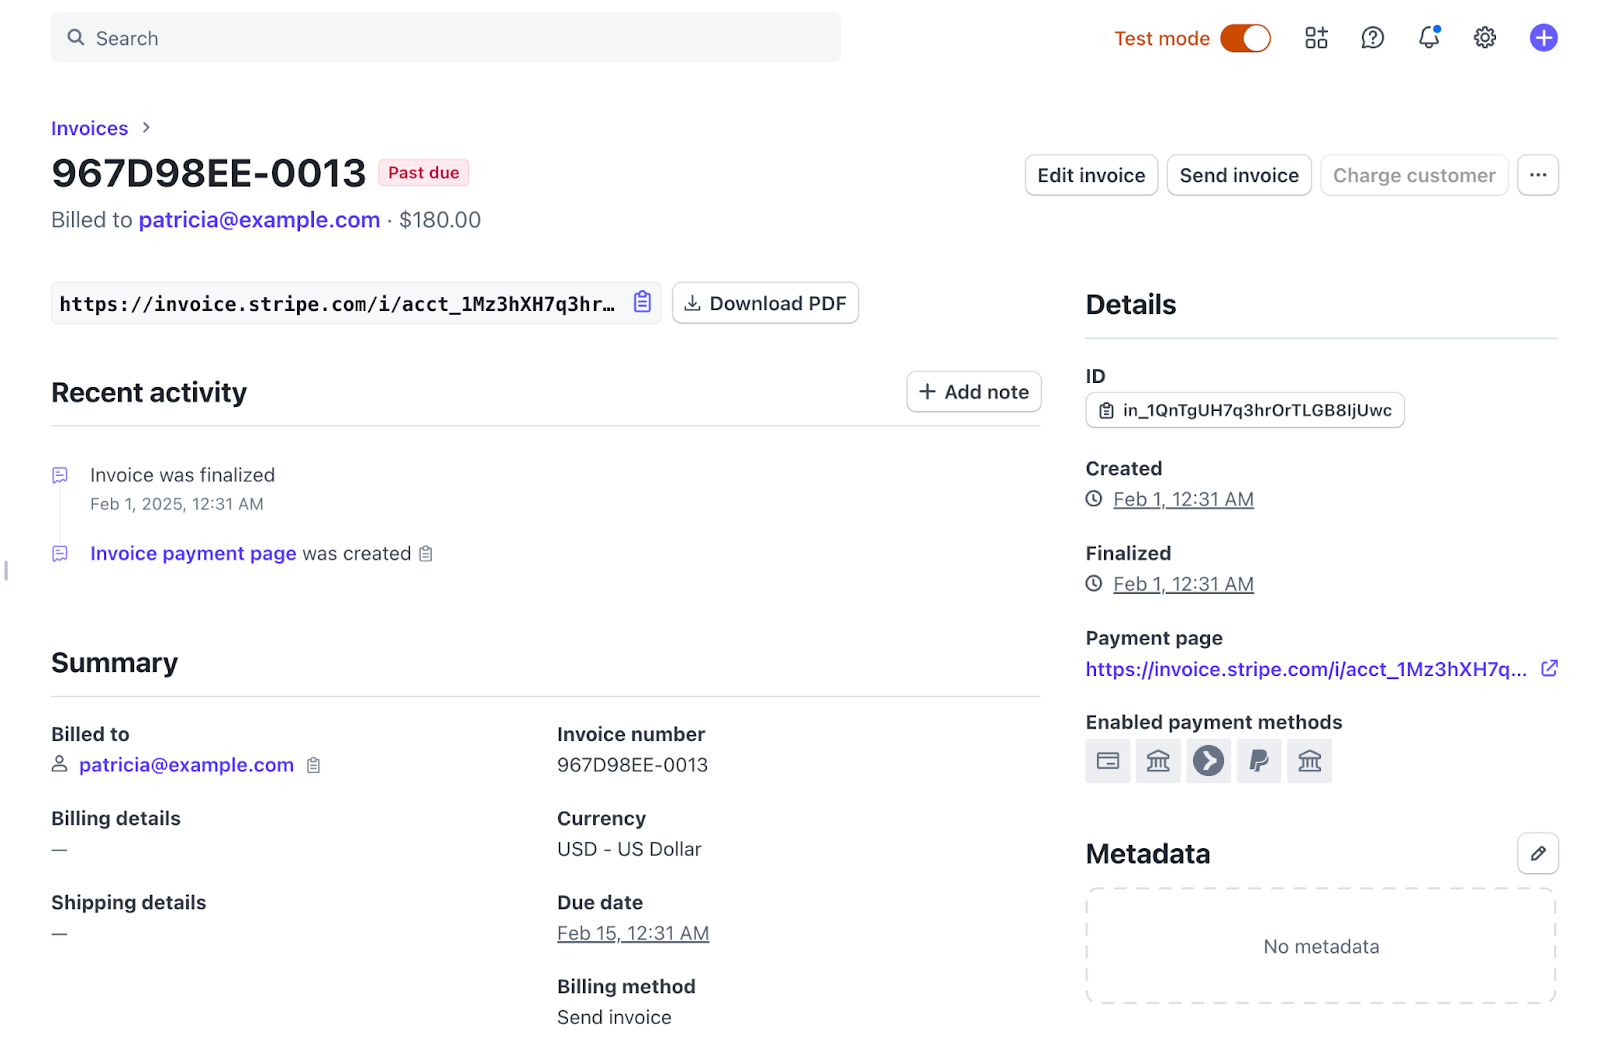
Clicking View Invoice will take you out of Glide and directly to the invoice in your Stripe dashboard (see below), allowing you to access it anytime. Now your integration is fully set up and ready to use!
To make this system even more fail-safe, you could add features like:
- Automatically update orders to ‘Invoiced’: when a Stripe invoice is generated, your Glide order record should reflect this change. You can automate this step to eliminate manual updates and keep everything in sync.
- Prevent Glide order edits once an invoice is issued: after an invoice is generated, you don’t want anyone making accidental changes to the order. You can implement a rule that locks the order record in Glide, preventing changes after Stripe has issued the invoice. This keeps your data accurate and avoids discrepancies.
You did it! Here’s what you could do next…
Now that your Glide + Stripe integration is in place, you can take automation even further with Glide’s new workflows feature. Features like scheduled triggers, webhooks, and email triggers mean you can automate everything from sending payment reminders to syncing invoice data with other applications.
Here are a few ways you can extend your Glide + Stripe integration:
- Reminders: automatically send invoice reminders to customers for unpaid invoices at specific intervals.
- Real-time sync: trigger updates in Glide whenever an invoice is paid in Stripe, ensuring real-time status updates in your app.
- Notifications: instantly notify customers via email when an invoice is generated, paid, or overdue.
- Reporting: generate and send financial reports to your team on a scheduled basis, keeping everyone informed, without manual work.
- Subscriptions: automatically handle recurring invoices by scheduling Stripe transactions directly from Glide.
These automations render your invoicing process simpler, more efficient, and completely hands-off, allowing you to focus on what matters most—growing your business.
Stay tuned for more ways to increase your business productivity!

