


In our previous Glide tutorial, we showed you how to turn your Google Sheets into a fully functional CRUD (Create, Read, Update, Delete) app using Glide. We covered all the basics, including connecting your data to Glide, building a user-friendly interface, and setting up user permissions to protect your data and control who can access or modify certain areas of the app.
By the end, you had a sleek, interactive order management app that made sorting your data more efficient than relying on Google Sheets alone. If you’re new to Glide, we recommend starting with our previous tutorial.
While useful, that order management app admittedly relied on a lot of manual processes, which left a large margin for error. So, today we’re going to build on that CRUD foundation with some more complex functionality that allows us to not only manage orders in our database, but include order details to break them down too.
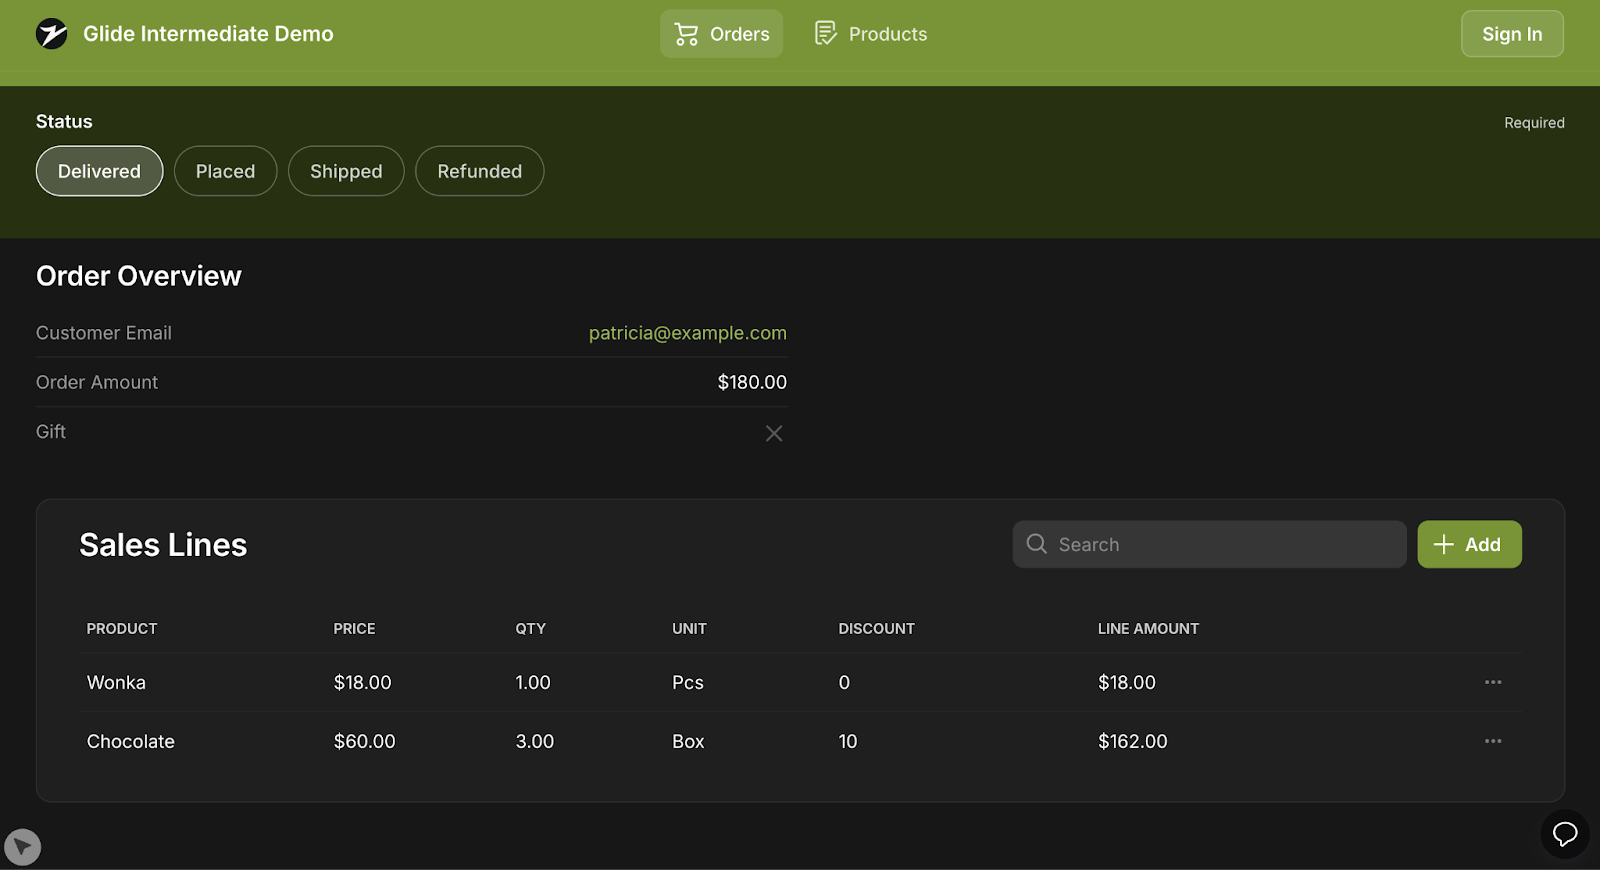
Here’s what our end product will look like:
What you’ll learn
This time, we’ll explore more advanced features like relations, lookups, and rollups to connect your data in smarter, more dynamic, and more meaningful ways.
By the end of this tutorial, you will have learned how to:
- Use relation fields and lookups in databases to pull in data from a different database and avoid duplicates.
- Perform calculations on these fields using rollups.
- Create an order CRUD with nested order details (Sales Lines).
- Create a more complex UI that allows for CRUD actions across several databases.
We will use the specific example of an order management dashboard in this tutorial, but the principles we discuss can be applied to most simple use cases.
Backend design: setting up more complex databases
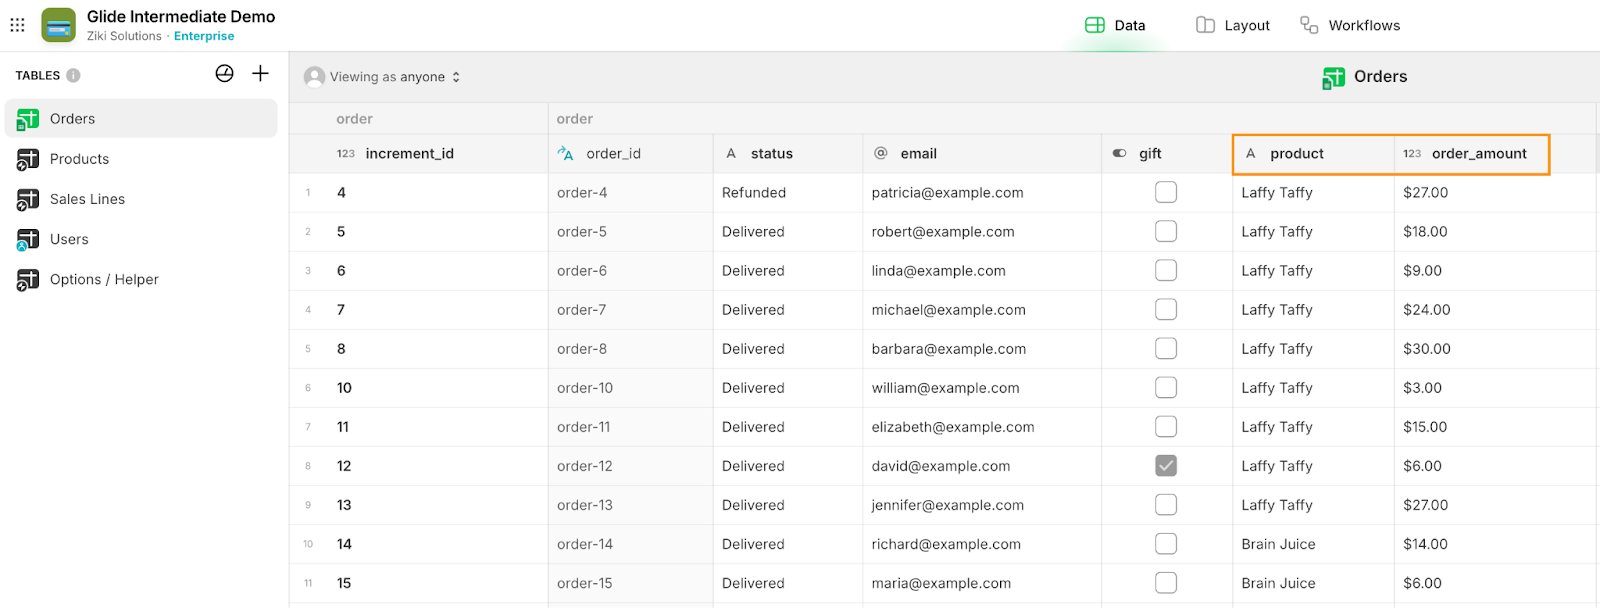
In our first tutorial, our database architecture was fairly simple. We had an Orders table where each order was linked to a single product and was assigned a total order amount. This setup works well for straightforward tracking, but what if you need to handle more complex scenarios—like tracking multiple products within a single order, managing inventory for each product, or analyzing trends across different products and categories?
In those cases, our previous, simple architecture won’t cut it. We’ll need to build on the initial setup, introducing features like relations, lookups, and rollups to connect your data more intentionally and unlock better reporting capabilities, giving you a clearer and more detailed picture of your data.
Here’s what we’ll add onto our simple architectural structure today:
- A Products database to define product pricing and metadata.
- A Sales Lines database to act as an intermediary between orders and products, allowing us to add discounts to individual products.
- Rollups and lookups to summarize data at the order level, replacing static data like order_amount with dynamic calculations based on product pricing and discounts at the sales line level.
We’ll also update our layout to ensure the changes in database architecture are reflected in the app’s user interface, making it intuitive and aligned with the new data structure.
Designing a Products database
As we mentioned, our new products table will define the product pricing and metadata.
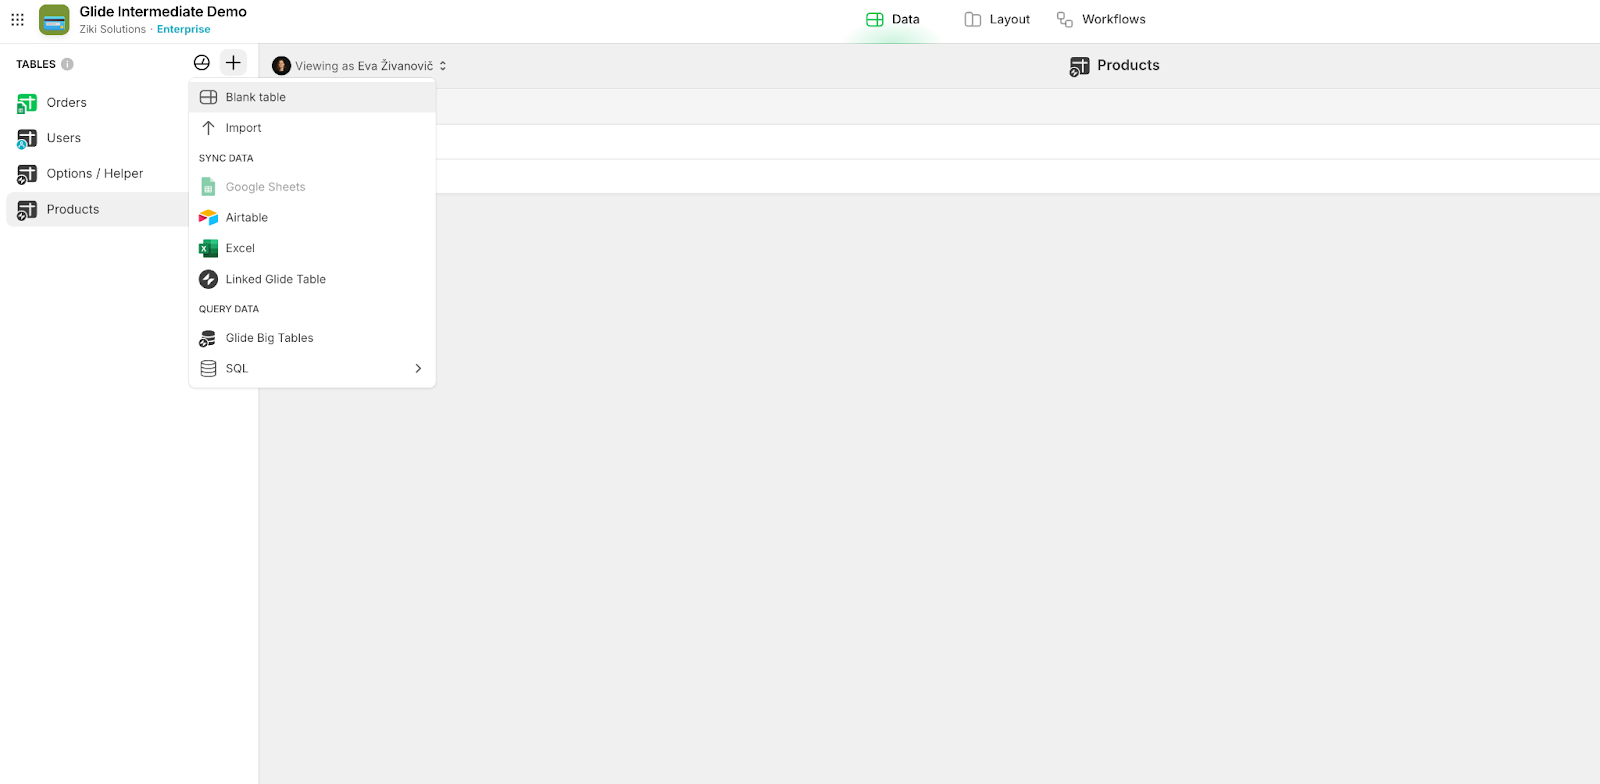
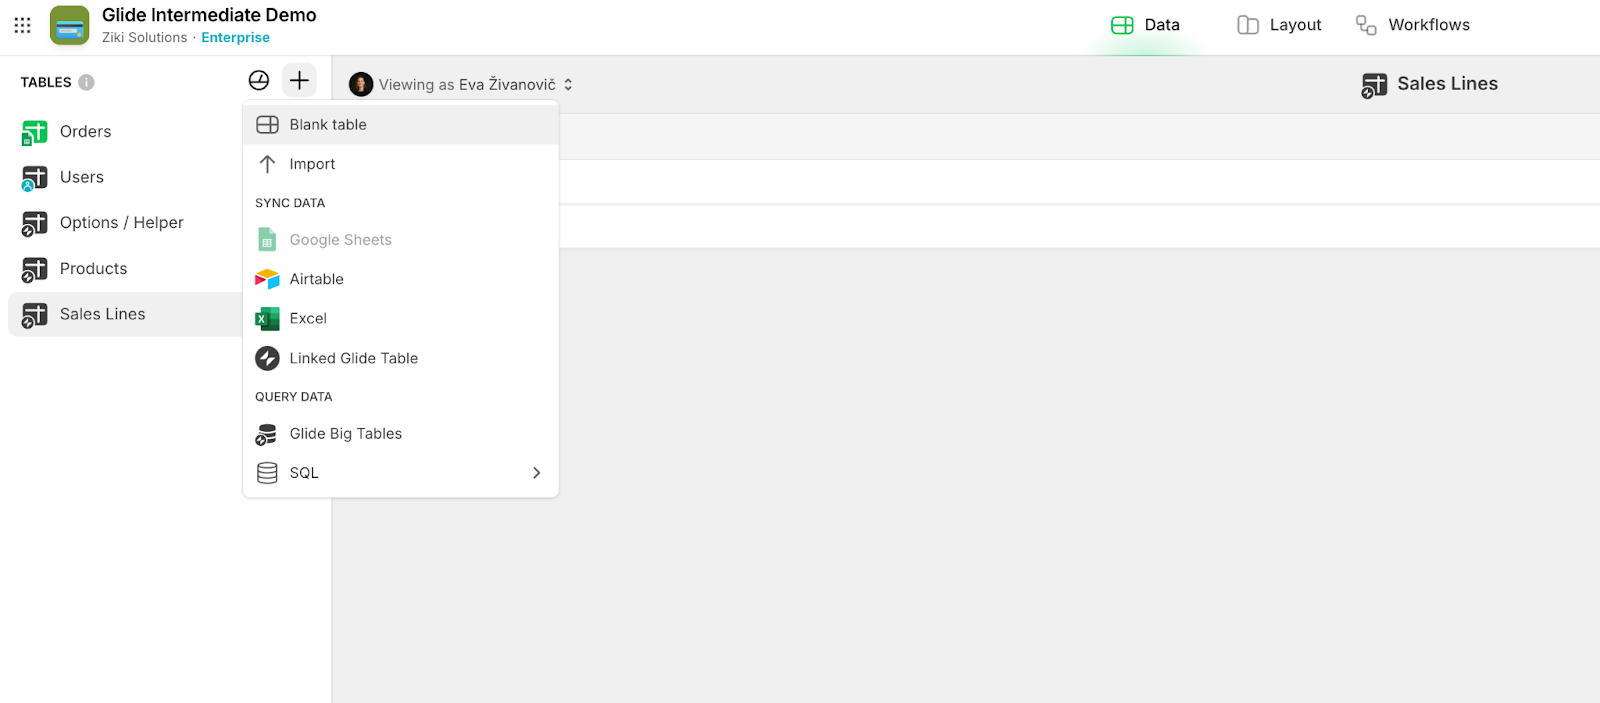
Start by adding a new table using the + sign in the Tables section, then select Blank table. Rename the table to “Products”.
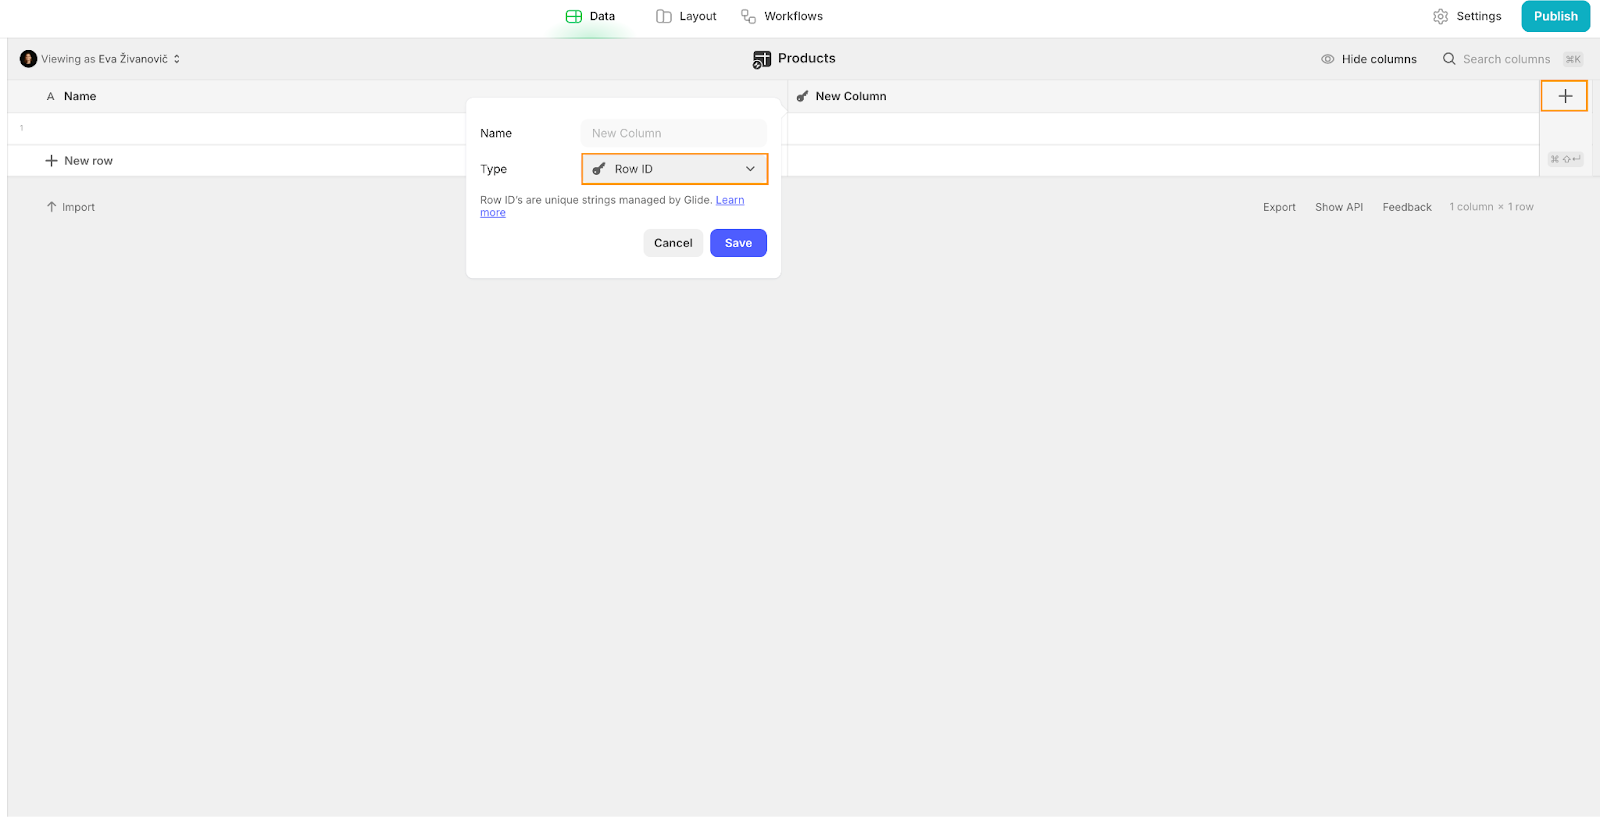
Next, we’ll add a Row ID column. This column automatically generates a unique identifier (UUID) for each row in the database, ensuring each record is distinct and easy to reference. These IDs will be used later to create relationships between Sales Lines and Products. Click the + sign in the top-right corner of the table, select Row ID as the column type, and click Save.
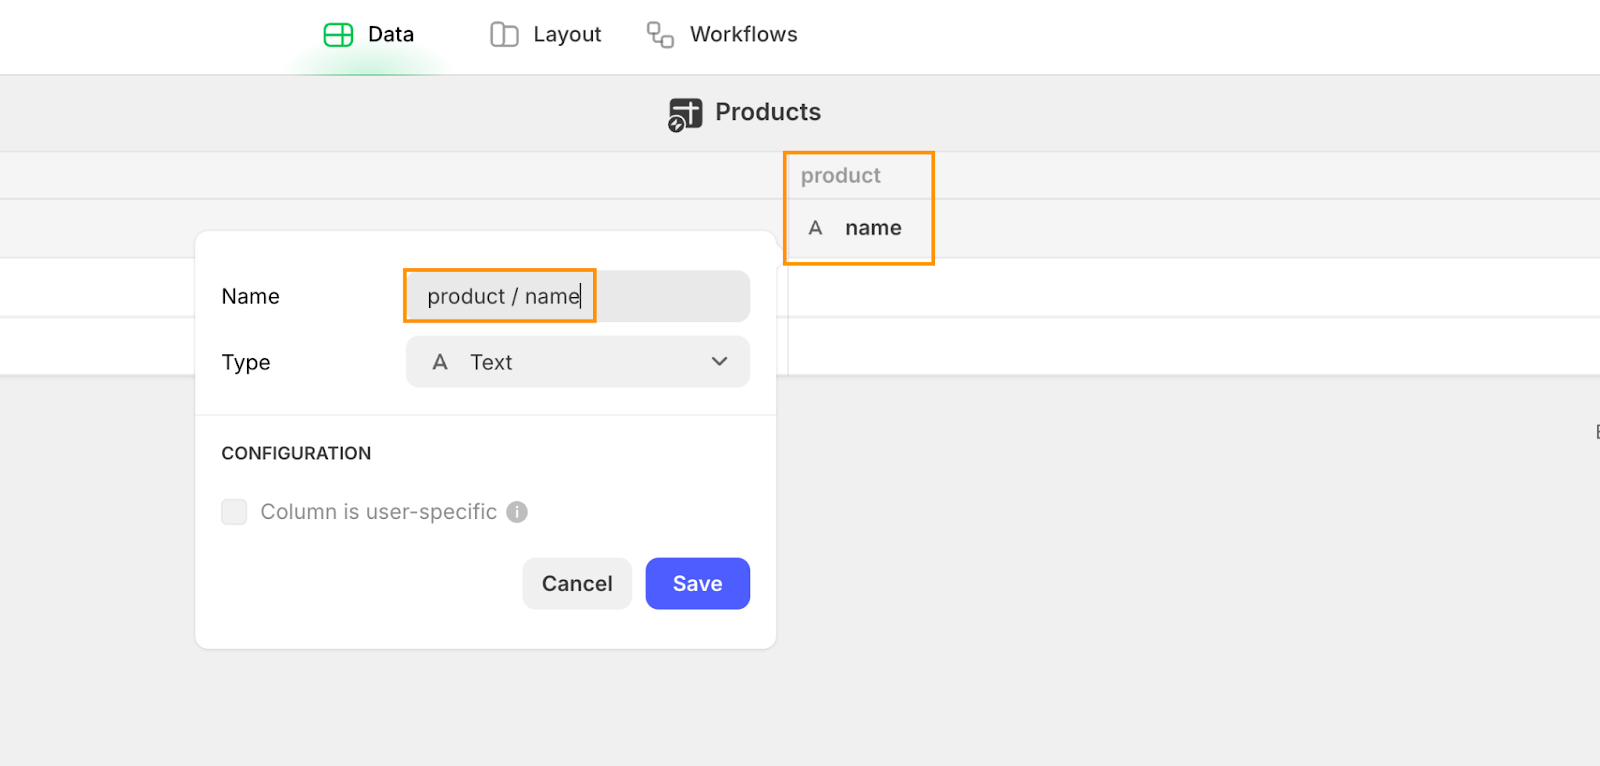
Rename the Name column to “product / name” by clicking the down arrow on the column, selecting Edit, and updating the name, then click Save.
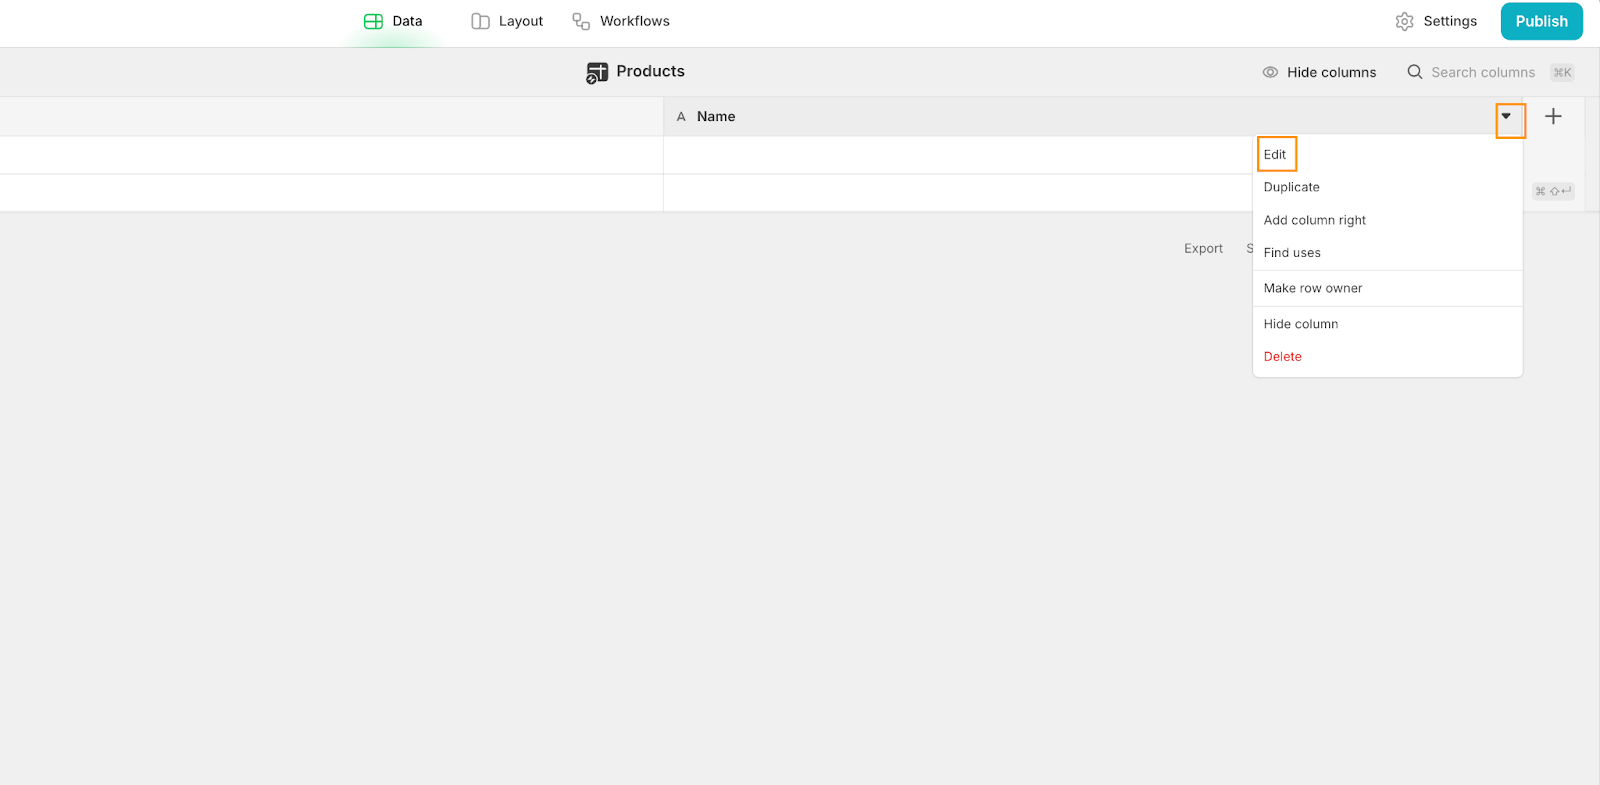
This naming convention helps group related columns, which makes your database easier to manage as it grows in complexity.
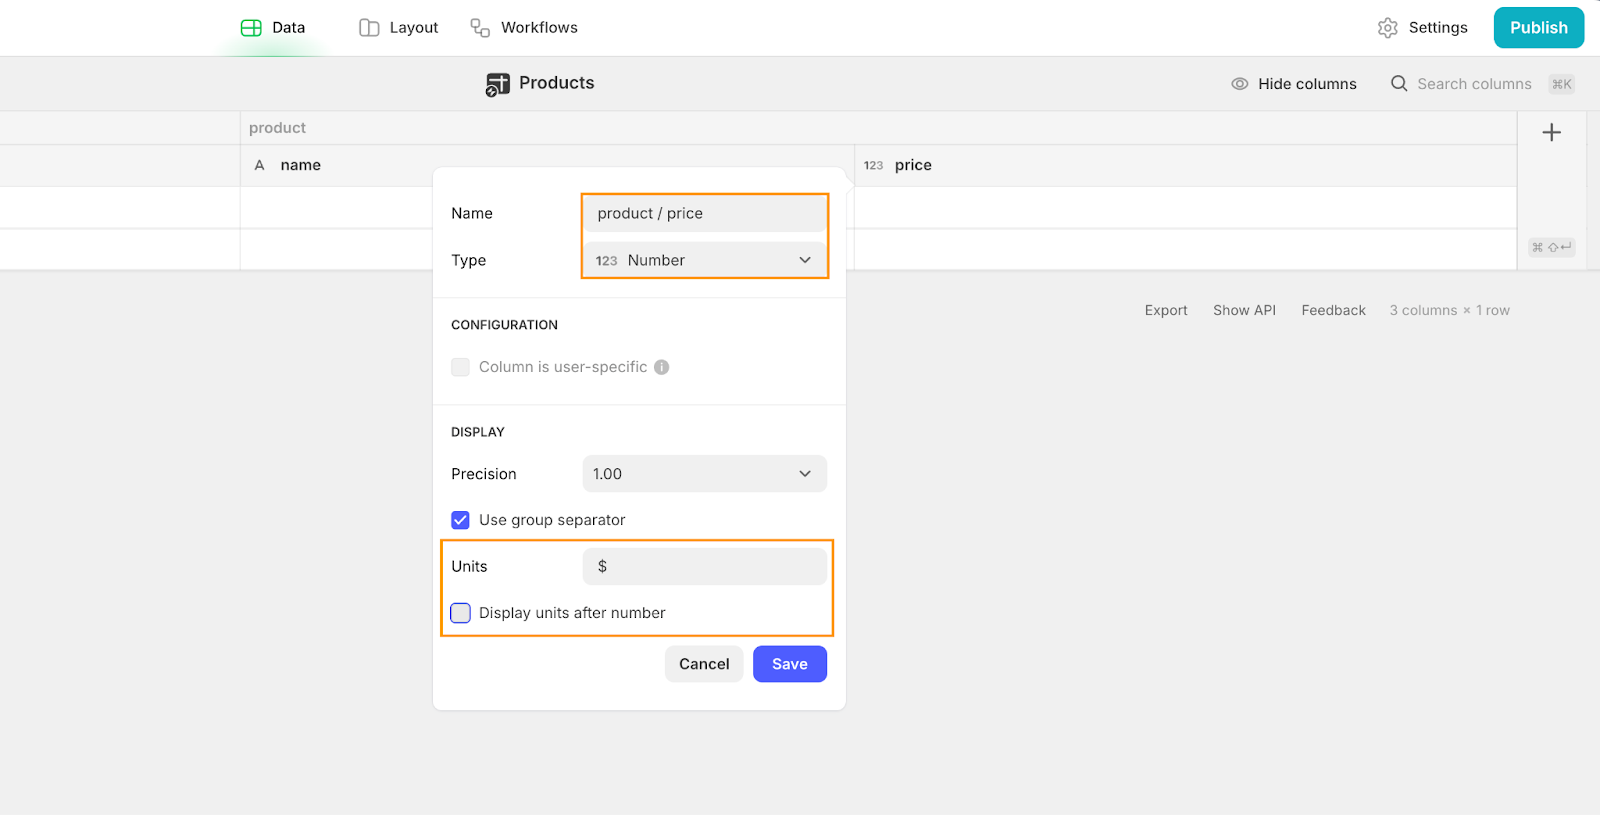
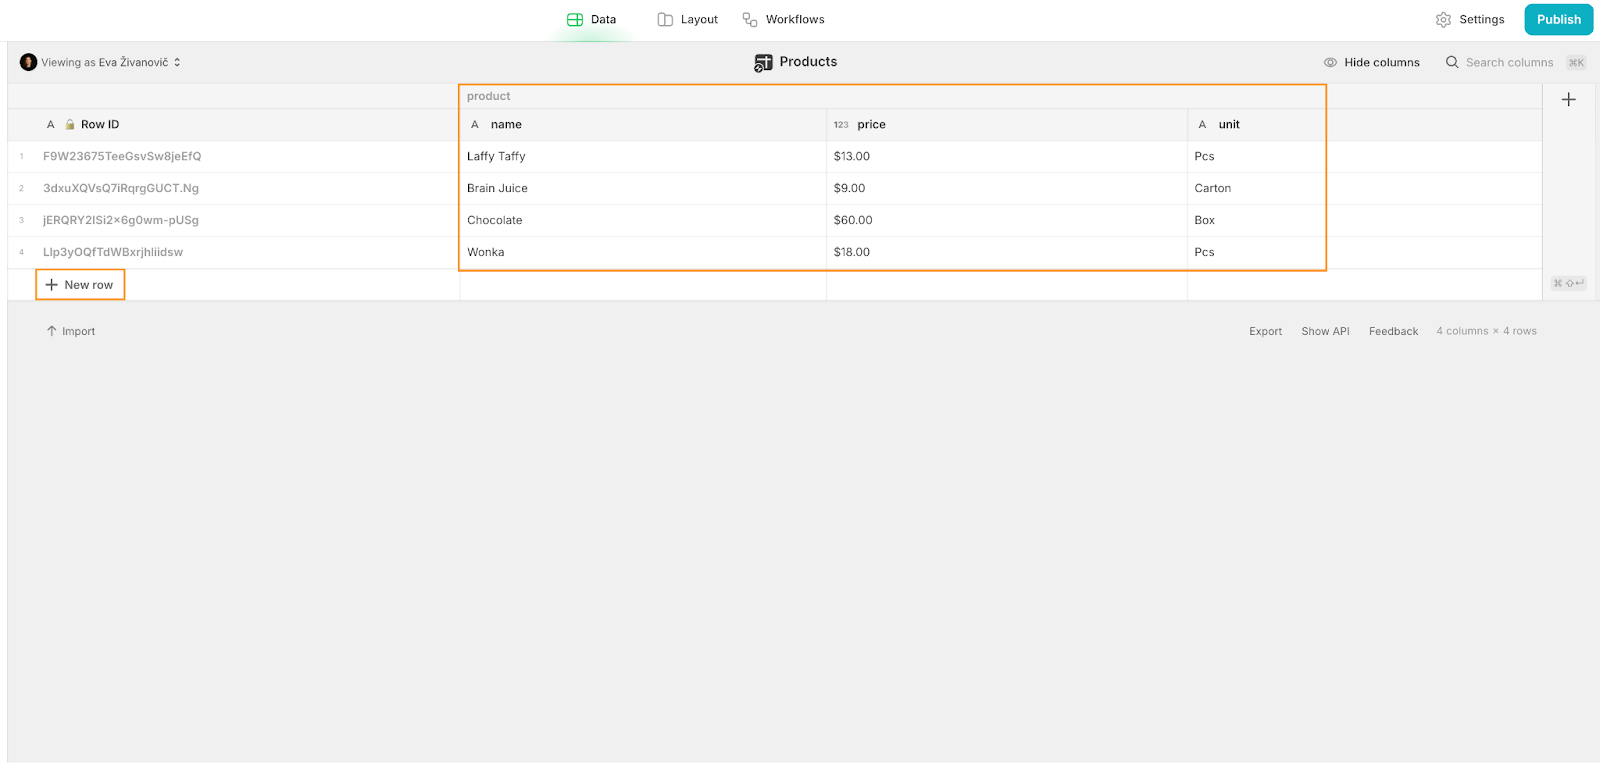
Next, add a new column, set the type to Number, and rename it to “product / price”. Choose a unit for the product price and uncheck the Display units after number checkbox (this controls whether the unit appears before or after the value). Leave the precision set to 2 decimal places and click Save.
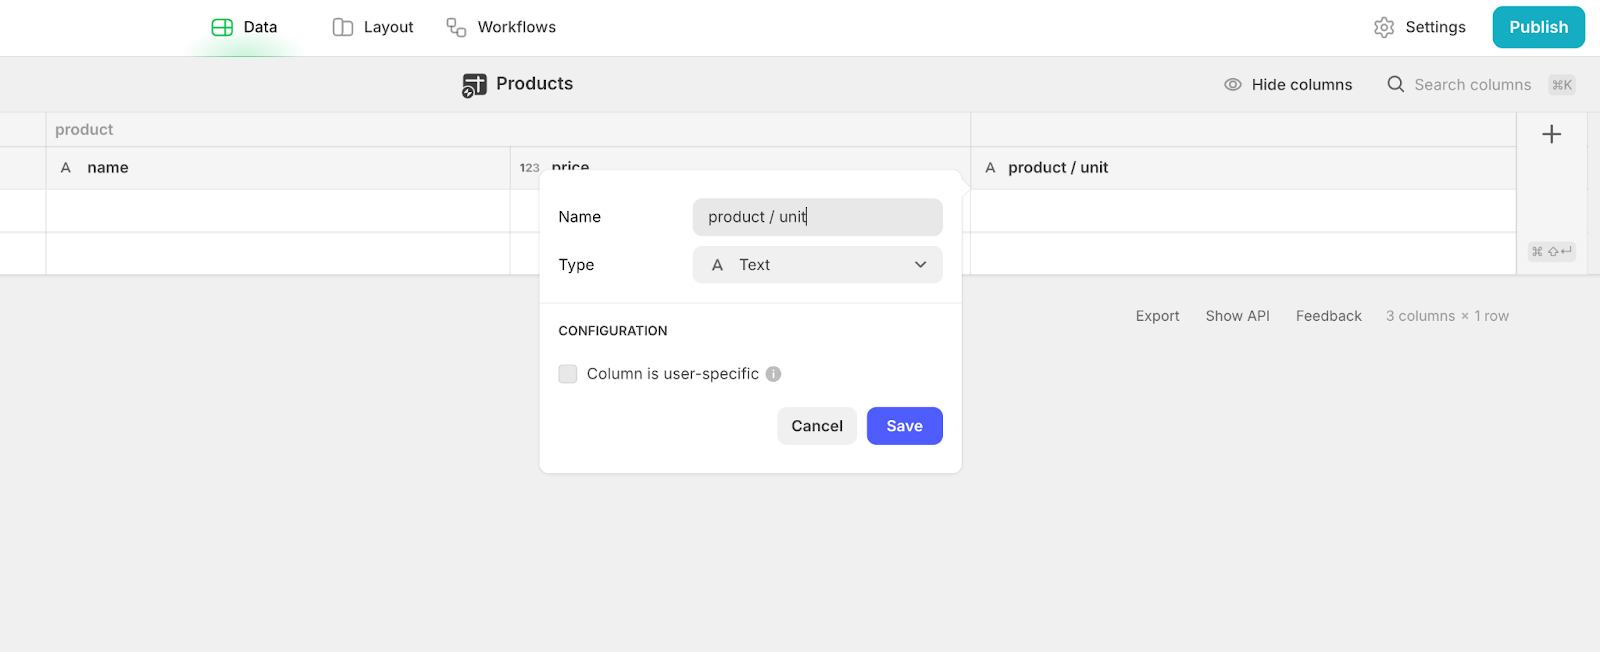
Finally, add a new Text column for the unit of measurement, name it “product / unit”, and click Save.
Once your columns are set up, add some demo products to the table using the + New Row button. For each product, enter the name, price, and unit.
Design a Sales Lines database
Now, let’s set up the Sales Lines database. This table will act as an intermediary between orders and products, summarizing the individual orders of each product and calculating the total value of each line. This table will also allow us to add discounts to individual products and calculate the new total value.
Create another blank table using the + sign in the Tables section, and rename it to “Sales Lines”.
We recommend adding a Row ID column to all main tables (no need to do it in helper tables, though, as they only define dropdown options). Row IDs are useful for automations, integrations, querying, and creating relationships. Add a new column, set the type to Row ID, and click Save.
When setting up this table, think about the typical details you’d see in an invoice. Sales lines usually include product, quantity, unit, sales price, discount, and line amount. We’ll stick to these core fields for now.
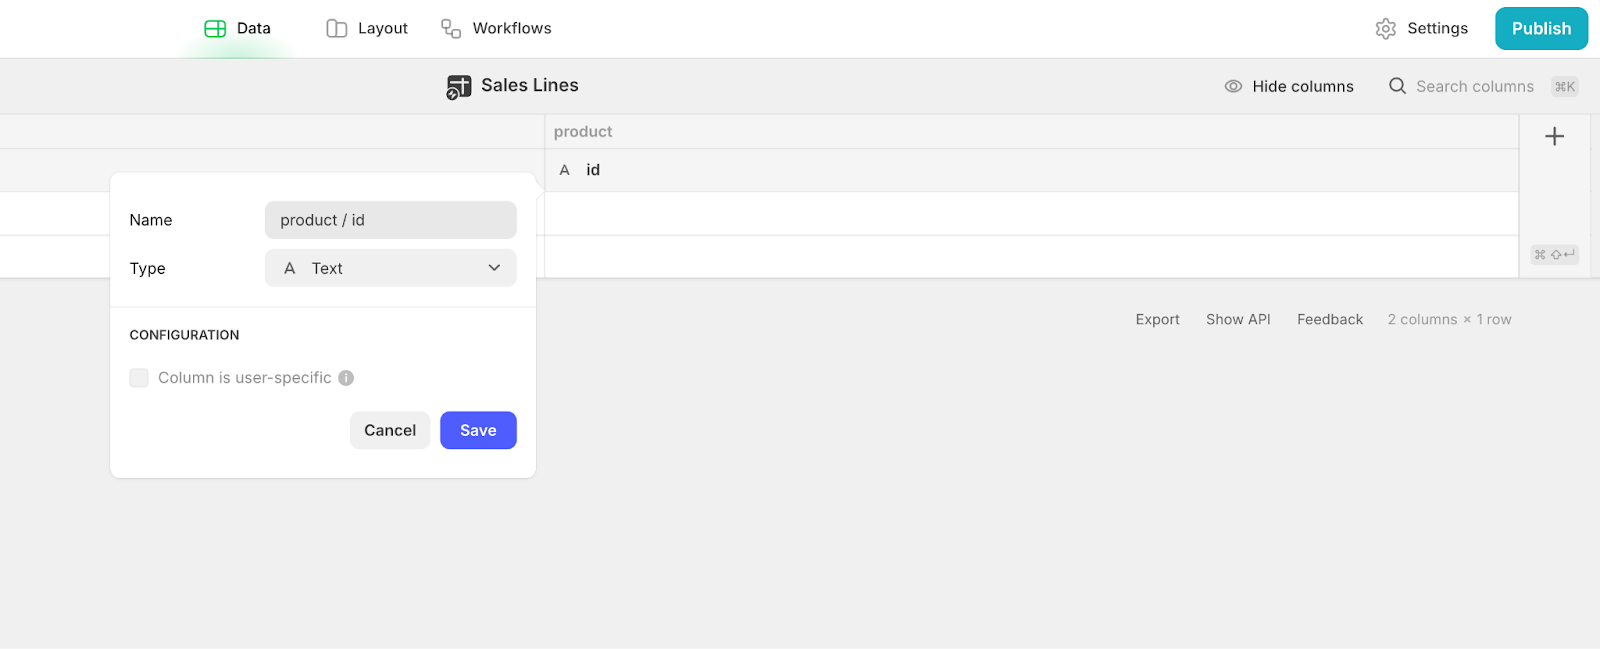
First, rename the Name column to “product / id” by clicking the down arrow on the column, selecting Edit, updating the name, and clicking Save. This column will store the product ID to link Sales Lines with Products.
Nevertheless, to avoid duplicating the product info we already have in our products table, we’re going to use relations to link these to our Sales Lines table.
How 'Relations' work in Glide
Relations are essentially connections between items from different tables. For example:
- An order has multiple sales lines.
- A sales line creates a link between an order and a product.
- A product belongs to a product category.
In Glide, relations are created by matching a value from one table with a value in another table. You might be familiar with these if you’ve worked with Notion or Airtable.
For example, the product / id column in the Sales Lines table is where we’ll store the product ID the Sales Line pertains to. To set up the relation, you just need to copy and paste the row ID from the products table to this cell. Later, we’ll set this up in the interface to connect automatically.
You can use any column to establish a relation (like the product name), but we recommend using unique IDs. Here’s why:
- Unique IDs prevent errors: If two products share the same name, the unique IDs ensure there’s no conflict.
- IDs stay consistent: If a product name changes, the ID remains the same, keeping the relation intact. If you used a product name to establish a relation, the relation would break in case you change the product name.
This approach ensures your relations are both reliable and scalable.
Now that you understand how relations in Glide work, let’s connect some of the key Products information to Sales Lines.
Build a one-to-one relation between sales lines and products
Now you’ve set up the product/id column to establish the product you’ll be connecting to, we can start pulling in some of the data saved in the products table.
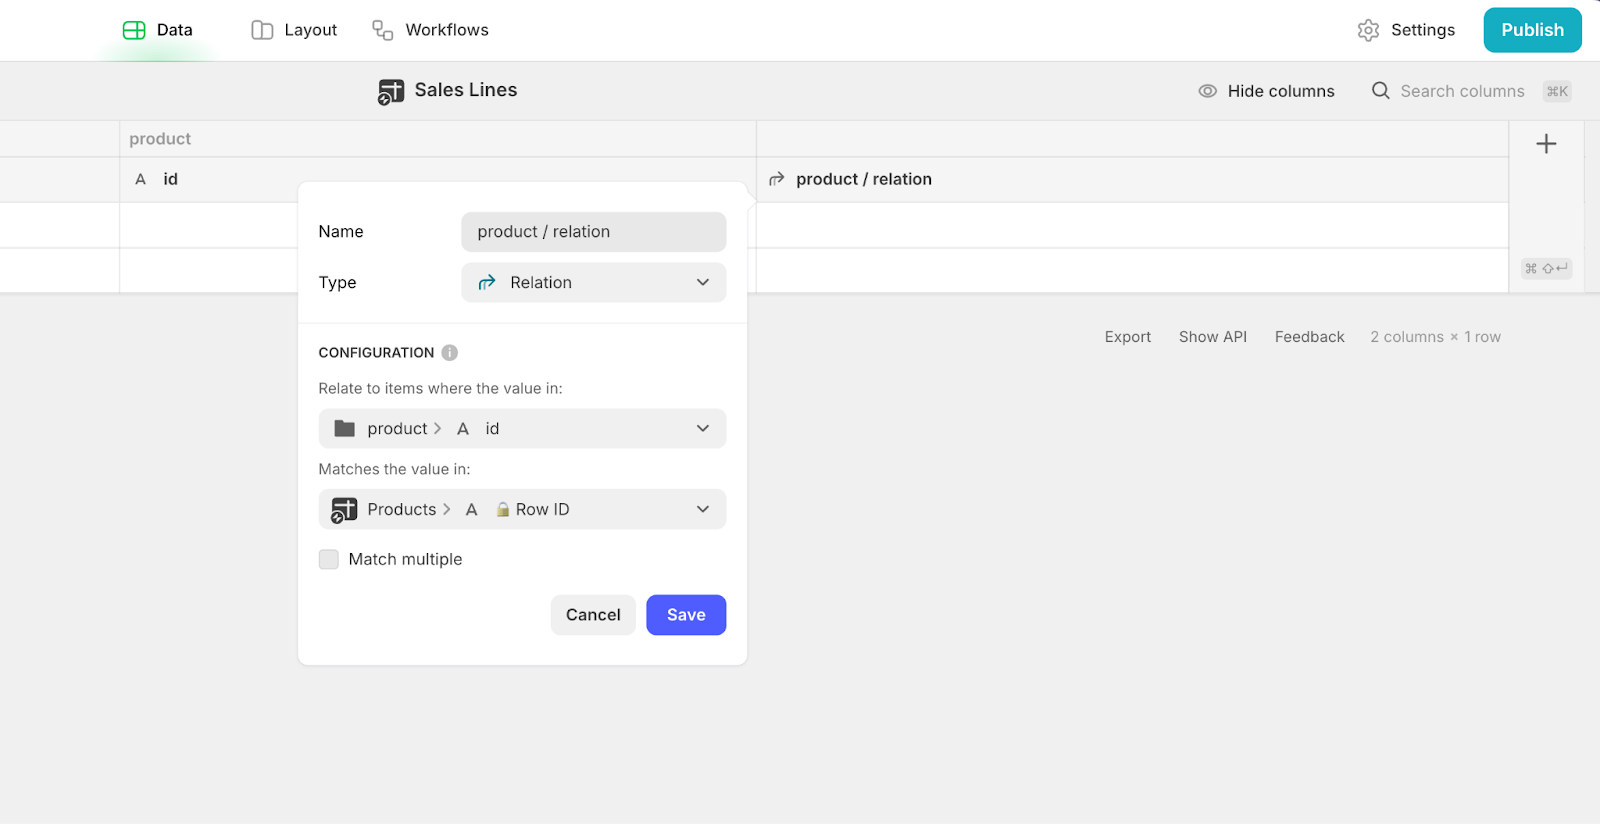
Start by adding a new Relation column and name it “product / relation”:
- Under Relate to items where the value in, select the product / id column.
- Then, under Matches the value in, choose Products table > Row ID column.
- Leave Match multiple unchecked.
- Click Save.
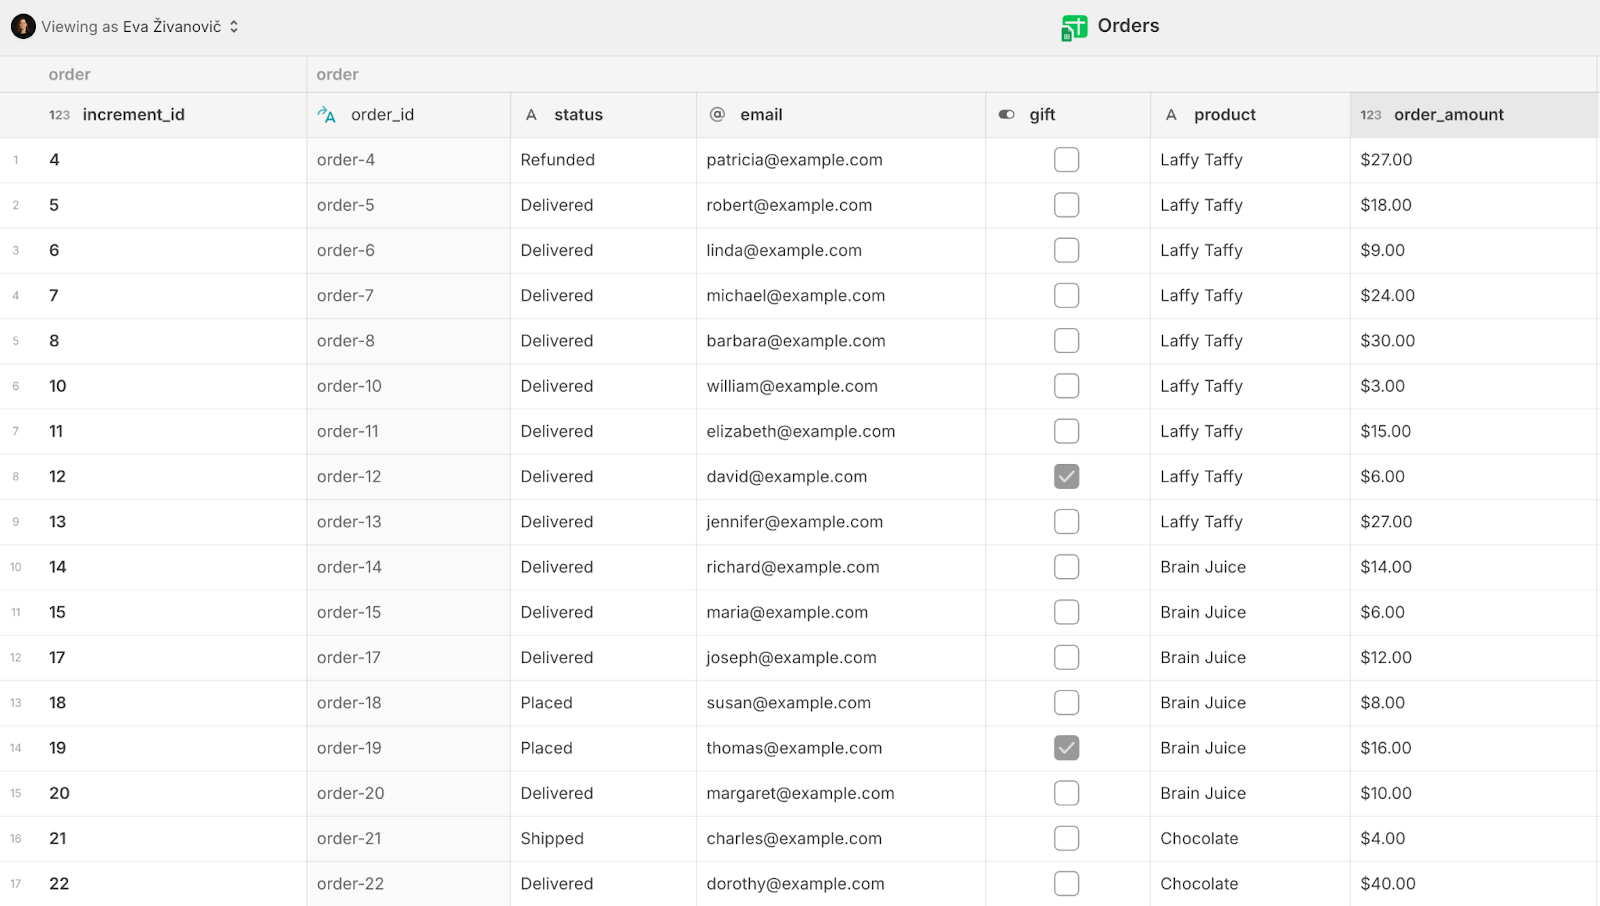
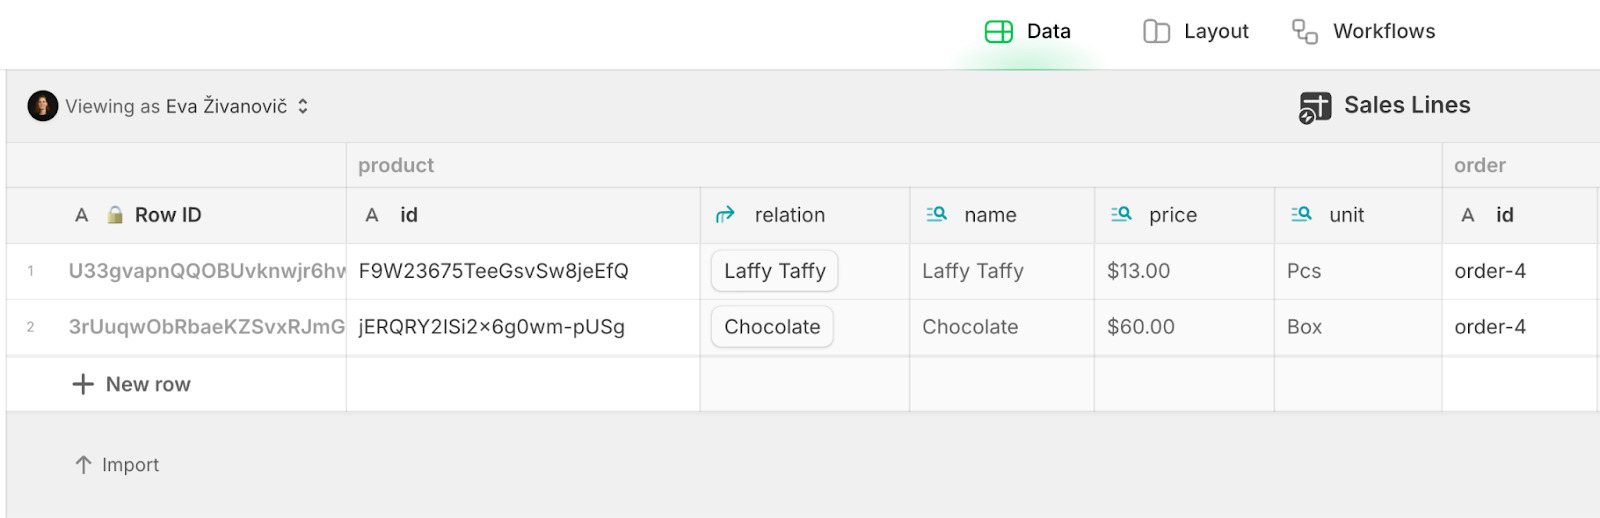
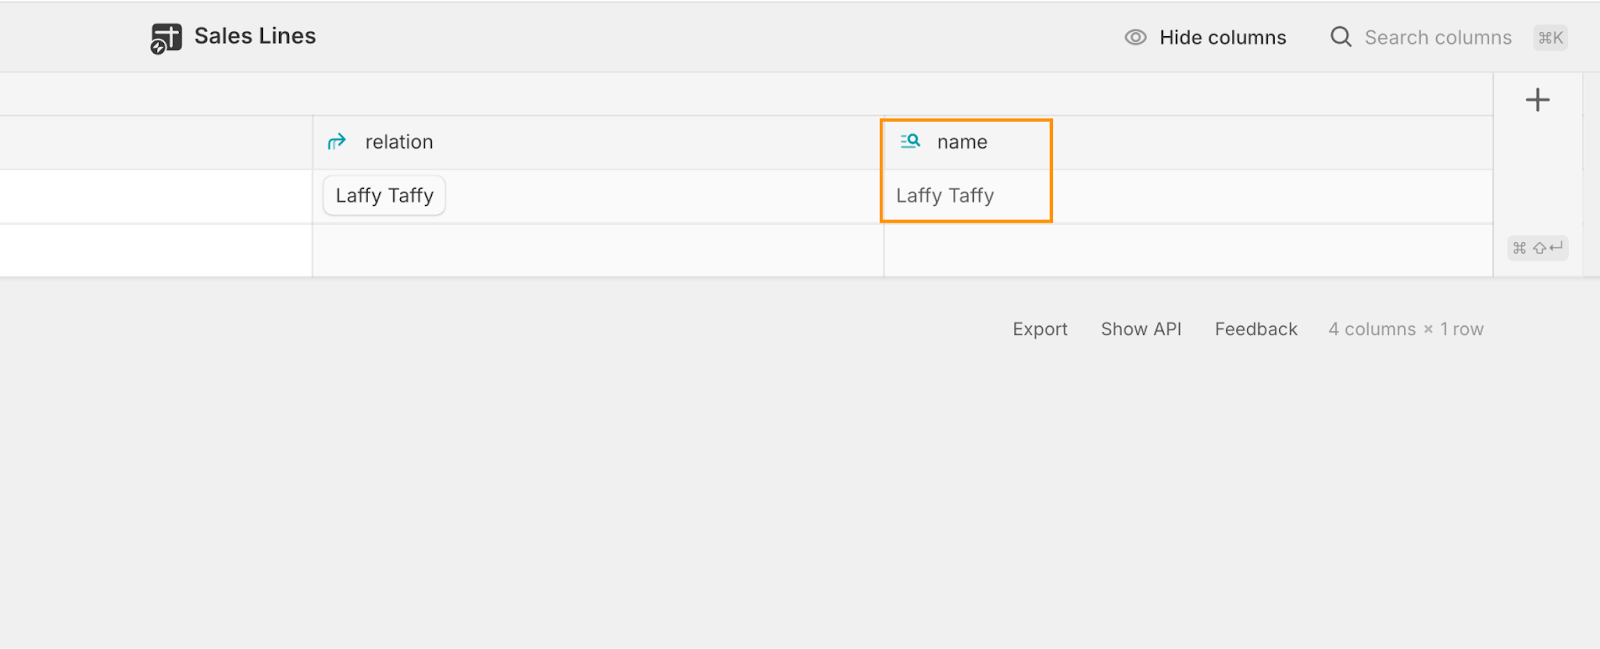
To test if the relation works, go to the Products table, copy the value of the Row ID for the Laffy Taffy product, and paste it into the product / id column in the Sales Lines table. If you set up the relation correctly, you should see the link established and the product name returned

Use Lookups to extract product details
To display the product name in the frontend interface and calculate the line amount, we’ll use Lookup columns to pull in additional product details from the related Products table.
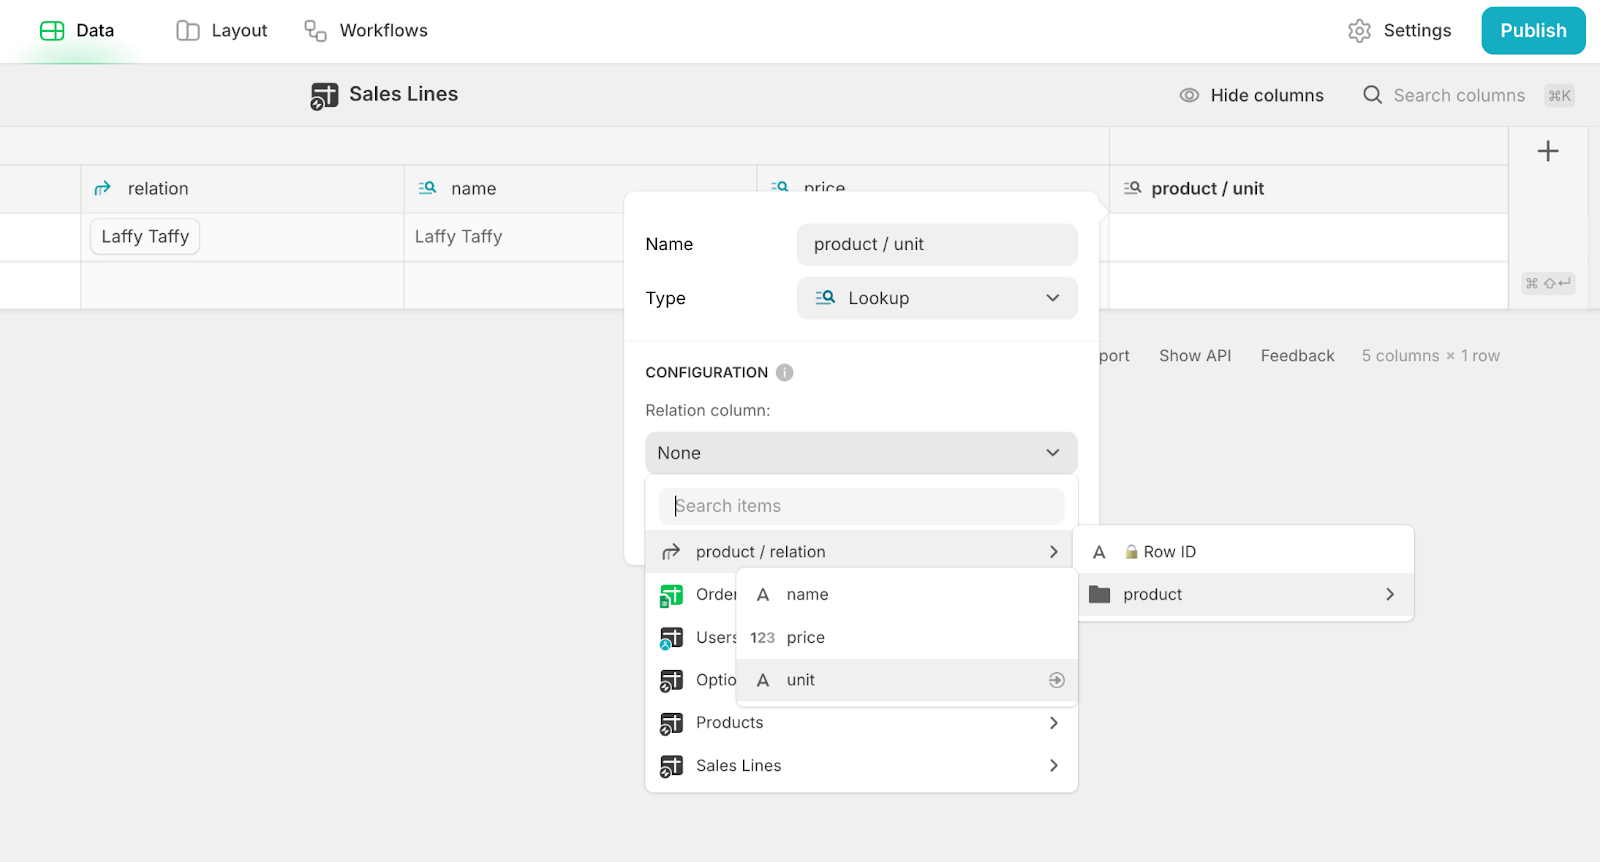
- Add a new column, and select Lookup as the type.
- Name the column “product / name”.
- Under the Relation column, select product / relation > product > name.
- Click Save to confirm the setup.
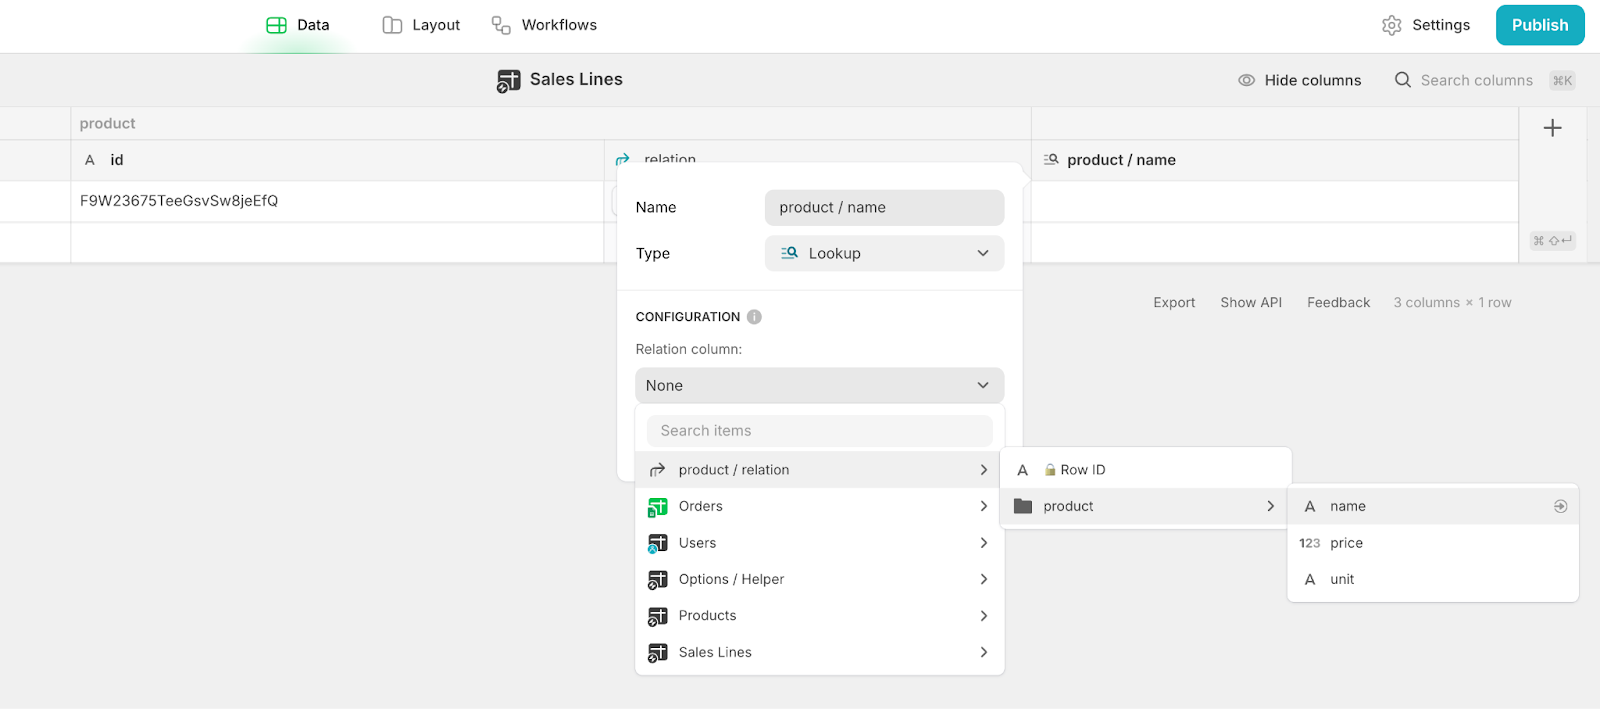
This will automatically retrieve the name of the related product based on the linked Product record.
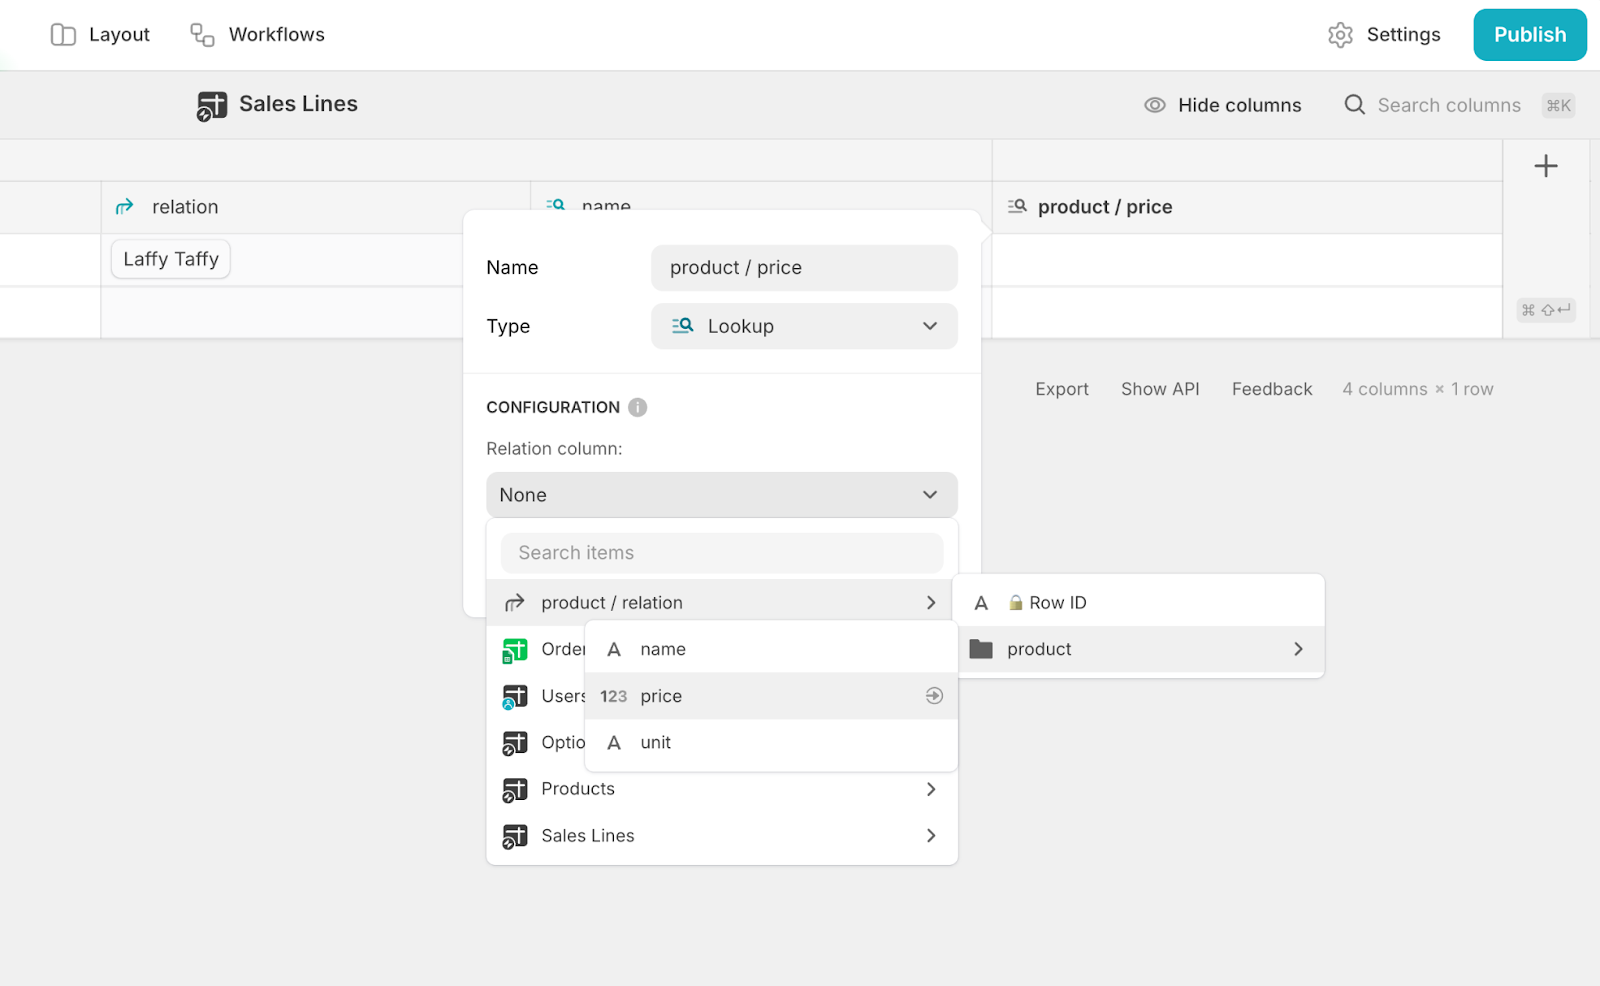
Create two more lookup columns using the same steps, but point them to different properties in the Products table:
- product / price: Pulls in the product price.
- product / unit: Pulls in the product unit.
These lookups eliminate the need to manually add this information for each sales line—Glide will automatically populate it based on the selected product. Performing relations in this way means having a single source of truth and avoids outdated data that has been duplicated in many places.
Product price:
Product unit:
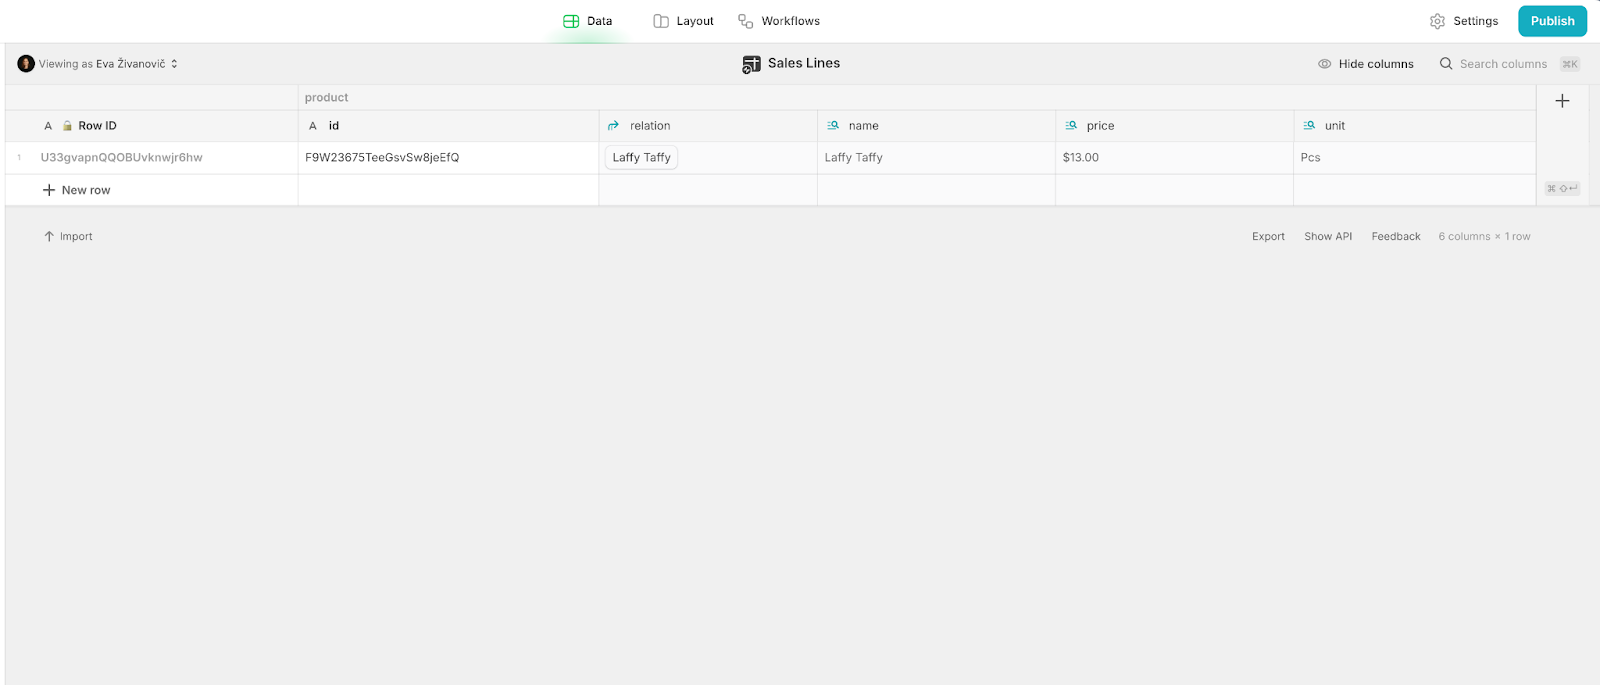
Your Sales Lines table should now look something like this:
Build a one-to-one relation between sales lines and orders
Now that we’ve connected to products, the next step is to create a relation to the Orders table. This is the table we built in the first tutorial to build out our CRUD. We’re going to use this table to summarize our orders, which is why we will add in columns to calculate the total sum of the Sales Lines.
The process is similar to the one we used for products:
Add a new Text column, name it “order / id”, and click Save.
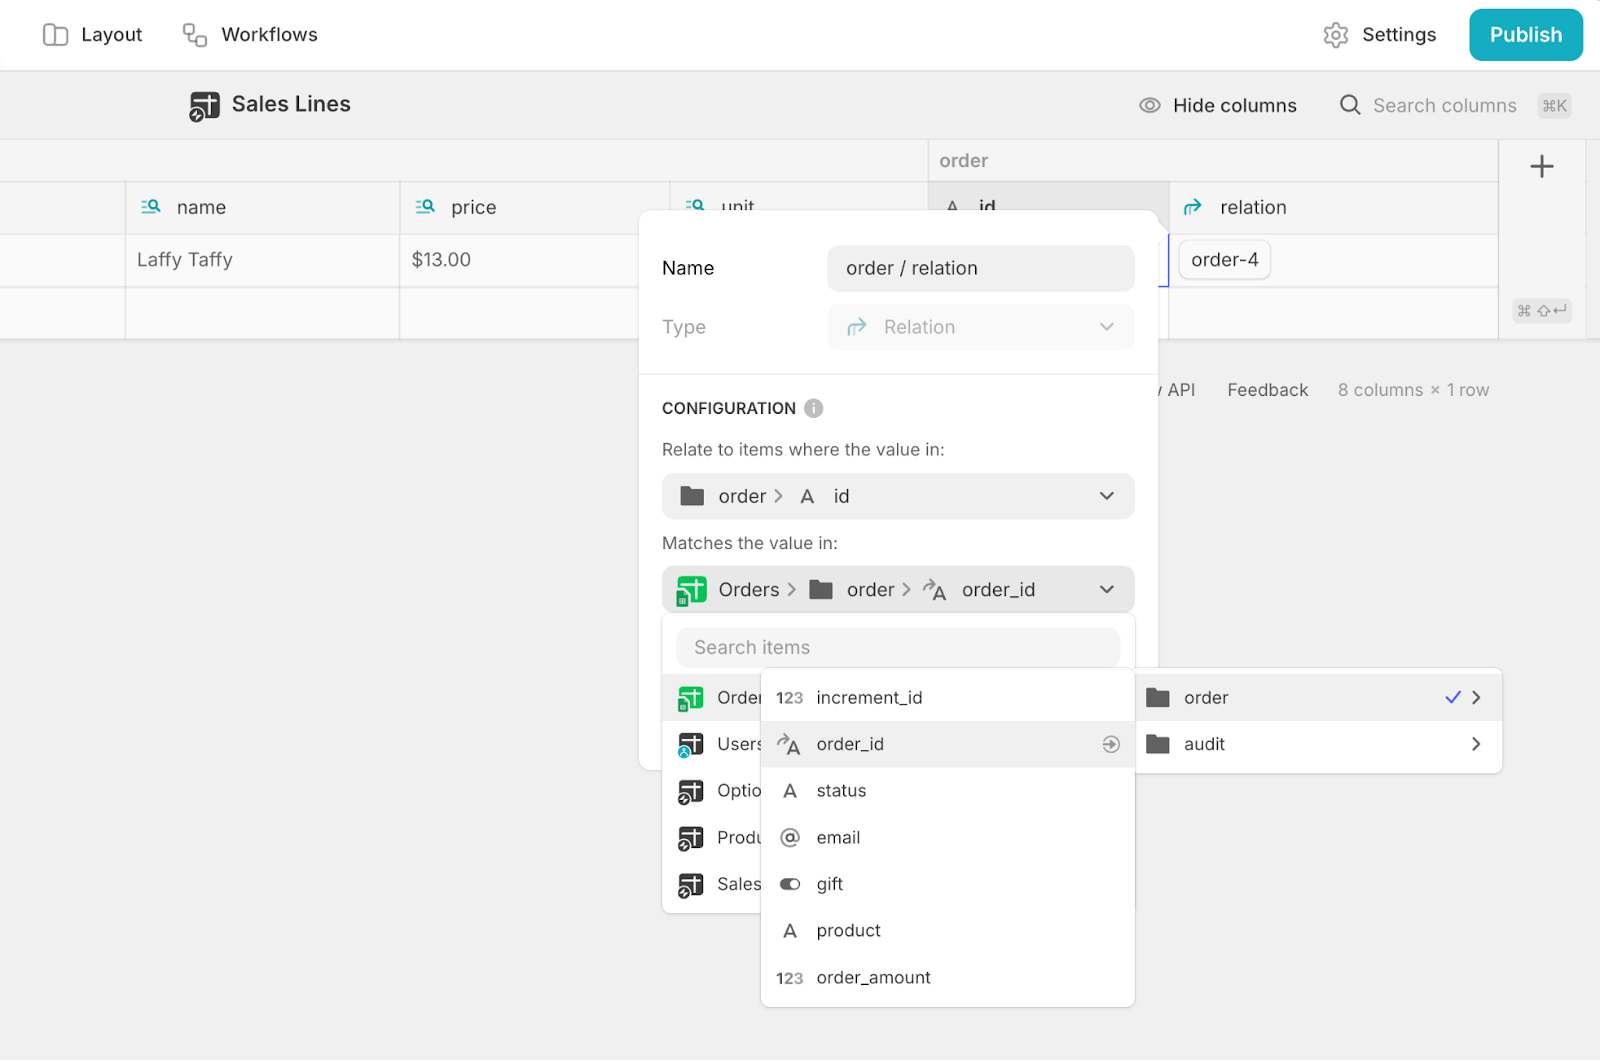
Next, add a new Relation column, name it “order / relation”.
- Under Relate to items where the value in, select order / id.
- Under Matches the value in, choose Orders table > Row ID column.
- Click Save to confirm.
To test your relation, go to the Orders table, copy an order ID from one of the records, and paste it into the order / id column in the Sales Lines table. If you followed the steps correctly, this should establish the relation.
Add additional columns to finalize Sales Lines
To finish setting up the Sales Lines table, we’ll add our quantity and discount columns, and make sure that the final total is calculated automatically. This will allow us to define the quantity of products ordered, decide a discount, and apply this discount to the final line amount without needing to calculate this ourselves.
We’ll add four more columns:
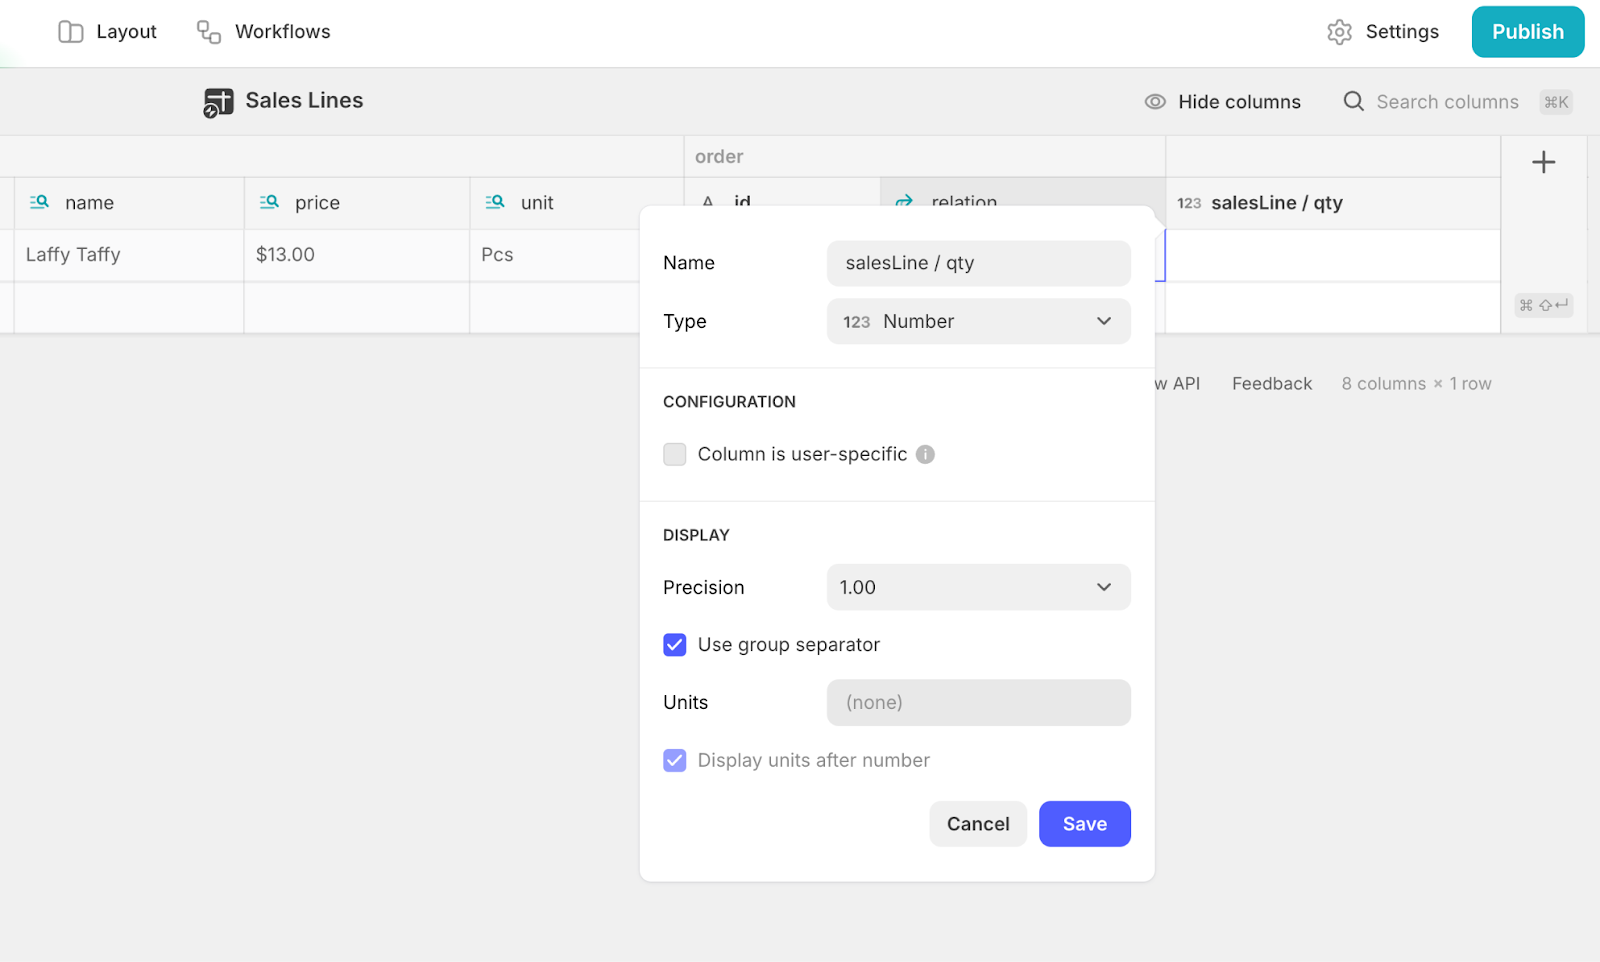
- Qty (Quantity): A Number column.
- Discount: A Number column.
- Discount ITE (If-Then-Else): A column to default the discount to 0 if the Discount column is empty.
- Line Amount: A Math column to calculate the total for each sales line.
Qty Column: Add a Number column, name it Qty, and leave the unit empty since the unit will be pulled from the product record.
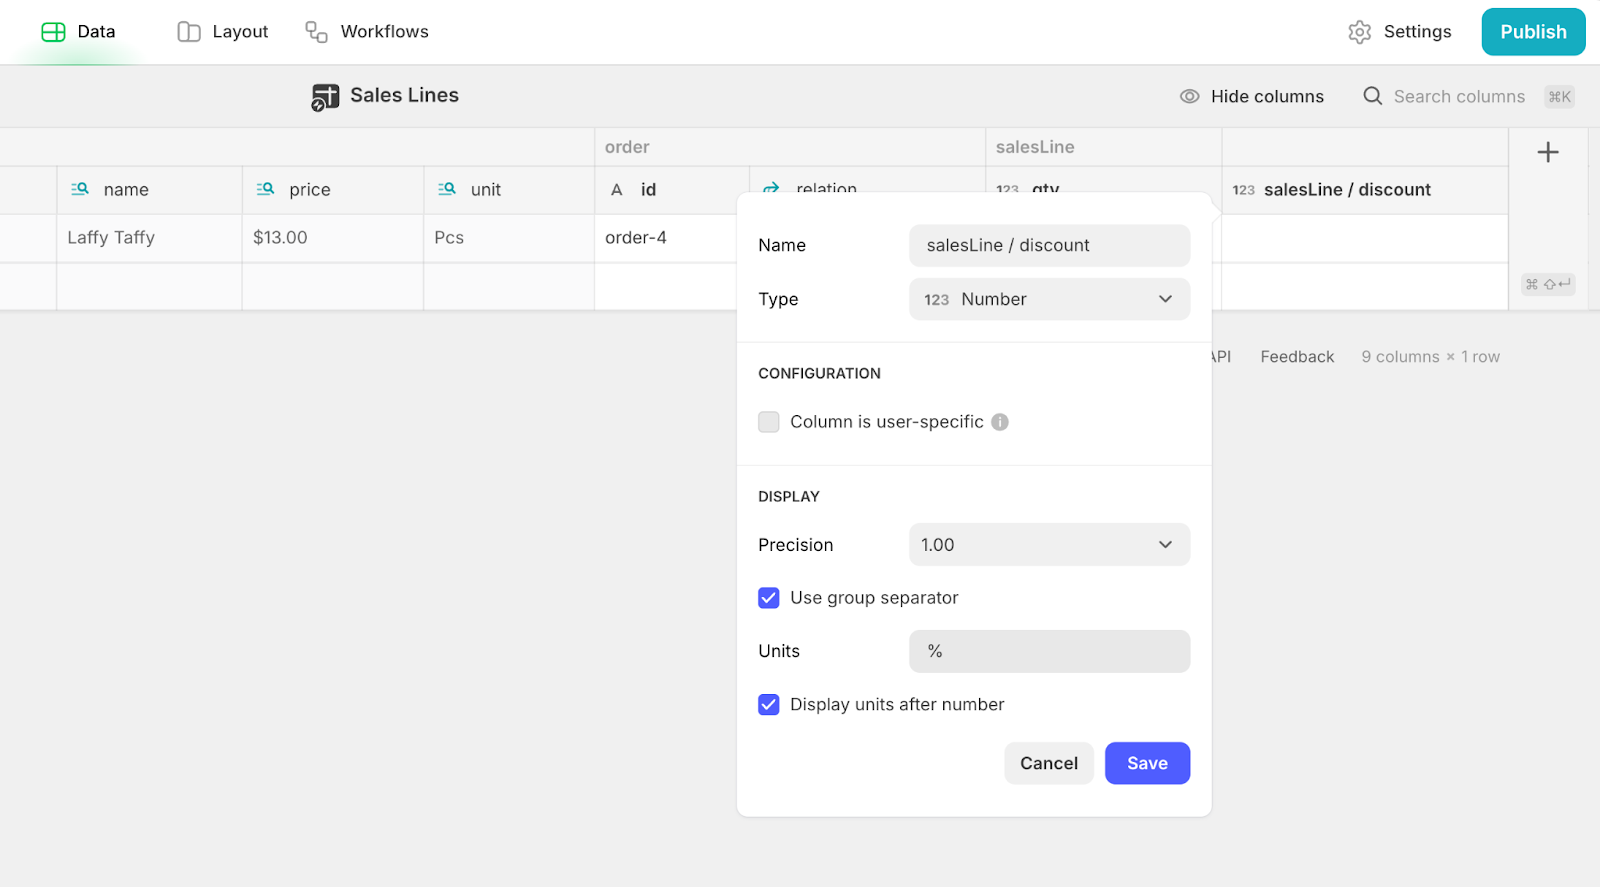
Discount Column: Add a Number column, name it Discount, and set the unit to % to represent percentages.
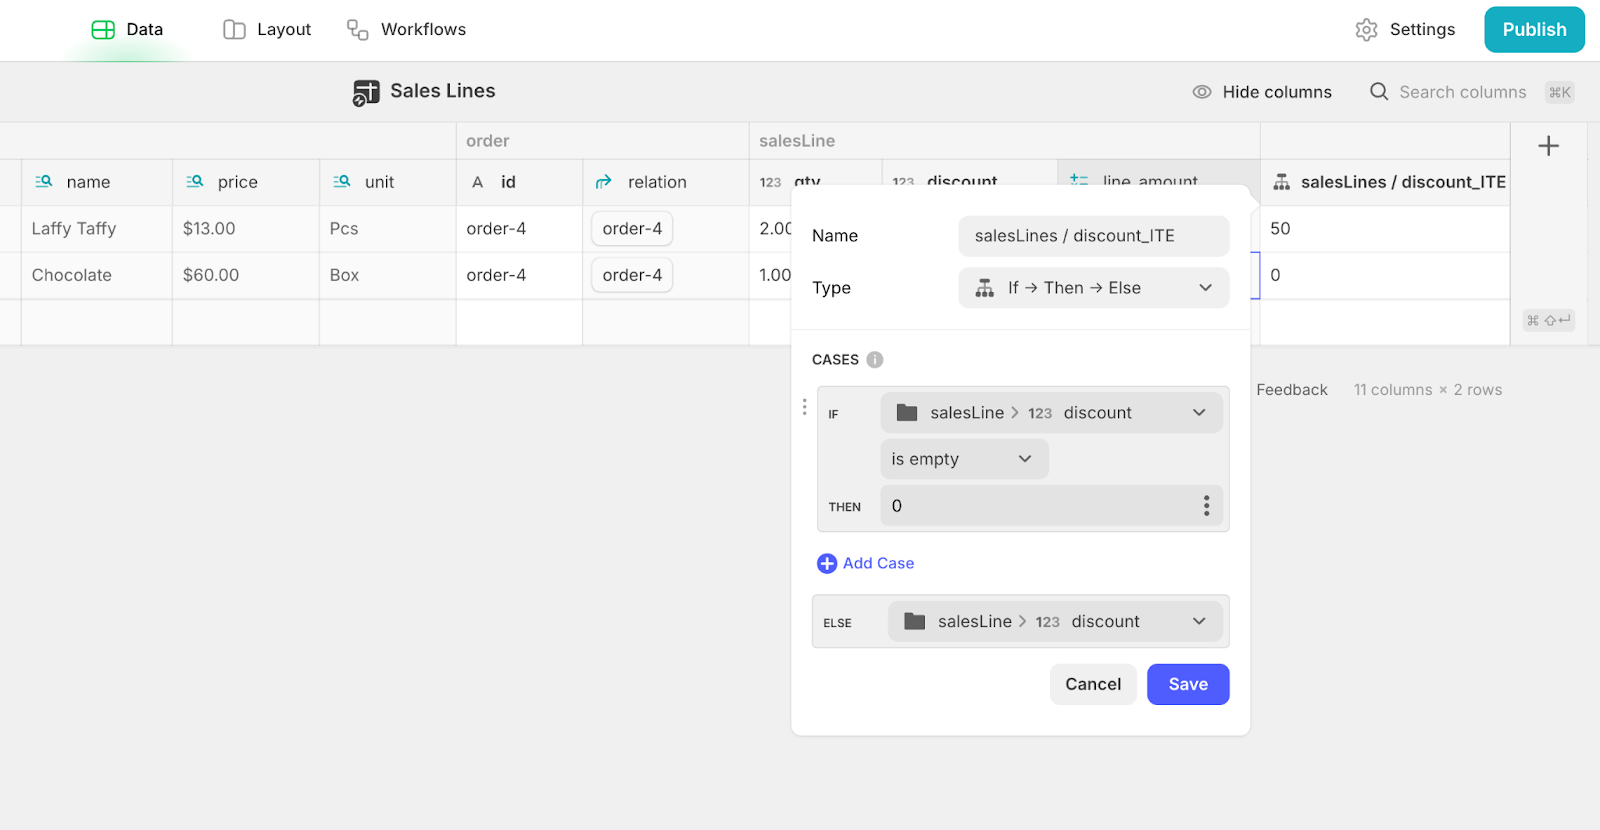
Discount ITE Column:
- Add a new column and select If-Then-Else as the type.
- Set the condition to: If Discount is empty, then 0; otherwise, return the discount value.
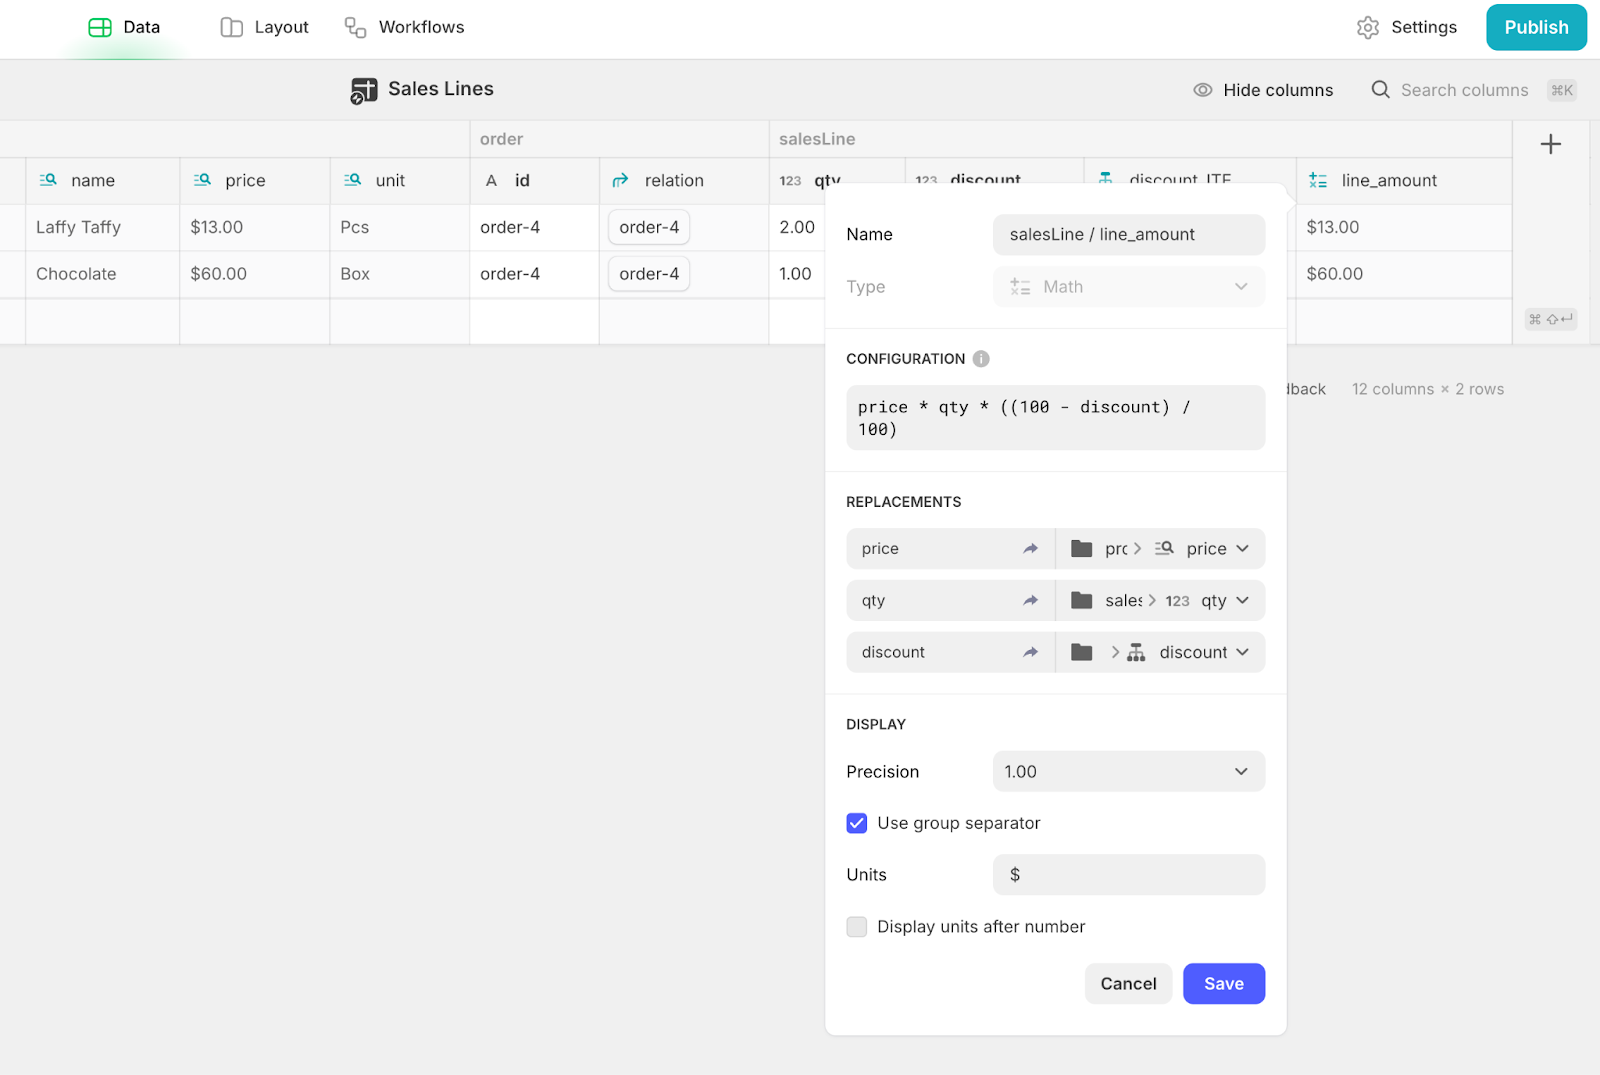
For your Line Amount column, you selected Math as the type. Use the formula:price * qty * ((100 - discount) / 100)
Make sure to map the variables to the correct columns using the replacements section:
- price → salesLine / price
- qty → salesLine / qty
- discount → salesLine / discount_ITE
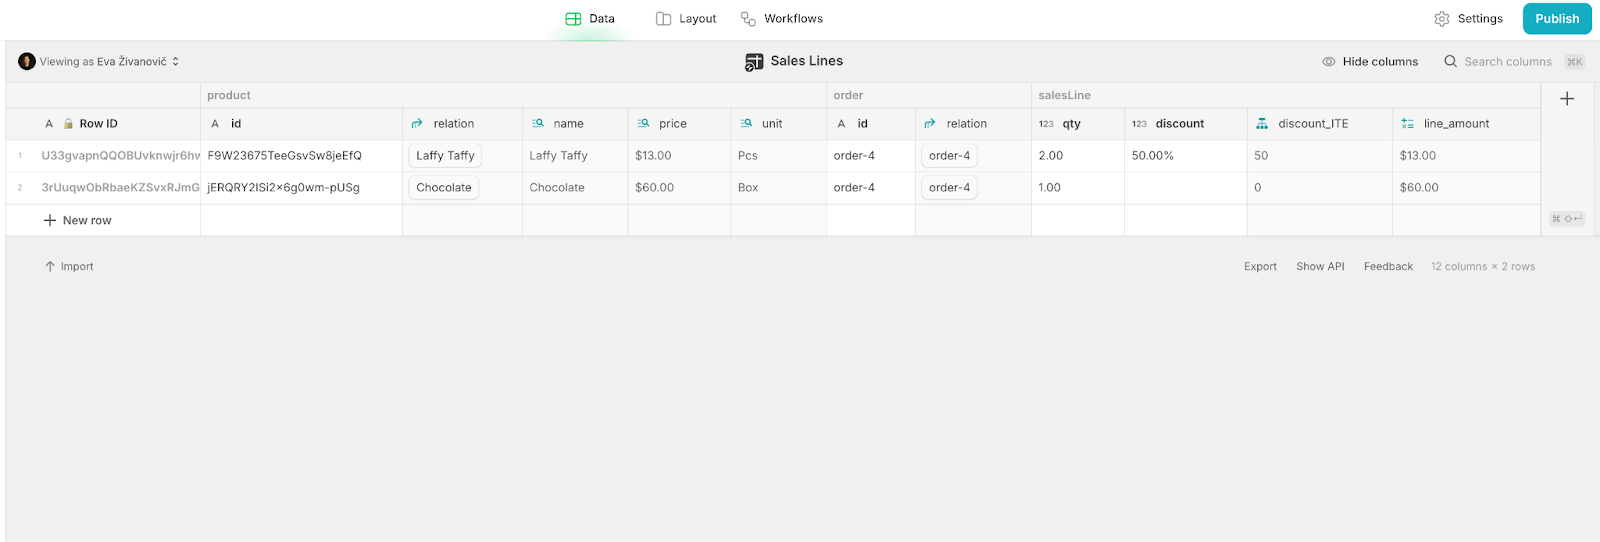
Here’s how this might look after adding Qty and Discount values to your record:
Create a one-to-many relation in the Orders database
Now, we need to finalize the connection of our Sales Line to our order table. We already linked to the order-id in the Sales Line table, but we need to make sure that the ID of the order’s respective Sales Lines are also linked to the Orders table.
When you look at the relationship between orders and sales lines:
- One sales line can only be linked to one order (one-to-one relation), as this sales line will always fall under a single order.
- One order can be linked to multiple sales lines (one-to-many relation), as each order might include several product sales.
This means that in the Orders database, we’ll need to build a multi-relation to link each order to multiple sales lines, while in the Sales Lines database, we built a single relation to connect multiple, distinct sales lines to a single order.
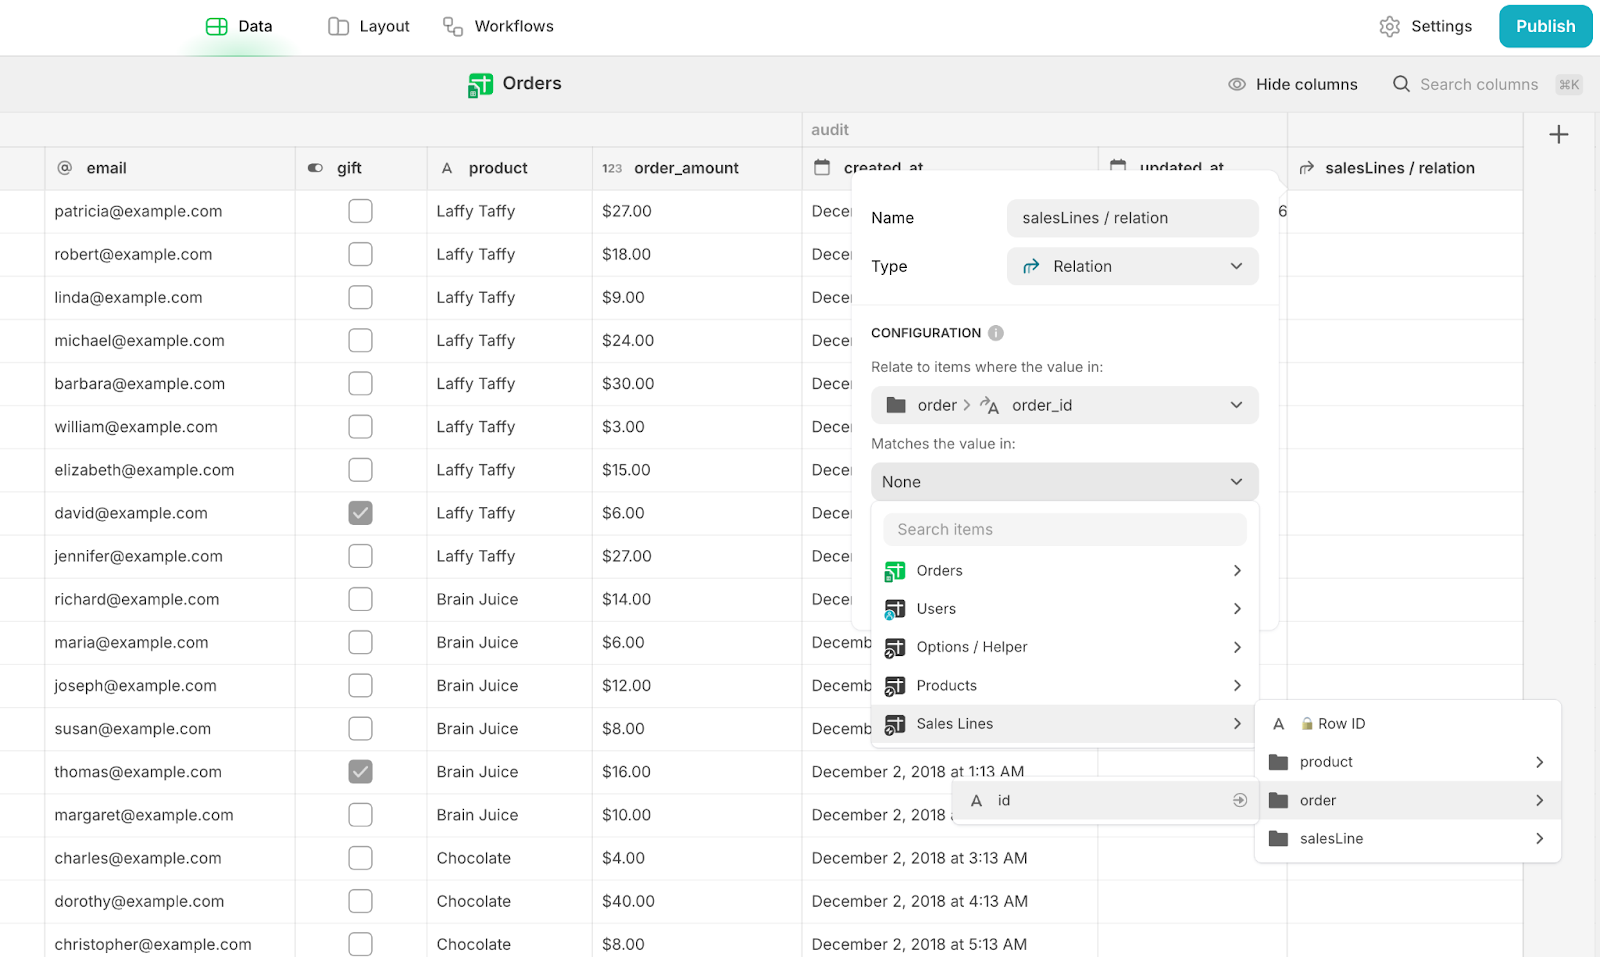
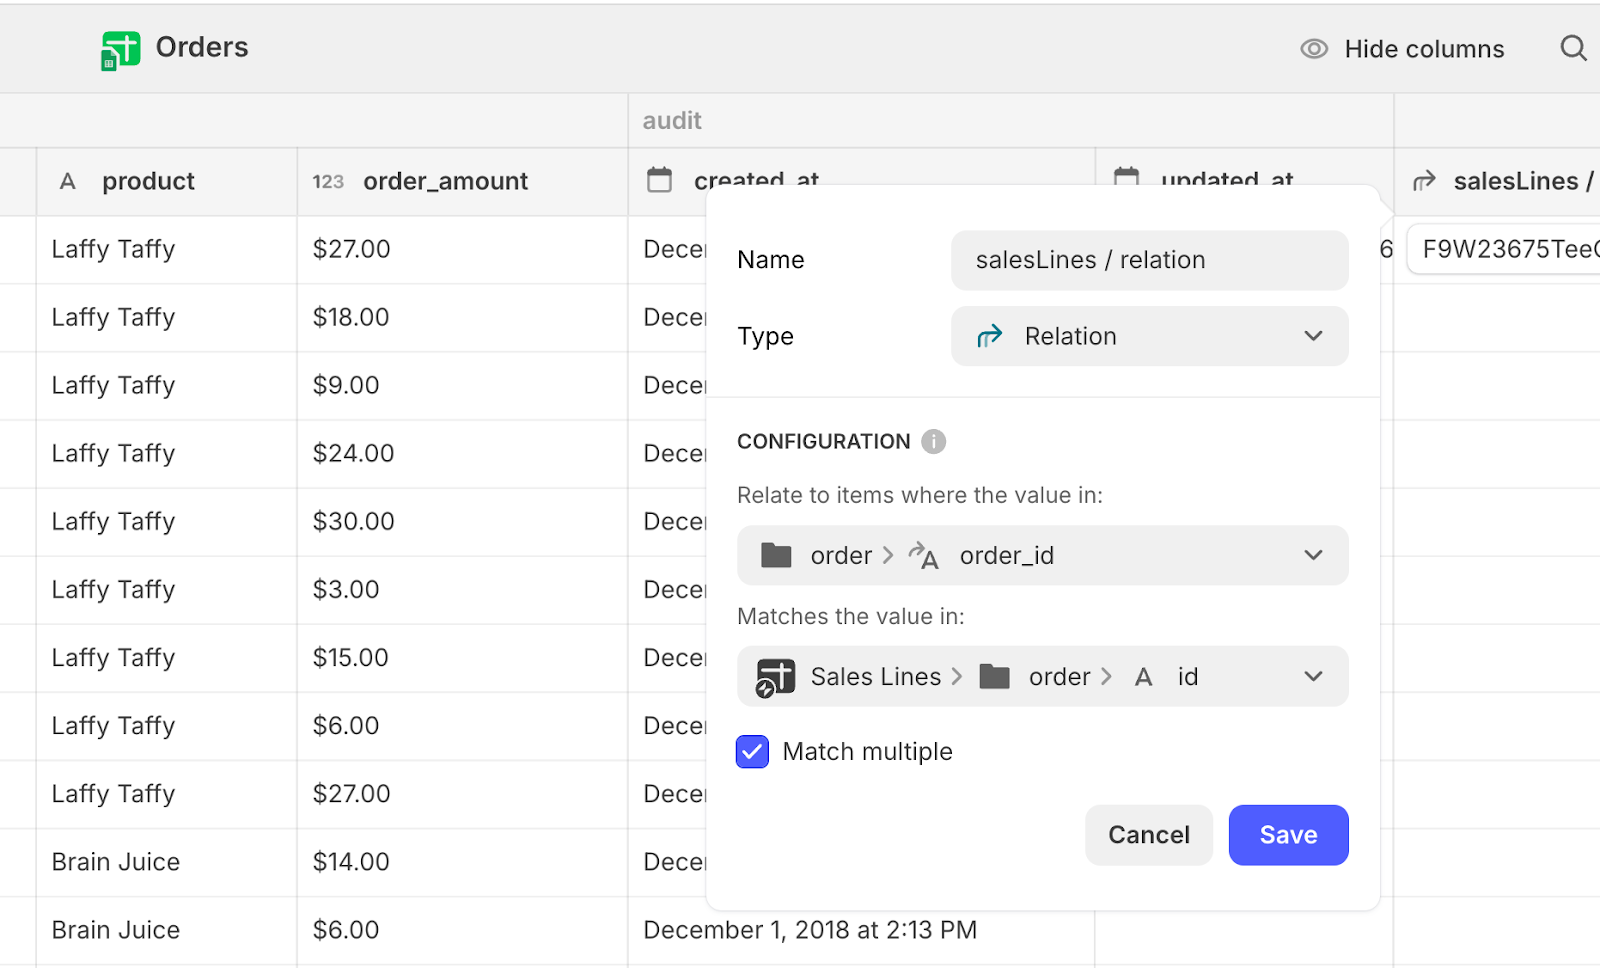
Start by adding a new Relation column in the Orders database:
- Under Relate to items where the value in, select the order_id column in the Orders table
- Then, under Matches the value in, select Sales Lines table > order > id.
- Make sure to check the Match multiple box—this ensures that all sales lines with matching order IDs are linked to the order.
- Save the column to finalize the setup.
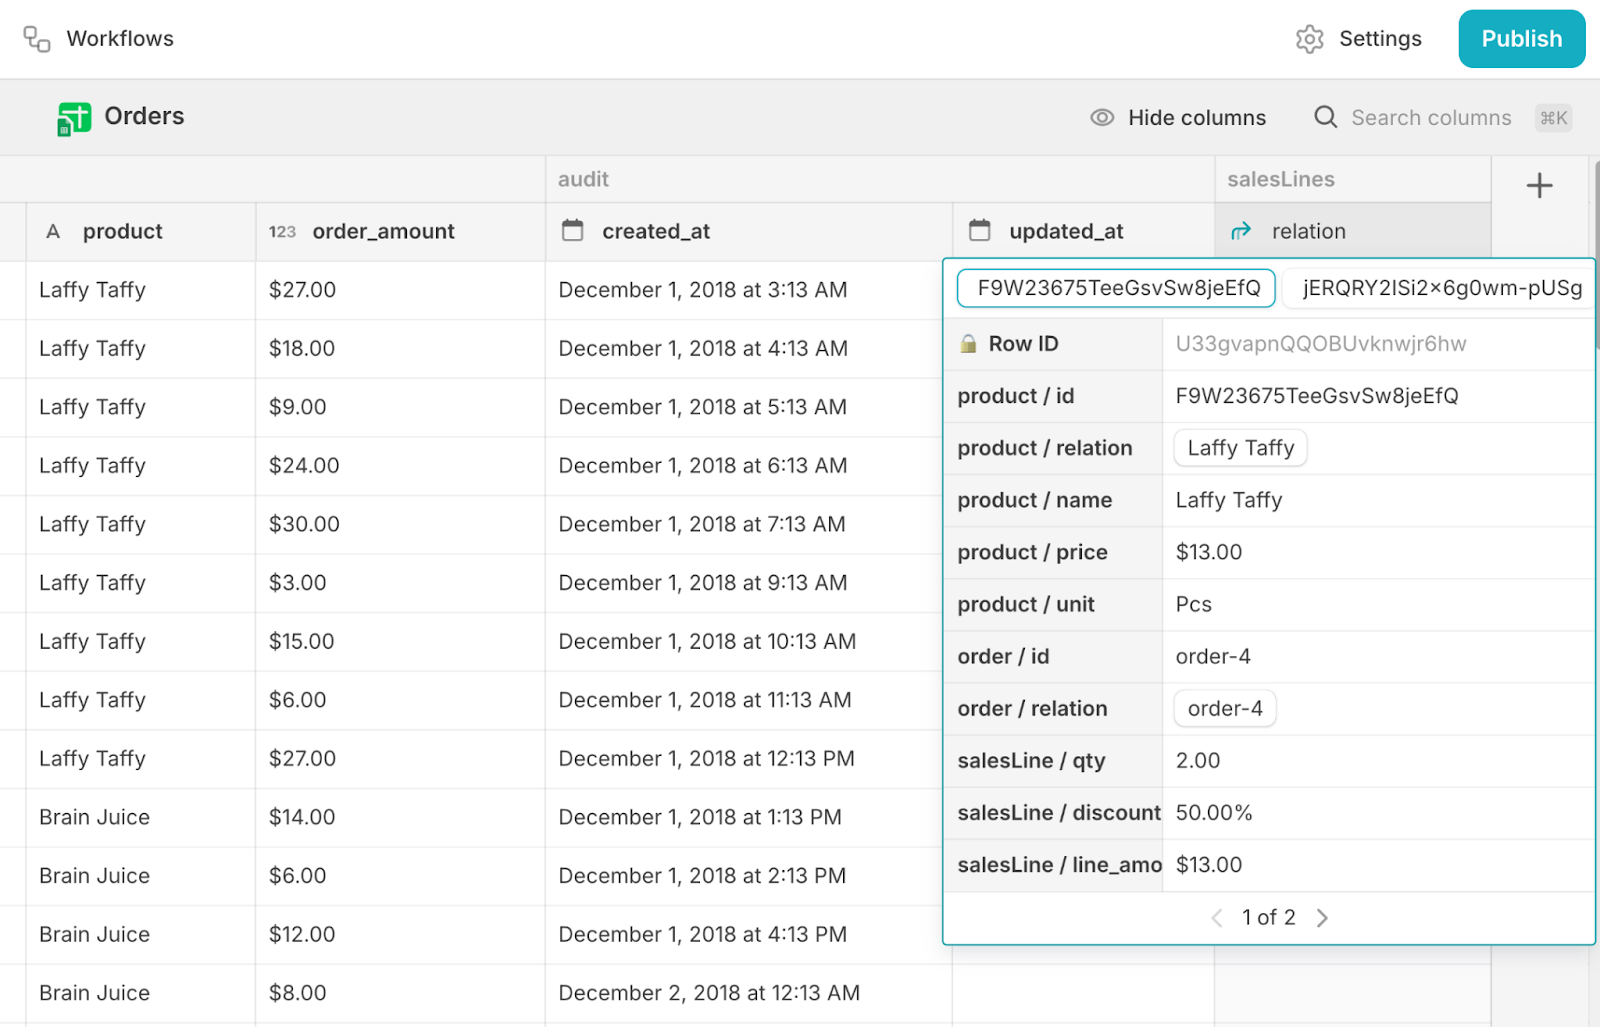
To test this relation, create 2 sales lines in the Sales Lines database and assign them the same order ID as an existing record in the Orders table. In the Orders database, you should now see the relation working, with multiple sales lines connected to a single order.
This means that now when we create an order, we’ll create one overarching order and its details in the orders table, which will connect to the detailed, nested values of the individual product orders in the Sales Line table.
Setting up calculations with Rollups
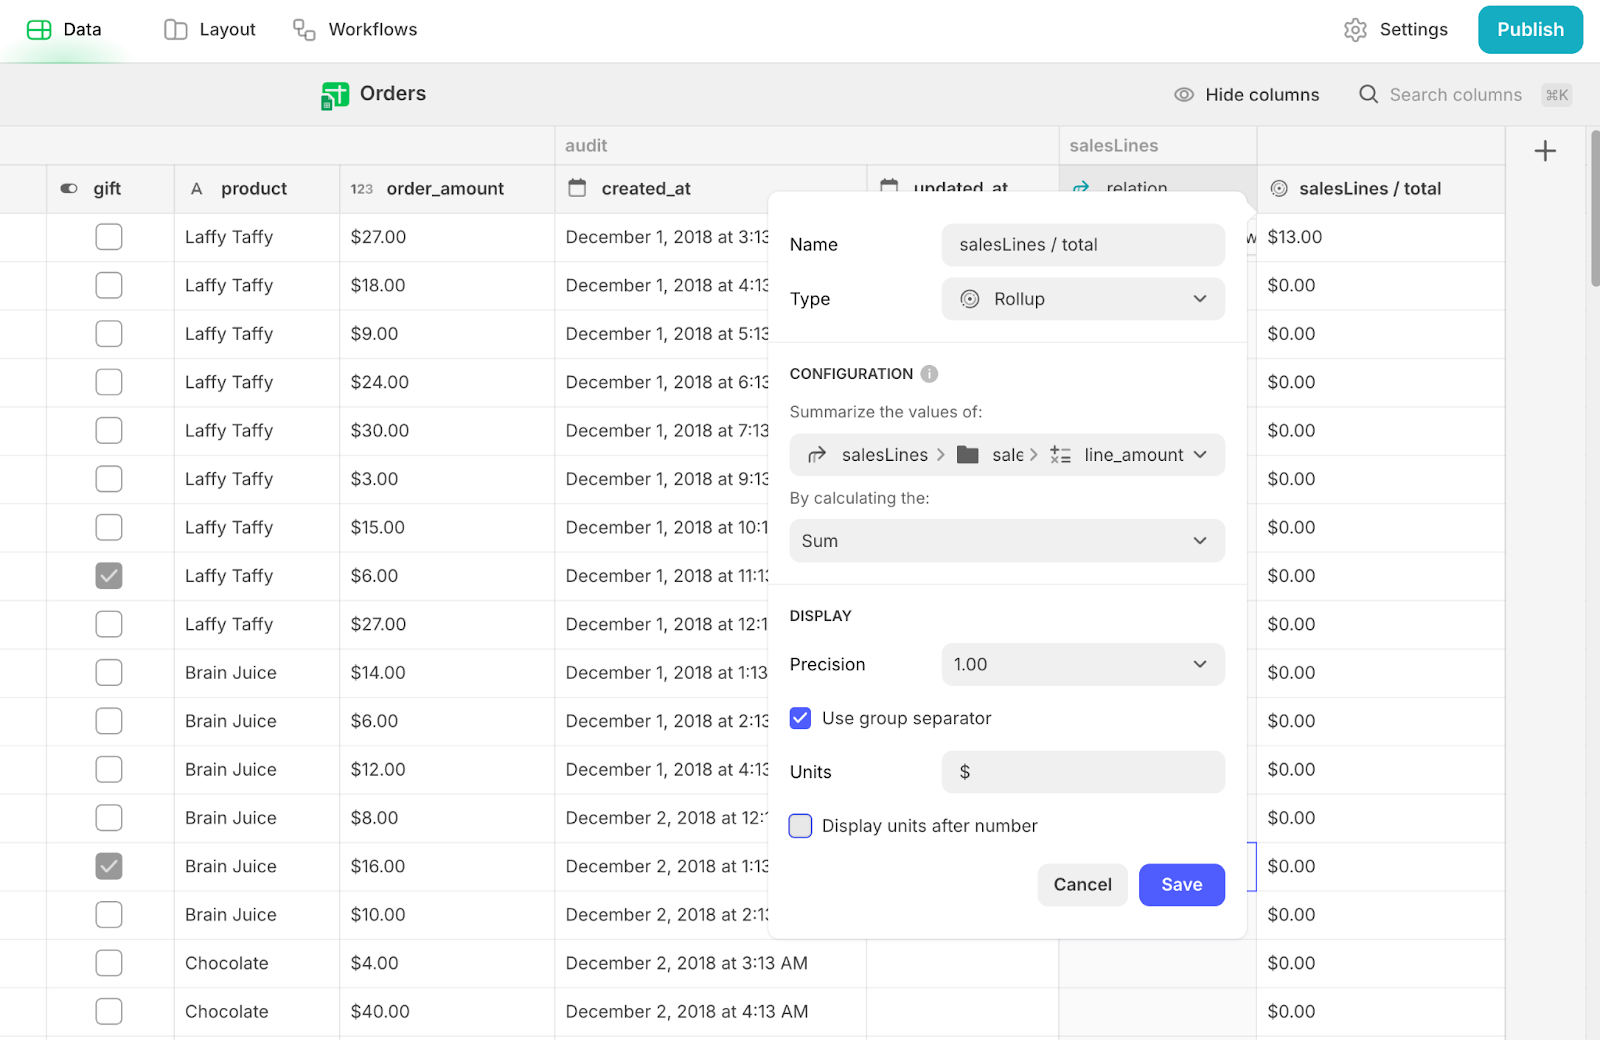
With this relation in place, we can now calculate the total order amount by summing up the related sales lines using rollups. Rollups allow you to aggregate (e.g. count, sum, etc…) related data across multiple records automatically, simplifying calculations like totals, averages, or counts. In our case, we’ll define a rollup field on the ‘order’ entity to sum up the amounts from all associated sales lines (the order details). This ensures that the total order amount is always accurate and up-to-date, without the need for manual calculations or inputs on the order level.
Add a Rollup column to the Orders database and point it to the salesLines / relation > SalesLine > line_amount.
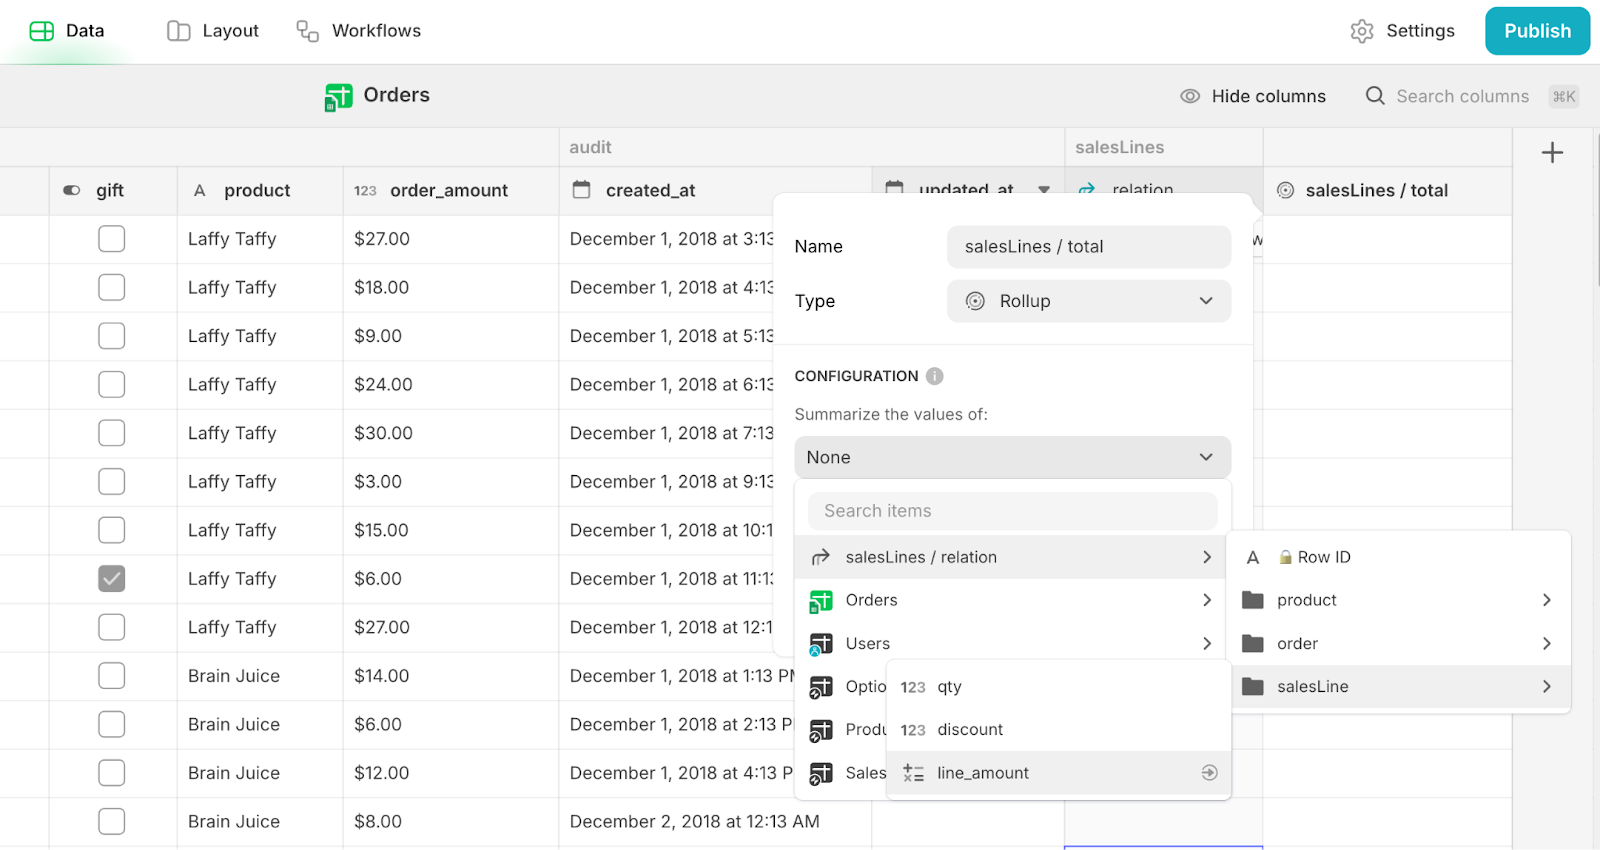
For the calculation, select Sum, set the unit, and click Save.
Adding Product Unit options to the Options / Helper database
Finally, to make assigning units to products more straightforward, we’ll start by creating a predefined list of product units from which users can select when adding or updating products. If you recall the Glide CRUD tutorial, where we built a User Role dropdown, Glide uses the Choice UI component to create dropdown menus. The Choice component requires a list of options as its source, which needs to be formatted as a single column in your backend, with one option per row.
To set this up, we’ll first add our options into the Options / Helper database and define the list of product units. Once this is configured, we’ll add a Choice component in the UI to the Create and Edit Product forms. This will allow users to select the appropriate unit for each product using a dropdown menu, ensuring data entry is both consistent and user-friendly.
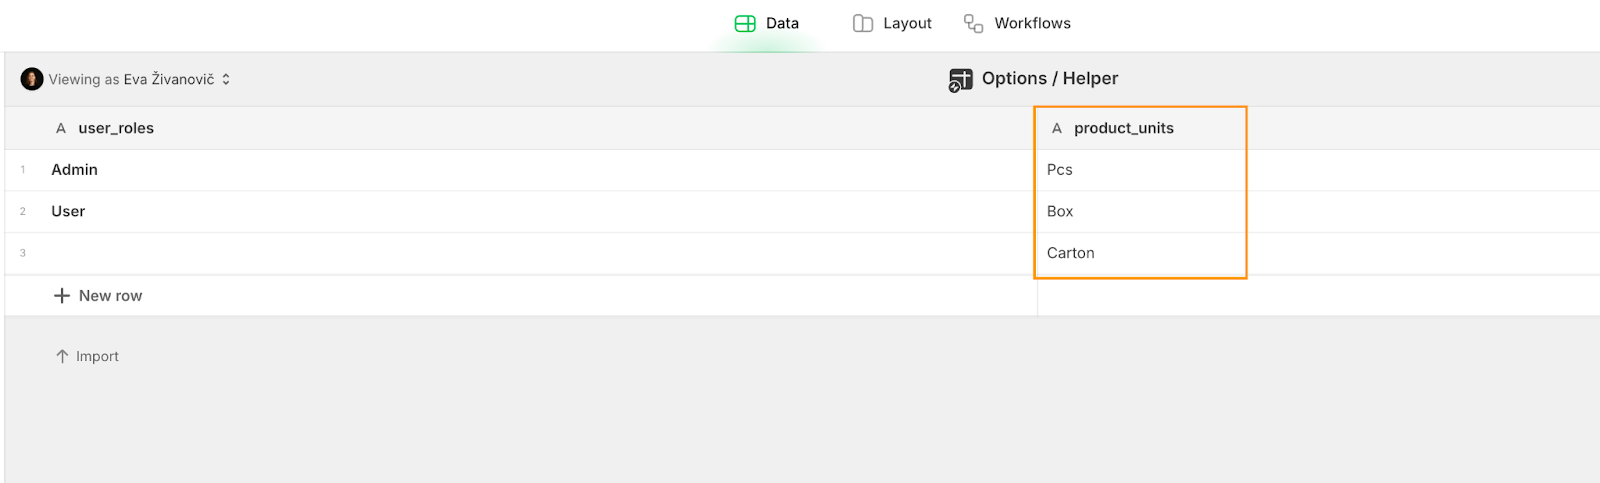
Start by going to the Options / Helper database and add a new Text column. Add common unit options like Pcs, Box, Carton, etc. These predefined options will help streamline the process of setting up and managing your products, and we’ll use these in the UI.
Frontend updates
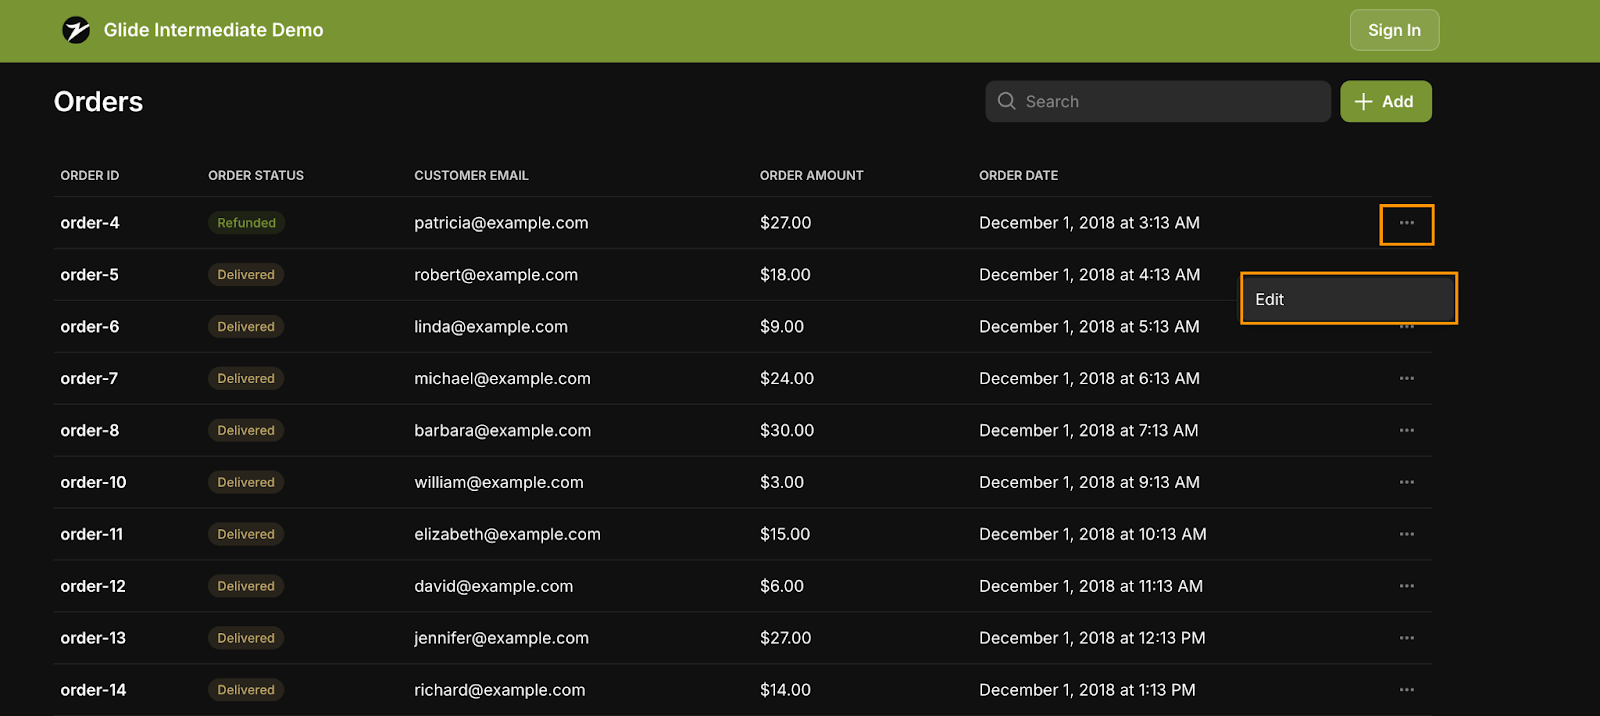
Previously, our frontend consisted of a table, detailed order view and forms to add new orders or edit previous ones, as well as a button to delete an order.
Here’s what it looked like before:

If you followed the first tutorial, to align the frontend with the updated database structure, you’ll need to make a few key changes, which we’ll walk through in the next section. Here is a summary of the work we’ll do next, to make sure the frontend corresponds effectively with the new database setup:
- First, we’ll remove the Order Amount field from the Create and Edit forms for orders, as it is now calculated automatically.
- Similarly, we’ll remove the Product dropdown field, since product details are now pulled dynamically from Sales Lines.
- Next, we’ll update the Order Amount display in the Orders grid view and detail page to reflect the newly calculated Rollup field, replacing the old static value.
- On the Order Detail page, we’ll add a section to show the related Sales Lines (similar to an invoice).
- We’ll include functionality to create new sales lines, edit existing ones, and delete them directly within the order.
- Finally, we’ll create a Products tab in the app, where you will be able to view all products and add, edit, or delete them as needed.
Here’s what the final UI will look like:
Let’s take it step by step.
Update your database structure: Remove the Order Amount and Product dropdowns
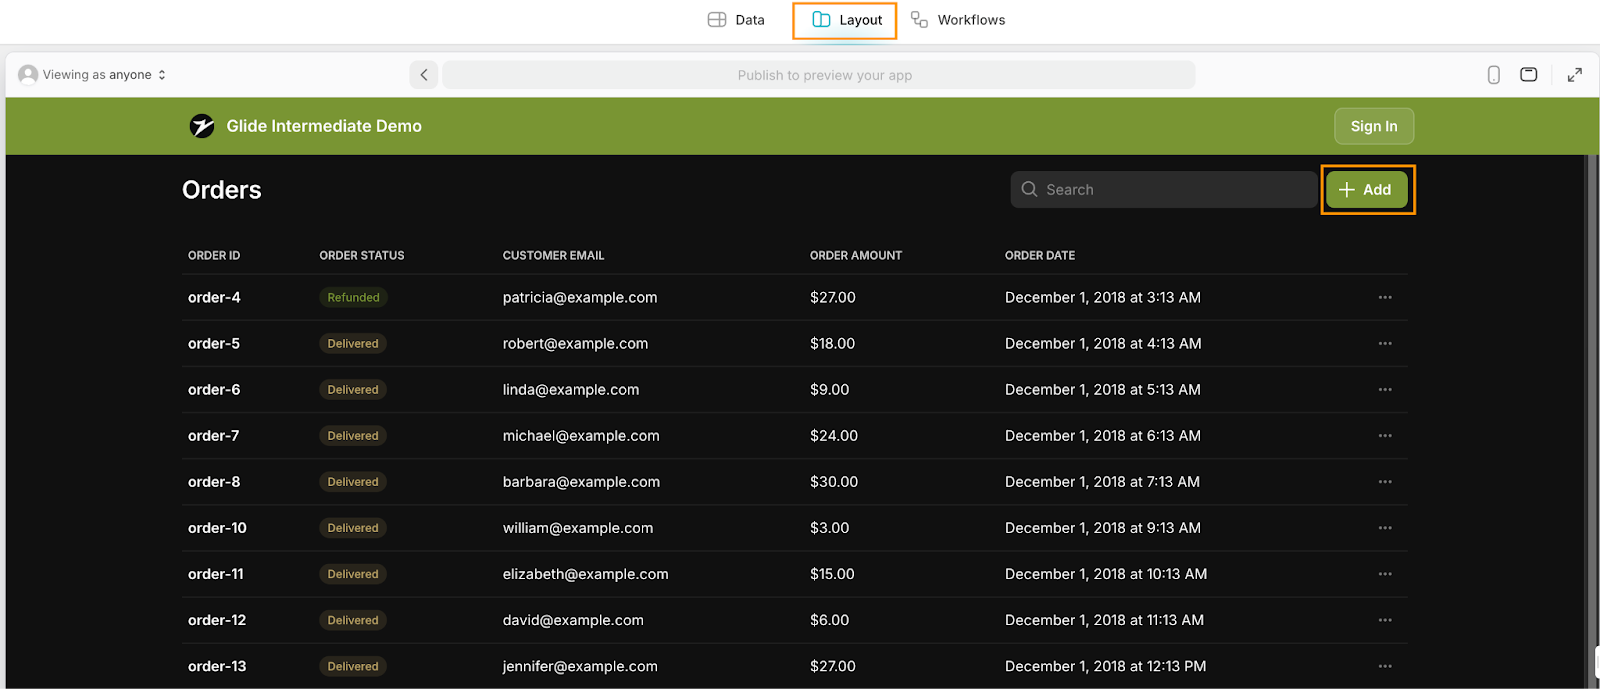
Click on the Layout tab in the upper toolbar to open the UI designer, then click on the Add button to open the Create form.
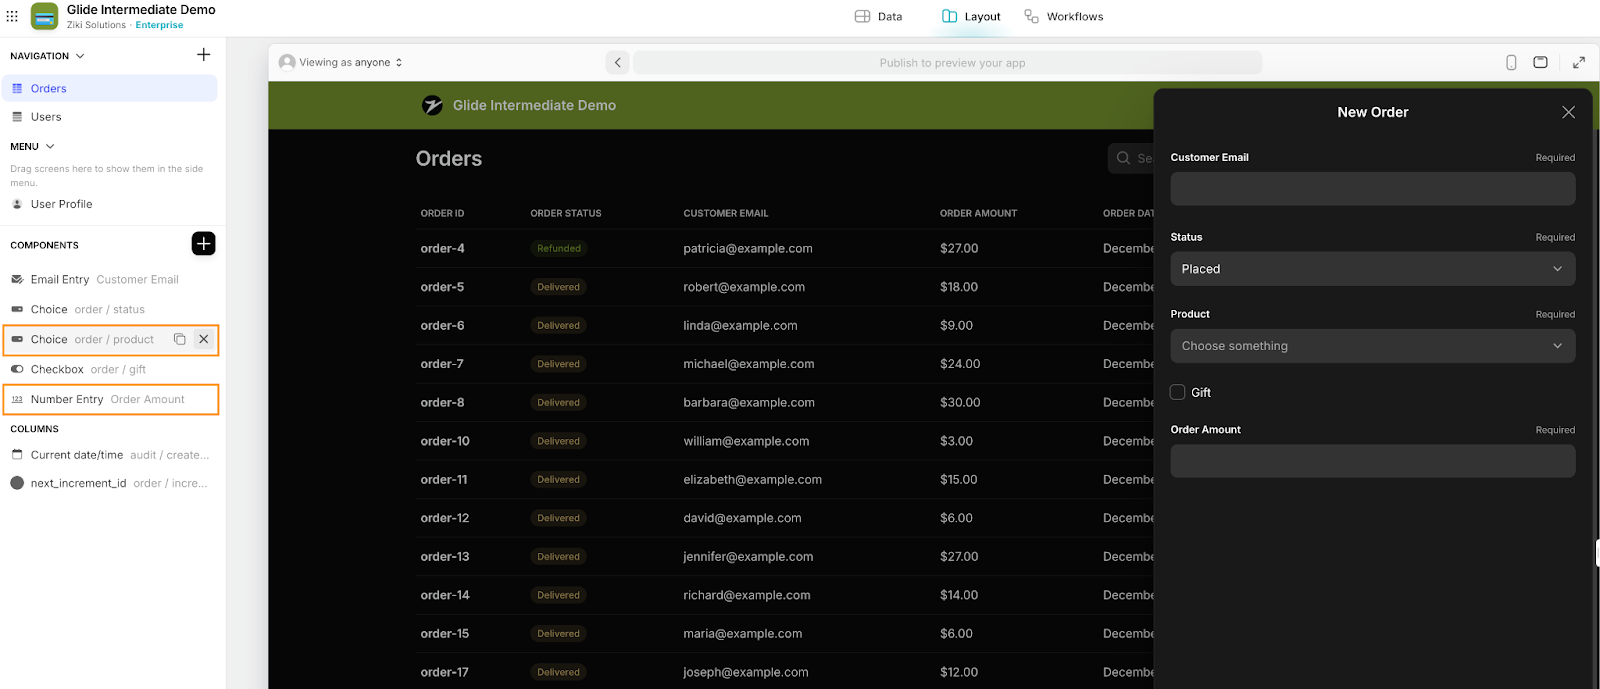
In the Components tree, hover over the fields for Product and Order Amount and click X to remove them. Once those fields are gone, close the form. You should now see only Customer Email, Status, and Gift input fields on the form.
We’ll do the same for the Edit form. In the Orders table, click on the three dots next to any record and select Edit to open the form. Remove the same two fields—Product and Order Amount—and close the form when you’re done.
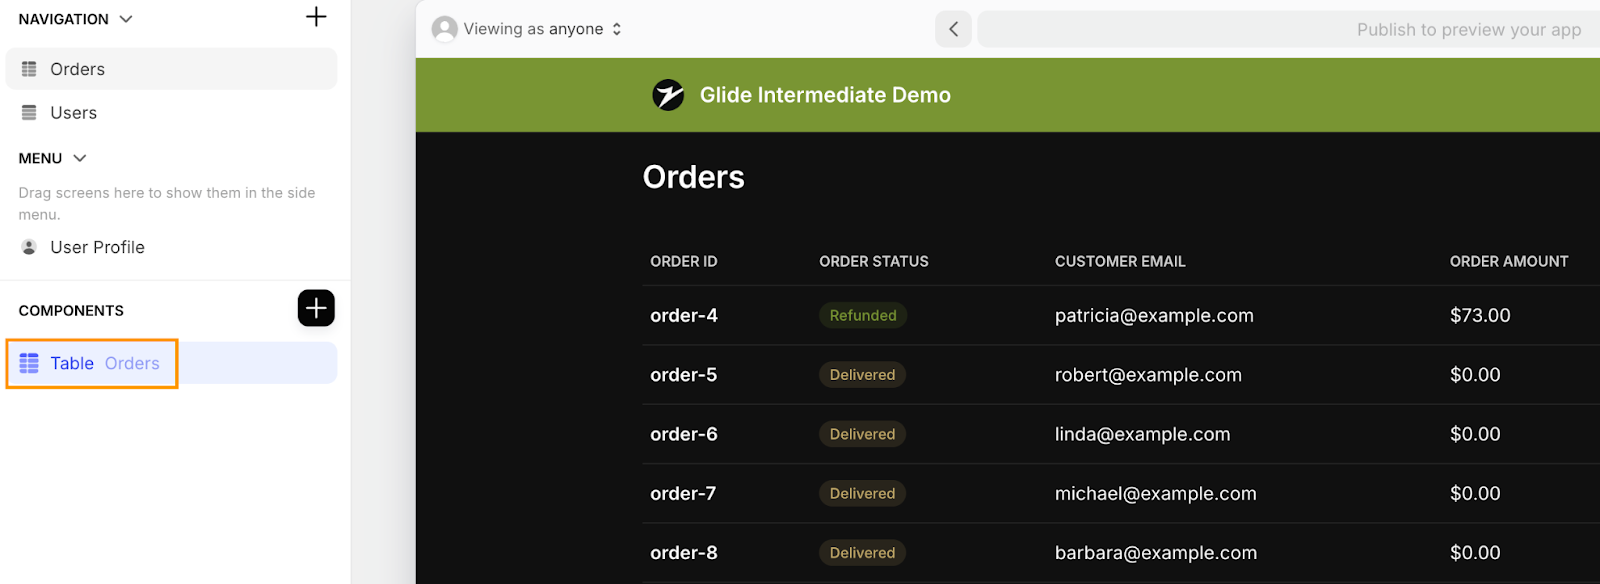
Update the Order Amount column in the Orders grid
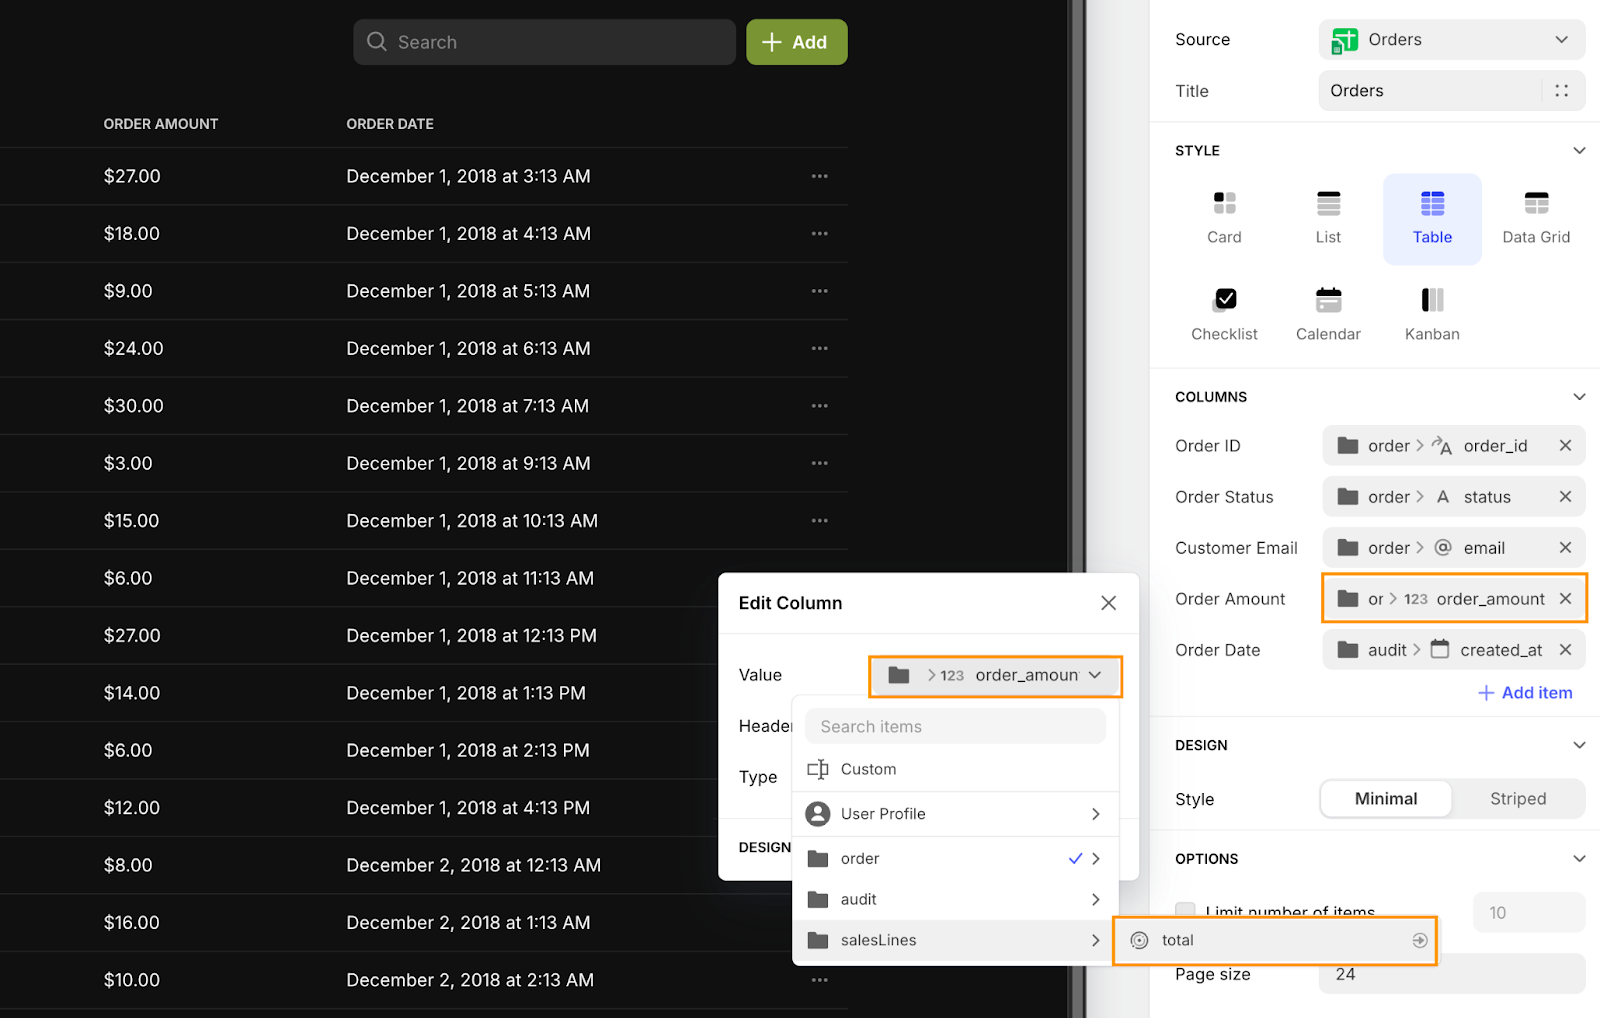
To update the Order Amount column in the Orders grid (the table view), click on the Table component in the Components tree to access the component settings.
On the right-hand side of the screen, in the component configuration panel, locate the Order Amount dropdown. Click on it, and under Value, select salesLines > total to point the column to the new rollup field that calculates the total amount dynamically based on the linked Sales Lines.
Now this table will automatically show the correct order amount as calculated in the backend to ensure the best accuracy for this information.
Add Sales Lines to the Orders detail page
We already created an orders detail page in the last tutorial, but previously it only showed a couple of details. Now, we want it to show a full breakdown of the Sales Lines of the order that we have saved in the Sales Lines database.
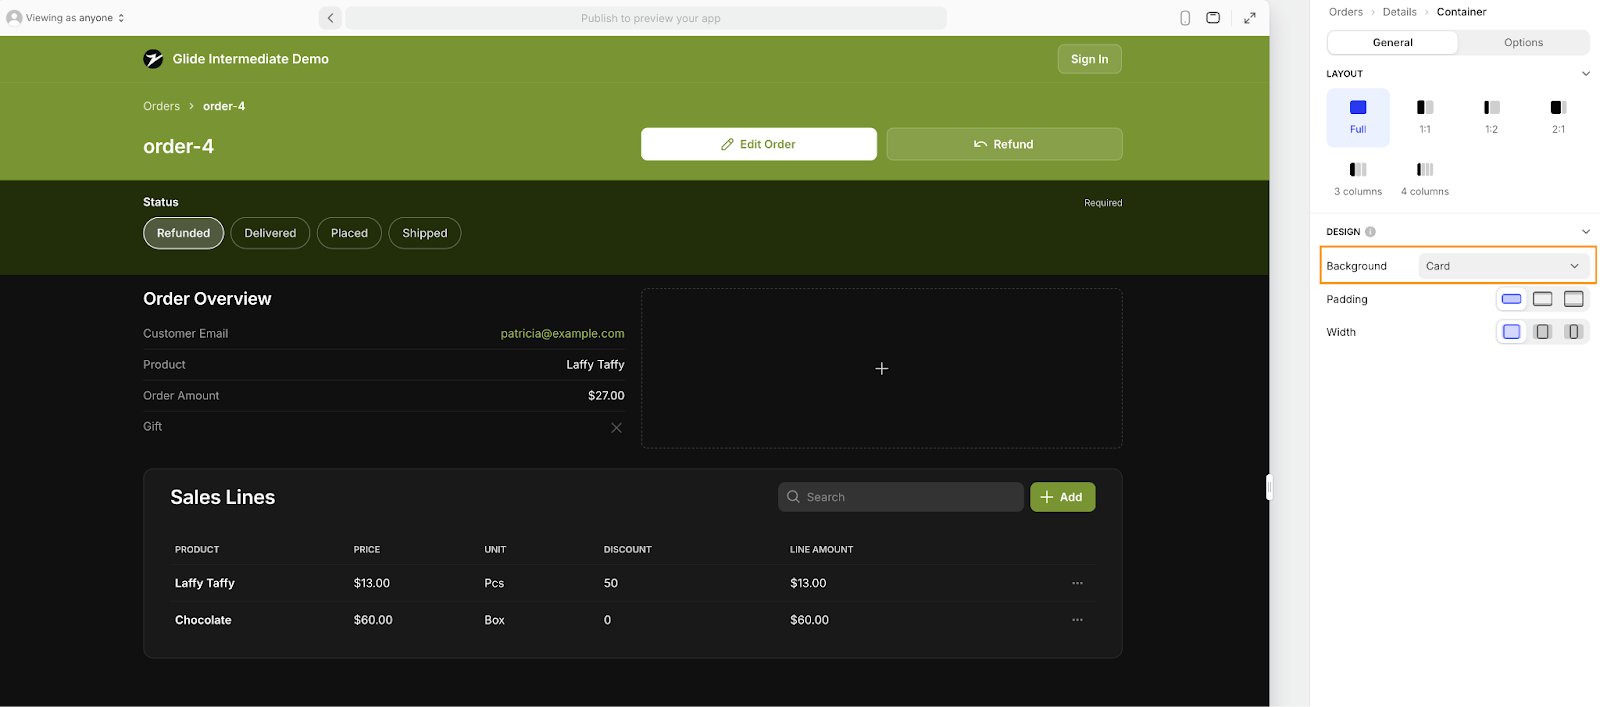
Click into any order to open the order detail page. In the Components tree, add a new Container component. Inside the container, add a Table component and link it to the salesLines / relation field.
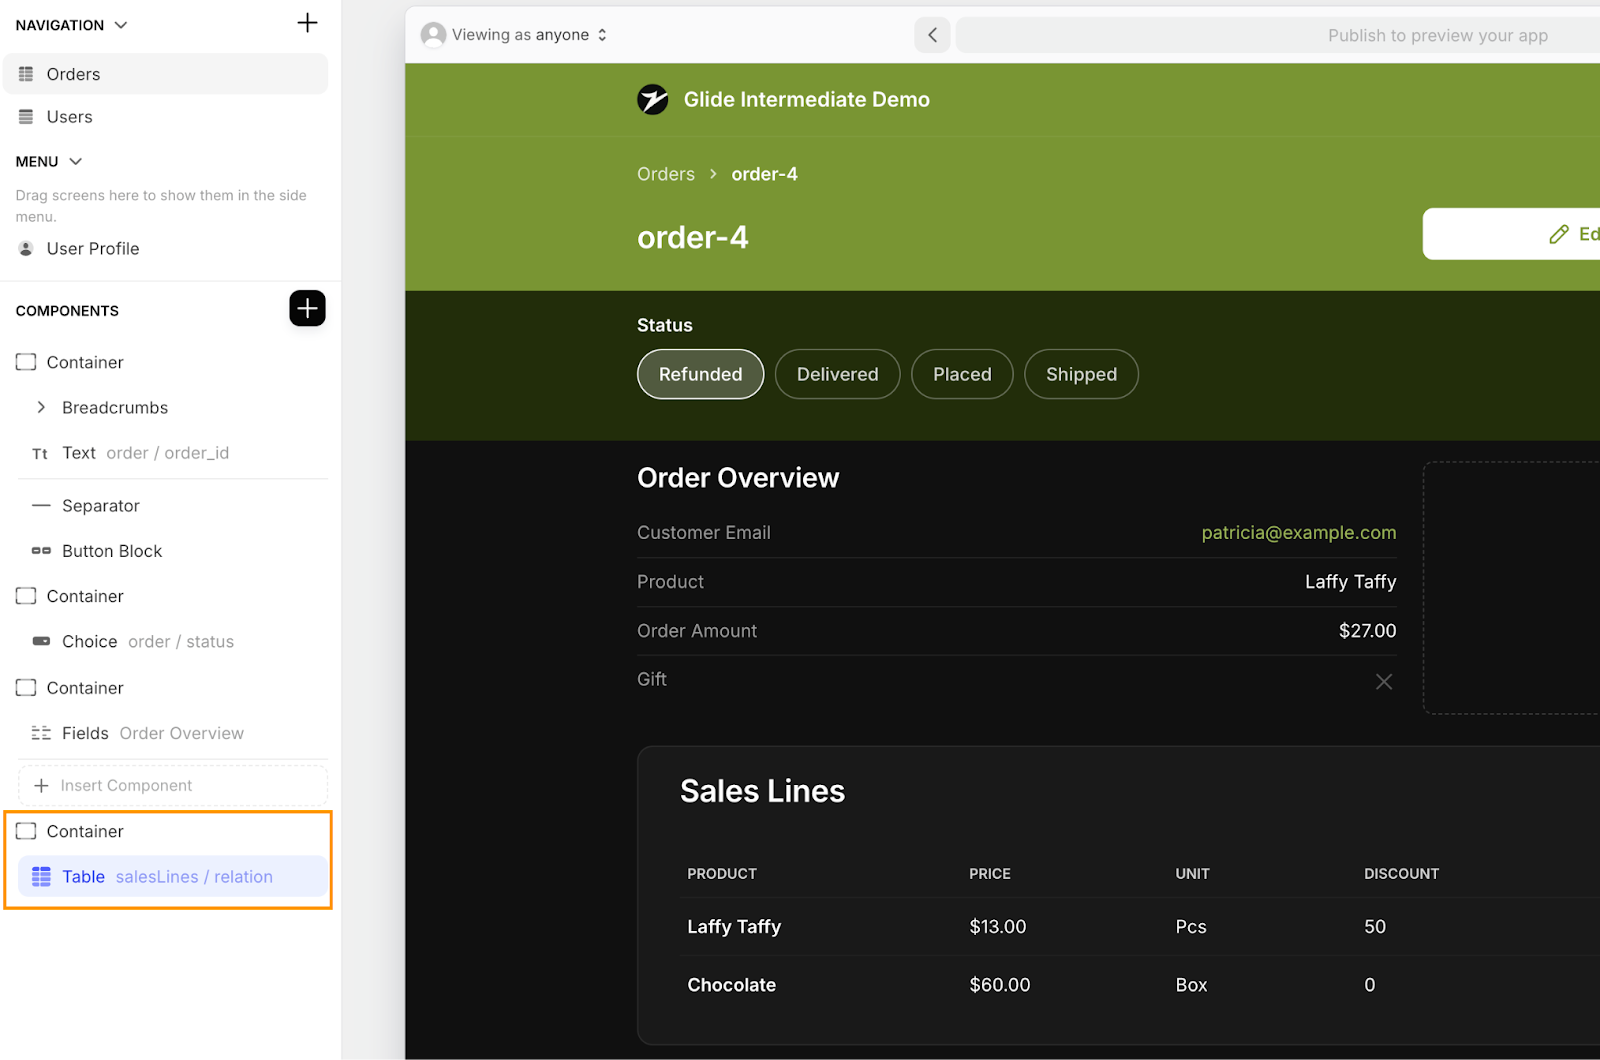
Next, click on the Container component to adjust its settings. In the component settings on the right, under Background, select Card to visually separate the Sales Lines section from the main Order Details.
Now, click on the Table component within the container. In the component configuration, set the Title to “Sales Lines”. Under Columns, remove unnecessary columns by clicking the X next to them. Keep only the following columns:
- Name
- Price
- Unit
- Qty
- Discount ITE
- Line Amount
If any of these columns are missing, use the + Add item option to add them manually and link them to the corresponding fields, as shown in the screenshot.
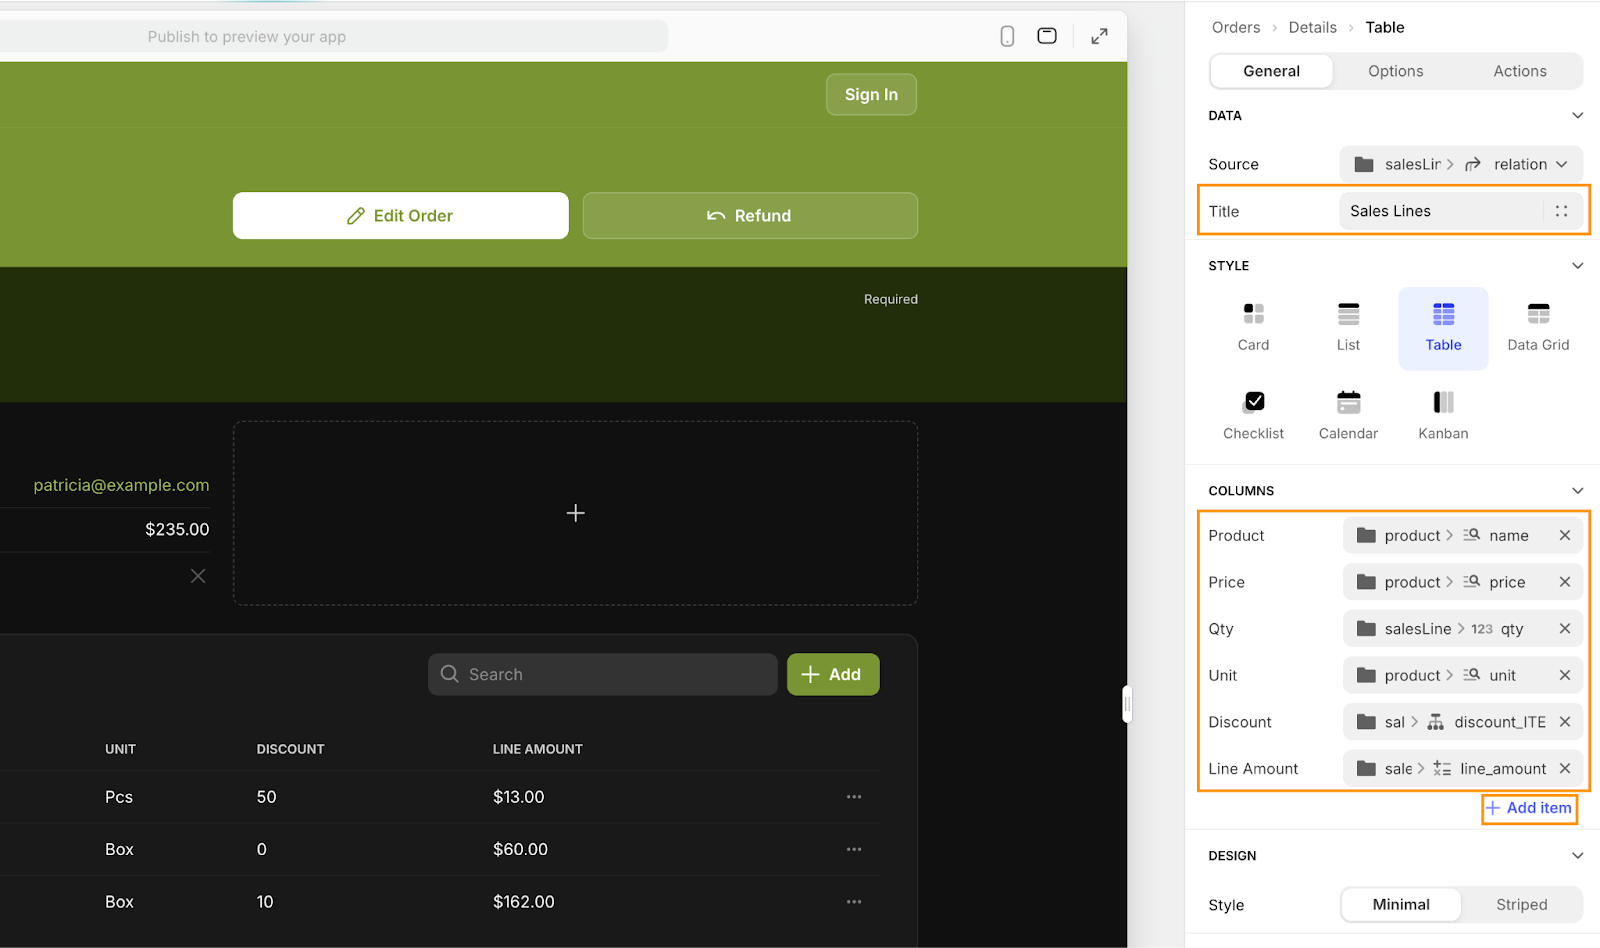
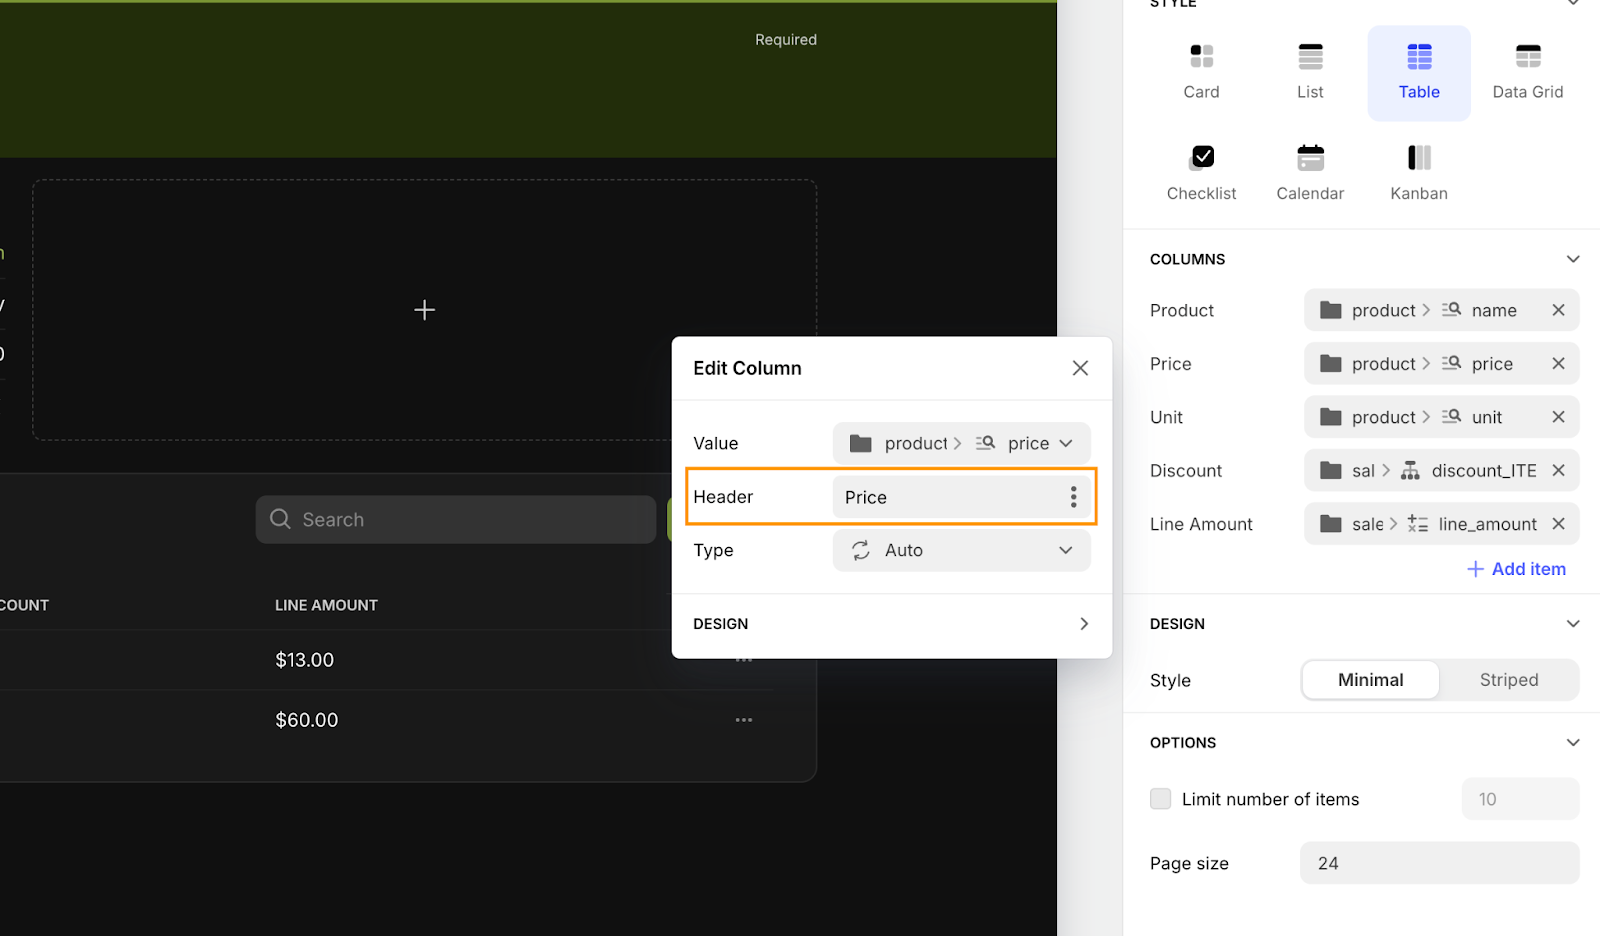
Make sure to give each column a descriptive title so it’s clear to the user what data is being displayed.
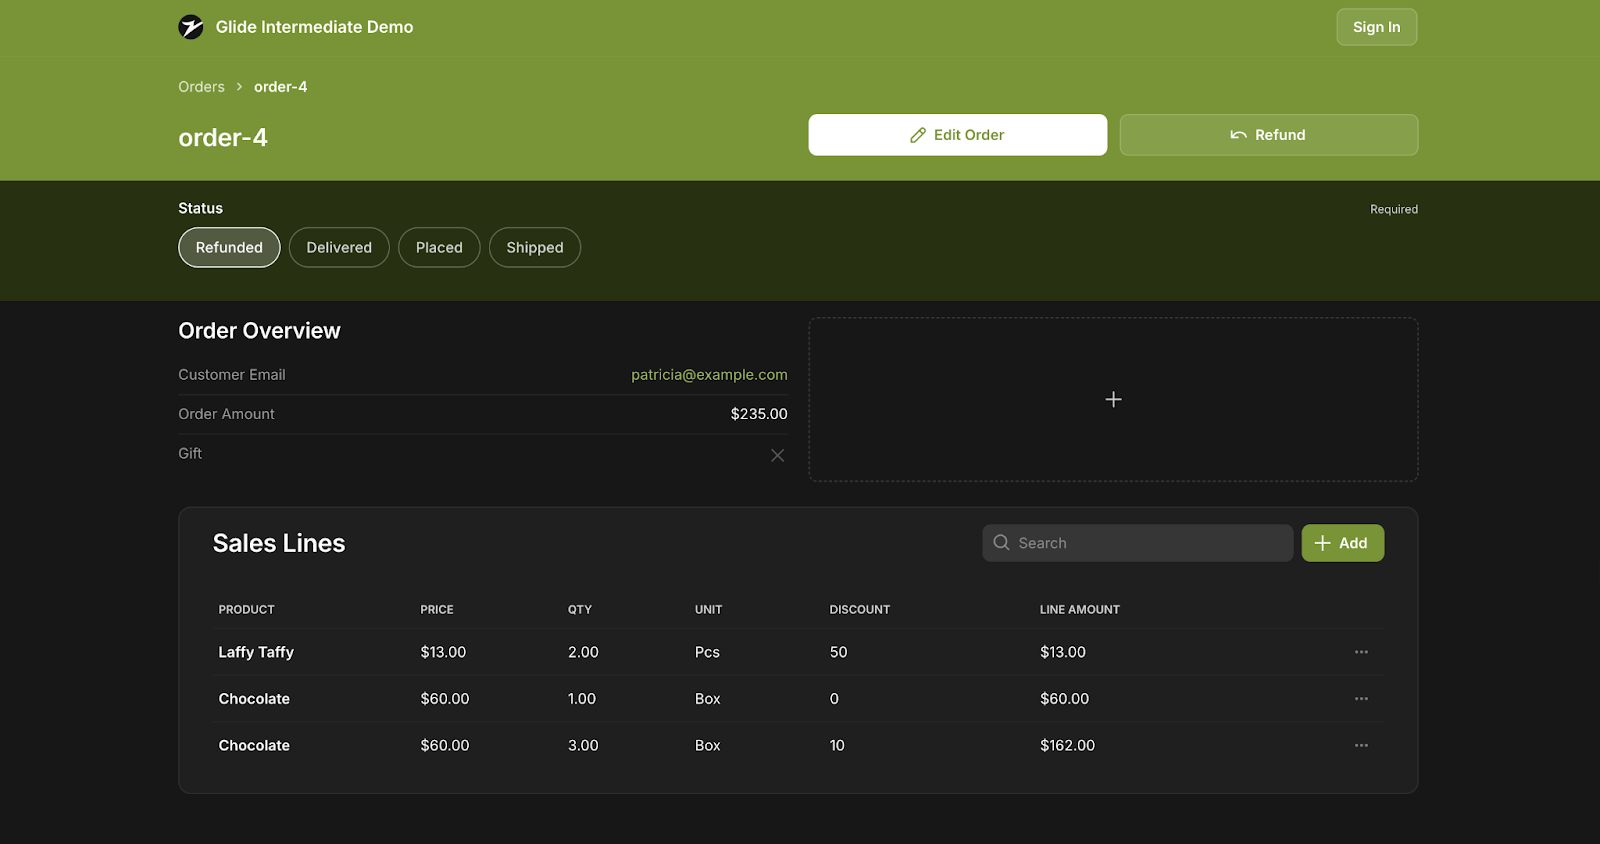
Here’s how your updated Order detail page should look now.
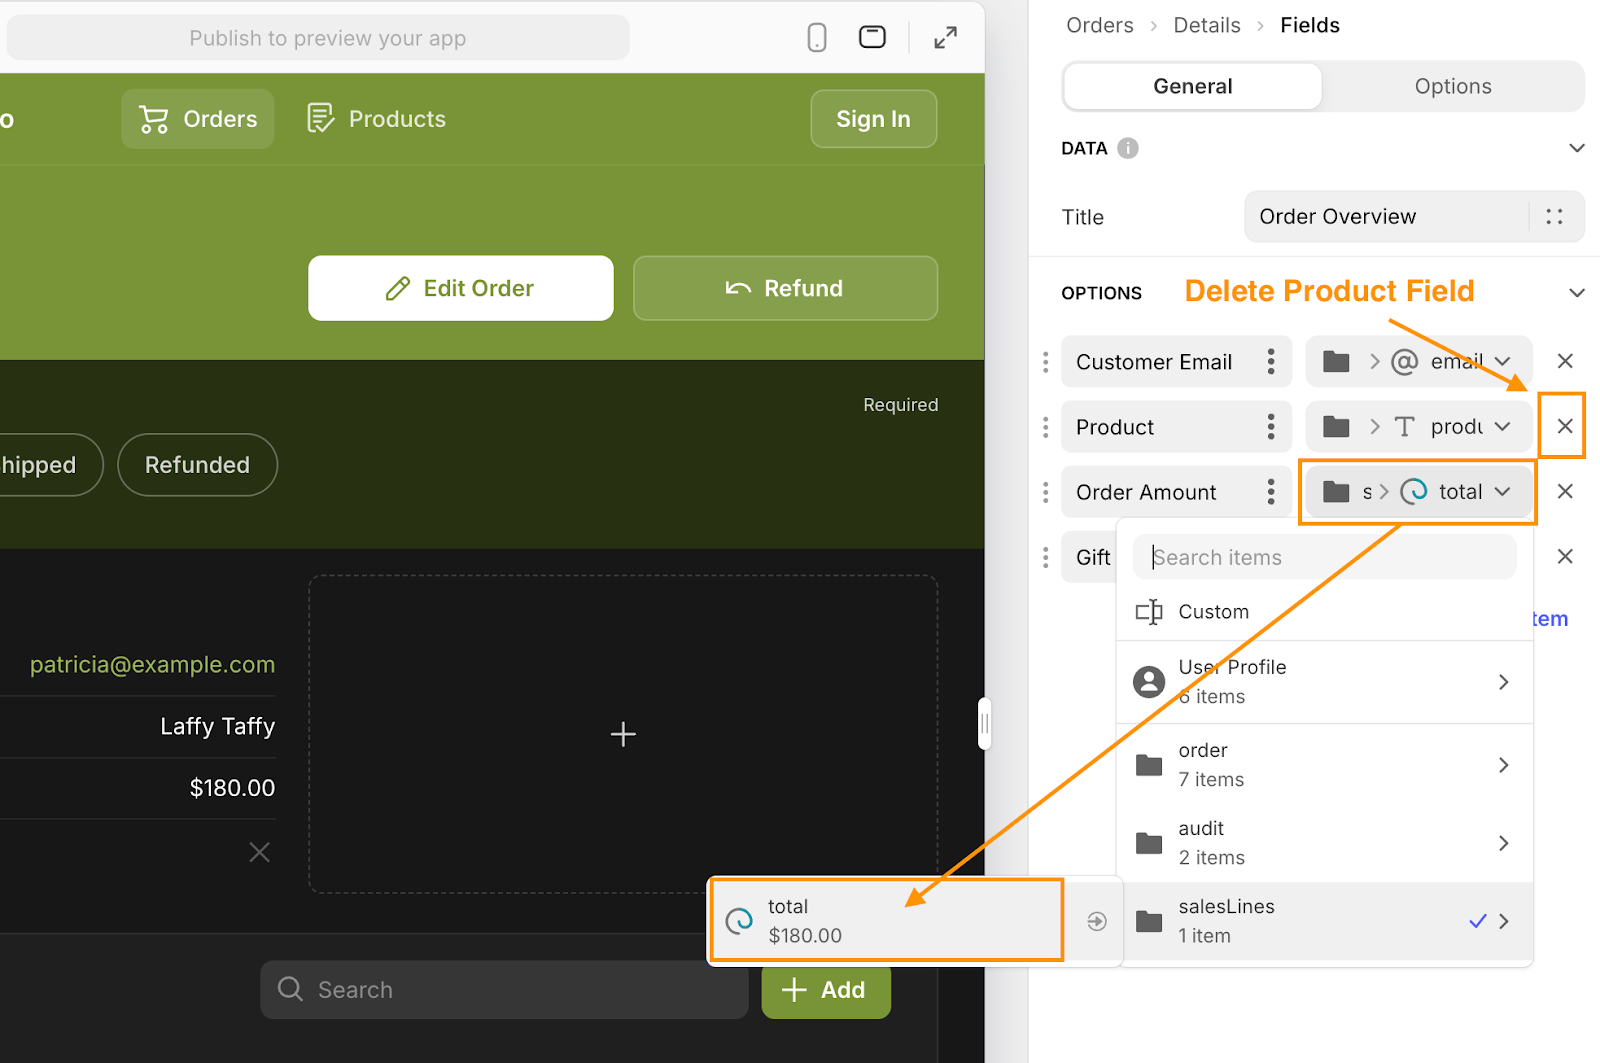
Finally, we’ll remap the Order Amount field in the detail view to use the new calculated total field and remove the outdated Product field. In the Components tree, click on the Fields component.
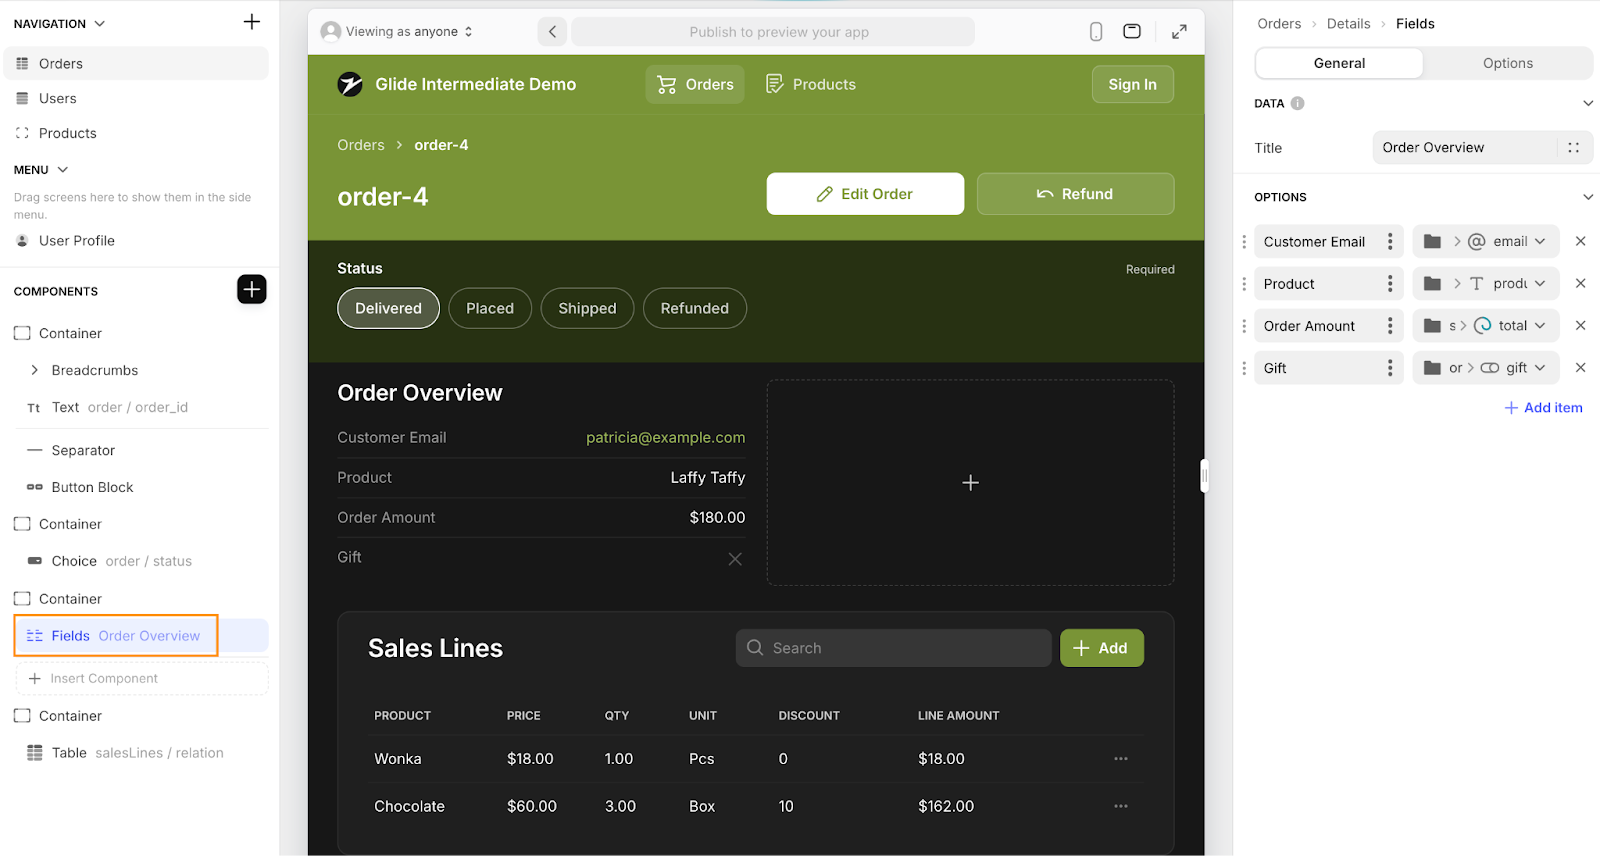
Under Options, update the Order Amount field to point to the total field (from the rollup column in the Orders table) and delete the Product field by clicking the X icon.
Now our order details are beautifully displayed, let’s make this data editable!
Create, edit, and delete Sales Lines
Set up the Create screen
Since we already covered how to build forms in the Glide Basics tutorial, we’ll go through this part quickly and focus primarily on how each field should be configured. If you need more help setting up the screen, follow the Arcade walkthrough:
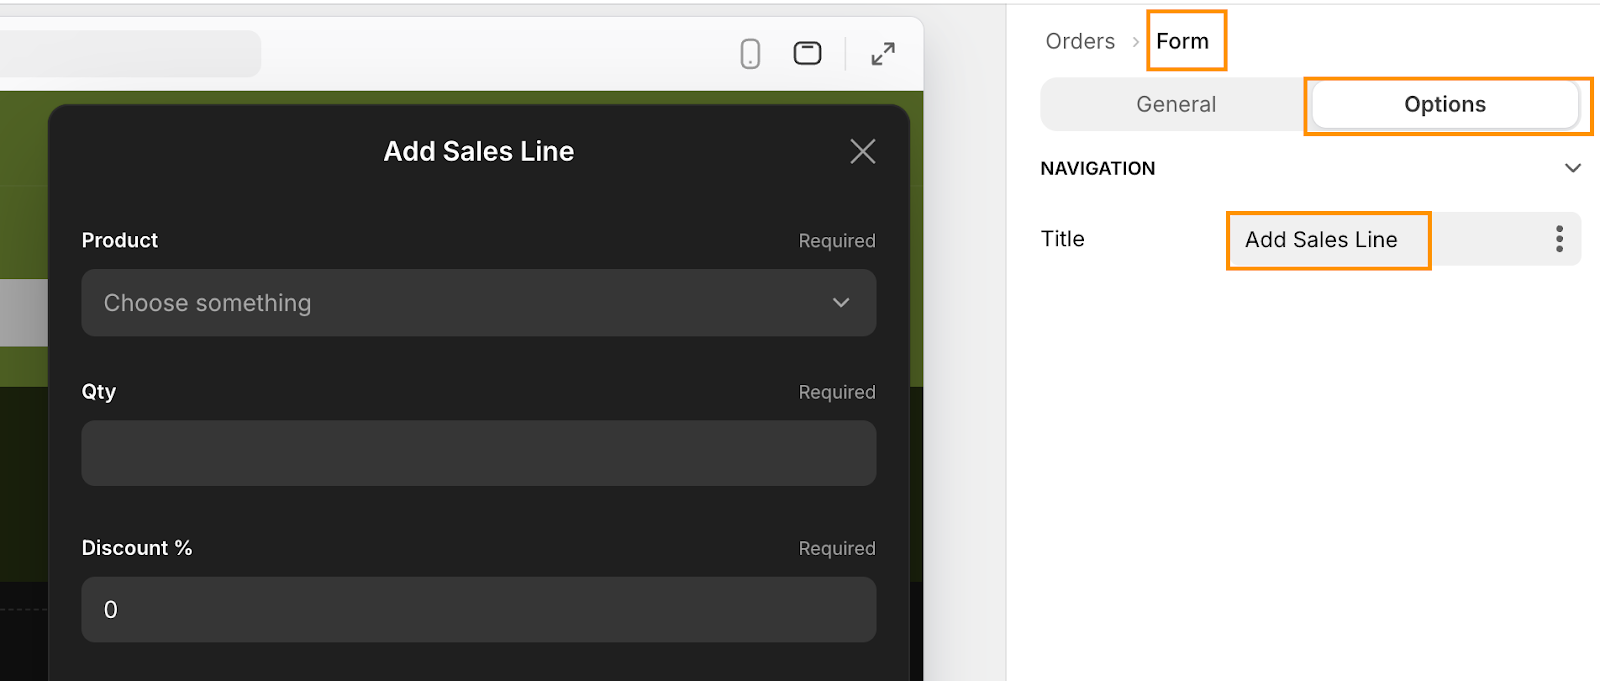
Click the +Add button in the upper right corner of the Sales Lines grid section to open the Create screen. In the form setup bar on the right, click on Form and, under Options, change the Title to Add Sales Line to make it more descriptive than “Add Item.”
In the same configuration, go to General and make sure the destination Table is set to Sales Lines. Under On Submit, set the action to Show notification, and in the Message field, enter something like Sales line created. This is an important step to make sure the user knows an action has been successful.

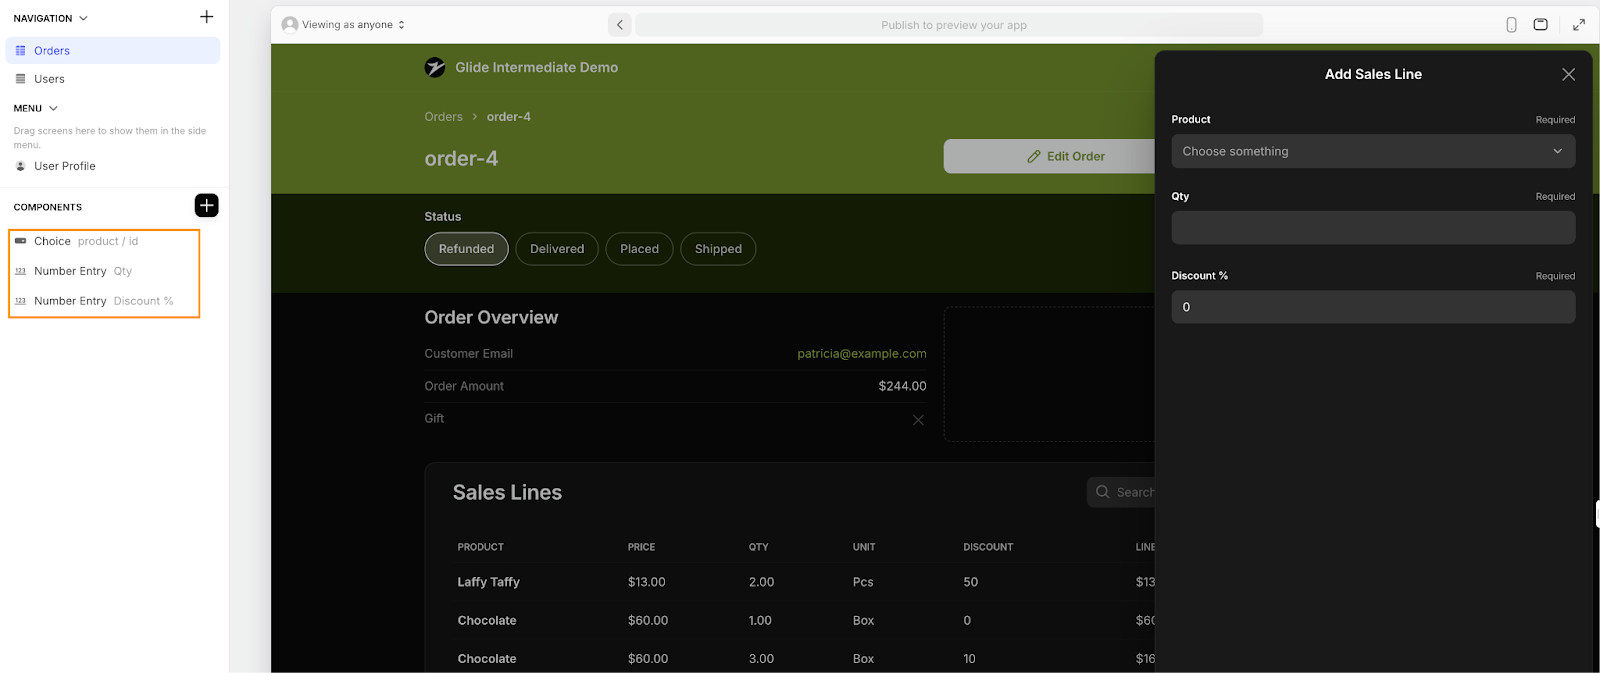
In the Components tree in the left-hand sidebar, remove all fields except:
- The Choice component linked to the product relation.
- The Number component for Qty.
- The Number component for Discount.
Setup the Product choice component like this:
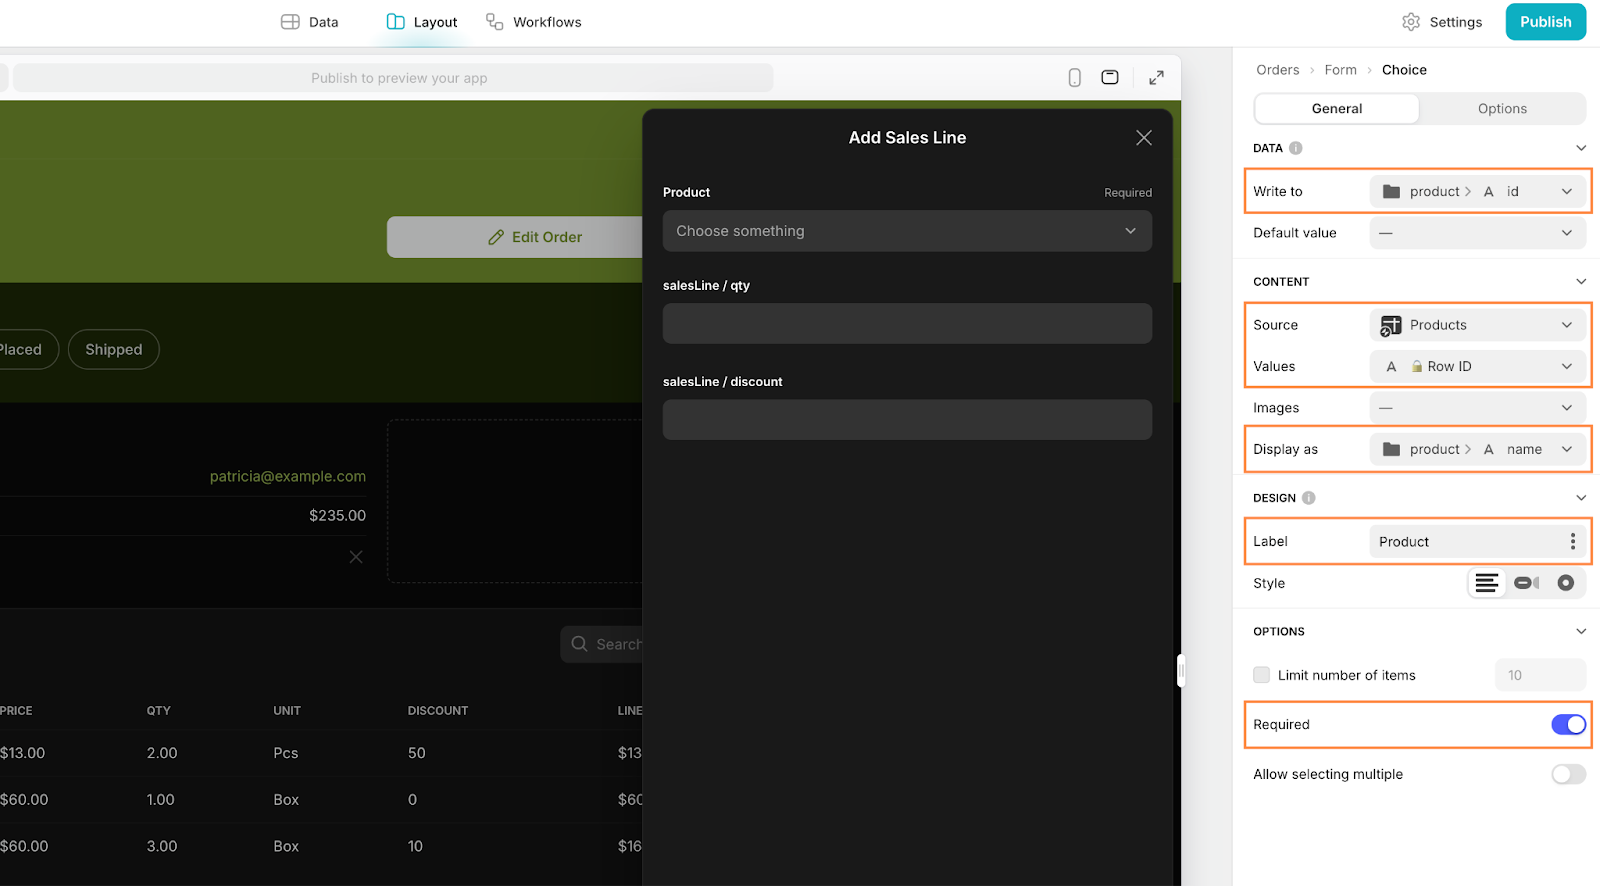
This setup means that while you are connecting to the product ID (a unique value), the user sees the product name. This ensures that the data is always saved to the correct product in the backend but that the user can understand what they are selecting.
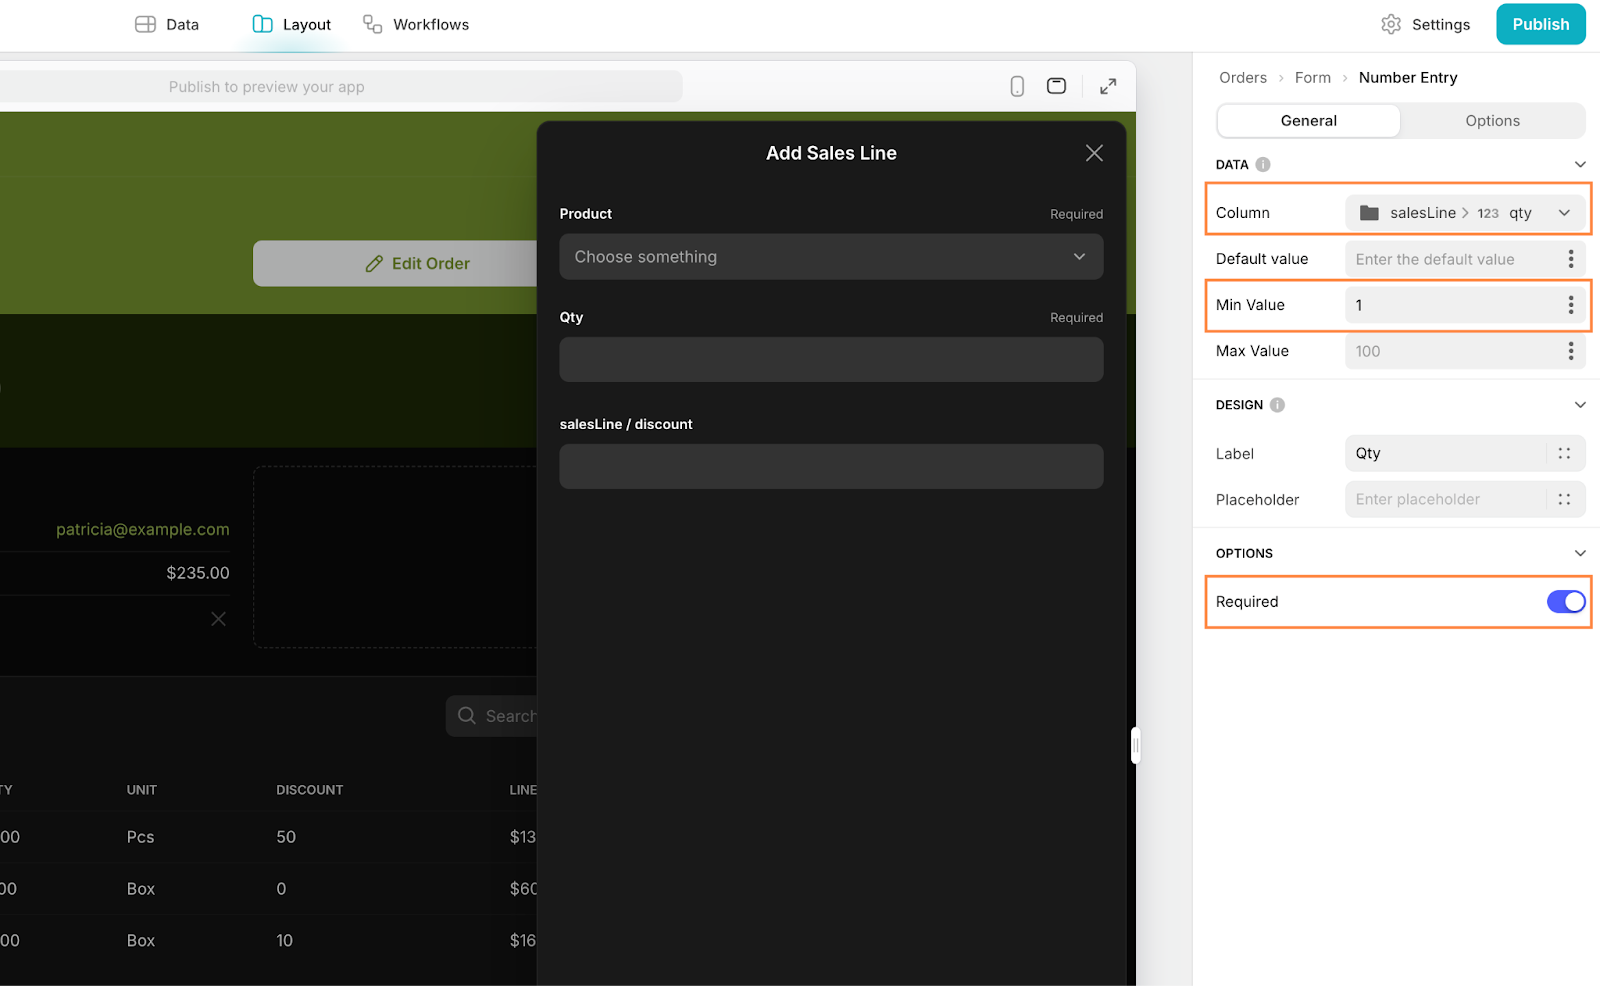
For the Qty Field, map the column to the qty column in the Sales Line table, set the min value to 1 and set the field as required to ensure it isn’t skipped:
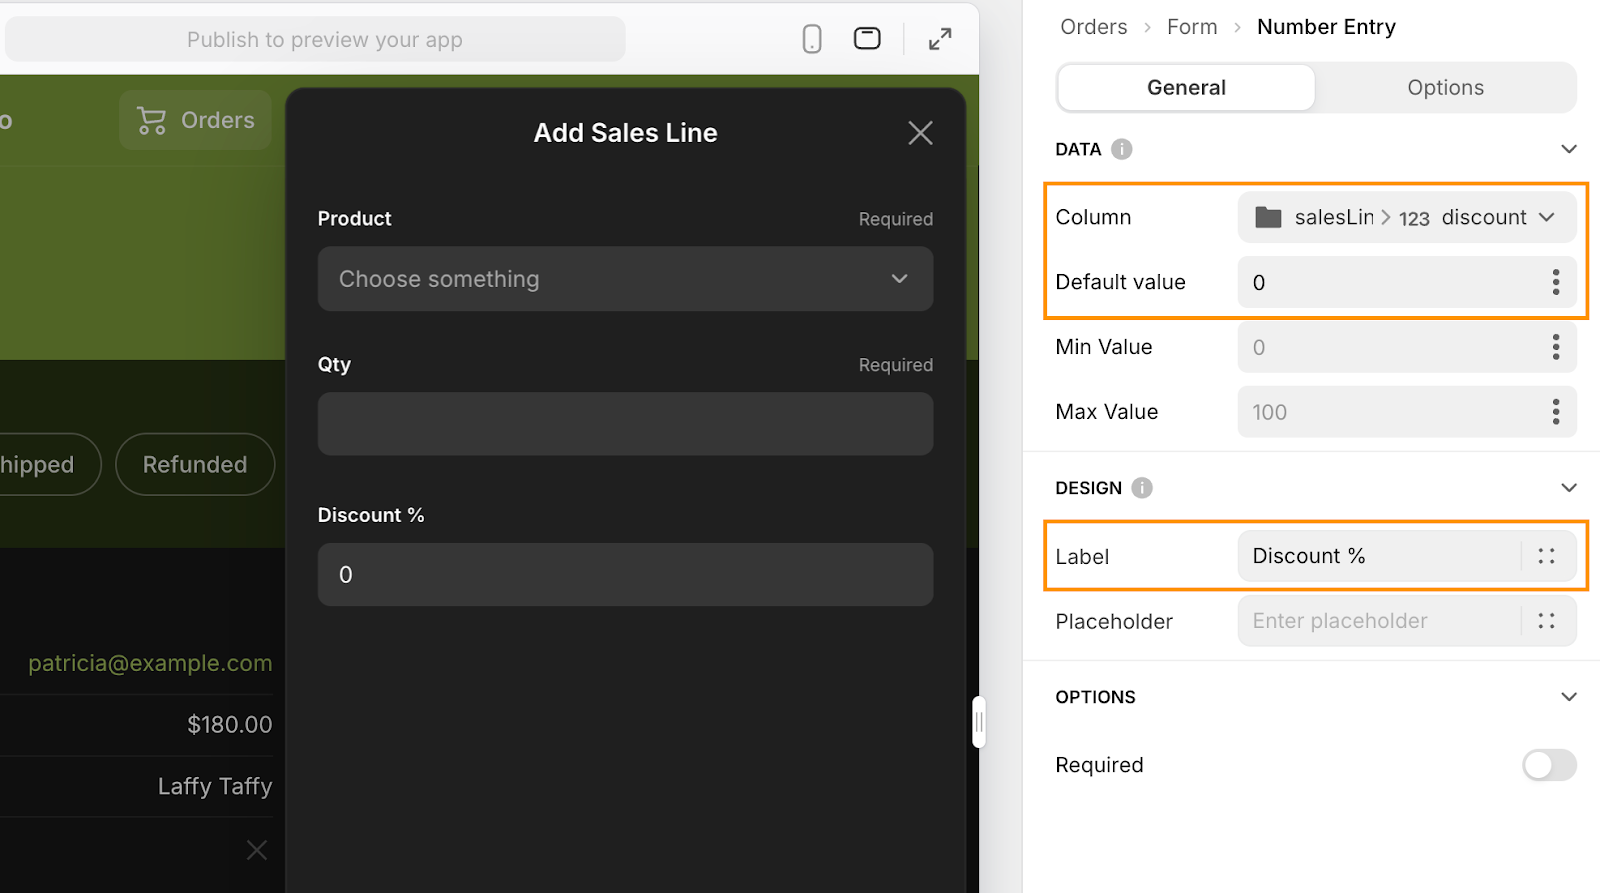
For the Discount Field, map to the discount column, and set the default to 0. Since the majority of orders will not have a discount, leave the Required option toggled off.
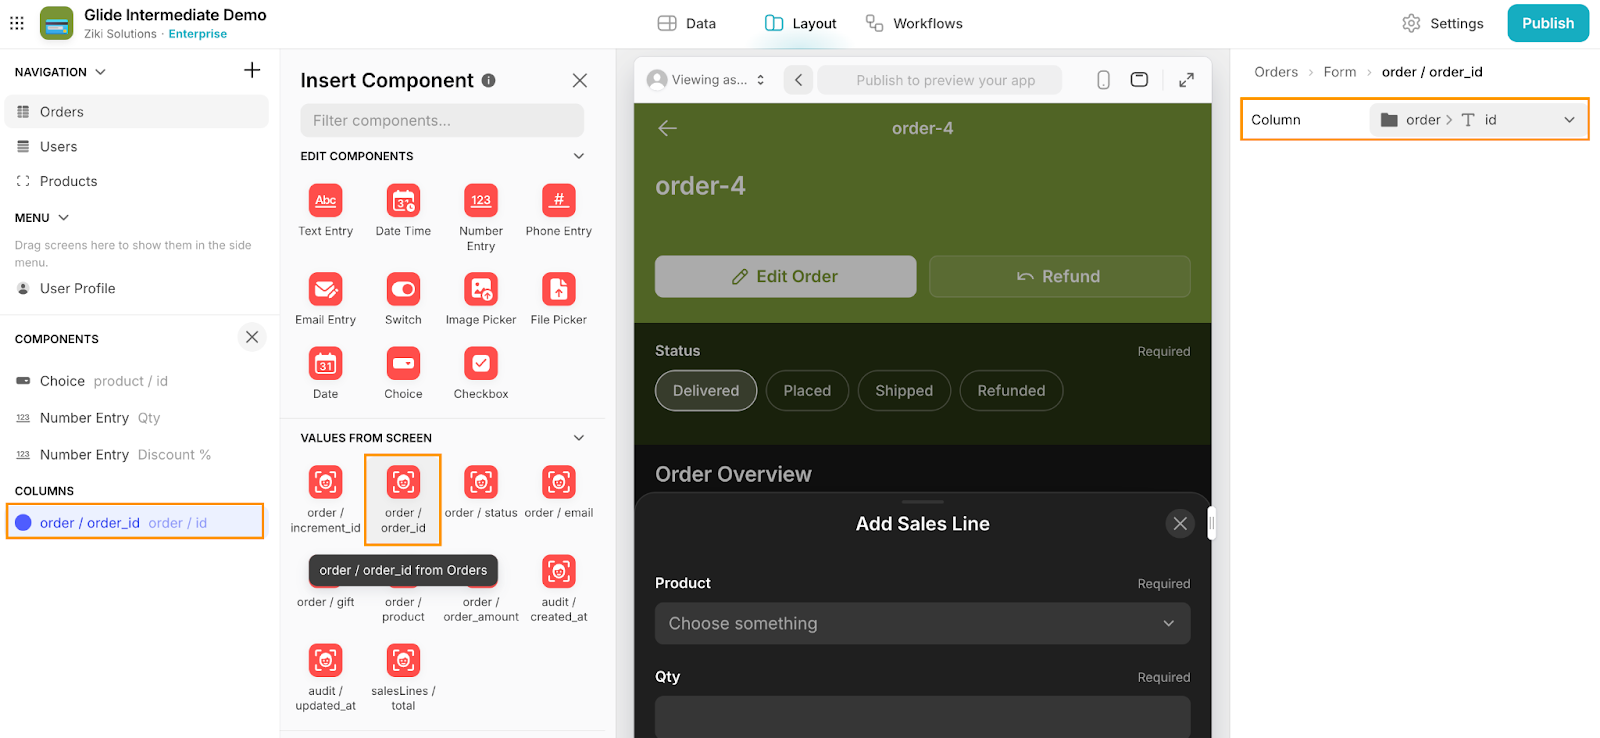
Finally, to automatically link the sales line to the order during creation, we’ll use Glide’s Values From Screen feature. This functionality allows hidden values - like a record ID - to be passed from the source table (in our case, the Orders table) to the destination table (in our case, the Sales Lines table) without requiring user input. In our case, we’ll pass the current order’s ID directly into the sales line, so the user doesn’t have to manually link the two each time. This makes the process smoother and helps prevent errors.
To set it up, find the order_id value under Values From Screen in the component picker and click on it to add it. Then, in the Column configuration on the right, make sure it points to the order > id column. With this setup, Glide will automatically take the order_id from the source record (Order) and add it to the order_id column in the new sales line, creating the relationship without any extra steps for the user.
Set up the edit screen
The Edit screen is almost identical to the Create screen, so you can save time by copying the components. If you need a bit more guidance, follow the Arcade below.
Open the Create form, right-click in the Components tree, and select Copy All.
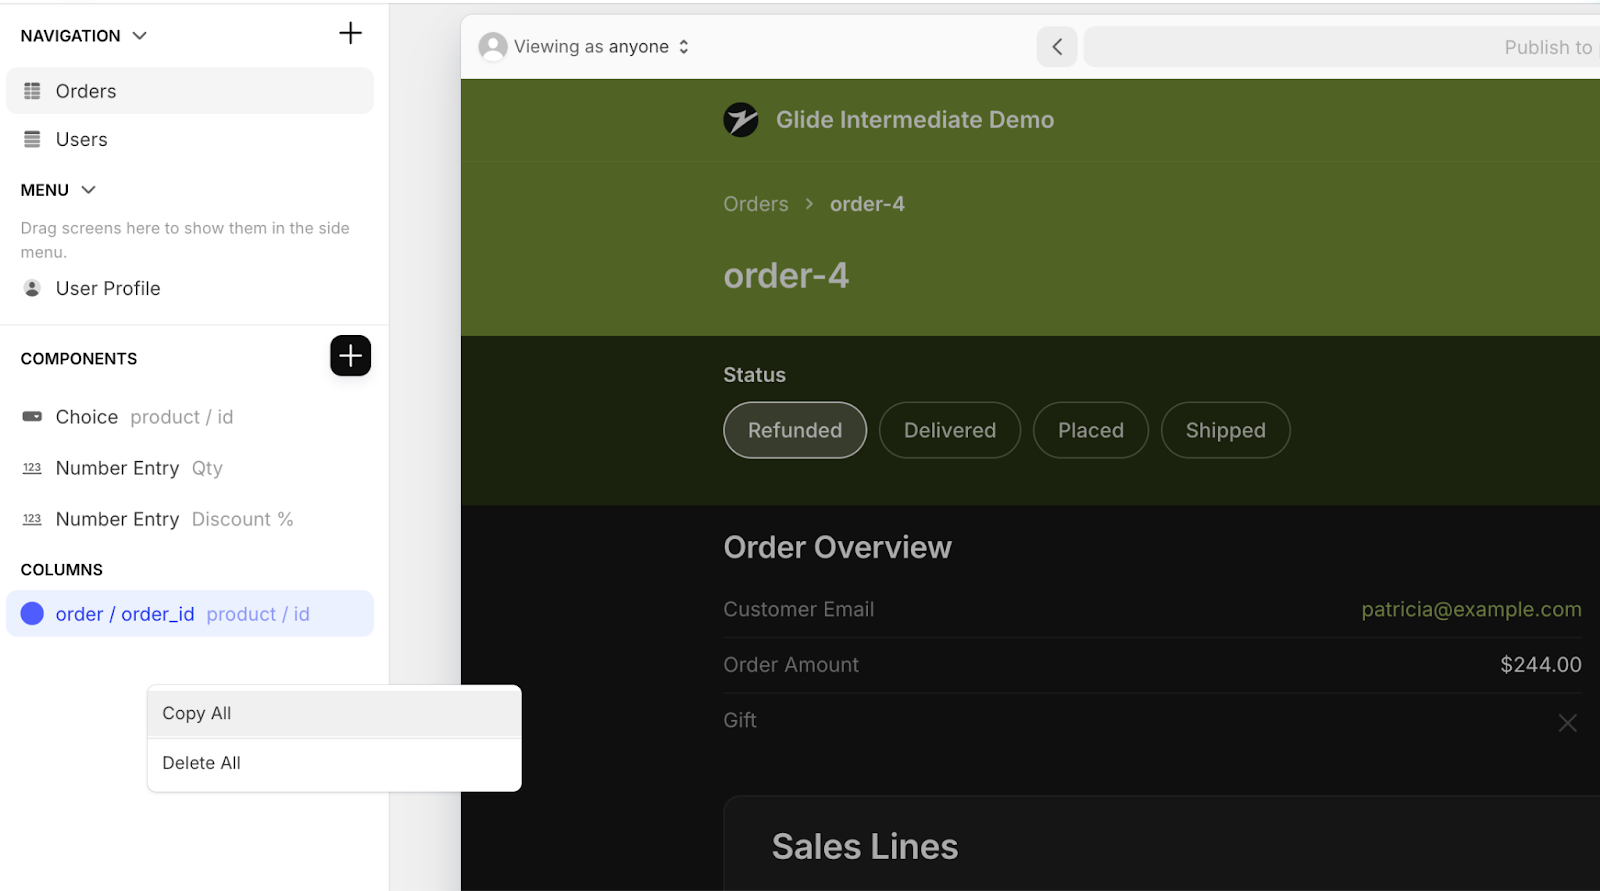
Now, close the form, click on the three dots next to any sales line, and select Edit to open the Edit screen.
Delete all existing components in the Components tree, then right-click and select Paste to add the copied components.

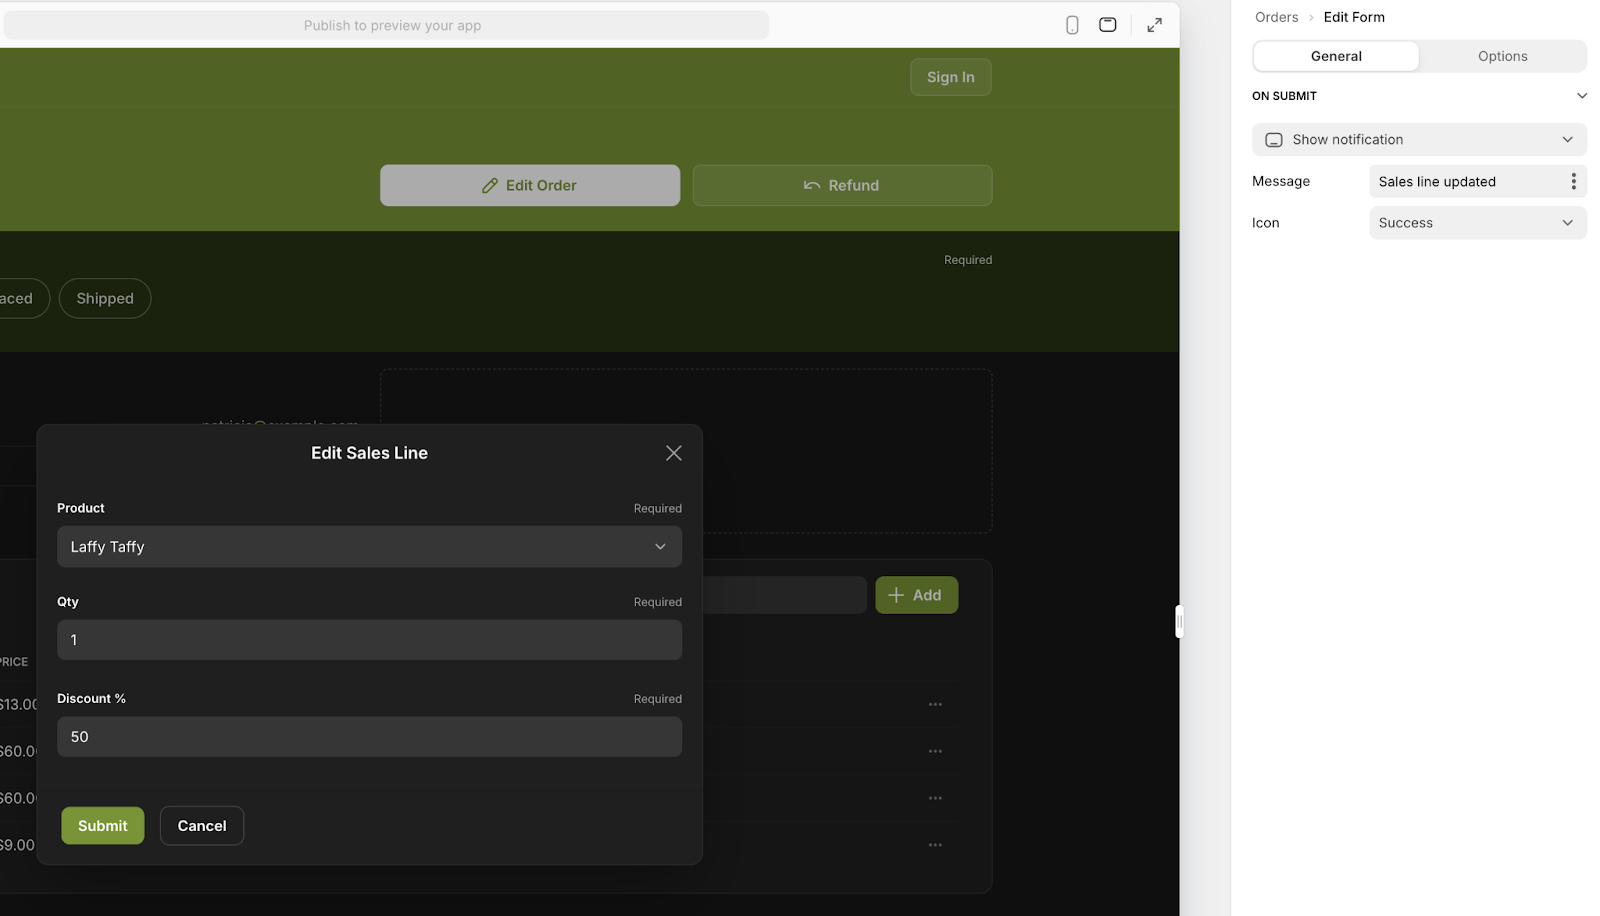
Finally, rename the form to Edit Sales Line and set the On Submit action to Show notification. Customize the notification message as needed (e.g., Sales line updated).
Remove detail screens and enable delete actions
To simplify the user flow, we’ll remove the ability to click into individual Sales Lines (since the grid already displays all the key information) and enable a delete action.
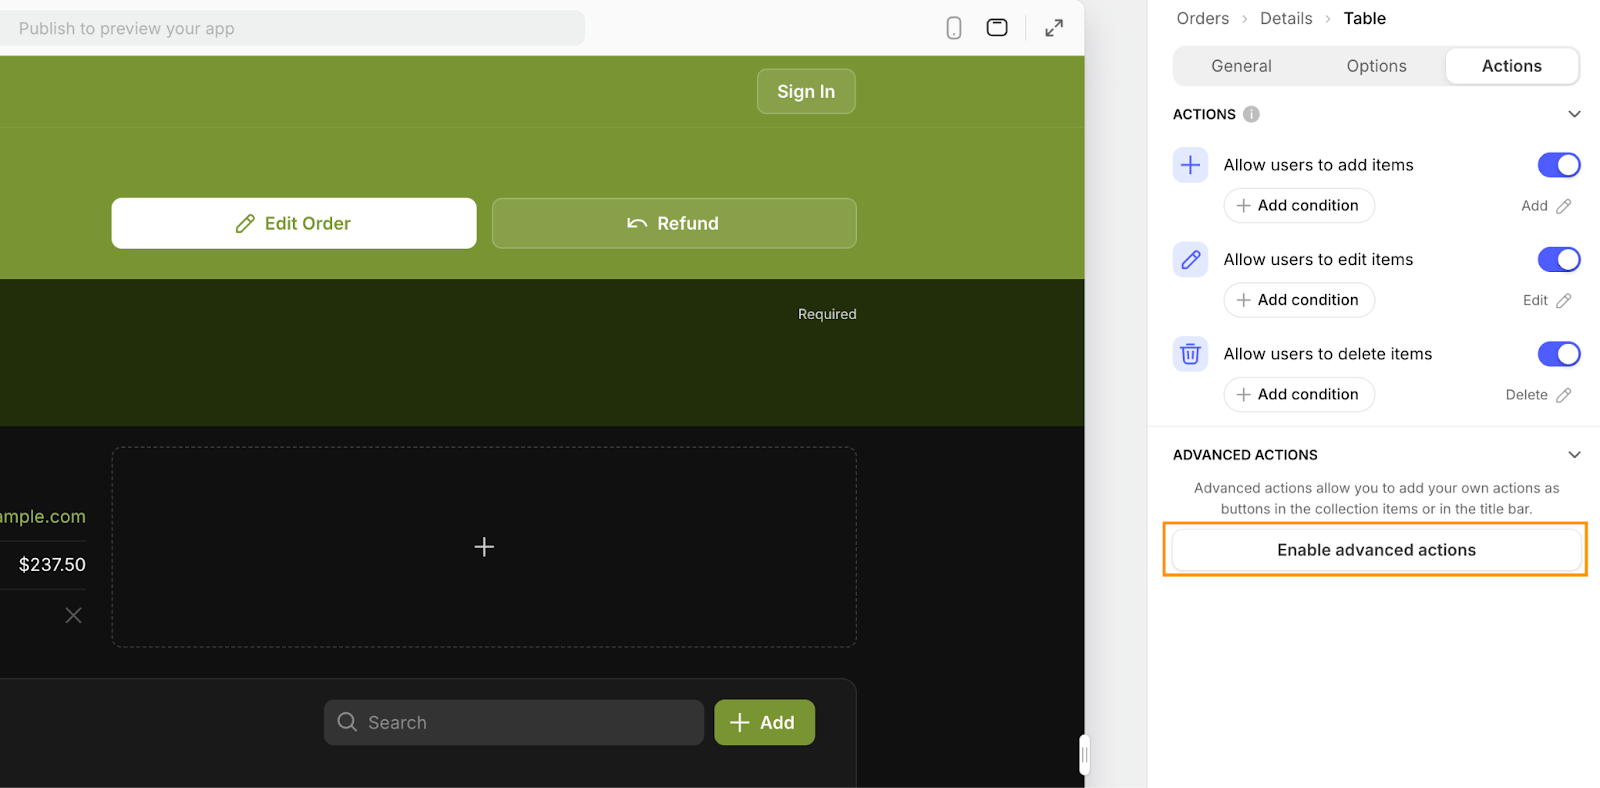
To enable the delete action:
- In the Components tree, select the Sales Lines table.
- In the Component configuration, go to Actions and toggle Allow users to delete items on.
While a ‘delete confirmation screen’ would add an extra layer of protection against accidental deletions, we’ll keep it simple for now. We’ll cover how to build custom forms and screens for this in an upcoming tutorial. For now, this setup allows your users to delete Sales Lines without that extra layer, so beware it only takes a single click to delete the record

To remove the detail screen, while still in the Component configuration, under Advanced actions, enable Advanced actions.
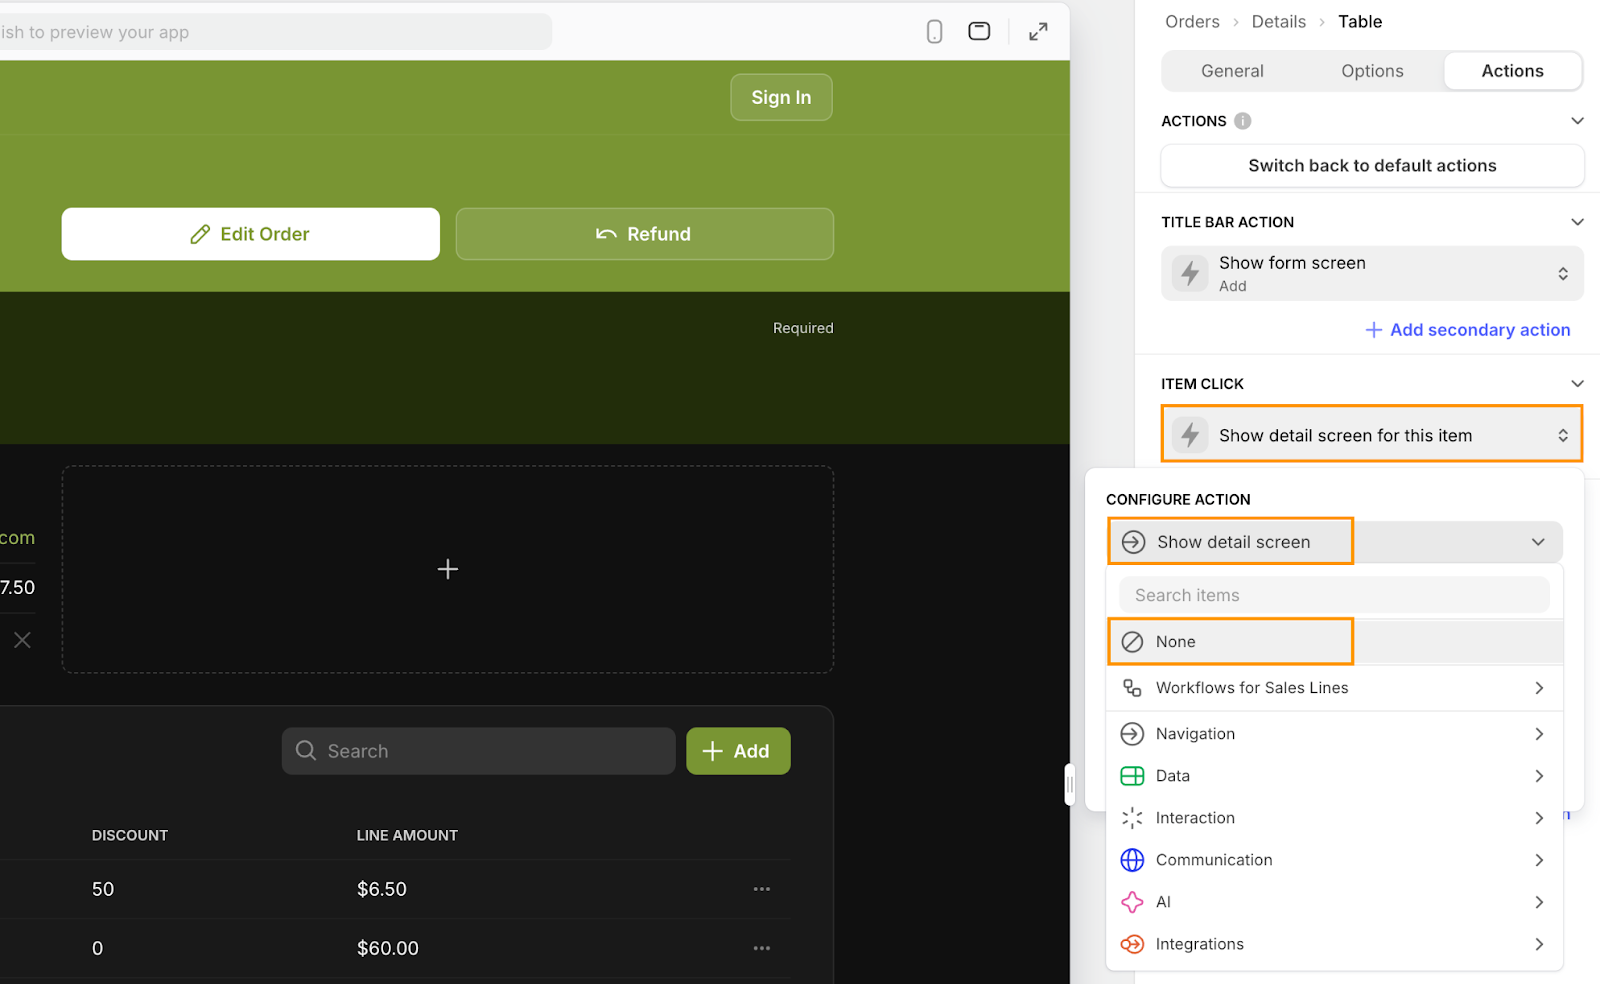
Next, under Item Click, change the default Show detail screen for this item to None. This ensures no action is triggered when a user clicks on a sales line.
Create a Products tab to display product details
Now is a great opportunity to practice everything you’ve learned so far in these Glide tutorials.
In Glide Basics, we set up an Orders tab with a grid to display all orders and configured the add, edit, and delete screens for managing orders. The process for the Products tab is nearly identical—just with different data—so we won’t go into all the details here. If you’d like, however, you can follow the linked Arcade below to set it up in just 5 minutes.
Here’s an example of what your Products tab could look like:

This means that you can now easily add any new product to your app directly from the UI.
Remember to use the Choice component to create the dropdown menu for your Unit field, and set the Options / Helper table as the source for the list of options. Here’s an example of how this configuration might look:

This setup now provides a clean and user-friendly dropdown for selecting product units, simplifying the process for your users while ensuring accuracy in your data.
Database cleanup
Now that we’ve updated everything in the UI (like replacing the static order amount and product data with dynamically calculated values), it’s time to streamline the columns in your database to remove those that duplicate any of this data.
To do this, open the Google Sheets file that serves as the source for the Orders database and delete the outdated columns directly in the sheet, such as the product text field and the order_amount numeric field, since these are now connected to our product and orders table. After the next sync, these columns will no longer be visible in your Orders table in Glide, keeping your database clean and focused on the new setup.
Summary
By following this tutorial, you’ve taken your basic Glide app to a new level, creating a dynamic system that connects your Orders, Sales Lines, and Products in a meaningful way. This scalable setup can handle more complex use cases like tracking multiple products within a single order and calculating totals with discounts—all automatically. With this new structure, your app connects data in smarter ways, unlocking sharper insights and more varied reporting capabilities. It’s also a solid foundation for even more advanced features like inventory management, automated notifications, or performance dashboards.
In the upcoming tutorials, we’ll dive deeper into Glide’s advanced features and show you how to build custom forms, set up advanced actions, and integrate with third-party tools. See you there!

