


Xano is an excellent backend-as-a-service (BaaS) platform that helps developers to build and scale their APIs without the need to manage servers or write extensive backend code. Whether you're working with data for a mobile app, web app, or any other API-driven project, Xano provides a no-code/low-code interface to create scalable and robust backends quickly.
With Xano, developers can define their database schema, create business logic, and expose APIs—all within a single platform and with a straightforward, no-code interface. Ultimately, it means that technical folk can build a database structure like a developer can, but without needing to know code.
It’s designed to integrate with frontend tools like Retool, React, Flutter, and others, making it a great choice for building application backends.
Combining Xano and Retool is a powerful alternative for developers who want to keep business logic outside of Retool and still access their database securely via an API. Unlike using Retool Database with direct SQL queries—which can expose applications to risks like SQL injection or unauthorized data manipulation—Xano allows you to format secure API calls, reducing the risk of malicious changes. This makes it especially useful for those building a SaaS on Retool.
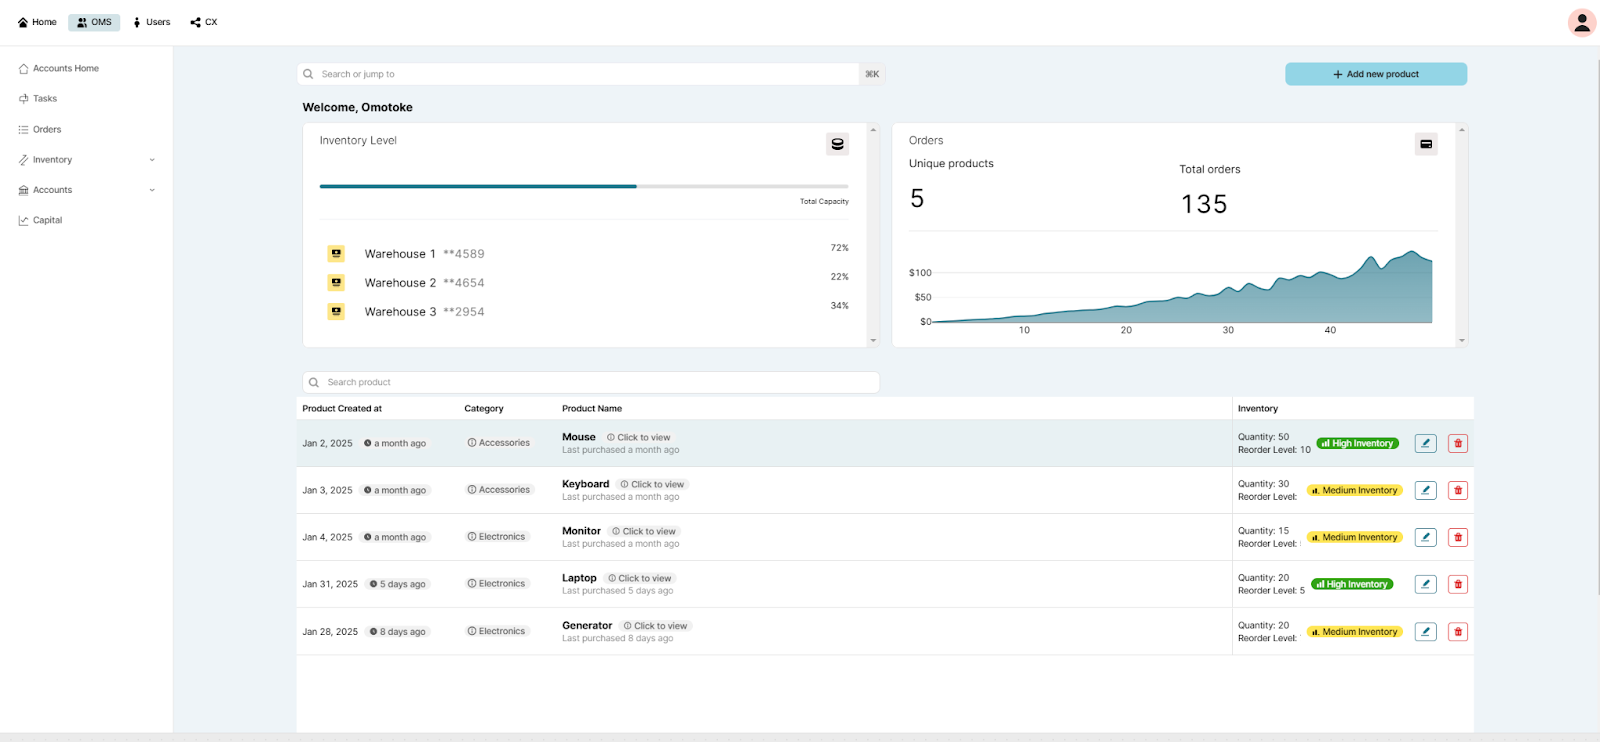
This tutorial will guide you to create a simple inventory management system using Xano API for your backend and Retool for your frontend. Here’s a snapshot of our final app:
Let’s go!
Set up your Xano Account and login
Visit Xano and register if you don’t already have an account. Click the “Get Started for free” button to register.

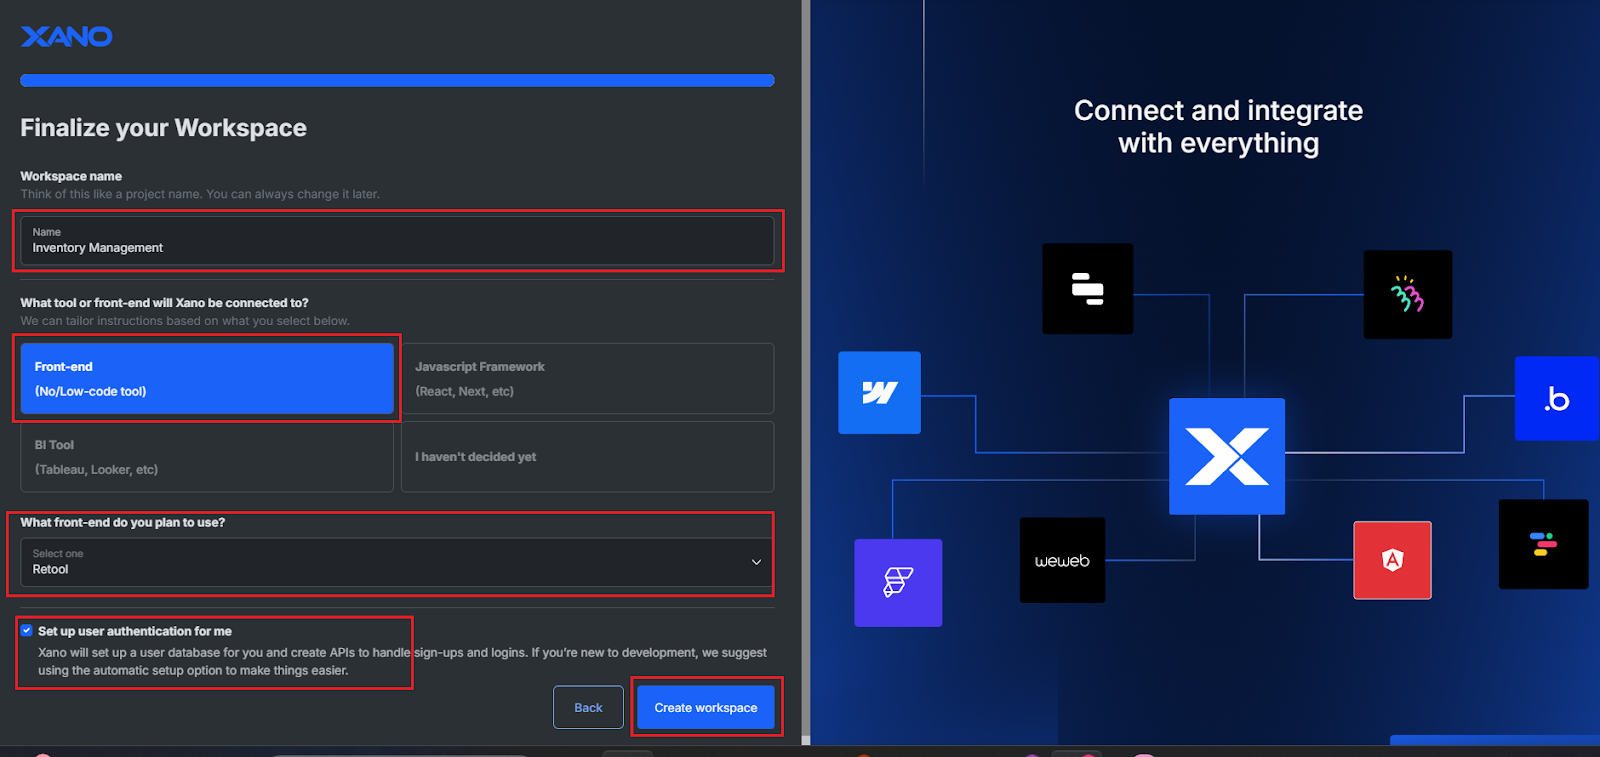
After registration, you'll be guided to set up your Workspace. A Workspace is where you'll manage your database, APIs, and logic for your application.
To set up your Xano workspace, fill in the details in the Workspace form. Once this is done, you can click "Create workspace" to initialize your backend environment, which prepares it for customization and integration with your frontend tool.
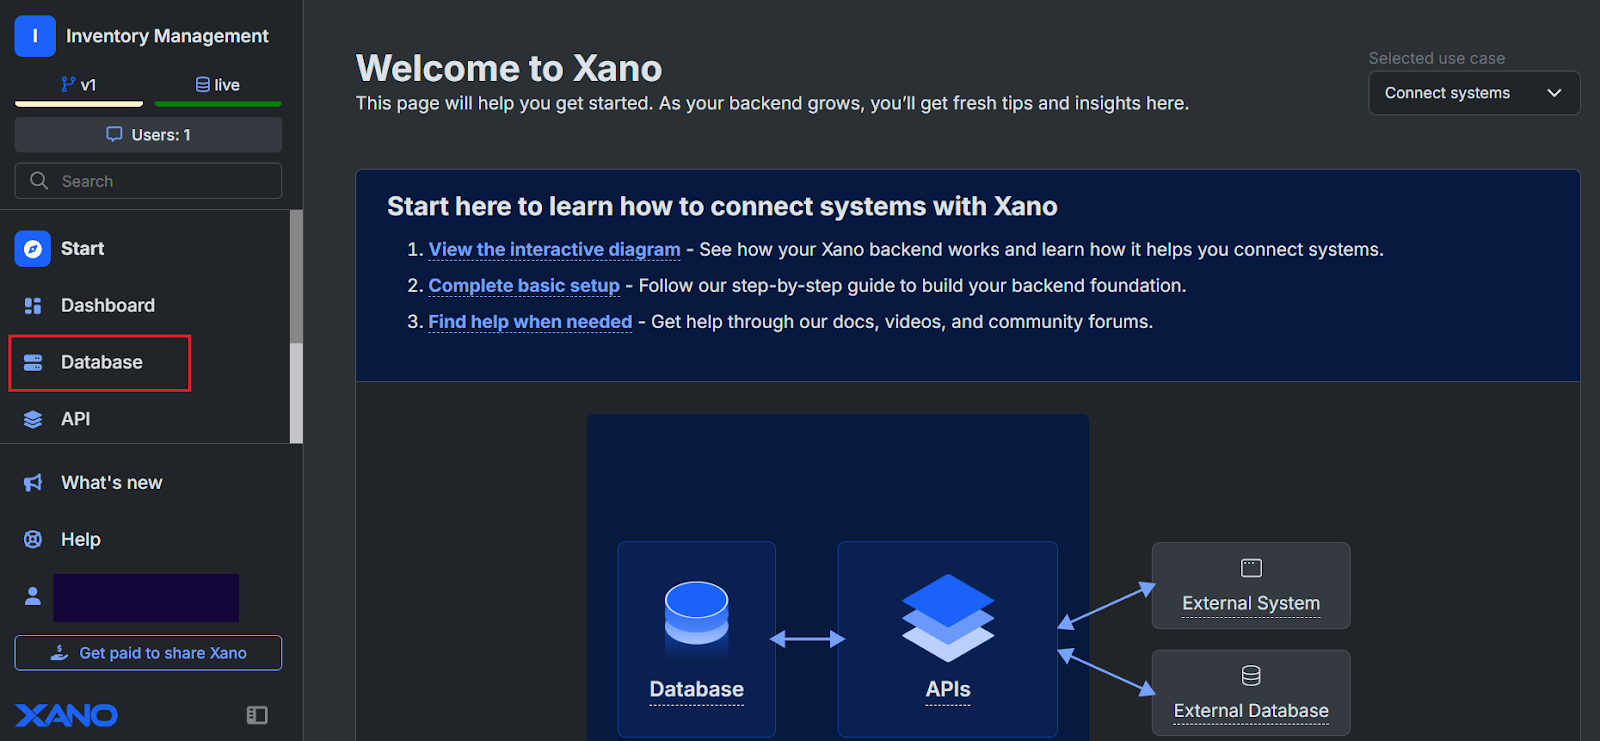
Once your workspace is created, you'll land on the Xano dashboard. This is the central hub where you can manage your backend.
Set up your database tables in Xano
To start building, navigate to the Database tab on the left-hand menu to create your Database.
This will be the starting point before creating APIs or connecting external systems.
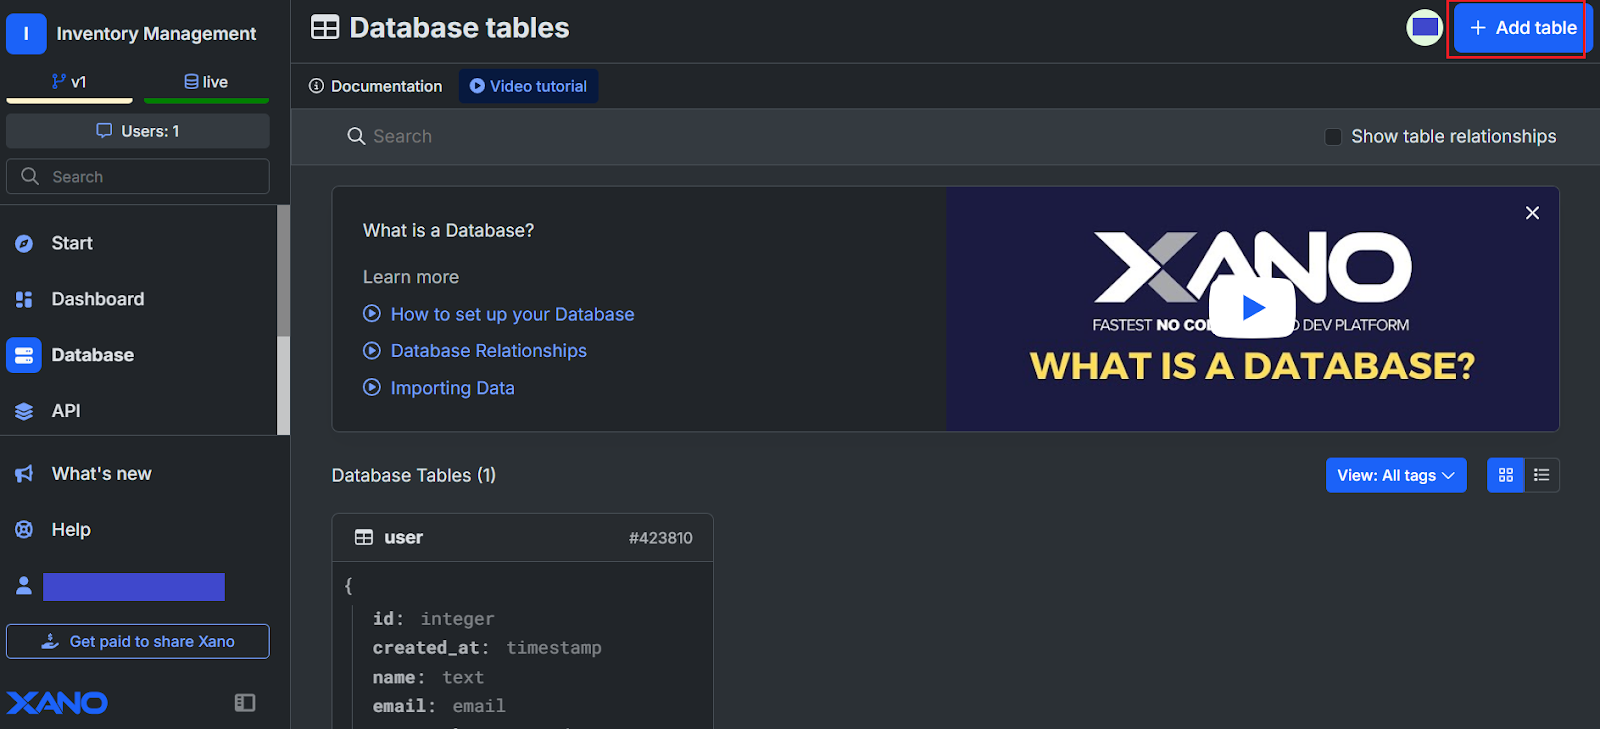
In the Database Tables section, you can start defining your data structure. To add a new table, click the + Add table button in the top-right corner.
When creating a new table in Xano , you have the option to Import data or enter your data manually.
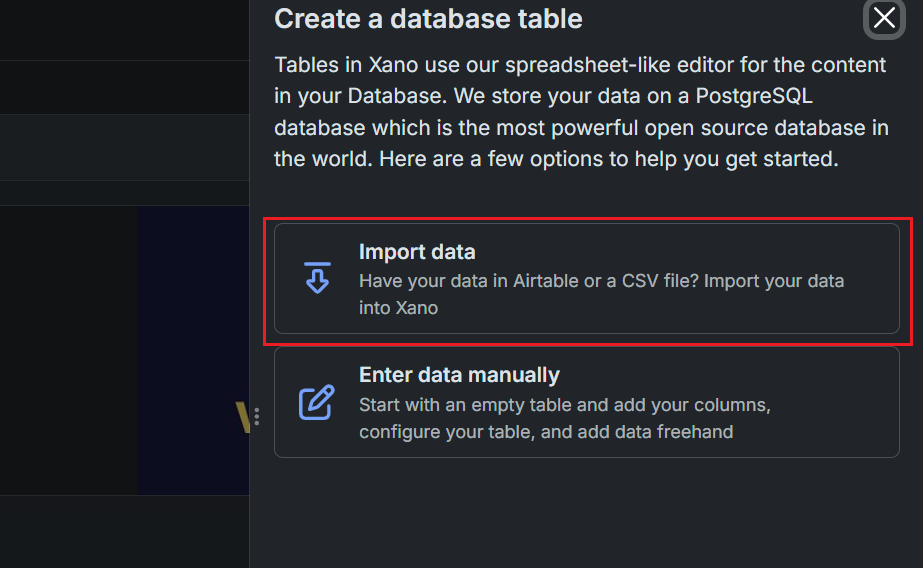
You can also choose to import data from either a CSV file or Airtable. For this tutorial, let’s select the CSV option, where you can upload your CSV file, and Xano will automatically create a table and populate it with the data from your file. You can download a sample CSV here to get started faster.
If you're using the provided sample CSVs, simply upload them to quickly set up your tables.
When importing your CSV, give the table a usable name (e.g., "Products") and select the primary key column (e.g., id). Make sure to review the preview to ensure your data is formatted correctly, and adjust column types if necessary by clicking on the headers.
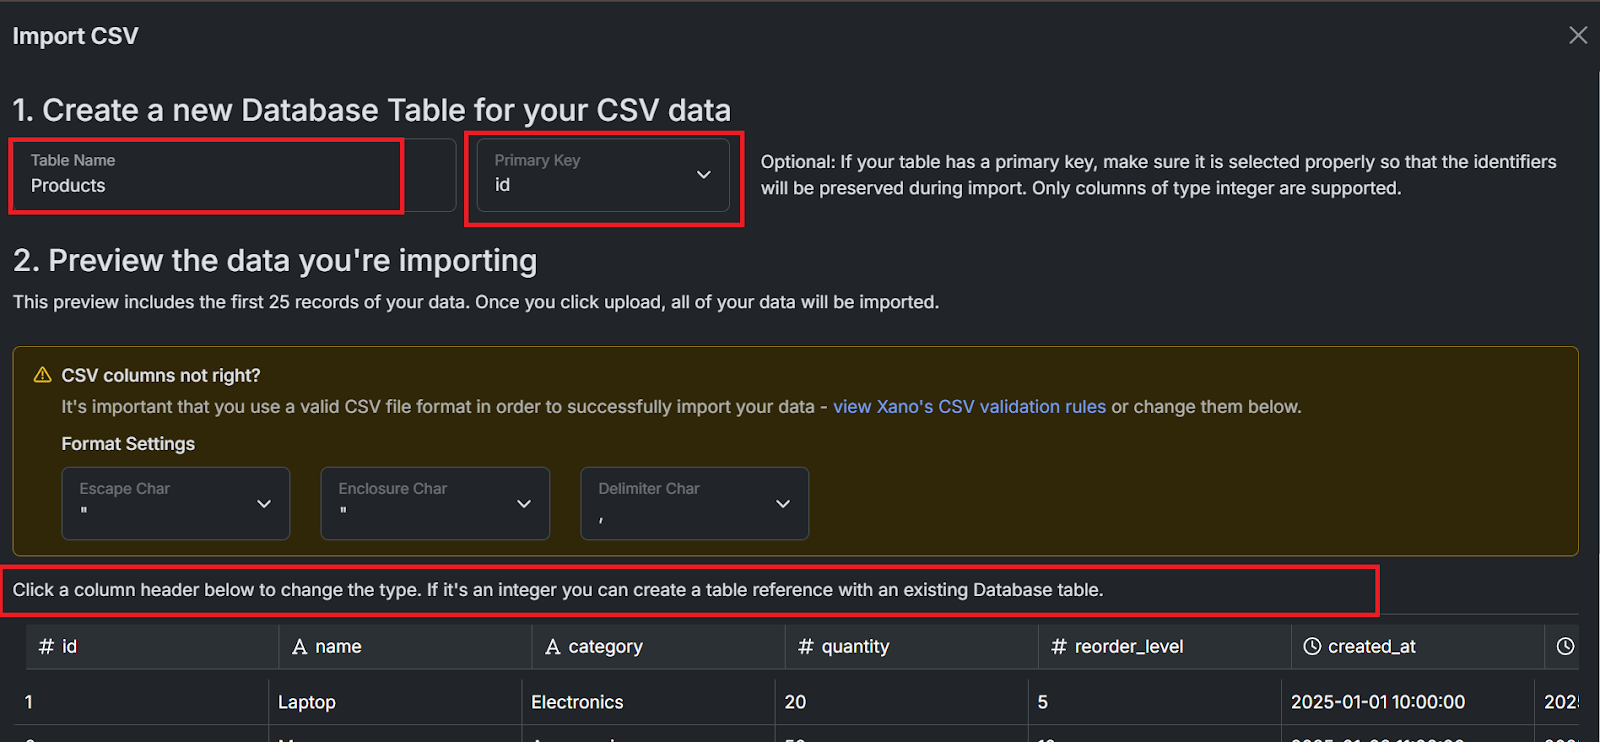
Once satisfied, click “Upload” to create and populate your table in Xano. Your table should look something like this:

Once the CSV is imported, your data will appear as a table in Xano, like the "Products" table shown here. You can now view, edit, and manage the records directly in this interface.
The next step is to create our API endpoints so that we can connect to these tables in Retool, navigate to the API tab in Xano and click on + Add API Endpoint in the top-right corner.
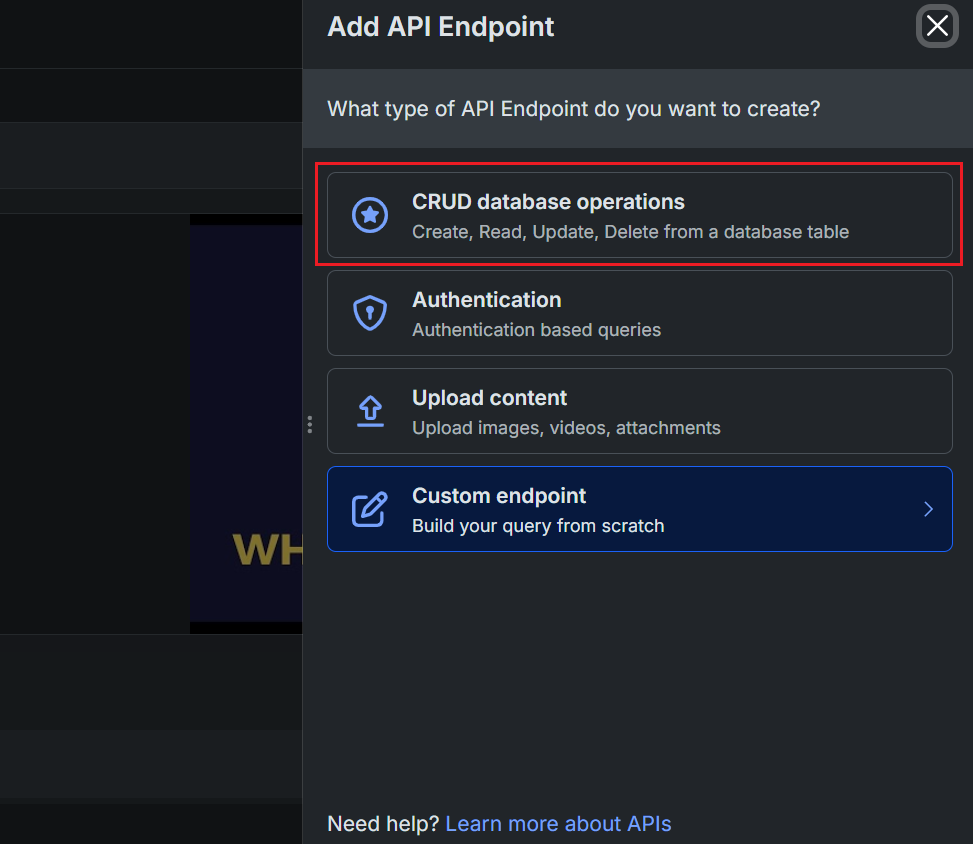
This section allows you to create endpoints that interact with your database, such as fetching, creating, or updating records. These endpoints will be used by your frontend application to communicate with your backend.

Select CRUD database operations to create API endpoints for managing your database table. This will generate endpoints for creating, reading, updating, and deleting records.
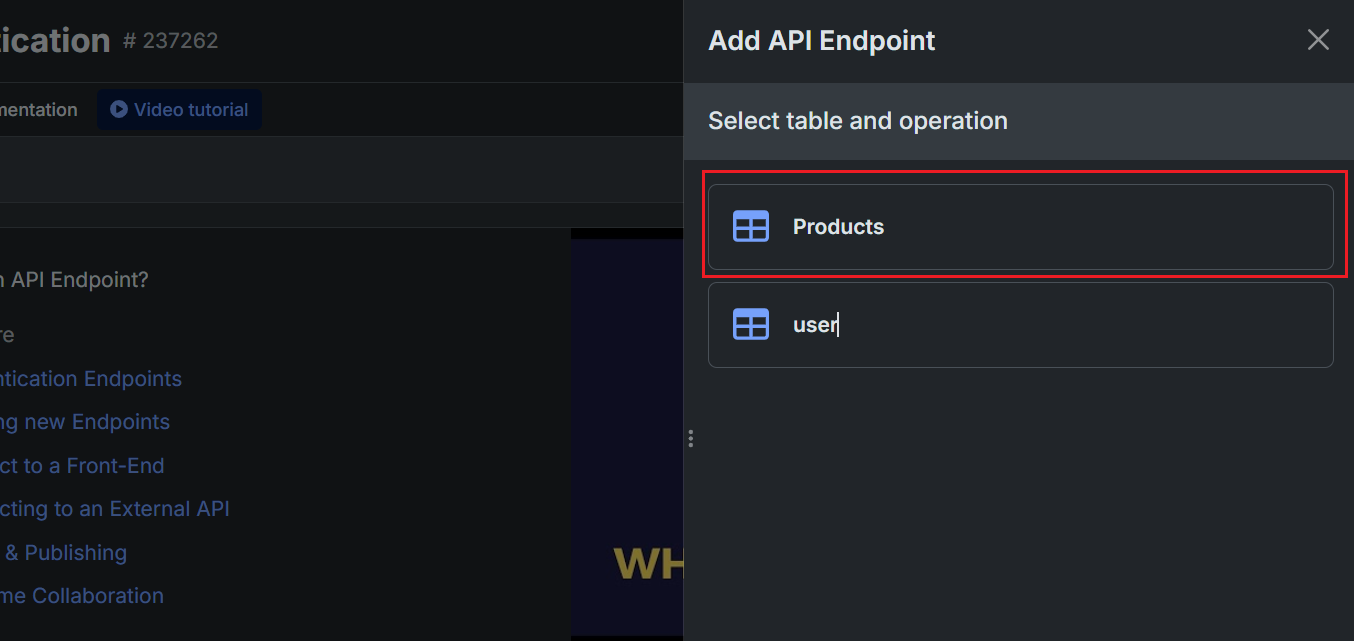
Select the Products table to create API endpoints for it. This will allow you to perform CRUD operations (Create, Read, Update, Delete) on the data stored in the Products table. Once selected, Xano will generate the necessary endpoints automatically.
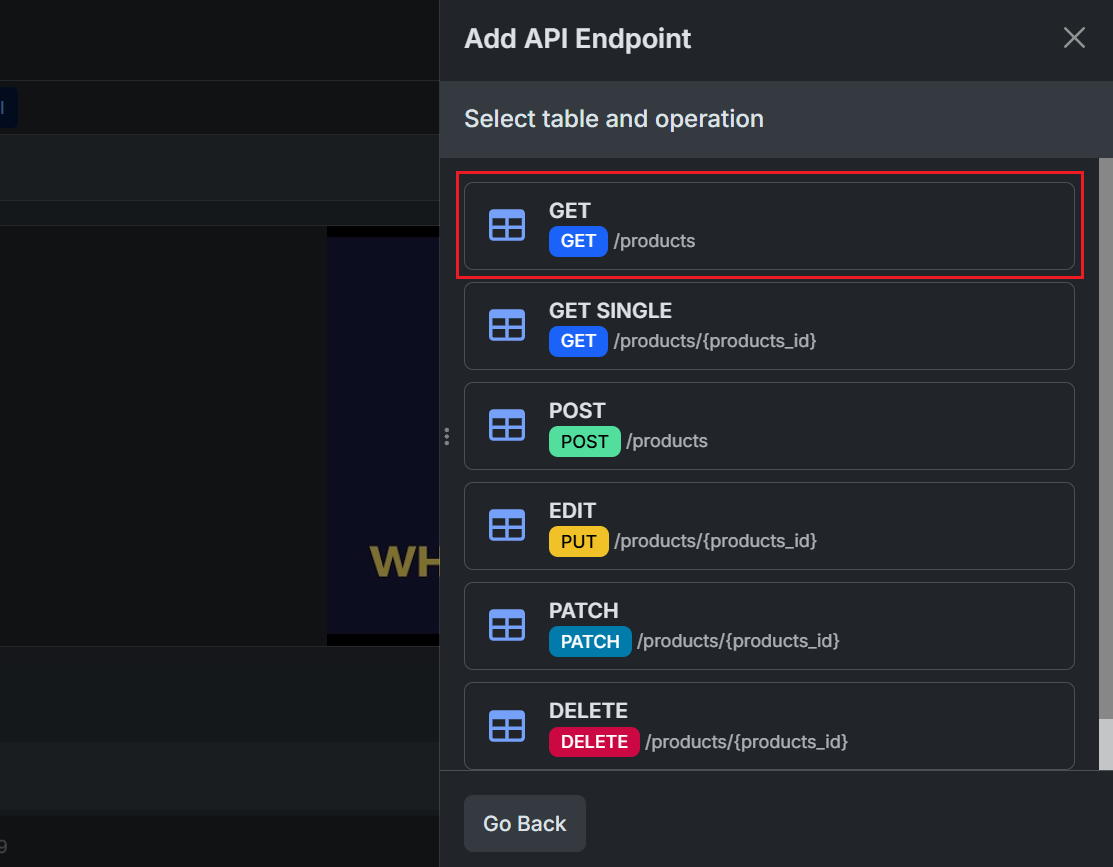
Select the GET /products option to create an endpoint that retrieves all records from the Products table.
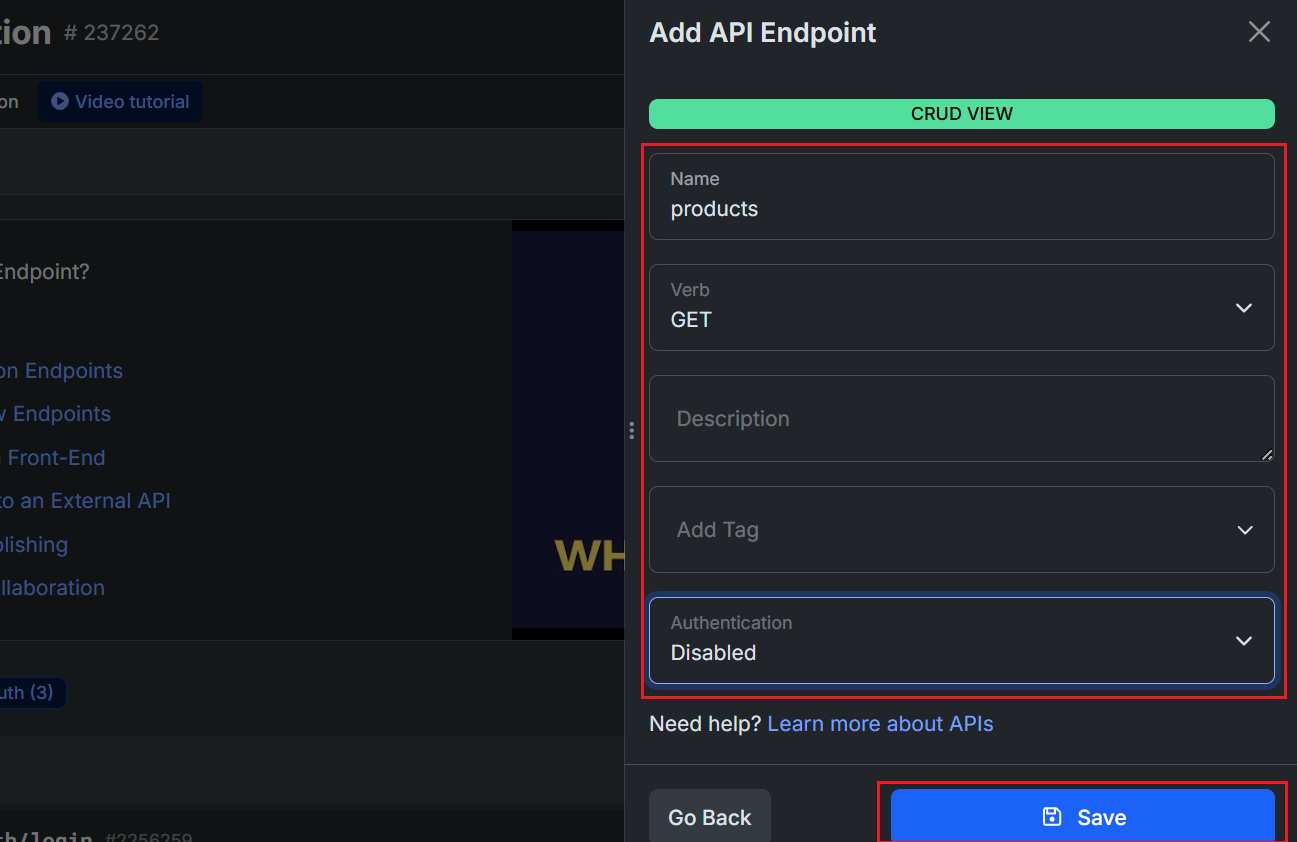
Fill out the endpoint details and once complete, click Save to finalize the endpoint creation.
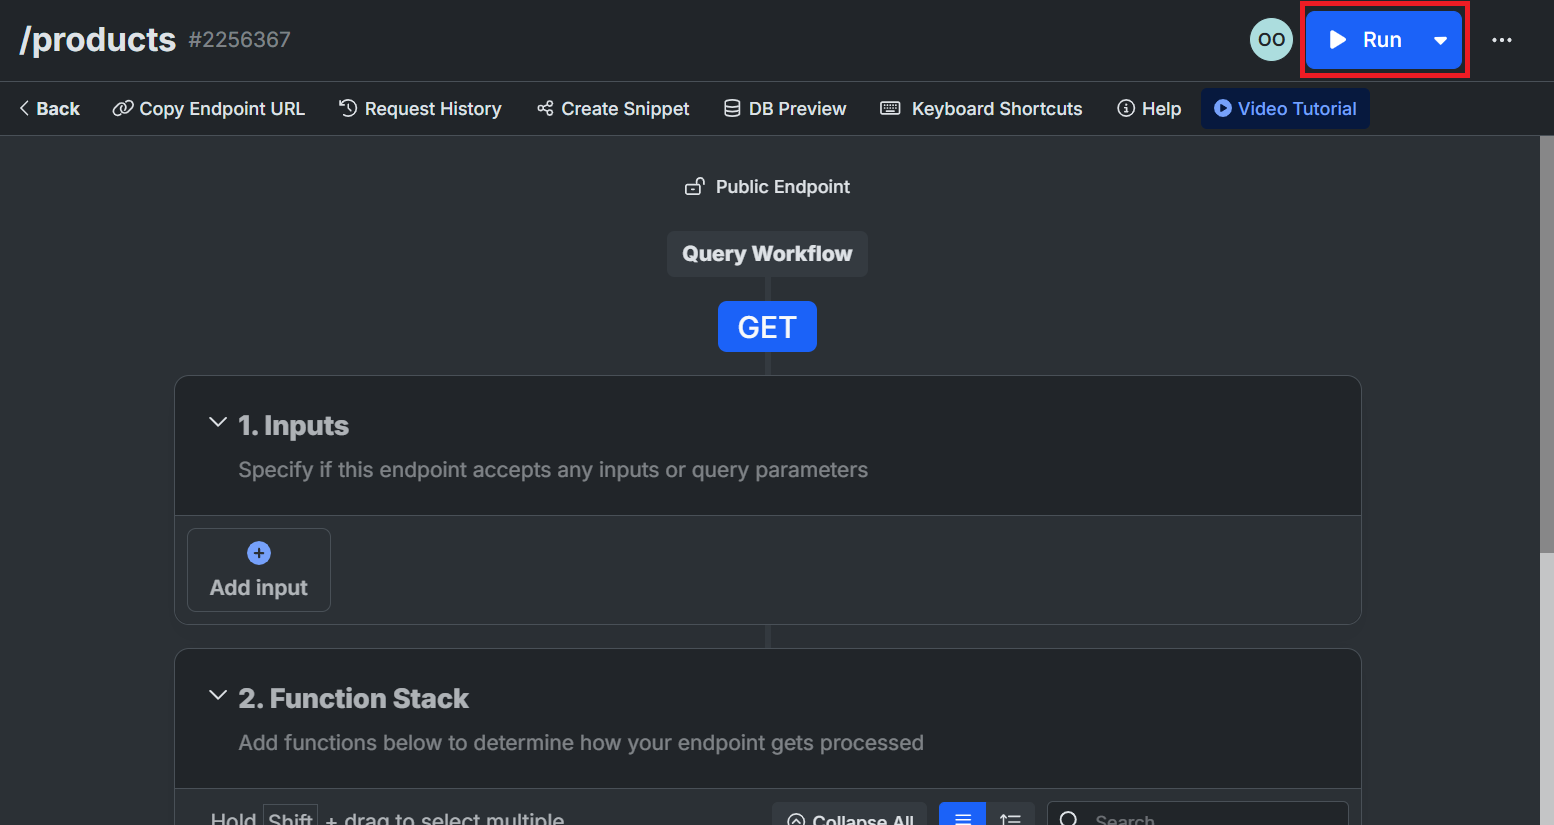
After creating your API endpoint, you can test it by clicking the Run button in the top-right corner. Use this to verify that the endpoint works as intended and processes data correctly.
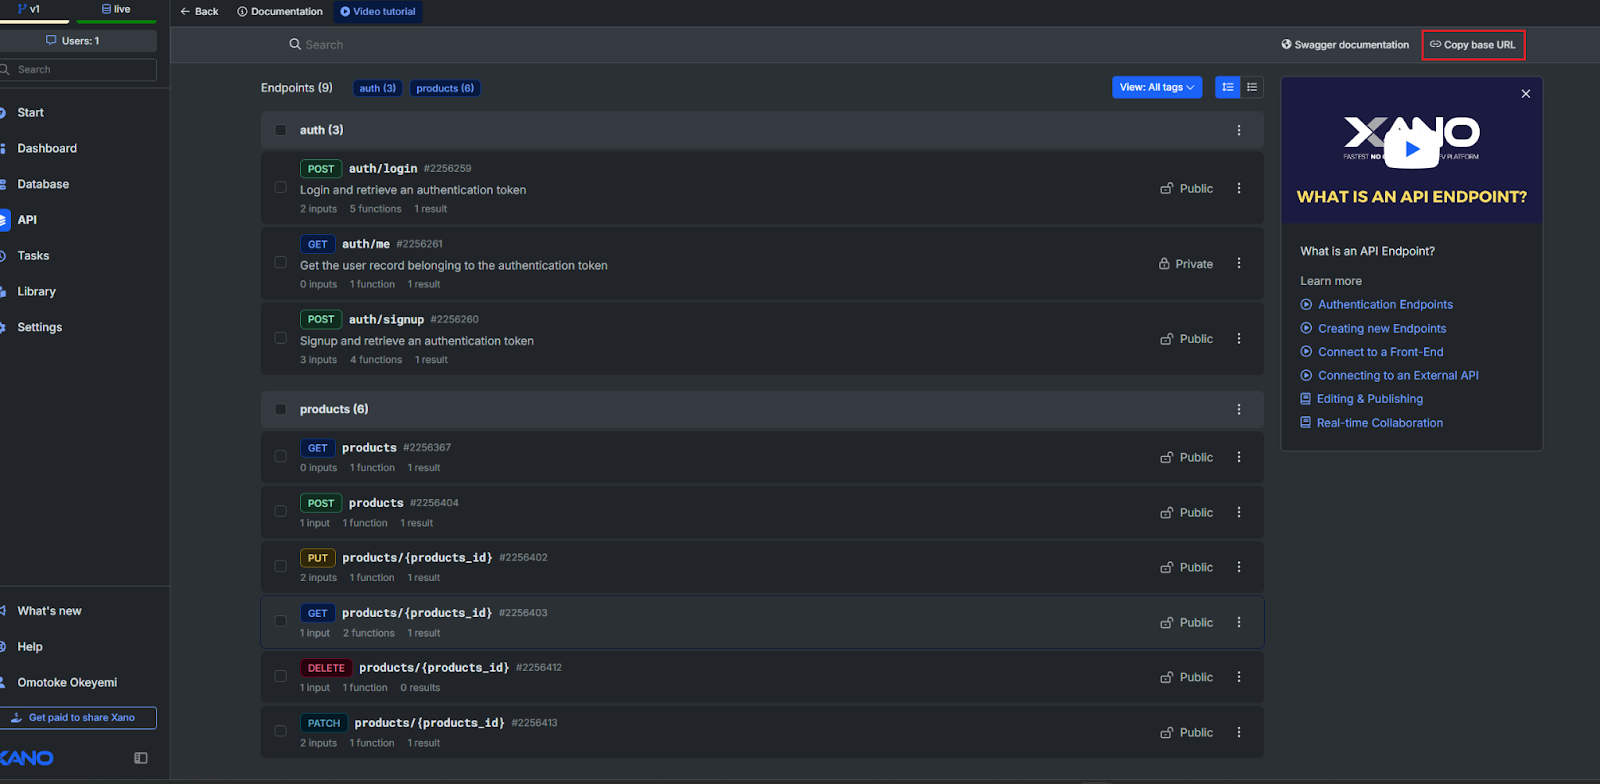
Repeat this process for each type of endpoint you need, such as POST for creating new records, GET SINGLE for fetching a specific record, PUT or PATCH for updating records, and DELETE for removing records. Continue adding endpoints until all CRUD operations are set up for your table

Click the Copy base URL button in the top-right corner. This base URL will be used as the starting point for configuring your REST API resource in Retool.
Set up your Retool Account
Retool is a platform for developers to quickly build frontends for their data using a drag-and-drop interface. It integrates seamlessly with databases like Postgres, MongoDB, Firebase, and APIs like Xano, enabling secure and scalable solutions. This rest of this tutorial will guide you through creating a CRUD app using Retool for frontend and Xano APIs for your backend.
Here’s a preview of how our final app will look like:

Visit Retool and sign up if you don’t have an account yet. The registration process is simple—use your email or log in with your Google account to quickly get started on the Free plan.
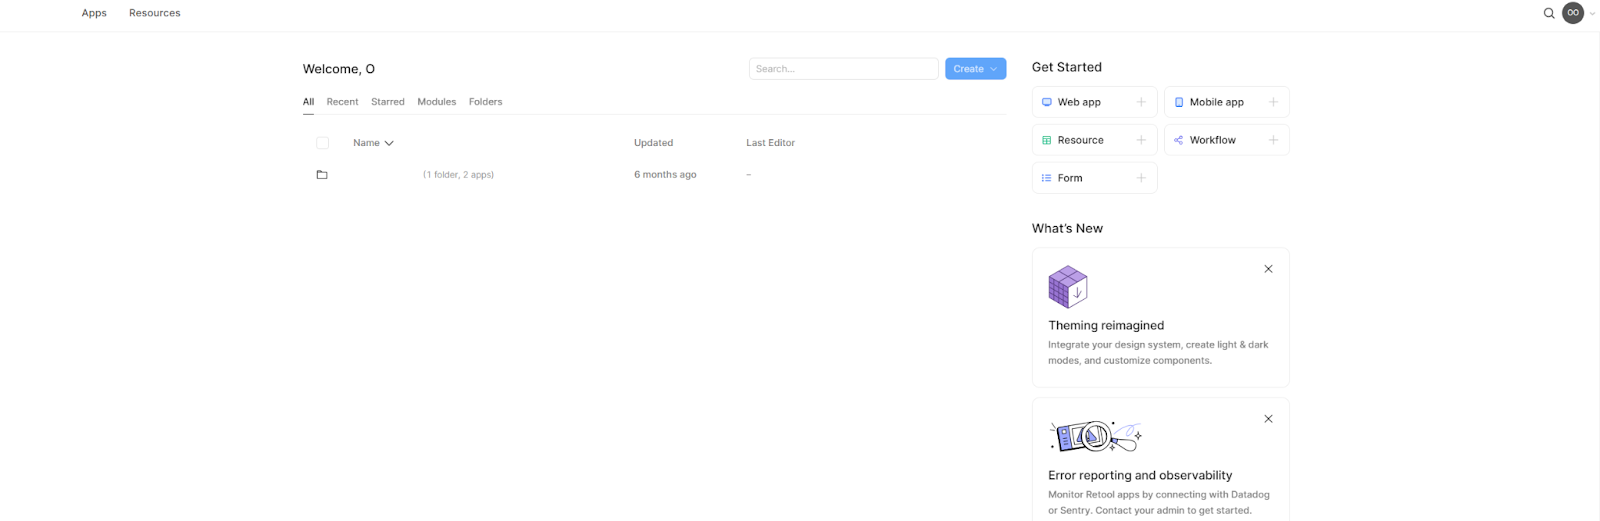
After signing in, you’ll land on the dashboard. Here you can access your Retool applications, workflows, resources, and environment settings and get started with building.
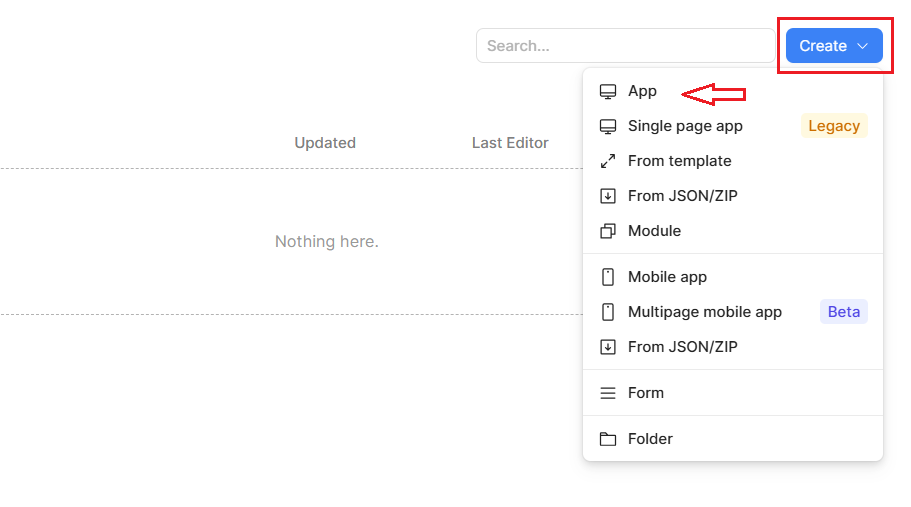
To get started in Retool, click the Create button in the top-right corner and select App from the dropdown menu. Here you can start building a new application where you’llconnect your Xano API endpoints and design the frontend interface for your project.
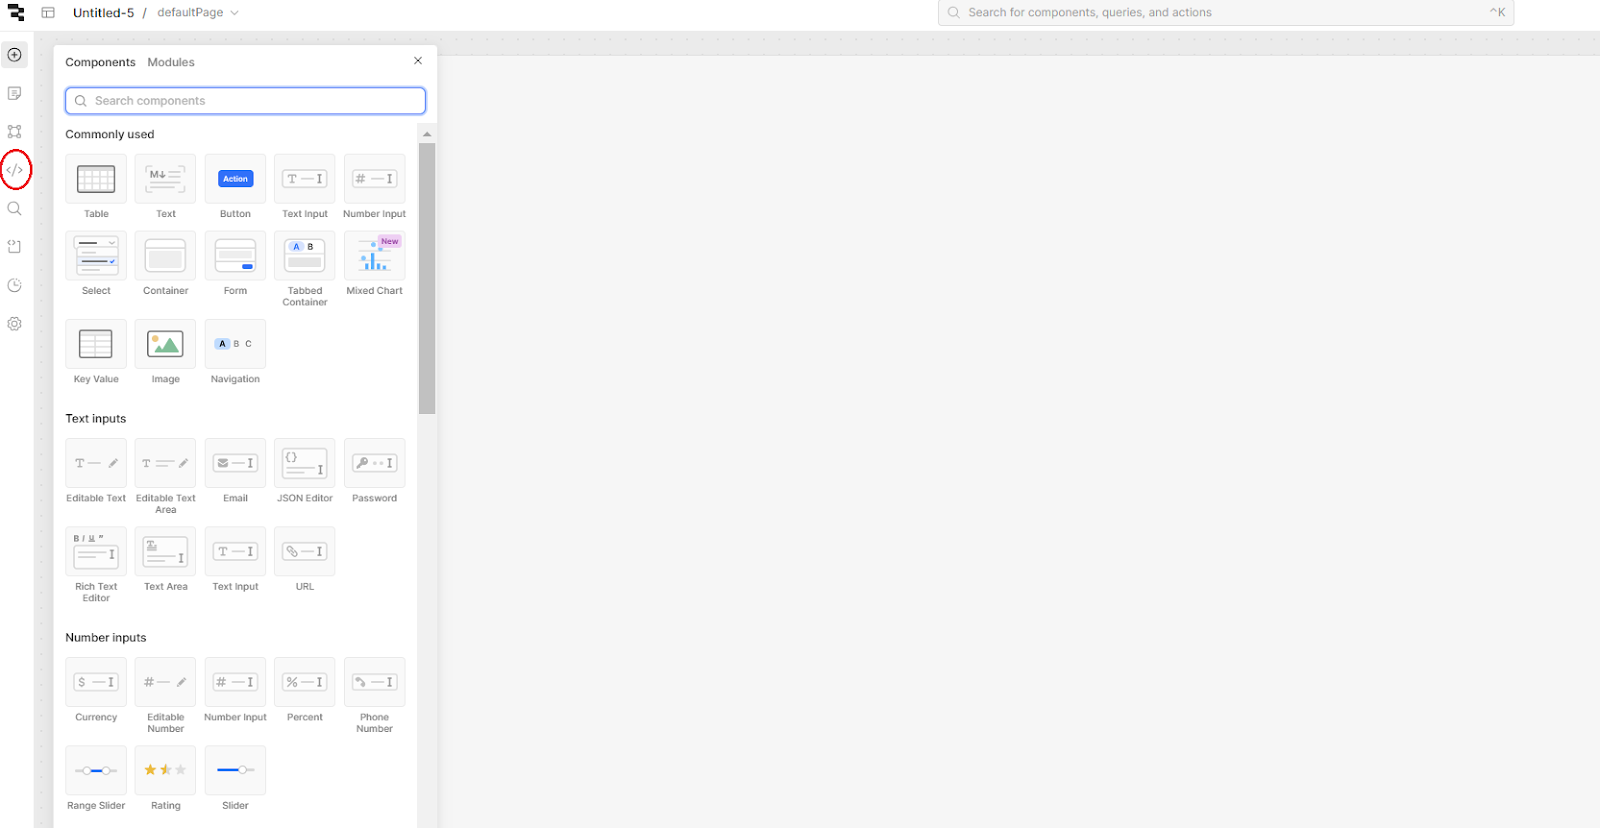
After creating your App, you’ll land on a blank canvas. Use the Components section to drag and drop elements like tables, buttons, and input fields onto the editor to start building your App, and configure them using the right-hand panel.
Connect to Xano in Retool
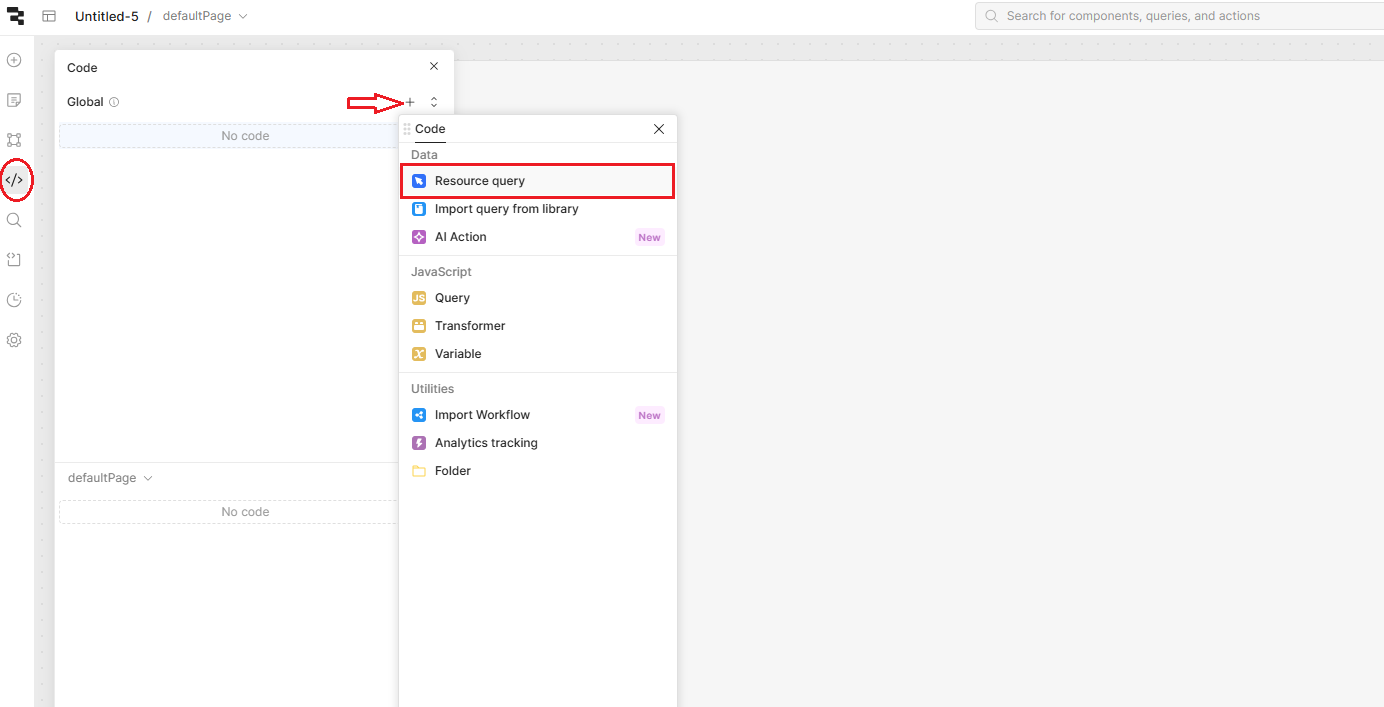
To connect your data or APIs, you can click the </> icon on the left-hand side of the screen to create new queries to access your Xano data. Let’s walk through these steps.
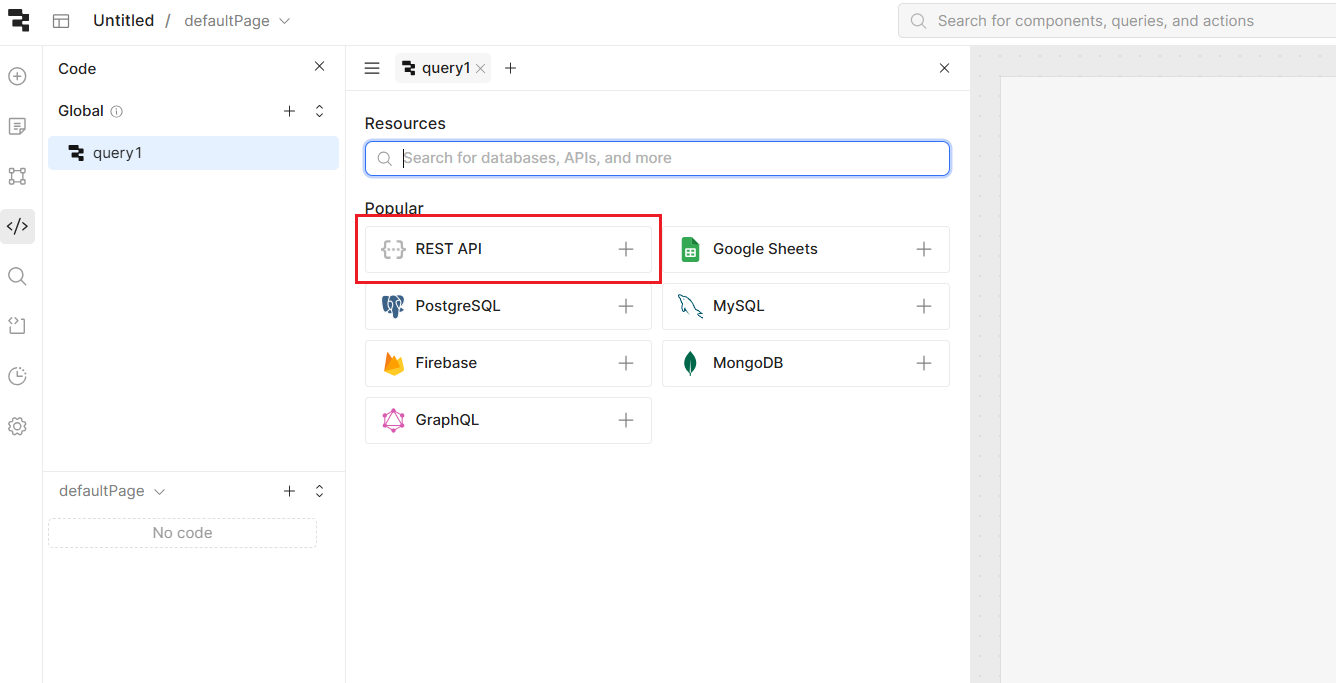
Click the + icon as you can see in the diagram below to add a Resource Query.
Select REST API to connect your Xano endpoints. This allows you to fetch, send, and interact with your backend data directly in Retool, just like those endpoints we set up in Xano.
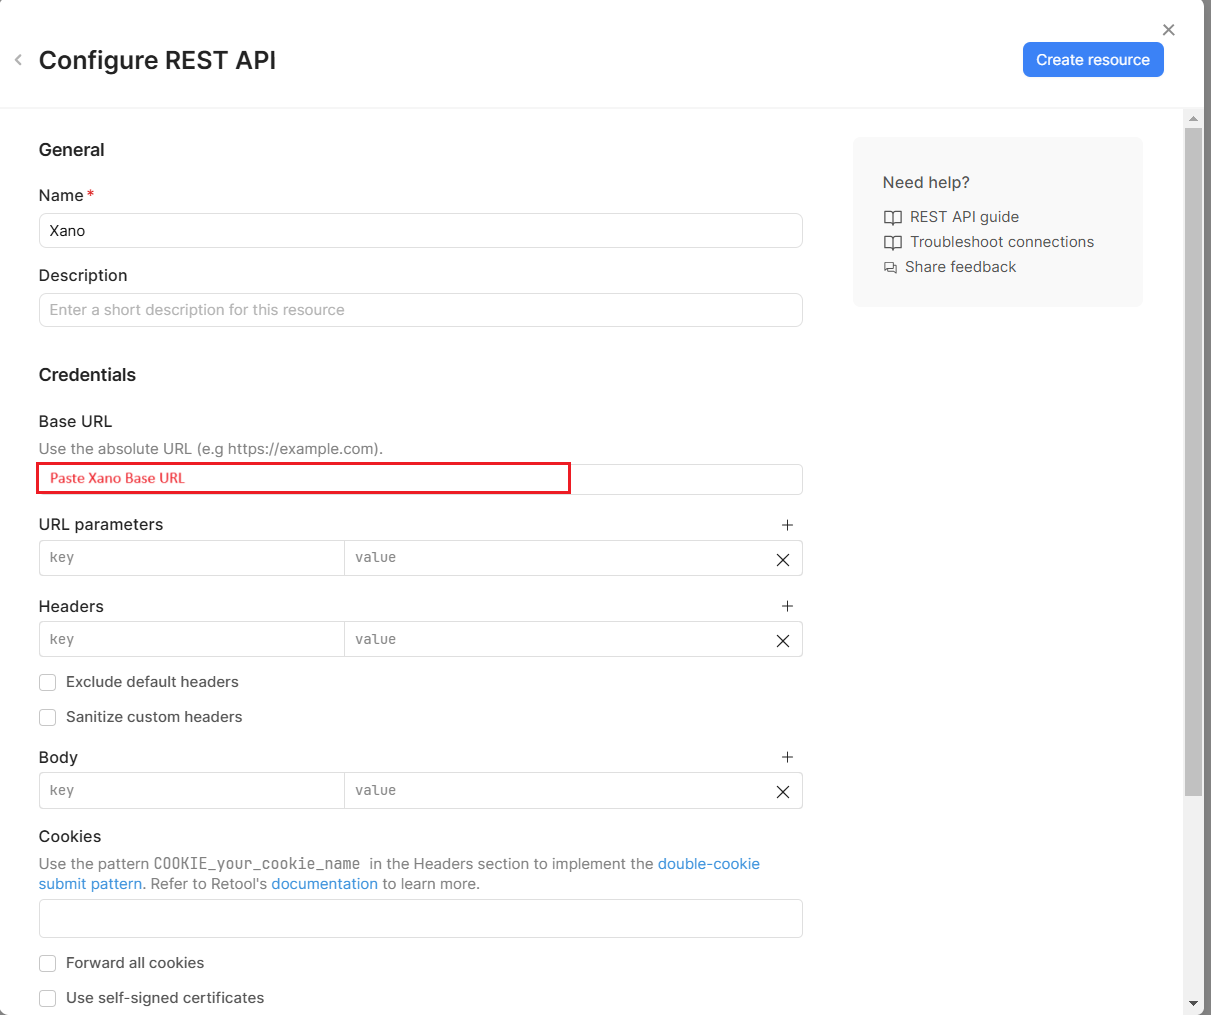
Configure your resource by pasting the copied Xano Base URL into the Base URL field under the "Configure REST API" screen. Once added, click Create resource to save and connect to your Xano API.
Congratulations! You have successfully integrated your Xano API into your Retool App.
Set up your ‘Get’ API call to read data
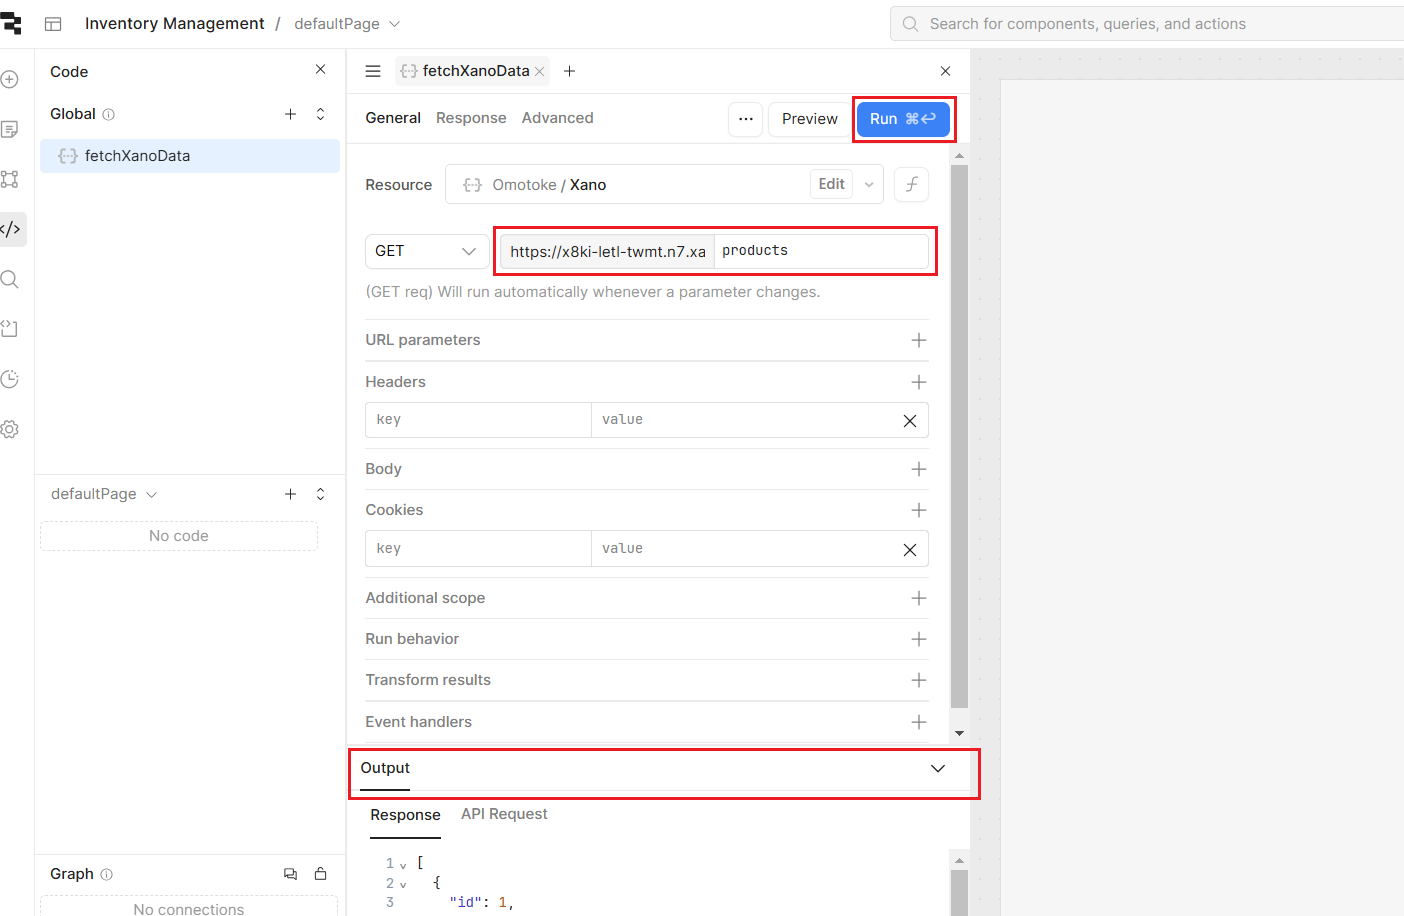
After creating your resource, select the HTTP method (e.g., GET) and specify the endpoint path (e.g., /products). Click Run to test the query, and the response will appear in the Output section. Use this query to fetch data for your application.
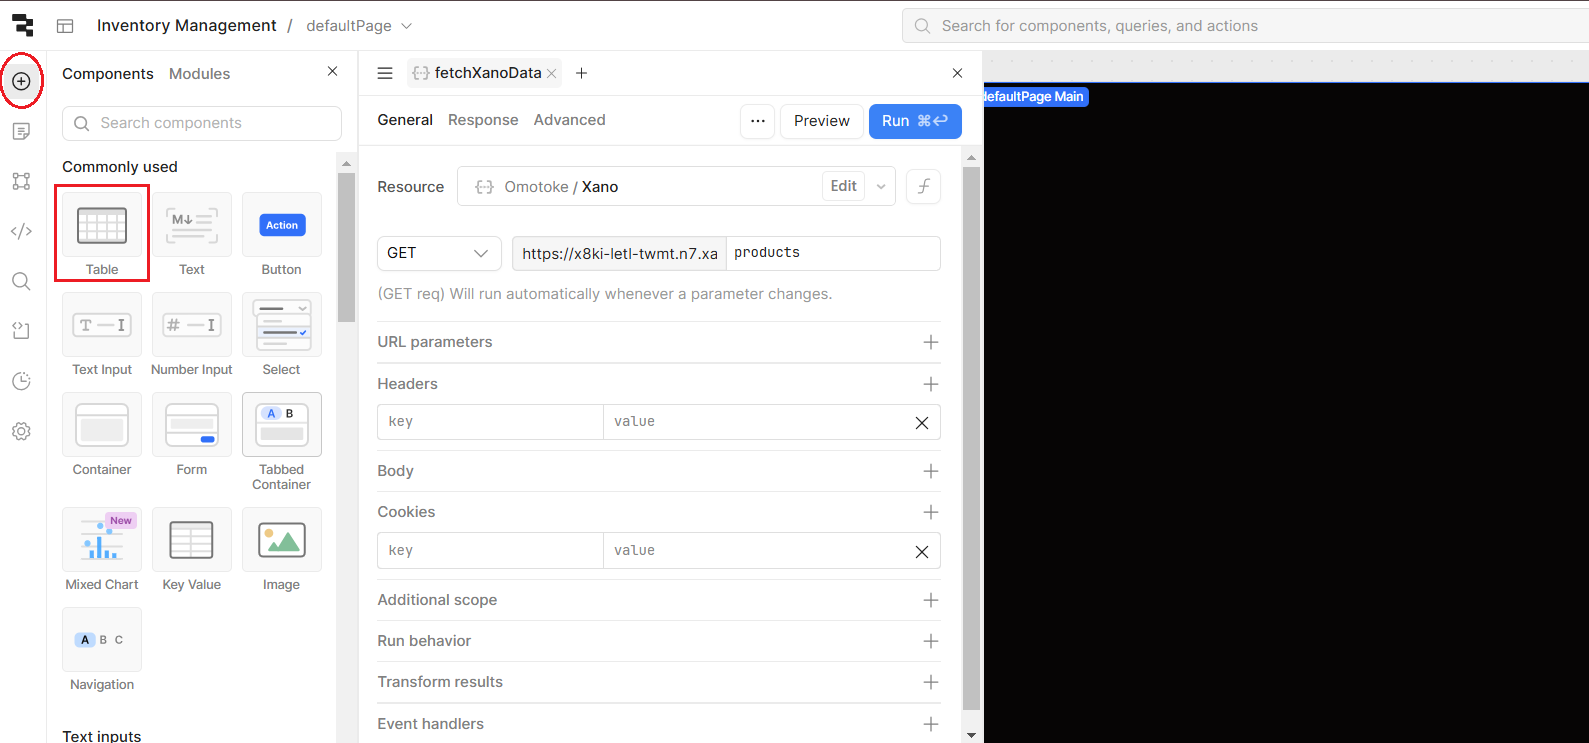
To display this data from your query, drag a Table component from the left panel onto the editor.
Bind the table's data source to the output of your query (e.g., {{fetchXanoData.data}}). This will automatically populate the table with the fetched data from your Xano API.
Congratulations! Your table is now populated with data from your Xano API.
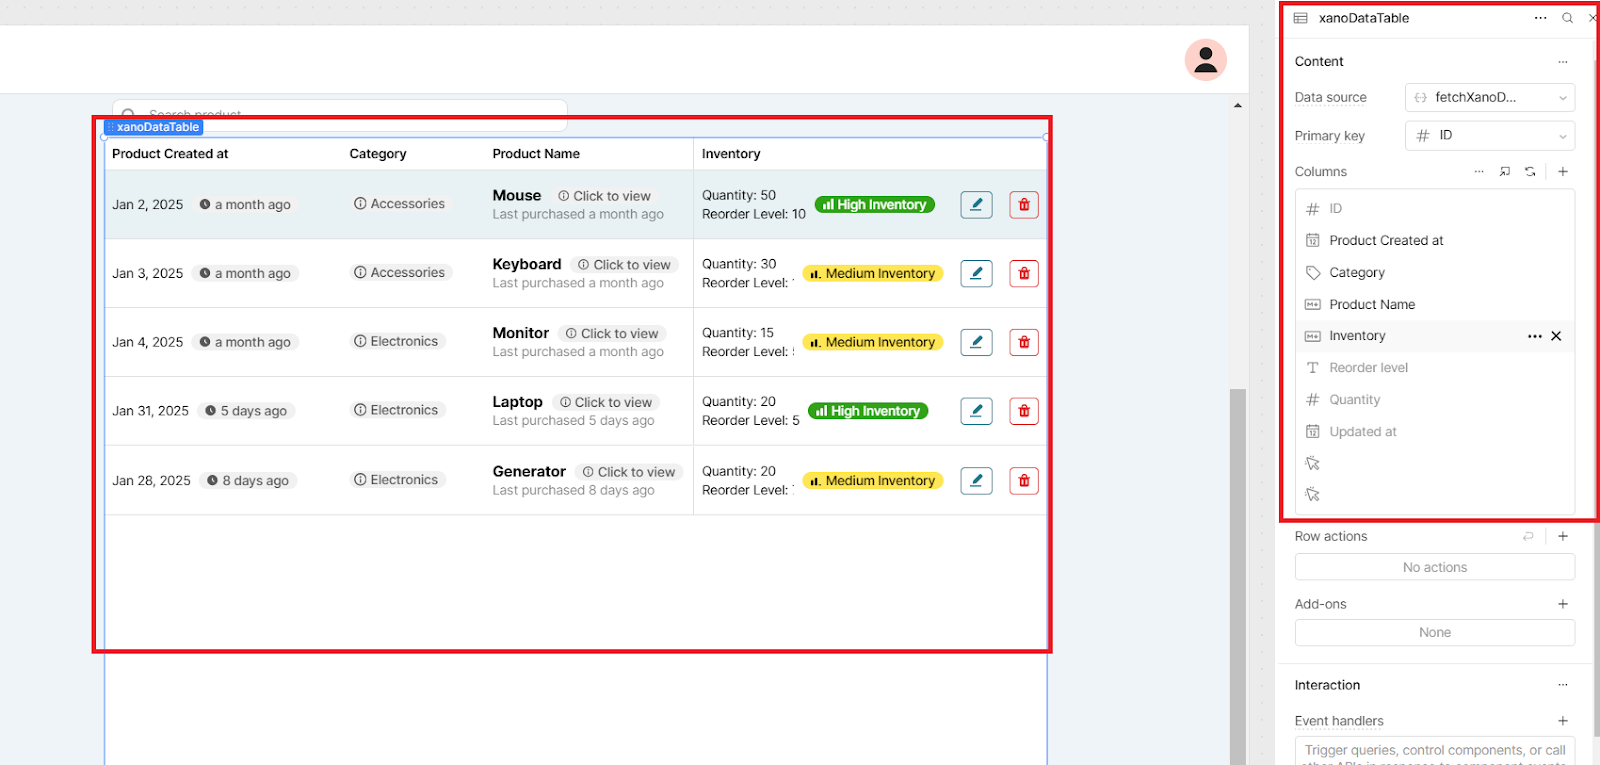
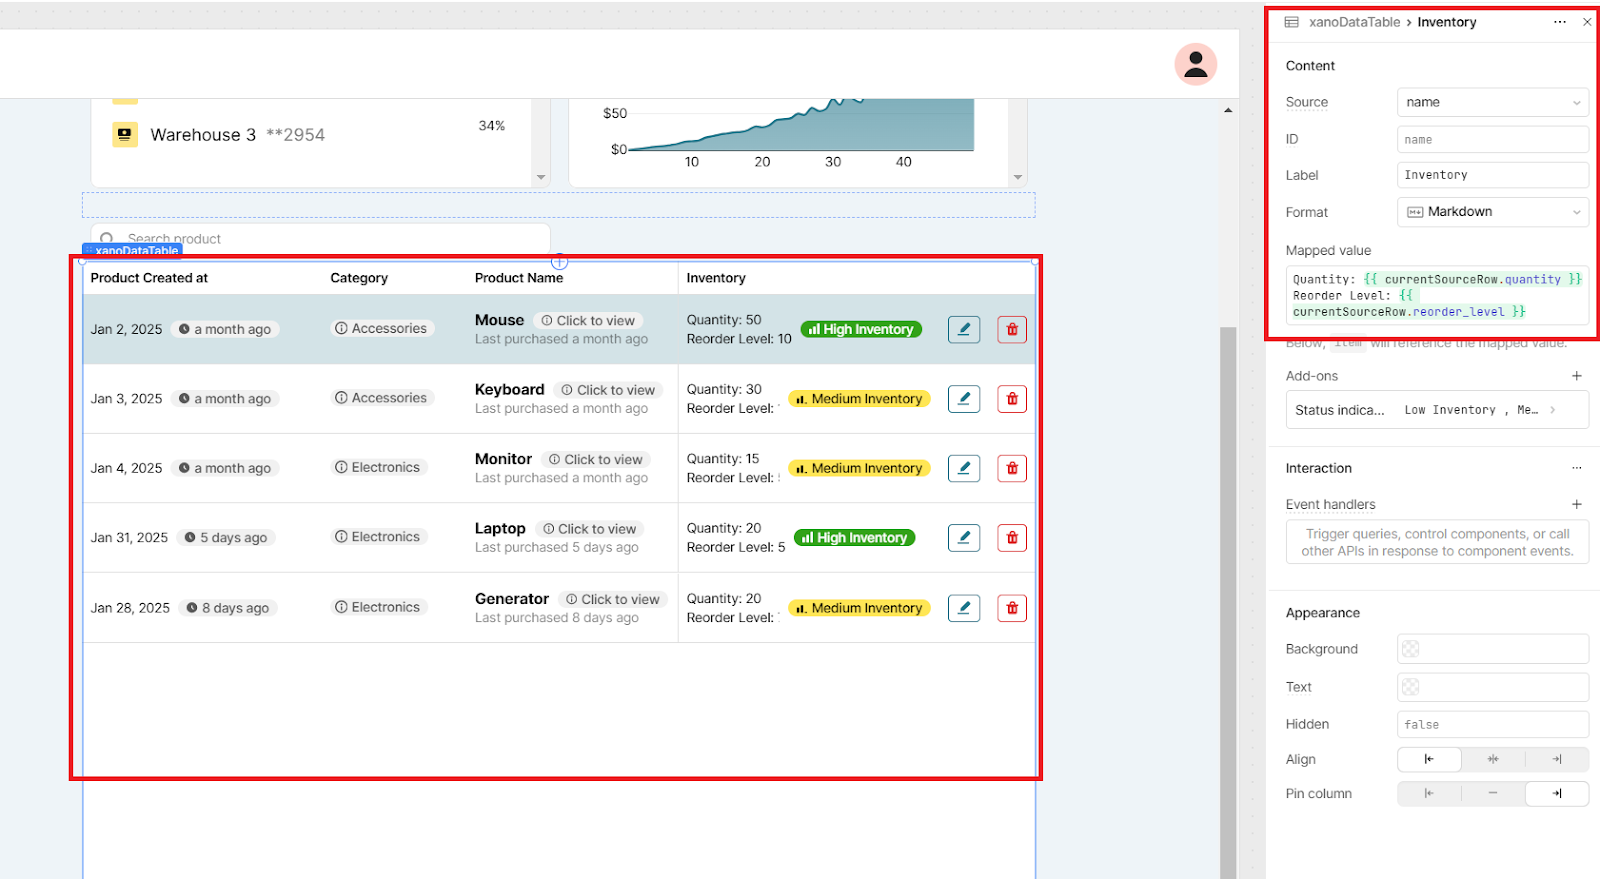
Now, in Retool, you can pretty easily customize how each column in the table is displayed. For example, you can format your inventory column as a Markdown to show Quantity and Reorder level in a more readable way.
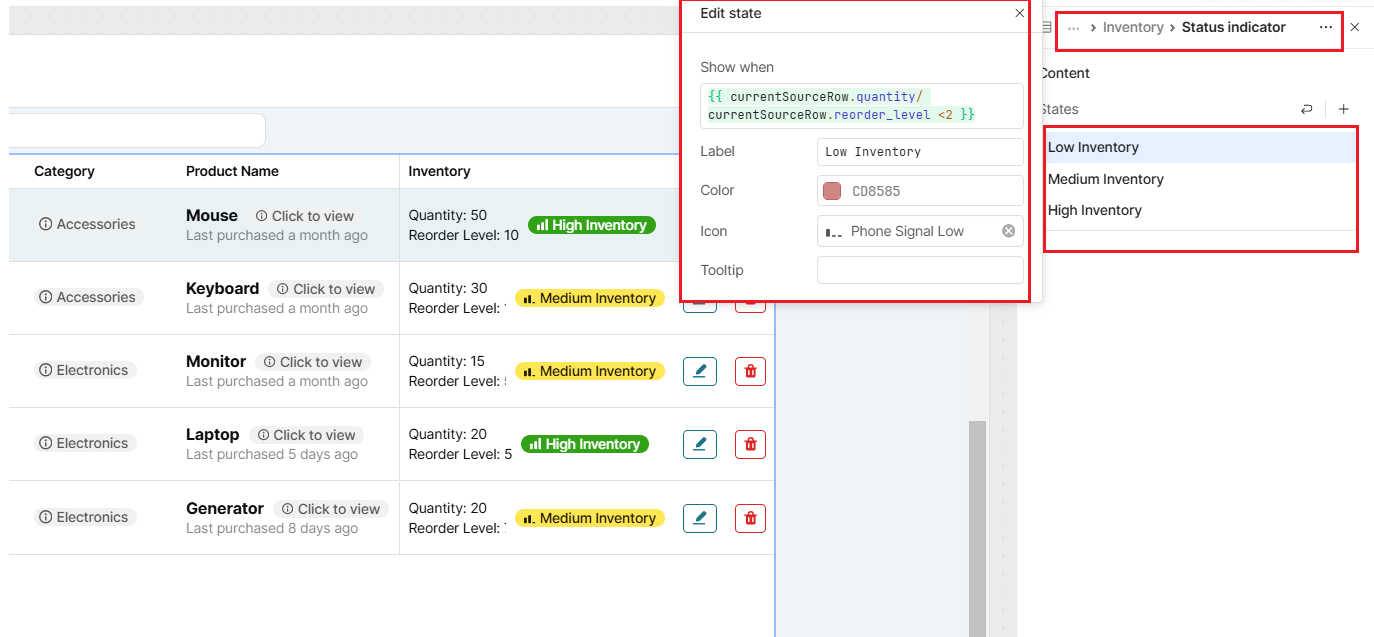
For additional visual feedback, you can also set up a status indicator and color for your Inventory column to track reorder levels.
To add a search feature for your table, drag a text input component (e.g., searchProduct) onto the editor and customize its placeholder (e.g., "Search product").
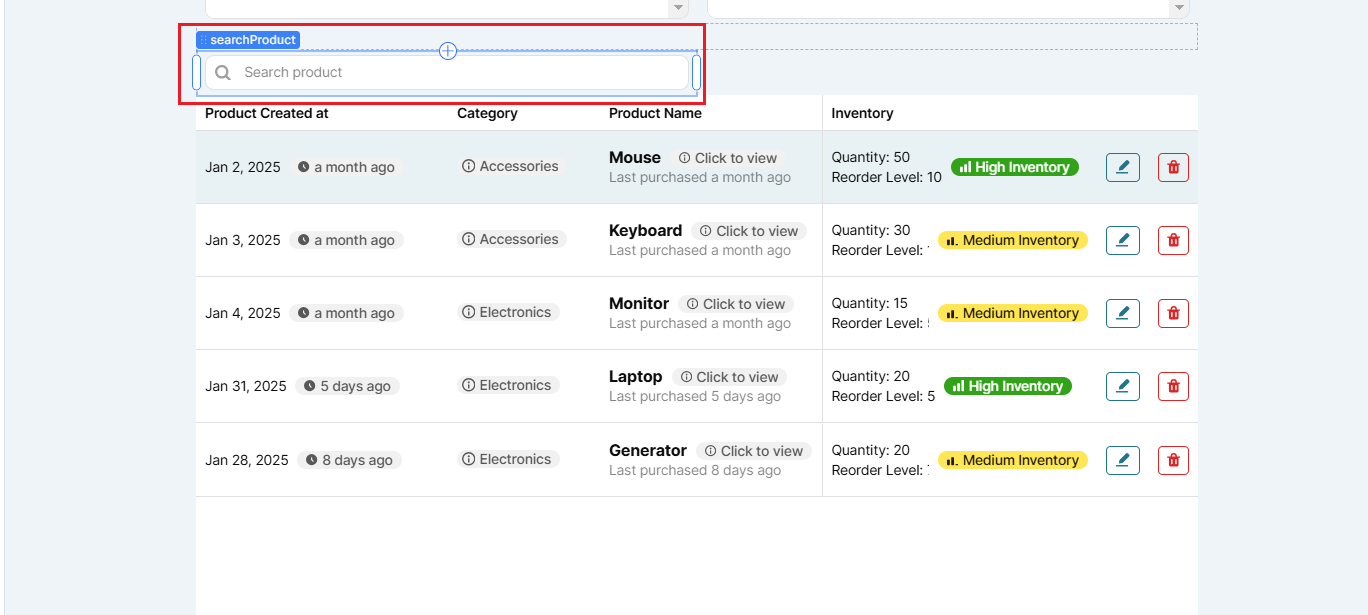
In the table settings, bind the Search term to the value of the text input, e.g., {{searchProduct.value}}.

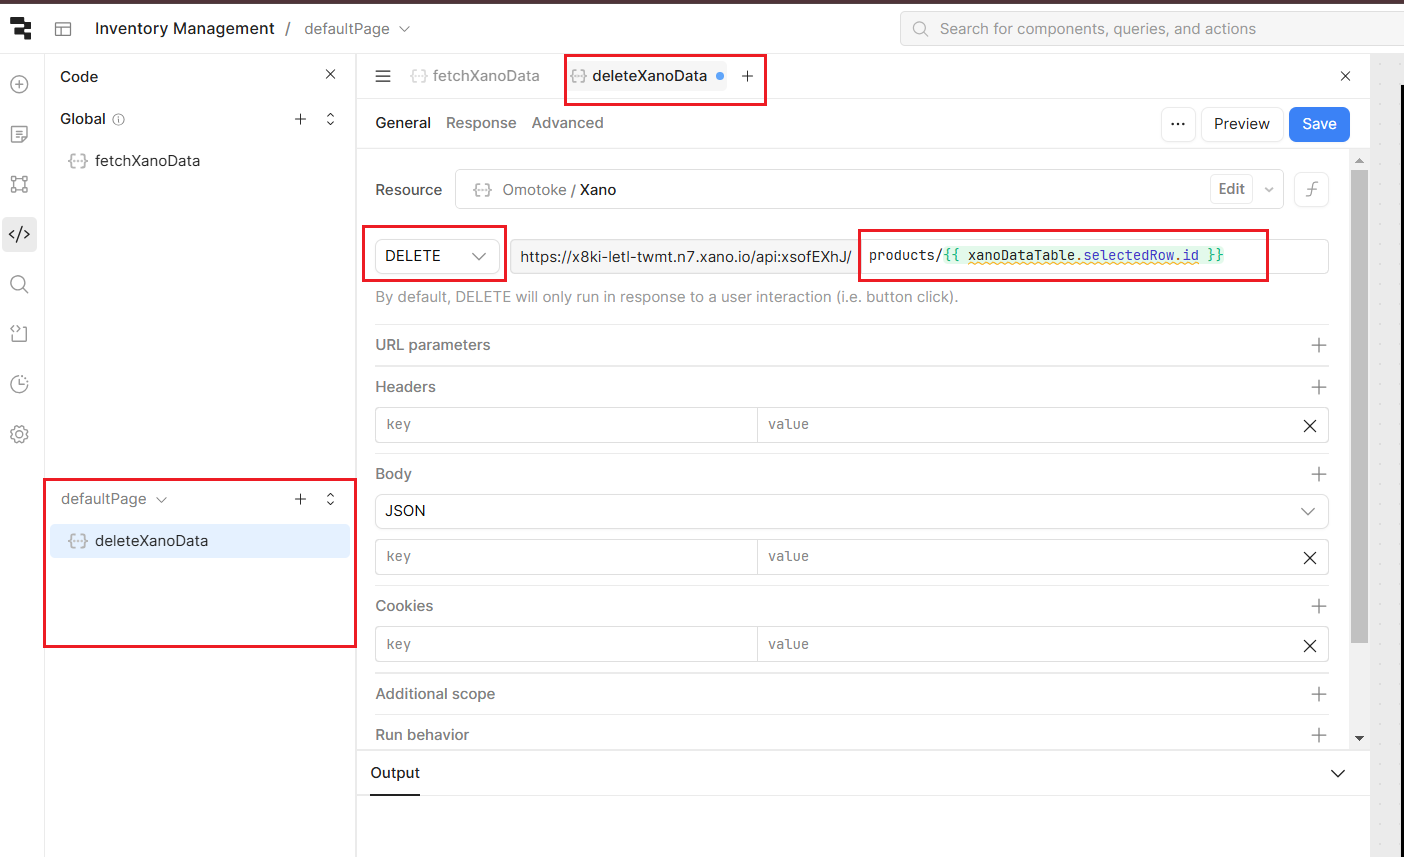
Set up your delete action
Now let’s set up our delete query. Create a new query named deleteXanoData. Set the method to DELETE and specify the endpoint, e.g., /products/{{xanoDataTable.selectedRow.id}}. Once that is done, save the query.
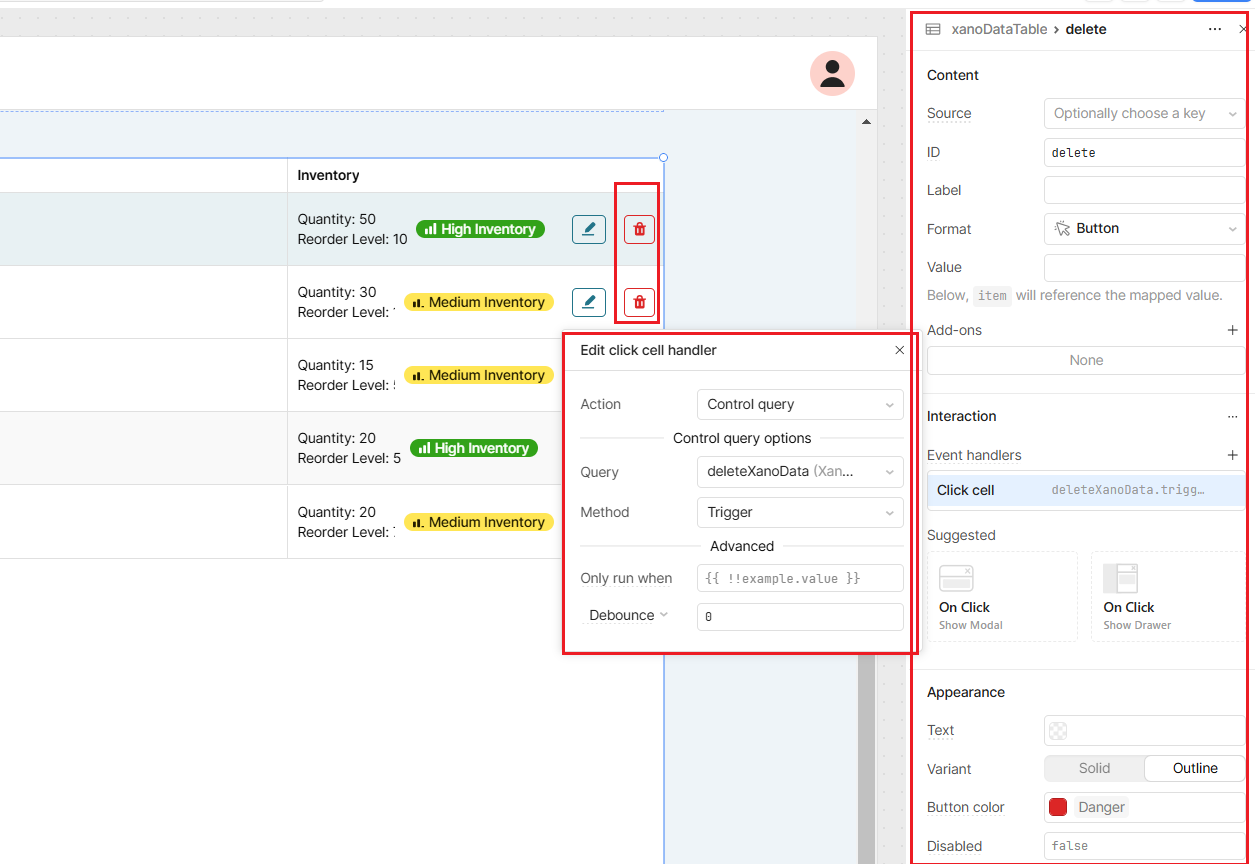
In the xanoDataTable where you’re displaying your data, add a new column with the ID "delete." Set its format to Button, and add an event handler. Link the button to the deleteXanoData query under the Interaction tab. Set the action to Control Query and trigger the deleteXanoData query you just set up when the button is clicked.
Set up your ‘create’ and ‘edit’ actions
For the create and edit actions, we’re going to use one modal frame that will double as both our create and edit forms. This makes maintenance easier so that when we make any edits to our data and forms, we only need to make them in one place.
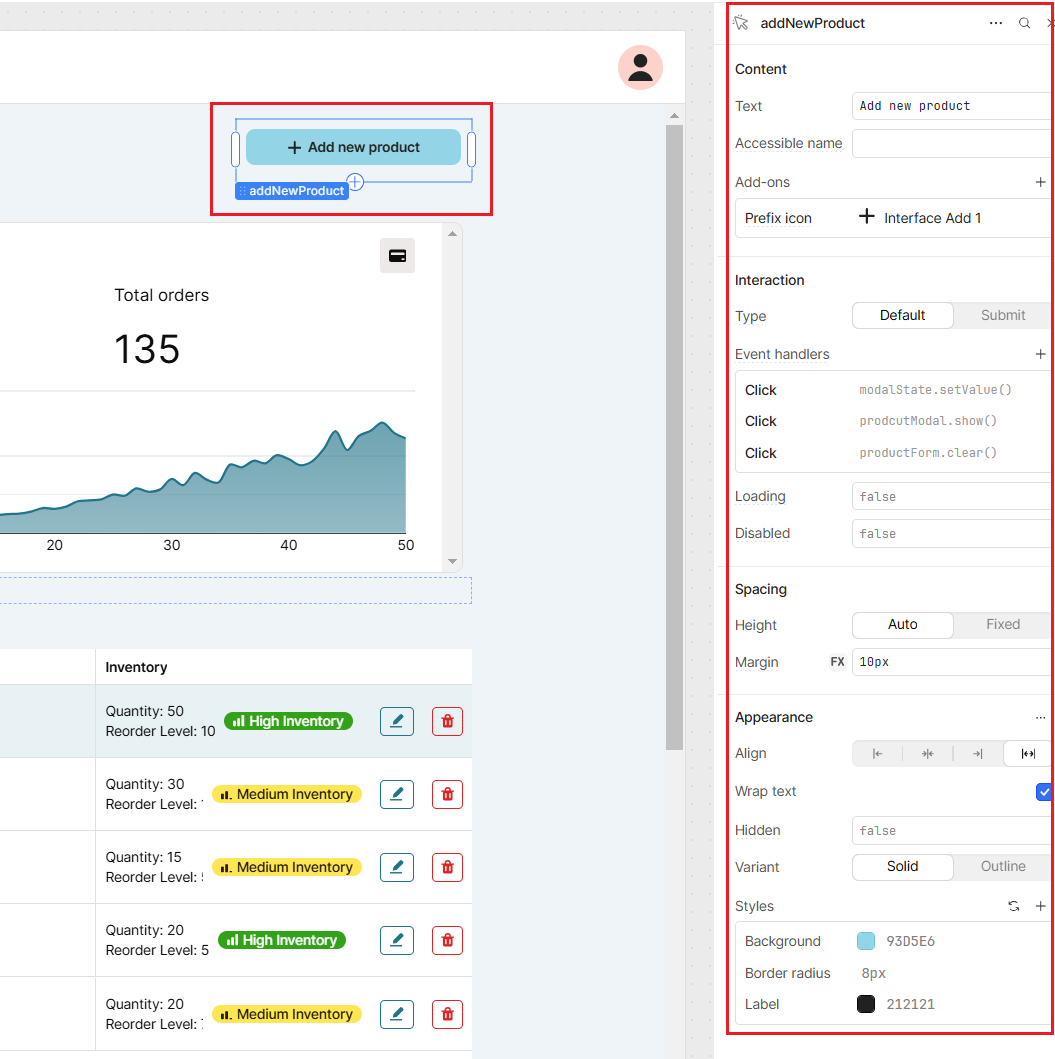
To set up our Create form, the next step is to add an "Add new product" button to the interface. Pull in a button component from the component menu in the left panel.
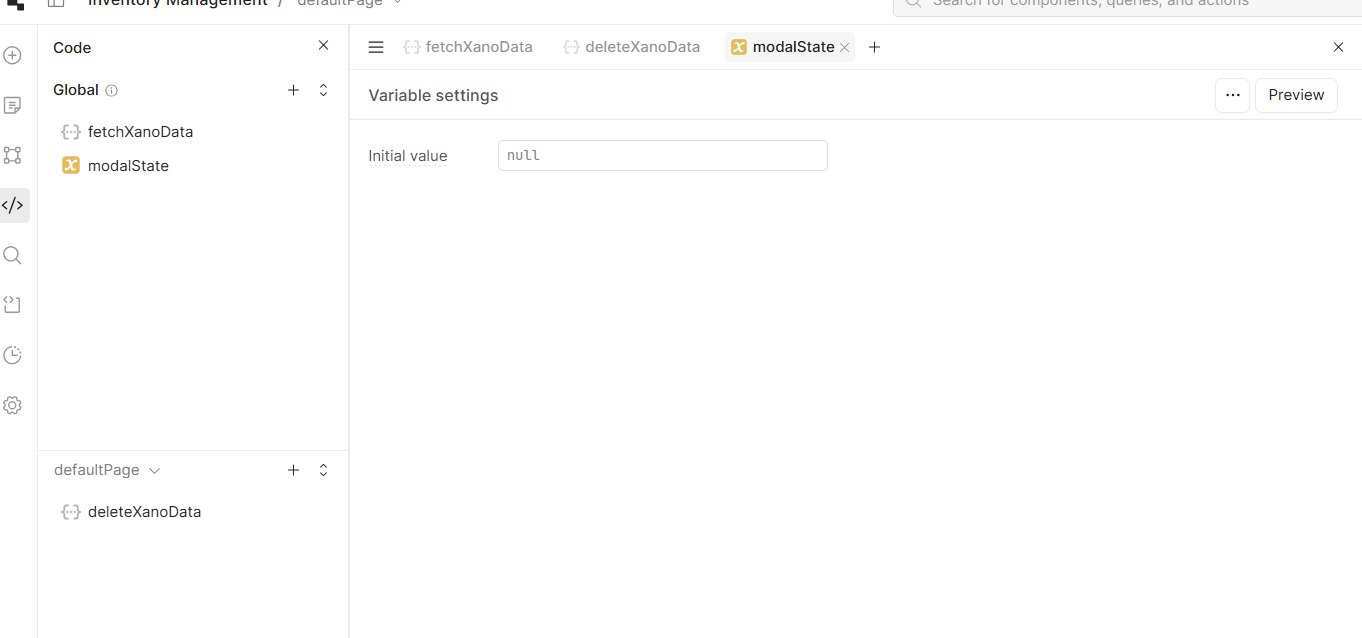
Now let’s set up the variable that will determine whether the Create or Edit form will open. Click the + button and select Variable from the dropdown.

Variable also allows you to control application-wide or page-specific states, such as different states for this modal.
Configure your Add new product button to Set variable in the click handler, Assign the value "Add". This ensures that when the Add New Product button is clicked, the variable modalState is updated to "Add", signaling that the modal should open in "add mode.
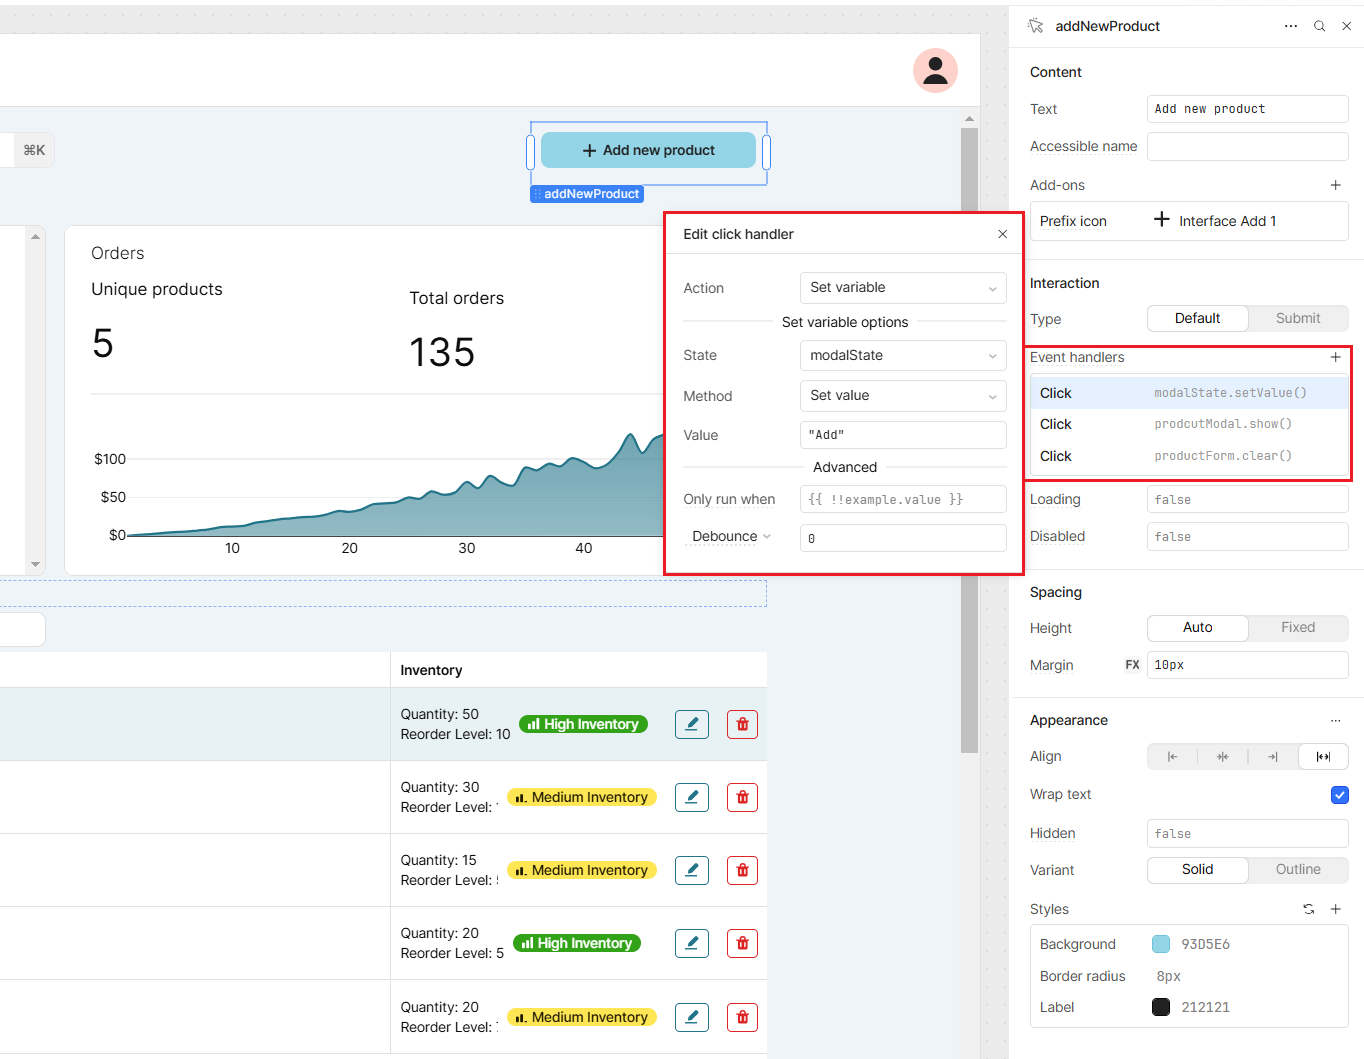
Now, add a modal component to your editor. We’ll use this to house our create and edit forms. Set the button to show this modal using a click event handler, as in the image below.
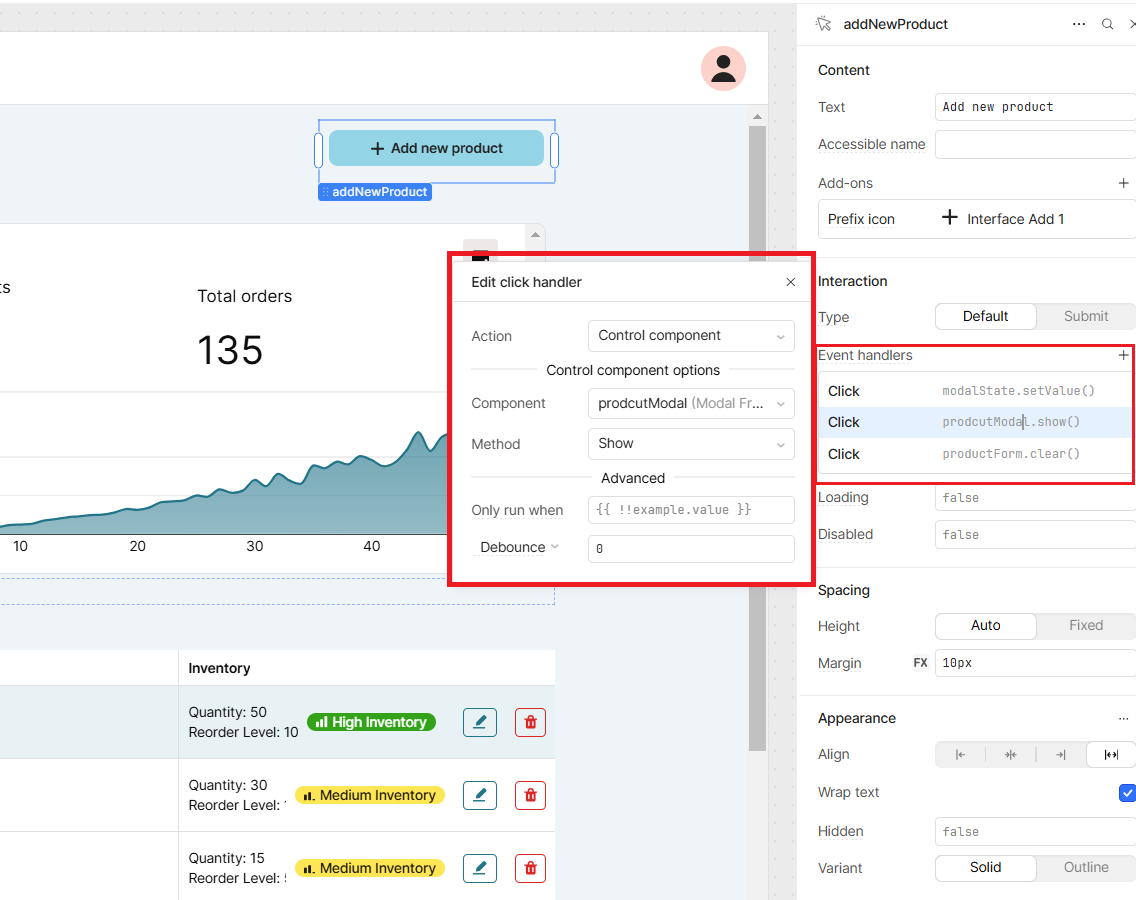
To make sure it’s clear what action the user is performing, we’ll set the title of the modal based on the value of the {{modalState.value}} variable.

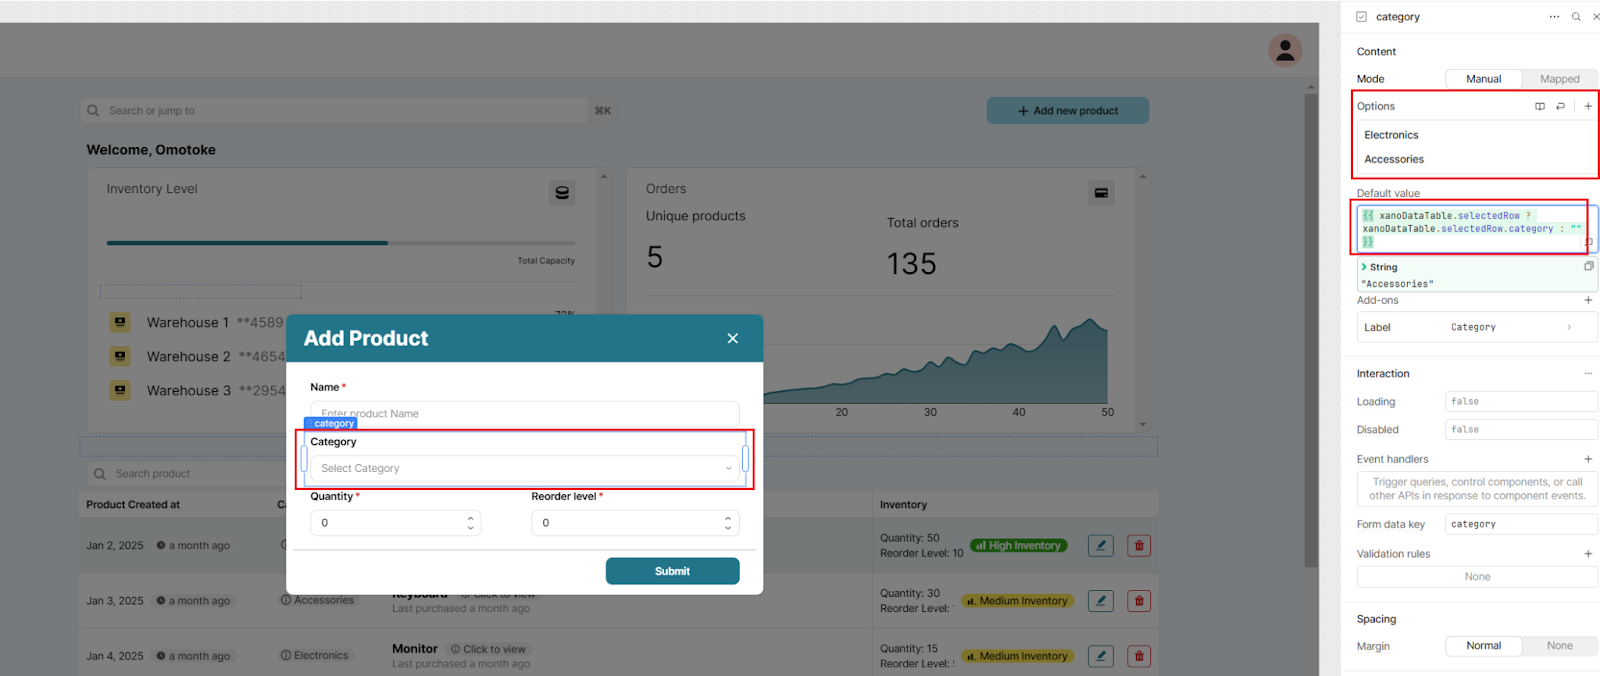
Now, pull in a form component to your modal. Retool’s "Generate from table" feature helps to quickly create a form based on the structure of your existing data table. Click on “Generate from table” and select the columns you would like to include or exclude from your form. After your form is successfully generated, configure each components as per your needs on the right-hand panel.
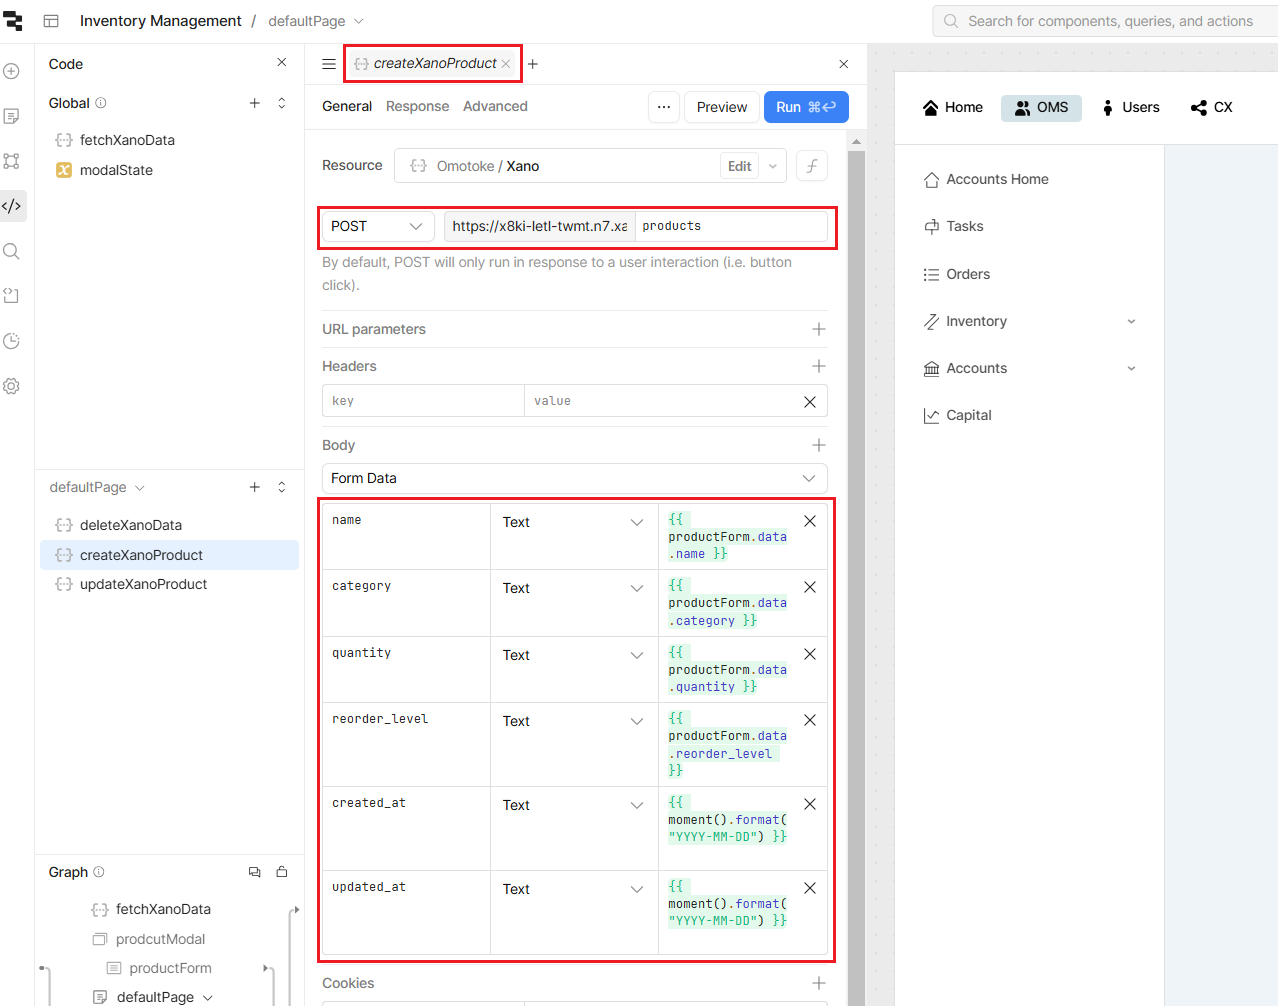
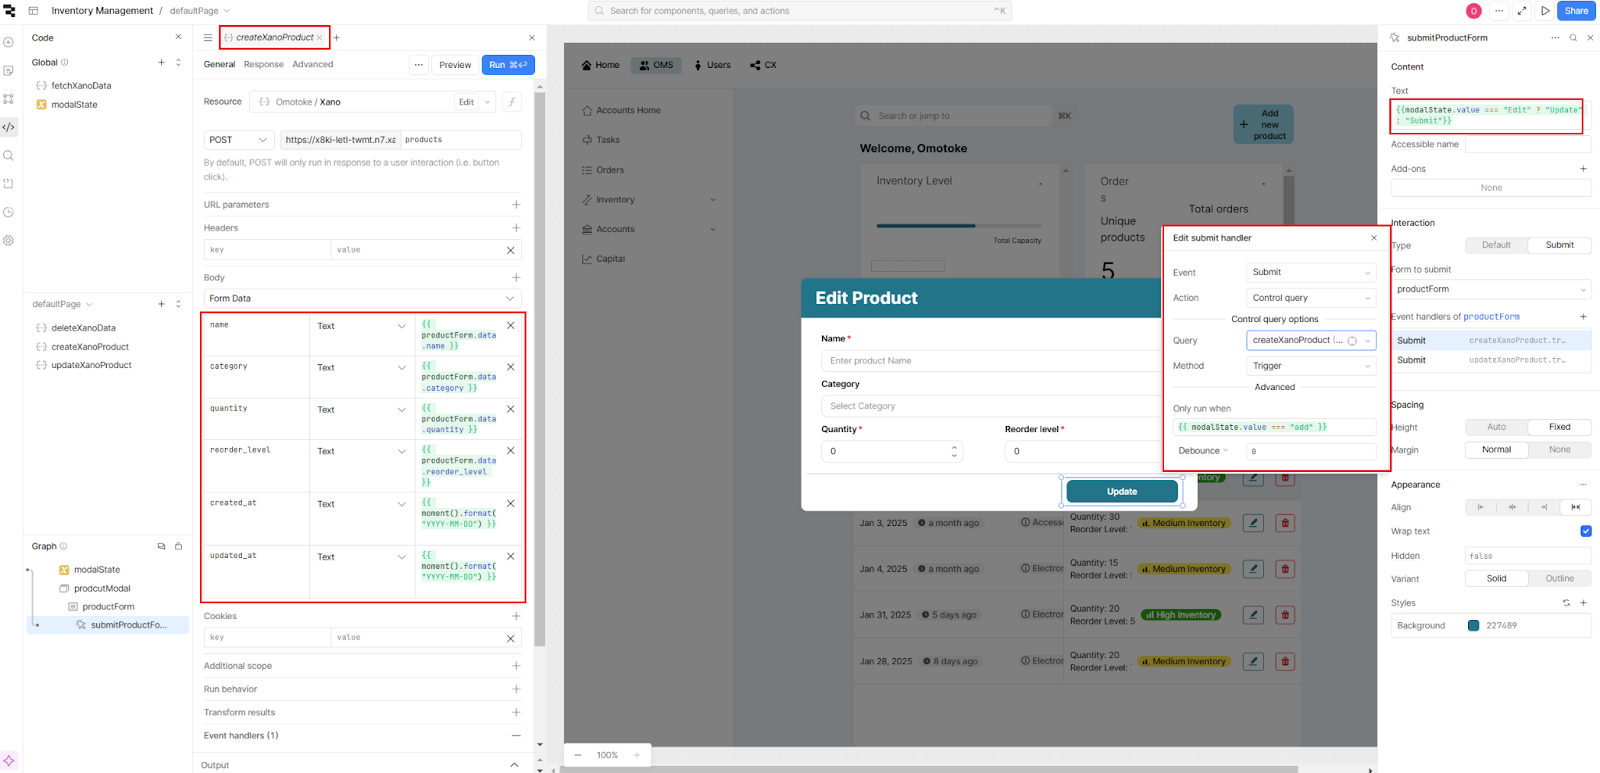
To make sure we add this new data to our Xano database, let’s create a new query, createXanoProduct with the POST method. We’ll use the form data to populate this query.
Specify the endpoint /products and map the query to our productForm:
- name: {{ productForm.data.name }}
- category: {{ productForm.data.category }}
- quantity: {{ productForm.data.quantity }}
- reorder_level: {{ productForm.data.reorder_level }}
- created_at: {{ moment().format("YYYY-MM-DD") }}
- updated_at: {{ moment().format("YYYY-MM-DD") }}
Finally, set the "Submit" button to Trigger the createXanoProduct query upon form submission.
Configure your edit action
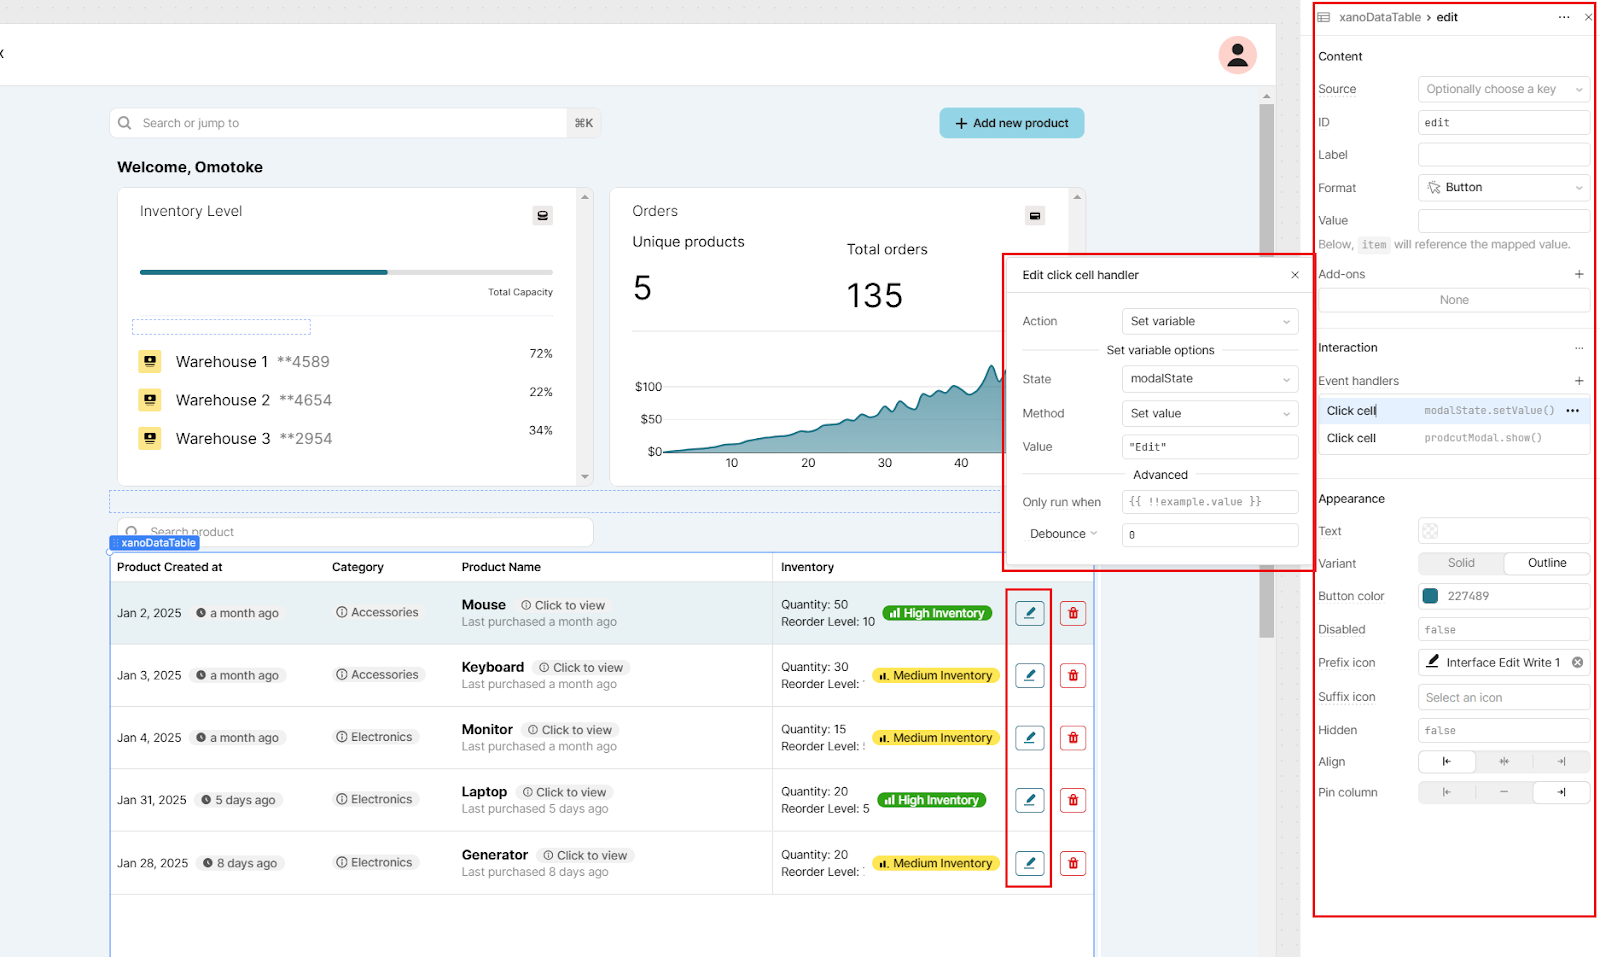
Like we did with the delete action, let’s add a new column to the data table for editing actions. Add an "Edit" button in this column. Then, set up a click handler that links it to the modalState variable. When the "Edit" button is clicked, set the modalState value to "Edit", preparing the modal to display editable data for the selected row.
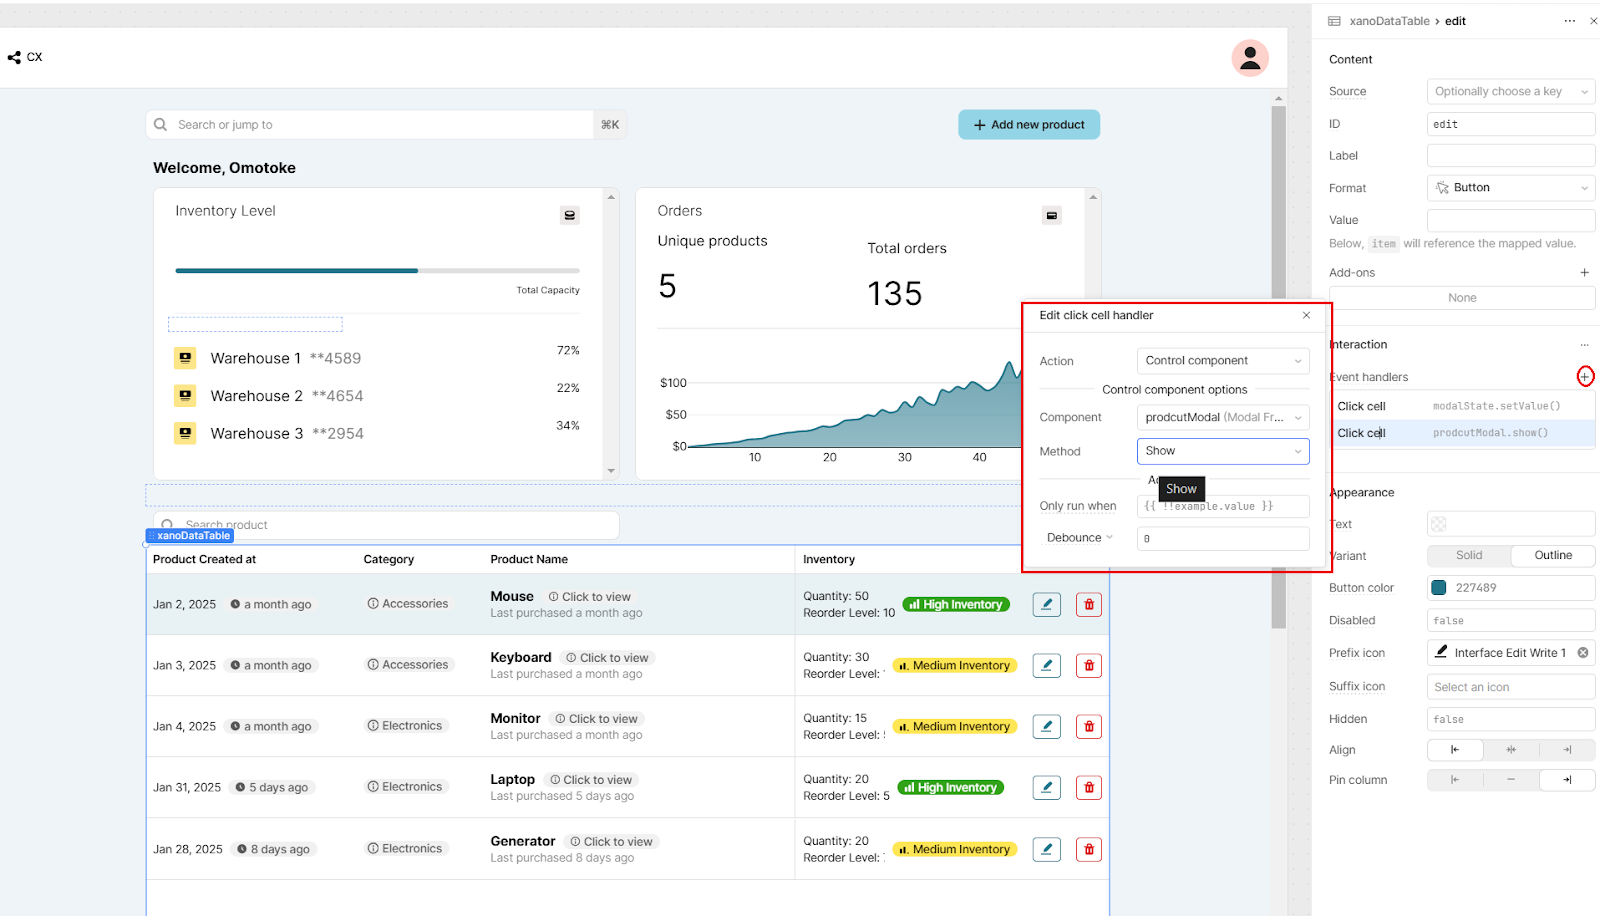
Set up an additional click handler to trigger the productModal to open when the "Edit" button is clicked.
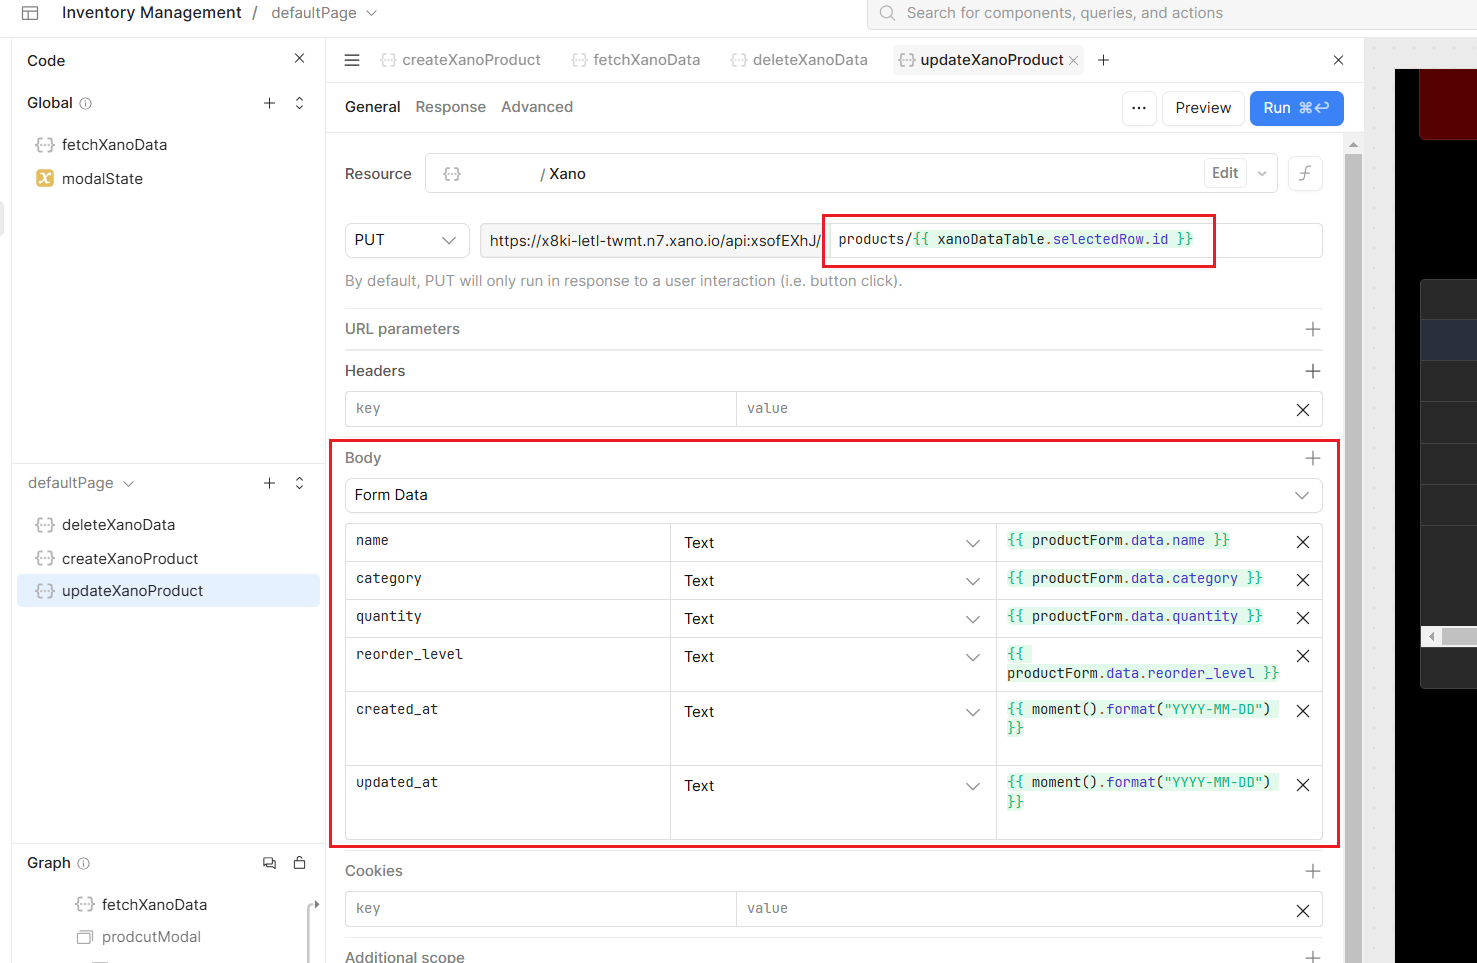
Finally, Create an updateXanoProduct query to edit an existing product. Configure the query to use the PUT method, targeting the endpoint products/{{ xanoDataTable.selectedRow.id }}.
Map the fields in the body as follows:
- name: {{ productForm.data.name }}
- category: {{ productForm.data.category }}
- quantity: {{ productForm.data.quantity }}
- reorder_level: {{ productForm.data.reorder_level }}
- created_at: {{ moment().format("YYYY-MM-DD") }}
- updated_at: {{ moment().format("YYYY-MM-DD") }}
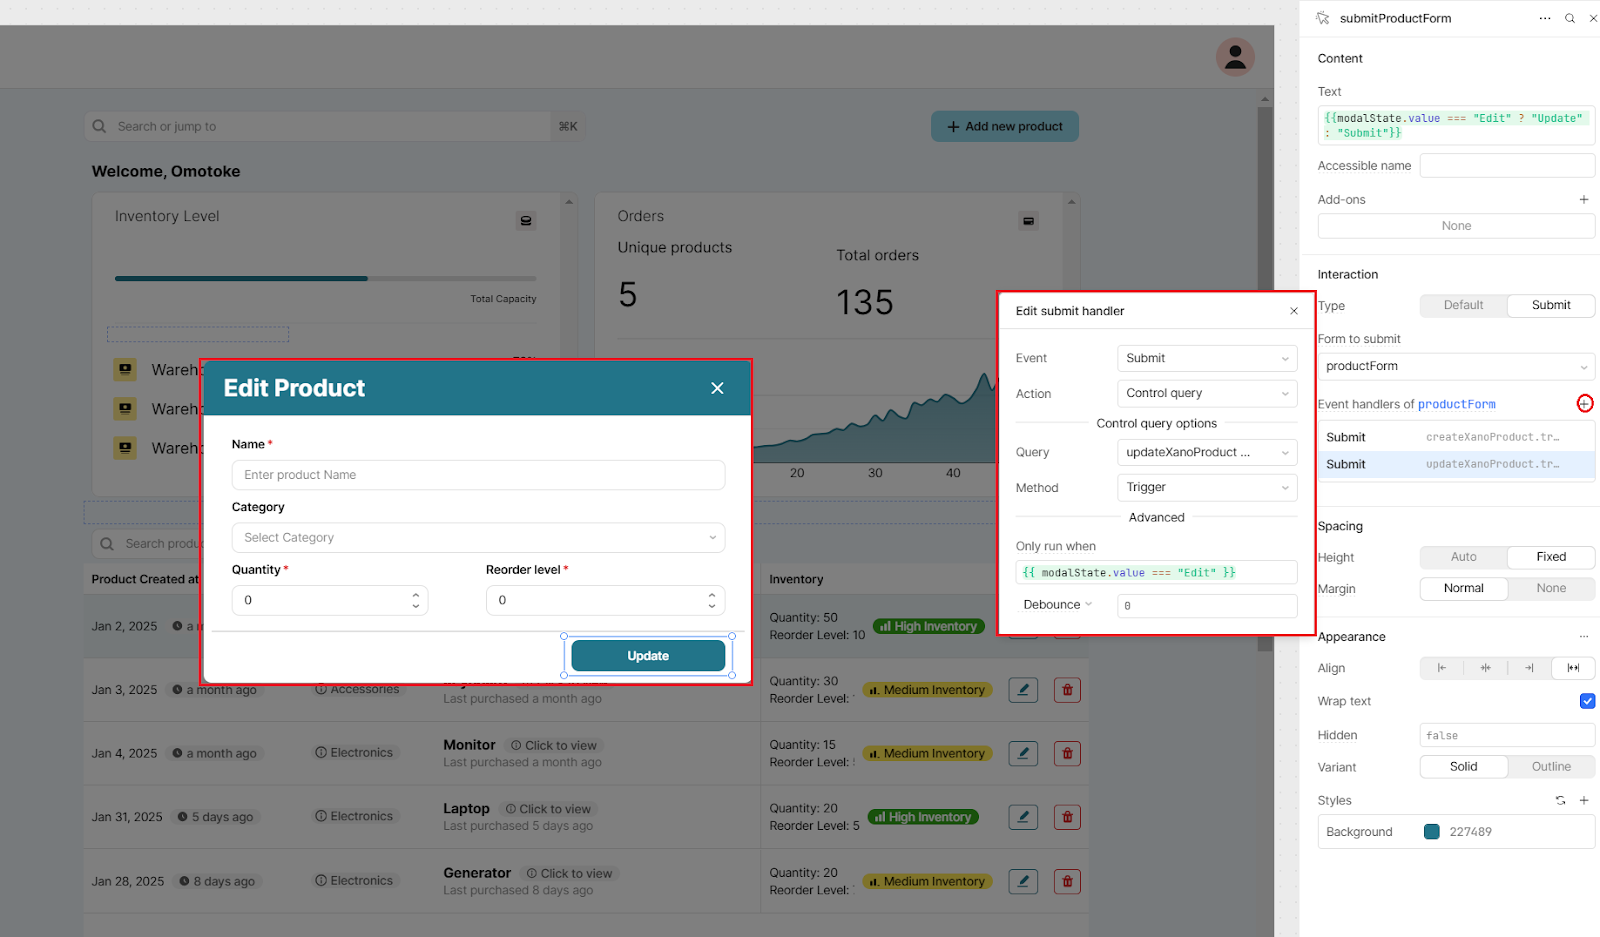
Add an event handler under the Submit action, linking it to the updateXanoProduct query. Use the Trigger method, ensuring it runs only when the condition {{ modalState.value === "Edit" }} is met.
With that, you’ve set up a simple CRUD interface to create, read, update and delete data from your Xano database! Keep reading for some more ideas of how to make this dashboard even more useful.
Additional UI features
Header and sidebar navigation
For a more complex app with multiple pages, you can add a navigation bar and optionally, a sidebar to your Retool app. With the Header and Sidebar frames, that open with a default navigation component, you can easily customize the navbar to create navigation links, such as "Home," "Users," and "CMS."

Summaries of data
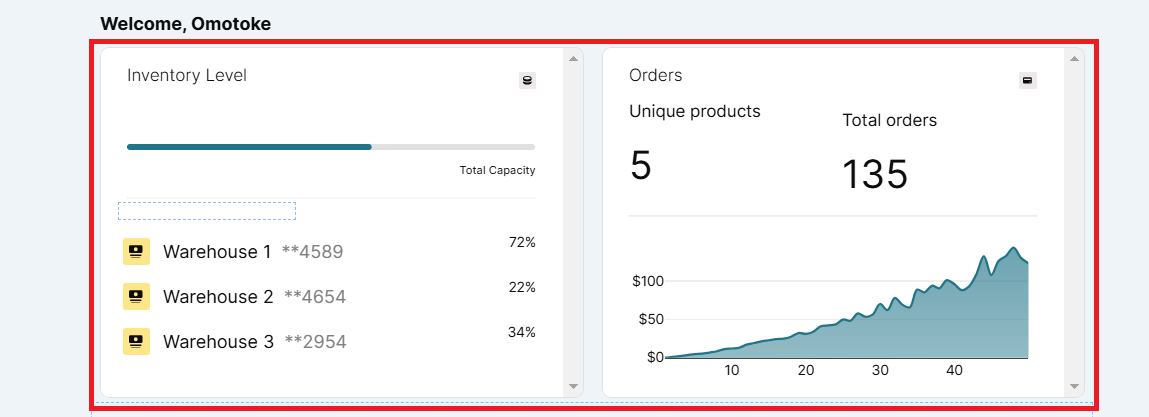
Additionally, you can add some dashboard data to your app with analytics elements to summarize key metrics in your Xano data. In this case we showed some summaries of our order data on the right side, and inventory information on the left.
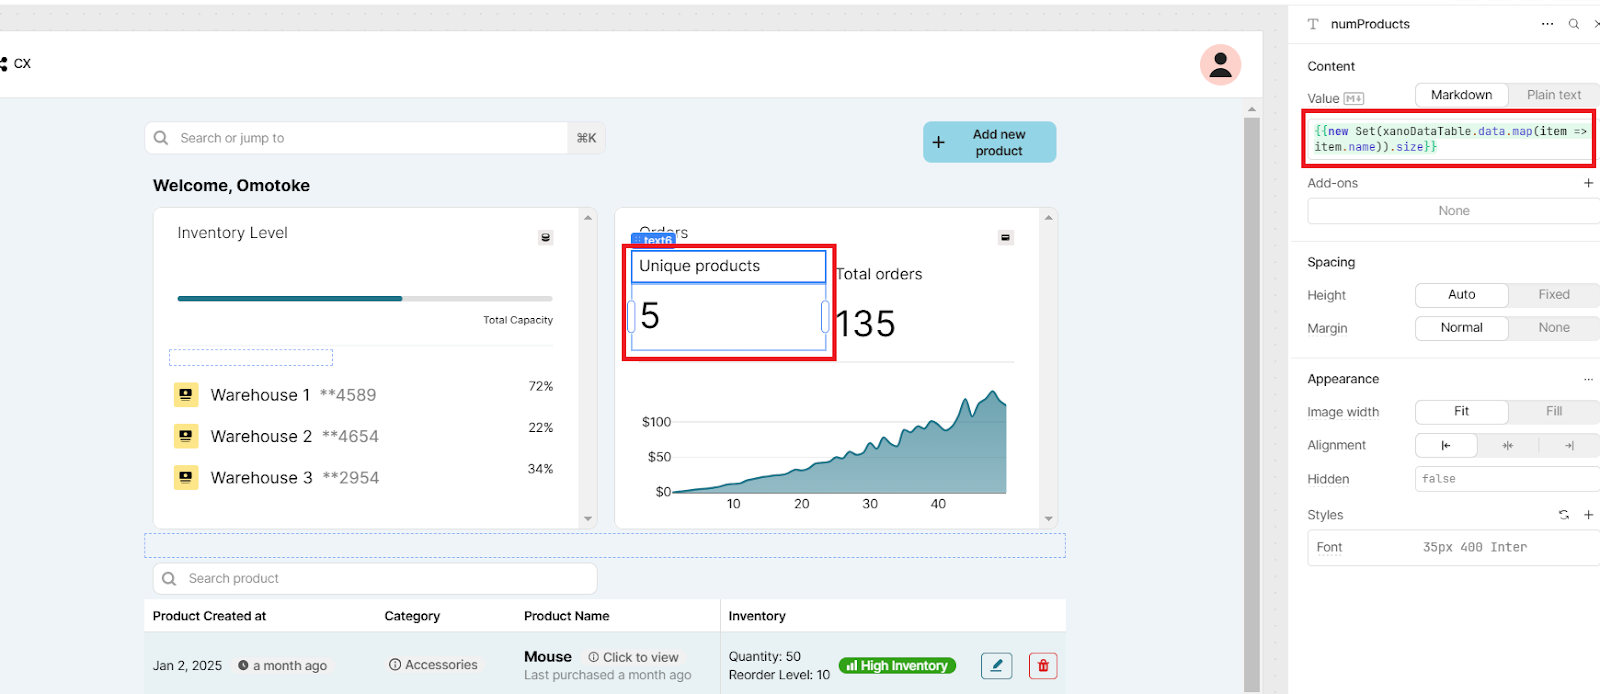
To display totals, such as the number of unique products, you can use this code to count the individual products based on the dataset: {{new Set(xanoDataTable.data.map(item => item.name)).size}}
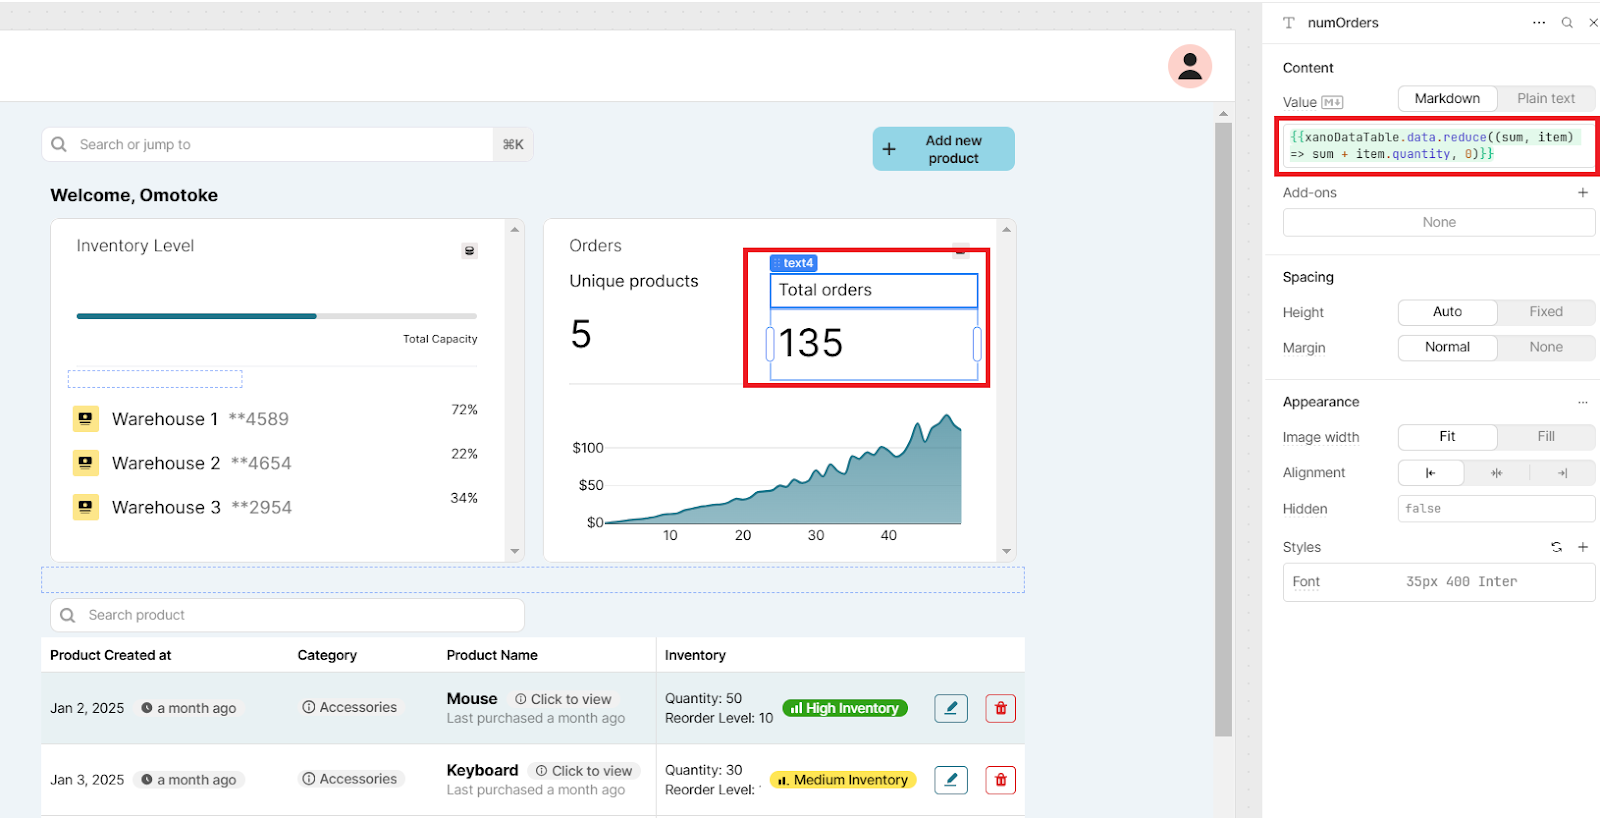
To display the total quantity of orders, you can use the following code to sum them: {{xanoDataTable.data.reduce((sum, item) => sum + item.quantity, 0)}}.
You can also use components like the chart to display how much revenue have been made over a period of time. We’ll cover components like the chart and the inventory level progress bar in future tutorials - stay tuned!
Summary
Great work! Using no code, you managed to set up a database in Xano and create API calls to perform actions on your data. In Retool, with a sprinkle of code, you created a simple dashboard with a useful table, a UI for your CRUD API actions and added some additional summary data.

