


There’s been a buzz around automation for a while now – and it’s easy to see why. Not long ago, automation was only available to companies with technical teams or those willing to invest heavily in custom solutions; everyone else was left to do the manual work.
No-code/low-code platforms like Make.com (read our full guide) are making it easier than ever for teams, even those that are non-technical, to automate away the repetitive tasks that eat up valuable ‘human’ work time. Instead of spending hours on manual data entry or switching between apps, teams can focus on what truly matters (the things humans need to do): building relationships, delivering value, and spending time on tasks that move the needle.
One simple (but time-consuming) process that many companies are repeatedly locked into is generating docs with specific information: think invoices, contracts, SOWs, and more. For this tutorial, we’ll use the example of a work proposal in Google Docs that we wish to send a client, that can be auto-filled by the fields in a simple database (in this case, Airtable). The concepts in this tutorial are largely universal and could easily be applied to any similar use cases.
So, for those looking to get their teeth stuck into the basics of Make, this tutorial sets up a basic, automation flow that will help you get to grips with the platform.
We’ll be basing this automation on our Customer database built in Airtable. If you’re new to Airtable, you can read our full guide. If you want to follow along step by step for the CRM too, check out our Airtable CRM tutorial. You could also use Notion, Glide, SmartSuite or any relational database that has an API to query data instead of Airtable.
By the end of this tutorial, you’ll have an automated workflow that takes the data from your Airtable CRM and generates professional proposals with minimal manual effort, saving you valuable time (and marbles) and reducing errors.

Make account setup
Let’s start by checking out Make itself.
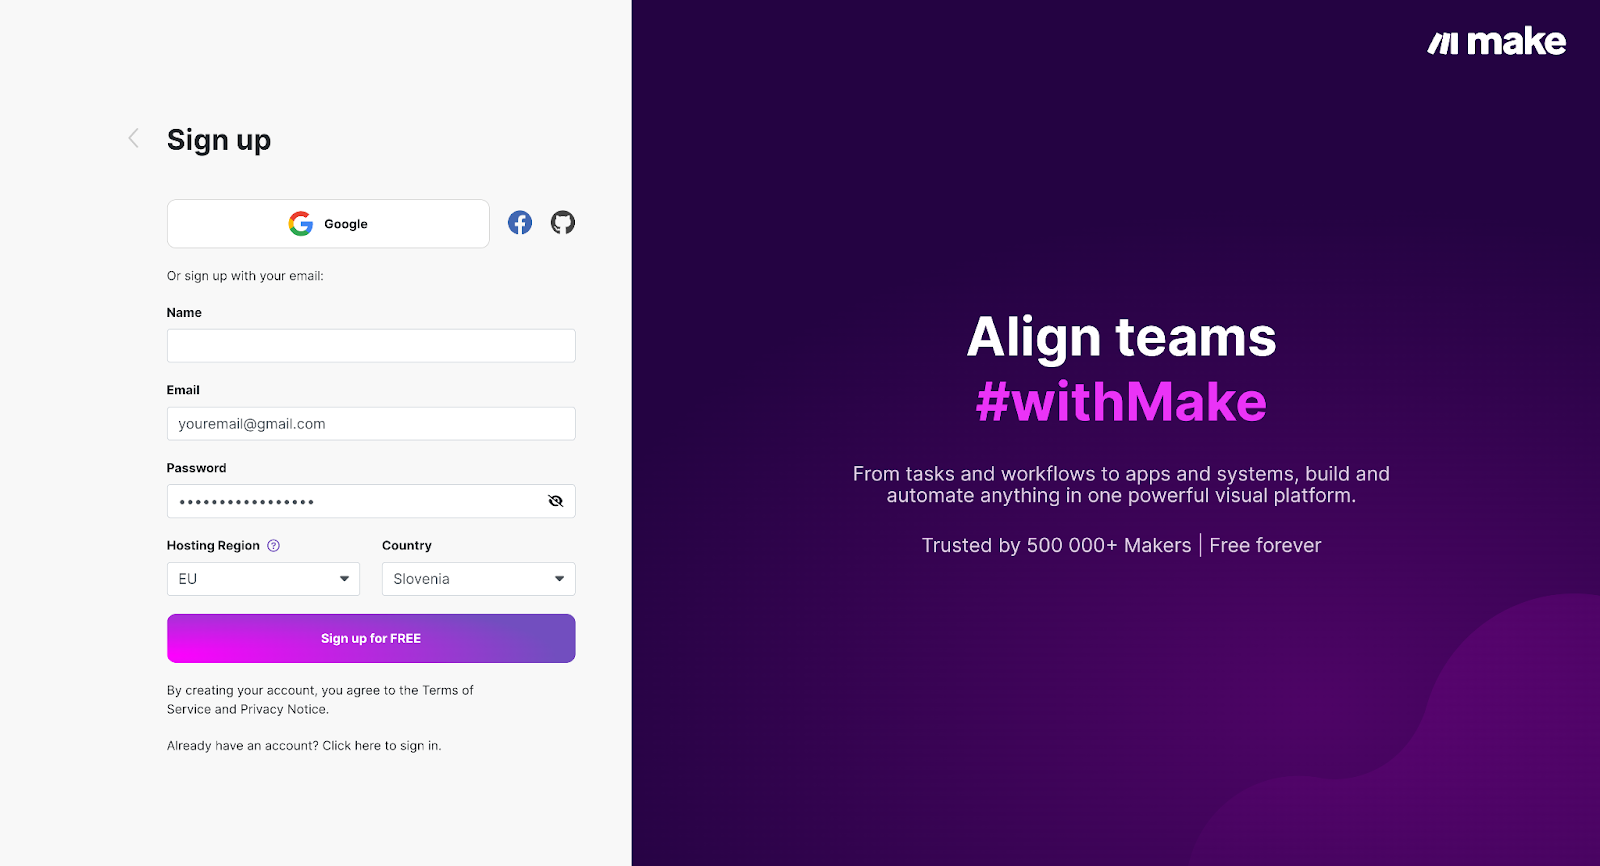
If you don’t have a Make account yet, head over to their website and click the Get started free button—either in the upper right corner or right in the middle of the page.
You’ll be taken to the signup form, where you can choose to sign up with Google or use your email. Select either the EU or US as your hosting region, depending on your location—this will determine where your data is stored and processed. After signing up, check your inbox for a verification email to complete the process.
Once your email is verified, you’ll go through a quick onboarding where Make asks for some basic info to personalize your experience.
Make walkthrough: key concepts
If you’re new to Make, the array of tabs and settings can feel overwhelming at first. But in reality, you’ll spend about 90% of your time using the same few tabs, buttons, and features, so getting familiar with these basics will make your life much easier. Here are a few tabs you will be using more frequently:
Organization: This is your main hub for managing the entire Make environment. It shows your plan, usage, and gives access to templates and resources. You can handle user management, teams, and billing settings here.
Team: Each team has its own set of automations, app connections, and data. In this tab, you can manage team settings, add or remove users, and set up notifications. This is relevant for bigger companies with multiple teams working in Make.
Scenarios: This is where you’ll spend most of your time. Scenarios are your automations, and this tab is where you can create, manage, and organize them. Pro tip: use folders from the start, or you’ll end up with a mess on your hands, as your automations grow.
Connections: These are the app connections you've authorized in Make. Whenever you connect Make to an app like Airtable, it appears here as part of your active integrations list.
Webhooks: Webhooks in Make are used to trigger your automations with HTTP requests. There are two types of webhooks in Make: app-specific (like the Airtable webhooks we’ll use) that listen for data from a specific app, and custom webhooks that can receive data from any source. Once you create a webhook, you can manage and edit it here. We’ll cover more on webhooks in future tutorials.
More: There are a few extra tabs for advanced settings, which we’ll cover in upcoming articles. For now, if you want a sneak peak at what’s available, check out the Arcade below.
Here's a full platform walkthrough to help put that into more context:
Key terminology
Like any platform, Make uses its own terminology, which might be confusing when you’re just getting started. But don’t worry, to begin with there are just a few key terms and concepts you need to start you off:
Module: Modules are the core components of automation in Make. They represent each action that Make performs within an app. For example, a module can read data, create a record, update a field, or delete an item.
Scenario: A scenario is simply an automation workflow. It’s made up of a series of modules strung together to automate your tasks.
Template: A template is a pre-built scenario designed to help you get started faster. You can customize a template for the kinds of automations you’ll make repeatedly so you can build faster without starting from scratch.
Trigger: Every scenario needs a trigger to get started. The trigger is the event that kicks off your automation. When setting up a new scenario, the first module you select will be your trigger.
Action Modules: Action modules are a specific type of module designed to perform tasks such as creating, reading, updating, or deleting data. These are the building blocks of your scenario and can appear anywhere in your workflow—at the beginning, middle, or end.
Operation: Operations are how Make measures your usage. Every time a module runs an action, it counts as one operation. For example, if Make fetches data from Airtable, sends data to Google Sheets, or updates a record in Notion, each of these actions is counted as an operation.
Blueprint: A blueprint is a file (in JSON format) that you can use to import or export a scenario. It includes all of your modules and settings (except for connections), allowing you to easily share your automation or back it up.
Diagram: A diagram is Make’s visual representation of your scenario. It’s one of the platform’s standout features, making automation building (and maintaining!) intuitive and easy to follow—just like creating a flowchart.
Airtable and Make integration
Since we’re going to be integrating Make with Airtable to perform our scenario, we first need to connect to our Airtable account to be able to read and write the data. You can follow the same steps here for any of Make’s native integrations, or set up a REST API connection to any API that isn’t natively supported.
To connect Airtable to Make, start by creating a new scenario. Go to the Scenarios tab and click Create a new scenario to open the Scenario Builder.
In the Scenario Builder, the Search module form will open by default. Search for Airtable, choose Watch Records as the trigger, and click Create a connection.
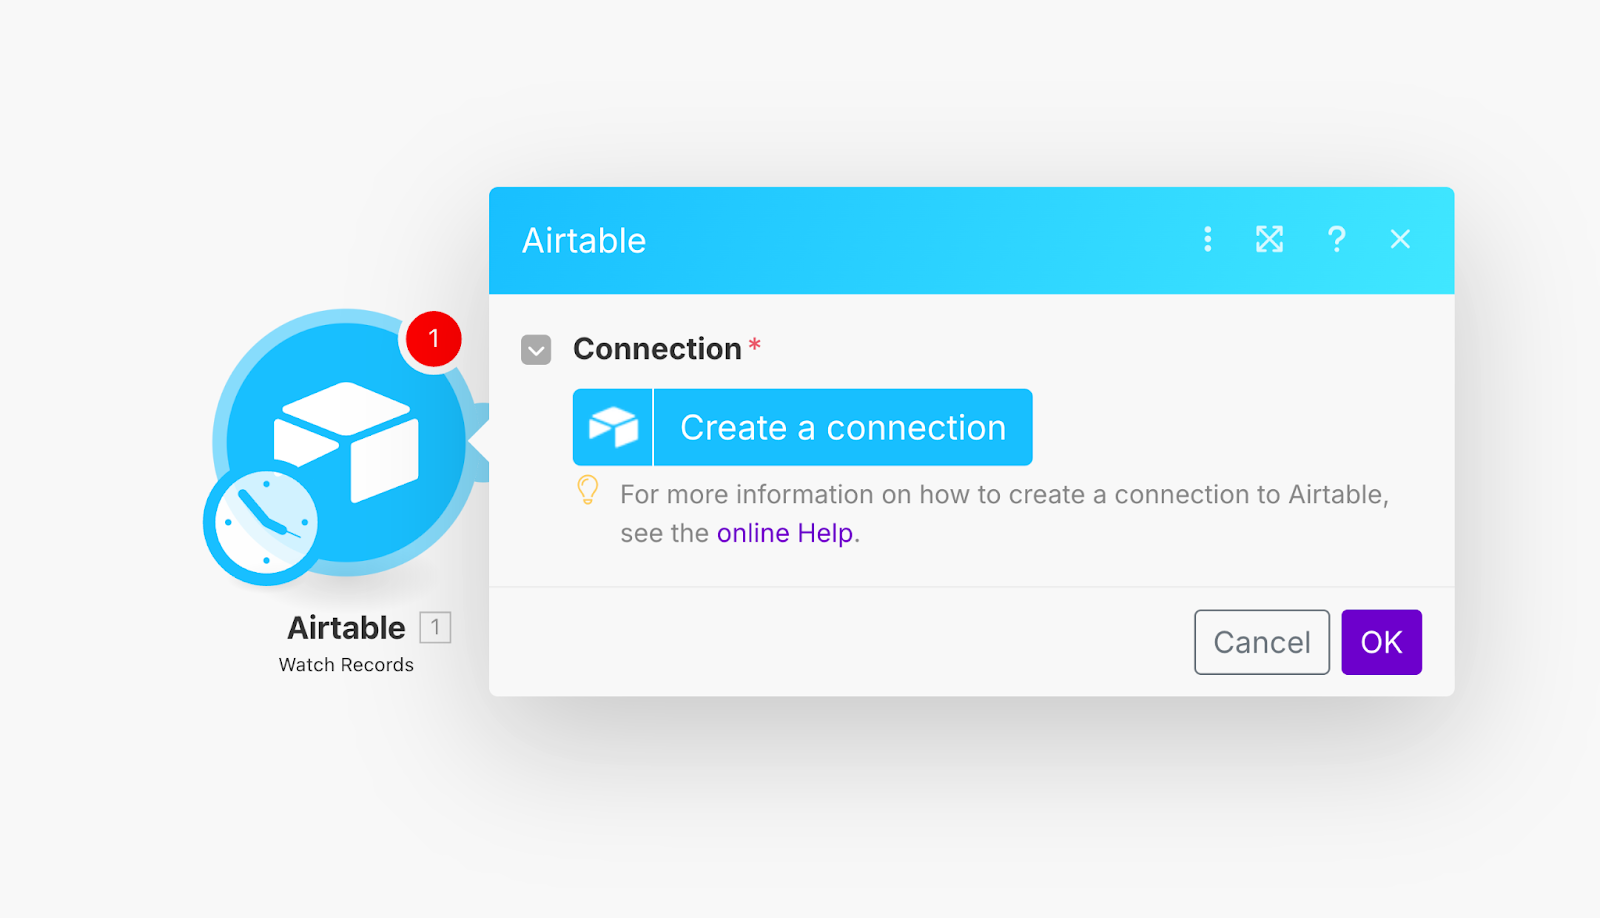
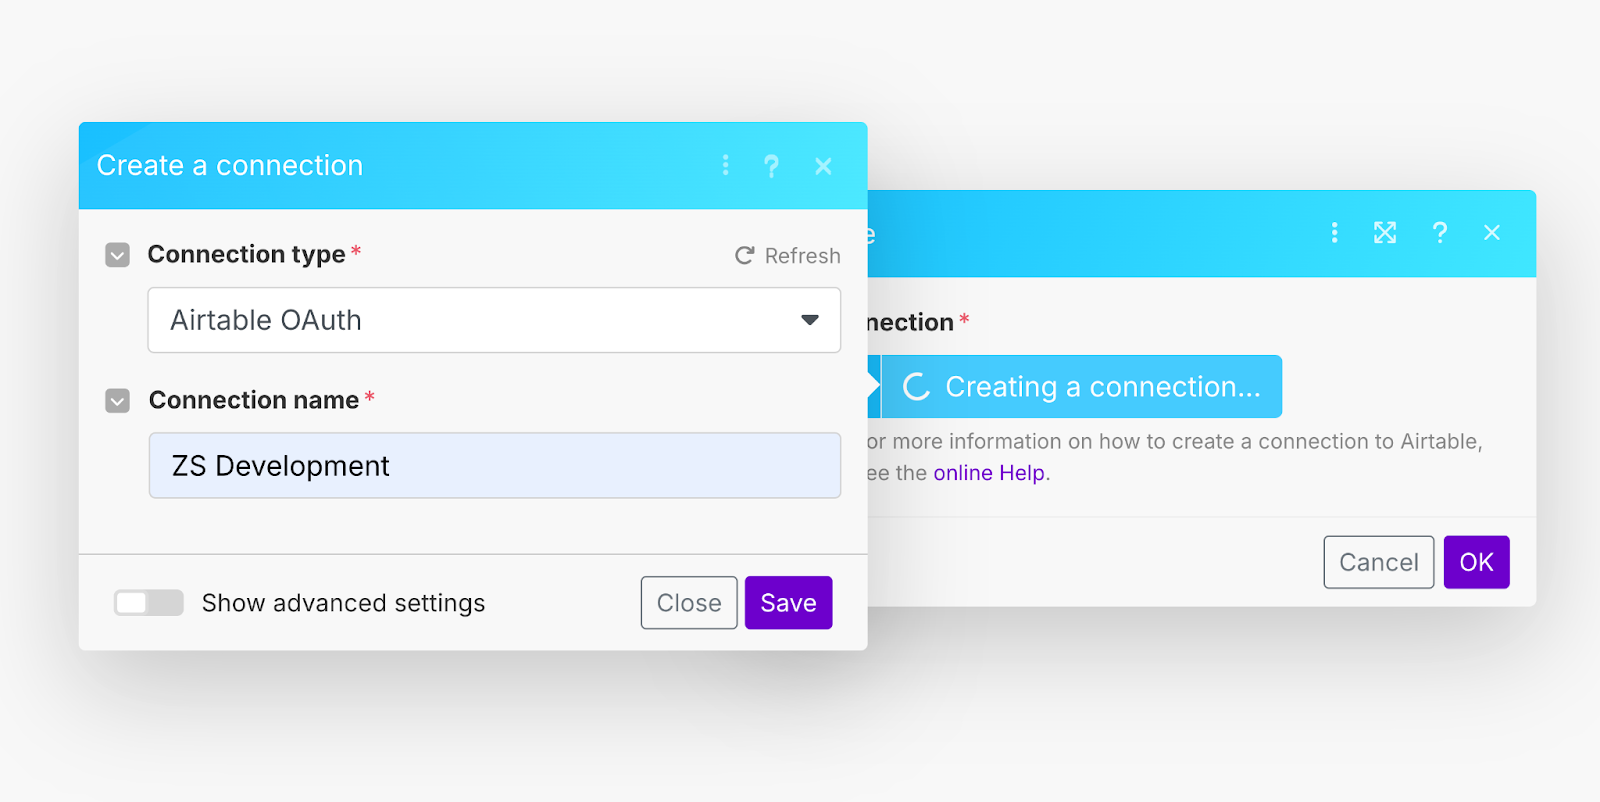
Select Airtable OAuth for the Connection type, give your connection a name (we recommend including the user's name for clarity since multiple people can create connections to the same app), and click Save.
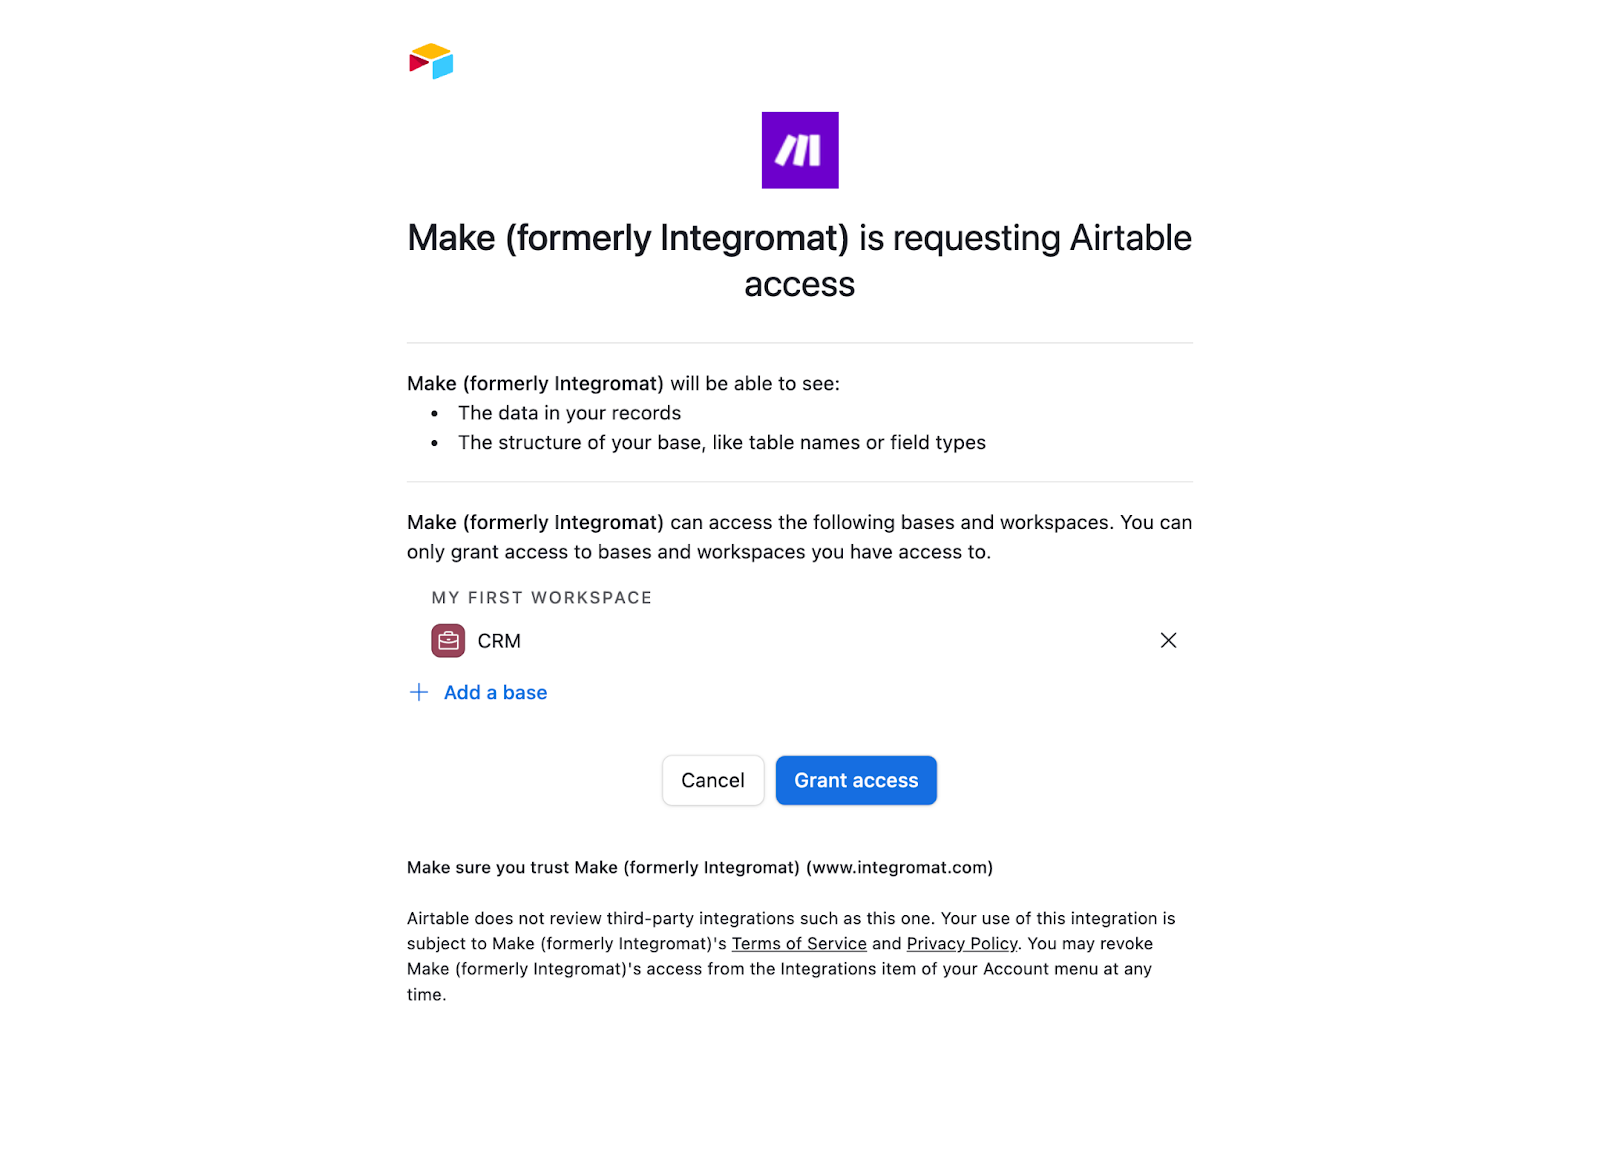
You’ll then be redirected to Airtable’s authentication page. Click Add a base, select your CRM base, then Grant access to allow Make to read data from it.
Airtable CRM setup with customer data
Now we’re connected to Airtable, we need to set up our database to work with our new automation.
As previously mentioned, we’ll be building on top of our pre-made Airtable CRM from our Airtables basics tutorial. To get our CRM ready for this automation, we first need to add a couple of fields. If you’re working with your own database, you just need to make sure that your database includes the fields below if you want to copy our proposal exactly.
Here’s the core information we’ll need to generate our proposal:
- Client Name
- Project Type
- Proposal Date
- Services
- Project Timeframe
- Main Contact Name
- Deal Amount
We also need a trigger field for the automation and a spot to store the proposal link, in this case:
- A “Generate Proposal” checkbox column, and
- A “Google Docs Proposal” URL column
Most of these fields are already set up in our Airtable base, so let’s quickly add the missing ones.
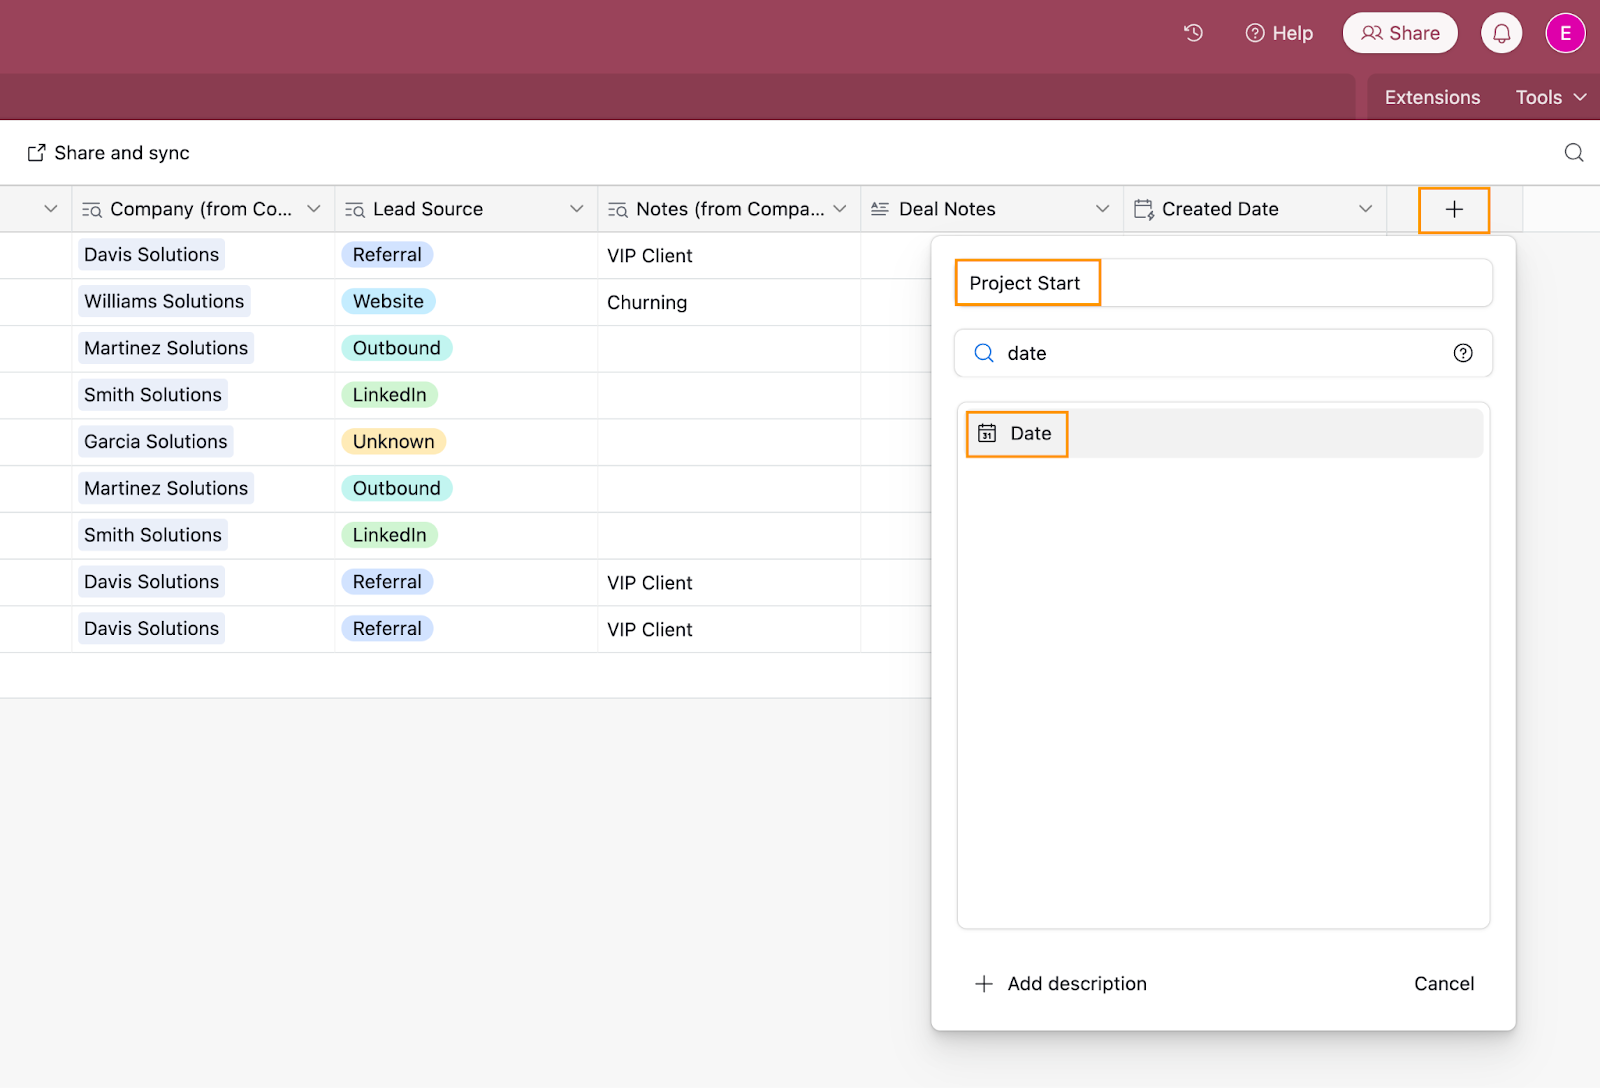
Project timeframe
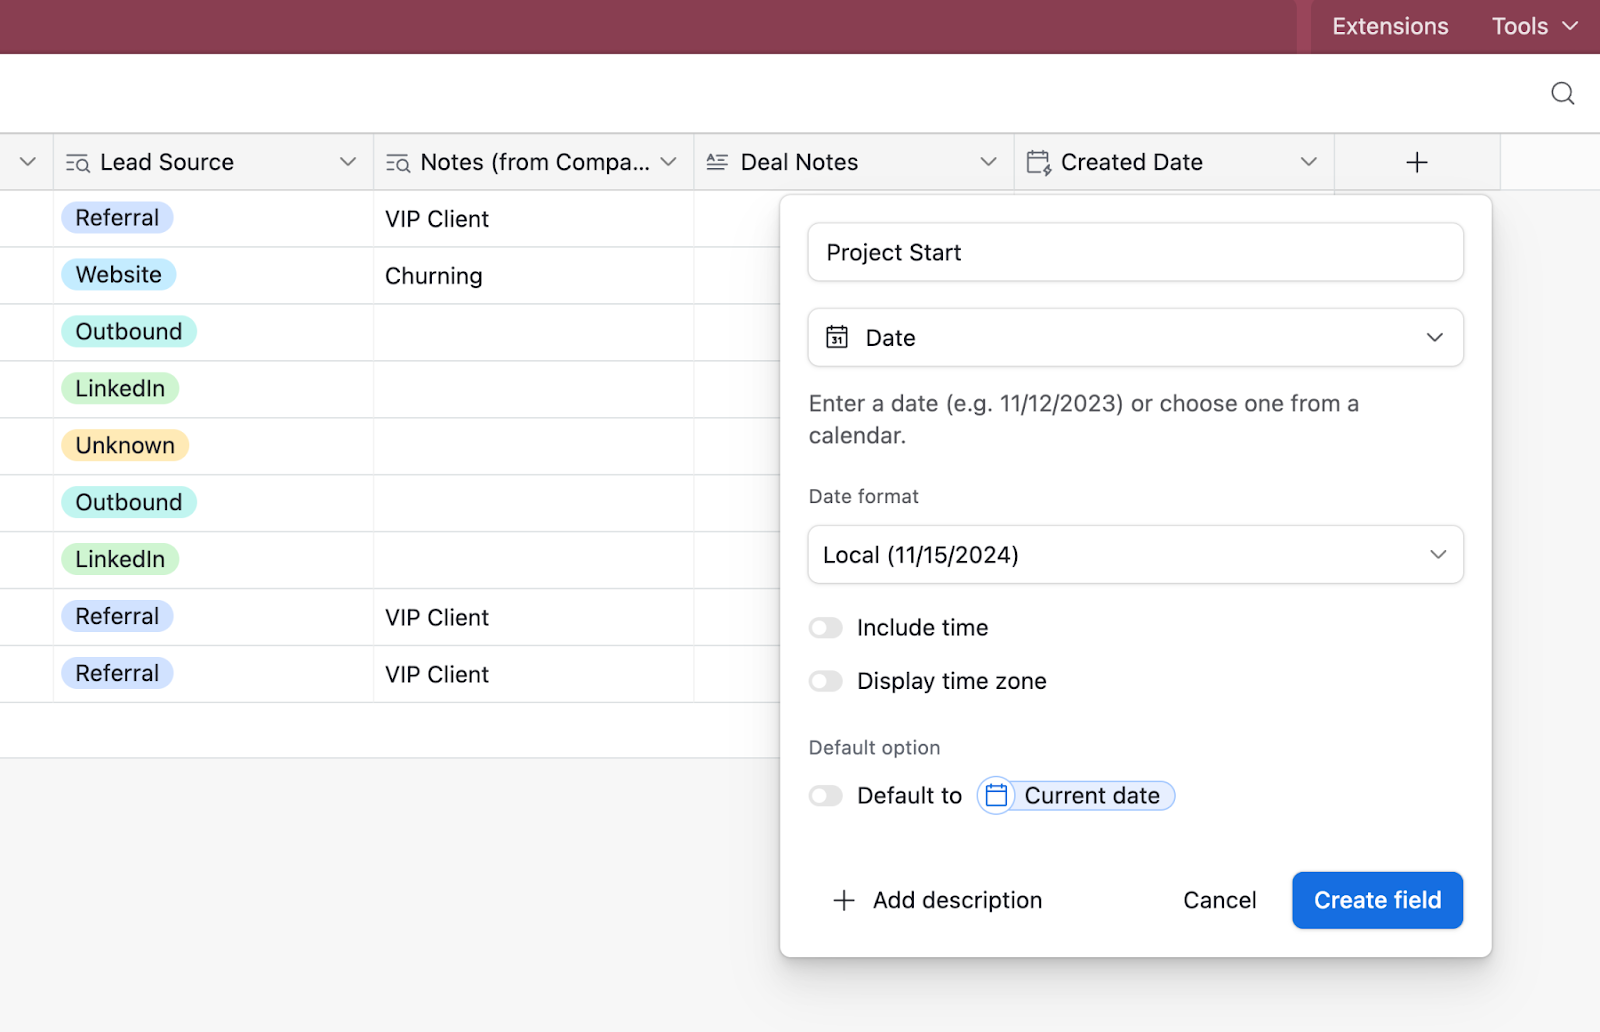
In your Deals table, add a new field. Set the column type to “Date” and name it Project Start. Leave the default date settings as they are and click Create field. Then, add another date field called Project End with the same settings as the Project Start column.
We’ll use these two date properties to create a project timeframe in Make.
Generate proposal
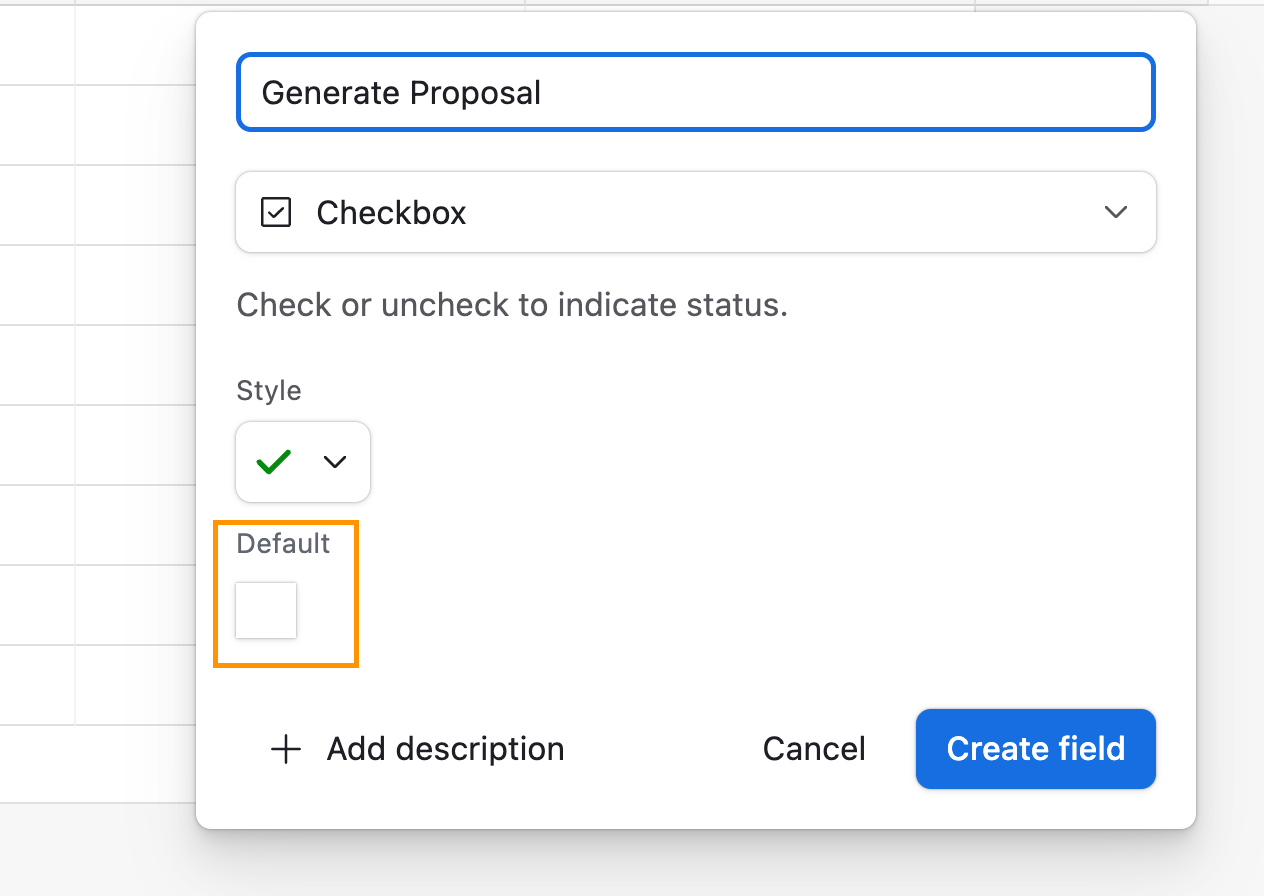
To trigger the automation from Airtable, we’ll add a checkbox field named Generate Proposal. Set the type to Checkbox and leave the default unchecked. This way, we manually check it when we want to run the automation.
Proposal date
Now, let’s add a Last Modified Time field named Proposal Date. This will automatically record the date whenever you trigger the proposal generation so you can trace it back. Set it to track changes only when specific fields are updated and choose Generate Proposal as the trigger.

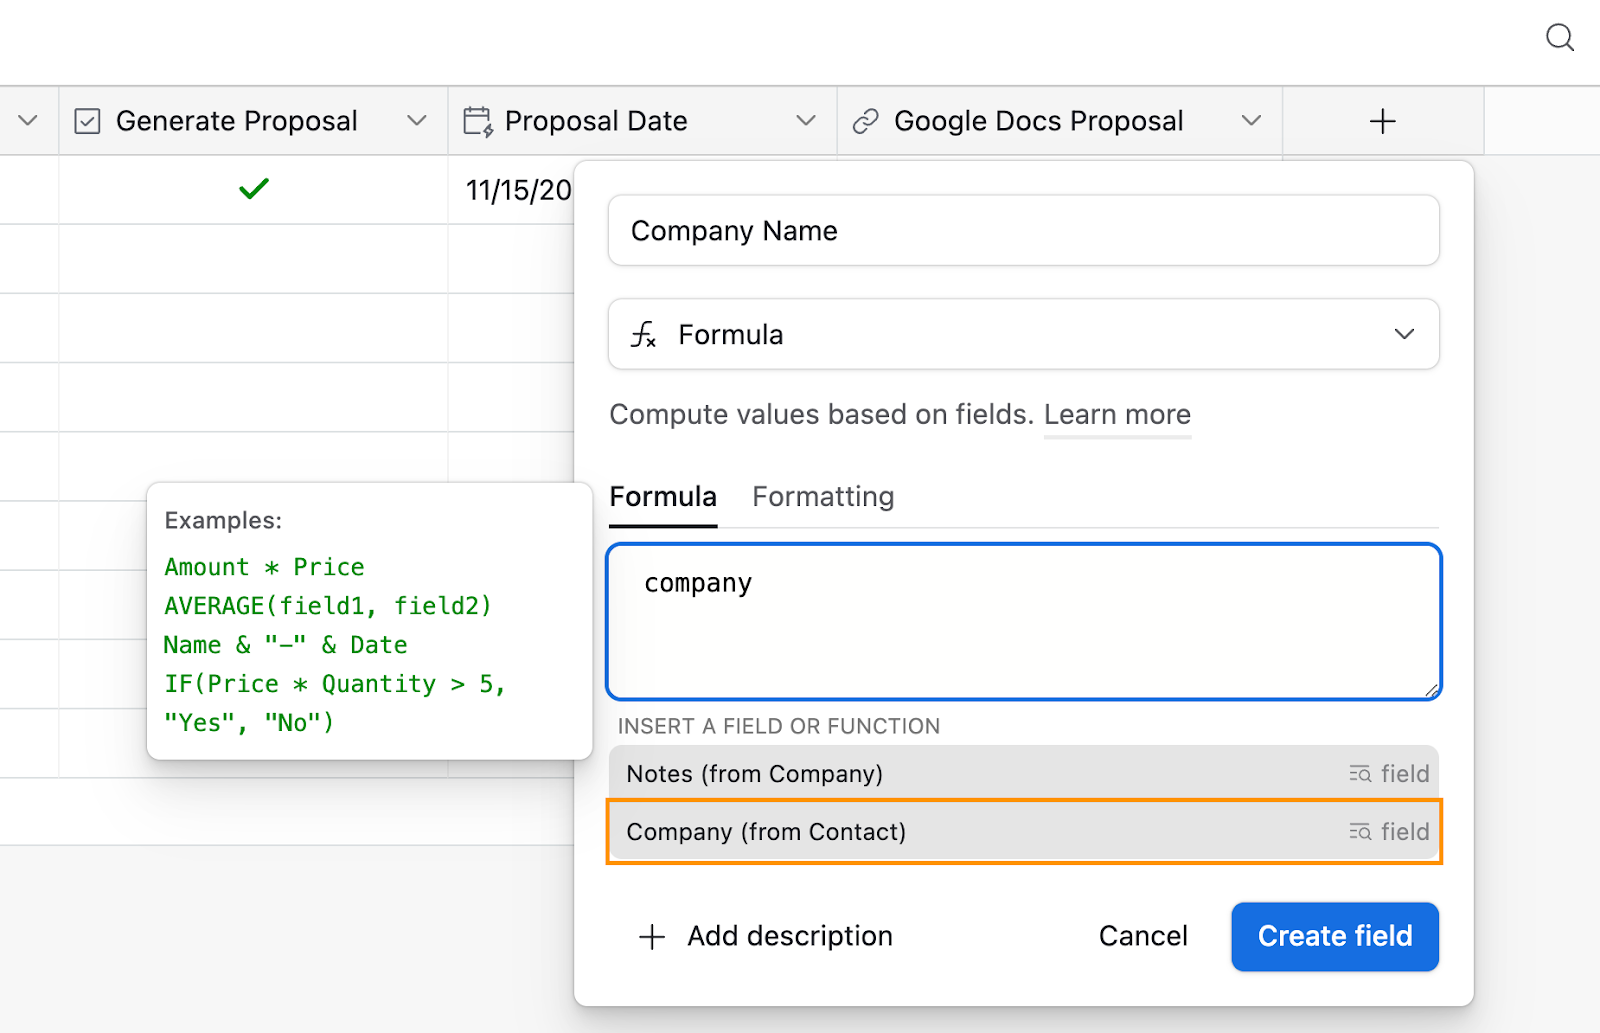
Company, Contact Name and Services
To prepare our data for automation, we’ll use lookup formulas to pull company and contact names from related records directly to the Deals database. This converts linked data into plain text values, making it easier to work within Make. Without this step, Airtable passes the data as an array or list of related record IDs instead of names, requiring extra effort and more advanced knowledge of Make to process.
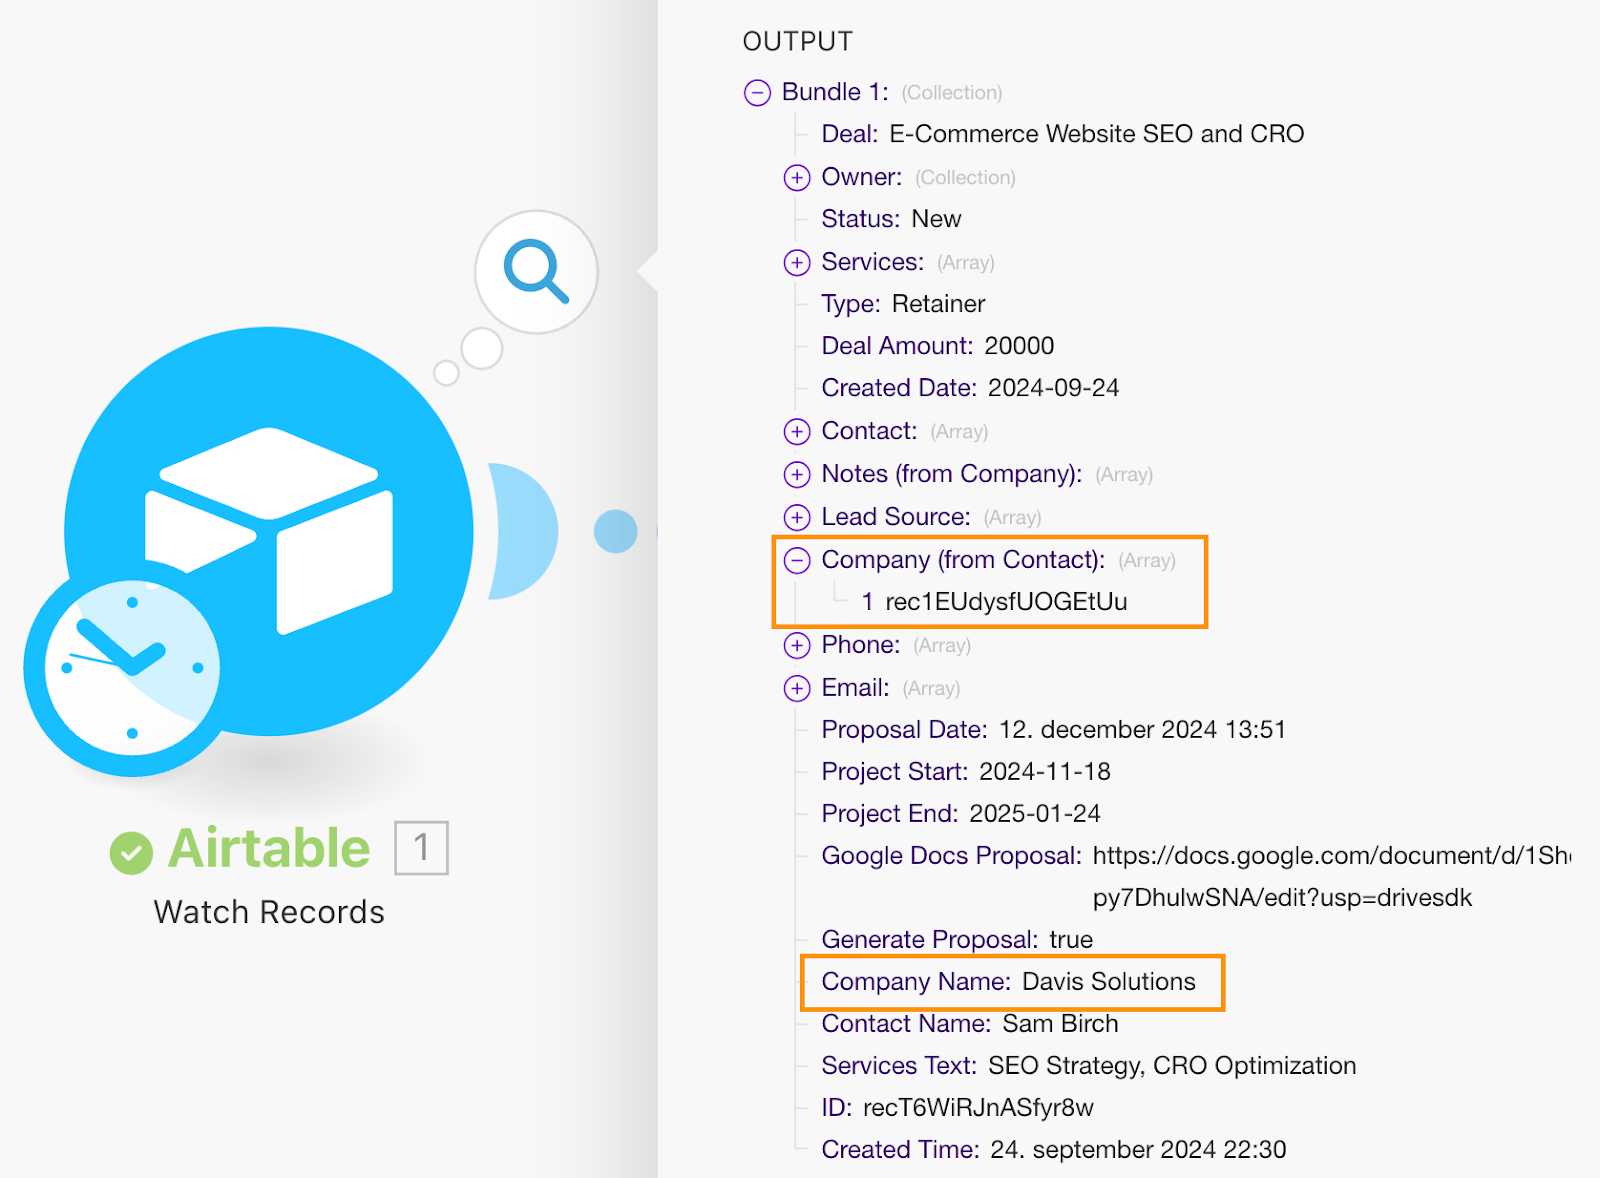
By using lookups to convert the data to plain text in Airtable before you send it to Make, you can map the actual company and contact names directly into your proposal document, avoiding unnecessary complexity. We’ll explore how to process arrays and more advanced use cases in our upcoming tutorials.
To set up the lookup formula, simply set the column type in Airtable to formula and select the field from the deal table. You can learn more about lookups in our Airtable tutorial.
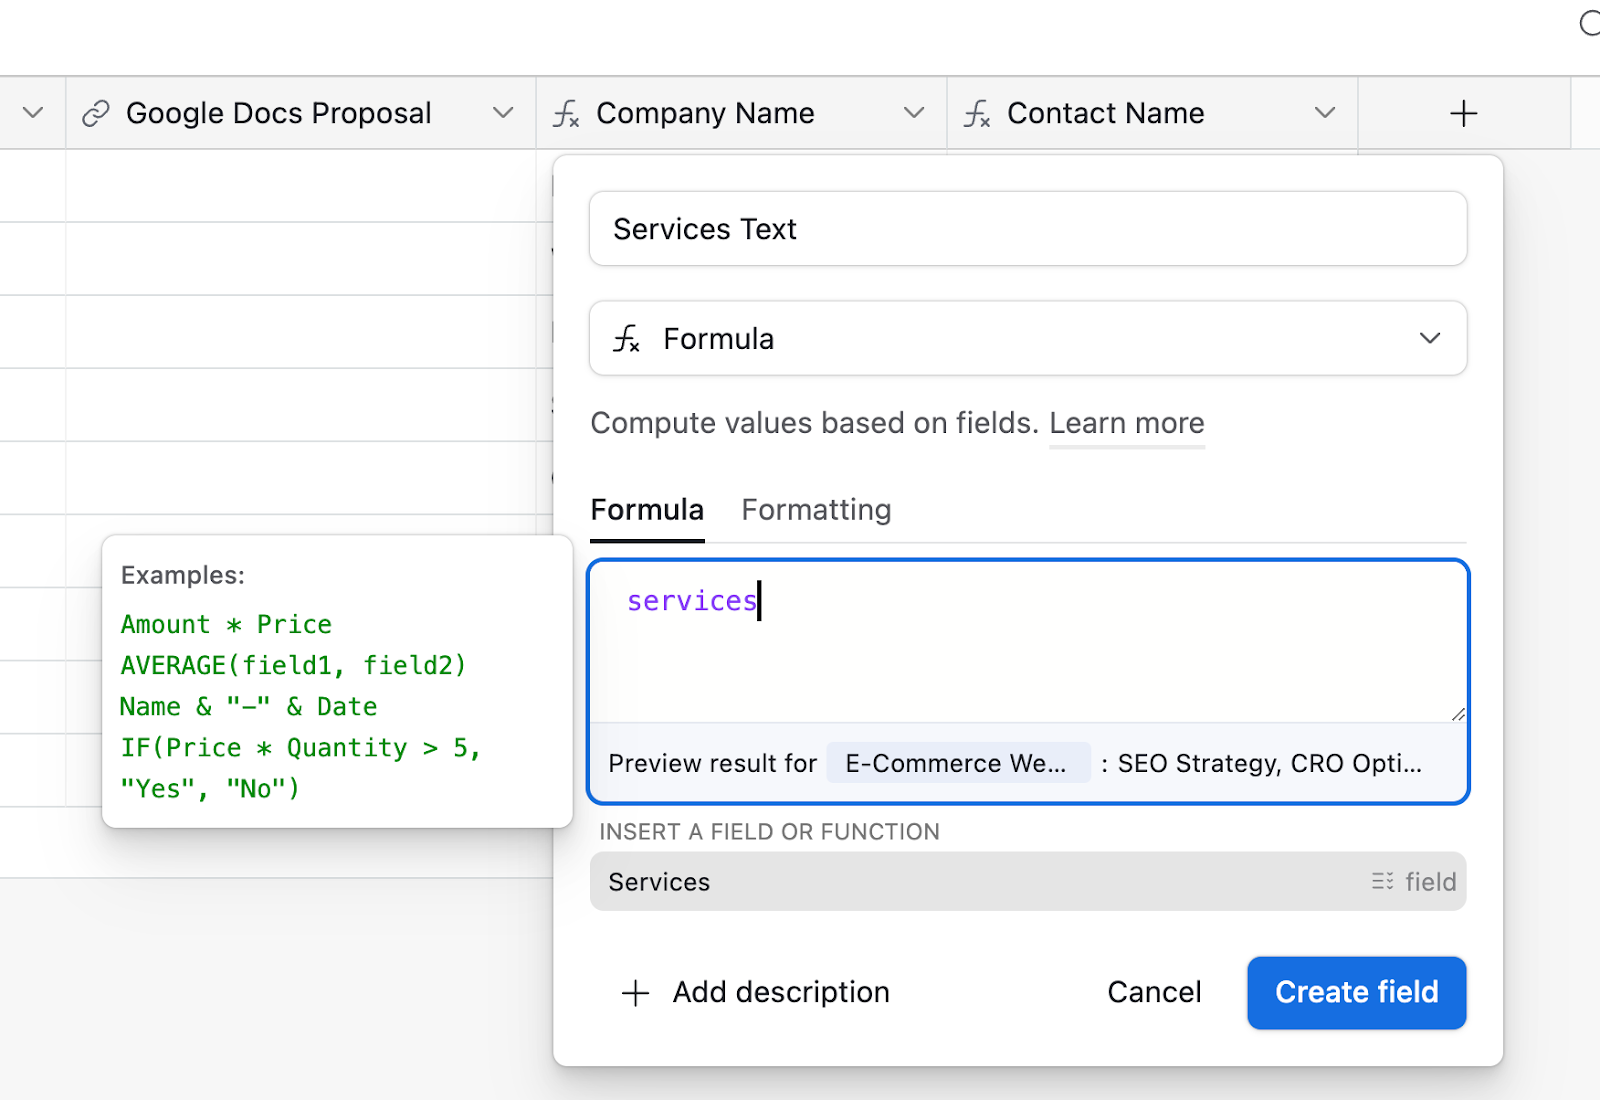
For the Services field, we’ll use a similar approach. In our CRM, Services is a multi-select field, which Airtable passes to Make as an array of values. To simplify the automation design, we’ll convert it into plain text and send it as such to Make.
Google Doc Proposal
Finally, add a URL field named “Google Doc Proposal”. This is where we’ll store the link to the generated Google Doc, making it easy to review and share directly from Airtable.
Automation design in Make
Now we’re connected to Airtable, and our database is set up and ready for our proposal automation, let’s return to Make and place up the first building blocks of our scenario.
Scenario builder overview:
When setting up a trigger in Make, you'll come across two types: polling (scheduled triggers) and webhooks (triggers using HTTP requests, which we've touched on earlier). Both methods serve the same general purpose—triggering an automation when a change or event occurs in another application—but they function in very different ways.
Polling triggers work by ‘asking’ the connected app (like Airtable) if there are any updates or changes at regular intervals. Imagine it’s like a child constantly asking, "Are we there yet?" during a long car trip. The system (the ‘child’) repeatedly checks with the app (the ‘parent’) to see if there is any new data to act on.
Webhooks work the opposite way—when an event occurs in the app, it sends a notification directly to Make without having to wait for a scheduled check. Going back to the analogy: it's as if the parents (the app) notify the kids (Make) when they've arrived at their destination, without the kids needing to ask constantly (if only!). Webhooks are triggered only when the event happens.
You might be wondering: which one is better? The answer depends on your needs—both triggers have their place.
- Polling is great when you don't need immediate updates and can handle a delay between when an event happens and when the automation runs. It’s typically cheaper because you're processing requests in bulk, at set intervals, rather than individually.
- Webhooks are ideal when you need real-time or immediate action. For example, if a lead schedules a call with you and both parties receive an instant confirmation via email, that's a webhook in action.
Even though Airtable supports webhooks, this tutorial will use a polling trigger instead as it’s simpler to set up. Don’t worry though, we’ll set up webhooks in the upcoming, more advanced tutorials.
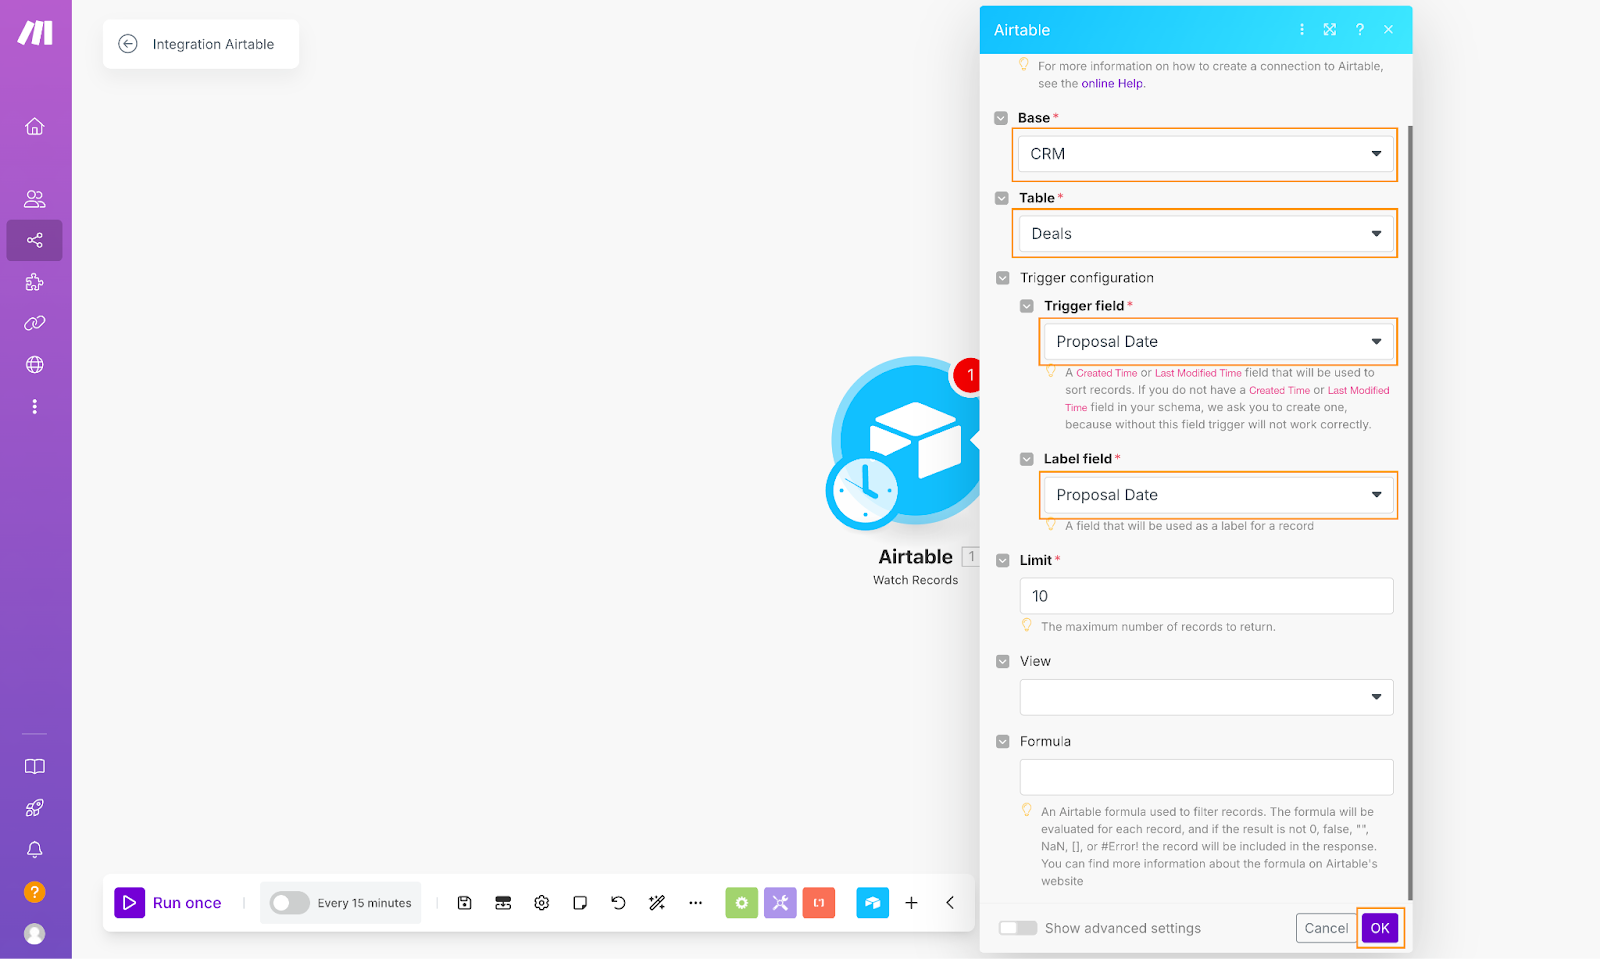
Now that you have a clearer picture of the different types of triggers, let's return to the scenario, where you'll configure additional settings on your trigger module:
- Base: CRM
- Table: Deals
- Trigger field: Proposal Date
- Label field: Proposal Date
Once you've set that up, click OK to finish configuring the trigger. On the next screen, under the Choose where to start section, select From now on to ensure that your automation starts from this moment forward, rather than from any historical data.
Name your module: It’s good practice to give each module a clear, detailed and meaningful name instead of just leaving the default. This way, you’ll have a much easier time understanding what each one does, and it’ll make maintaining your automations simpler as they get more complex down the line.
To rename the module:
- Right-click on the module you’ve set up.
- Select Rename.
- Pick a name that makes sense and is easy to understand—something like "Proposal Generated Checked" works well.
At this point, Make doesn’t have any data from Airtable because we haven’t run the automation yet. But to keep building our Automation and to be able to populate the Google Doc with Airtable data, we need to fetch that info first.
Here’s what to do:
In Airtable:
- Go to the Deals table.
- Select a record to test with.
- Fill out the Project Start and Project End fields.
- Check the Generate Proposal checkbox.
In Make:
Right-click on your module and select Run this module only. This runs just the single module (action) you’re testing. This is an integral step as your automation grows, because you won’t always want to test the whole workflow at once.
After checking that Generate Proposal checkbox and running this step, you should see data pulled from Airtable. This will help confirm that Make is pulling the right information for the next steps in your automation. Plus, it will allow us to map the Airtable data to your Google Doc.
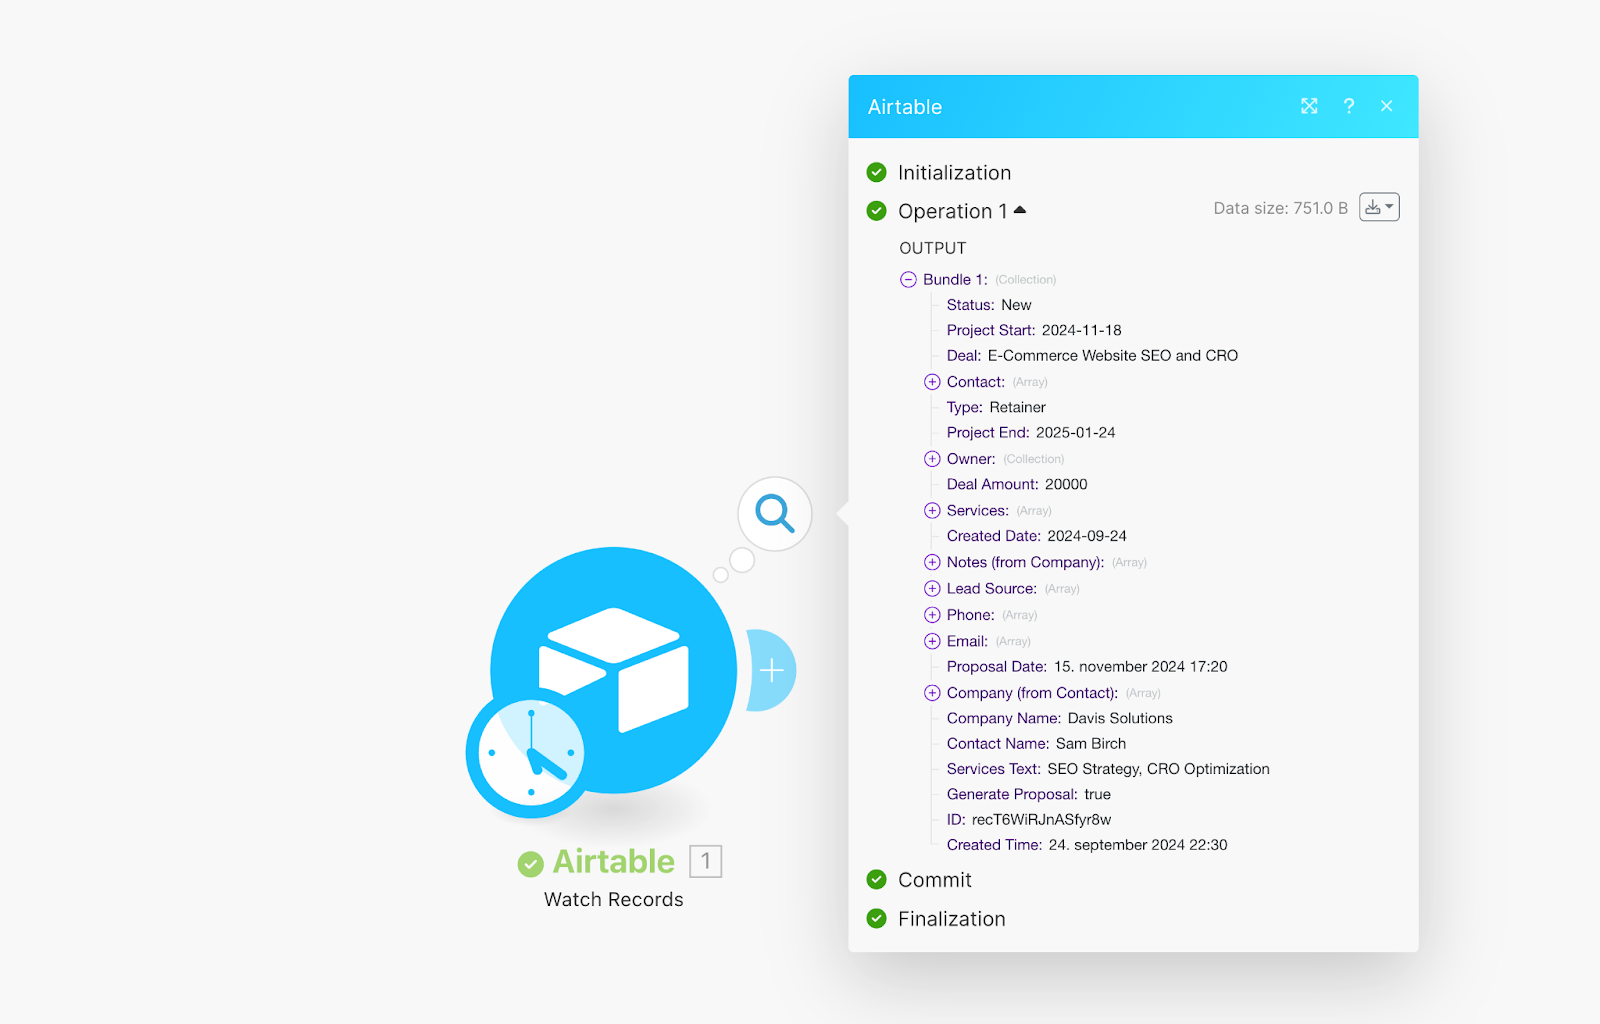
The returned output might look a little confusing, but all will become clear in the following steps!
Google Doc template configuration
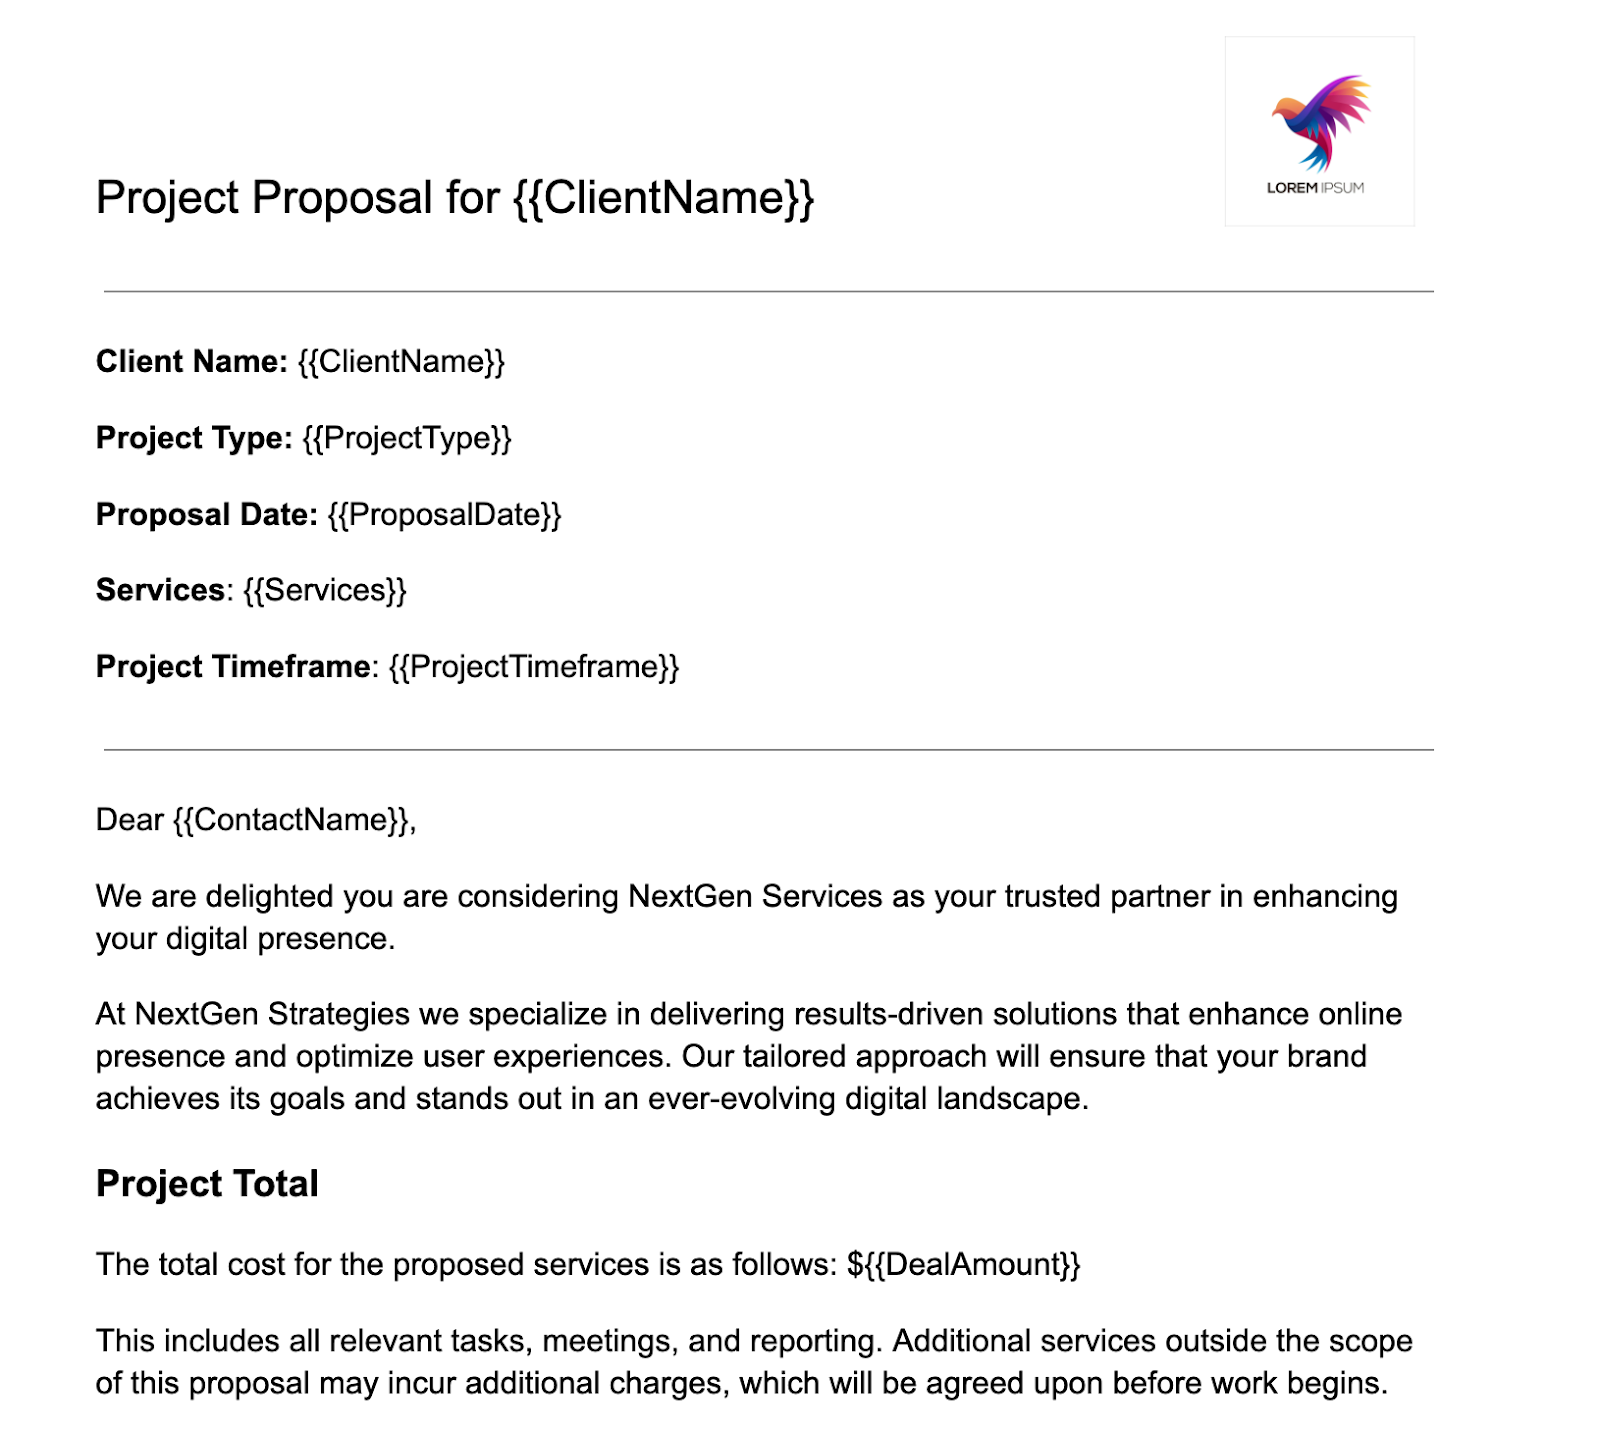
Now that your Airtable data is set up, as well as your initial automation trigger, it’s time to create the Google Doc template we’ll use to dynamically generate proposals. You can start from scratch or use our simple template as a base to save time.
The best part about Google Doc templates is that you can customize them to fit your brand—add your own intro, logo, or any additional information you want. Our example template is minimal, but feel free to tweak it as needed. No matter what details you decide to include, the core concept remains the same.
To pull in data from Airtable, we need to add placeholders to the Google Doc. Placeholders are simply pieces of static text wrapped in double curly brackets that get replaced with live data during automation. Here’s an example:
Project Proposal for {{ClientName}}
1. Use meaningful names: In Make, you’ll only see the placeholder text, not the surrounding context. So, choose names that make it clear what data they should be replaced with. For example, use {{ClientName}} instead of something vague like {{Name}}.
2. Reuse placeholders: If you need the same piece of information in multiple places, use the same placeholder throughout the document. For example, you can use {{ClientName}} in both the proposal title and body text. You only need to map it once in Make, and it will update everywhere.
3. Avoid spaces in placeholders: Keep the placeholder text simple and human-readable without spaces. We recommend using camel case (e.g., {{ClientName}}) or using dashes or underscores (e.g. {{client-name}} or {{client_name}}). This ensures the placeholder works correctly while still being easy to read.
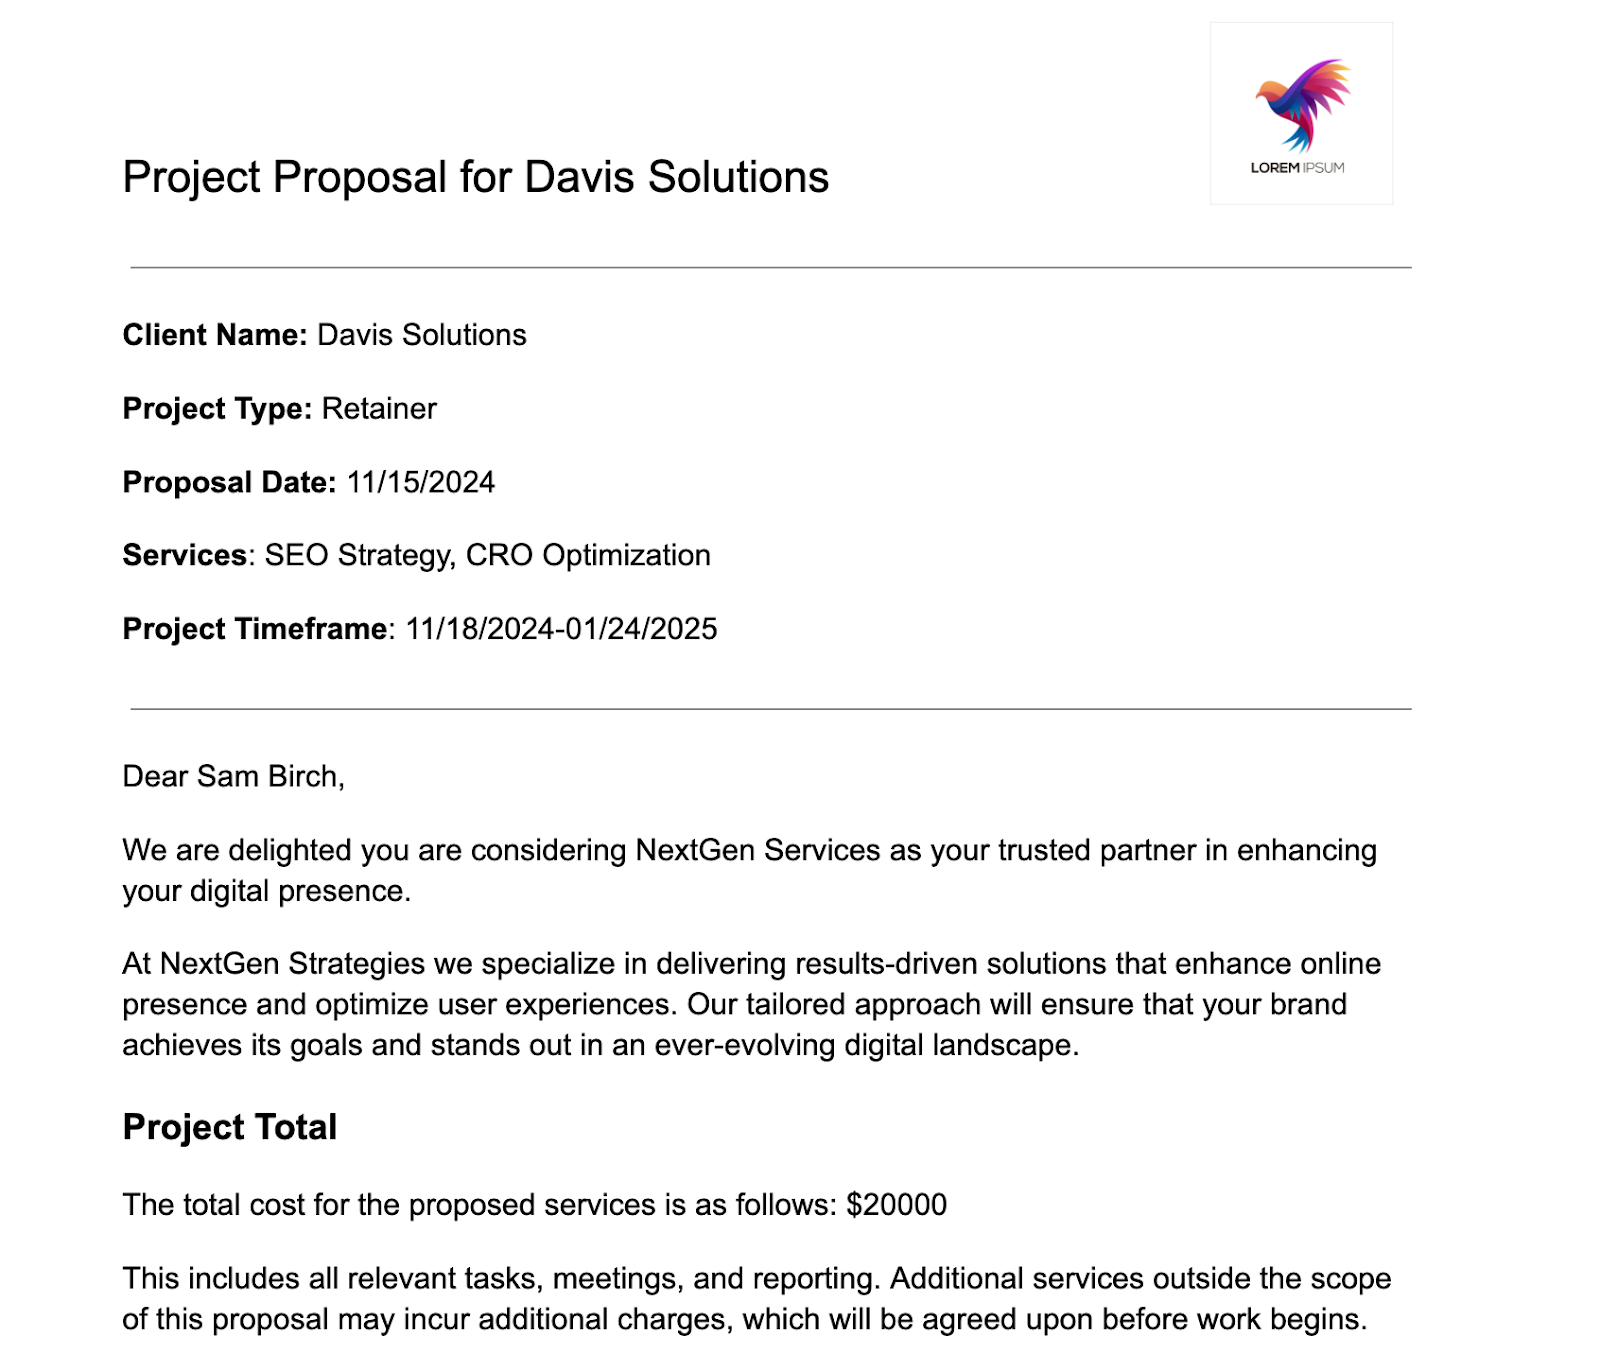
Here’s our proposal doc in practice:

Once your template is ready, it’s time for the most exciting part— making your Airtable data ‘talk’ to your Google Doc proposal. In other words, setting up the automation that will take data from Airtable and generate your proposal in Google Docs.
Create a proposal from a Google Doc template
Now, we’ll connect Make to your Google Drive account, fetch the proposal template, and populate it with dynamic data from Airtable. Head back to Make for these steps:
- Close the Airtable data panel, then click on the Plus sign on the right side of your Airtable module to open the module search pane.
- In the search pane, type “Google Docs”, and click Show more to expand the list of Google Docs modules.
- From the list, choose the Create a Document from a Template module.

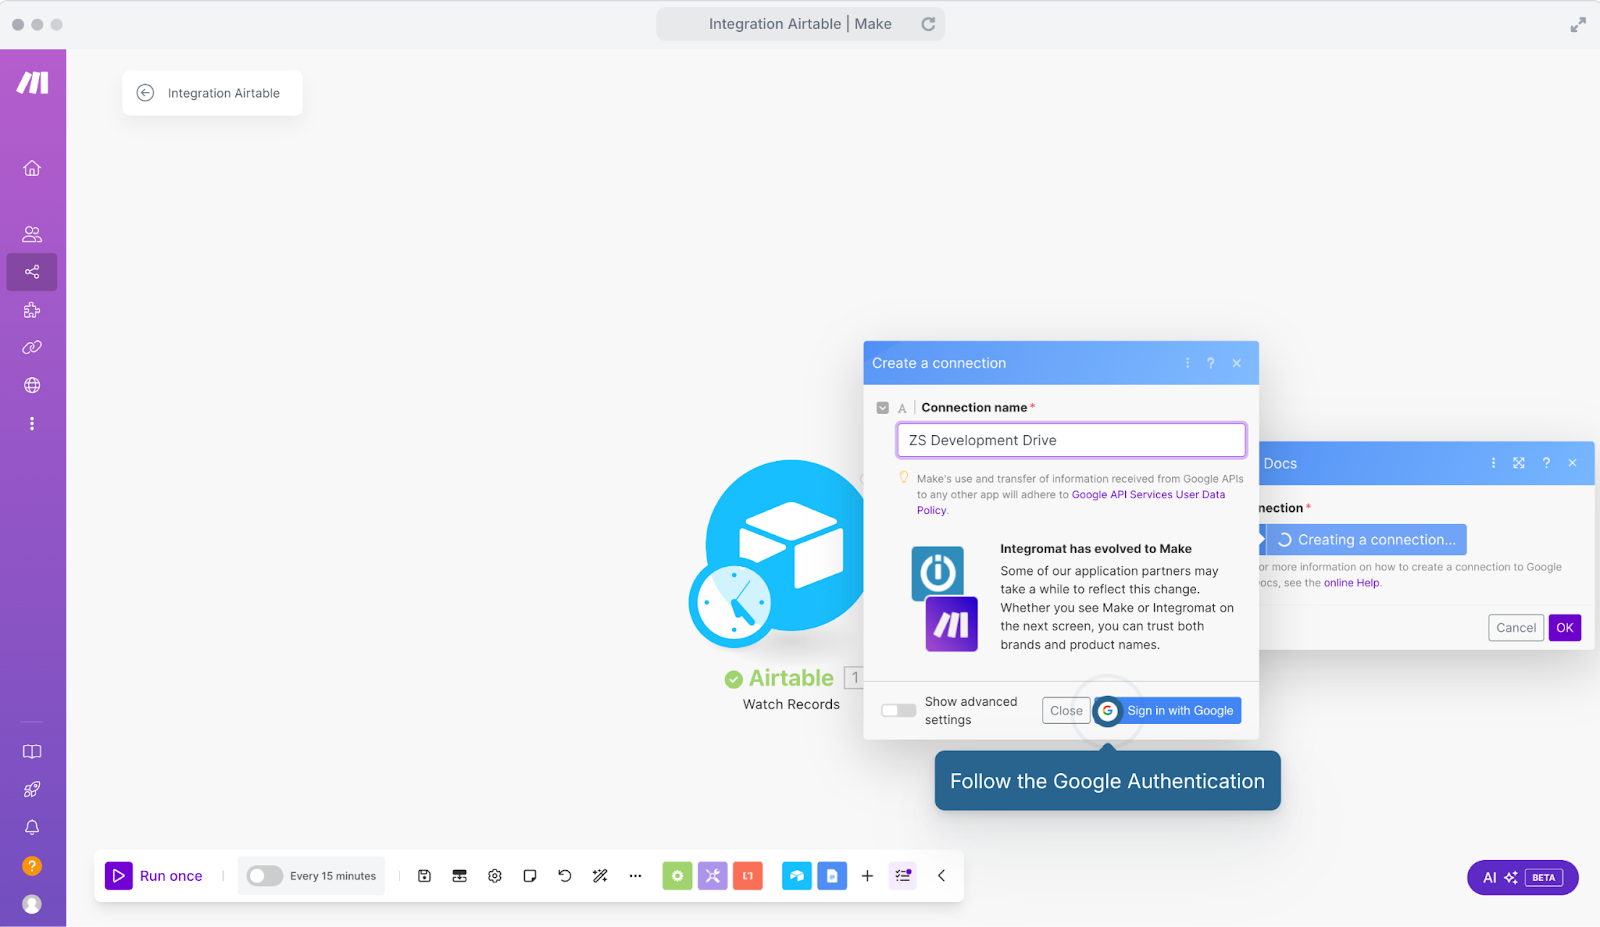
Since we haven’t authorized Make to access Google Drive yet, we’ll need to set up a connection, just like we did for Airtable.
- Click Create a connection to start the authorization process.
- Give the connection a name that will help you recognize the account you’re connecting to.
- Click Sign in with Google and follow Google’s prompts to authorize Make.
Once you’ve granted access:
- Under the Document ID section, select the proposal template you created (make sure it’s uploaded to Google Drive first).
- Once you’ve selected the template, you’ll see that magically, the placeholders automatically appear in the Values section of the module configuration.
These placeholders are where we’ll insert the dynamic data from our customer info in Airtable.
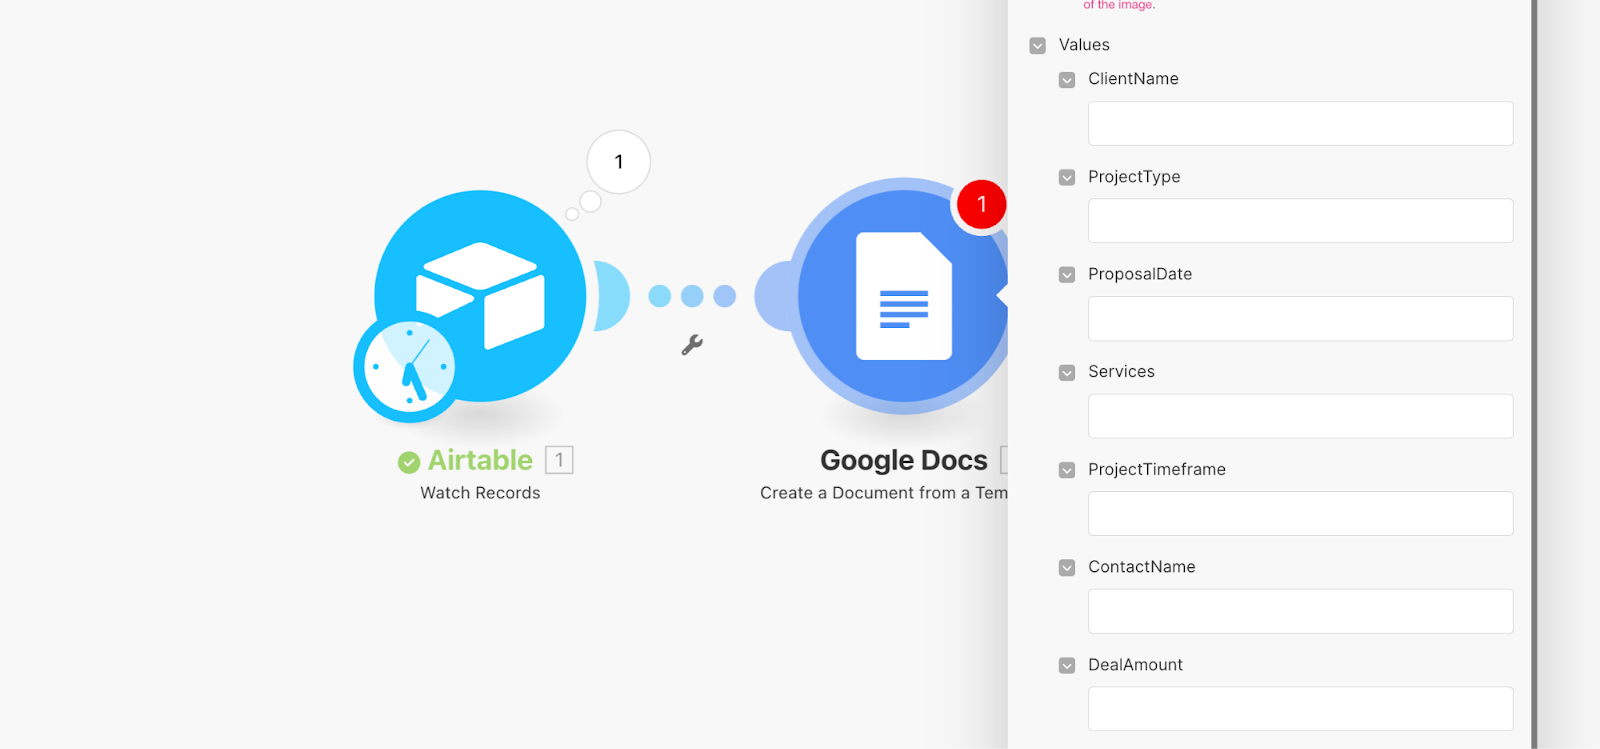
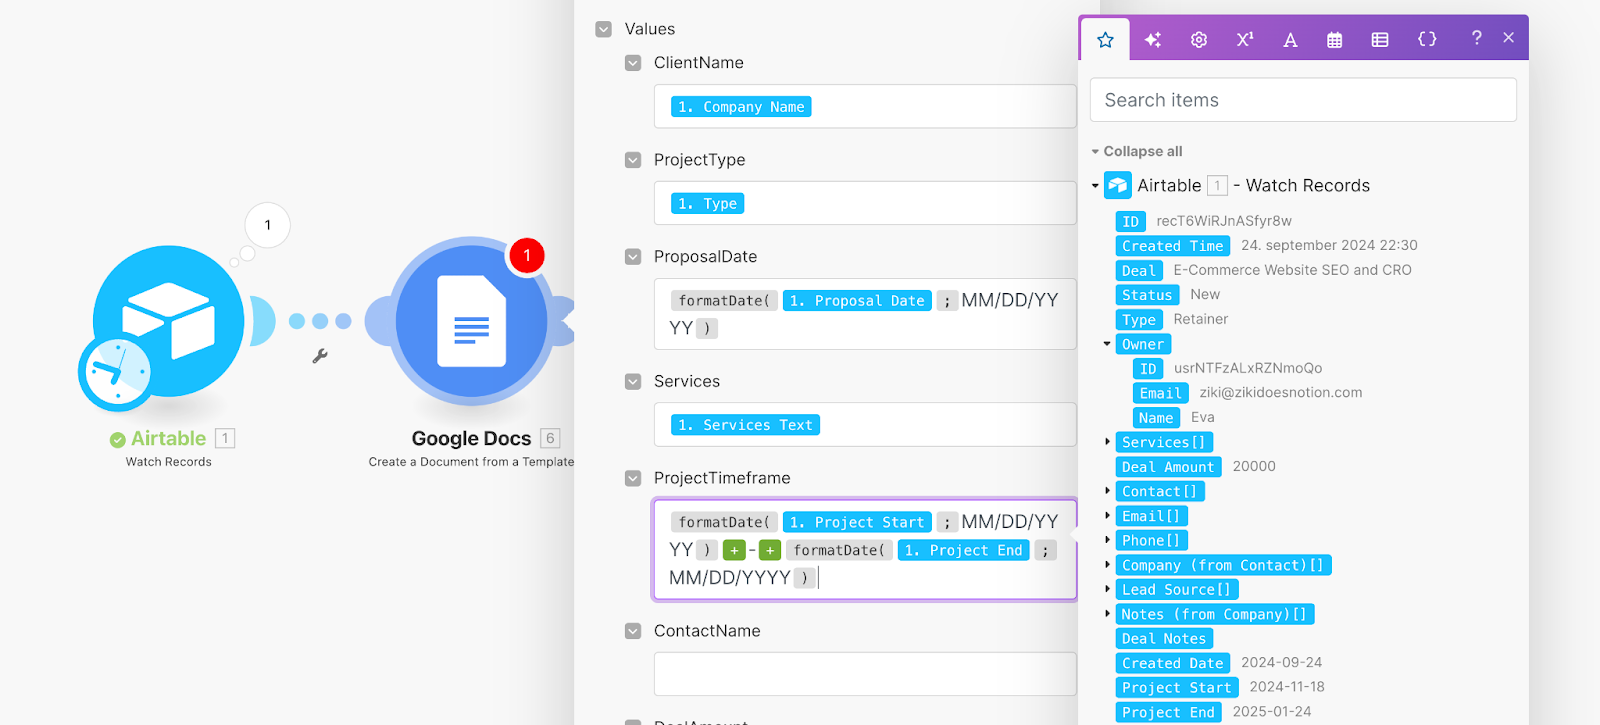
To add dynamic values, click on each field to open the value picker. The first tab (the star icon) will show values from the previous modules, and the other tabs contain functions and operators that you can use to manipulate and format the data.
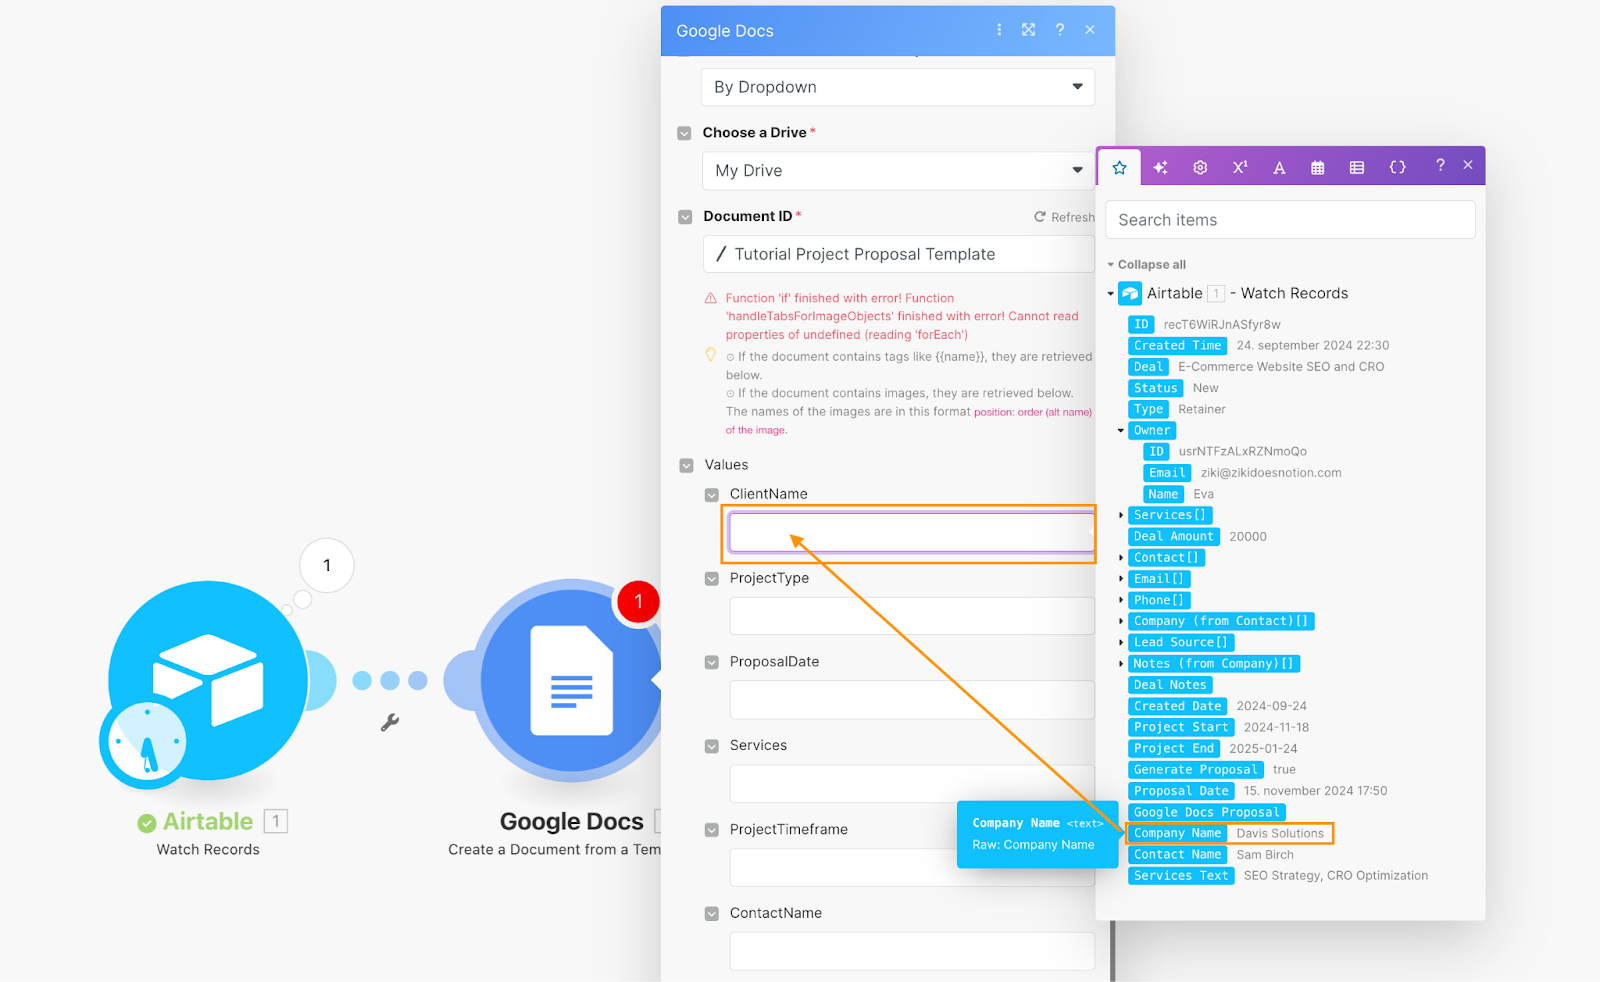
Let’s map the values from our Airtable data. For some fields, we’ll just match up the values directly, but for our dates we’ll need to do a bit of light formatting:
- Company Name: Map this to the ClientName field in the module in our doc. You'll notice that when you map the field the field name is prefixed with a number, which corresponds to the module number that the field is sourced from. This numbering system is used to clearly identify and reference data mappings between modules within the workflow, making it easier to understand the source of each field you map.
- Type: Map this to the ProjectType field.
- Proposal Date: The Proposal Date column from Airtable returns a date and time value, but we don’t want the time on the proposal. To fix this, we’ll use the formatDate() function to reformat the date.
- Click into the Proposal Date field
- Write formatDate( and then select the Proposal Date column from the value picker
- Add a semicolon ;
- Enter the date format MM/DD/YYYY (or whatever format fits best based on your location)
- Add a closing parenthesis )
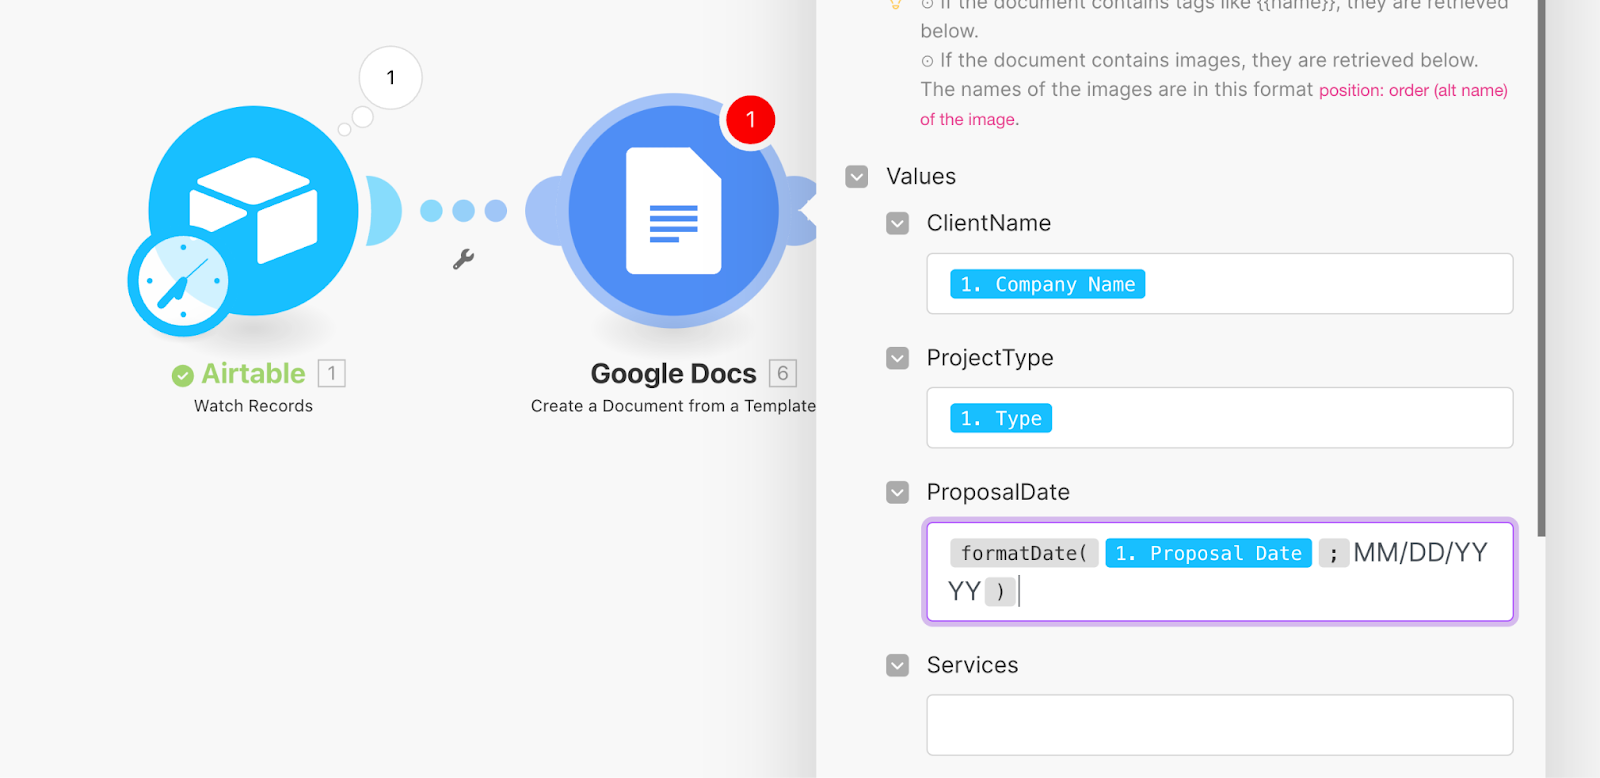
4. Services: Map the Services Text column from Airtable.
- Project Timeframe: For the timeframe, we’ll use the Project Start and Project End dates.
- Reformat the Project Start Date just like we did for Proposal Date:
To join the Project Start and Project End dates into a single timeframe, use the + operator (located in the equation icon tab)
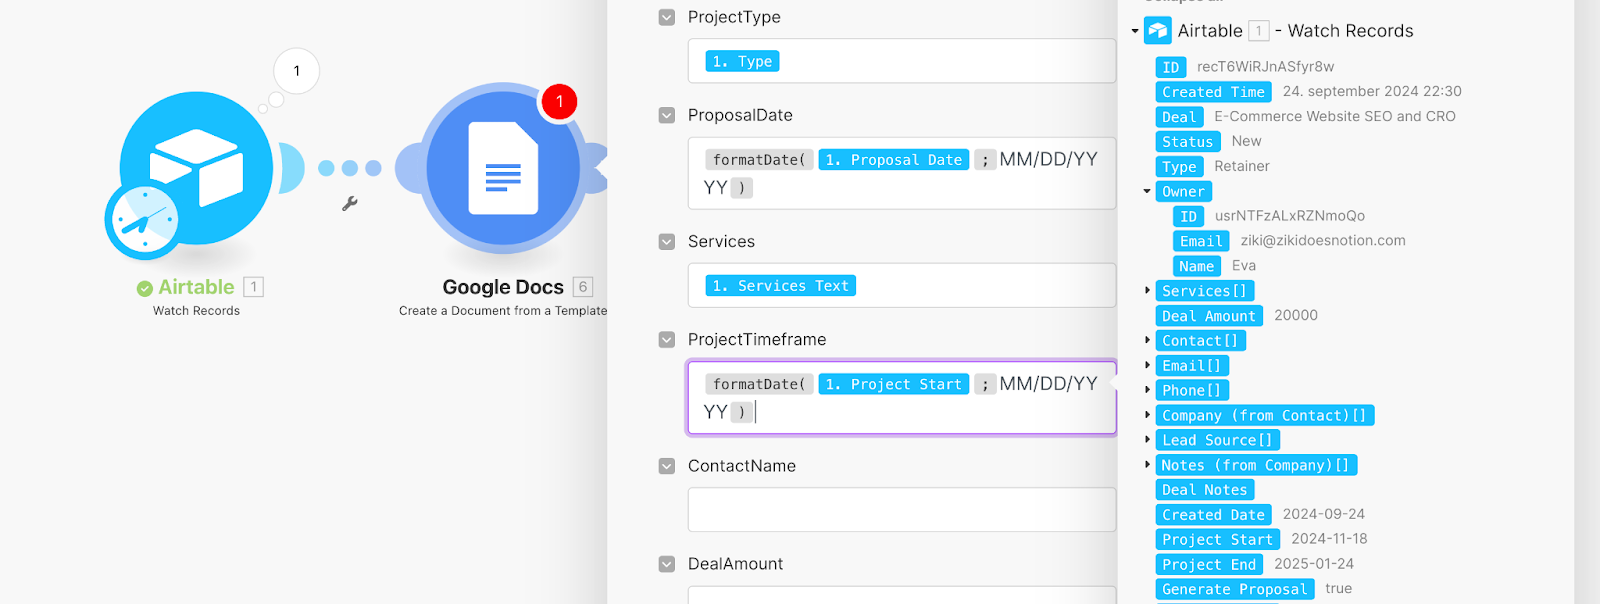
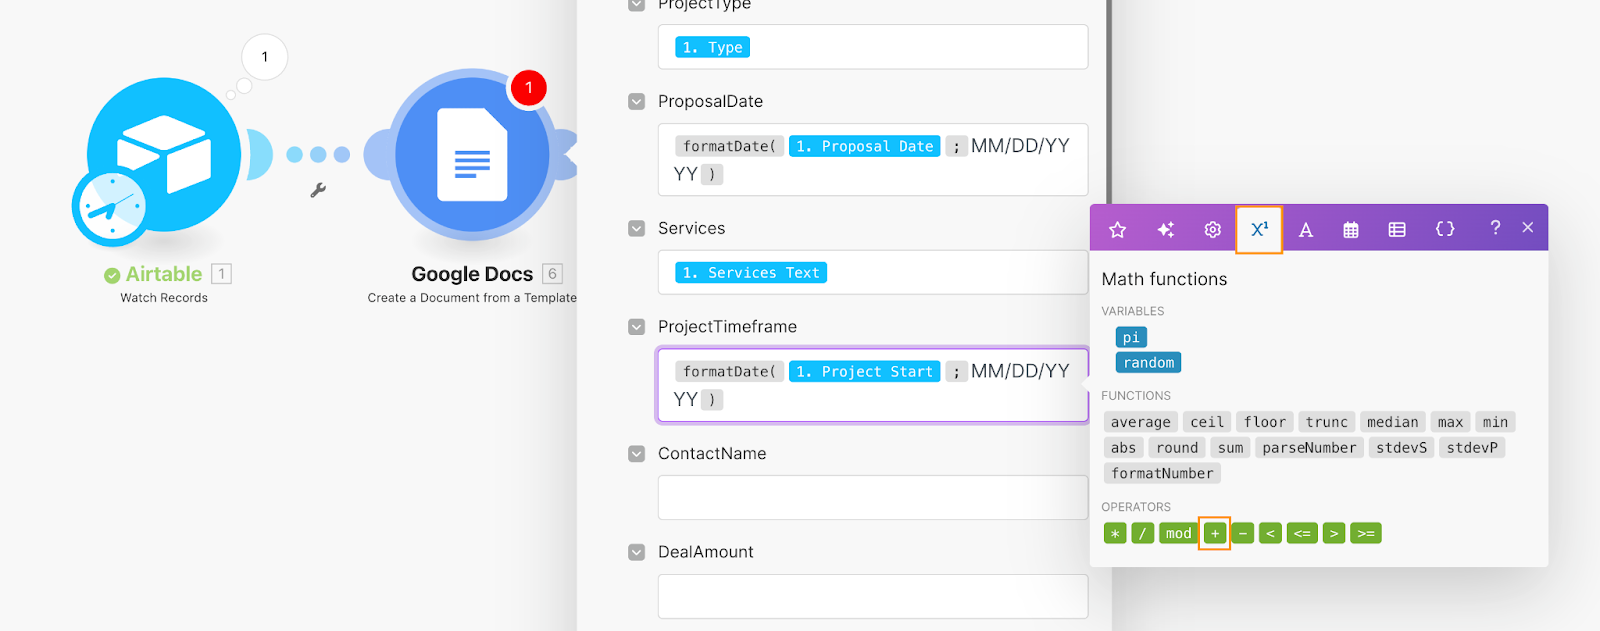
- Manually type a dash “-” after the + operator
- Add another + operator
- Format the Project End Date just like we did for Project Start Date
- Now, this field will add a value that looks like 11/11/2024 - 12/15/2024
6. Contact Name: Map this to the ContactName field in the module.
- Deal Amount: Map this to the DealAmount field.
To generate a title for the new document, map the Company Name value to the Title, and write “Project Proposal” to add to the end of it.
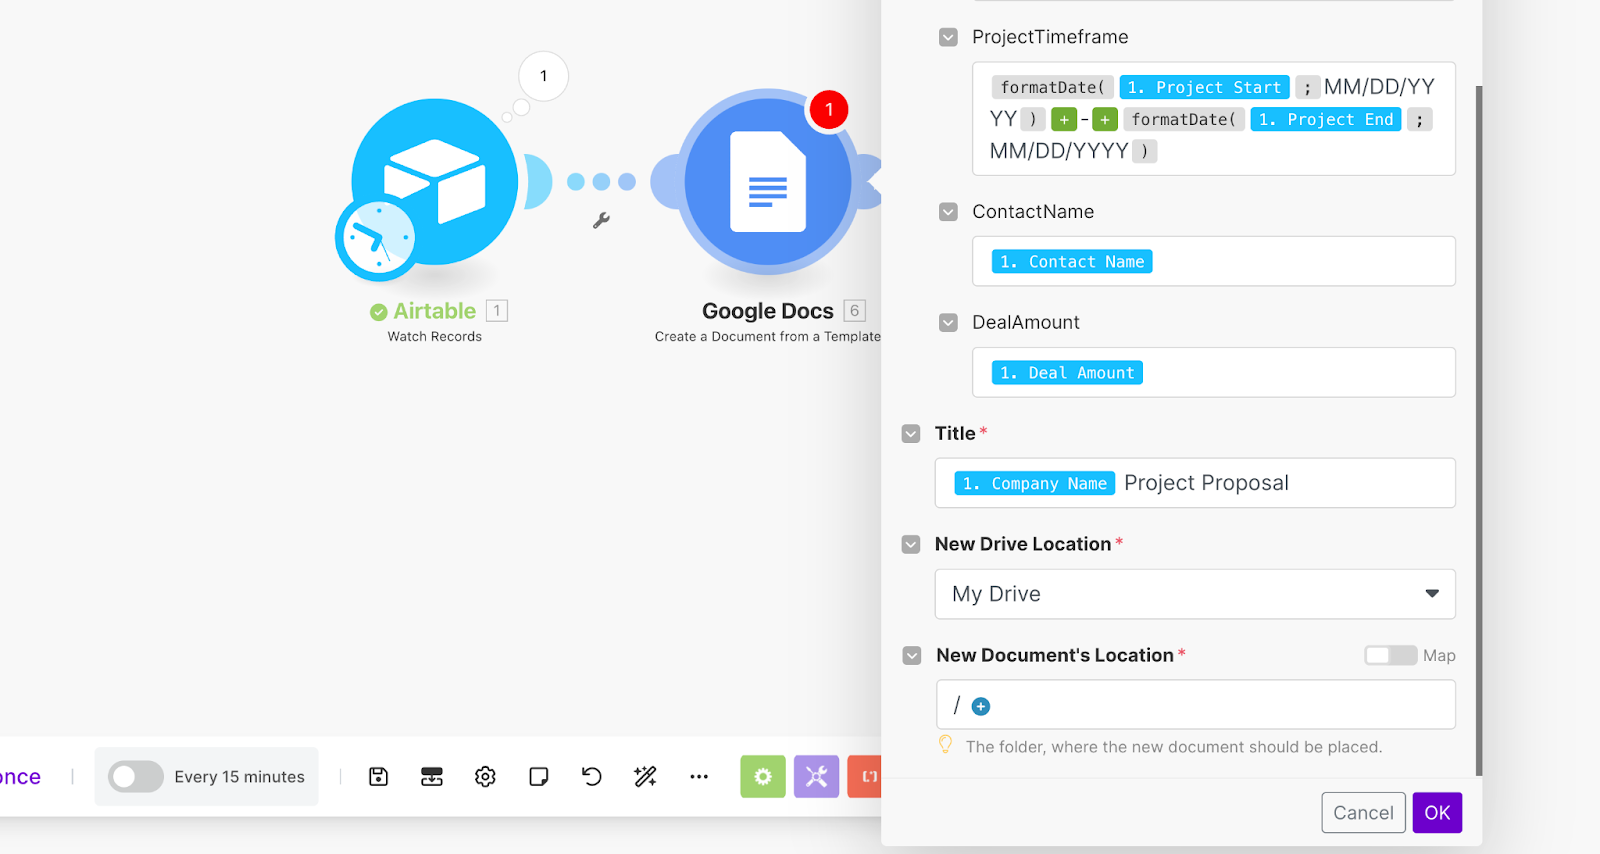
And to define where the new document should be stored:
- Under New Drive Location, select My Drive
- Under New Document’s Location select the folder where you want to save the proposal
- Click OK to confirm the settings.
As with our first module, since there’s no sample data for the Google Doc module yet, Make doesn't know what to expect. We need data to test this scenario and make sure it works. To get the correct data for mapping to the next module (like the URL of the generated proposal), we need to run the automation with real data.
- Go to your Airtable CRM, and check the Generate Proposal box on one of the deals (make sure to add dummy data if your table is blank!).
- In Make, click Run Once (located in the lower left corner). This will run all the modules, generate the proposal, and return the URL of the new document.
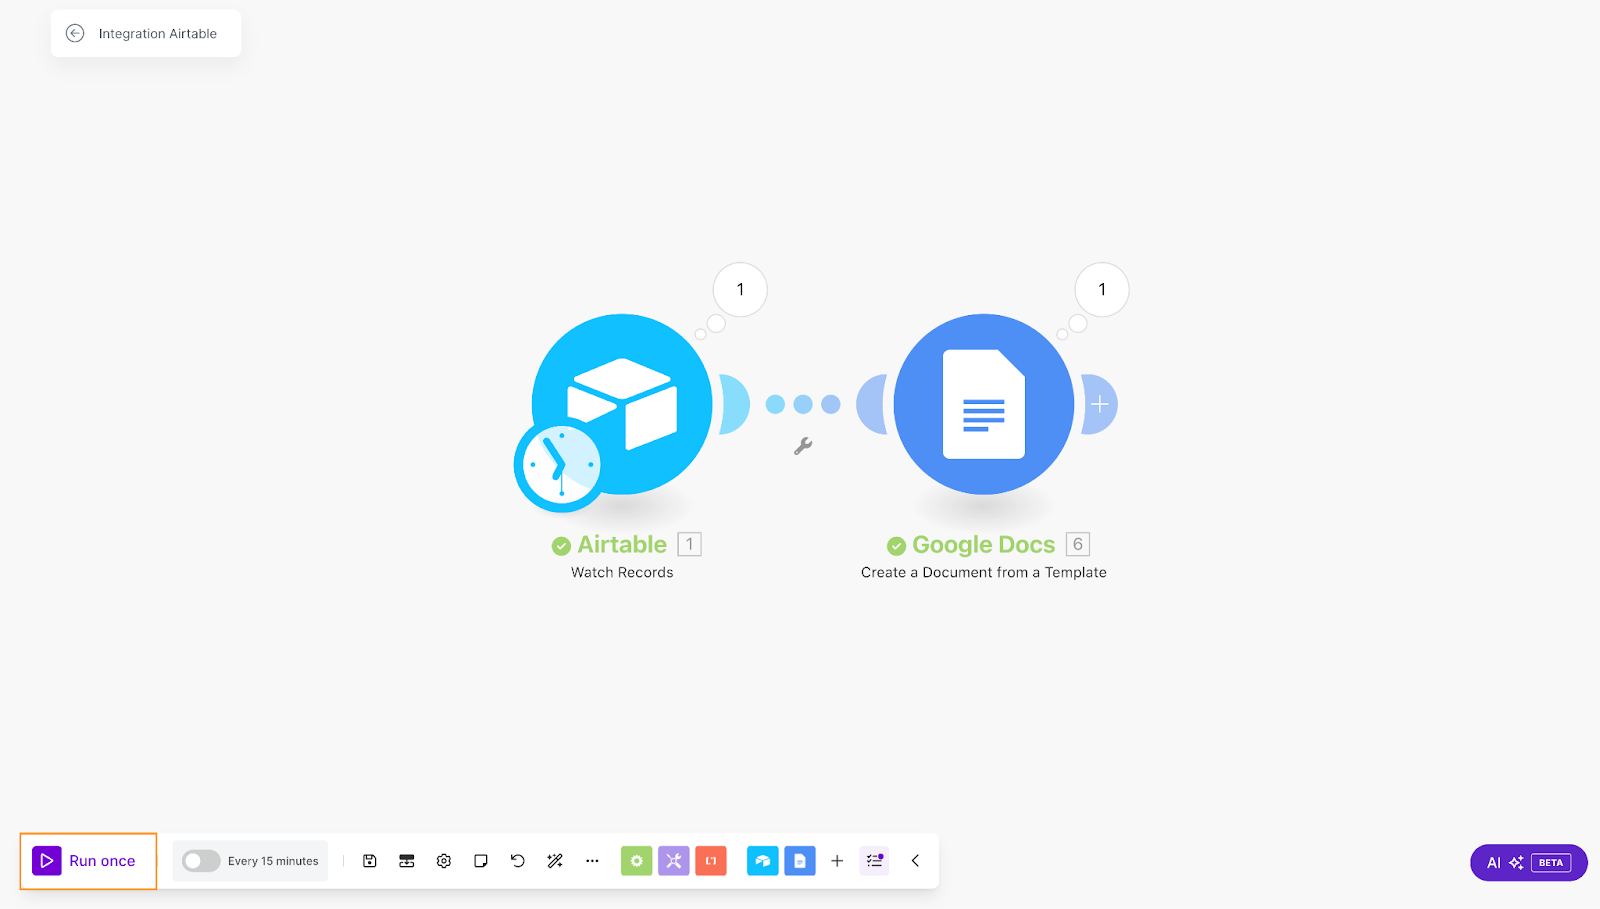
Finally, give the Google Docs module a meaningful name. Right-click on the Google Docs module, select Rename, and name it “Create Proposal” to reflect its function.
Return the Google Doc proposal to the Airtable deal
In the final step, we’ll focus on sending the newly generated proposal link back to Airtable for easy access. This ensures that you can view the proposal doc directly from the deal record (or table row) in Airtable.
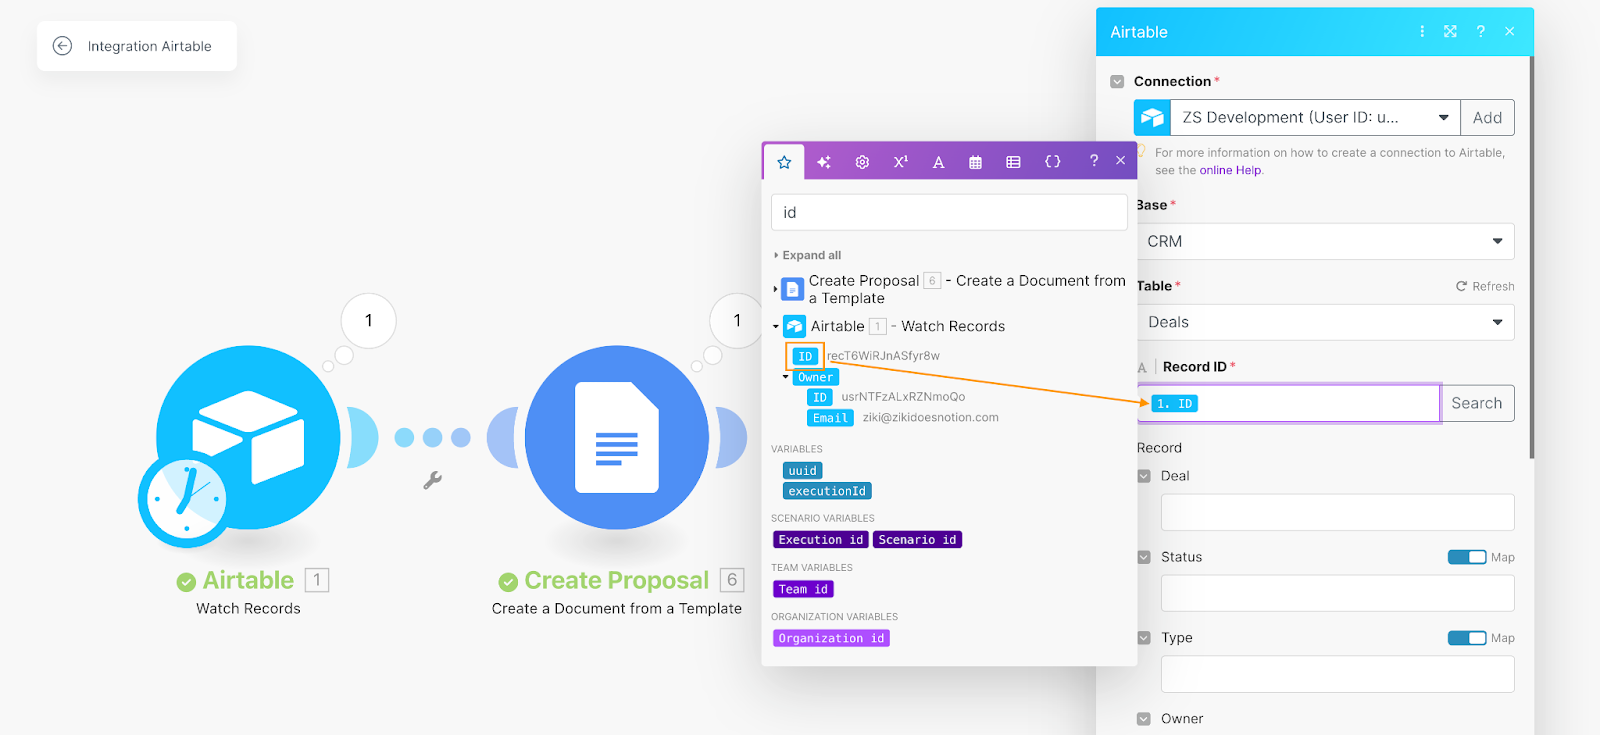
To set this up, click on the Plus sign on the right side of the Google Docs module. This will open up the module picker. From the options, select Airtable and then choose the Update a Record module.
Since you've already created a connection with it earlier, Airtable should appear in the dropdown. But, for this particular action module, Make requires additional permissions; we’re writing data back into Airtable, not just reading from it.
You’ll be prompted to update these permissions. Once prompted, simply follow the guided steps to grant Make access to the Airtable CRM base. Make sure you provide the necessary access to the correct workspace and base. Once access is granted, additional configuration fields will appear in the module settings form:
- Base: Set this to CRM
- Table: Choose the Deals table
- Record ID: For this, map the Record ID from the Watch Records module(the first one you made). This setting ensures that Make updates the correct Airtable deal record with the proposal URL.
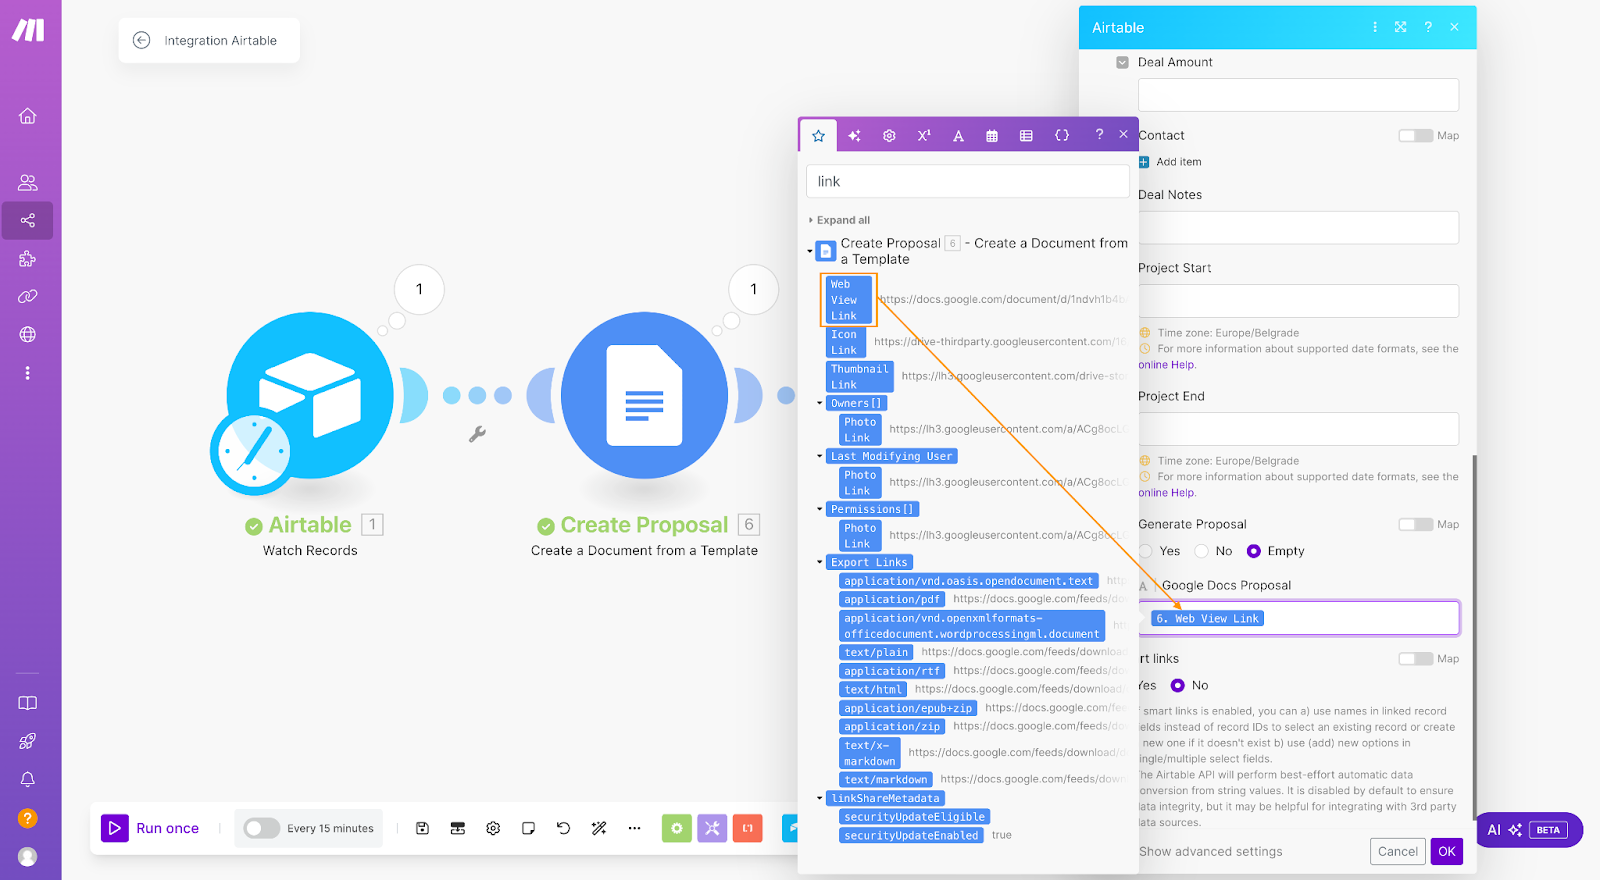
Next, we’ll map the URL of the newly generated proposal into Airtable. To do this:
- Scroll down and find the Google Docs Proposal field in the module configuration.
- Click into the Google Docs Proposal field, and in the value picker, you’ll find the Web View Link generated by the Create Proposal module. Select this link and map it into the Google Docs Proposal field.
- Once you’ve mapped this field, click OK to confirm the setup.
Remember to rename your module to something that will instantly indicate the function of the module (like “Send Proposal URL to Airtable”).
Now we’re ready for the final test to make sure everything works as expected. To do this, head over to Airtable, and check the Generate Proposal checkbox on a deal row with all the data.
Next, return to Make and click Run Once, which you’ll find in the lower-left corner of your screen.
Once the automation completes, head back to Airtable and navigate to the relevant deal record. You should now see the Google Docs Proposal field populated with the link to the proposal. Click on this link to open the document and verify that the automation correctly populated the template with dynamic data from Airtable. Check if all the details, like the company name, project dates, and other fields, were populated as expected
Deployment
Once you’ve confirmed that everything is running as expected, it's time to activate your automation to be used. We call this ‘deployment’. Start by saving it—just click the floppy disk icon in the bottom toolbar.
On the left side of the save button, you’ll see an option to configure the trigger schedule. Since we’ve set up a scheduled trigger, you’ll need to choose when the automation should run. Make gives you plenty of options here, from running at regular intervals, to specific days or times of day. You can also run it on-demand, which means you run it manually as needed.
For our case, let’s set it to run every 2 hours. Just enter the frequency in minutes, and then hit OK to confirm. Why 2 hours? Well, since Make's free plan includes 1,000 operations (ops) per month, this setup allows you to run this automation 300 times and potentially generate over 300 proposals for free. If you shorten the frequency and run the automation every hour, you'd be able to generate around 140 proposals per month within the free plan limit. To better understand how Make counts how many ops you spent, we recommend looking into their help documentation.
In this beginner tutorial, we kept things simple by using a scheduled trigger for the automation. However, to make the solution more economical, we could also use webhooks instead. Webhooks are more efficient because they only trigger the automation when a specific event occurs—like checking the Generate Proposal checkbox in Airtable—rather than running on a schedule regardless of whether changes happen. This eliminates unnecessary automation runs and optimizes costs. Since webhooks are a bit more advanced, we’ll cover them in upcoming tutorials, where we’ll explain the differences between webhooks and polling, and guide you through setting up webhooks in Make step by step.
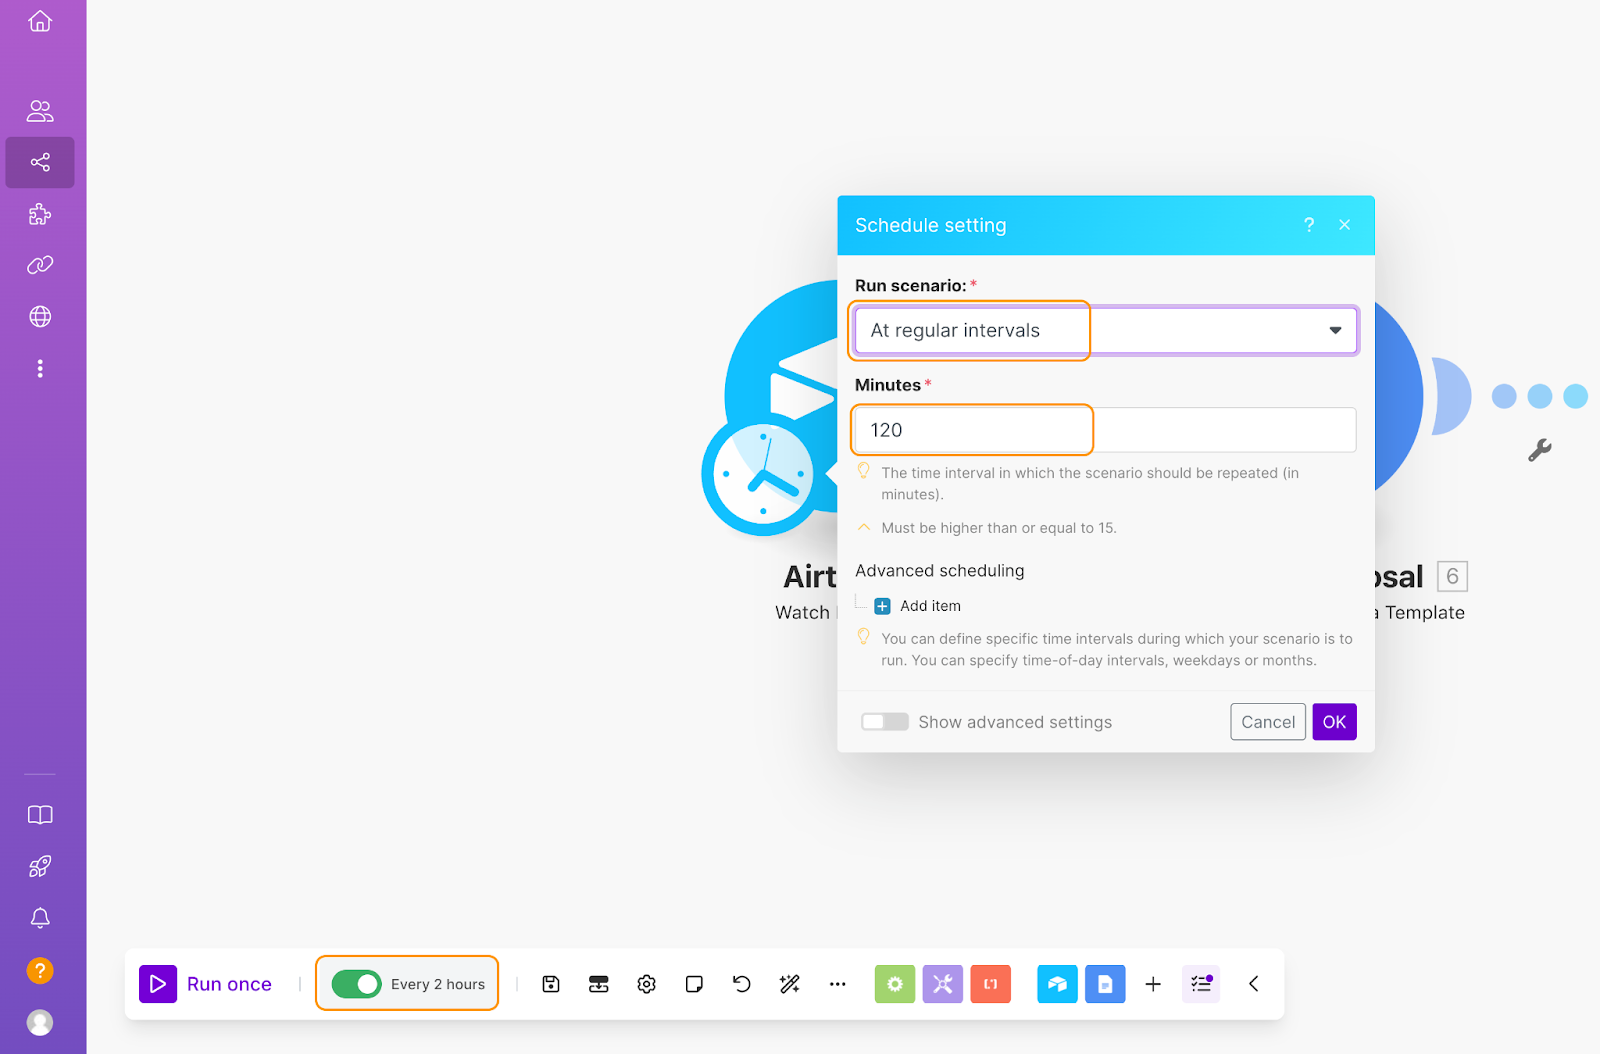
After setting the frequency, Make will ask if you want to activate the scenario. Go ahead and confirm, then save the scenario again to lock in the settings.
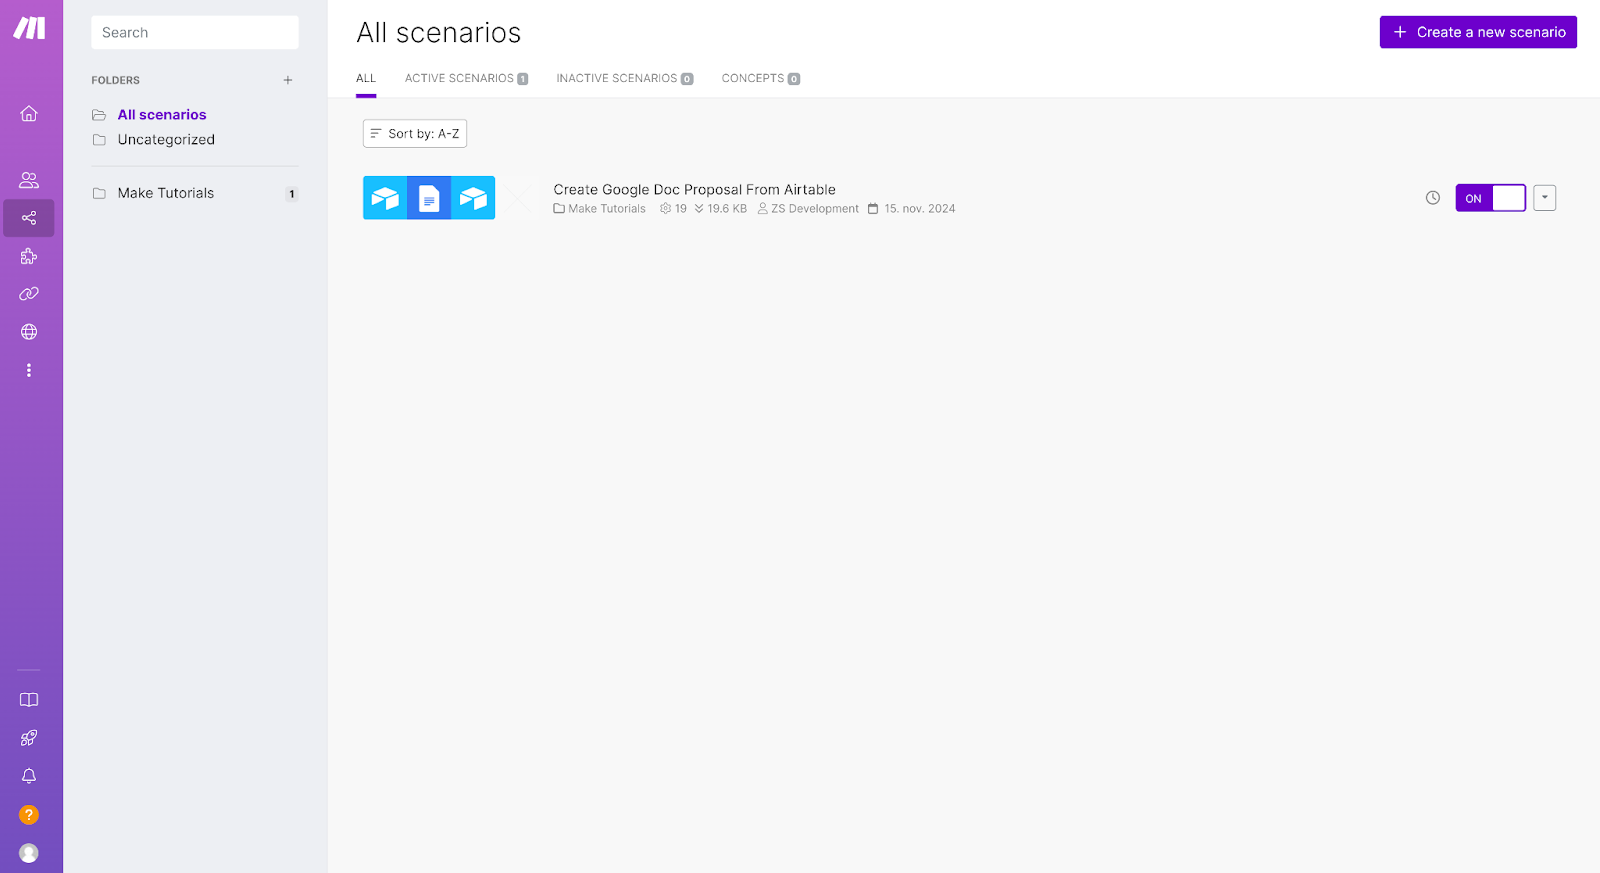
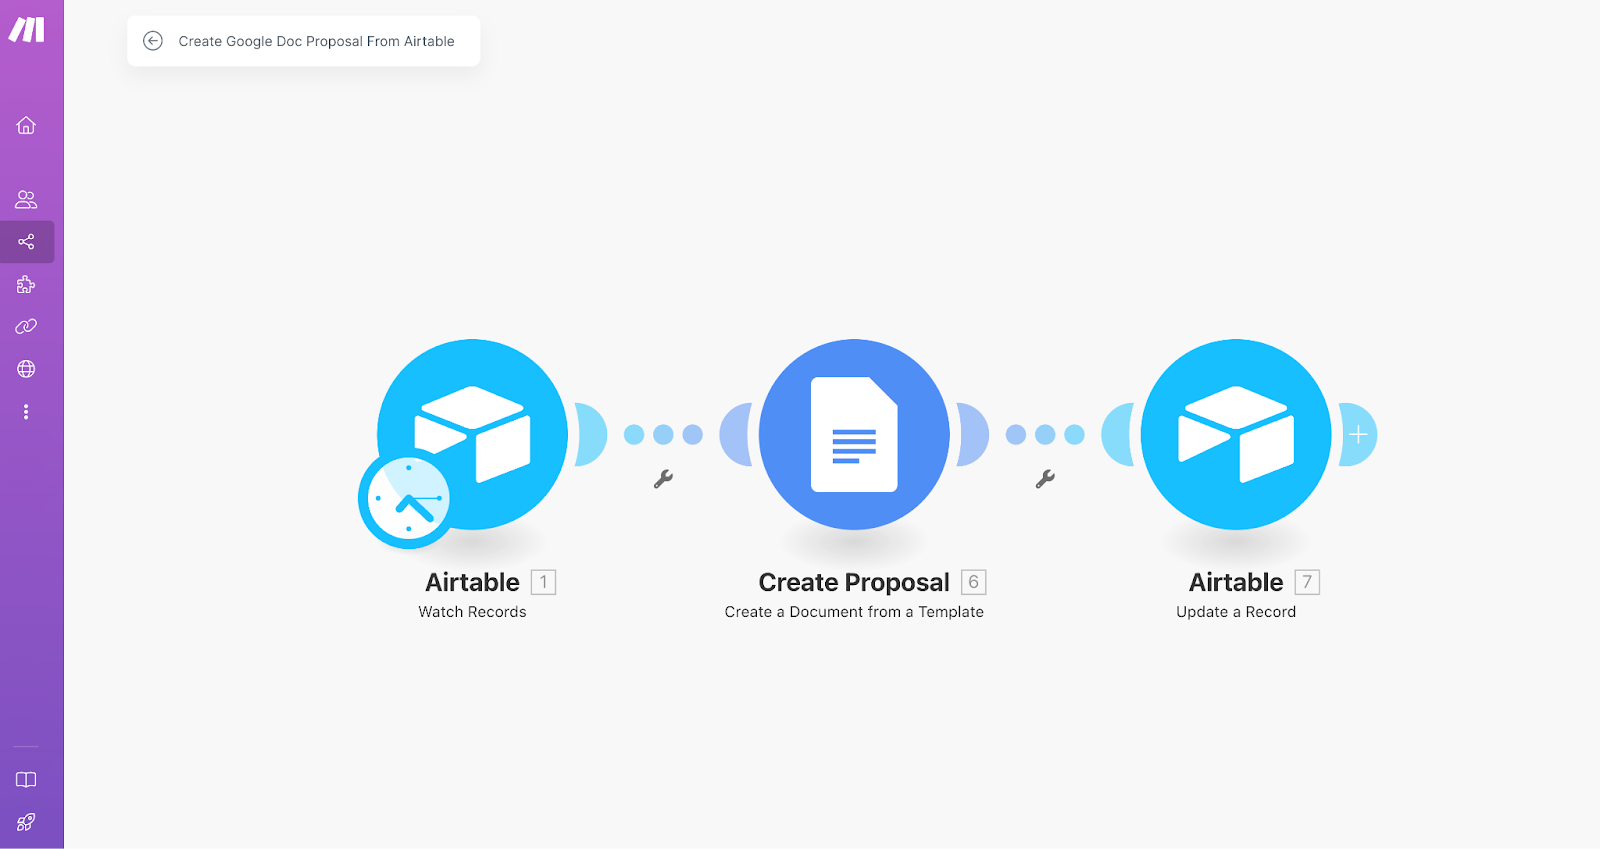
Finally, give your scenario a name that makes it clear what it does. Something like "Create Google Doc Proposal From Airtable" works well. This way, you’ll instantly recognize the purpose of the automation when you see the title.
Once you’ve set this, Make will ask you if you’d like to turn on the scenario. Confirm, then Save the scenario again to save the settings.
Lastly, as a good practice, rename your scenario “Create Google Doc Proposal From Airtable” in the upper left corner, to make sure you immediately know the purpose of the automation when you look at the title.
Conclusion
Are we there yet? Yes! You made it. Now that you've completed these steps, you'll have a fully functional automated proposal generation system in place, saving you time and ensuring consistency in your process. With Airtable and Make working in harmony, you can focus more on building client relationships and less on manual tasks.
Keep an eye out for future tutorials, where we'll dive deeper into Make, introduce more advanced functionality, and help you deepen your knowledge through more real-life, practical examples.
Hire an expert!
Sold on Make but need some help getting started? Let us know what you're looking for below and our team will reach out to help.

