


When it comes to managing your sales pipeline and client interactions, a CRM (customer relations manager) is only as valuable as the processes supporting it. Your use of a CRM is rooted in your data storage and collection systems, so to realize the maximum impact of CRM, these data systems must be robust. Once you’ve got the data part down, the real power of a CRM goes beyond just storing data - it’s in how effortlessly that data feeds into your system and how efficiently you can use it to take action.
Yet, many companies still rely on manual data entry, which is tedious, time-consuming and poses a higher risk of human errors. Above all, though, precious human time spent on manual data entry is not always necessary, as we’ll demonstrate with this tutorial!
Now, imagine this instead: when a lead schedules a discovery call, all of their information—company name, website, industry, and more—automatically flows into your CRM, perfectly organized and ready for follow-up. No manual input. No missed details. Just actionable, clean data at your fingertips. That’s exactly what we’re building in this tutorial: a practical, step-by-step guide to integrating Calendly with Airtable to automate contact intake and map critical information directly into your CRM fields.
By the end of this part of the tutorial, you’ll learn how to:
- Set up an app-specific webhook in Make: Configure a Calendly webhook to sync contact data to your CRM in real time whenever someone schedules a meeting with you.
- Validate and prevent duplicate CRM entries with routes and filters: Create workflows that adapt dynamically, based on your input through conditional routing and filters.
- Create new contacts in your CRM automatically: Map Calendly form fields directly into your CRM and automate the creation of new contacts.
We’ll also give you the tools to expand on this system and make it more sophisticated, with extra tips and tricks waiting for you at the end of the tutorial. In part II, we expand on some of these skills by learning how to work with arrays and merging routes.
Ready? Let’s dive in!
Prerequisites: what you’ll need to get started
First of all, it’s worth noting that, to follow this tutorial exactly, there are three tools you’ll need to have in place. Equally, the principles of this tutorial are quite universal and you can use these skills to build any conditional automations that suit your workflows.
Here’s what we used:
- A CRM: We’re using Airtable for this tutorial, but you can choose any platform that fits your workflow, whether it’s Notion, ClickUp, HubSpot, or another no-code solution (even Google Sheets). If you don’t have a CRM yet, you can build one in under an hour by following this step-by-step guide.
- A Make account: Make is the automation platform we’ll use to integrate Calendly with your CRM. If you’re new to Make, we recommend you start with this article, where we break down the basics, walk you through the platform, and even create a simple Airtable-based automation to get you comfortable with the basics.
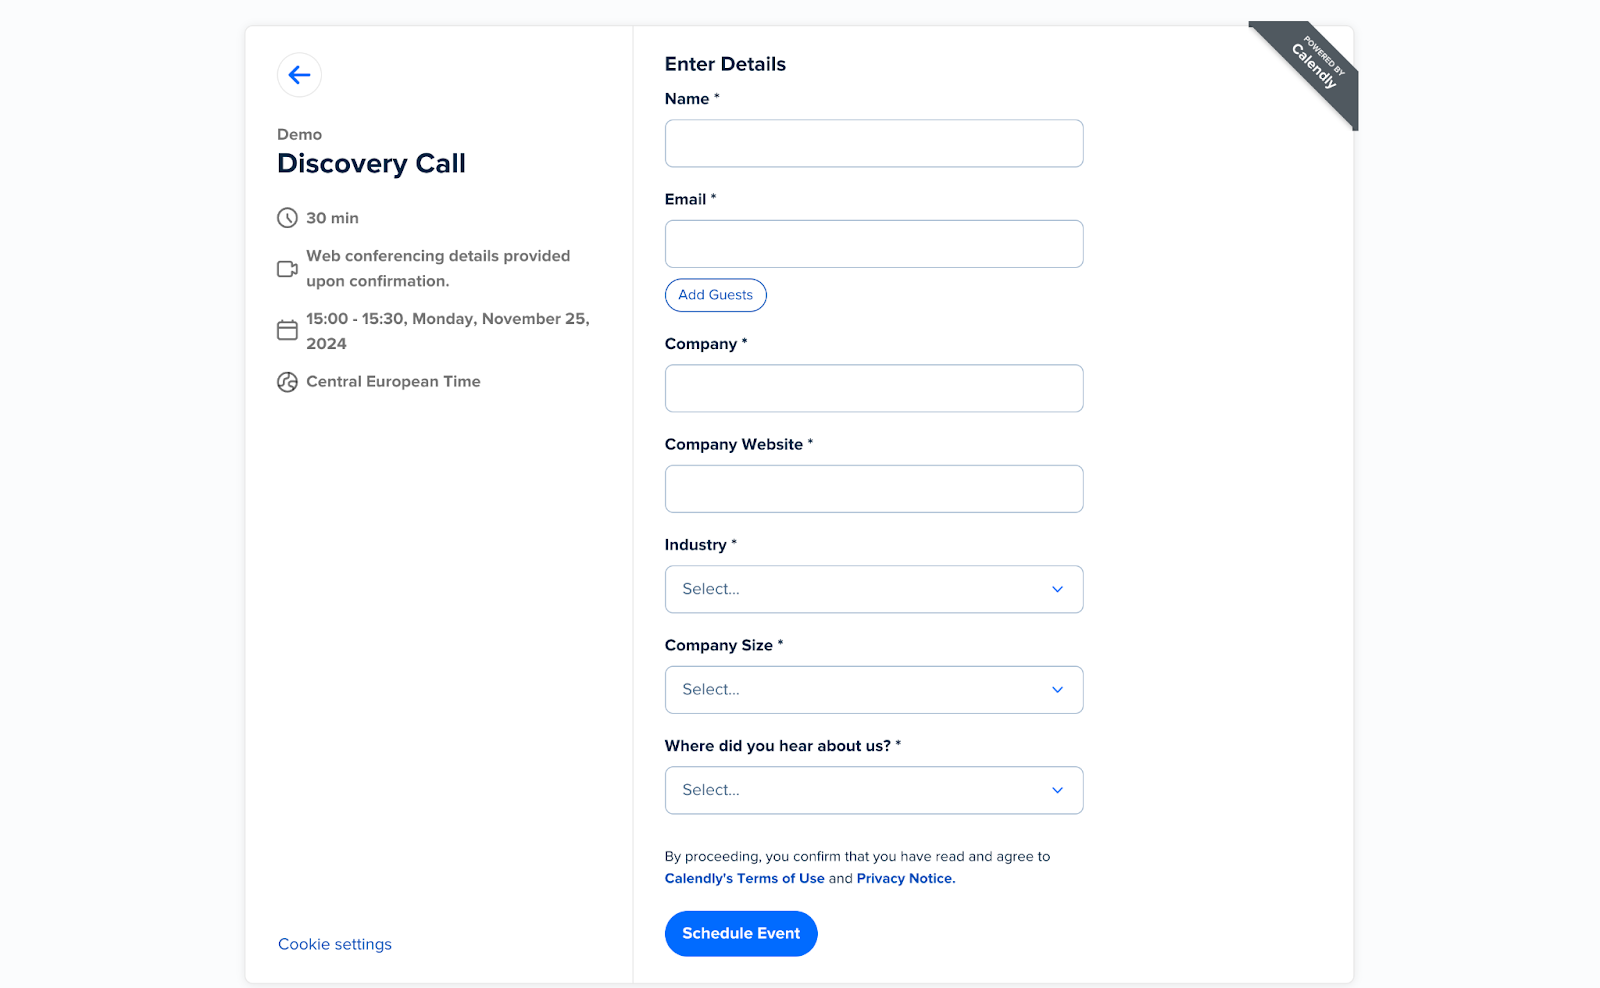
- A Calendly account: If you don’t have a Calendly account yet, create one. Once your account is ready, create a scheduling link that you can share with clients or leads. If you want to collect more details beyond just a contact name and email, you can customize your form to include fields like Company Name, Website, Industry, Size, and Lead Source (we’ve already set up our Calendly form to include them). You can map these fields directly to your CRM - we’ll show you how in Part 2 of this tutorial.
Once everything is set up, you’ll have the necessary foundation to be ready to jump into the next steps of building your automation.
Setting up a Webhook with Calendly
In our first Make tutorial, we touched on the two main types of triggers in Make: webhooks and polling triggers. There, we used a polling trigger that periodically checks for changes in our Airtable CRM and automatically generates a proposal based on the updated data.
In this tutorial, we’ll take a different approach by using a webhook trigger. Instead of waiting for scheduled checks, a webhook triggers actions instantly—sending a notification to Make as soon as an event occurs. In this case, when someone schedules a discovery call with you through Calendly, the webhook will notify Make, which will then execute the automation to immediately add the contact and any additional information to your Airtable CRM; everything is pretty much instantaneous.
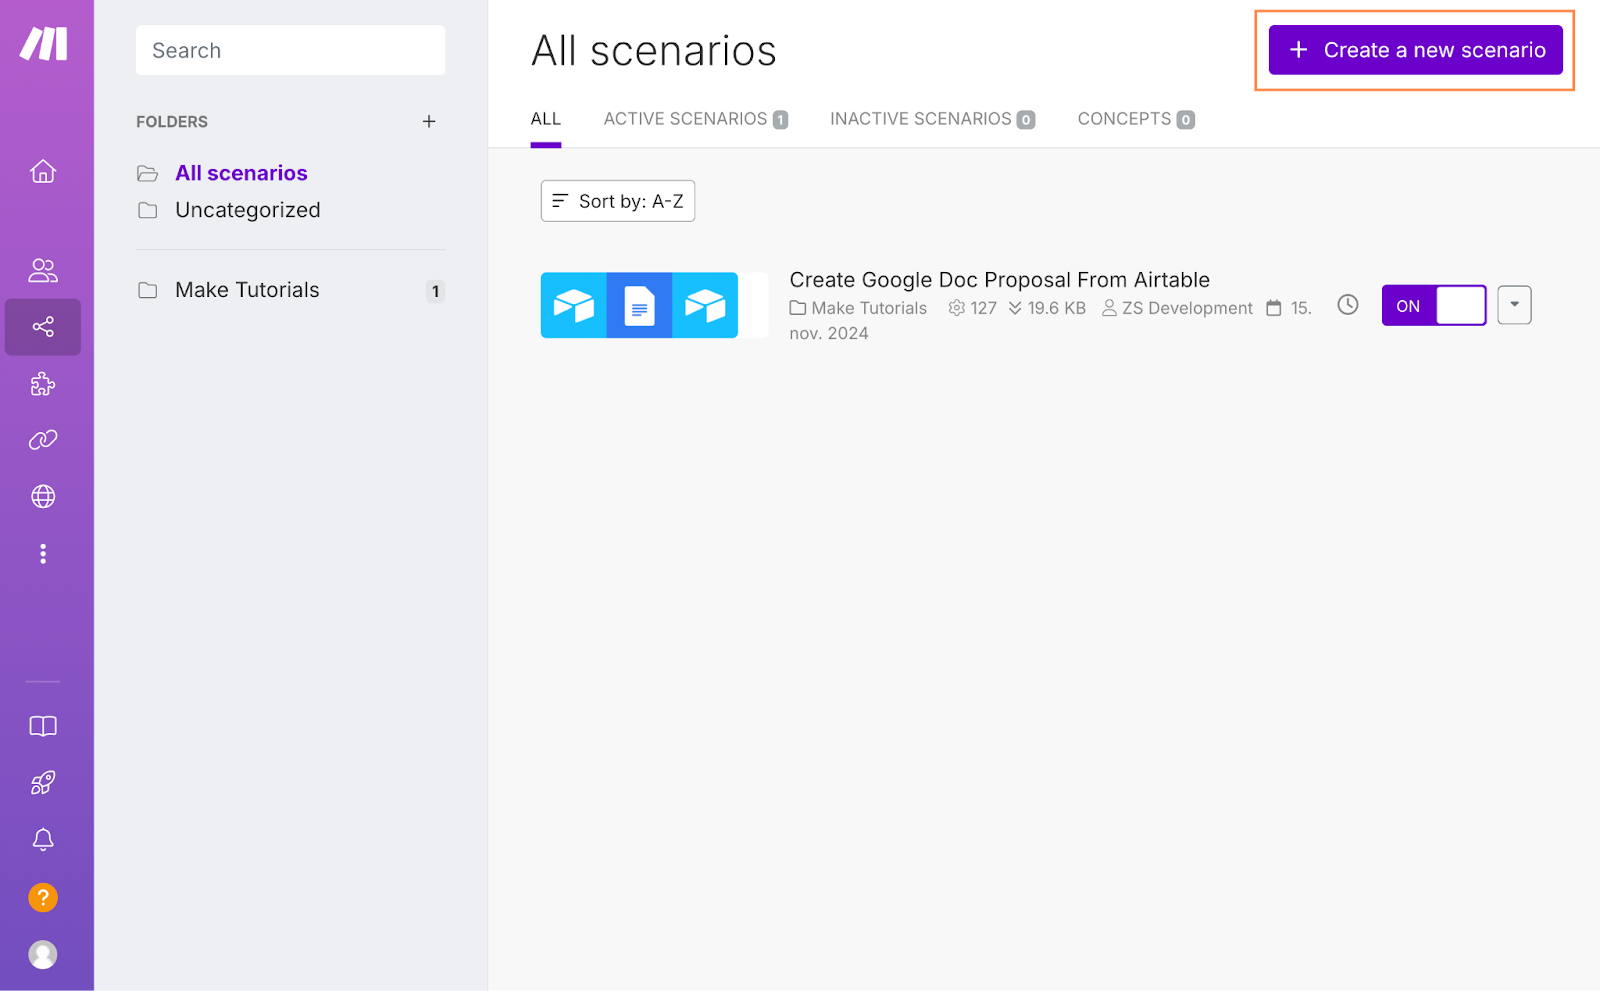
To get started, open Make, navigate to the Scenarios tab, and click Create a new scenario in the upper-right corner. This will open the Scenario Editor, where we’ll build the automation.
First, let’s rename the scenario so it’s easy to identify later. As you build more automations, keeping your scenarios organized becomes increasingly important for maintenance.
Click on the scenario name in the upper left corner, type something descriptive like “Add Calendly Contacts to Airtable CRM,” and press Enter. This small step will save you a lot of time down the line.
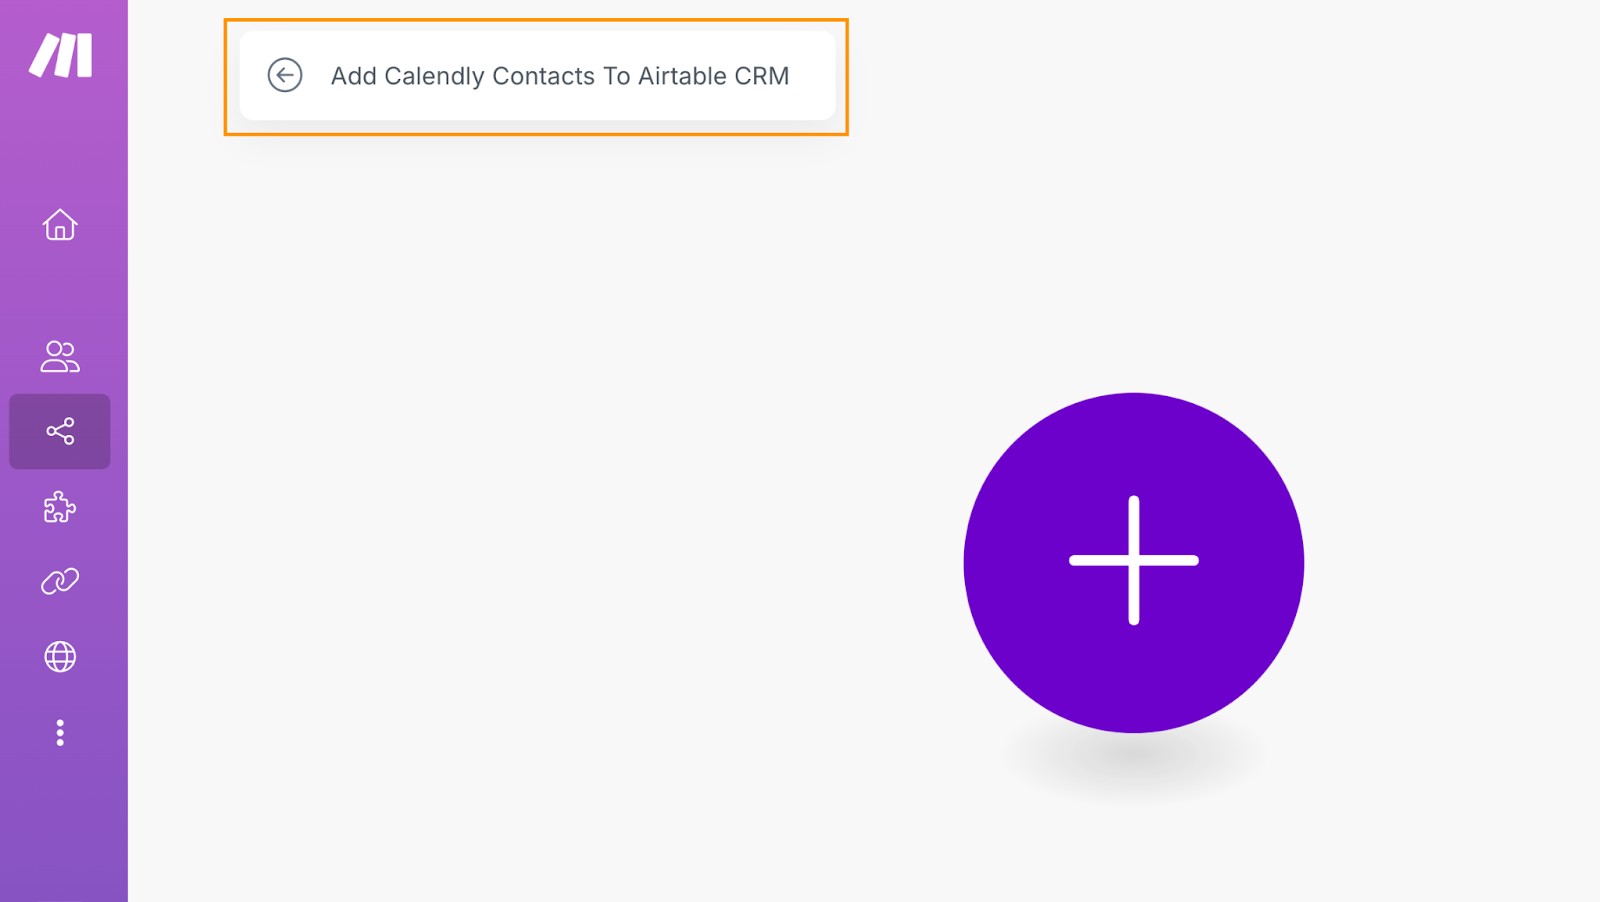
Click the purple circle with the plus sign to add a trigger module. Search for “Calendly” and select the Watch Events module.
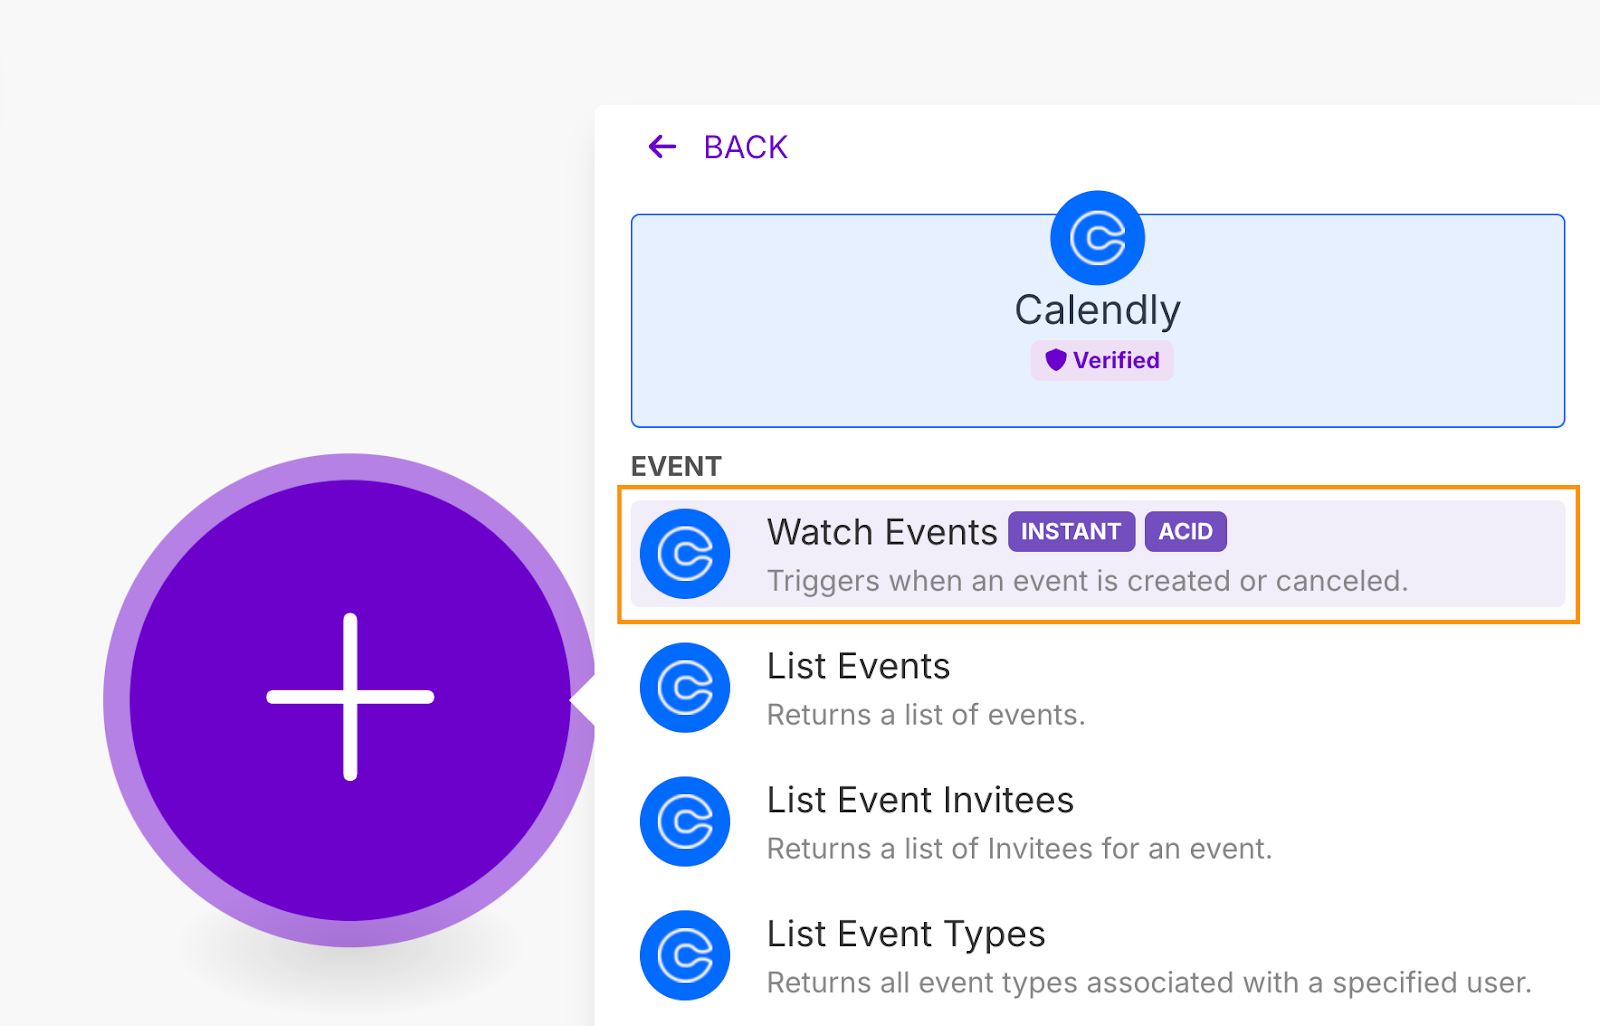
You’ll notice the INSTANT tag on this trigger module, which indicates it’s a webhook trigger, not a polling trigger. If you ever need clarification on Make’s terminology, their glossary is a handy resource.
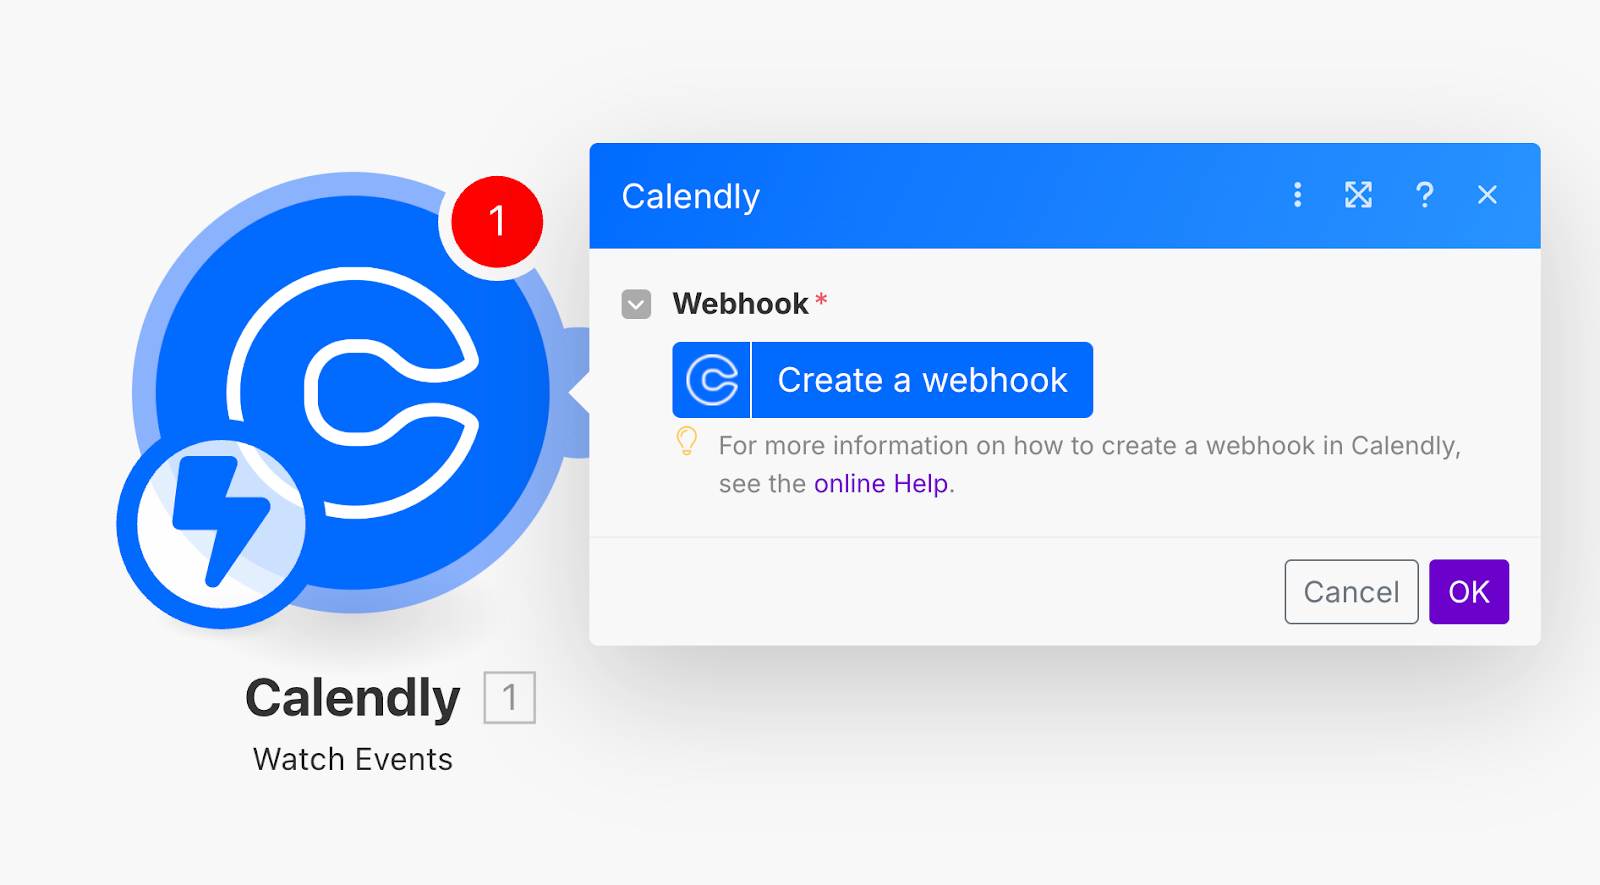
Now that you’ve added the module, Make will prompt you to create a webhook. Click Create a webhook to open the setup form.
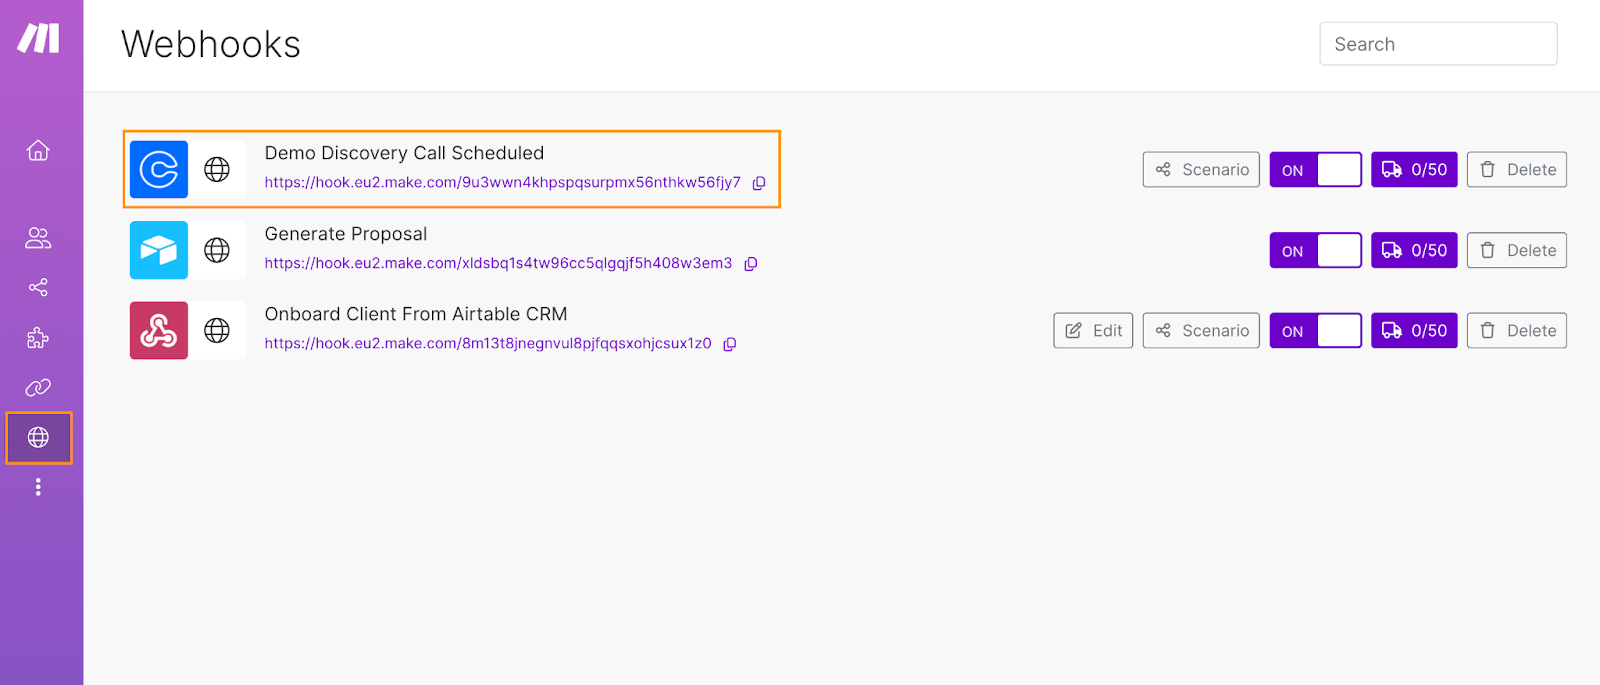
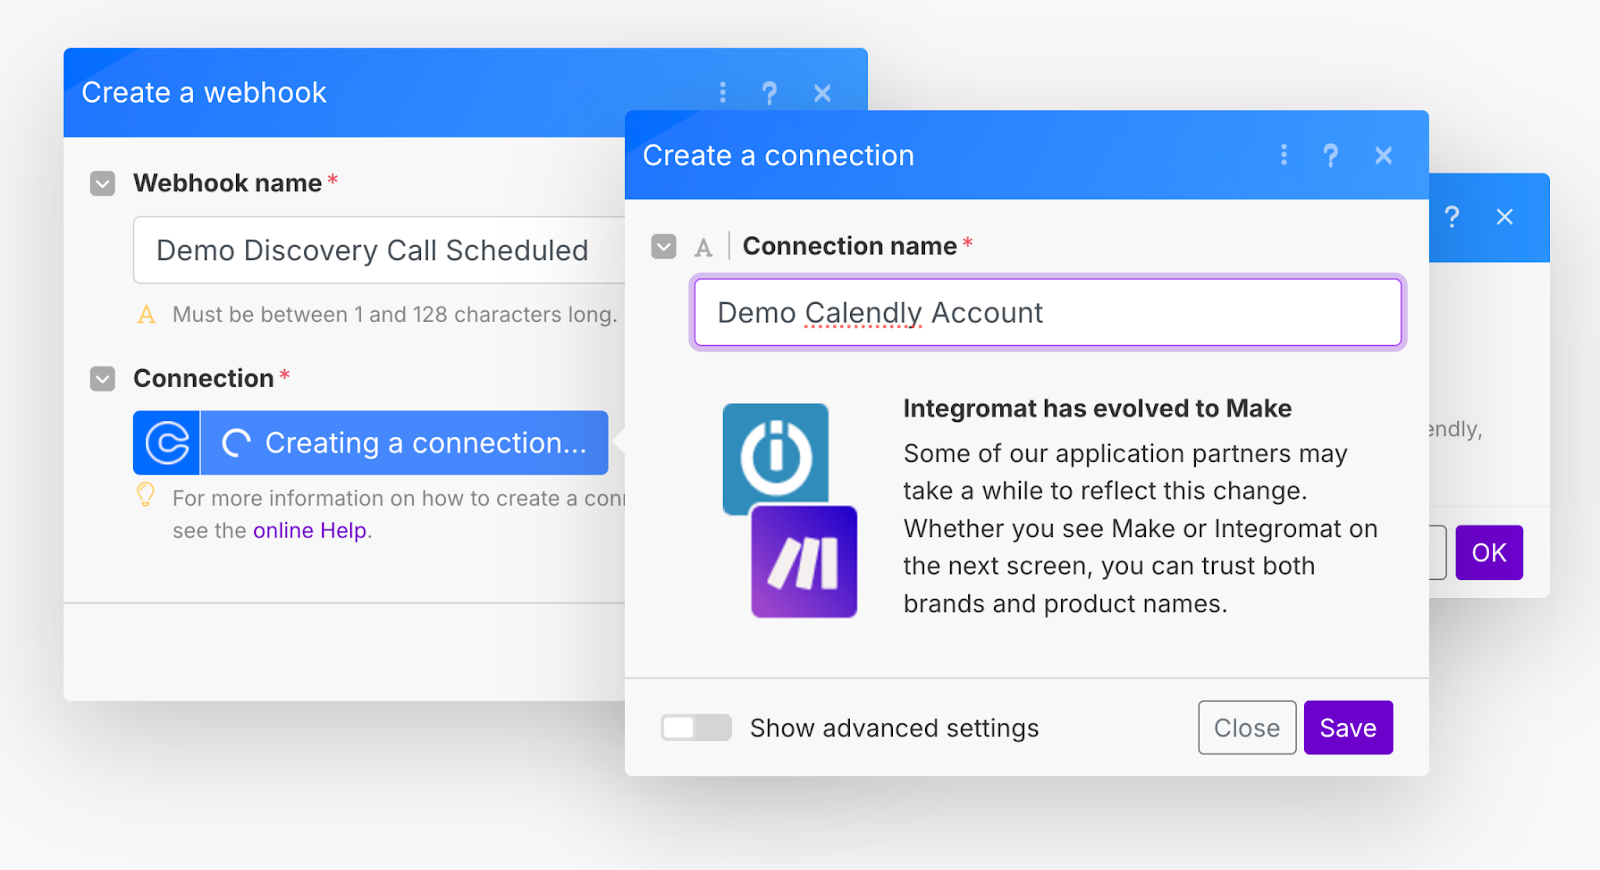
In the Webhook name field, add a name that reflects the type of event triggering the webhook. For example, if this webhook is for discovery calls, you can name it something like “Discovery Call Scheduled”. Naming your webhooks descriptively is especially useful if you have a lot of webhooks across your scenarios, as it makes them easier to locate in your webhook list and simplifies tasks like bulk management or checking queue details for specific webhooks.
Next, under the Connection section, click Create a connection. This will open a secondary form to link Make with Calendly.
In the Connection name field, if you work in a team on Make, it’s best to name the connection so it’s clear which Calendly account it’s linked to. For example, we named it “Demo Calendly Account”, but you can keep it simple with something like “[Your Name] Calendly”.
Finally, click Save to confirm the connection.
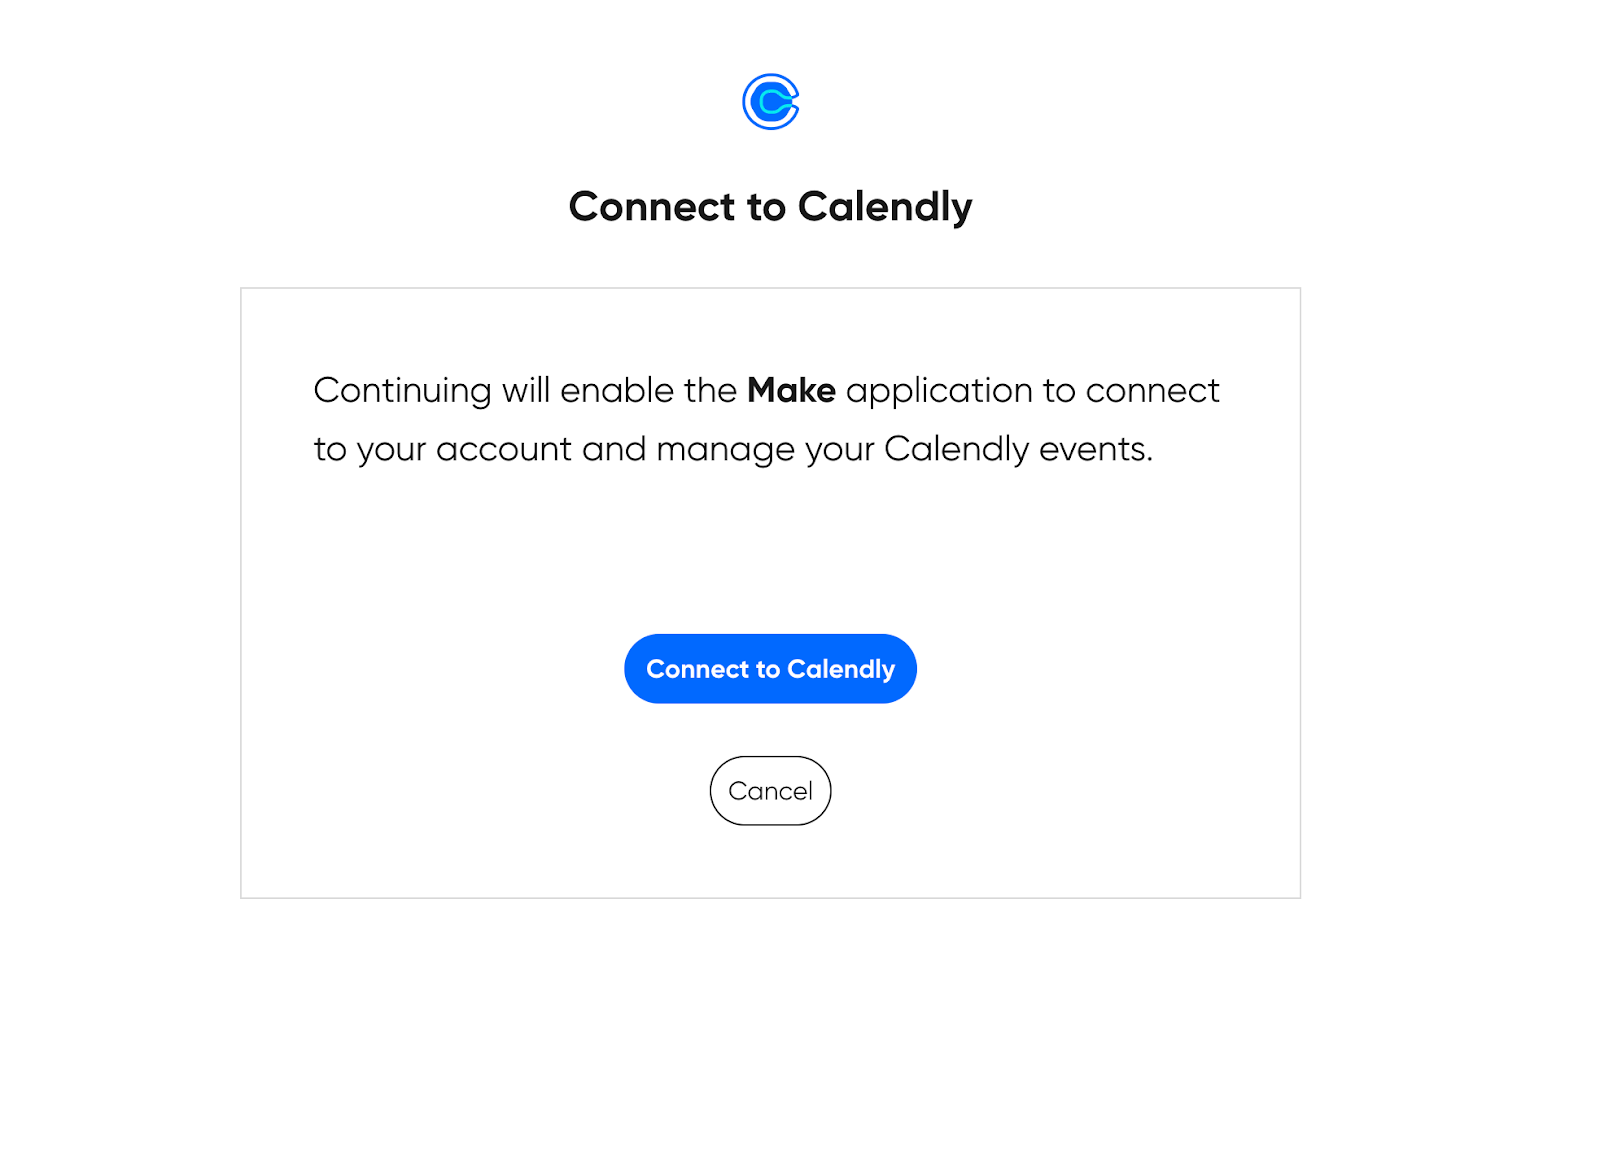
Make will redirect you to Calendly’s authorization page. On this page, click Connect to Calendly to grant Make permission to access your account.
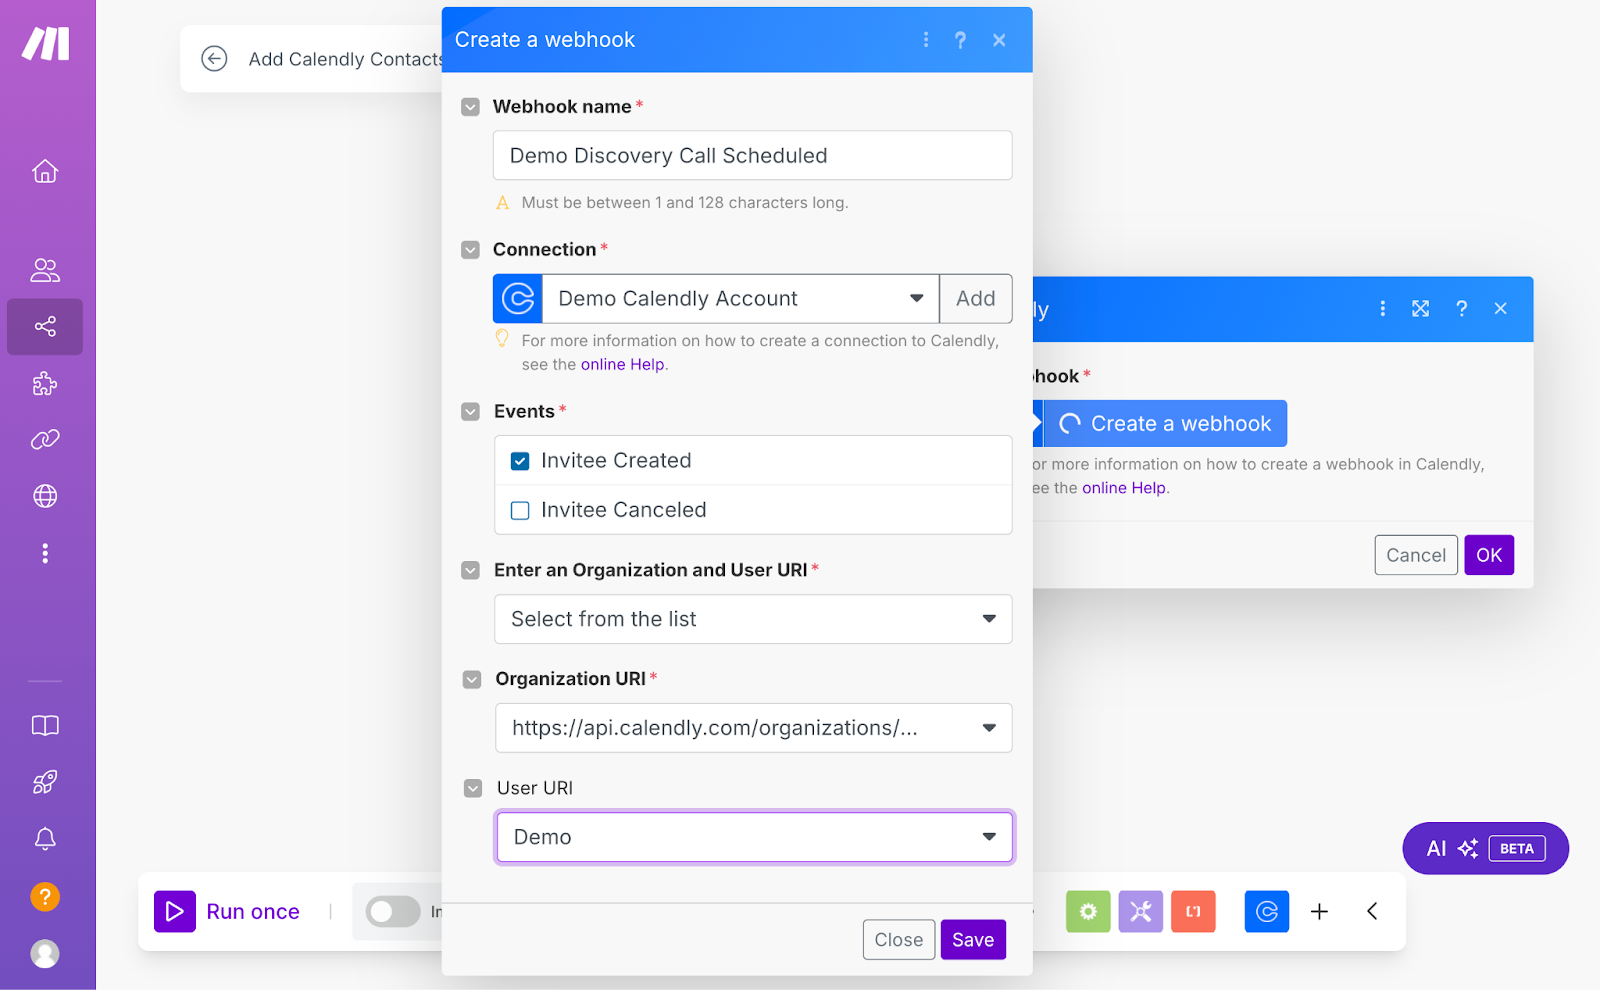
After authorizing Make to access your Calendly account, you’ll be redirected back to the Create a webhook form. Here, you’ll see additional configuration options to customize your webhook.
Set up the webhook as follows:
- Events: Select Invitee Created from the dropdown.
- Organization URI: Choose your organization from the list.
- (Optional) User URI: If you only want to subscribe to events for a specific user (such as your own scheduling events - important for teams), select that user from the dropdown.
Once you’ve configured these options, click Save to confirm the webhook setup.
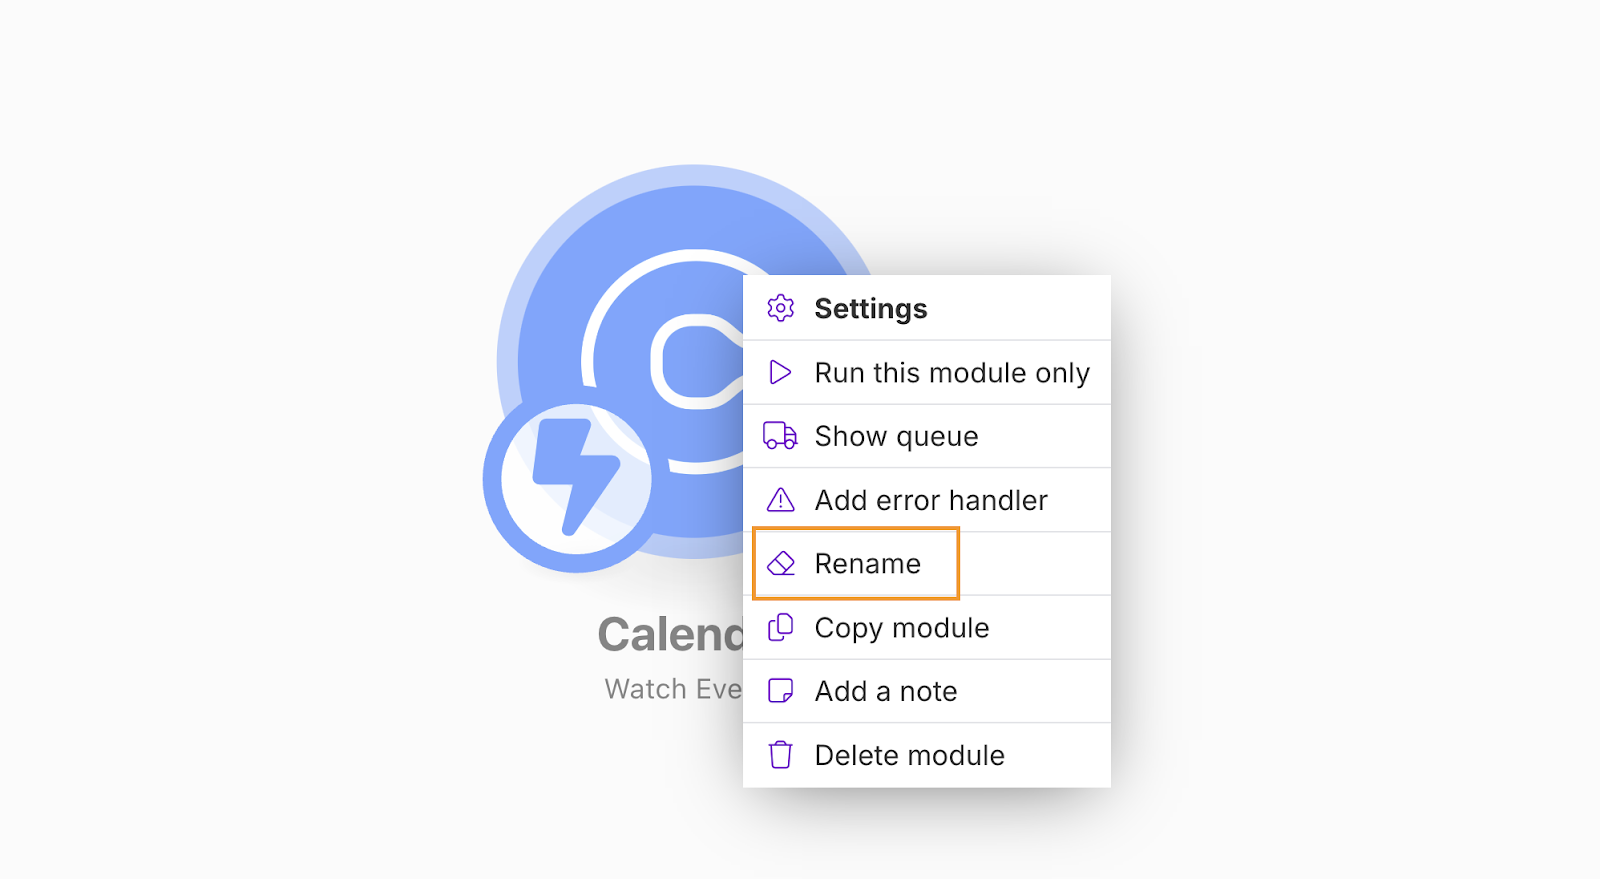
To make sure you instantly know the event type you subscribed to without needing to open the trigger configuration, right-click on the module, click Rename, and rename the module itself to something like “Discovery Call Scheduled”.
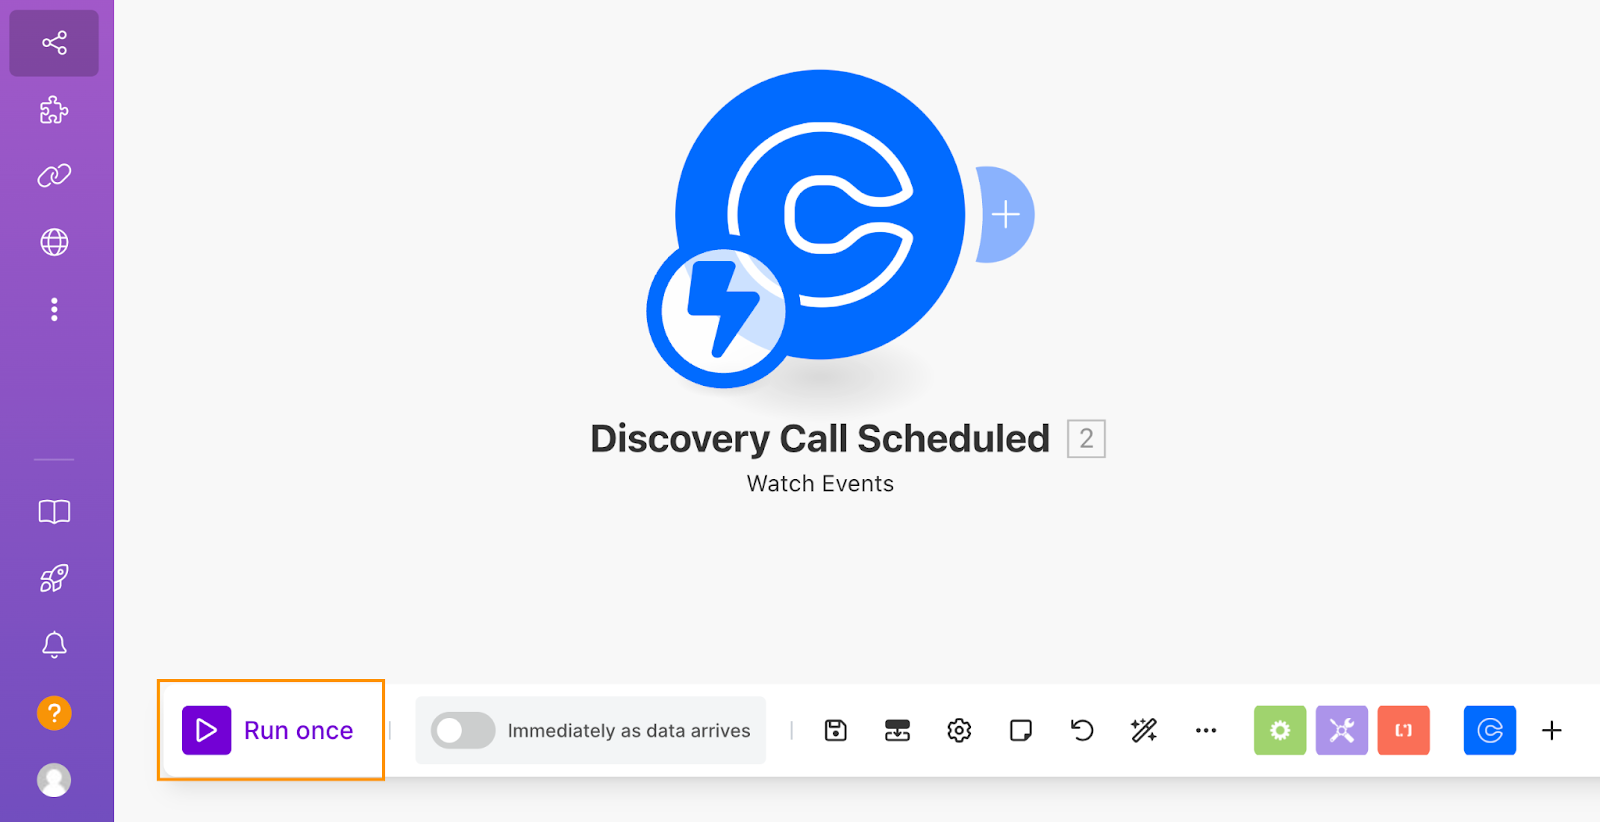
So that we can pull in the Calendly data to Airtable to continue building the automation, we’ll need to test the connection by scheduling an event through the Calendly form.
To do this, in the lower-left corner of the Scenario Builder, click Run once to make sure the automation will run, then head over to your scheduling link and populate it with some sample data (it doesn’t matter what it is—we just need sample data).
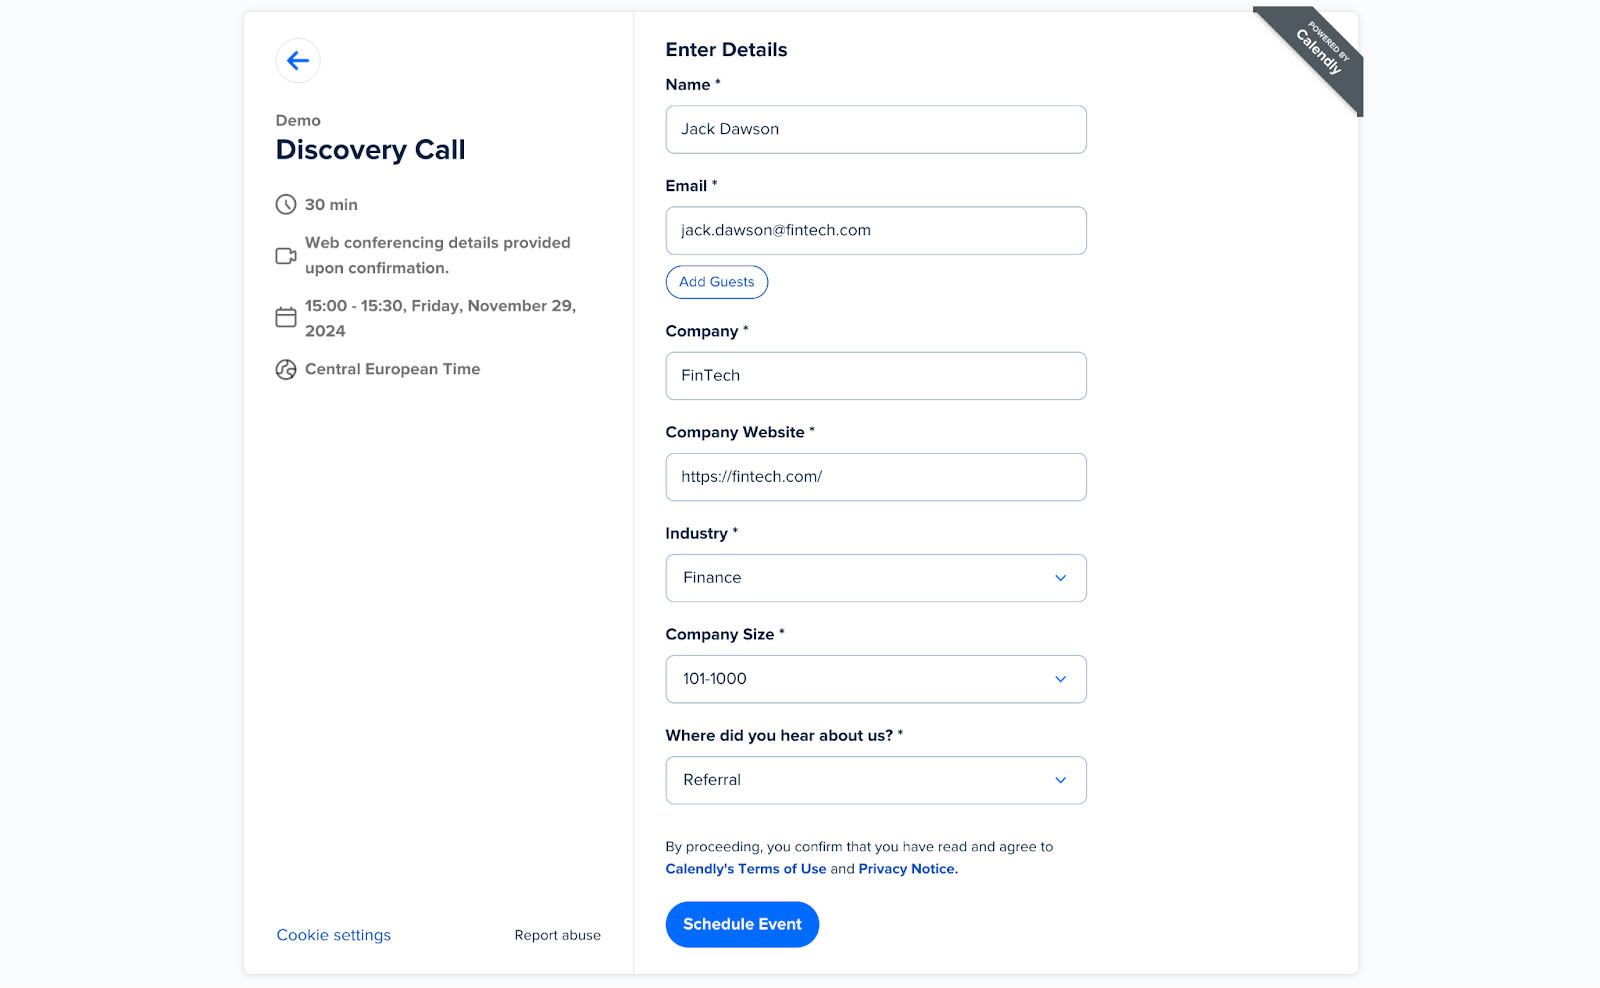
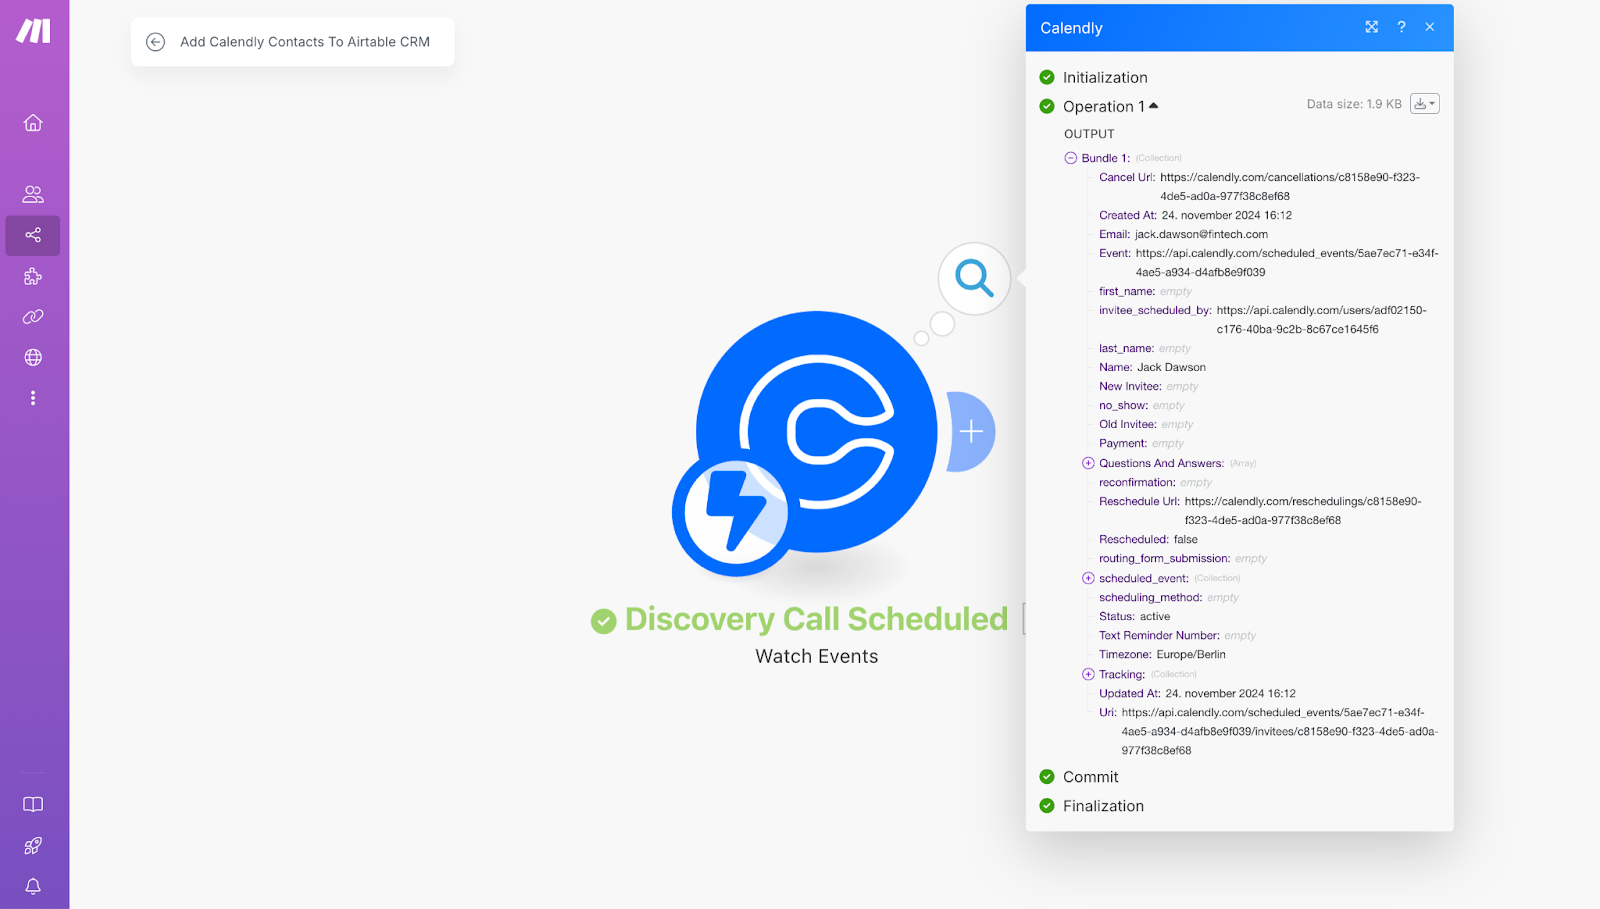
On the Calendly form, click Schedule Event, then return to Make to review the data that was received. Here’s an example of what it might look like once the data comes into Make.
Conditional logic: Check if the contact exists in your Airtable CRM
While in our basic tutorial we set up a simple, single-route automation, it’s important to understand how to create conditional workflows in Make to enable smarter, more dynamic automations. Conditional workflows let you split scenarios into multiple conditional routes based on specific criteria, defining exactly what should happen when those criteria are met—and what should happen when they’re not.
In this case, it’s possible that the lead who is scheduling the call with you is already in your CRM—maybe they’ve scheduled a call with you before or you added them manually during outreach. To avoid creating duplicate contacts that you’d have to clean up later, we’ll first check if the contact already exists. Depending on the result, we’ll set up a conditional flow to either add the contact to our CRM, or skip this step.
To search if the contact exists, add a new module in Make, search for Airtable as your source, and select the Search Records module for your action. If you’ve followed our previous tutorials, you should already have an Airtable connection set up. If this is your first time, follow Make’s simple prompts or check out this article for detailed instructions on connecting Airtable.
Configure the module like this:
- Base: Select CRM.
- Table: Choose Contacts.
- Formula: Set up the formula as shown below. Make sure to put the dynamic Email variable in quotes so the Airtable formula doesn’t create an error.
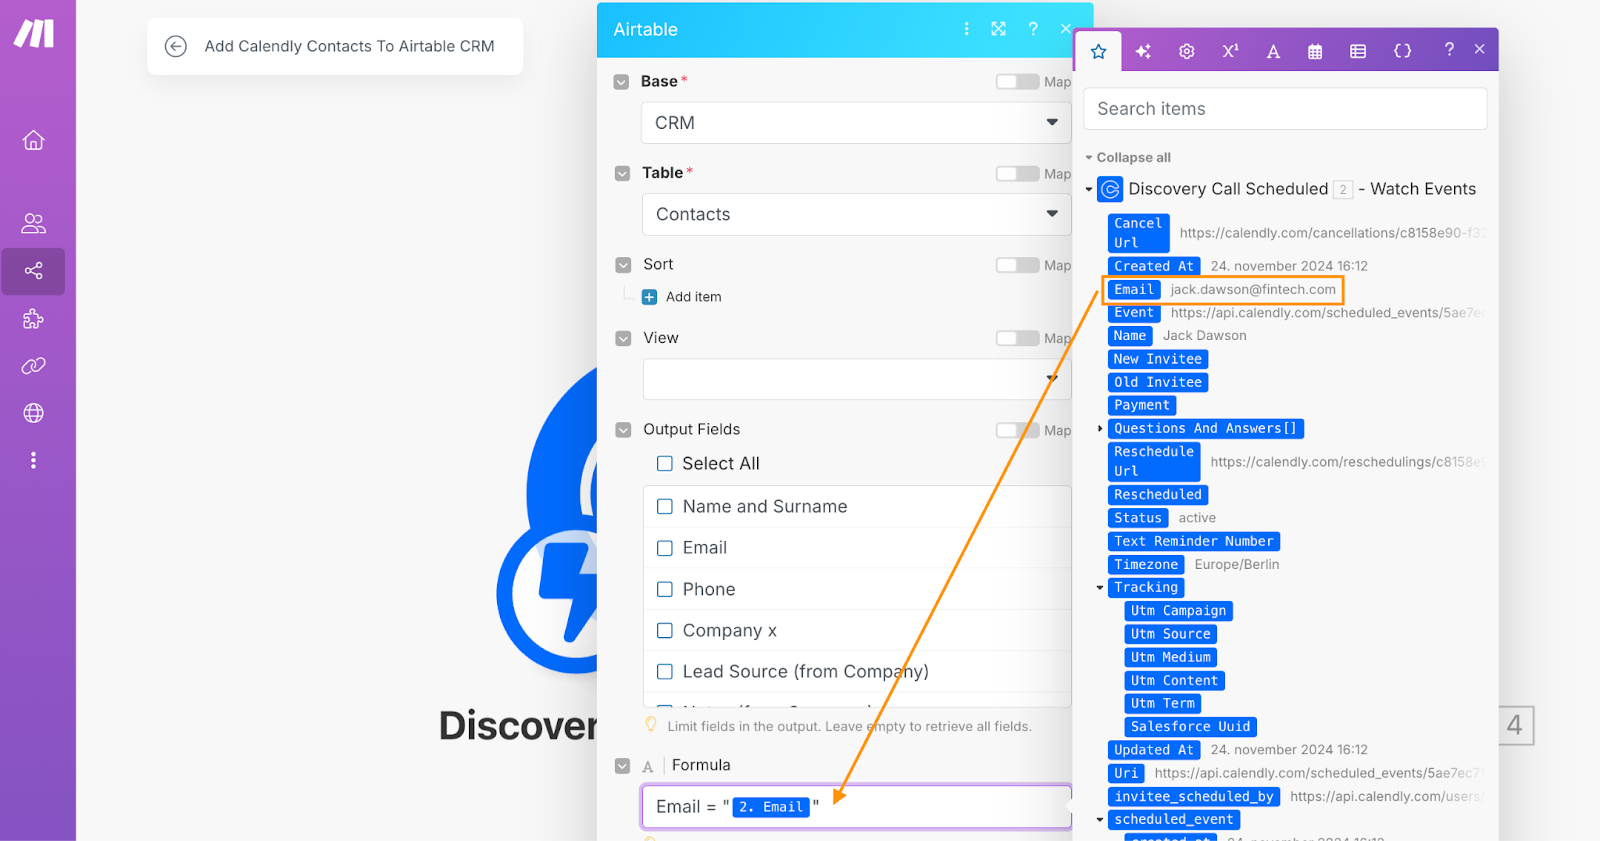
Click OK to confirm the configuration. Then, right-click on the module, select Rename, and update the name to something like “Find Contact By Email” for better clarity.
Now, to test this flow and check whether a contact exists, we’ll need to schedule another meeting through the Calendly form. Unfortunately, working with webhooks in Make can be a bit tiresome for building and testing—once they’ve been triggered, there’s no straightforward way to re-run them. There are advanced methods, like copying the payload (the output data from the Calendly trigger module) and resending it through tools like Postman, but for simplicity, we’ll skip these for now and cover them in later tutorials.
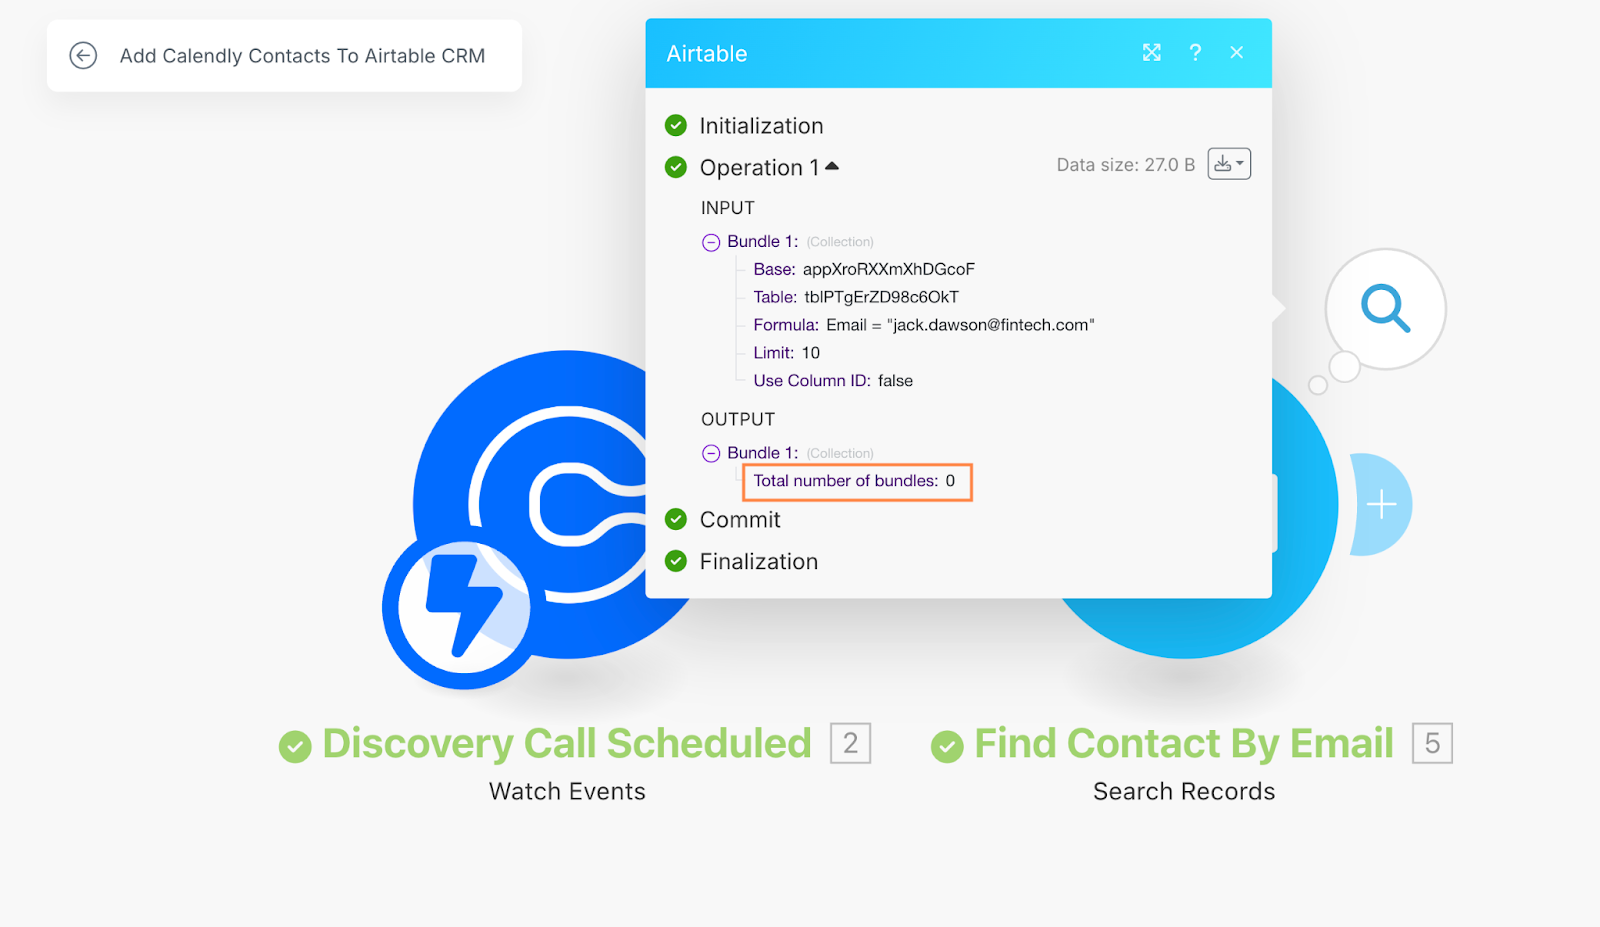
Instead, click Run once in Make, then go back to your Calendly form and schedule another test call. Once completed, check the OUTPUT in Make. Here’s what to look for (it works a bit like a ‘count’ function):
- Total number of bundles equals zero: This means no contact exists in your Airtable CRM for this email.
- Total number of bundles is higher than zero: This indicates the contact already exists.
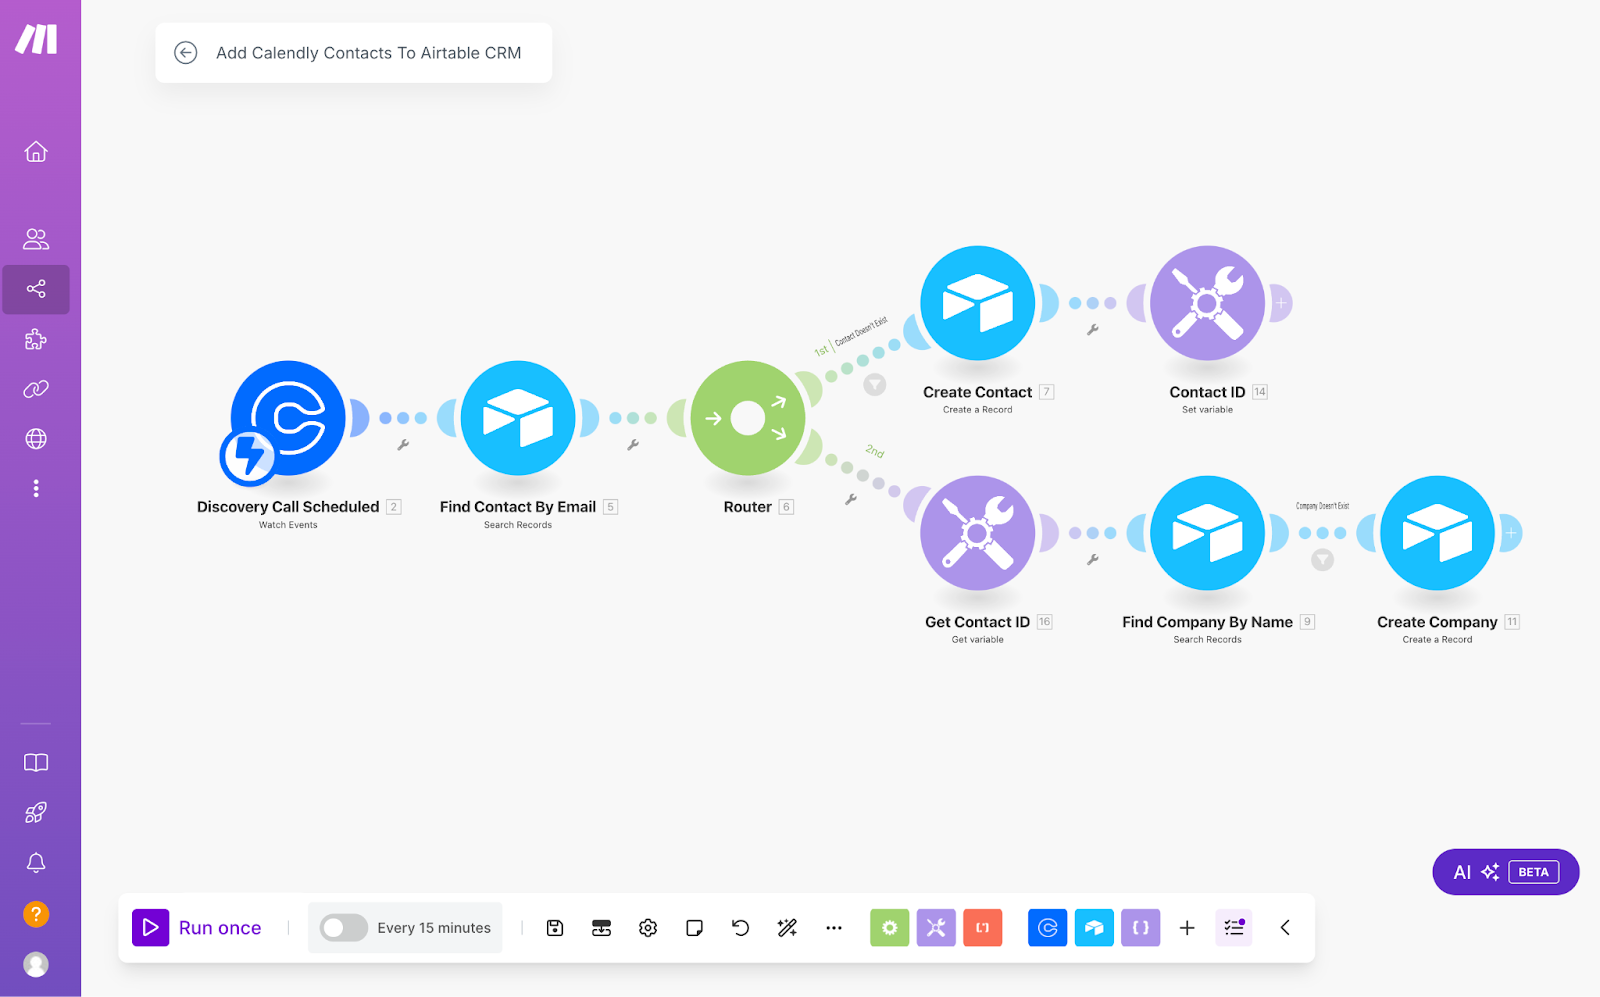
Now that we’ve checked whether the contact exists, we’ll set up a conditional route to handle the next steps. If the contact doesn’t exist, we’ll create a new one. If it does exist, we’ll simply do nothing and let the workflow continue.
Setting up a router module for different conditions
To set up the two routes, we’ll use a Router module in Make.
Note that Router modules can be used in a couple of different ways:
- Conditional routes:
- This is the most common use case. You set filters on each route to define when the automation should follow a particular path.
- This allows your workflow to branch into different flows based on specific criteria, giving you the flexibility to handle multiple scenarios within the same automation.
- Organizing dependent routes:
- Sometimes, a process has a specific sequence of execution, but trying to cram everything into one long chain of modules can quickly become overwhelming. If your automation has more than 8–10 modules in a single line, it can get hard to read, let alone maintain.
- By breaking it into routes, you can define the sequence of execution in a way that’s visually clear and much easier to manage.
- In this case, both routes will execute without the need for any filters. Since there is dependency between the routes, the only thing that matters is setting up the execution order.
- Non-dependent routes:
- In cases where different tasks are independent of each other, it doesn’t matter which happens first. Even if something goes wrong in Route 1, Route 2 can still execute.
- This approach not only makes your automation more scalable but also simplifies troubleshooting. You can focus on fixing just one route without worrying about the rest, making it a lot more efficient.
- Similarly to dependent routes, both routes will execute without the need for any filters, so each route runs independently, regardless of the other, and the execution order doesn’t matter. This is the way we’ll be using the router in this example.
To set up the router for this Scenario, follow these steps:
- Add a new module by clicking the + in the gray module.
- Search for “Router” and select the Router module.
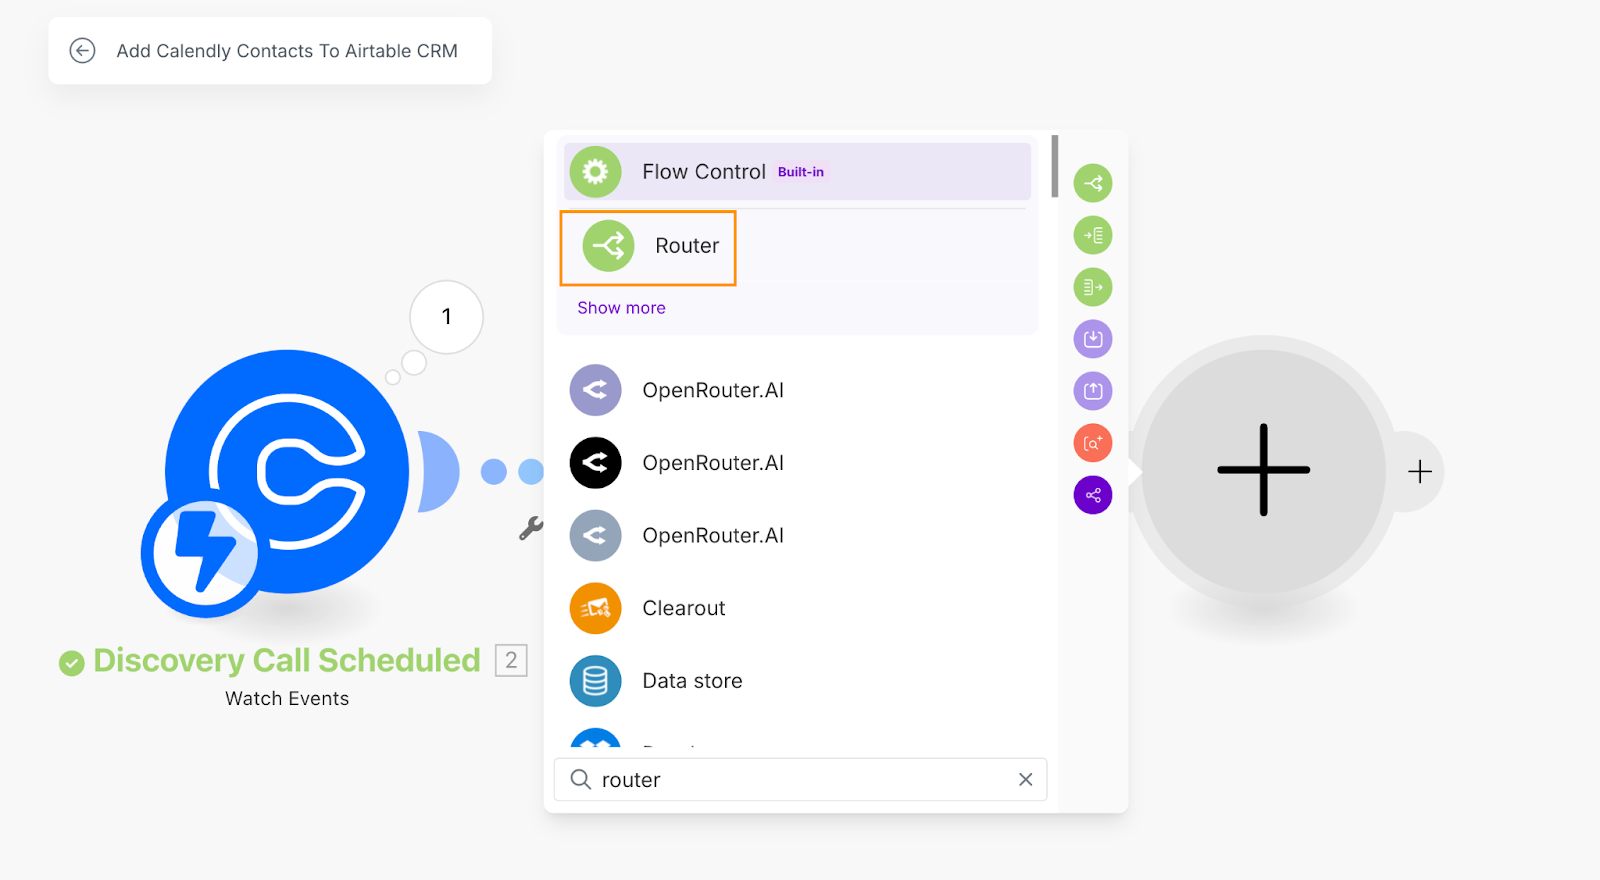
Make will add the Router module to your scenario and automatically create two routes, each with an option to add a module.
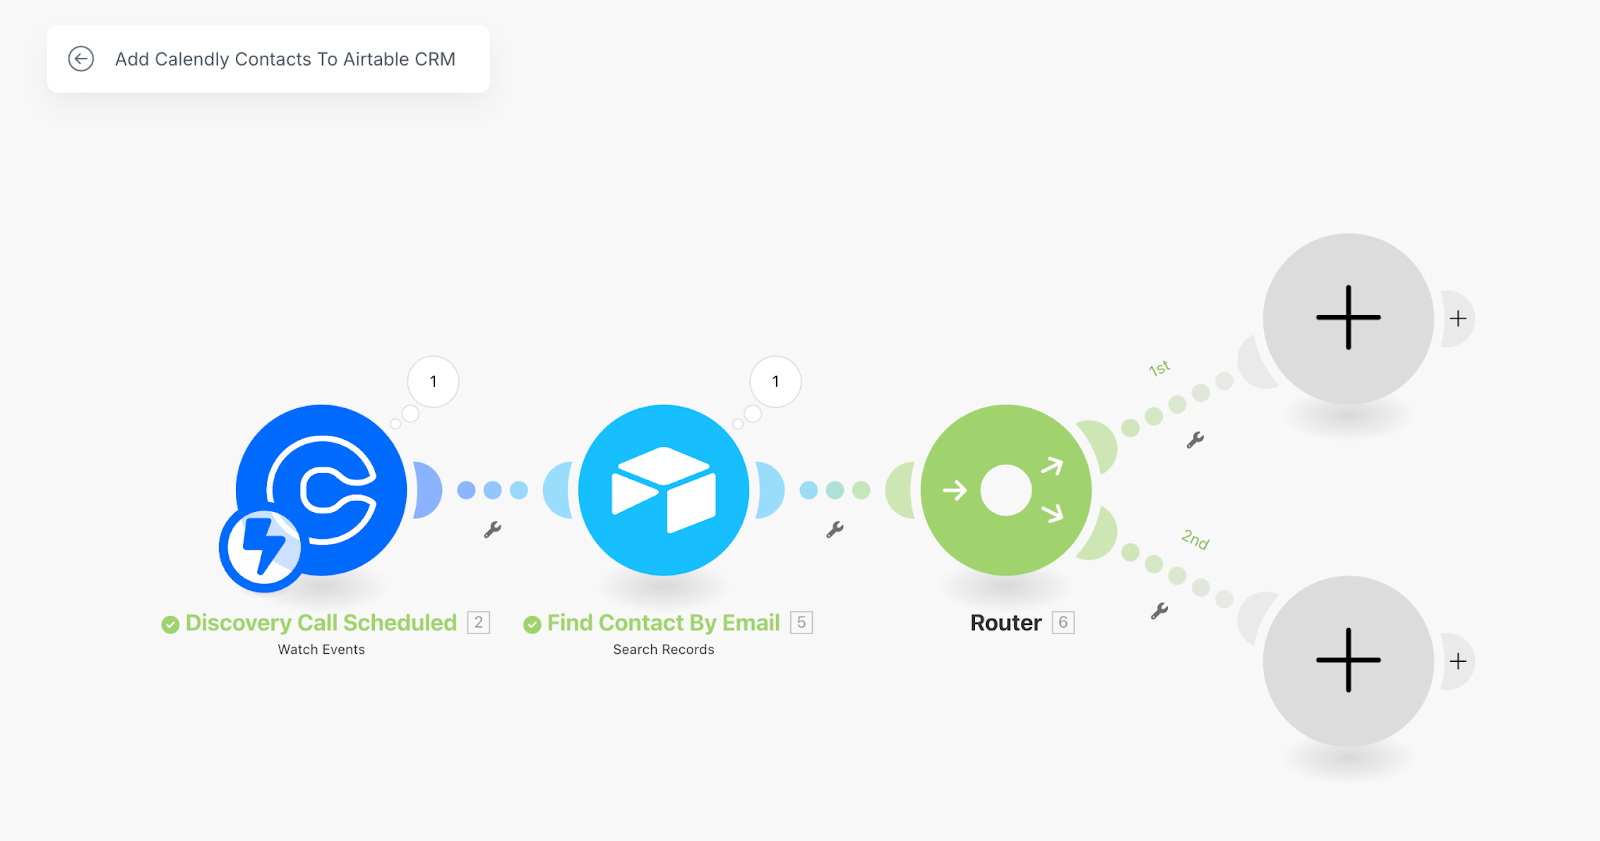
The sequence of how routes are executed is indicated by the number above each route (e.g., 1st, 2nd).
- Route 1: We’ll use this to add a new contact to a company if the contact doesn’t exist.
- Route 2: Regardless of whether Route 1 executes or not, this route will continue the automation, to add other details like company and metadata to the Airtable CRM. This ensures that this step is always completed even if the first route filters out Calendly bookings where the contact already exists in the CRM.
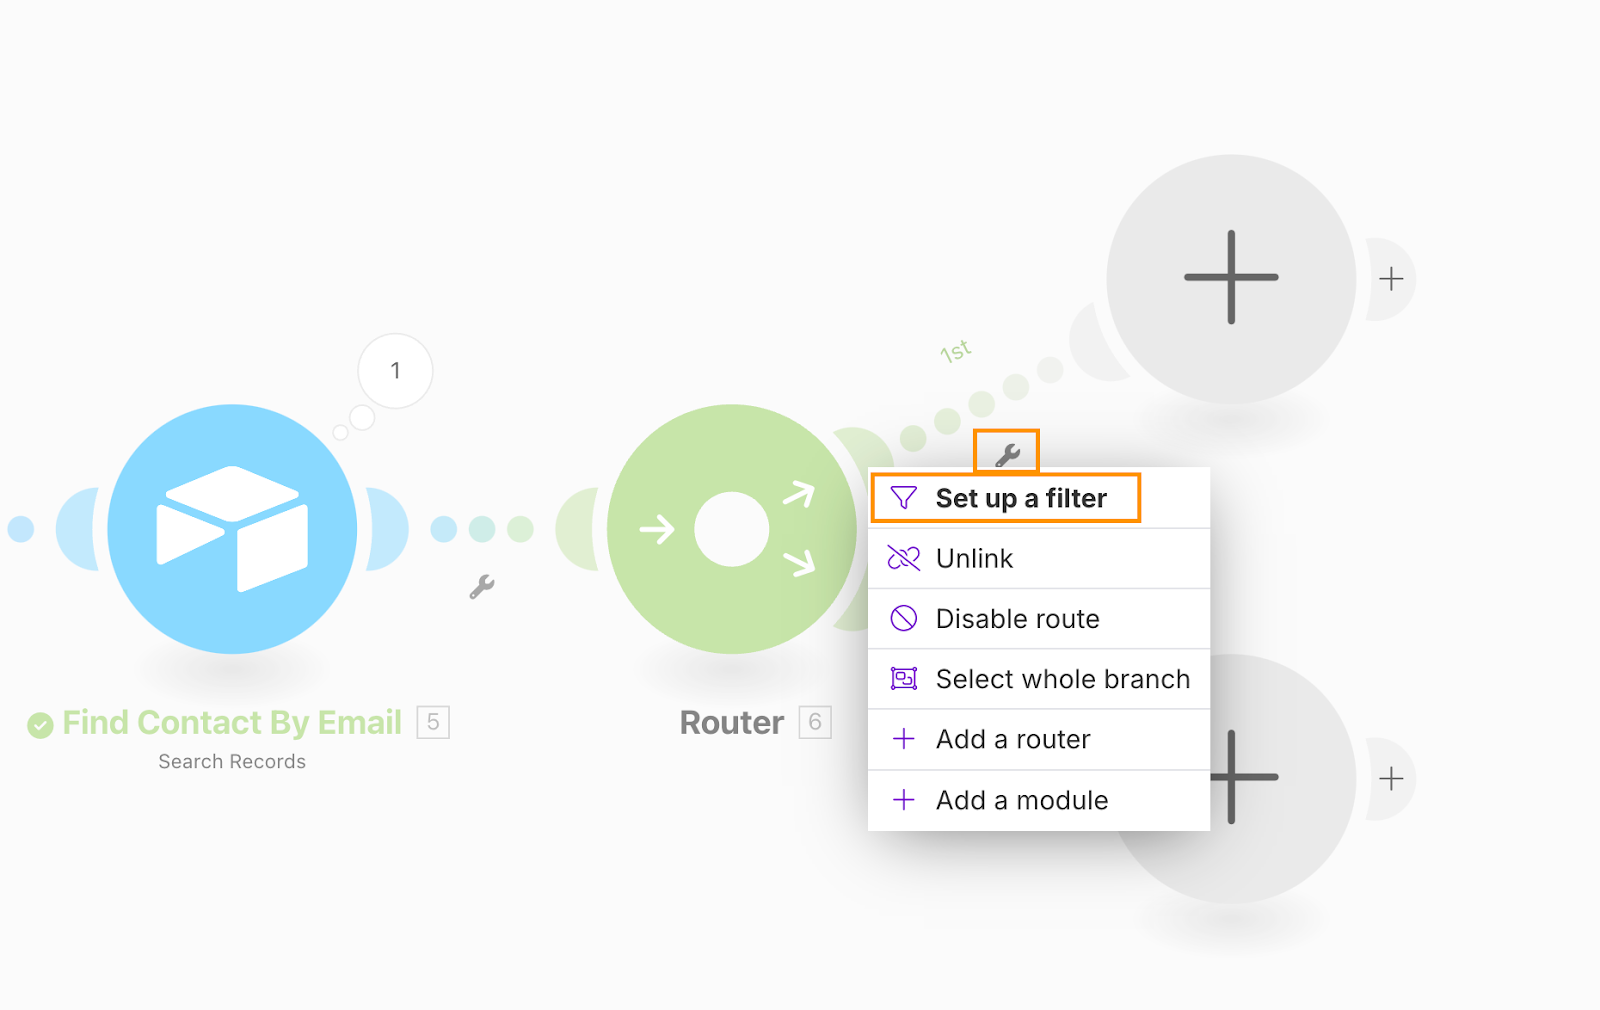
To make sure we execute Route 1 only if the contact doesn’t exist, we’ll set up the filter on Route 1 by clicking the wrench icon below the route and selecting Set up a filter. This will open the filter configurator.
Configure the filter as follows:
- Label: Contact Doesn’t Exist
- Set the route as a fallback: No
- Condition:
- Select Total number of bundles (use the dynamic value from the value picker).
- Numeric operators: Equal to 0
Click OK to confirm the configuration.

With this setup, the first route will execute only if no matching contact exists in your Airtable CRM. If a contact is found, Make will bypass Route 1 and proceed with Route 2.
Create a new contact in Airtable
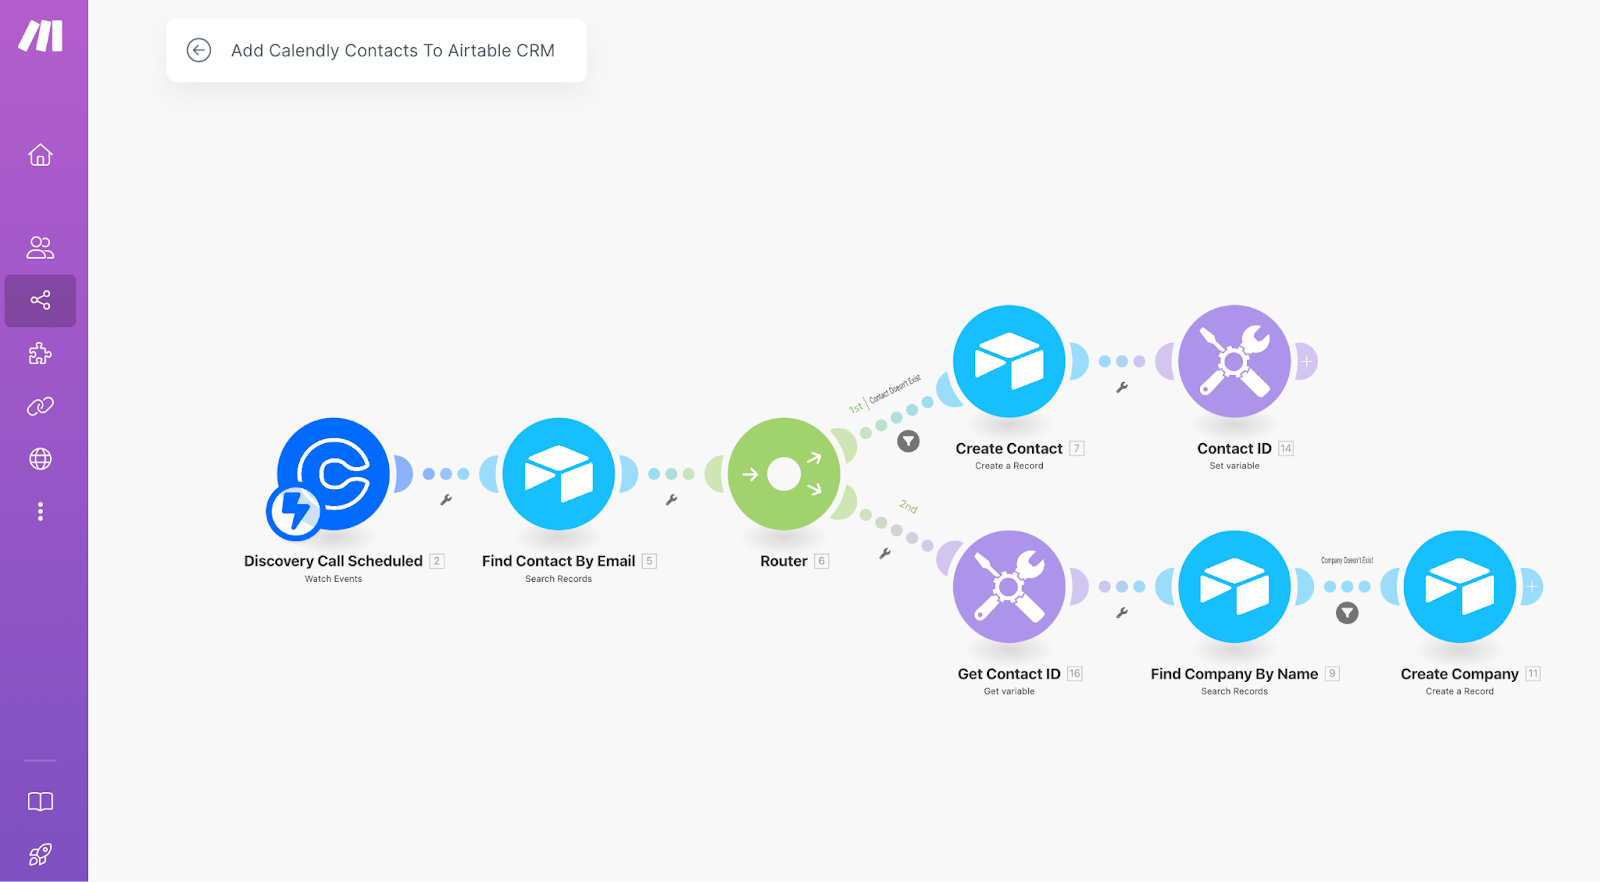
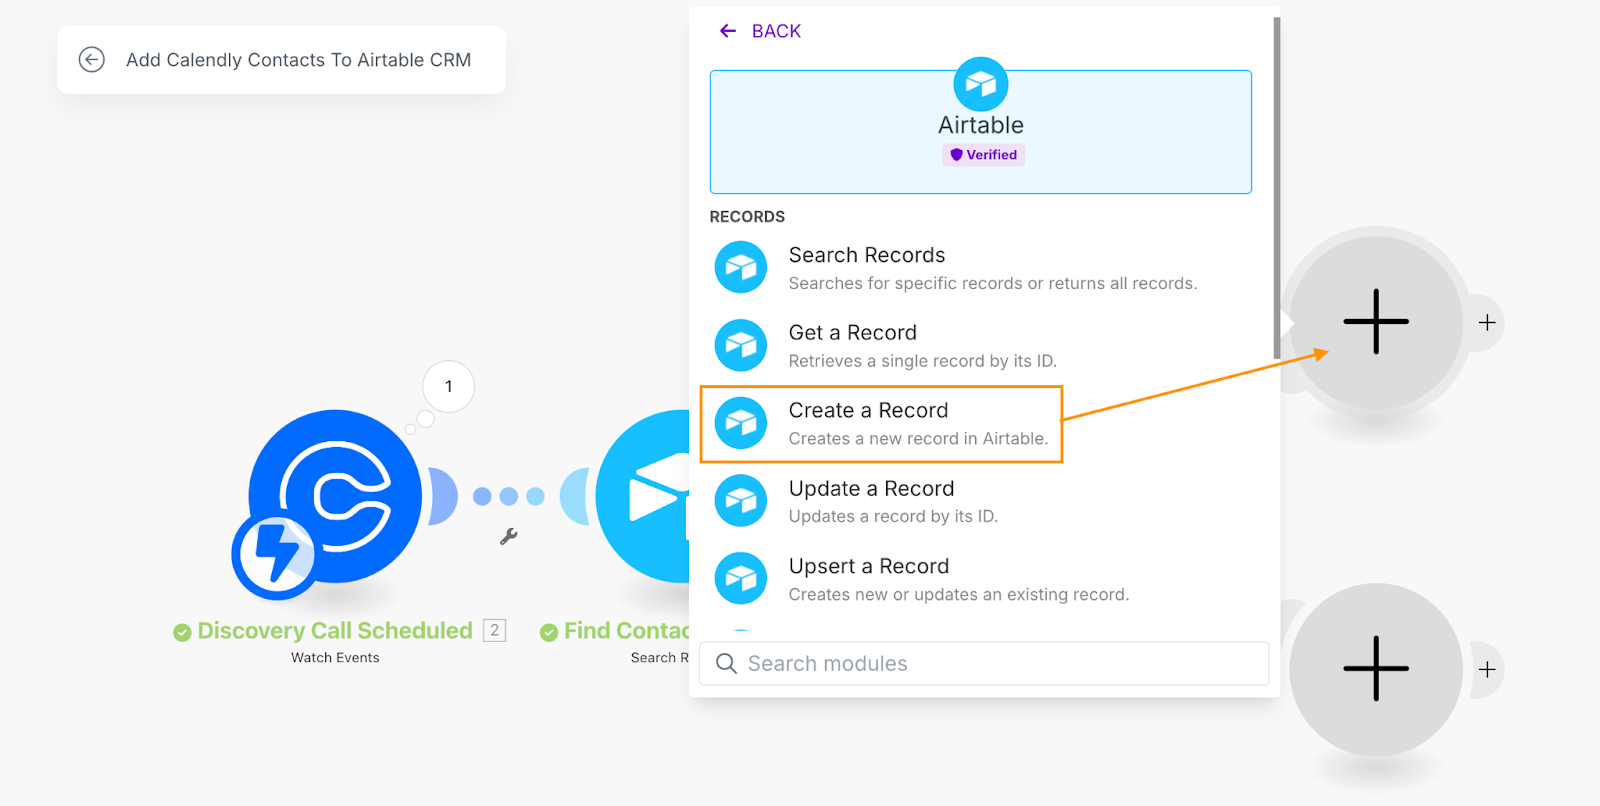
Now that we’ve set the filter on Route 1 of creating a new contact, let’s continue the workflow for Make to follow for this condition. The next step is to add a Create a Record module to this route. Click the + icon on Route 1 to add a new module, search for “Airtable” and select the Create a Record module.
Configure the module to create a new contact in your Airtable CRM as in the image below:
- Base: Select your CRM base.
- Table: Choose the Contacts table.
- Fields: Map the Email and Name data from Calendly to the corresponding fields in your Airtable table.
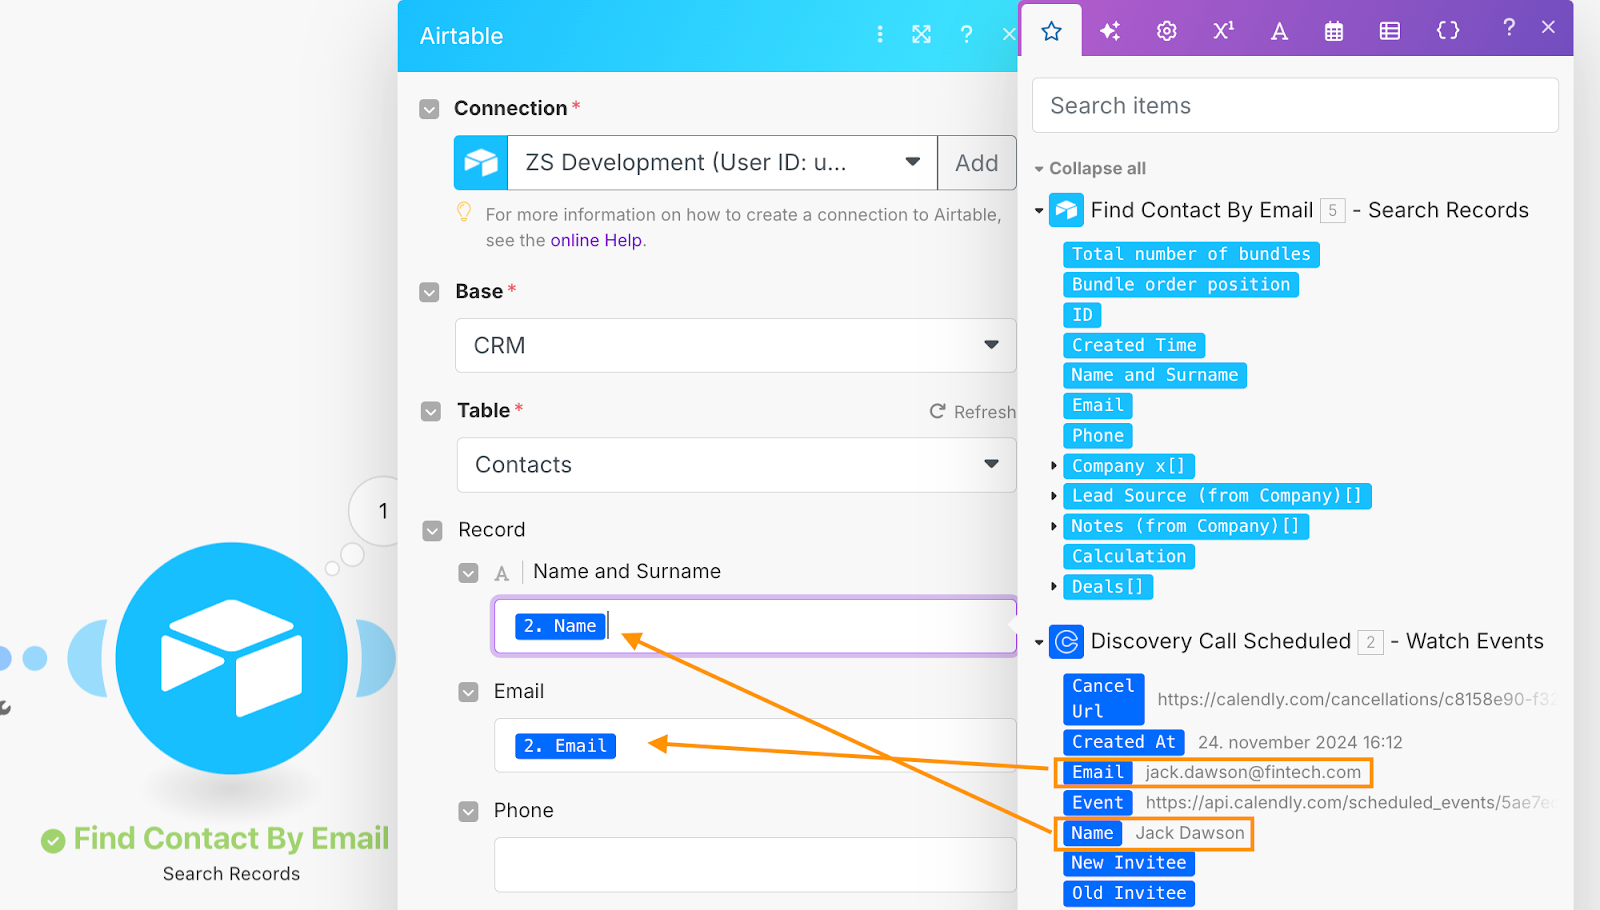
Click OK to save the configuration.
Now you’re all set for route 1 - if a new contact submits a Calendly form, your scenario will add this contact to your Airtable CRM Contact table!
In the next part of this tutorial, we’ll cover how to set up another route and learn some more essential functionality in Make. Nevertheless, you could finish the tutorial here by setting up a simple second route, such as notifying a Slack channel of the Calendly booking, or tagging the Contact ID as a ‘Hot’ lead since they’ve just requested to meet you.
Summary
In this tutorial, we’ve covered the foundations of configuring app-specific webhooks and building conditional automations along with filtering conditions.
In part two of this tutorial, we’ll build on this workflow by incorporating additional information from your Calendly form, like company data, and linking it to associated contacts—all while making sure your automation stays efficient and scalable.
You’ll learn how to handle arrays—like Calendly’s Questions and Answers custom fields—and extract exactly the data you need using Make’s iterator modules, map functions, and get functions. We’ll also dive into variables, a great tool for passing data between different routes of your workflows, helping you avoid duplicating steps and keeping your automations scalable.
By the end of part two, you’ll have the tools and techniques to design more sophisticated, efficient automations that scale with your growing workflows. So if you’re ready to take your automation game to the next level, stick around for part two.

