

In Part 1 of this tutorial of this Make tutorial, we focused on creating a smooth conditional automation to add individual leads from Calendly to your Airtable CRM, ensuring no duplicates clutter your system. But what happens when we need to account for more layers of data, like linking each contact to their company details? And what if this data is structured in a more complex format, like an array, that can’t be directly mapped to your CRM without some additional steps or data reformatting? This is where things get a little more complicated. But don’t worry, we’re here to guide you every step of the way.
In Part 2, we’ll expand on the workflow from Part 1 by delving into one of the most critical concepts in automation: working with arrays. An array is a structured list that holds multiple related pieces of information—such as a list of leads, deals, or responses—to custom form fields (like those from your Calendly form). While arrays are excellent for keeping related data grouped and organized, they also introduce an added layer of complexity in automation, especially for automation newcomers. Unlike simpler structures like single text fields (e.g. a scheduler’s email), arrays require additional steps to extract, process, or map specific items within them to the target app. That’s why mastering how to work with arrays can help you unlock the full potential of your automations, allowing you to handle complex data scenarios with confidence.
By the end of this tutorial, you’ll know:
- How to extract specific data from arrays (like the company name) using map and get functions.
- When to use iterator modules for breaking down larger datasets into manageable parts.
- How to use variables to pass data between different routes of your workflows, helping you avoid duplicating steps and keeping your automations scalable.
- How to design automations that link contacts to companies seamlessly in your CRM without duplicating effort.
Let’s get started!
Step 1: Search for an existing company in your Airtable CRM
Now since we are building this automation on top of our Airtable CRM, we have a slightly more complex database structure to account for. In our CRM, we not only have a contacts table (which records all people we connect with), but also a separate companies table that records the company details. This avoids lots of duplicated information, since multiple contacts can be associated with the same company.
In route 1, when we received a Calendly request, we checked if the contact existed in the Contact table and added it if not.
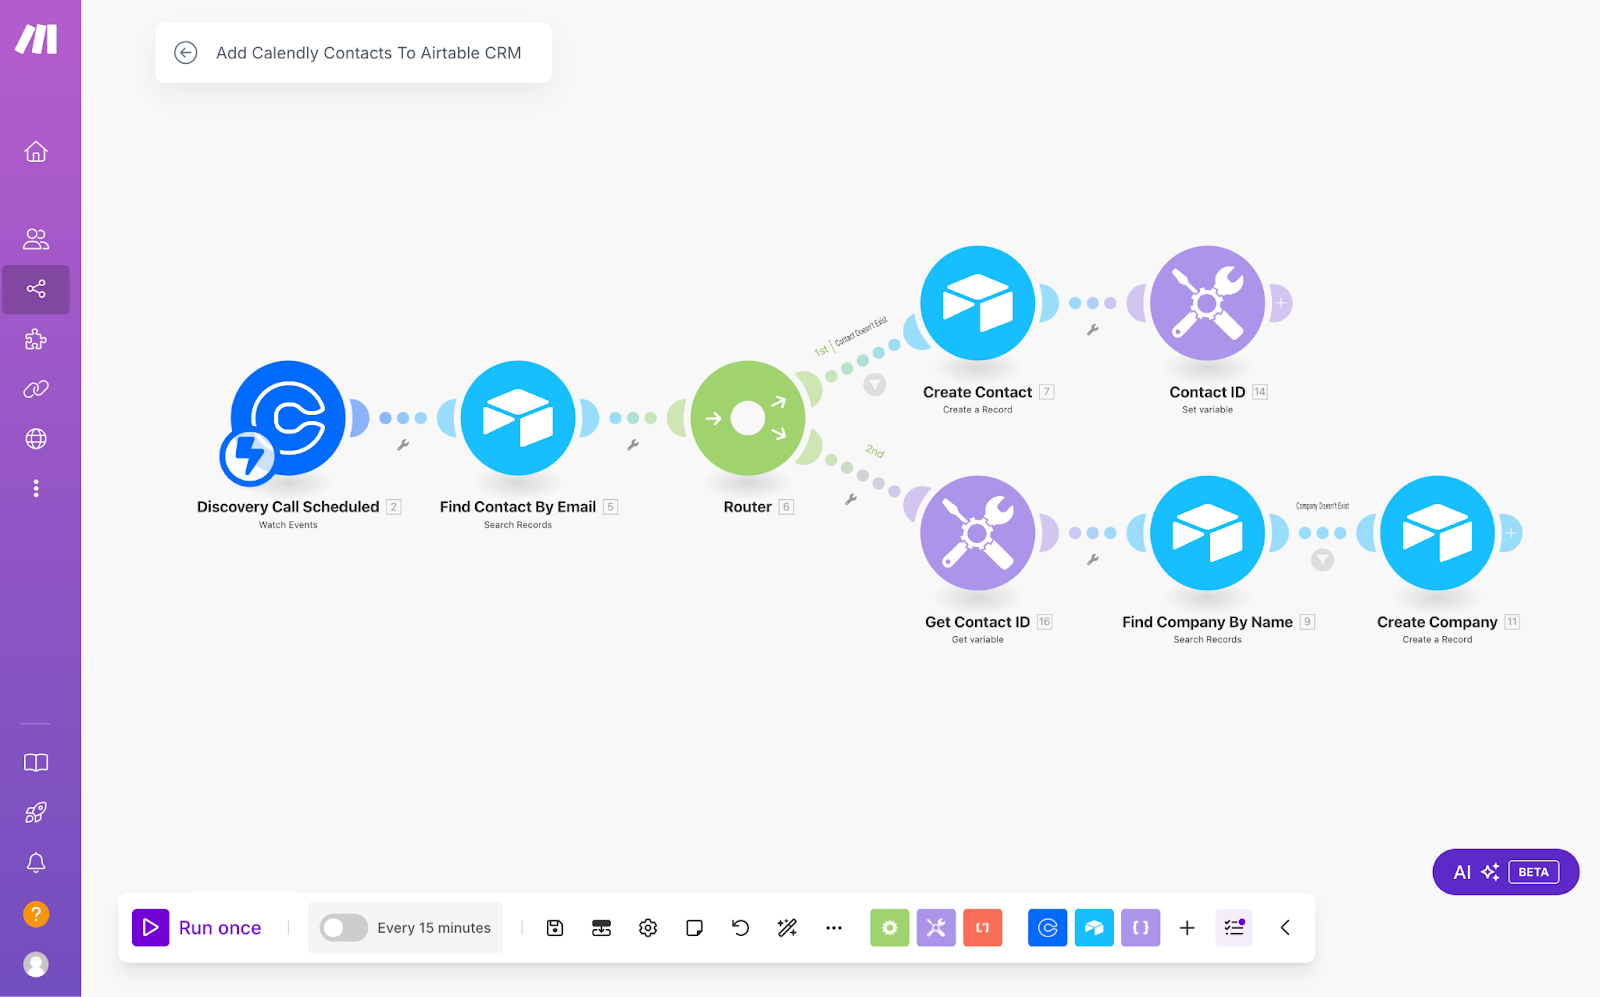
In route 2, we’ll repeat the steps we used for the contact, but this time for the company information. First, we’ll search for the company by name, and if it doesn’t exist in our Airtable CRM, we’ll add it. This is a great way to reinforce what you’ve learned in Part 1 while picking up a few extra tips along the way. In this section, we’ll learn how to work with Arrays.
To start, add a new Search Records Airtable module as the first step on route 2. This module will check if the company already exists in your Airtable CRM. Unlike the previous route, we won’t apply any filters here since we always want to follow this route.
Working with Arrays in Make
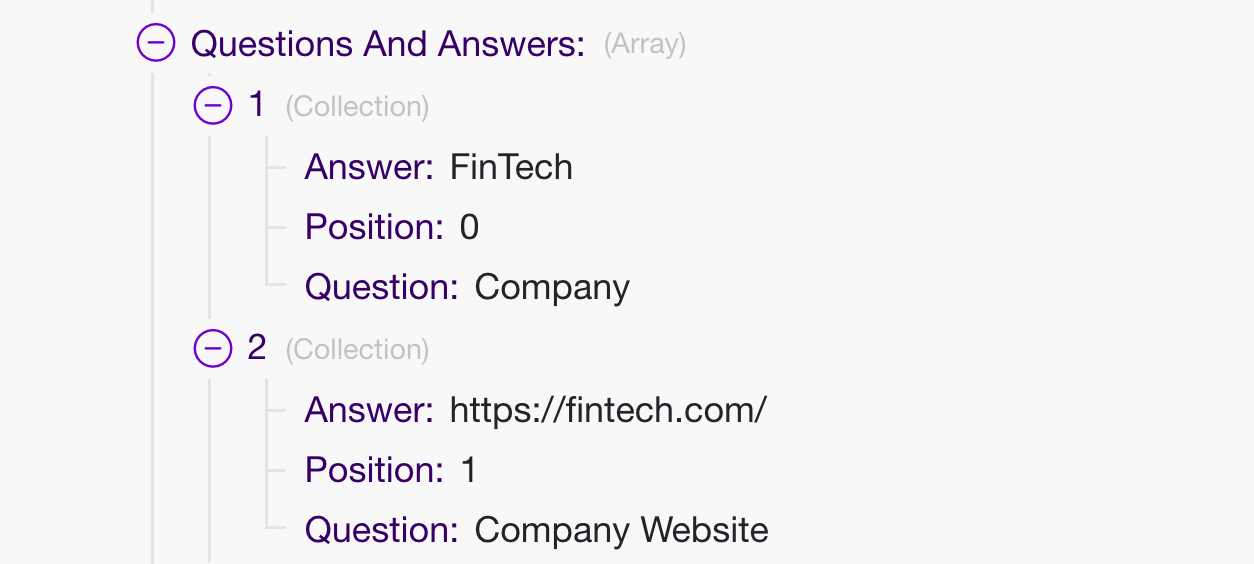
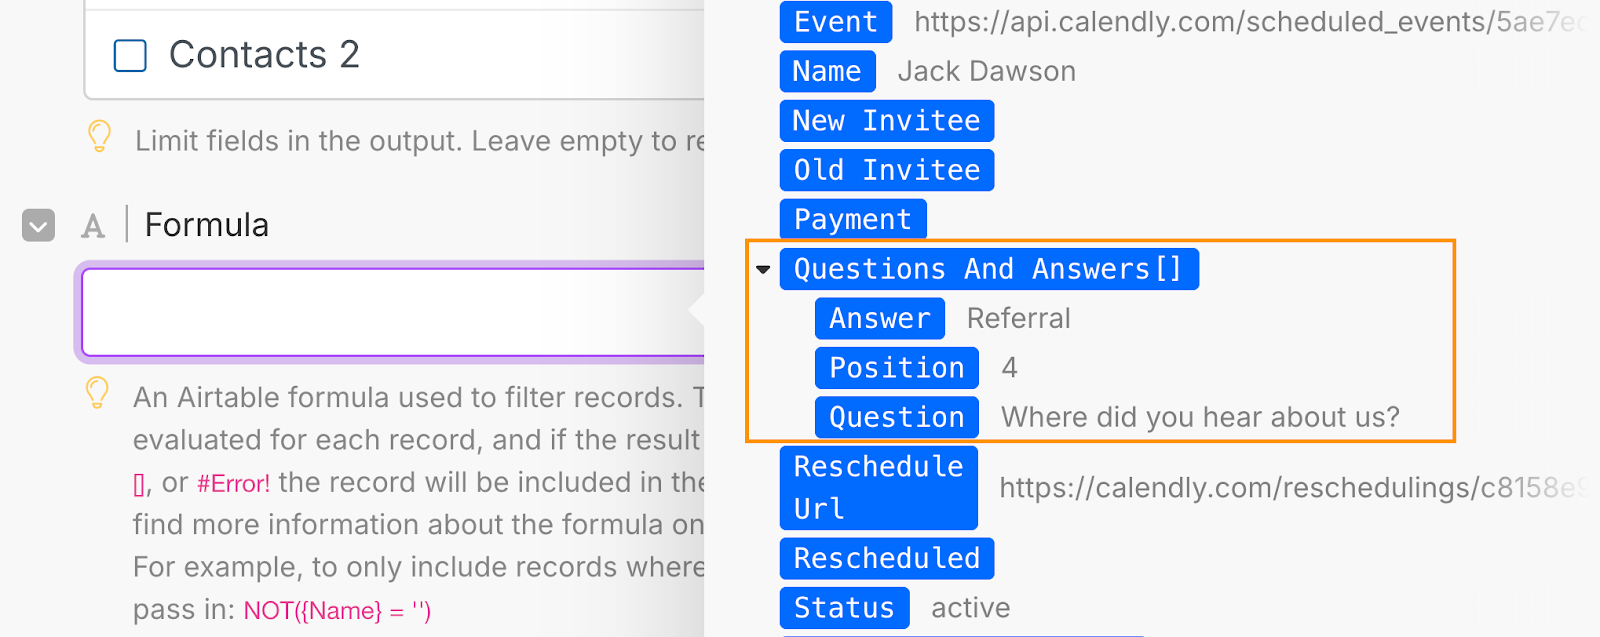
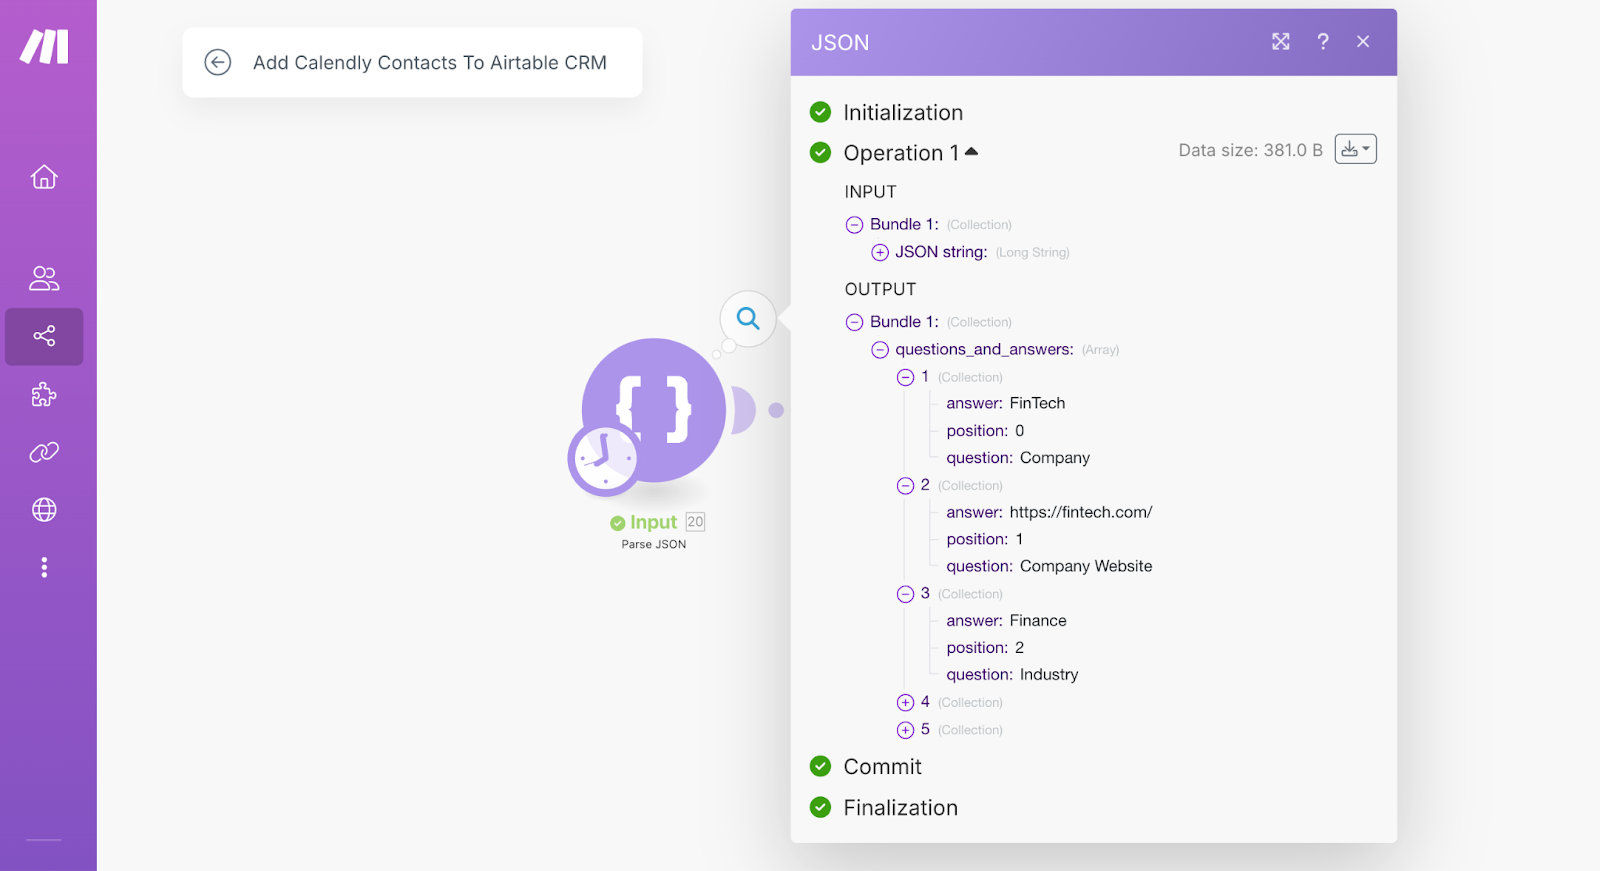
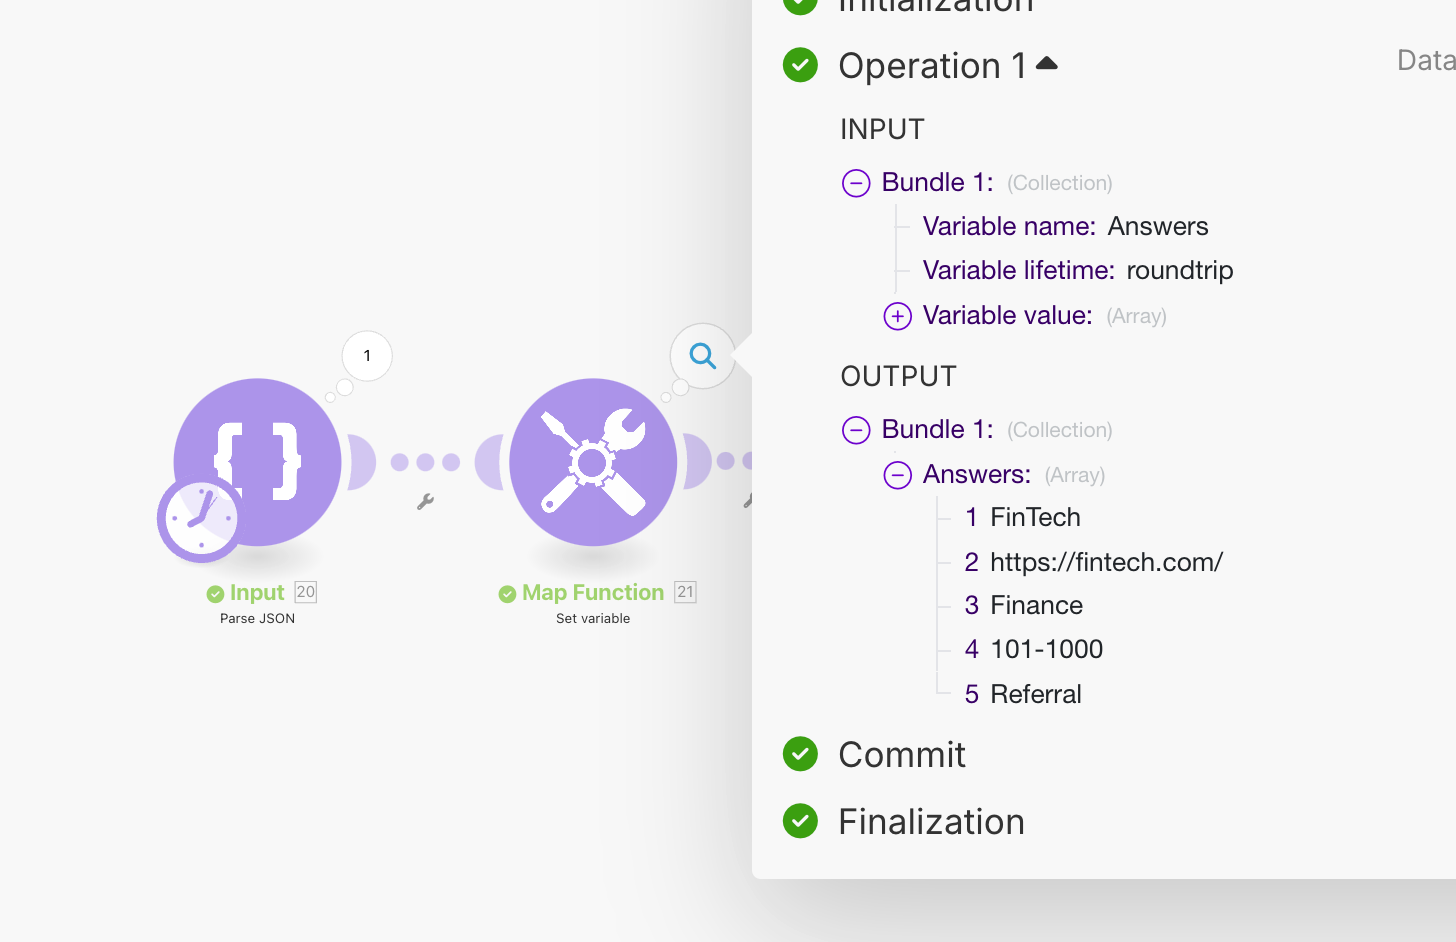
Now, before we continue, we need to organize the data that our Calendly webhook returns so that we can add it to the company record. If you take a closer look at how Calendly presents the custom fields we added to the form, you’ll notice they’re stored as an array.
In our case, Calendly uses an array called ‘Questions and Answers’ to store the custom form data. Each item in this array includes three key elements: the answer (what the contact submitted), the question (the name of the form field), and the position (its index in the list).
When working with an array in Make, by default, you can only map one item from the list to a module. This means that if you have 5 Questions and Answers, you’ll only be able to access one of them at a time. The rest of the data stays out of reach unless you take extra steps to pull it out. This prevents us from directly using the company name as a filter in the Airtable Search Records module. To address this, we first need to iterate through the array and extract the specific data we need for the filter. So, how can we do that?
Two approaches to extract data from arrays
We have two approaches to choose from that will help us separate this array into individual items to work with. Before we show you how to implement them, let’s quickly break down what the approaches are used for:
- Using an Iterator Module: An iterator is a special type of module in Make that takes an array and breaks it down into individual bundles. Each item in the array is treated as a separate bundle, which means we can work with each piece (or collection) of data individually. For example, if our array contains 5 questions and answers, the iterator will separate them into 5 individual bundles, allowing us to process each question-answer pair independently. Here’s an example of what that might look like:

This Make automation starts by watching incoming emails in the Email module (1). If an email contains a list (array) of attachments, the Iterator module (2) breaks down the array into individual elements, and processes each separately. Finally, the Dropbox module (3) uploads each processed file to a Dropbox folder.
- Using a Combination of map() and get() Functions: If you’re only interested in extracting specific information, like the answer to the question Company, this method is a more efficient shortcut.
Original data structure:
The map() function will be familiar to those who know how to code already, but for those who don’t, mapping transforms the original list (or array) by applying a specific logic to each item, creating a new list in the process. You can think of it as reformatting the list into a different structure that might be more useful, for example, if we want to extract just the answers from our array of questions and answers, the map() function will help us convert the original list into a new one that contains only the answers. This is what we’ll do for our example.
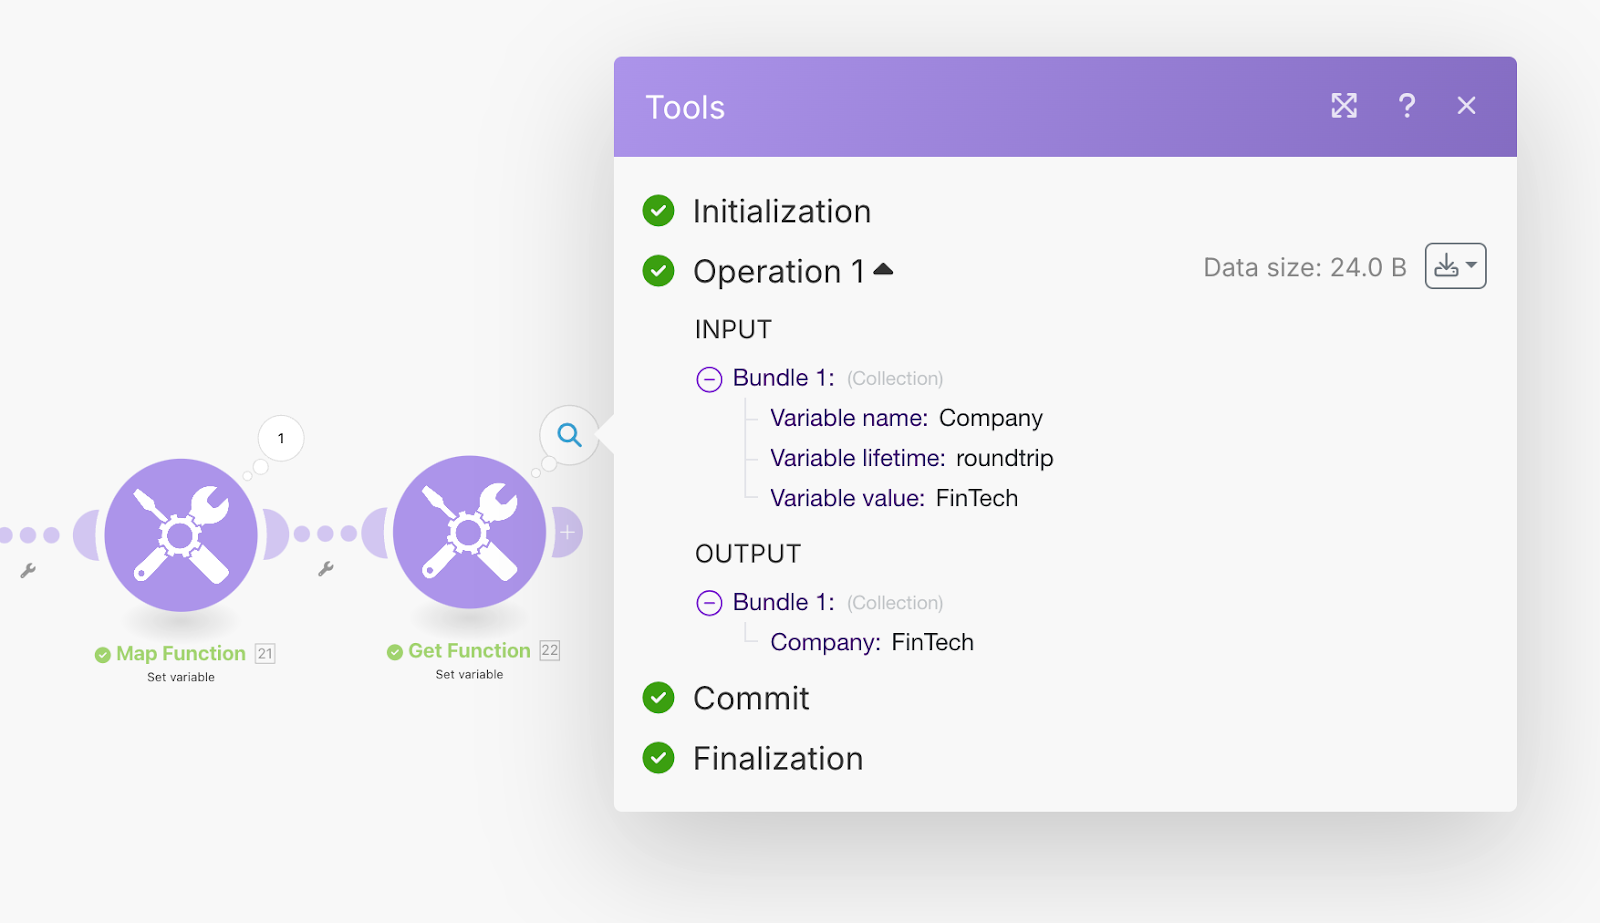
Once you’ve set up your newly formatted array, the get() function is then used to extract one specific piece of information. Think of it as pointing to a specific item in a row and saying, “That’s the one I need!”. In our case, once we have a list of answers, we’ll use get() to extract the specific answer related to the company name.
When to use each approach
- Iterator Module: Use this when you need to process multiple pieces of data from an array. For example, if you need to work with both the question and the answer for each item in the array, the iterator is the better option since it breaks down the dataset into manageable parts.
- map() and get() Functions: Choose this method when you only need a single, specific value from the array. If you know exactly what you’re looking for—like the answer to the Company question—this approach is faster and more direct.
For our scenario, since we’re only interested in the answer related to the company name, we’ll use the map() function to extract all the answers into a list, then apply the get() function to pull out the specific answer we need for the filter.
How to use the Map and Get functions
Configure the Search Records module like this:
- Base: CRM
- Table: Companies
- Formula: Configure as seen below
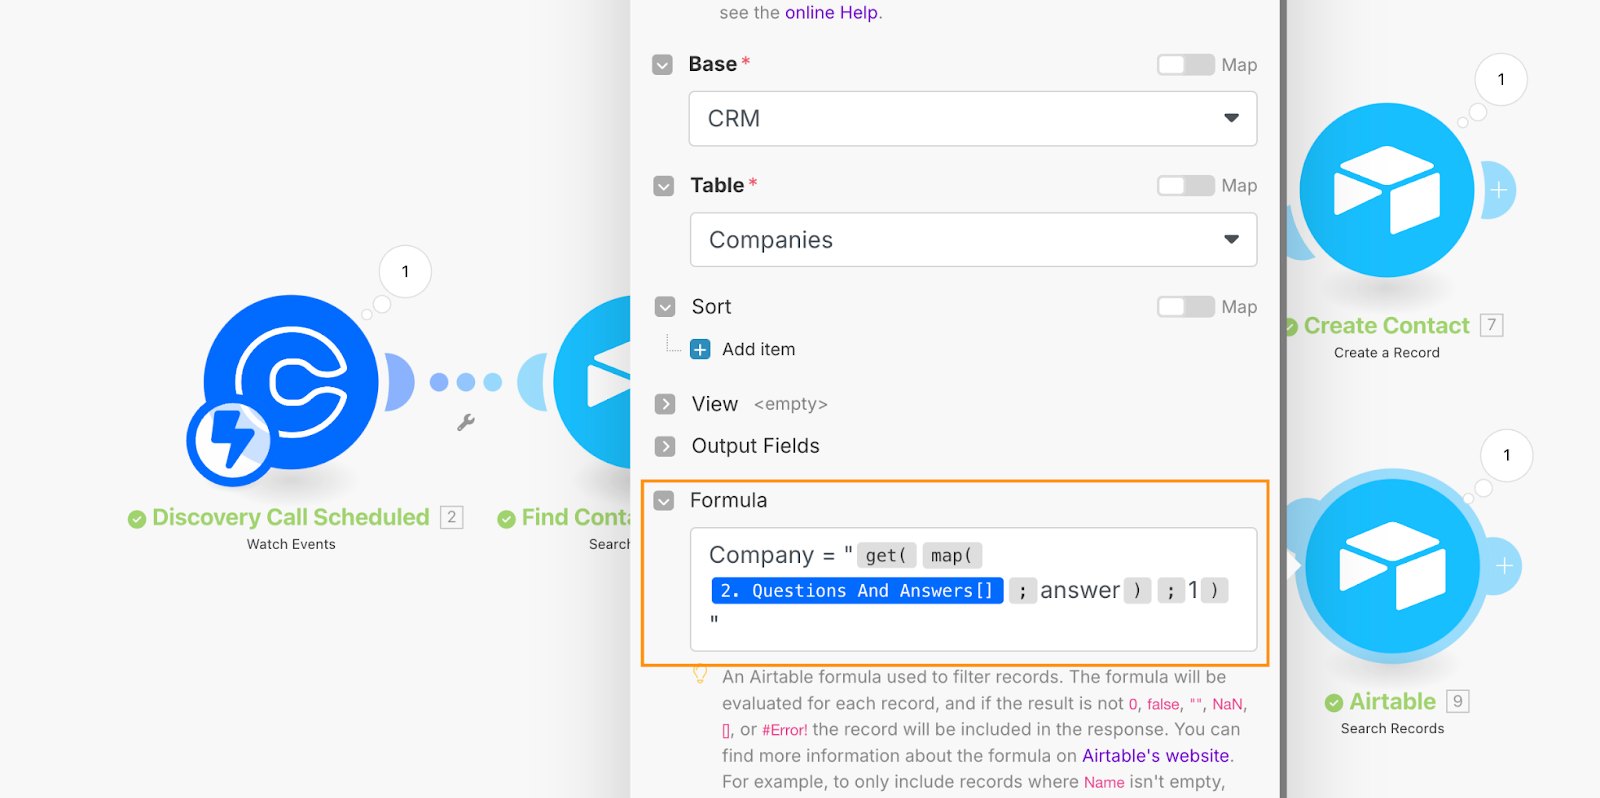
Let’s break down this expression:
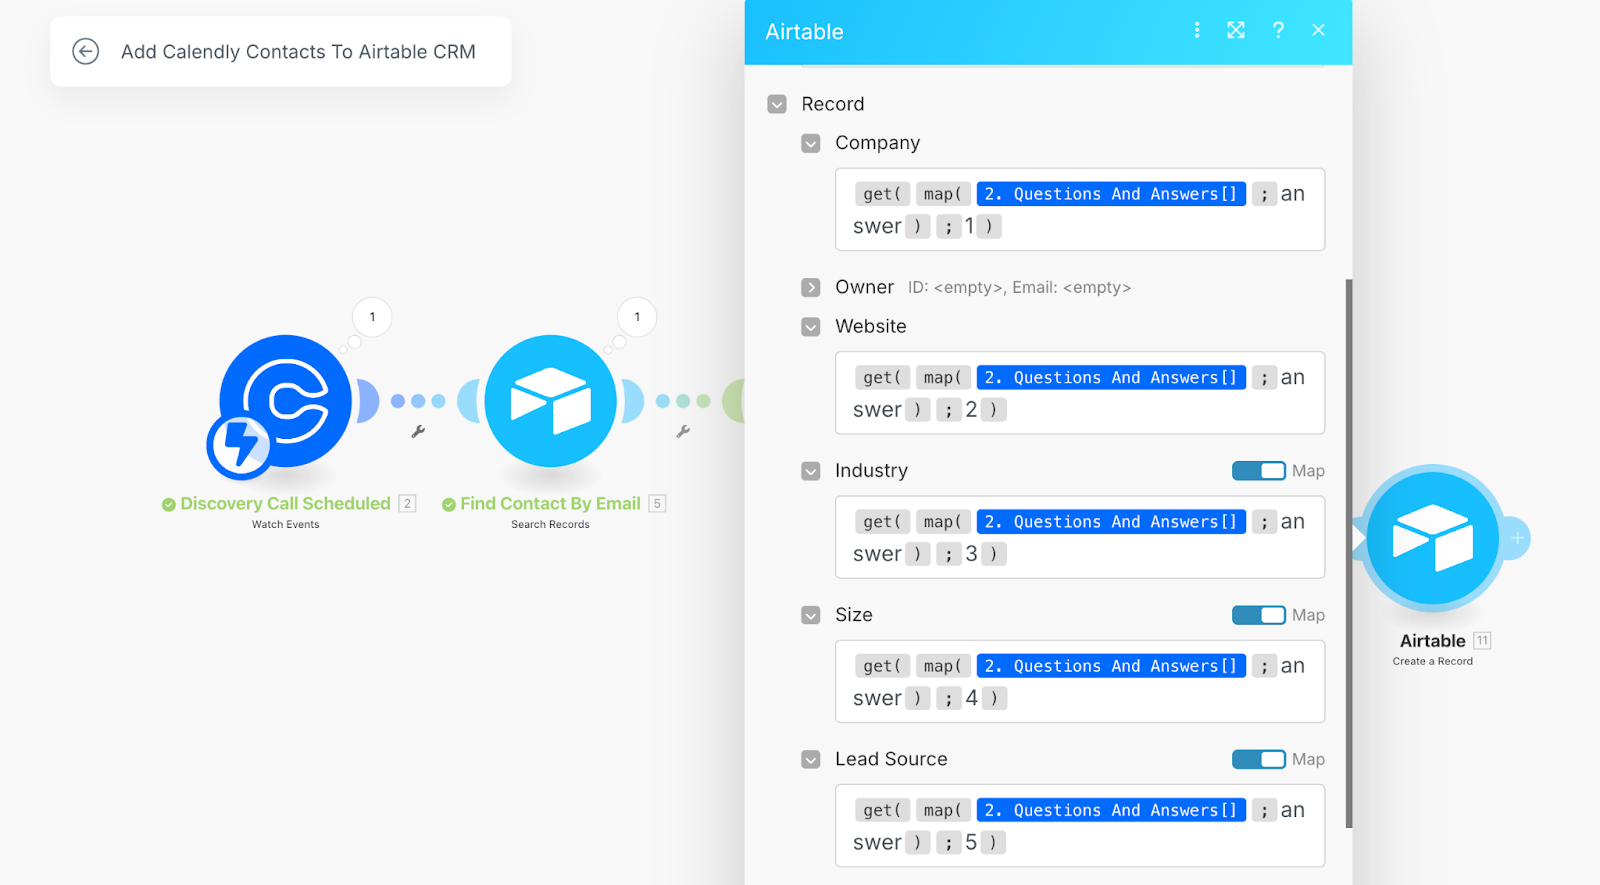
- The map() function creates a new list containing only the answers from the original Questions and Answers list, which is the data we’ll want to include in our company record. The new list created by map() would look like this: "FinTech", "https://fintech.com/", "Finance", "101-1000", "Referral"
- The get() function picks out a specific item from the newly created list based on its position (starting from 1). In this case, get(map(...), 1) pulls out the first item, which corresponds to the company name.
If you wanted to extract the website instead of the company name, you’d modify the formula to:
![A Formula value box from a Search Records module in Make which contains the following formula: Company = "get( map( 2. Questions and Answers [] ; answer ) ; 2 )"](https://tools.dev/content/images/2025/02/8-3.png)
Click OK to confirm the configuration. After that, rename the module to something descriptive like “Find Company by Name” to keep things organized and easy to identify later.
Step 2: Add the company to Airtable CRM if it does not exist
The next step is to create a company record in Airtable if it doesn’t already exist. Since this is the final step of the automation, we don’t need multiple routes. If the company exists, the automation stops. If it doesn’t, we’ll create the record.
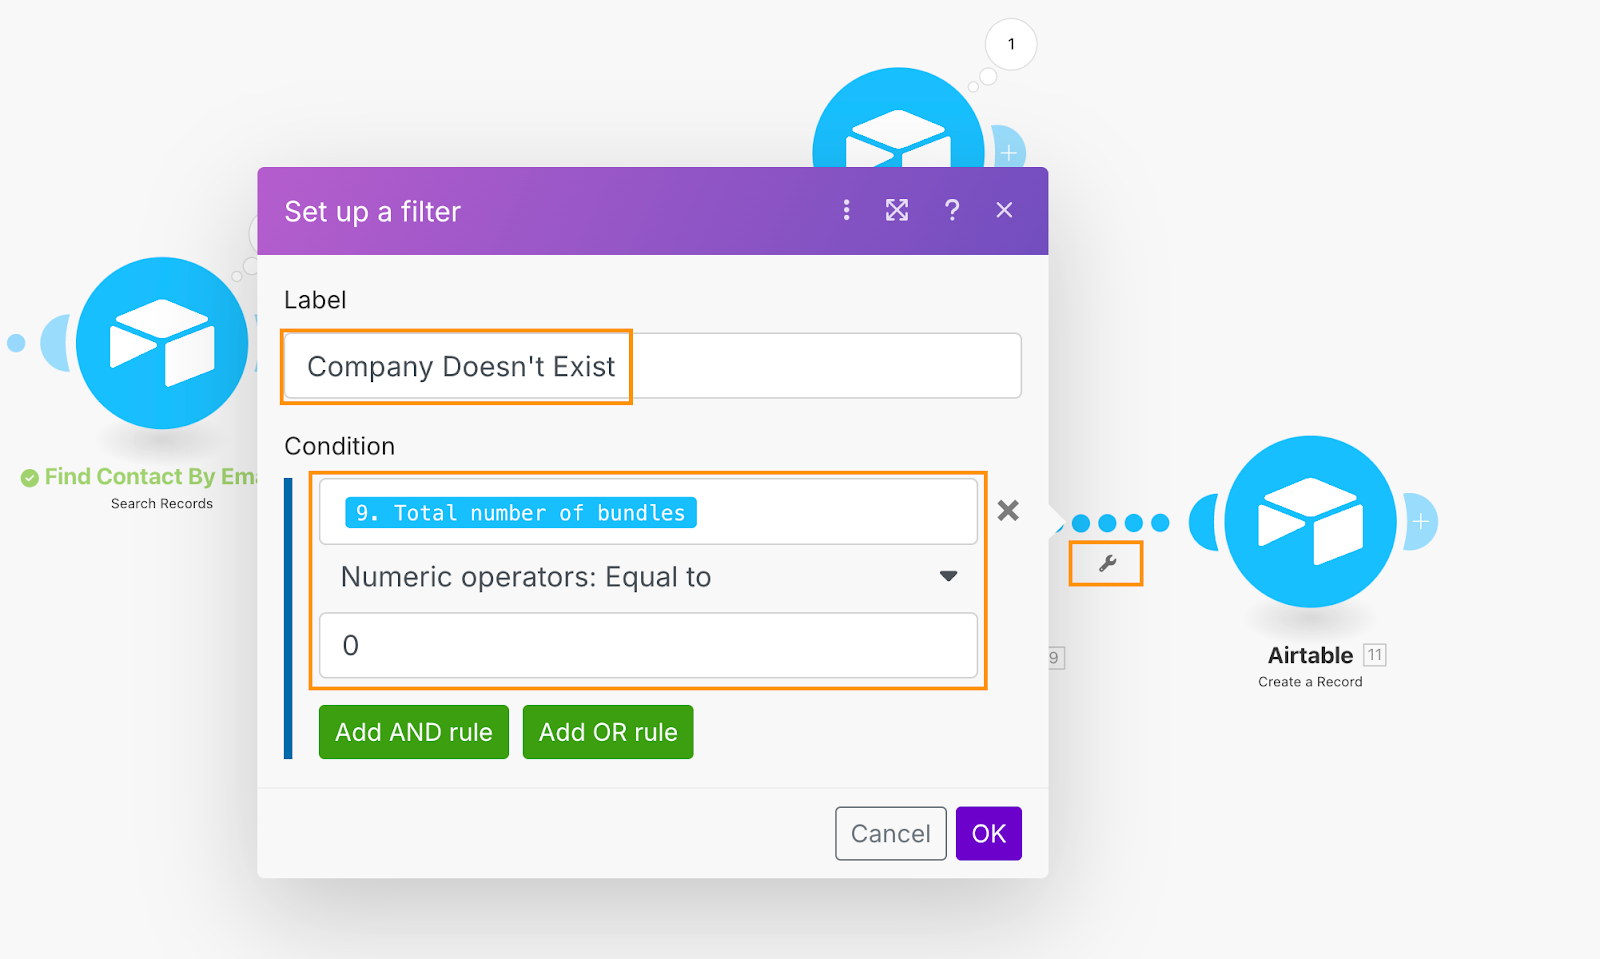
Add a Create a Record Airtable module after the Search Records module. Between the two modules, click on the wrench icon and configure a filter. Set the filter up the same way you did for contacts in Route 1, but name it “Company Doesn’t Exist”. Make sure to pull the Total number of bundles from the Find Company By Name module.
Now, in the Create a Record module, select CRM as the base and Companies as the table.
To map the company name, copy the get and map expression from the Search Records module and paste it into the Company field here. Since this isn’t an Airtable formula, remove the Company= part of the expression and the double quotation marks.
![Dialogue box for a Create a Record module in Make with CRM selected as the Base and Companies selected as the Table. The Company field has the following equation: get( map ( 2. Questions and Answers [] ; answer ) ; 1 ).](https://tools.dev/content/images/2025/02/10-3.png)
For the other fields, like website, industry, size, and lead source, use the same approach. Copy the expression in the Company field, and refer back to the list created by the map function and update the index number for each field. For example, if the list is:FinTech, https://fintech.com/, Finance, 101-1000, Referral
- The company name is the first item (index 1).
- The website is the second item (index 2).
- And so on for each field.
Once you’ve mapped all the necessary fields, click OK to save. Then, right-click the module, select Rename, and name it “Create Company” to keep everything clear and organized.
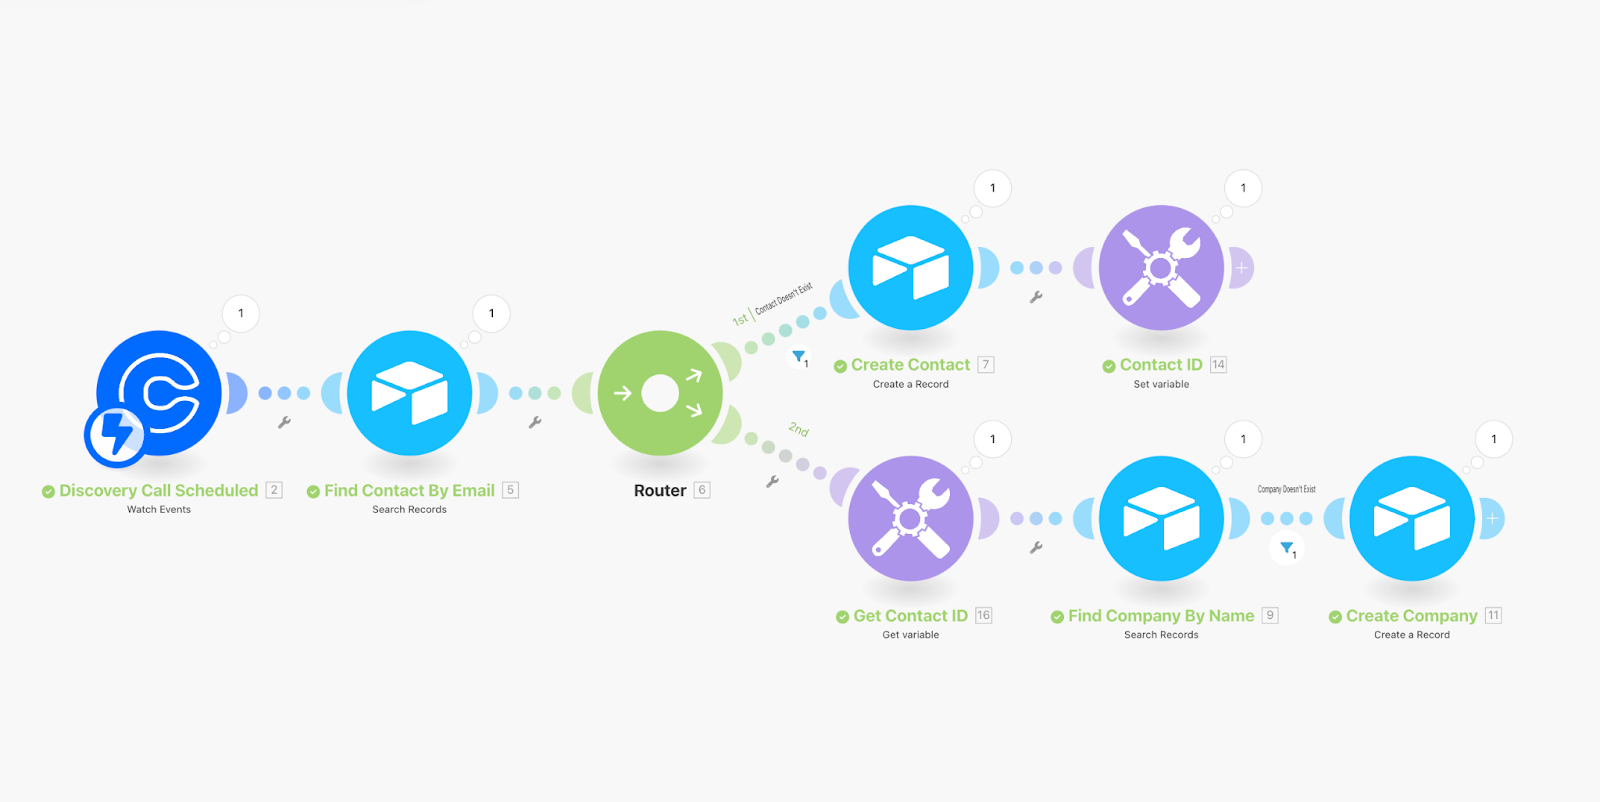
Step 3: Merge routes and link contact to company in Airtable CRM
The final step is to link the contact and company in your Airtable CRM. The challenge with conditional routes in Make is that once a workflow splits, there’s no built-in ‘merge’ module to bring it back together. This means you can’t directly access data from one route in another.
One common workaround is duplicating steps on both routes. For example, after the Create Contact module in Route 1, you might add a module to search for the company in Airtable, and then create the company if it doesn’t exist, repeating the steps we just followed for Route 2. While this works, it leads to duplicate steps that are hard to maintain as your automation grows and makes the Scenario less scalable. If you ever need to make changes to these modules, you’d have to update them in every place they appear—this can be tedious and prone to errors.
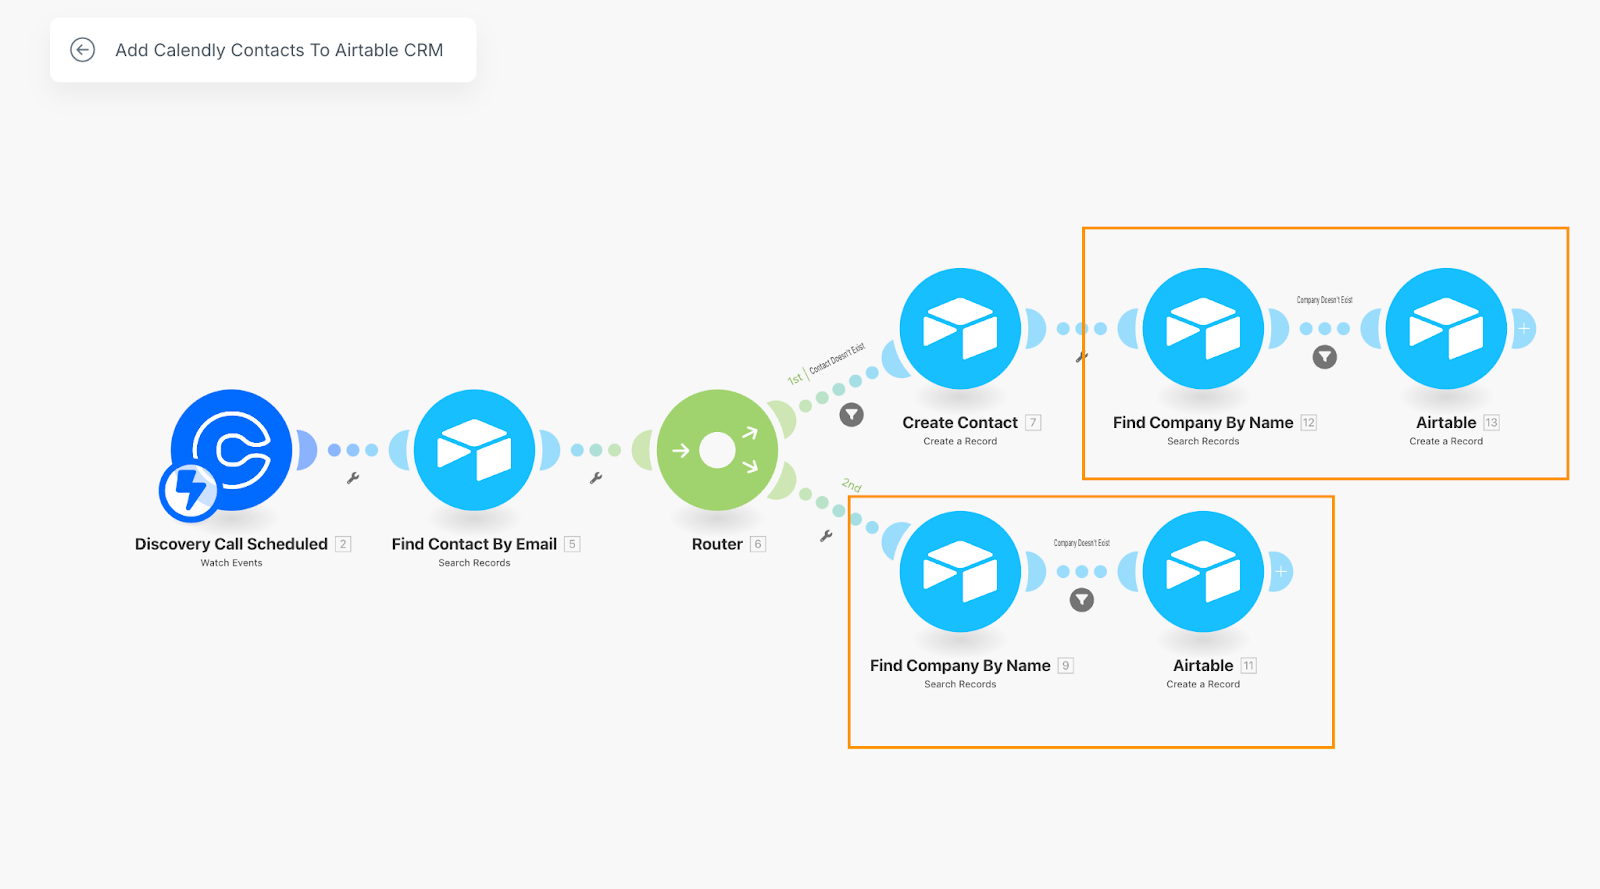
Instead, we suggest using Variables modules, which provide a much cleaner, more scalable solution.
Variables modules in Make are incredibly useful for creating and reusing data within your automation. They allow you to define values in one part of your workflow and reference them later, even across different routes. There are four core Variable modules:
- Set Variable: Lets you define a single variable.
- Set Multiple Variables: Allows you to define multiple variables at once.
- Get Variable: Retrieves the value of a single variable.
- Get Multiple Variables: Retrieves the values of multiple variables.
To avoid duplicating steps in Route 1, we’ll use the Set Variable module. Add the module right after the Create Contact step, name the variable Contact ID, and set the ID from the Create Contact module as the variable value.
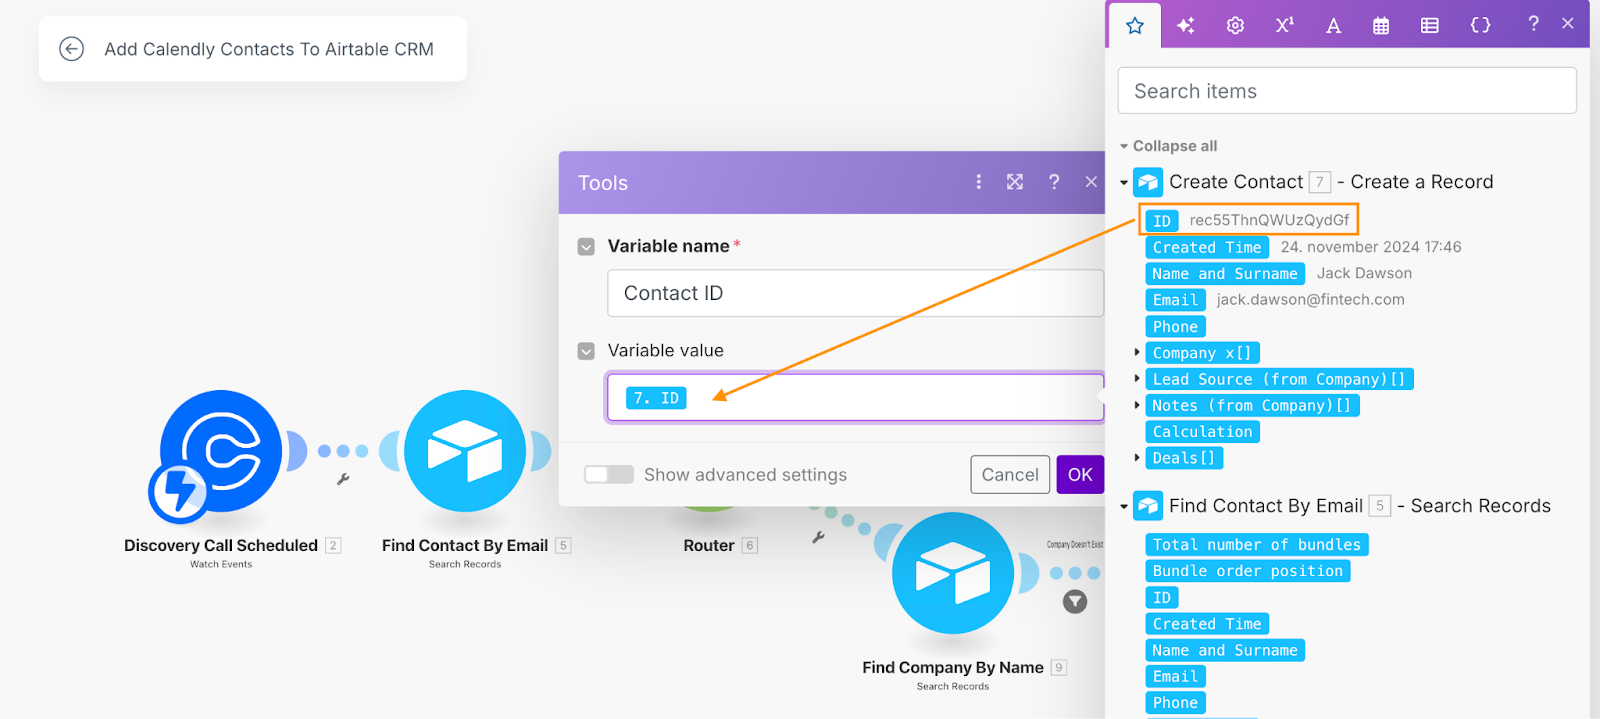
Click OK to confirm, then right-click on the module and rename it “Contact ID”. Always name the module after the variable it sets so you can easily identify it without opening the configuration.
Next, we need to make sure we pull this Contact ID variable into the second route so that it can be used when creating the company record. Just before the first Find Company By Name module in Route 2, right-click on the dotted line, select Add a module, and add a Get Variable module. In the Variable Name field, type “Contact ID” to retrieve the value of the variable set in Route 1.
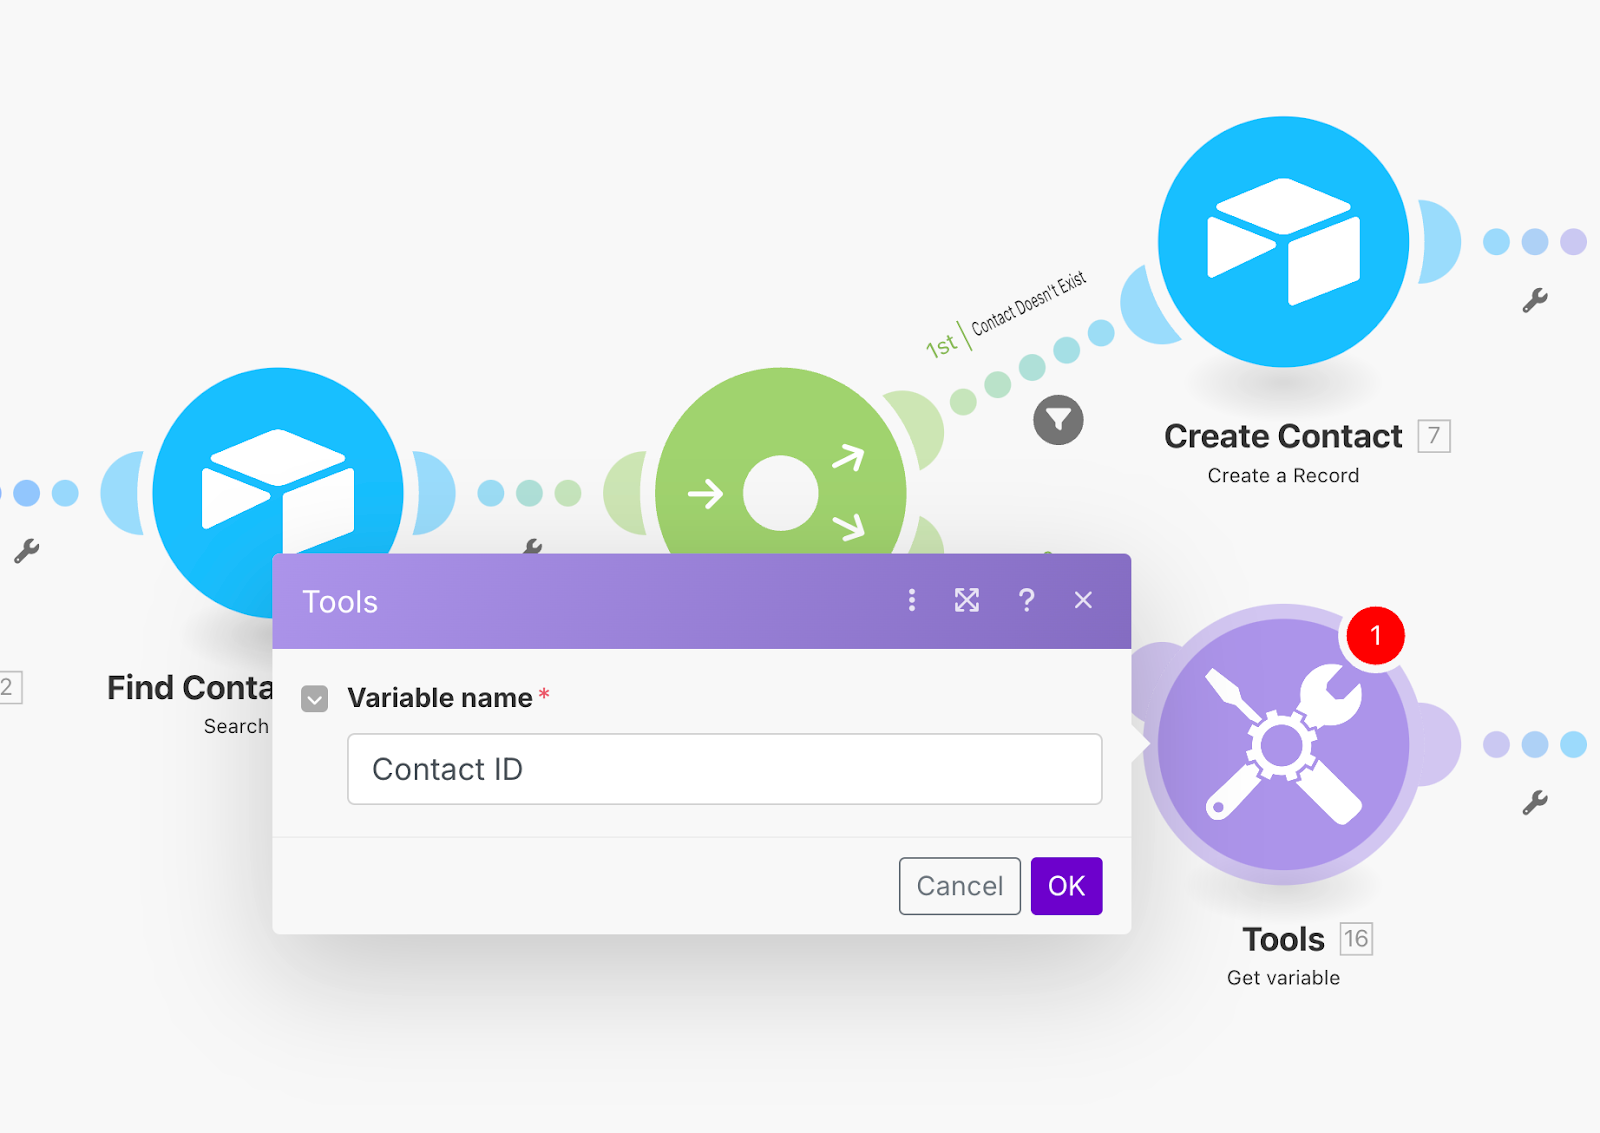
Right-click on this module and rename it “Get Contact ID”. Naming the module this way makes it clear which variable it’s retrieving.
Now, in the final Create Company module that we made earlier, scroll down to the Contacts section and click Add Item. Under Record ID 1, add the following expression:
if(Total number of bundles = 0, Contact ID, ID)
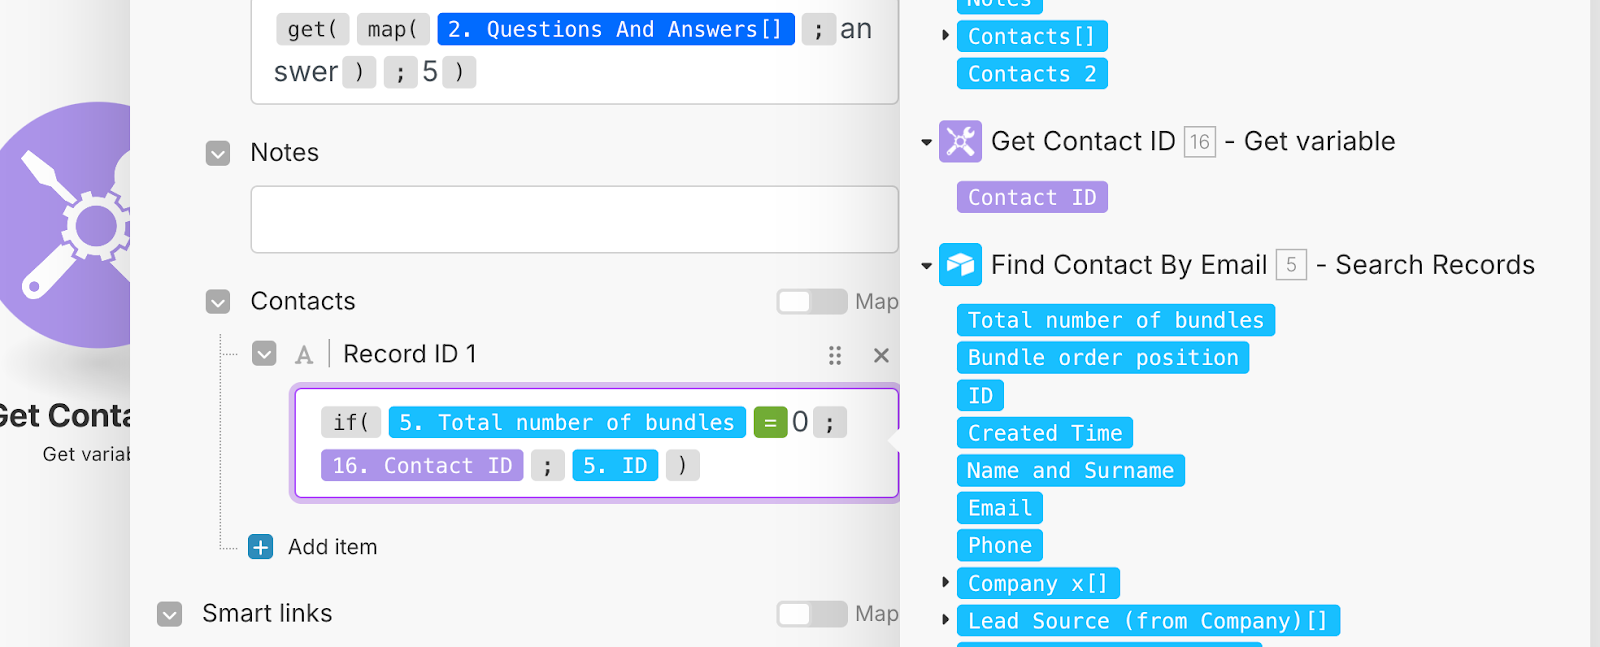
This expression makes sure that if the very first Find Contact By Email module doesn’t return any results (meaning no contact exists and a new one will be created by following route 1), it uses the Contact ID variable (which represents the ID of the new Contact in Airtable, which was created in route 1). Otherwise, if the contact already exists, it pulls in the ID of the contact found by the Find Contact By Email module. This ensures that the second route can execute properly, regardless of whether we need to make a new contact first or not.
Using this variables method to merge paths makes sure your data stays connected and up to date without duplicating steps, keeping your automation clean, scalable, and easier to maintain.
Click OK to save the configuration, and your automation is ready for testing!
To test your automation, click Run once in the lower-left corner of the Scenario Builder, then schedule another call using your Calendly form. We recommend testing two scenarios to ensure everything works as intended:
- Test Case 1: Run the automation using your sample data. This should create both a new contact and a new company in your Airtable CRM. Before running the test, make sure to delete any sample data from previous runs in your CRM. Expected Results: All modules in both routes should execute, creating a new contact and a new company.
- Test Case 2: Run the automation again using the same contact and company data. This time, the automation should not create any new contacts or companies since they already exist in your CRM. Expected Results: Route 1 should not execute at all, as the contact already exists in your Airtable CRM. In Route 2, the final Create Company module should also not be executed, since the company already exists.
- Test Case 3: Now, delete the company record you used for testing (but leave the contact), and run the automation a third time. This scenario reflects a common use case where your team adds a prospective lead to your CRM manually (for example someone they met on a networking event) but hasn’t had the time to add the company details. In this run, the automation should recognize that the contact already exists in your CRM and avoid creating a duplicate, meaning route 1 should not execute at all. It should, however, go through all the steps on route 2, creating a new company record and linking it to the existing contact.
If all tests work as expected, your automation is set up correctly. If not, check which modules were executed that should not have been and compare their filters and settings with those outlined in this tutorial.
Once your tests are successful, turn the automation on.

Conclusion
By now, you’ve probably realized that automation isn’t just about knowing how to use modules—it’s about how you approach a process and proactively account for all the different scenarios that can happen.
- If we didn’t check for existing contacts and companies, you’d end up with duplicate data that you’d have to clean up manually.
- If we didn’t use variables, you’d be left with repetitive steps and automations that are difficult to maintain.If we didn’t name each module clearly, you’d have to click into every single one to figure out what it does.
- And if we used iterators instead of get and map functions, you’d waste operations, increase costs, and make your automation harder to manage.
As you build more complex automations, being intentional with your design becomes even more important. A carefully curated design, tailored to the needs of your context, makes your workflows scalable, efficient, and easy to maintain. Many people learn these concepts months or even years into working with Make. Learning them now means you’re setting yourself up for success and avoiding the hassle of redoing your automations later.
Keep an eye out for future tutorials where we'll dive deeper into Make, introduce more advanced functionality, and help you deepen your knowledge through more real-life practical examples.
Need a Make expert?
Get in touch and we'll connect you with our network.

