

As a small business, the tedious, error-prone setup you're faced with when signing on a new client is a bore, but it's not a necessary evil: onboarding clients does not need to be manual. Imagine if, alternatively, when a new client signs on, their project folders are automatically created in Google Drive, a dedicated Slack channel is at the ready for seamless communication, and their status in your Airtable CRM updates instantly—all within seconds by pressing a single button. This tutorial will make this a tangible reality.
What you’ll learn
In this tutorial, we’re going to show you how to build an automated workflow that streamlines your onboarding process using Make, Airtable, Google Drive, and Slack. By the end, you’ll have a system that saves you time, keeps everything organized, and is ready to grow with your business. The concepts in this tutorial are quite universal, so they can be used for similar processes like onboarding new employees or contractors, creating new projects and more.
This is an advanced Make tutorial and will be most suitable for those who are familiar with the basics. We will specifically cover:
- Custom webhooks and processing their responses
- Connecting to Google Drive to create folders and sub-folders
- Creating a new Slack channel and using a JSON payload to create a building block message to your new client
- Updating a record in Airtable
- Testing and deployment
If you are less familiar with Make, you can learn the first steps to building automations with our first tutorial. For those you want to learn a little more, you can follow our intermediate tutorials to learn about webhooks, filters and routers, as well as working with arrays and merging routes with variables.
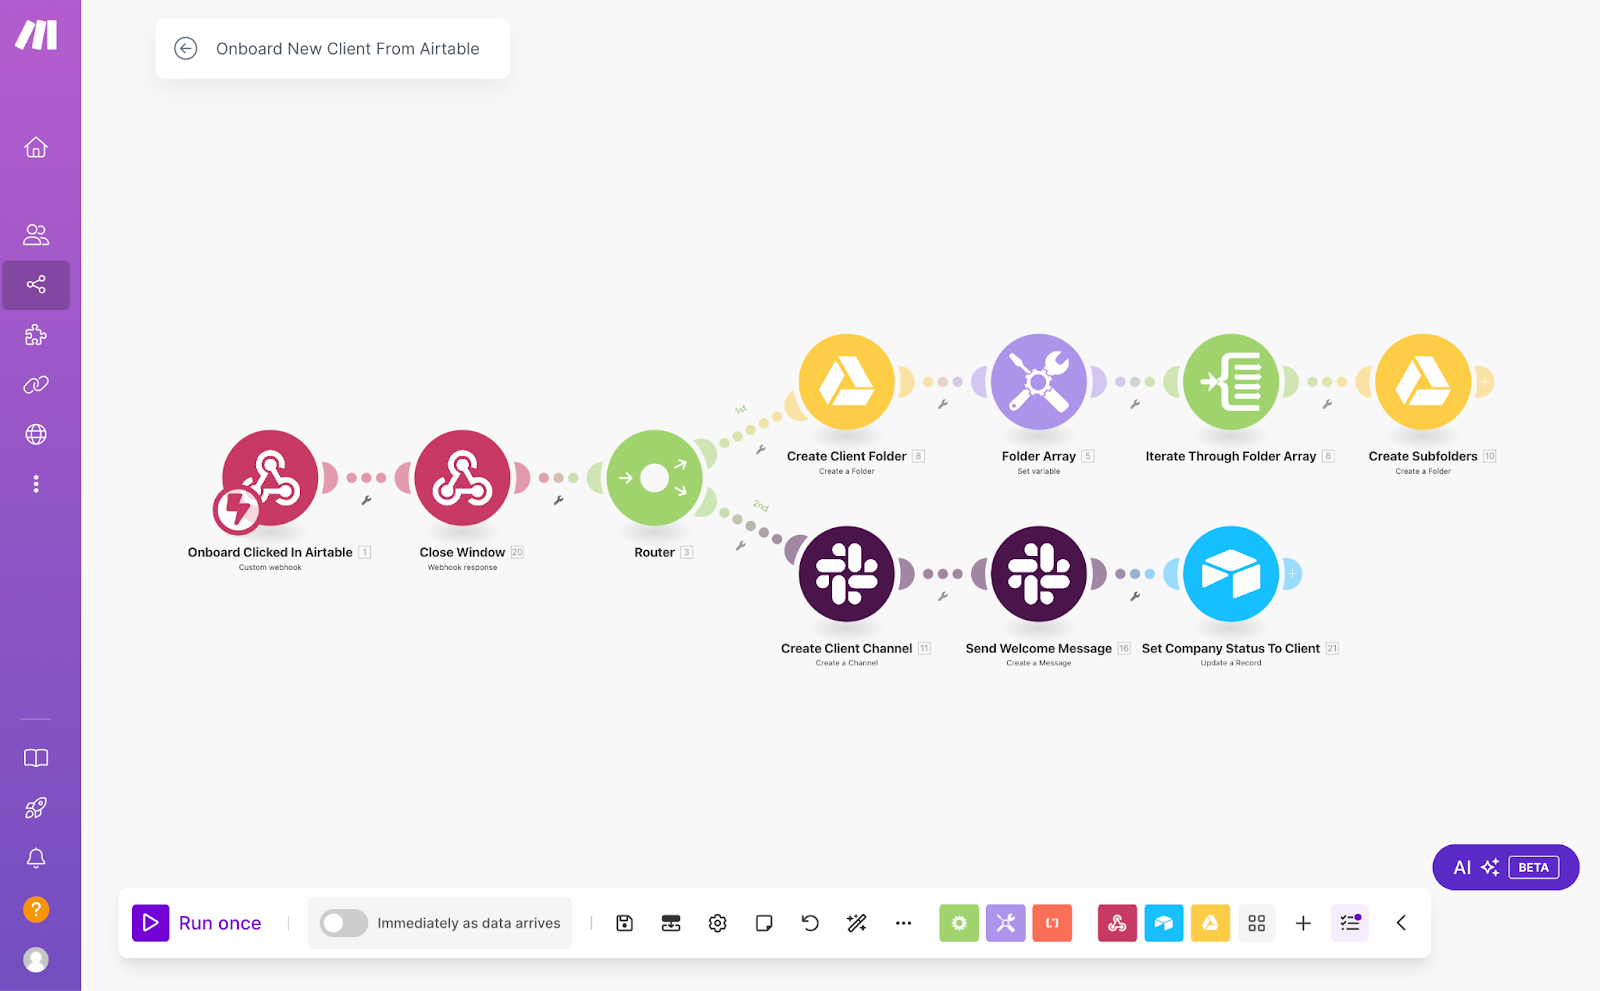
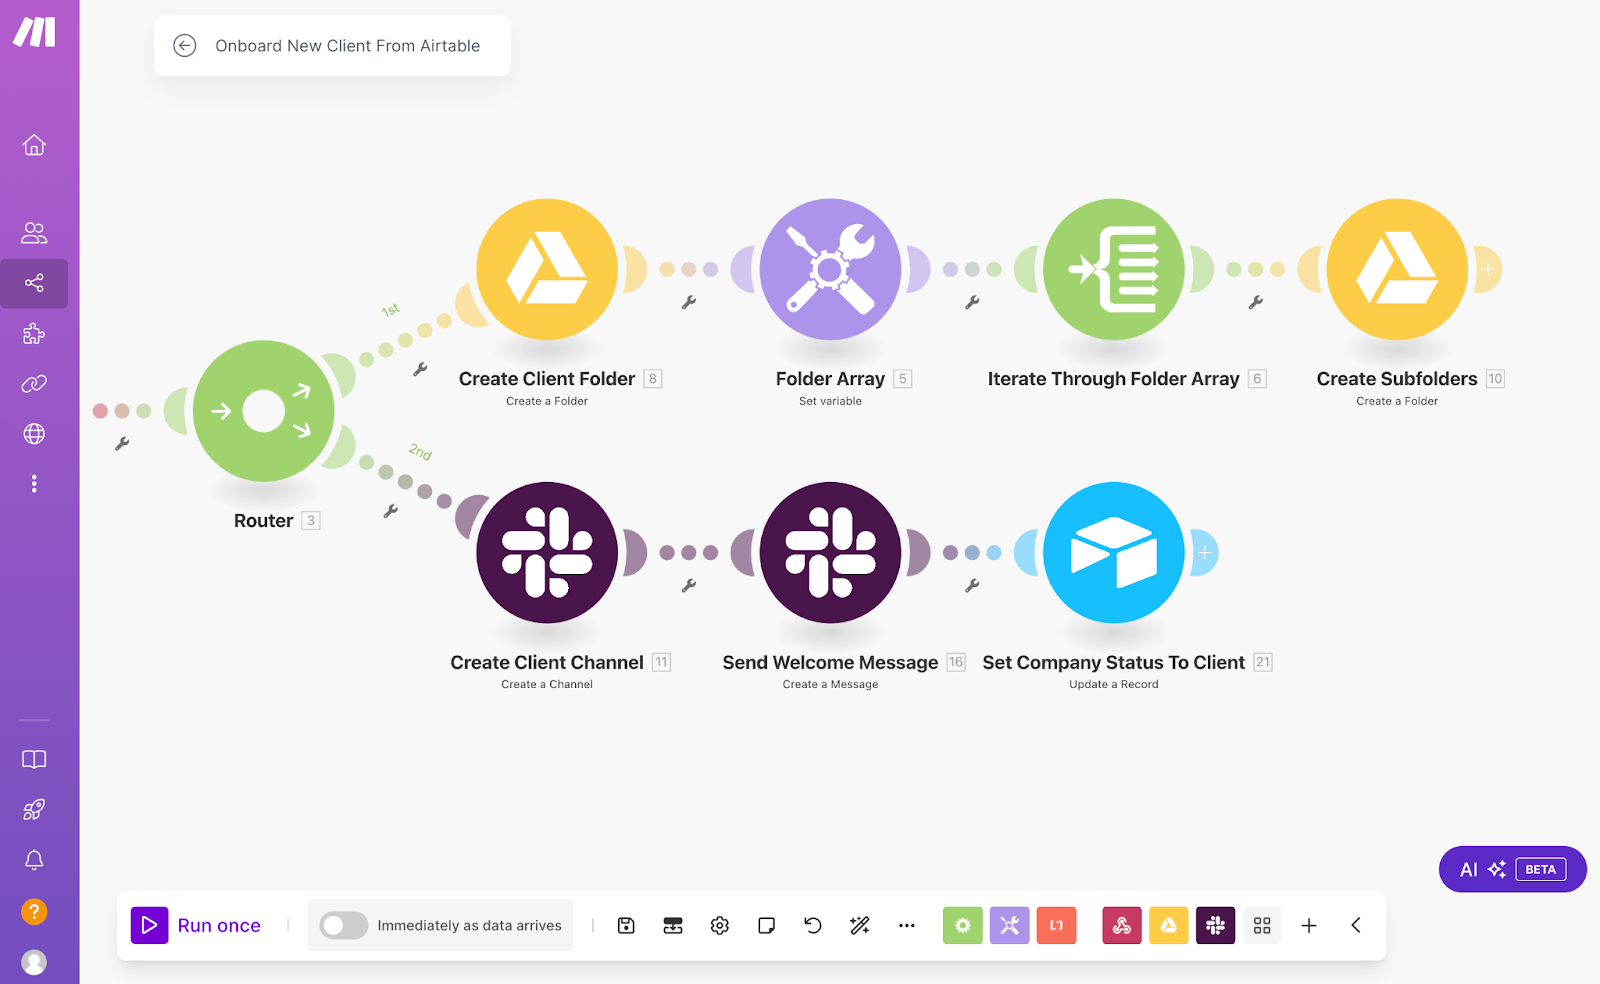
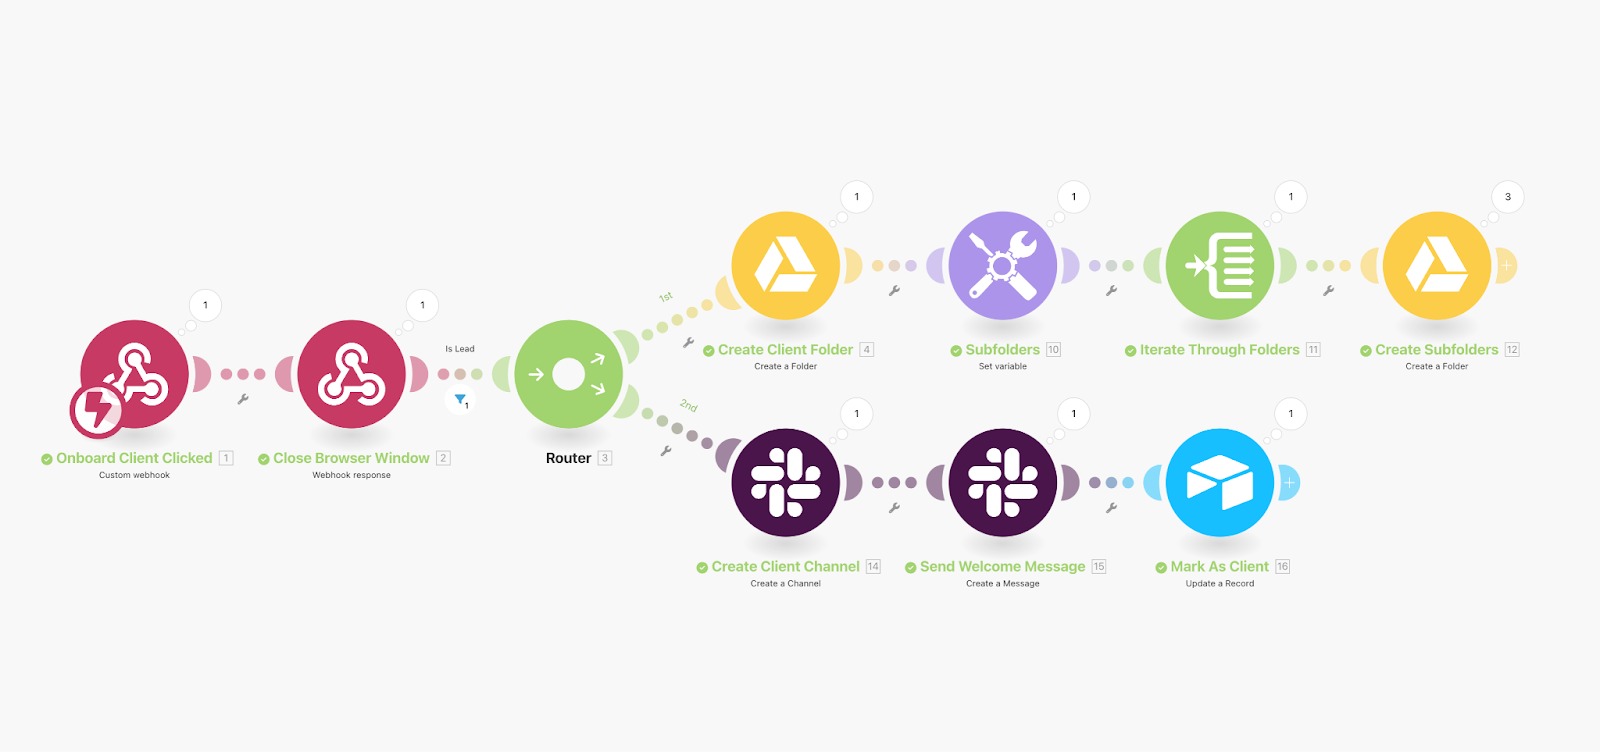
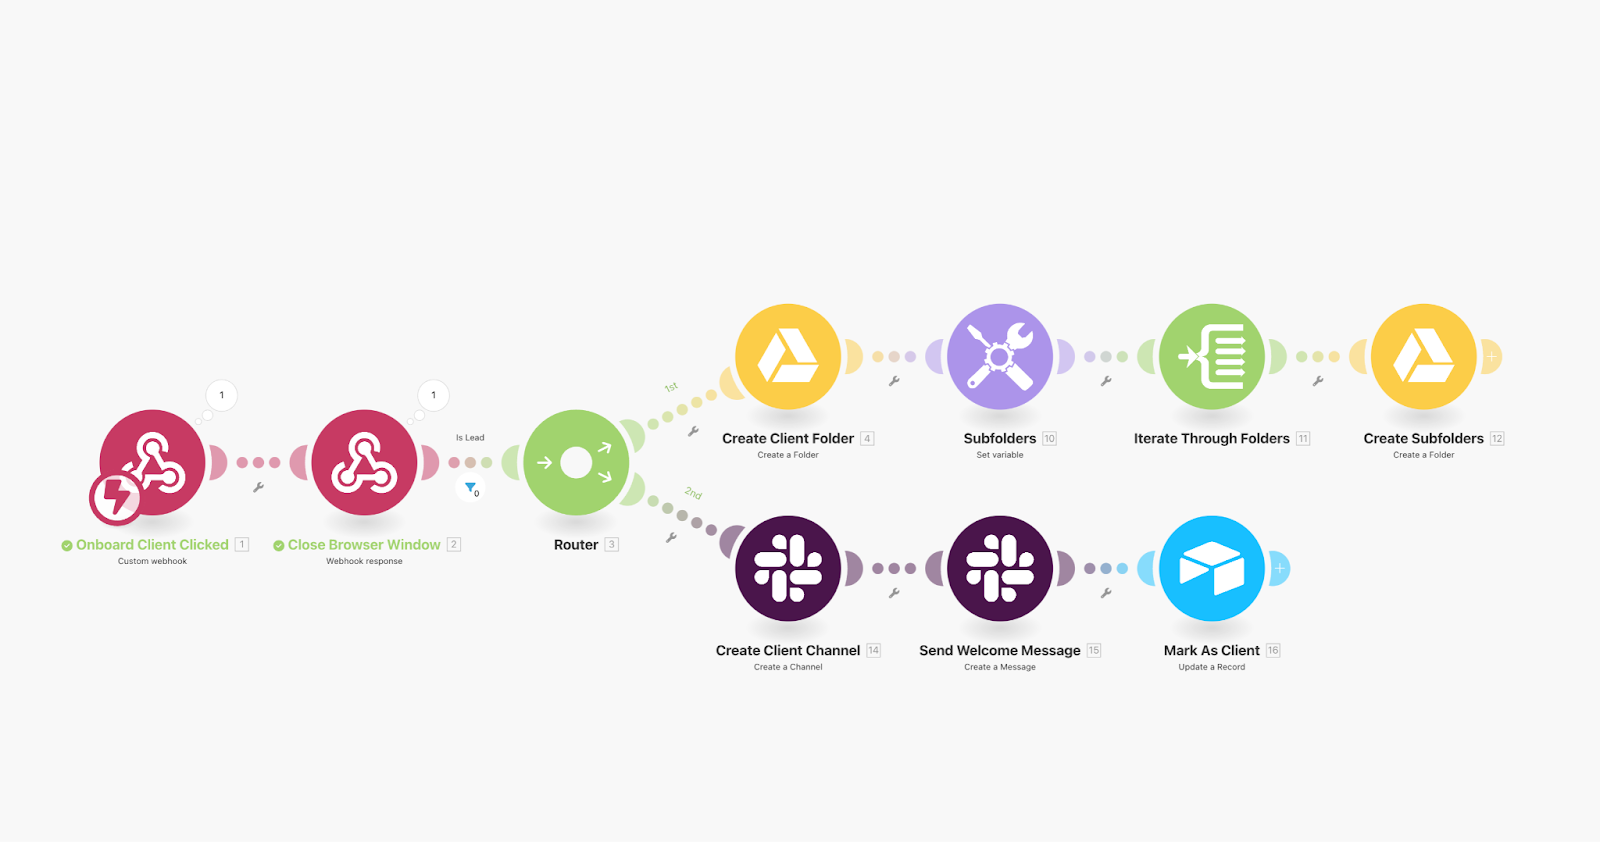
To give you a taste of what’s in store, here’s what our final automation will look like:
How do Custom Webhooks work in Make?
Webhooks are a powerful way for different applications to talk to each other in real-time. They instantly send data from your source app to your target app, making them a perfect tool for when your workflows depend on staying in sync and processing time-sensitive information.
In the context of CRM workflows, webhooks can:
- Automatically add new leads to your CRM as soon as they schedule a call (see our 2nd tutorial)
- Send alerts for key events and updates like new deals or customer escalations
- Keep your apps updated with real-time changes, saving you the hassle of manual effort
- Help you onboard new clients with a click of a button.
And more!
Make supports two types of webhooks to match a variety of scenarios:
- App-specific webhooks: These listen for data coming directly from specific apps. They’re available only for Make apps that support this functionality and are perfect for app-to-app integrations.
- Custom webhooks: These are just unique URLs where you can send your data. They’re really flexible, and allow you to connect almost any app or system to your workflow.
In tutorial 2, we learnt the basics of webhooks. Today, we’ll go one step further and set up a custom webhook. We’ll show you how to instantly onboard new clients from Airtable with just the click of a button.
How to configure a custom webhook
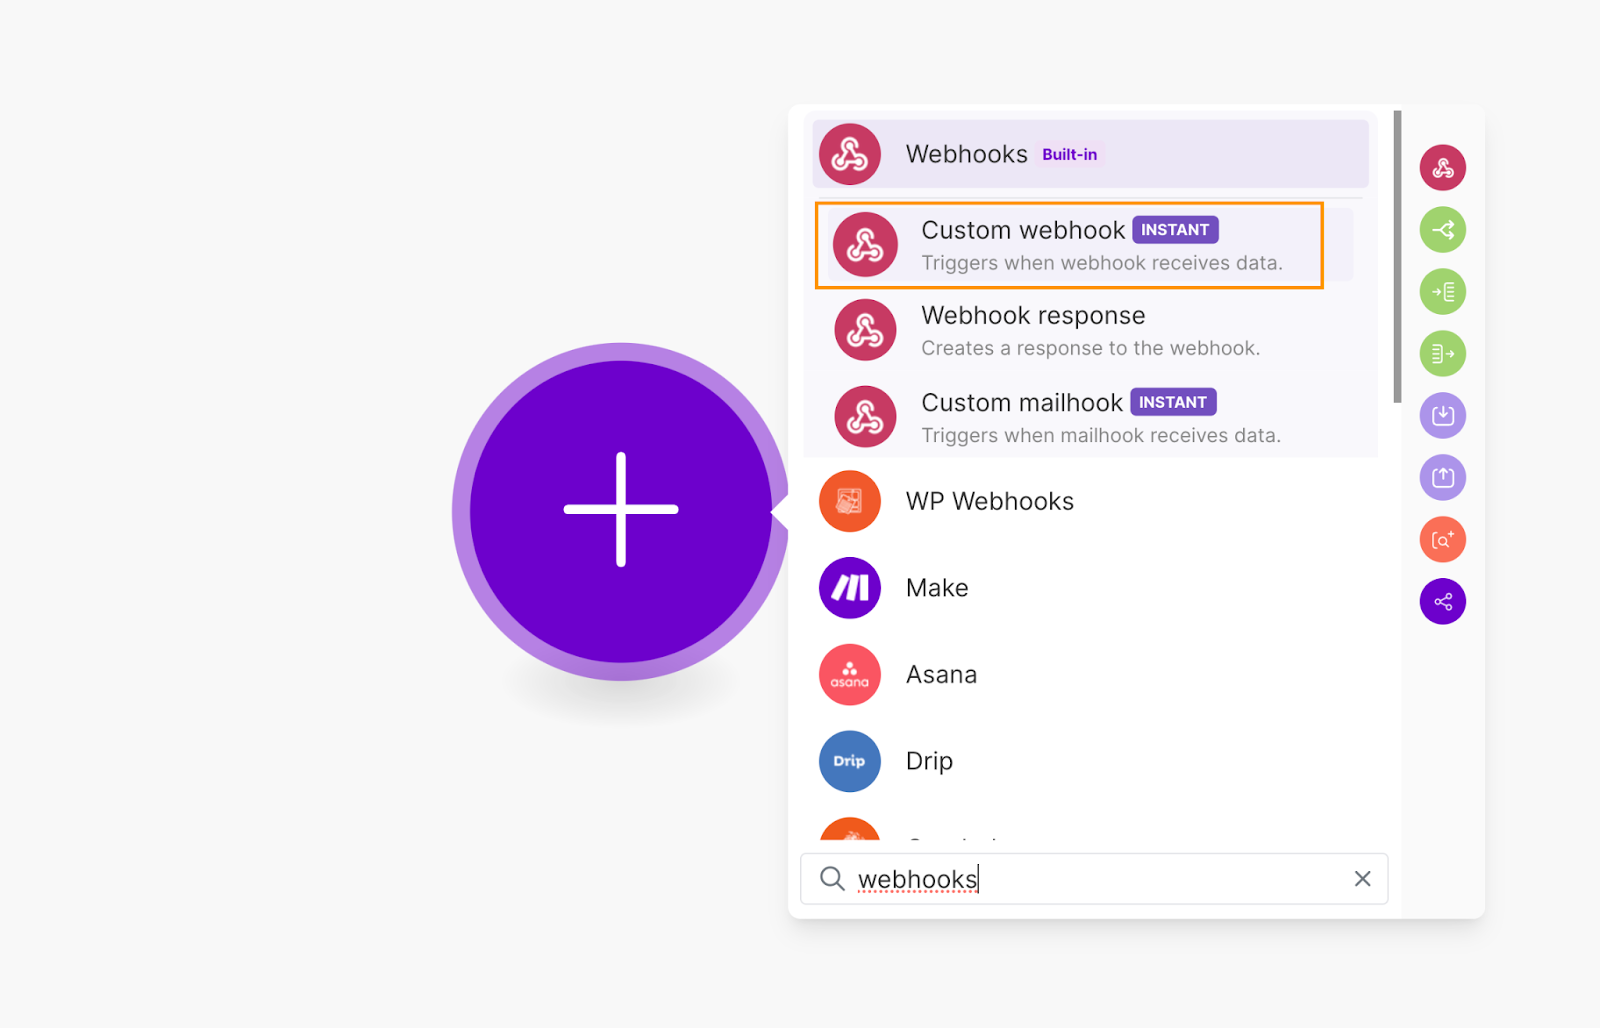
To get started, open Make and go to the Scenarios section. In the top right-hand corner, click +Create a new scenario to open the scenario builder.
Once you’re in the builder, click the big purple plus sign, search for "webhooks," and select Custom Webhook.
In the webhook setup form, click Create a webhook, and give it a name that clearly explains what it does—something like “Onboard Client From Airtable CRM.” Once you’ve named it, click Save.
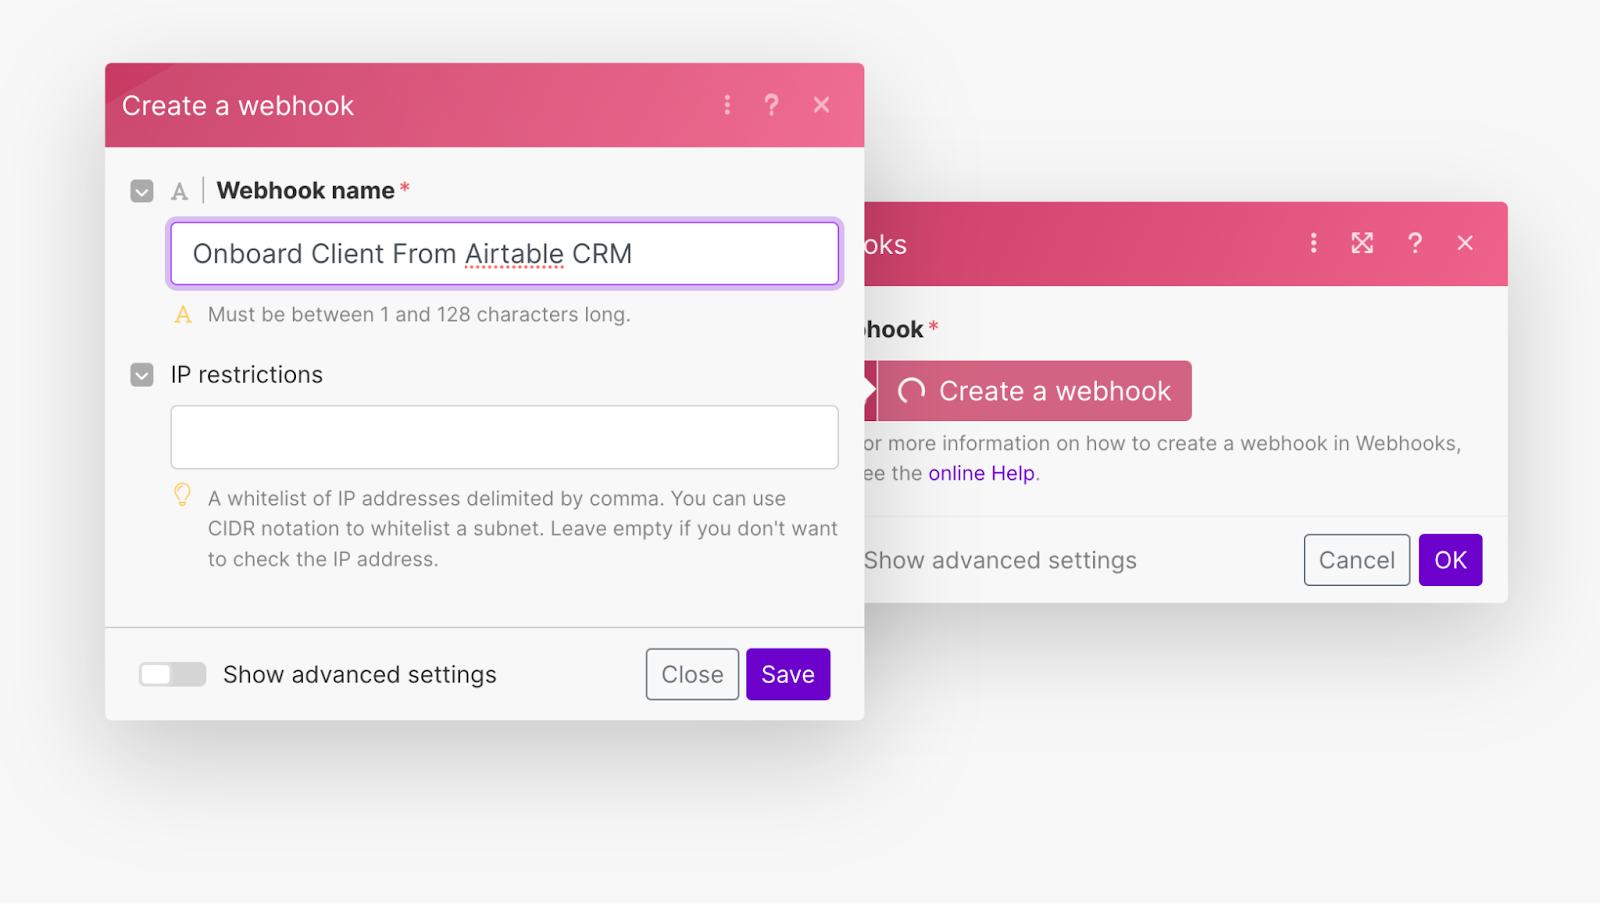
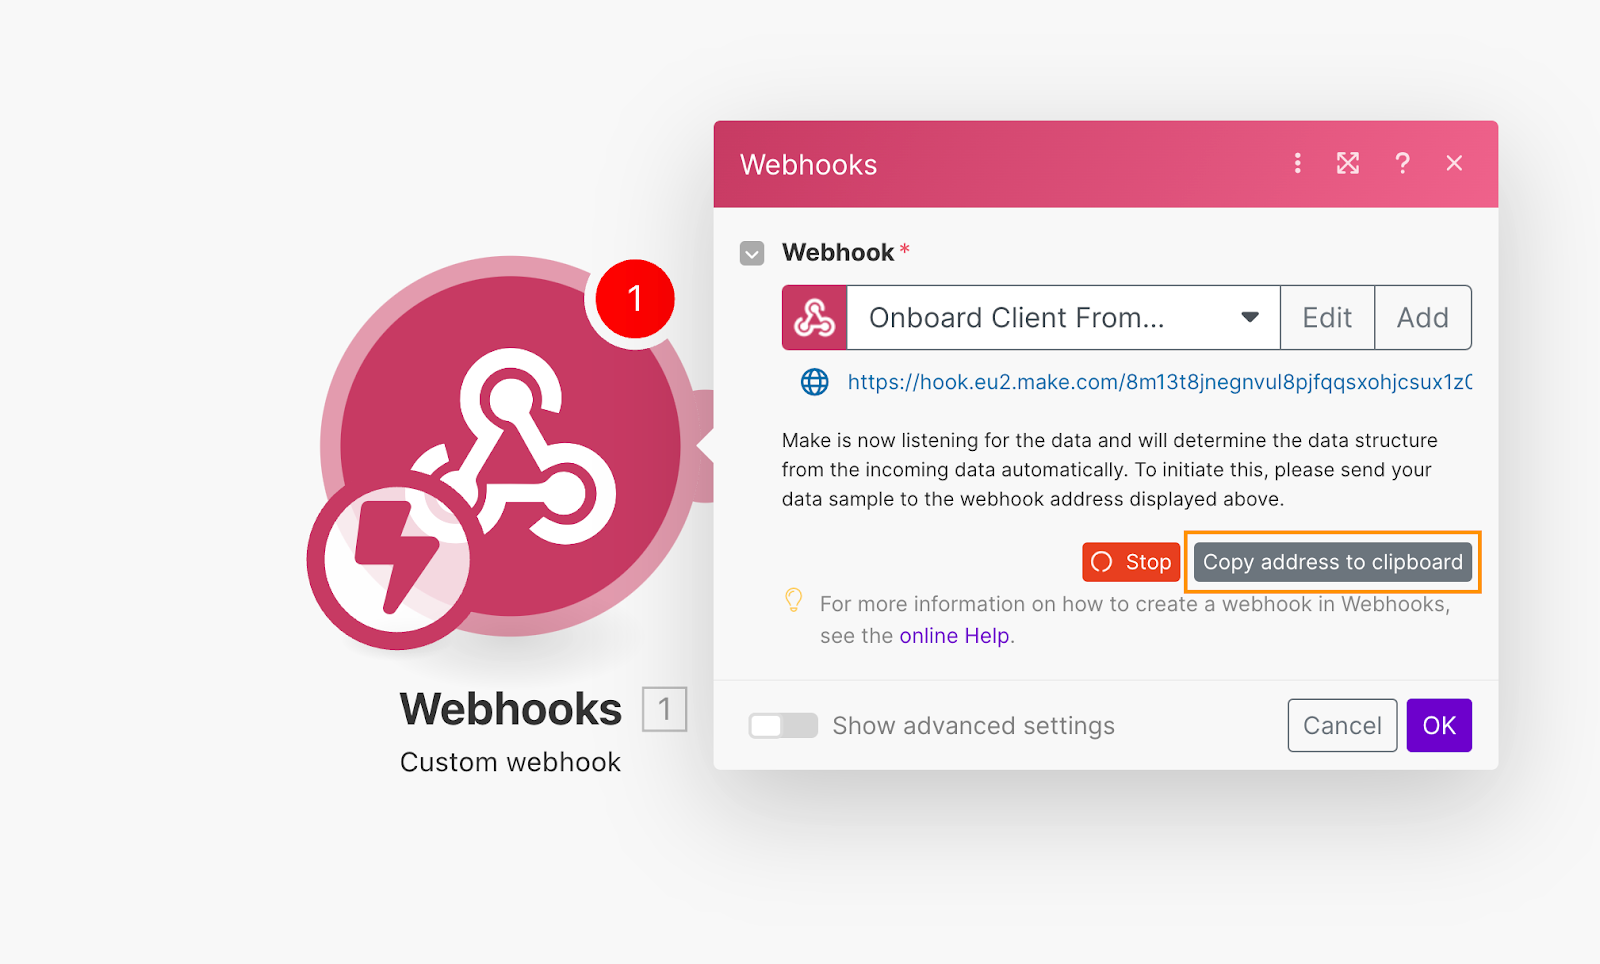
Copy the webhook address from Make by clicking Copy address to clipboard in the next window, then close the form by clicking OK. With your webhook URL ready, the next step is to set up a button in Airtable to send your client data straight to Make.
Airtable webhook setup
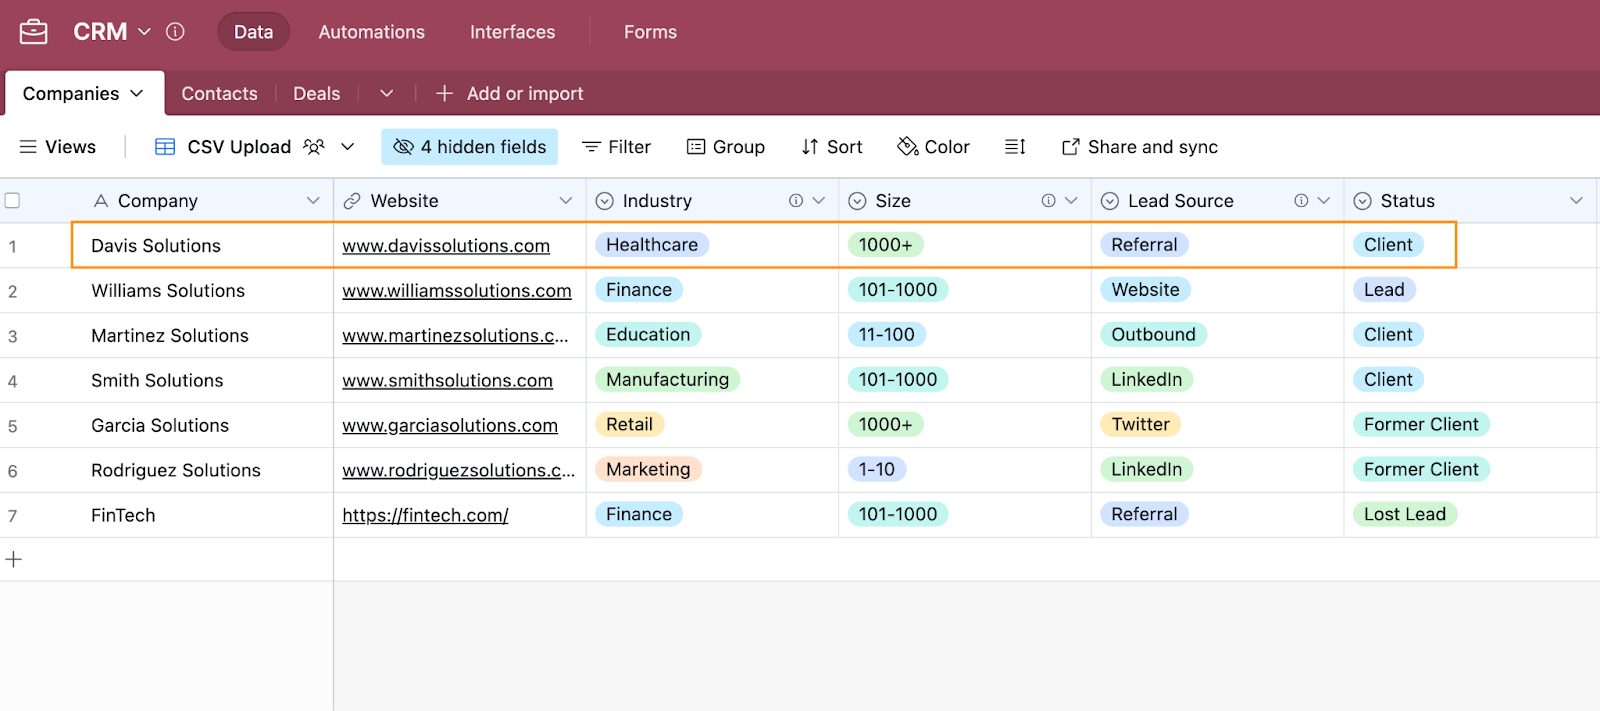
In Airtable, you’ll need something like a Companies database, with at least the company name field set up as a starting point. If you’re starting from scratch, you can follow our tutorial where we built a simple CRM Airtable app.
Now we’ll add two new fields to the Companies database: Status and Onboard Client.
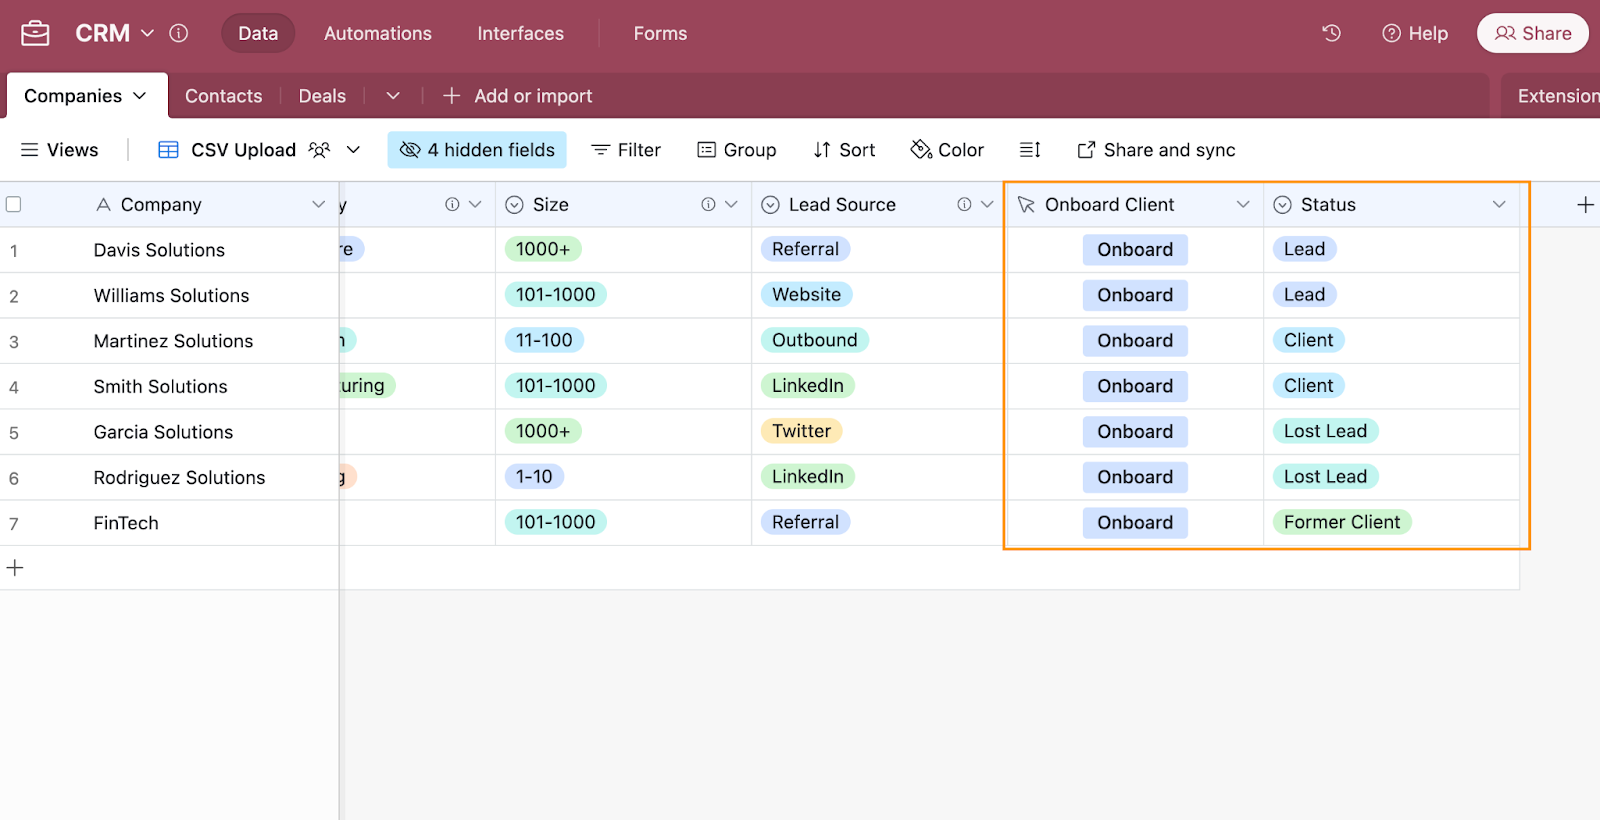
First, add a new field called Status. Set the type to Single select, and add the following options: Lead, Client, Former Client, and Lost Lead. If you have additional types, feel free to include them. Set Lead as the default value for new records.
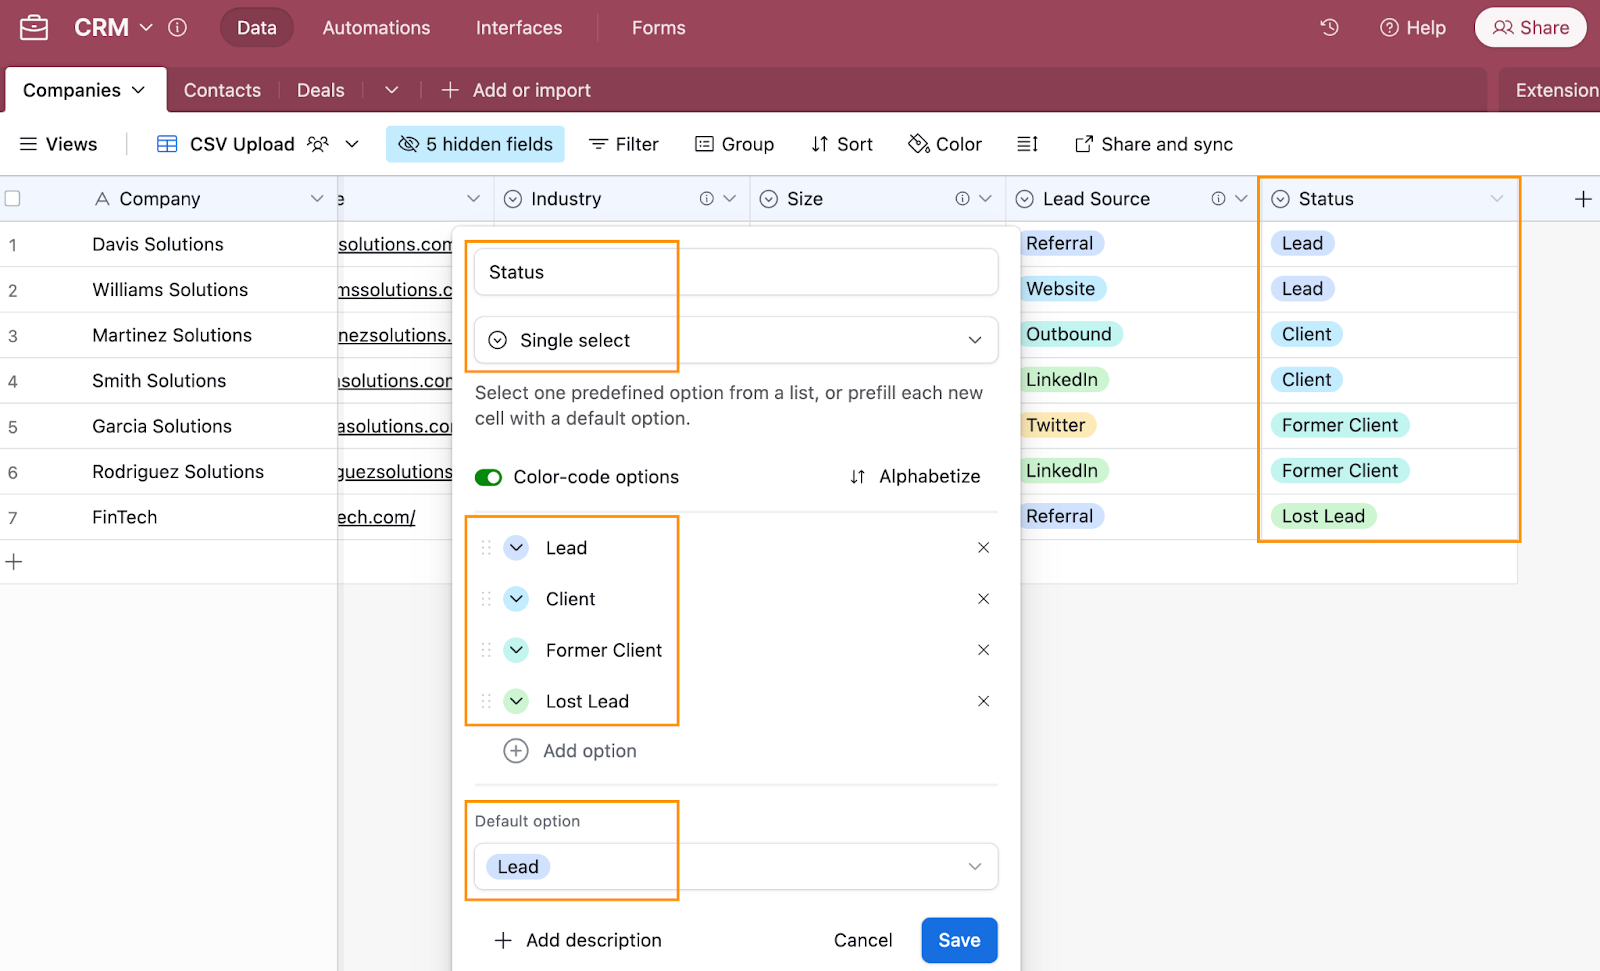
The Status field serves two purposes:
- We’ll use it as a filter in Make to ensure the automation only runs if the company status is Lead, preventing mistakes and making sure you don’t onboard the same client more than once.
- We’ll use it to track whether a lead has already been onboarded. You will be able to see this information quickly, because as soon as the onboarding has been successful, our automation will change the status from Lead to Client.
Next, add a new Button field and name it Onboard Client. Set the button label to Onboard and choose a style. Under Action, select Open URL.
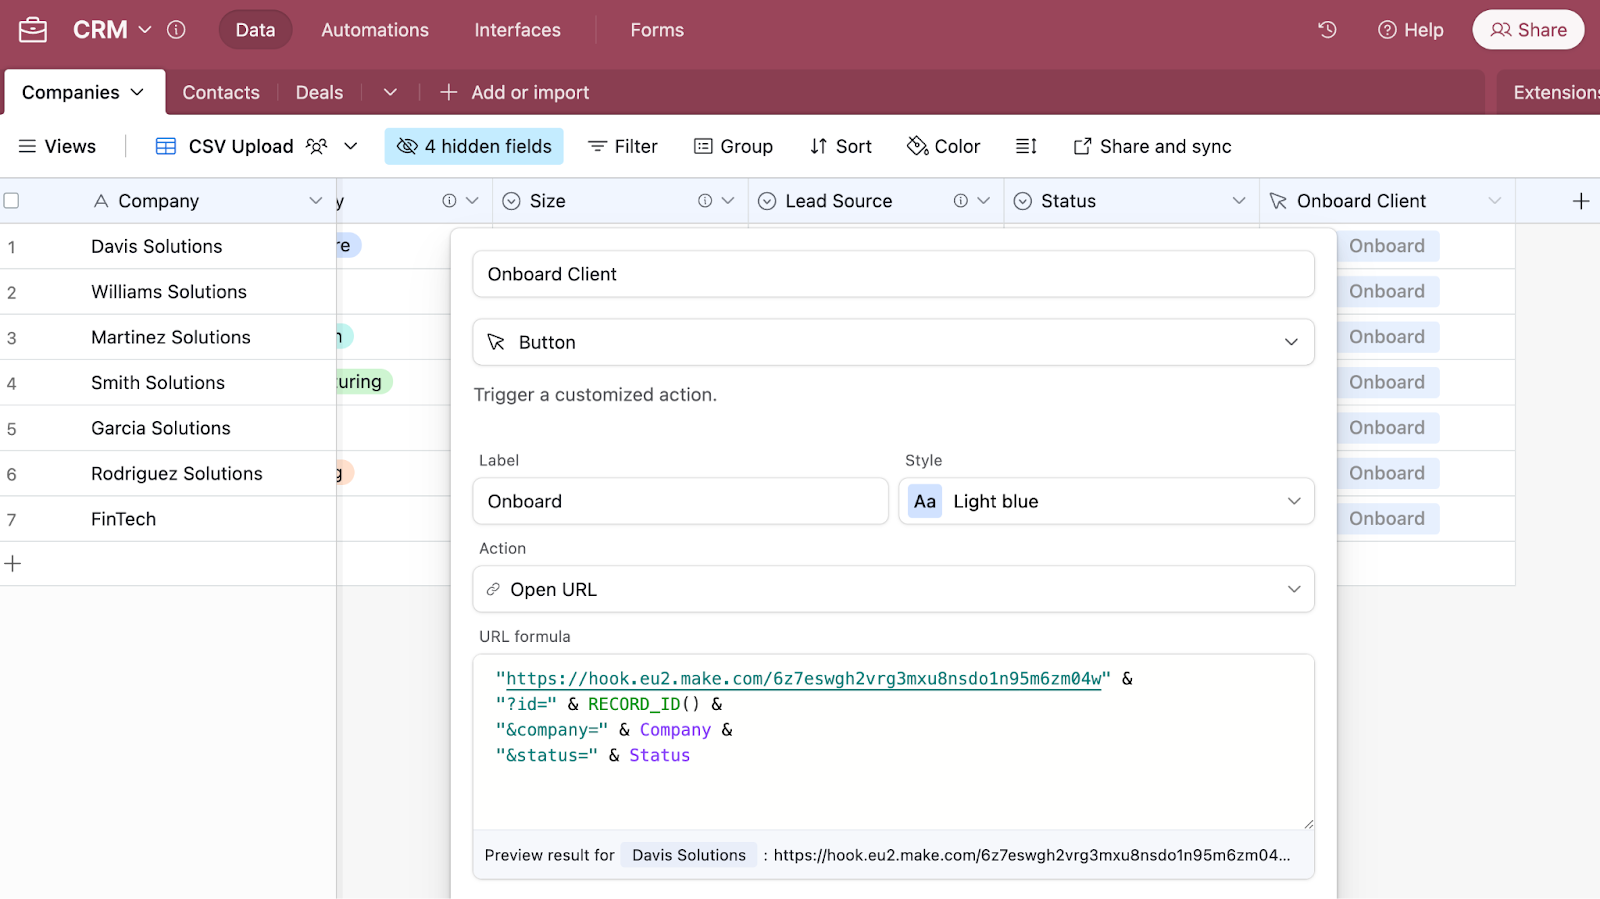
For the URL formula, use this expression:
"yourWebhookURL" &
"?id=" & RECORD_ID() &
"&company=" & Company &
"&status=" & Status
Make sure to replace the values below, then click Save to finalize the button configuration:
- yourWebhookURL: The URL of your custom Make webhook (each webhook URL is unique)
- Company: The Airtable field that stores the company name.
- Status: The Airtable field that stores the status value.
If you ever want to dive deeper into formatting URLs to send data to your webhook, take a look at Make’s documentation.
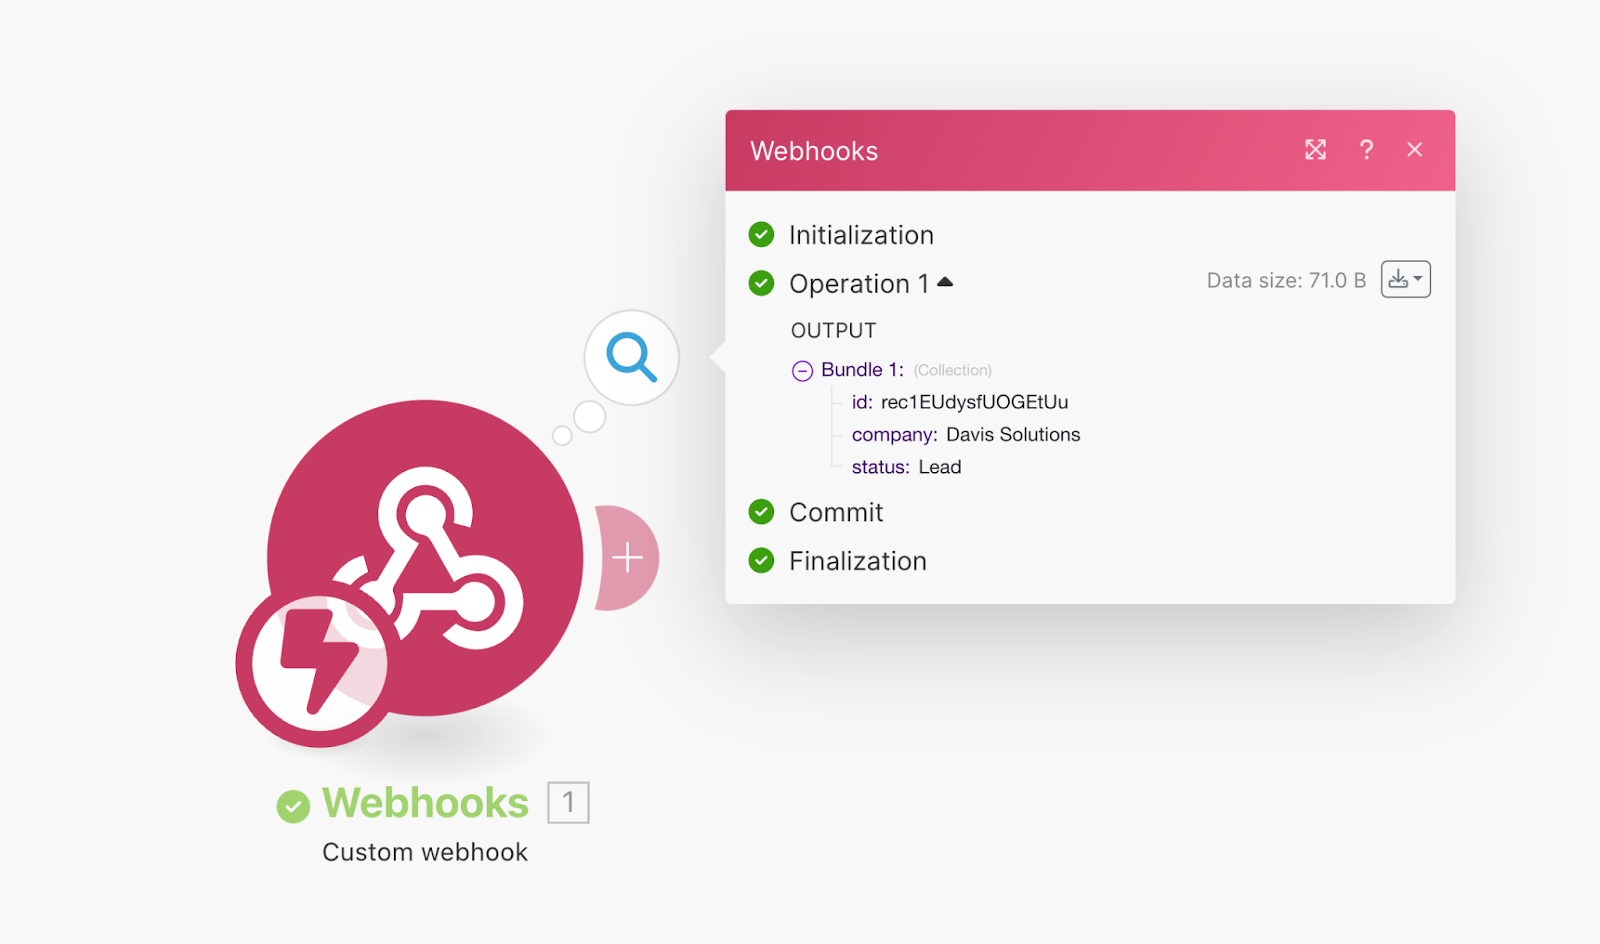
Now it’s time to test your webhook button. Head to your Make scenario, click Run Once in the bottom left-hand corner, and then click Onboard on one of your company records in Airtable.
In Make, the webhook output should look something like this, showing the Airtable record ID, company name, and status, which you can now use in your automation.
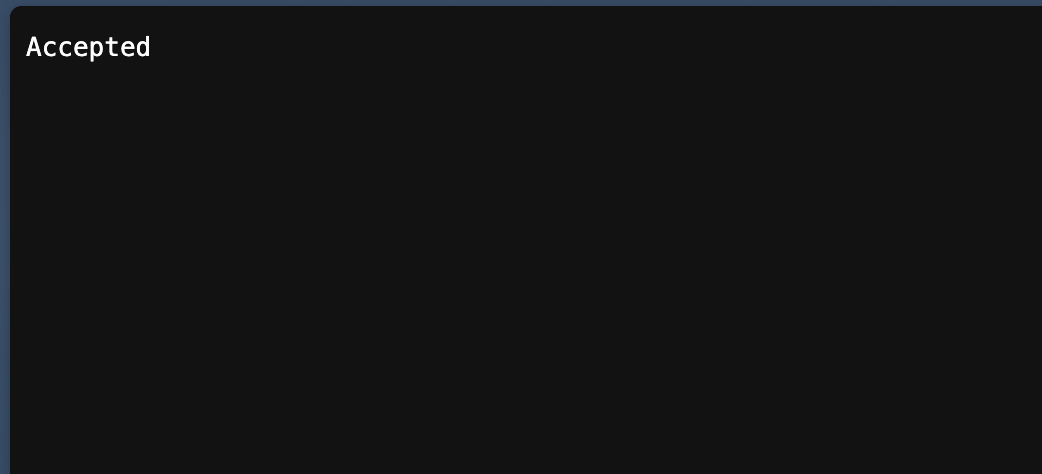
You might have noticed that when you triggered the automation from Airtable, a new browser tab opened with the message “Accepted.” This happens because a webhook is essentially just a URL, and just like clicking on www.google.com opens a new tab, this URL does the same thing.
While this doesn’t affect the results of the automation, it can be annoying to close the tab manually every time. Let’s fix that.
Customizing the Webhook response and closing the tab
Make’s default response to a webhook call is an “Accepted” message, which appears in your browser. If you want to customize this response or execute a script to close the browser tab that opens, you can use the Webhook Response module. This module has two fields: Status and Body.
In the Status field of the Webhook Response module you can add an HTTP response code to communicate back to the service or application that sent the webhook request that your webhook received and understood the incoming data. Here are a few examples:
- 2xx for Success (e.g., 200 for OK)
- 3xx for Redirection (e.g., 307 for Temporary Redirect)
- 4xx for Client errors (e.g., 400 for Bad Request).
The Body field is what the webhook returns as a response, and it can be text, HTML, JavaScript, XML, JSON—pretty much anything the webhook caller can handle.
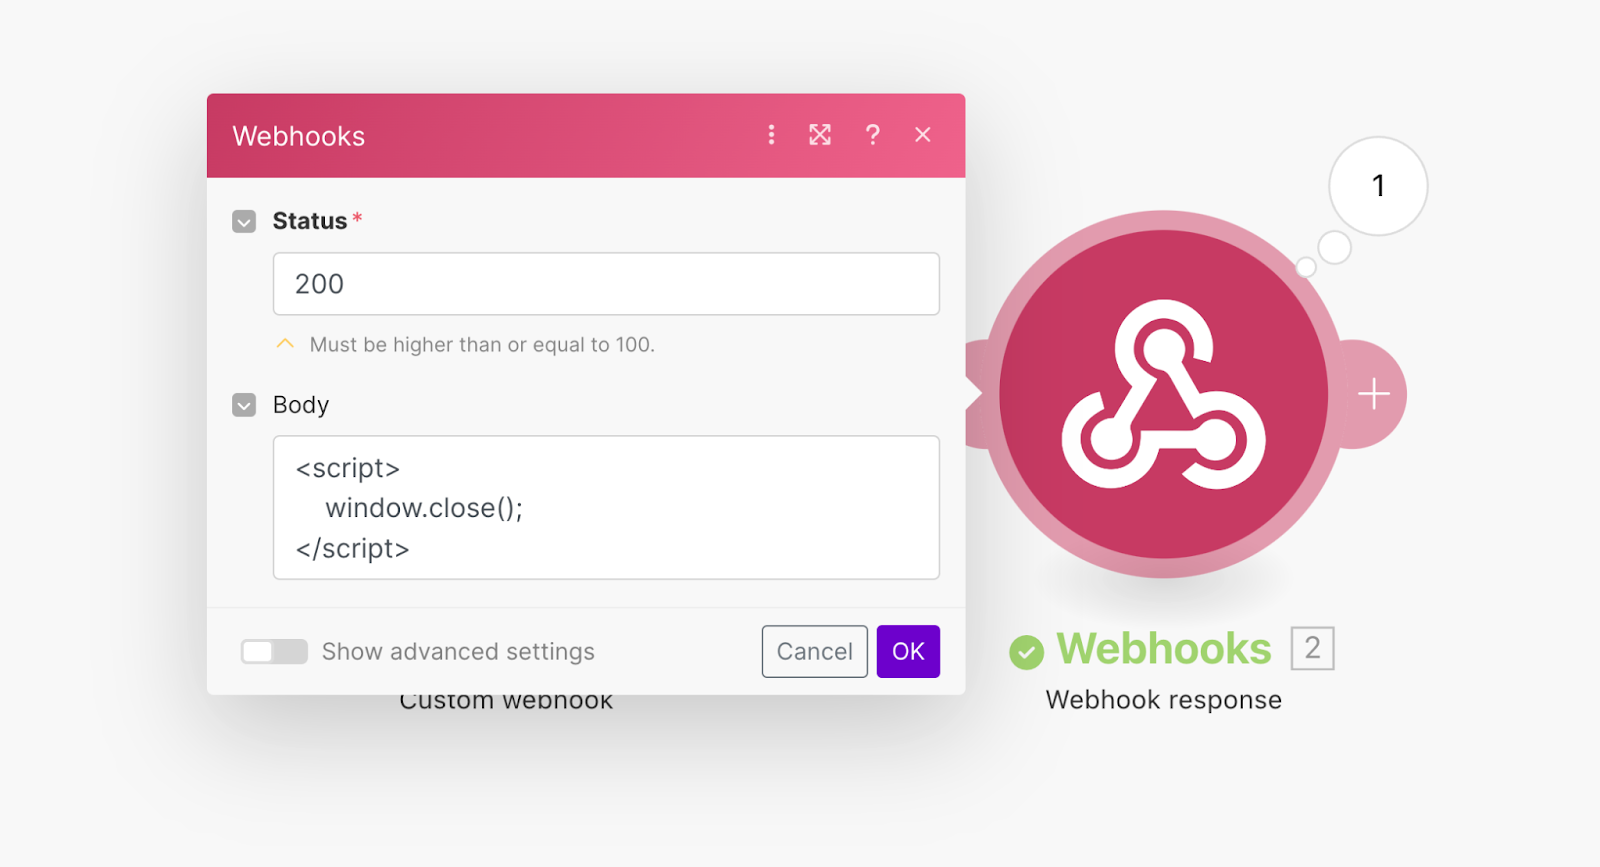
In our case, we’ll add an HTML snippet with JavaScript to close the browser window. To set this up, add a new module to your scenario, search for “webhooks”, and select Webhook Response. Set the Status field to 200, and in the Body field, use the following code:
<script>
    window.close();
</script>
Now, when you run your scenario and click Onboard in Airtable, you’ll see the browser window open for just a second before closing automatically.
With that cleaned up, the next step is to use the data sent to your webhook to onboard your client.
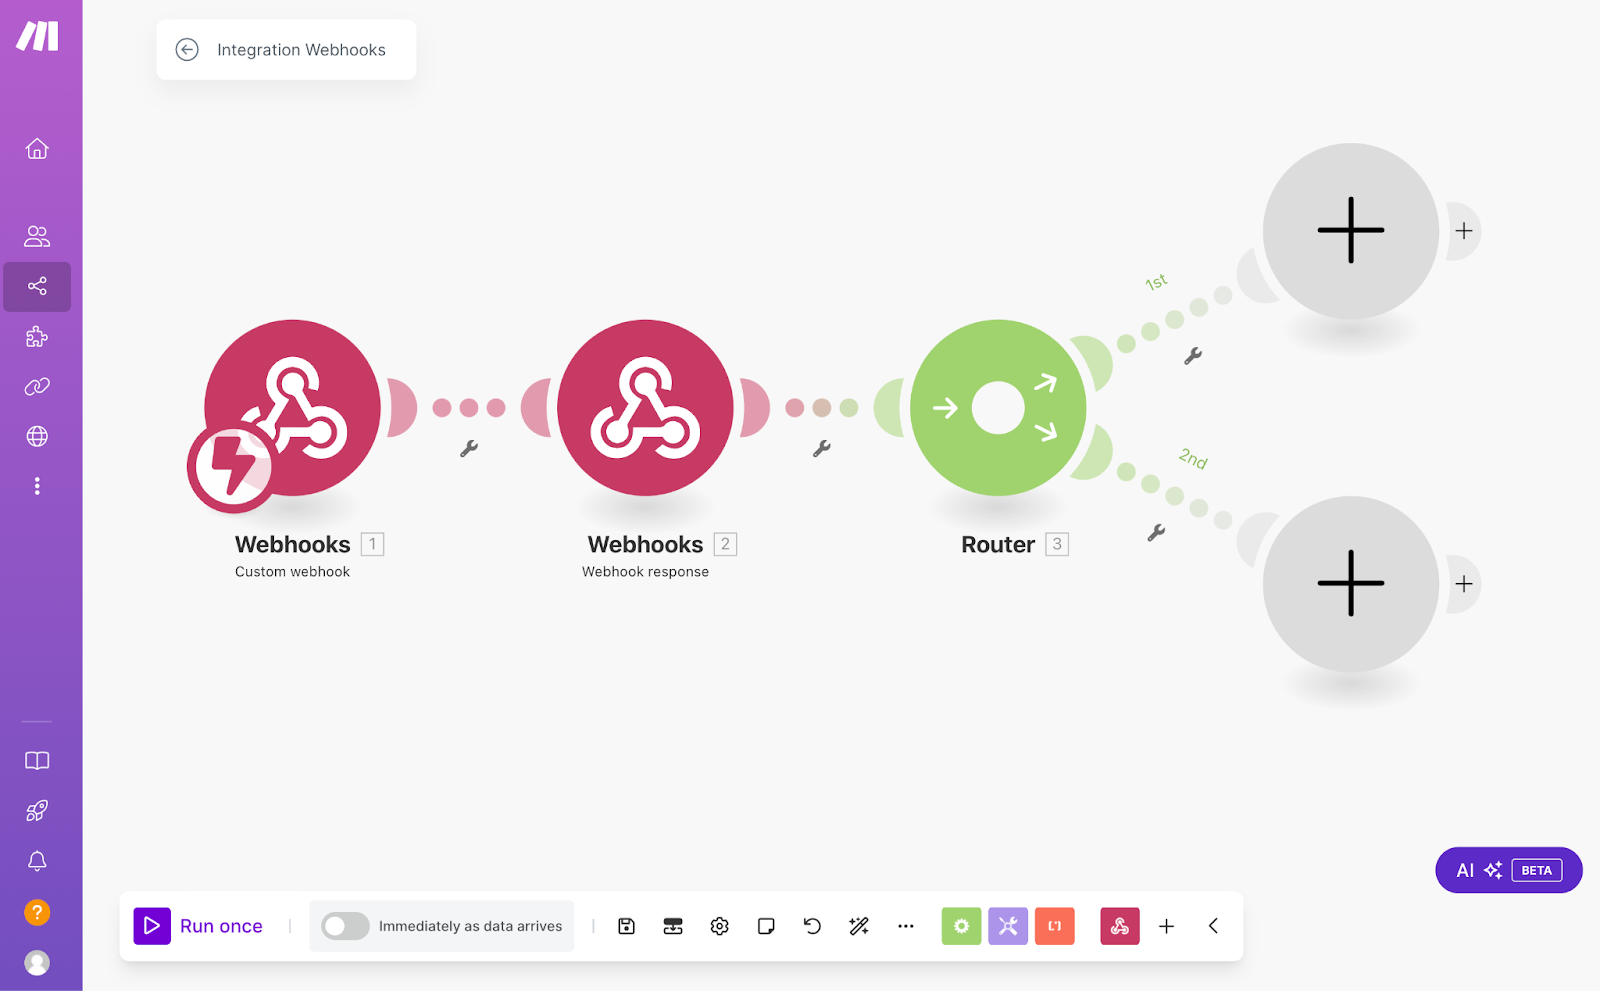
Route 1: Create a Google Drive folder structure
When you start working with a client, you’ll usually have documentation tied to the project. This might include contracts, invoices, project files presentations, to name a few.
While it only takes a few minutes to set up a client folder in Google Drive, the more clients you have, the more time you’ll spend repeating this same task. Automating this process not only saves time but also ensures a uniform folder structure, making it easier to find and manage your files. This consistency also creates opportunities for incorporating additional automation, like automatically saving invoices to the appropriate Invoices folder within the client folder. The more standardized your process, the easier it is to build automation on top of it.
To get started, we’ll add a Router module. The first route will handle creating the client folder and subfolders, while the second route will create a dedicated Slack channel for the client.
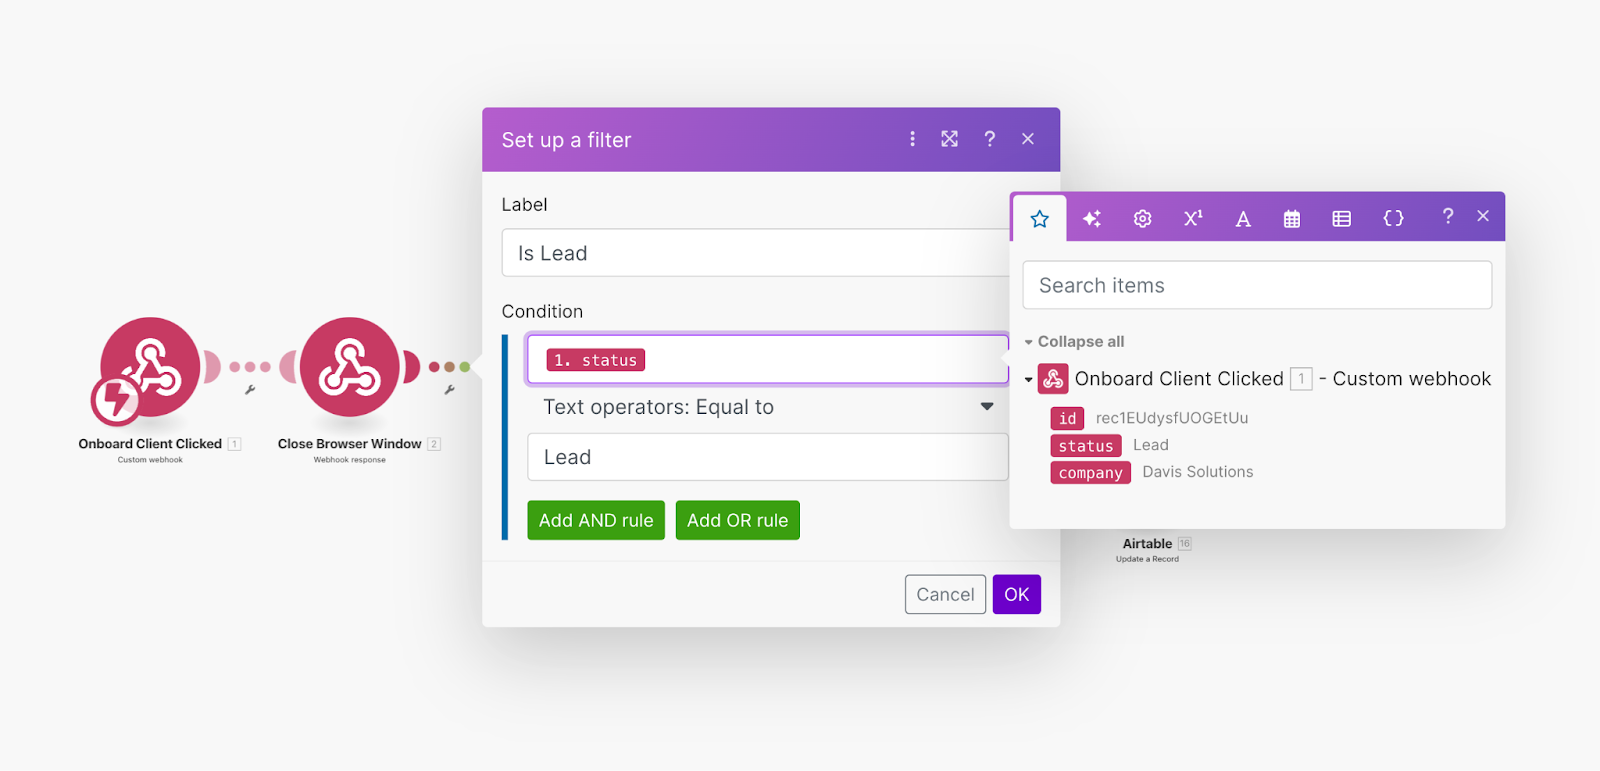
Between the Webhook Response and Router module, click the wrench icon to set up a filter. To make sure you don’t onboard former clients, lost leads, or existing clients by mistake, configure the filter to only pass records where the status is Lead. Map the status value to the condition and set it to Text operators: Equal to = Lead. Click OK to confirm.
Before we dive into building our routes, let’s first clear up a common misconception about them. While routes are often used for conditional flows—like, "If condition = true, take this route; otherwise, take another route"—their value goes beyond just creating conditions. Routes can clean up your automation workflows cleaner, making them easier to understand and to maintain, especially as they grow in complexity.
There are three main purposes of routes:
- Conditional routes: This is the most common use case. You set filters on each route to define when the automation should follow a particular path. This allows your workflow to branch into different flows based on specific criteria, giving you the flexibility to handle multiple scenarios within the same automation.
- Organizing dependent routes: Sometimes, a process has a required sequence of execution, but trying to cram everything into one long chain of modules can quickly become overwhelming. If your automation has more than 8–10 modules in a single line, it can get hard to read, let alone maintain. By breaking it into routes, you can define the sequence of execution in a way that’s visually clear and much easier to manage. In this case, both routes will execute without the need for any filters. Since there is dependency between the routes, the main thing that matters is setting up the execution order.
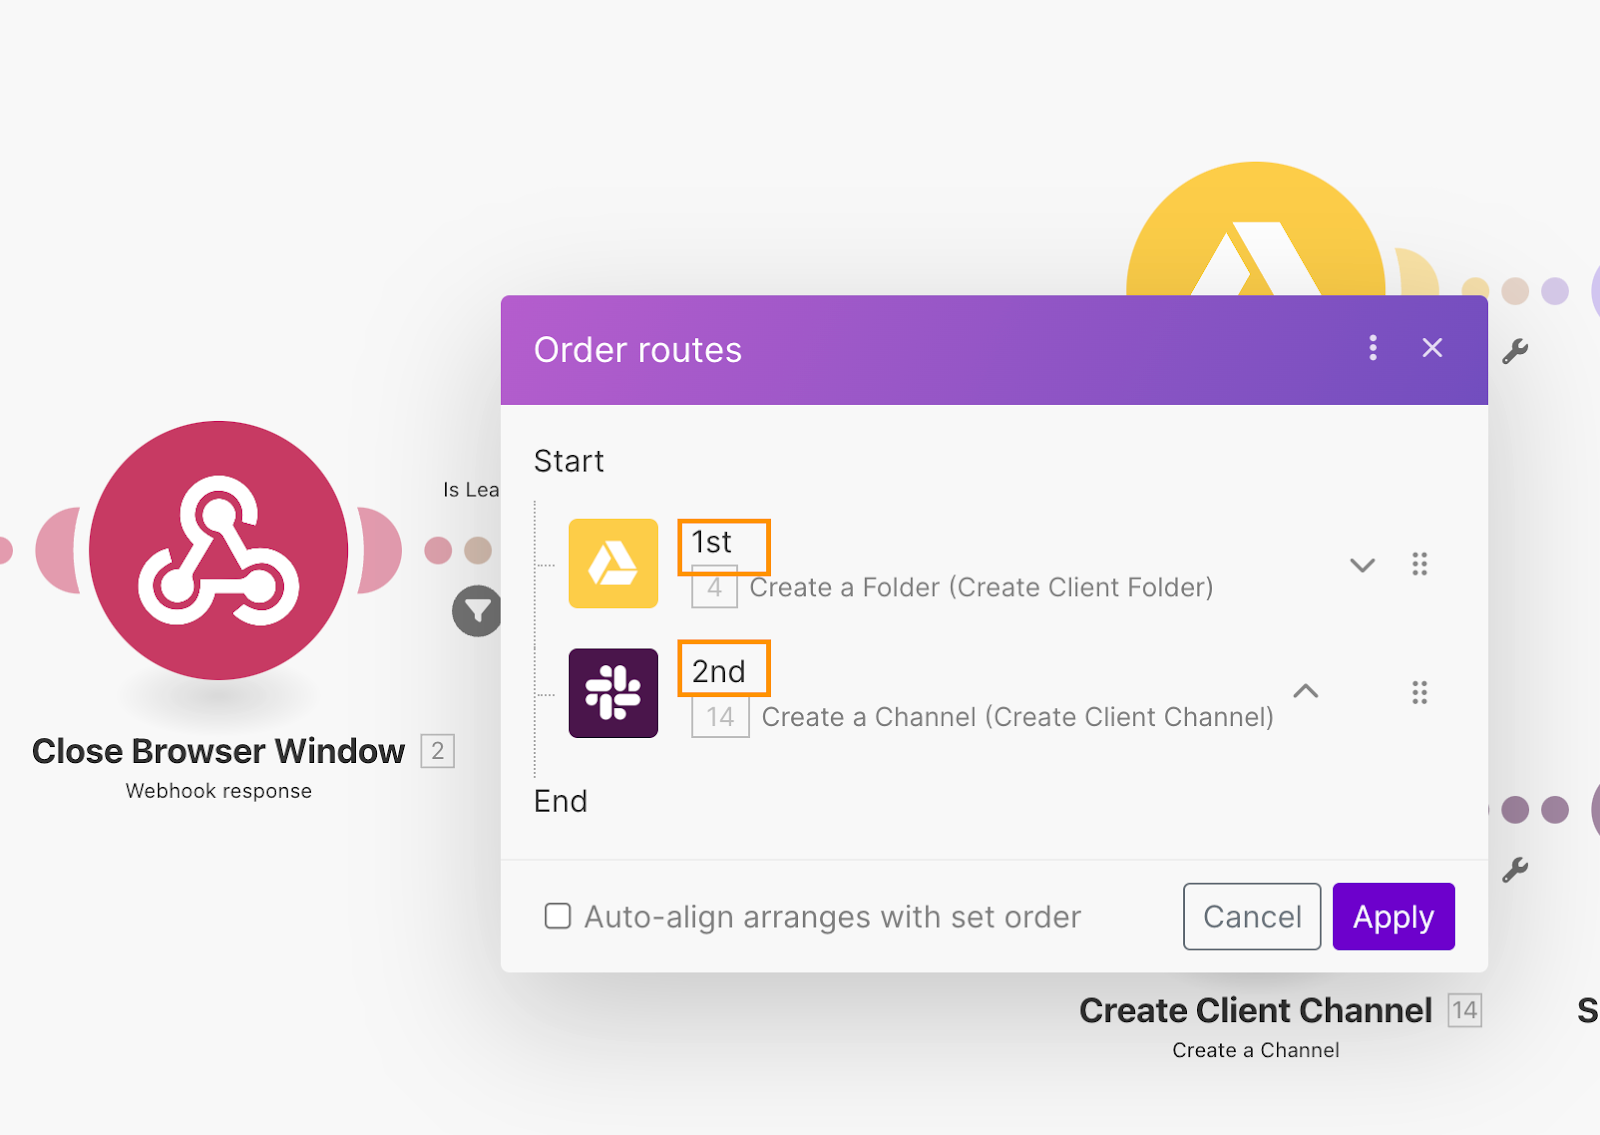
- Non-dependent routes: This is what we’ll be using in our automation. In cases where different tasks are independent of each other—like creating a Slack channel versus setting up a Google Drive folder structure—it doesn’t matter which happens first. In other words, if something goes wrong in Route 1, Route 2 can still execute. This approach not only makes your automation more scalable but also simplifies troubleshooting. You can focus on fixing just one route without worrying about the rest, making it a lot more efficient. Similarly to dependent routes, both routes will execute without the need for any filters.
Now that you’ve got a clear understanding of how routers can be used, let’s start setting up our independent routes.
In our example:
- Route 1 creates the client folder structure in Google Drive.
- Route 2 creates a Slack channel for the client and updates the status to show they’ve been onboarded.
This setup makes the process more organized and gives you a clear visual of how each step connects to the overall workflow.
Create the client folder in Google Drive
Okay, we’ve connected the button in our Airtable, clicked it, and made sure to filter out any of the contacts that are marked as ‘Leads’ and not yet ready to onboard.
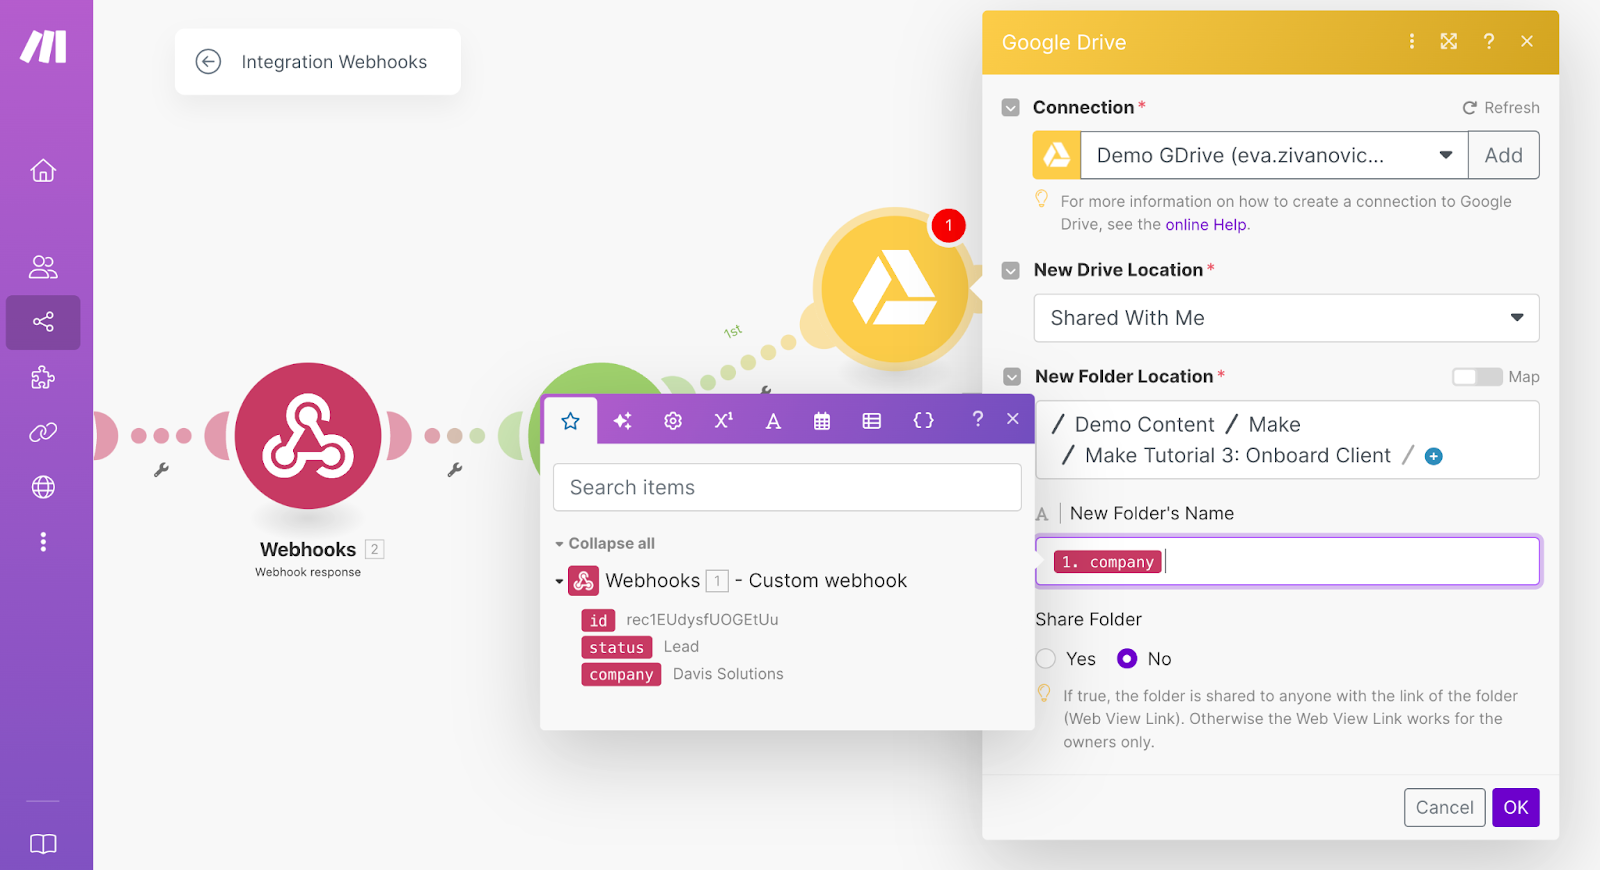
Now, in Route 1, the first step is to create a folder in Google Drive for the client. Add a new module, search for “Google Drive”, and select the Create a Folder module. If you haven’t connected your Google account yet, Make will guide you through the authorization process. Once you’ve authorized access, a setup form will appear.
Choose the location where you want the new folder to be created. Under New Folder’s Name, map the company value from your Webhook module. Click OK to save the configuration.
Since you’ll often have lots of different types of documentation per client, it’s important to keep your files organized for quick retrieval. To do this, we’ll create a set of subfolders within the client folder. For this example, we’ll add three subfolders: Invoices, Contracts, and Projects. You can customize these to fit your business needs or add additional subfolders as needed.
Create client-specific subfolders
There are two main ways to create subfolders in your automation.
You could set up three separate ‘Create a Folder’ modules and configure each one to create a different folder within your client folder. While this works fine for just a few folders, it quickly becomes messy and hard to manage if you’re dealing with a larger or more complex folder structure. Each folder would require its own module, and any changes would mean updating them all one by one, which is not ideal.
Here’s what that first way might look like:
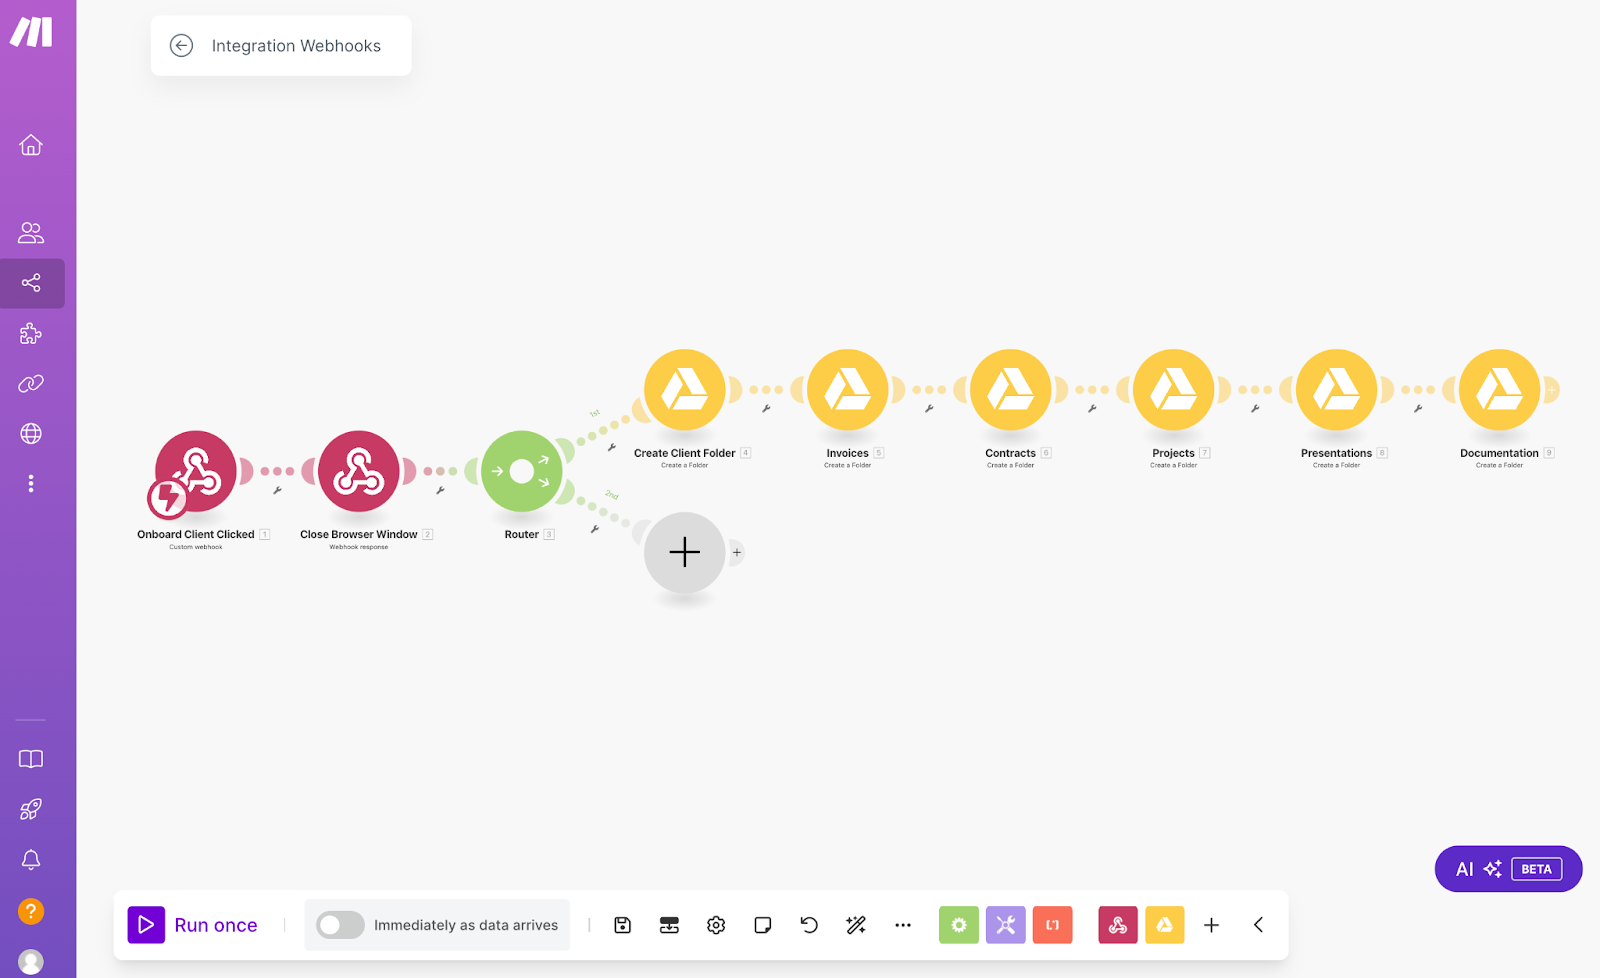
As you can see, maintaining separate modules for each folder isn’t very scalable. Since the logic stays the same across all modules, and the only difference is the folder name, we’re basically doing unnecessary work.
So that brings us to the second way to create subfolders in your automation. Instead of manually creating each folder, we’ll implement a best practice option for a scalable solution that’s simple to manage, no matter how many subfolders you need. This method generates a list of folder names and uses a single module to dynamically create each subfolder.
Step 1: Create a List of Folder Names
First, add a “Set Variable” module. This module lets you store a value that you can reuse later in your automation (in this case, our folder names).
- Name the variable “Subfolders”.
- In the Variable value, add your folder names separated by commas, with no spaces (e.g., Invoices,Contracts,Projects).
- Use the split() function to turn the string into a list:
- Before the first folder name, type: split(
- After the last folder name, add a semicolon ; followed by a comma ,
- Then add a closing parenthesis )
- Click OK to save the variable.
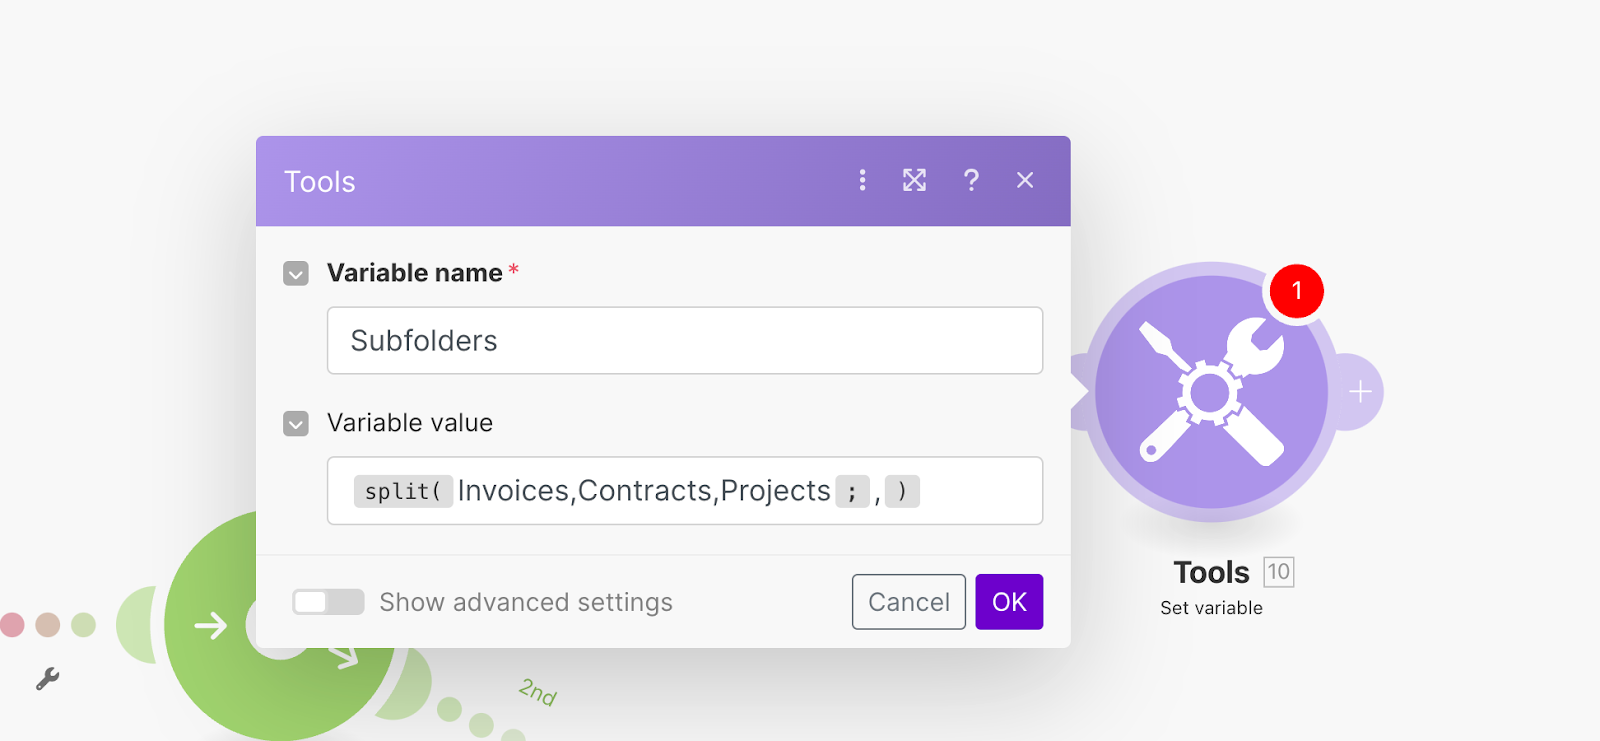
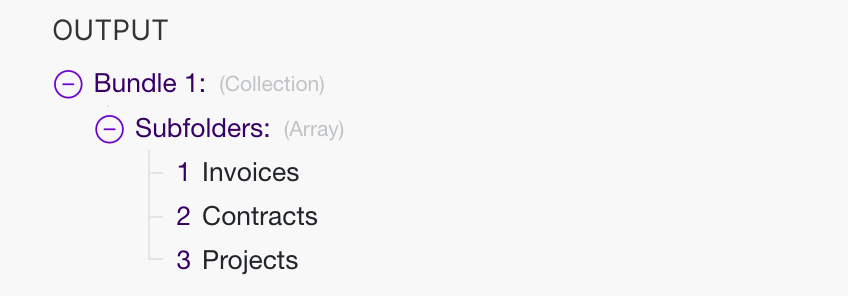
The split() function takes the text you entered (like Invoices,Contracts,Projects) and turns it into a list of items that can be processed individually. When you run this module, the result will be an array (a list of items), which you can see by the type indicator in the output. If you’re not familiar with arrays, they are essentially a collection of items, like a list, that can hold multiple values (like Invoices, Contracts, Projects) in a single variable (like Subfolders).
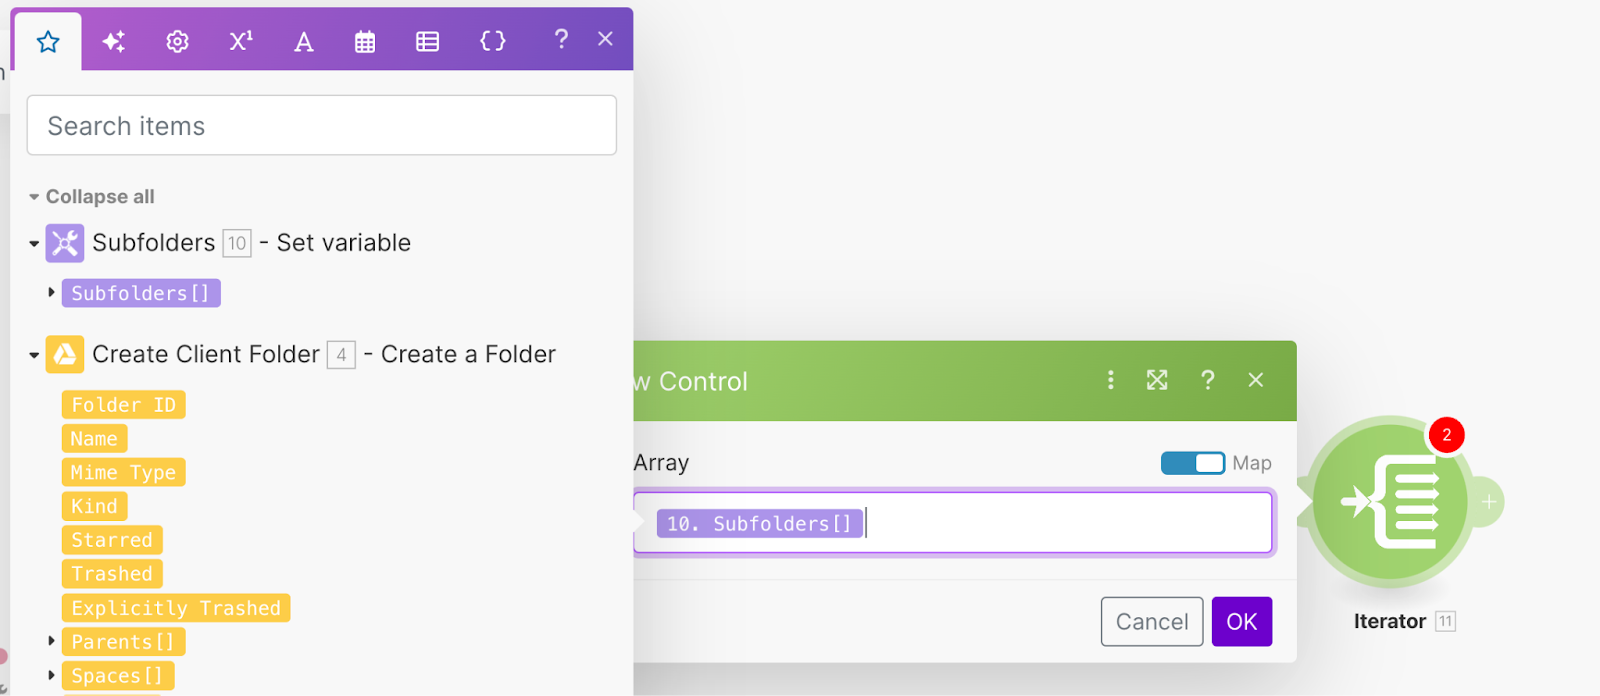
Step 2: Process each folder name with an ‘iterator’
Now that you have a list of folder names, you’ll need to process them one at a time. To do this, we’ll use an Iterator module. An iterator takes your list and turns it into individual items (called bundles), so the automation can handle them one by one. In programming, this is the same as a ‘for’ loop.
- Add a new module and search for “Iterator”.
- In the Array field, map the Subfolders variable you created in the previous step.
- Click OK to save.
Step 3: Create the Subfolders
Finally, we’ll use a single “Create a Folder” module to dynamically create all the subfolders.
- Search for “Google Drive” in the module picker.
- Select the Create a Folder module.
- In the New Folder Location field, map the Folder ID from the first Create a Folder module (the client folder you created earlier). This ensures the subfolders are added inside the main client folder.
- In the New Folder’s Name field, map the Value from the Iterator module (this represents the current folder name being processed).
- Click OK to save.
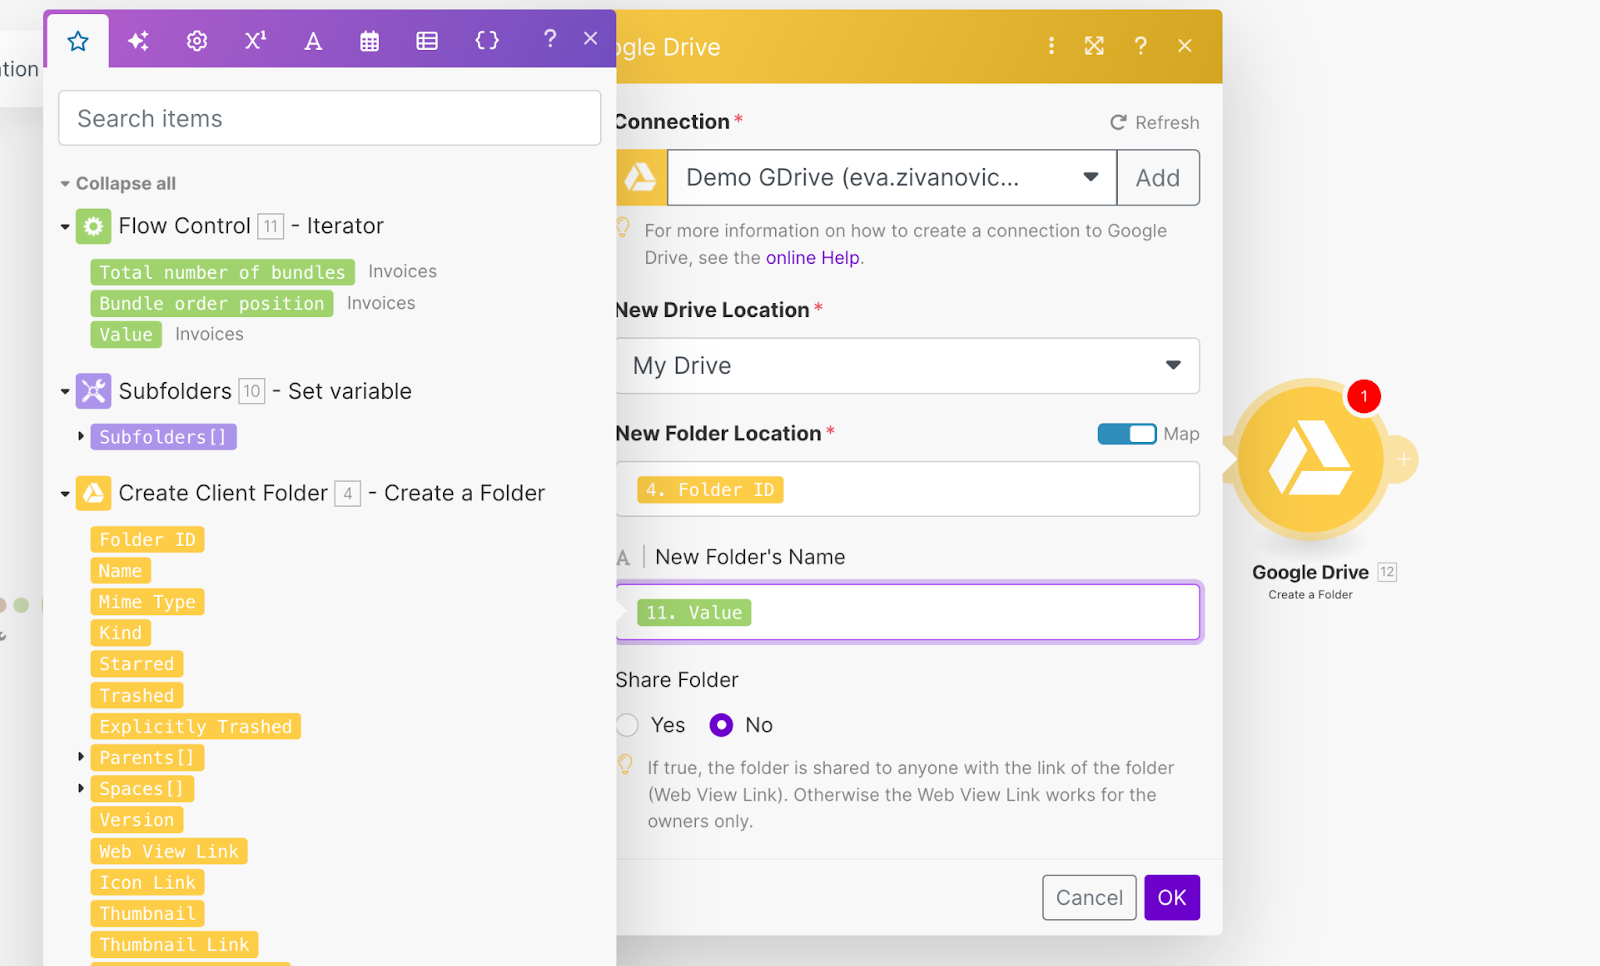
With this setup, the automation will loop through your folder list and create each subfolder inside the client folder by looping through each of the folder names you defined. If you need to add a folder to the list, you simply need to add one to your variable, or if you need to change a folder location, you can edit all subfolders at once. This approach replaces multiple modules with a single, reusable process, making it easy to scale and maintain.
And that’s it for Route 1! Next, let’s move on to Route 2 and set up the Slack channel configuration.
Route 2: Create a client Slack channel
During your project, it’s important to keep communication open with your client so they can easily reach out if they need anything. In Route 2, we’ll create a dedicated Slack channel for your client and even send them a welcome message.
Start by adding a new module in Route 2, search for Slack, and select the Create a Channel module. If you haven’t connected Make to Slack yet, follow the authorization process that Make guides you through.
The only required configuration for this module is the channel name. Depending on your naming convention, your setup might look different, but you’ll typically want the client’s name included to differentiate your Slack channels.
In our example, we’ll use the naming format #client-clientName. If the client’s name is “David Solutions”, the channel would be named #client-david-solutions.
It’s important to keep in mind that Slack requires all channel names to be lowercase and have no spaces. Typically, the data in you Airtable CRM will not meet these data validation rules (e.g., “David Solutions”), so we can use Make functions to fix it:
- Replace, to replace spaces with dashes.
- Lower, to convert the text to lowercase.
Here’s the formula we’ll use to format the company name in Make:
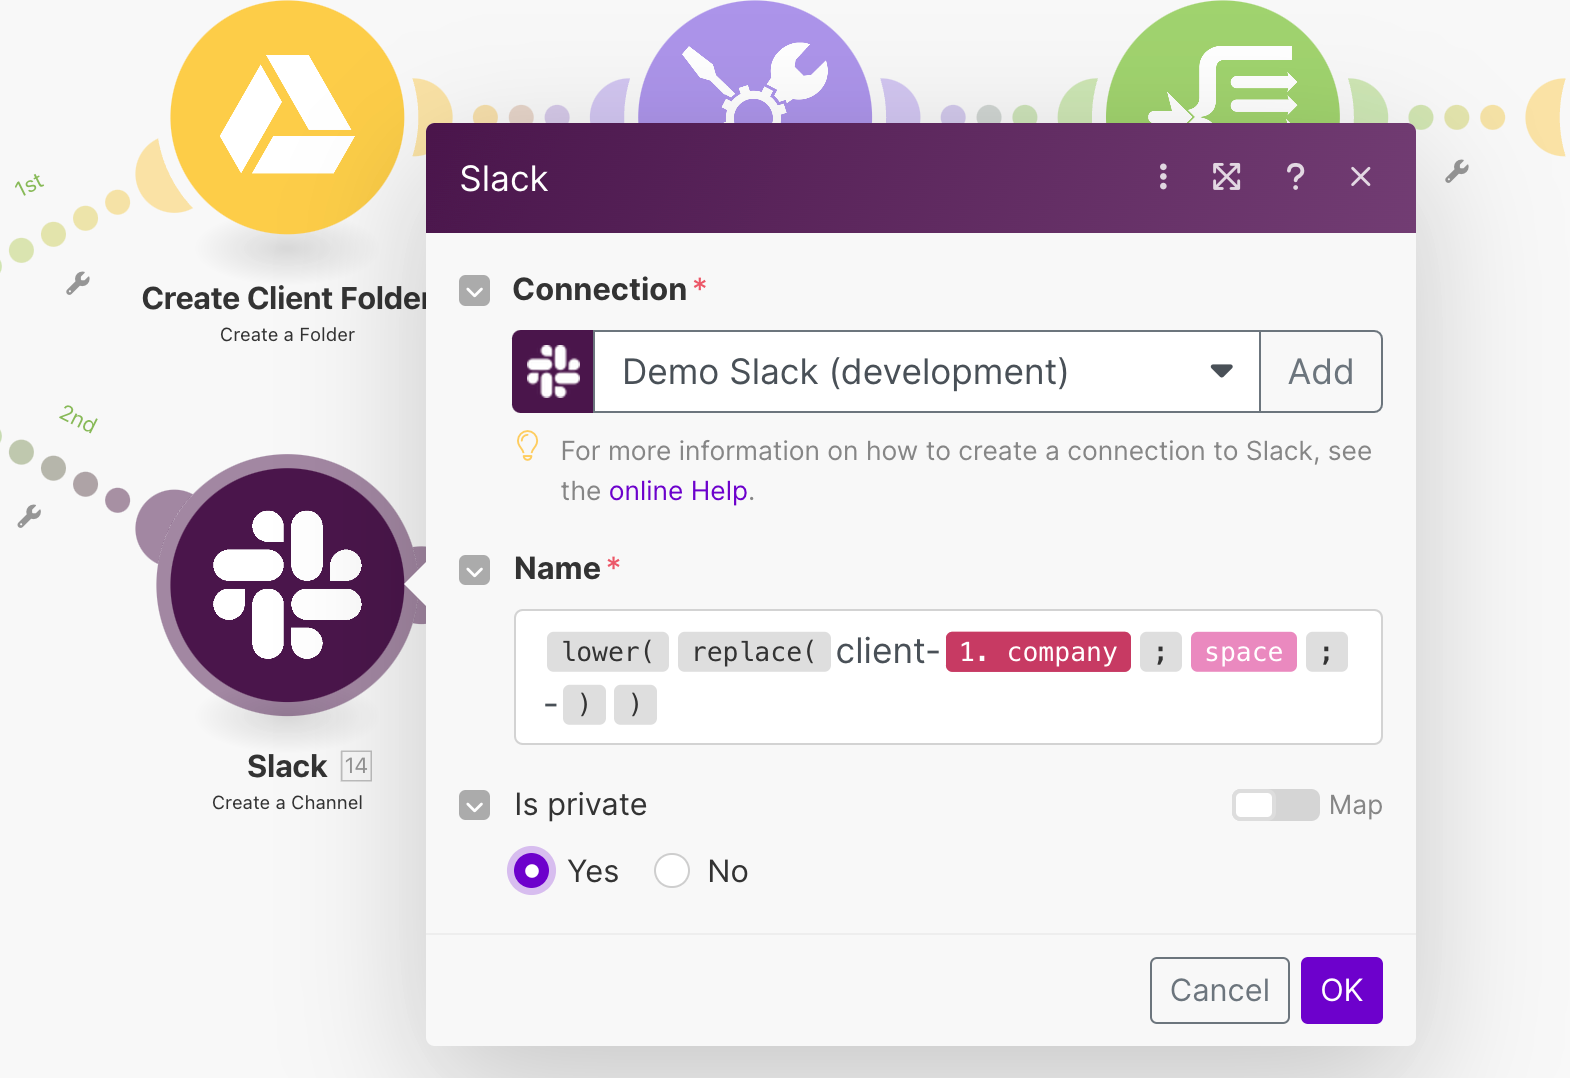
To break this down:
- Start with the client’s name from Airtable, which is 1.company in this case
- Add the prefix client- to the name: "client-" + 1.company. This is just customizable text that helps us know it’s a client channel.
- Use the replace function to swap spaces for dashes: replace("client-" + 1.company; " "; "-").
- Wrap the whole result in the lower function to convert everything to lowercase: lower(replace("client-" + 1.company; " "; "-")).
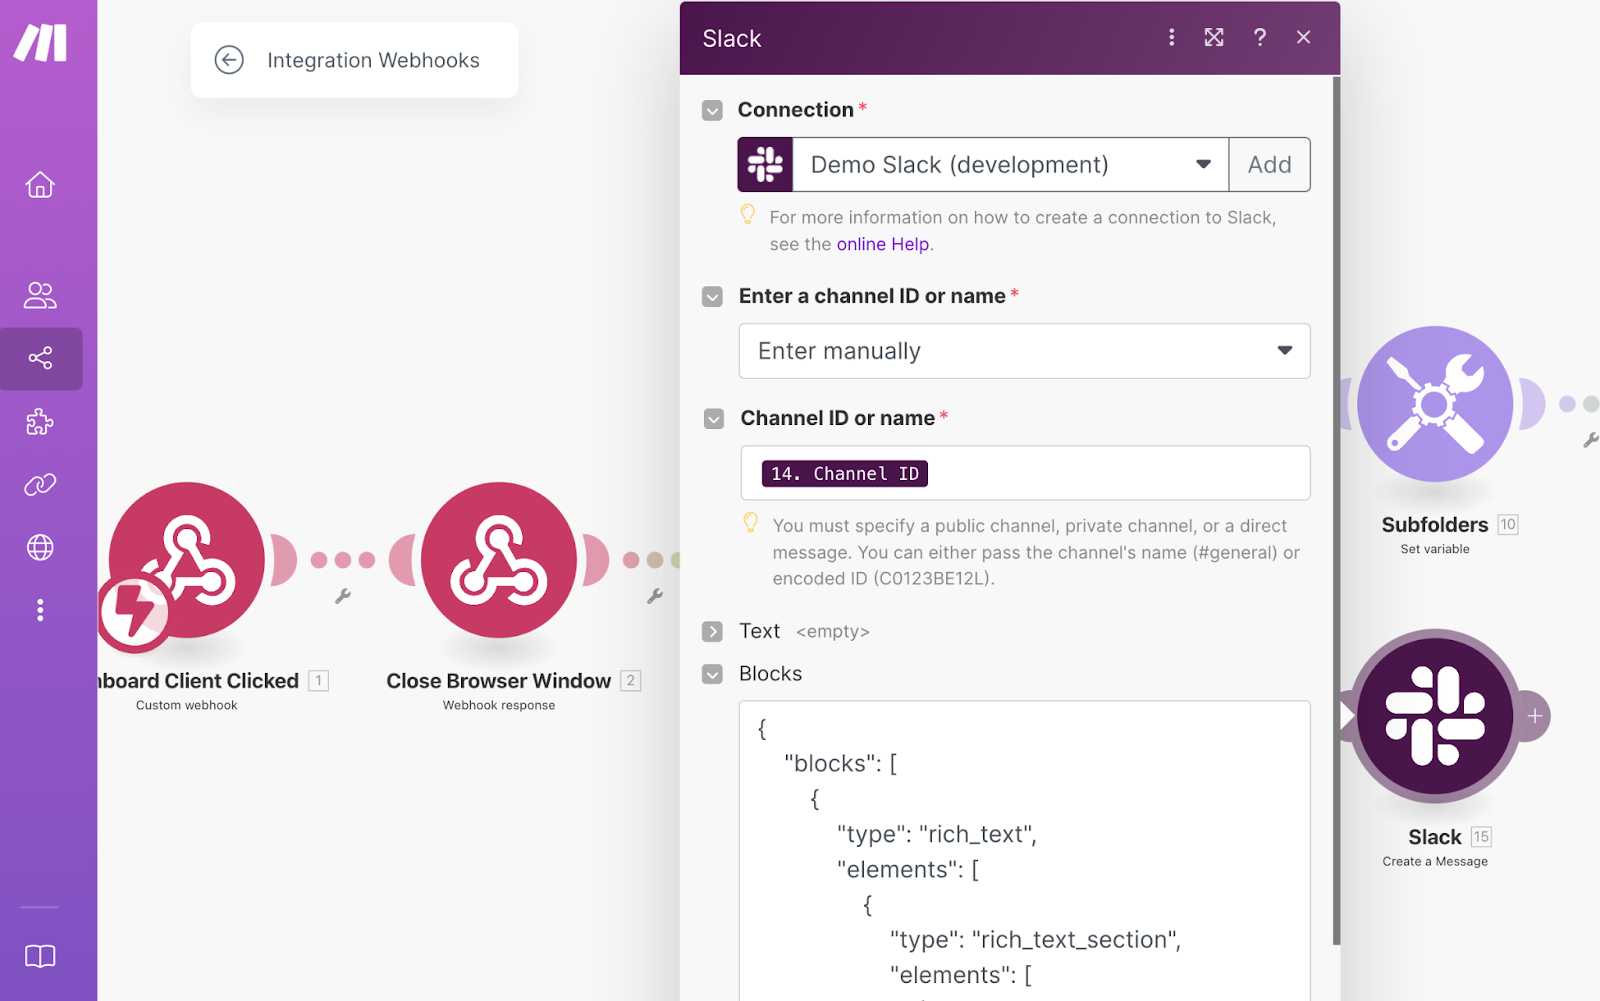
Save your configuration by clicking OK.This module will automatically create a Slack channel that follows your naming convention, like #client-david-solutions. To personalize the experience for your clients even more and make a real impression, we’ll set up a second Slack module to send a welcome message to the new channel.
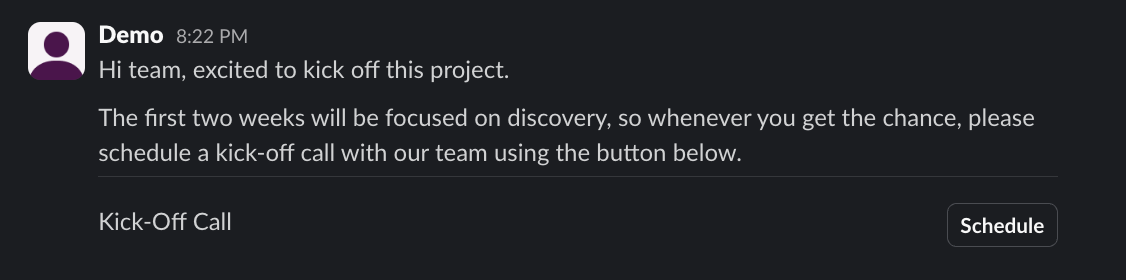
Send a friendly welcome Slack message
For your welcome message, you might want to introduce your client to the project, share helpful links like your calendar for scheduling a project kick-off call, and provide any resources they might need to get started.
Start by adding a new Slack module called Create a Message. Under Channel ID, map the ID of the channel you created in the previous step.
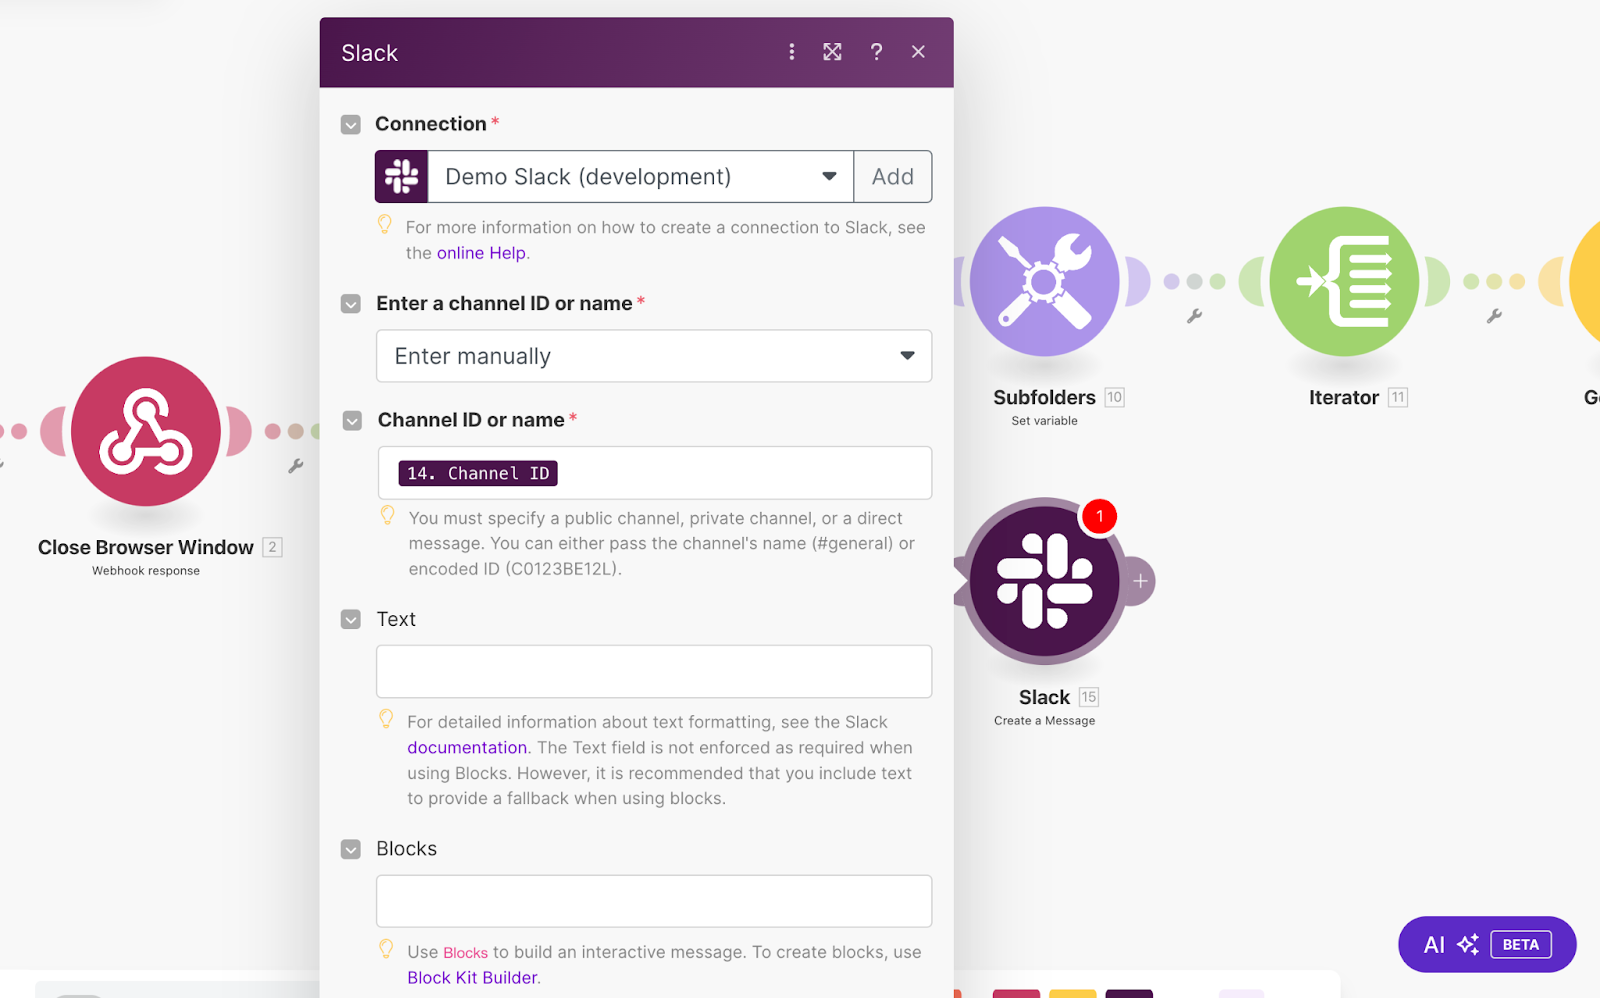
Below this configuration, you’ll see two optional fields: Text and Blocks. If you want to send a simple message, the Text field works great. You can format a rich-text message using Markdown, which supports things like bold, italics, and links.
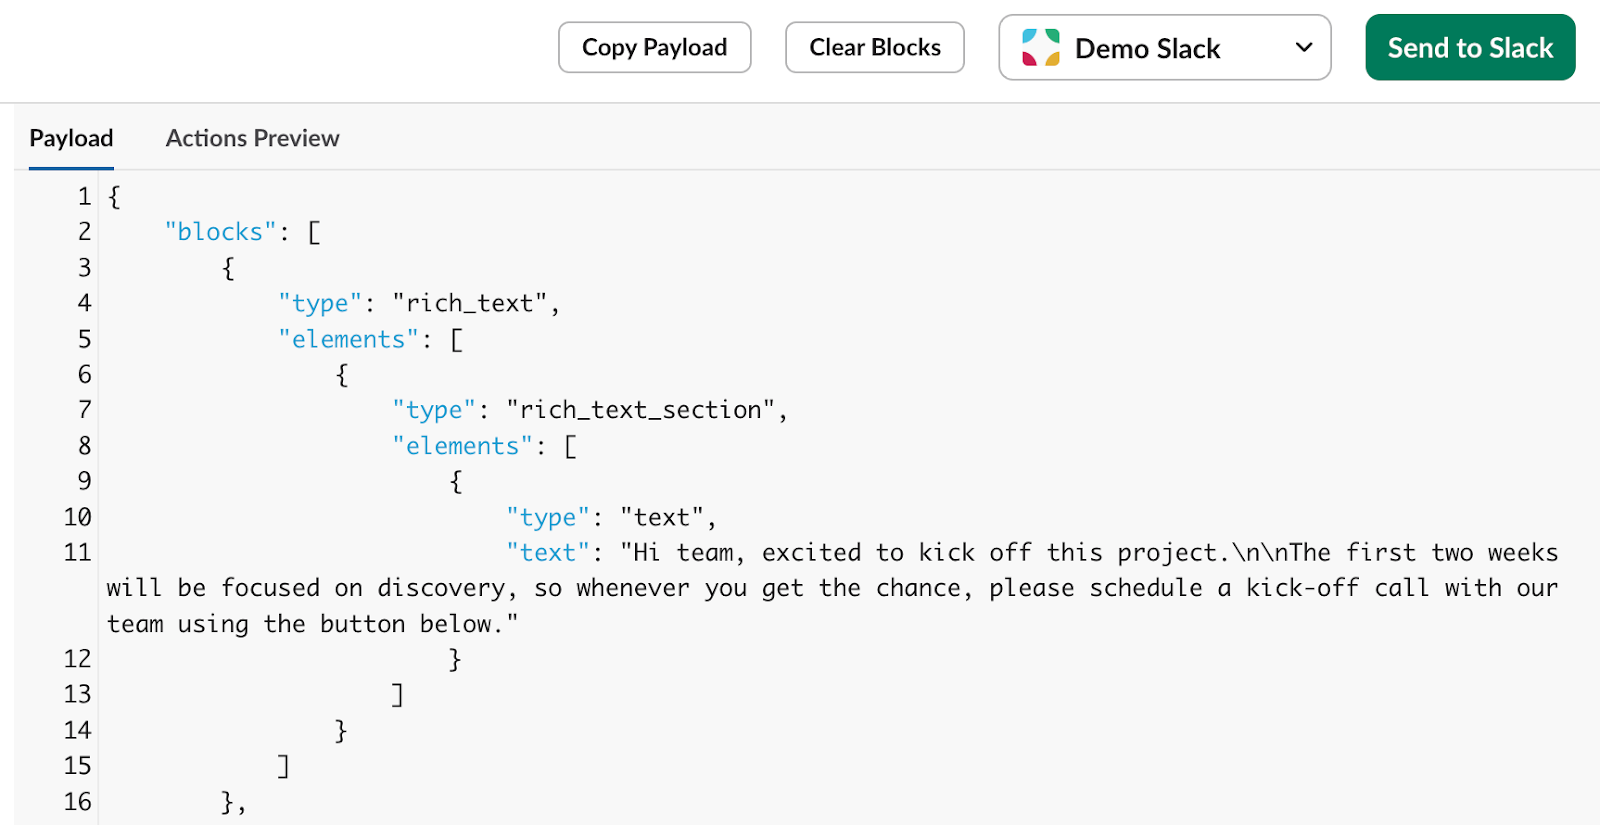
But if you want to make a stronger impression and create something interactive, Blocks are the way to go. Slack’s Block Kit Builder makes it easy to design interactive messages with elements like buttons, links, or images. You can build your message in the builder, and Slack will generate JSON code for you, which you can then just copy and paste into the Blocks field in Make. You can even replace the static data with dynamic values from your automation.
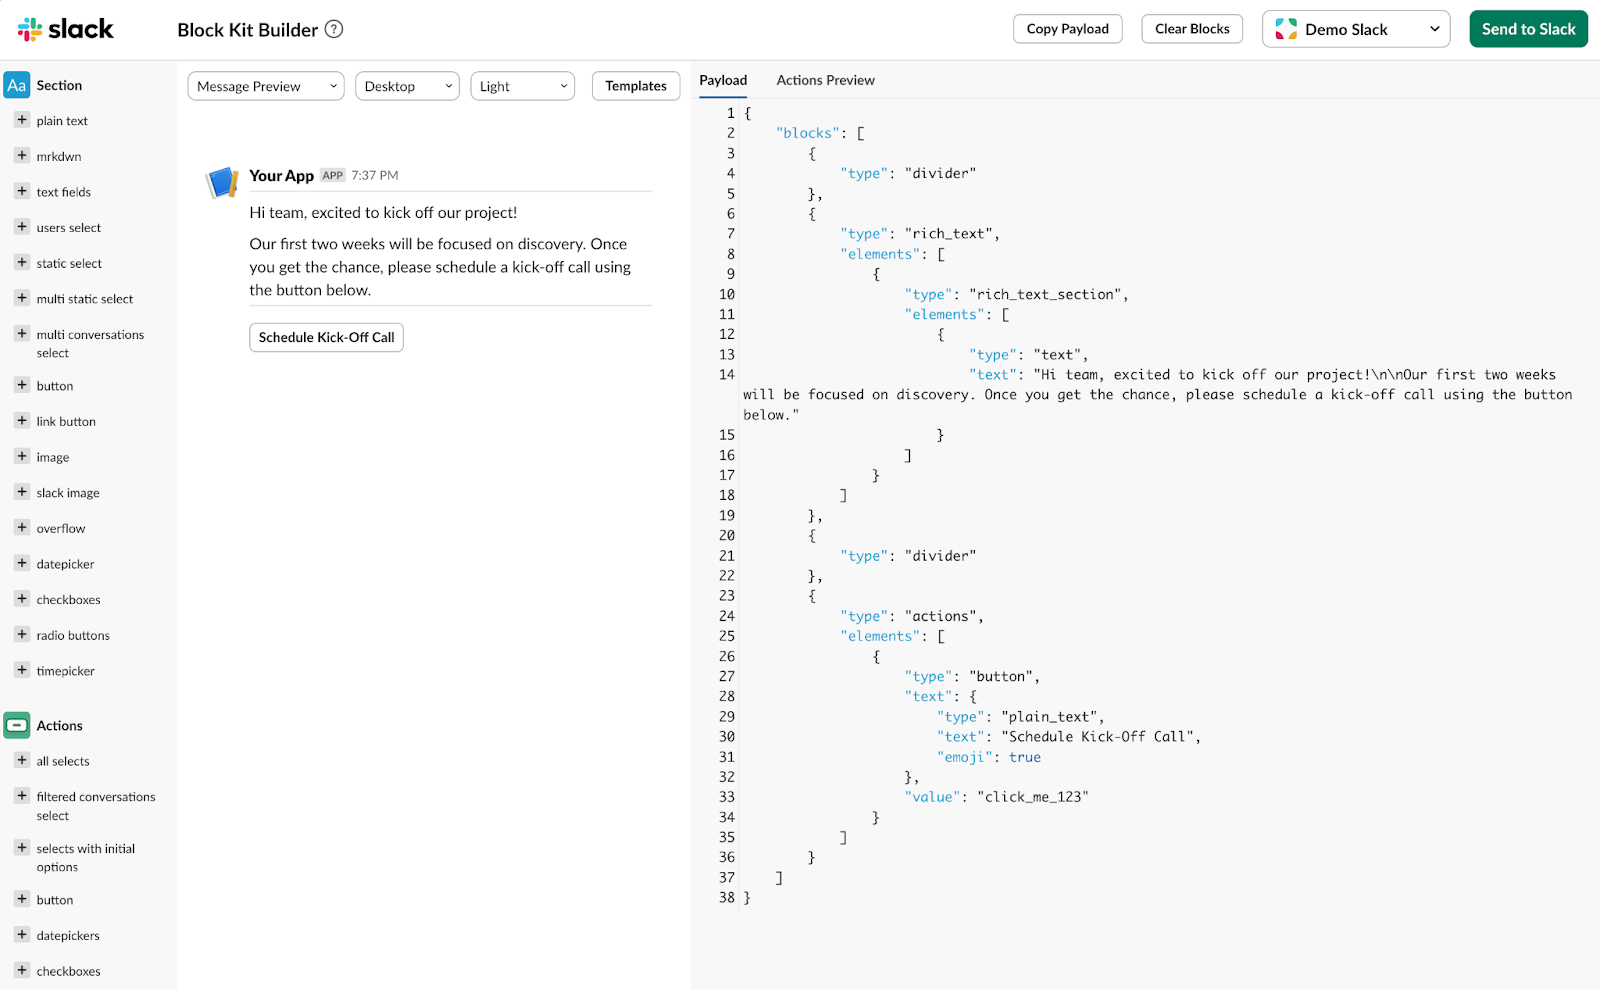
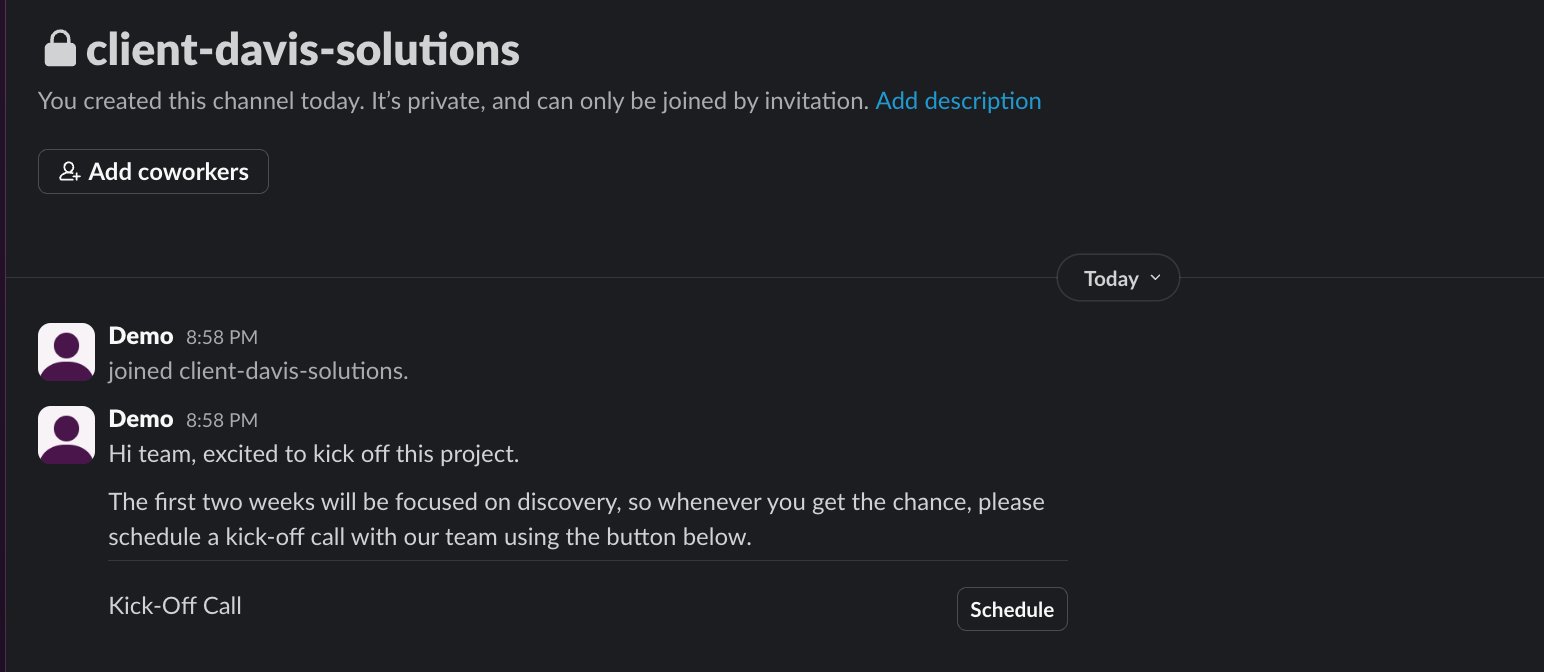
Here’s what our code looked like, and the resulting message Block on the left.
Next, we’ll create a simple interactive message as a starting point, which you can then customize to fit your needs.
Create your interactive message JSON payload
Open the Slack Block Kit Builder and start adding blocks from the left sidebar to build your message. In our example, we’ll include a welcome message, and a call-to-action button to schedule a kick-off call.
To get started quickly, here’s an example JSON payload you can use as a starting point:
{
    "blocks": [
        {
            "type": "rich_text",
            "elements": [
                {
                    "type": "rich_text_section",
                    "elements": [
                        {
                            "type": "text",
                            "text": "Hi team, excited to kick off this project.\n\nThe first two weeks will be focused on discovery, so whenever you get the chance, please schedule a kick-off call with our team using the button below."
                        }
                    ]
                }
            ]
        },
        {
            "type": "divider"
        },
        {
            "type": "section",
            "text": {
                "type": "mrkdwn",
                "text": "Kick-Off Call"
            },
            "accessory": {
                "type": "button",
                "text": {
                    "type": "plain_text",
                    "text": "Schedule",
                    "emoji": true
                },
                "value": "schedule_call",
                "url": "https://calendly.com/demo/30min",
                "action_id": "schedule-call"
            }
        }
    ]
}
Once you’re happy with your message, click Send to Slack in the Block Kit Builder to preview it in Slack. Make sure to test the button to make sure it opens the right link and that your link is not broken.
If everything looks good, click Copy Payload in the Block Kit Builder, and paste the JSON into the Blocks field in your Create a Message module in Make.
Click OK to save the configuration.
Now that you’ve set up the channel and sent the welcome message, note that you will need to manually invite the client to the Slack channel. This is because some of Slack’s API endpoints, like this one, are exclusive to Enterprise Grid clients. Since many of our readers likely aren’t on the Enterprise Grid plan, we skipped this step to keep the automation widely accessible, regardless of their tool stack or subscription level.
If you’re on the Enterprise Grid plan, you can add this feature to the automation to make it even smoother. Use the Slack Make an API Call module, and configure it following the Slack API documentation. To do this, you’ll need to understand how to structure a JSON payload.
Marking the company in Airtable as a “Client”
Woohoo - you just made a sale and onboarded your client, both with just one click! The final step in our automation is to go back to our Airtable CRM and update the company’s record, changing its status from Lead to Client to indicate that onboarding is complete. Here’s how:
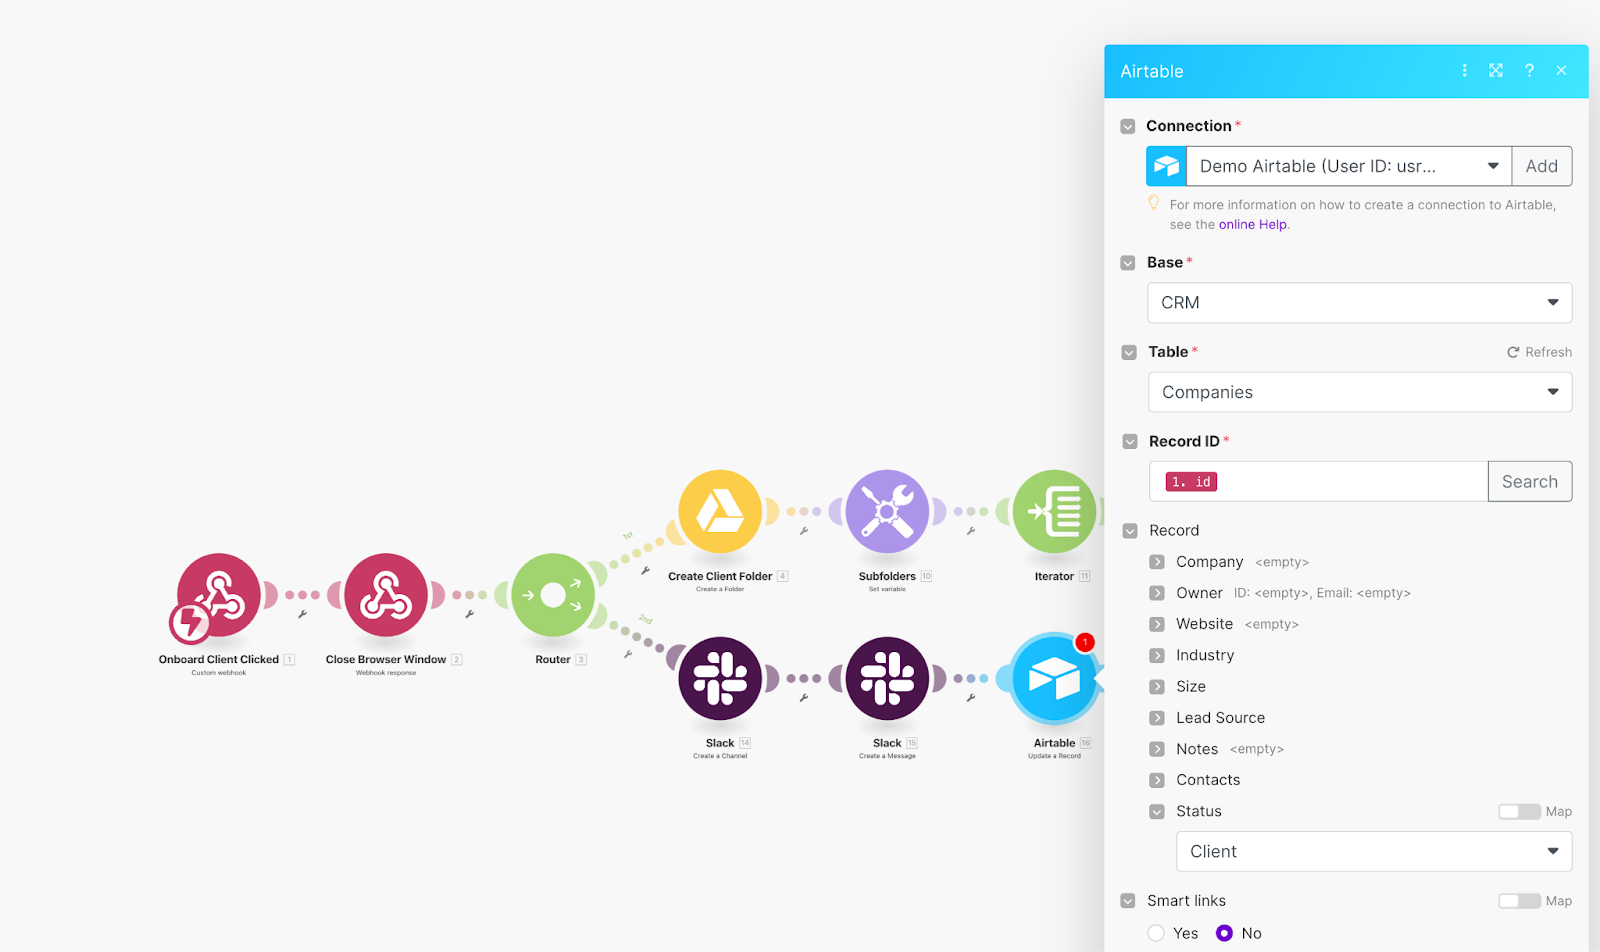
- Add a new module, search for Airtable, and select Update a Record
- Configure the form to point to the Airtable Base where you’re storing company records
- Select the Companies table that you pulled the company data from in the first place
- Under Record ID, map the id value from the Webhook Trigger module
- Set the Status column to Client
Click OK to save the configuration.
With that, your complex automation is complete! What took you less than an hour to build, could save you dozens of hours in the future. Behold: the power of automation.
Before we set the automation off and running, let’s do some testing to make sure everything is working as it should.
Testing and deployment
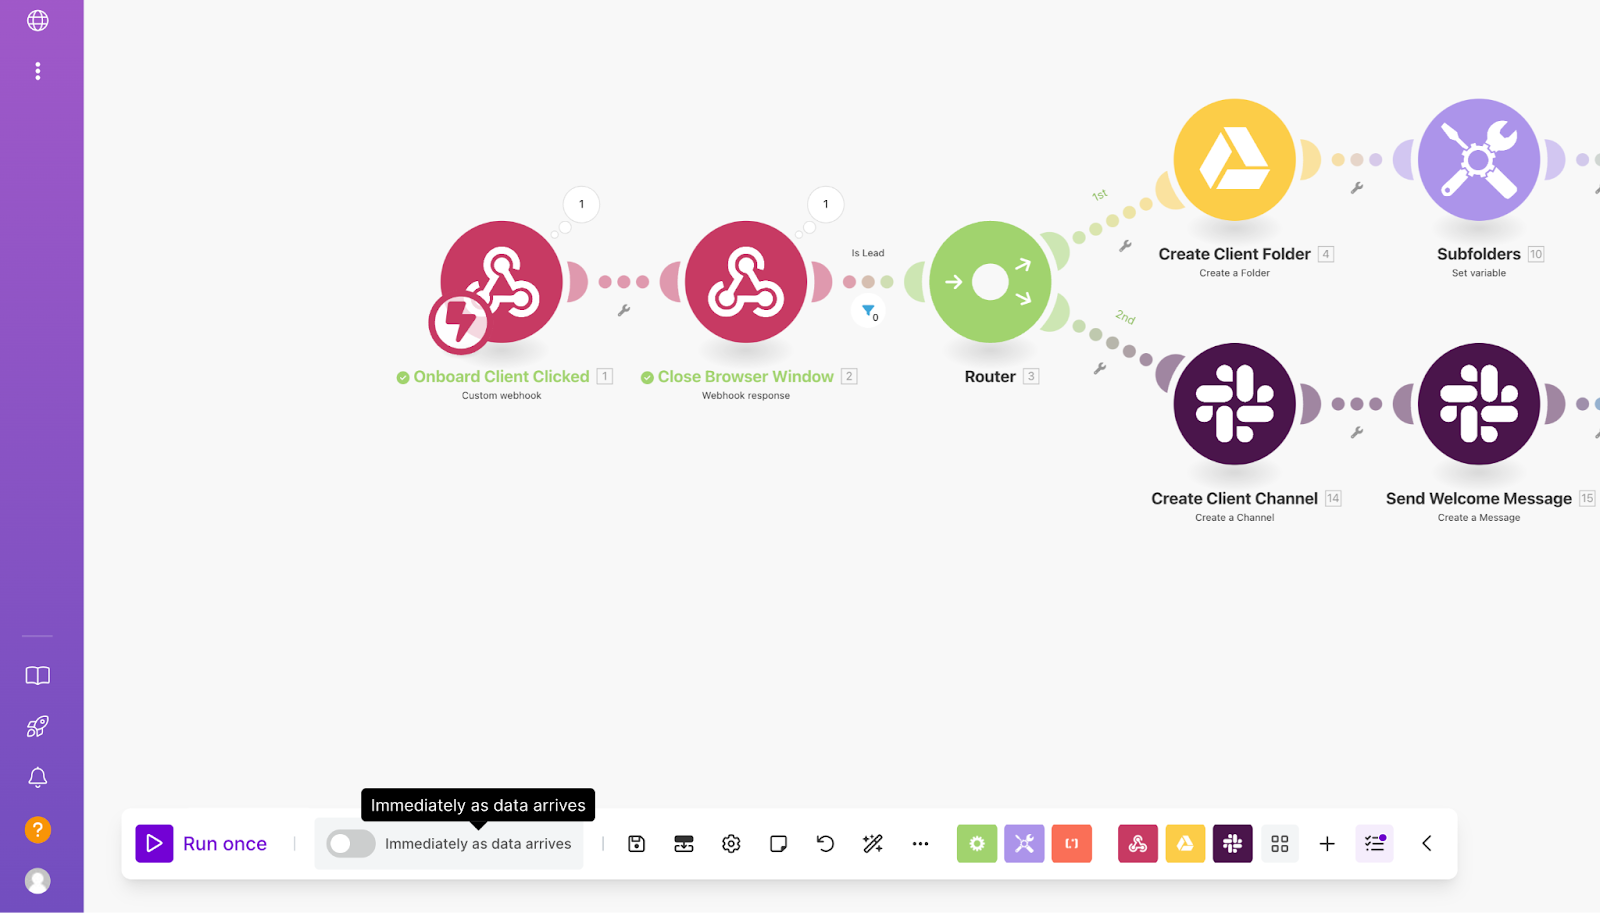
Now that all modules are configured, it’s time to test the automation.
- In Make, click Run Once in the lower bottom corner. This preps the automation to run, but it will still need to be triggered by the webhook.
- In your Airtable CRM, click Onboard on a company record with the status Lead.
This should trigger the following processes:
- A dedicated client folder with nested subfolders is created in Google Drive - check they are in the right location!.
- A Slack channel is created for the client, following your predefined naming convention.
- A welcome message is sent to the Slack channel - check the message and the button link works as expected.
- The Airtable record is updated, marking the company as a Client.

Perform a second test
Remember that we’ve actually filtered this automation to ensure we don’t perform actions on company records that aren’t marked as ‘Lead’. Trigger the automation using a record where the status is not Lead. This should stop the automation after the webhook response, ensuring your filter logic works.
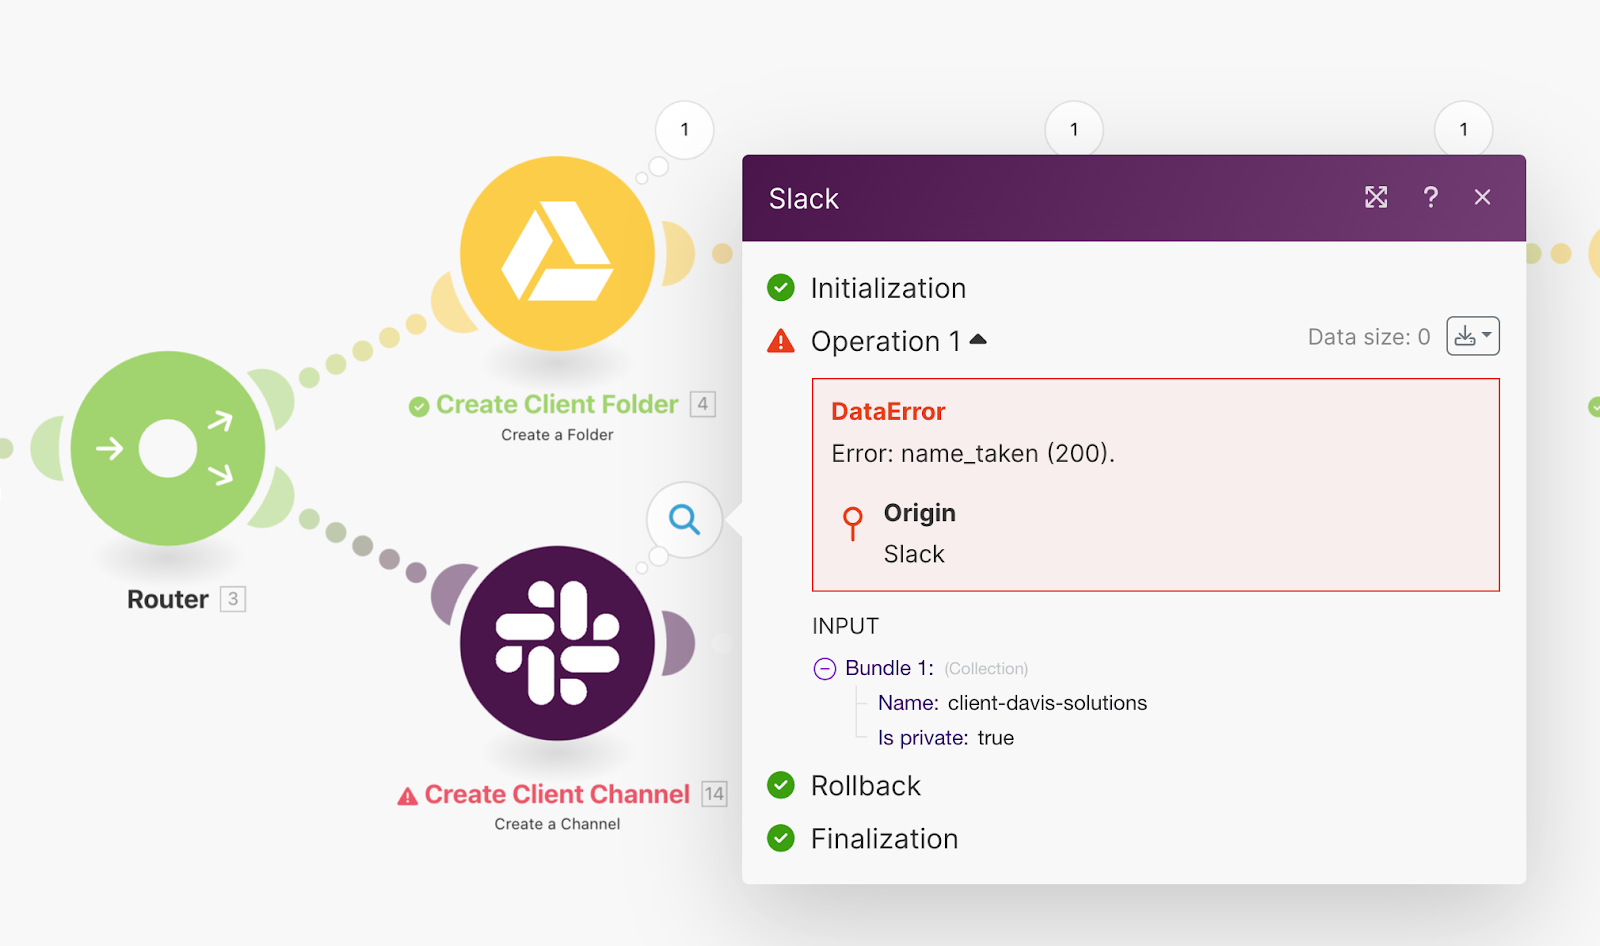
If any of your tests fail, check the module where the error occurred. Most errors are descriptive enough to point you in the right direction for troubleshooting. For example, if a Slack channel with the same name already exists, the automation might fail at the channel creation step.
If both tests are successful, you’re ready to turn the automation on and deploy it. Toggle the Immediately as Data Arrives option to enable it. Don’t forget to rename your automation to something descriptive, like “Onboard Client from Airtable,” for easy identification.
Summary
Every company’s onboarding process is unique, but Google Drive folders and Slack channels are widely used across agencies, companies, and freelancers for all kinds of processes. With this automation, we execute more than 5 actions with a single click and the only manual step left is adding client contacts to Slack.
The best part is that you can build on this automation to fit your specific workflows. You can add additional routes to create invoices, update the trigger to initiate the automation when a client signs a contract (as long as your contracts app supports integration or sending data to a webhook), or even send an automated email informing the client they’ve been onboarded and outlining next steps.
As your automation becomes more complex, it might make sense to break it into multiple, smaller automations. These can act as ‘building blocks’ for a larger system. In one of our upcoming tutorials, we’ll cover how to scale your automations seamlessly by breaking them down into smaller, more digestible workflows.
Until next time!

