

Customer Relationship Managers can help businesses manage contact information, support history, projects, as well as their sales pipeline.
One popular CRM tool, particularly for smaller businesses that don’t require complex automation, is Notion. Notion is a no-code tool with a flexible building block system that allows you to build bespoke tools for your workflows. Read all about it in our What is Notion guide.
With Notion, you can connect multiple databases to reveal data stories that would otherwise be lost if they were siloed in separate databases, tools, or spreadsheets. What’s more, Notion allows you to view your data in varied views to create a more intuitive experience.
In this tutorial, you will learn how to use some of Notion’s advanced features to connect the fundamentals of any CRM - people, companies, deals, and comments - in a way that allows you to squeeze all you can out of your contact data.
Why use Notion for your CRM?
The concept of managing a CRM might seem daunting to non-technical folk, especially those with a pile of physical business cards on their desk, but thankfully Notion, as a no-code platform, makes it really simple to set up a more efficient, centralized resource for your team. Notion is a great place for teams to build simple systems to improve their internal processes.
When building systems on Notion, it’s generally best for text-based tools and content management systems with relatively basic datasets. But the important thing to note here is that Notion is a highly approachable platform for creating satisfyingly beautiful organizational systems, even for non-technical users. It’s a great upgrade from building systems in spreadsheets - that is if you’ve built any systems at all….
Nevertheless, for technical users looking for a more robust, complex solution for their CRM needs, they might find that Notion is not flexible enough to suit their needs. The Notion permissioning system is also something to keep a close eye on before building, as it can be easy to accidentally give users access to too much information.
If you’re keen to give Notion a go for managing your customer data, let’s jump straight in.
Step 1: Creating your Notion Databases
To set up our CRM, we have four different databases with different kinds of data: our contacts and their details (people), the companies they are associated to (companies), the deals or projects that we are negotiating with these companies (deals), and finally the comments and updates log to track actions. We will separate this data into different databases to make the data easier to handle and update. Before anything else, we need to set these up.
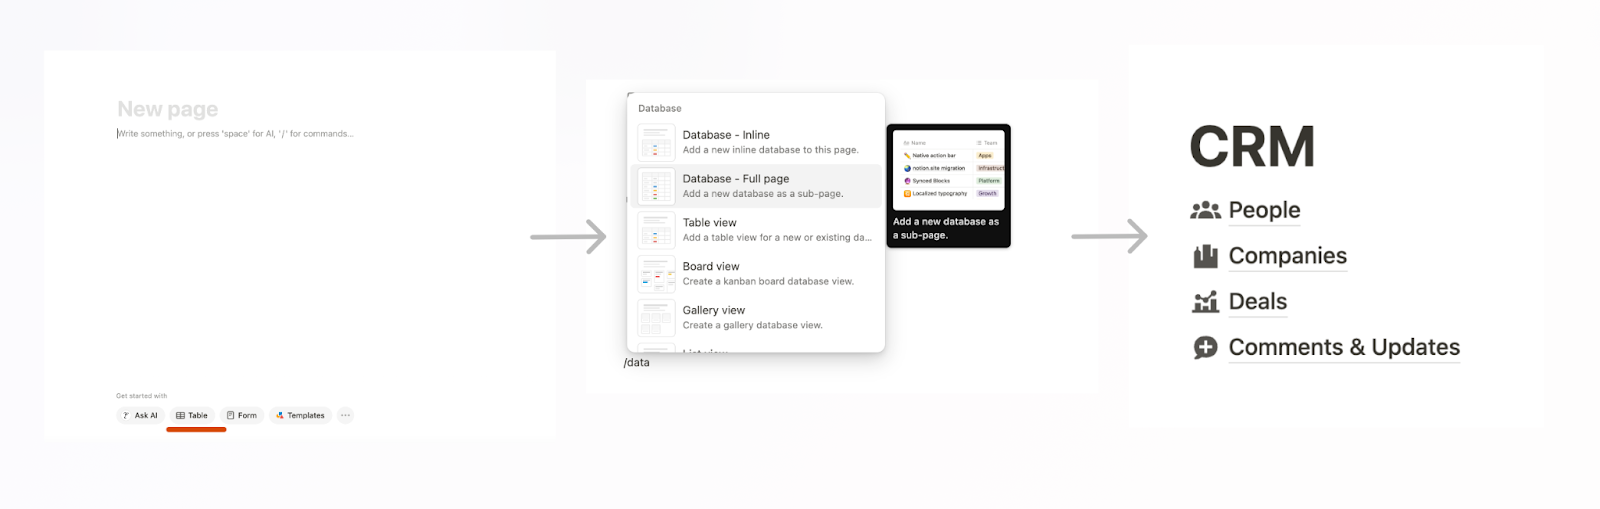
To create a database in Notion, add a new ‘Page’ in your sidebar. You can then click the “Get started with… Table" function to create a full-page database. Alternatively, you can create a "database block" by typing "/" on your keyboard.
You can choose to create a sub-page for each of your full-page databases, as pictured above, or an inline database that is nested in the page and where you can place other content (such as text, bookmarks and more) above or below— this option is great if you’re looking for a dashboard layout.
There's no strict right or wrong way to do this—it depends on the user experience you're trying to achieve. Thanks to Notion's flexibility, you can always change where your database is located further down the line.
For our CRM, we’ll be creating four of these pages using the full-page database for each. Name each of the pages People, Companies, Deals and Comments & Updates respectively.
2. Defining your Notion Databases’ properties
Now that you have your table pages, we need to configure the databases. First, you need to decide what the schema of each database is, i.e. what the columns and their properties need to look like.
There are many different column types available to ensure you’re always adding the right data type, including text, number types, Select (dropdown), email URL, and more. Here you need to assess what you’ll need for your data and pick the most suitable column type for each.
Picking appropriate column types helps to ensure the integrity of your data, and to reuse it in useful ways across your Notion system. As an example, any calendar date should utilize the date property that can be used in the calendar of timeline views, while any “yes/no”, “true/false”(known as binary) conditions are best represented by a checkbox.
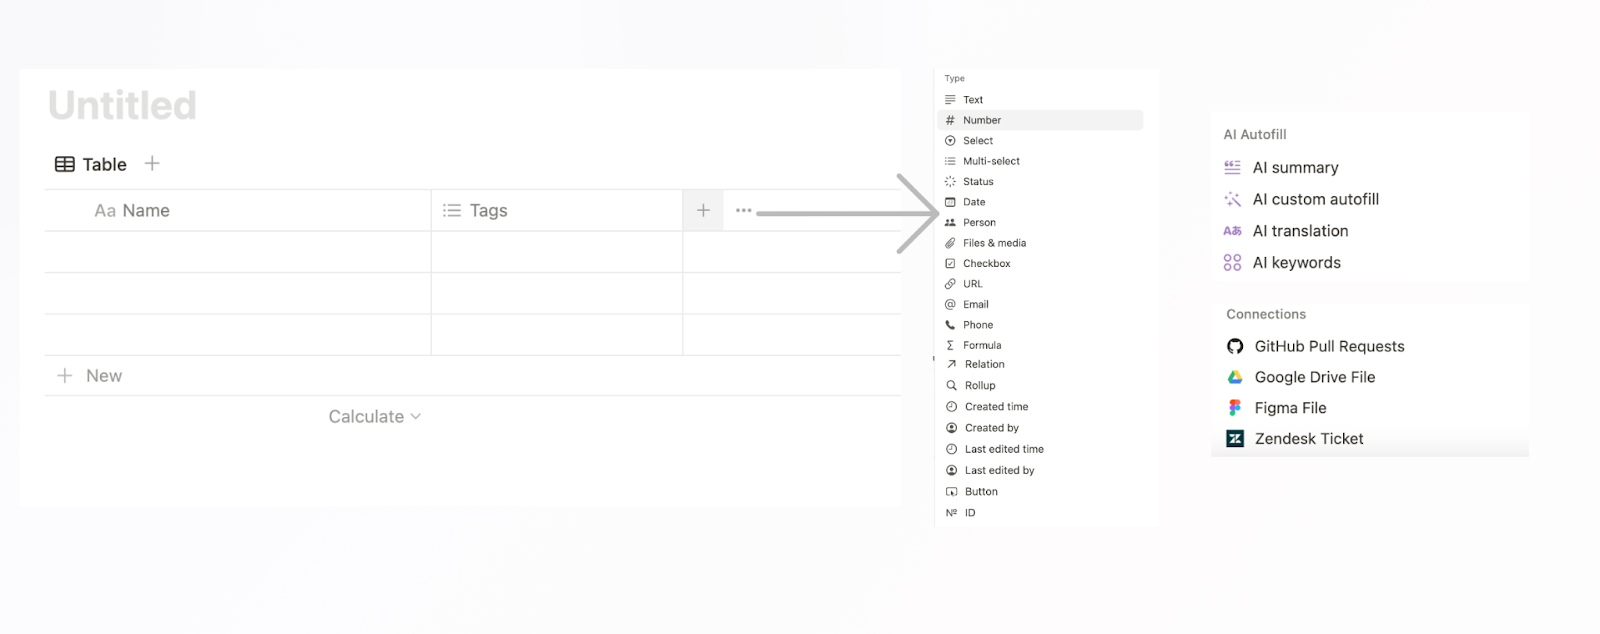
We’ve split our data into several tables that we’ll interlink using relations and rollups, but it’s also important to avoid bloating your database. Try only to create properties for data that would be useful to search, sort, filter, or view by since any other information (e.g. long text or images) can be stored within the body of the page. This is one of the major benefits of Notion - pages are incredibly customizable with different data formats.
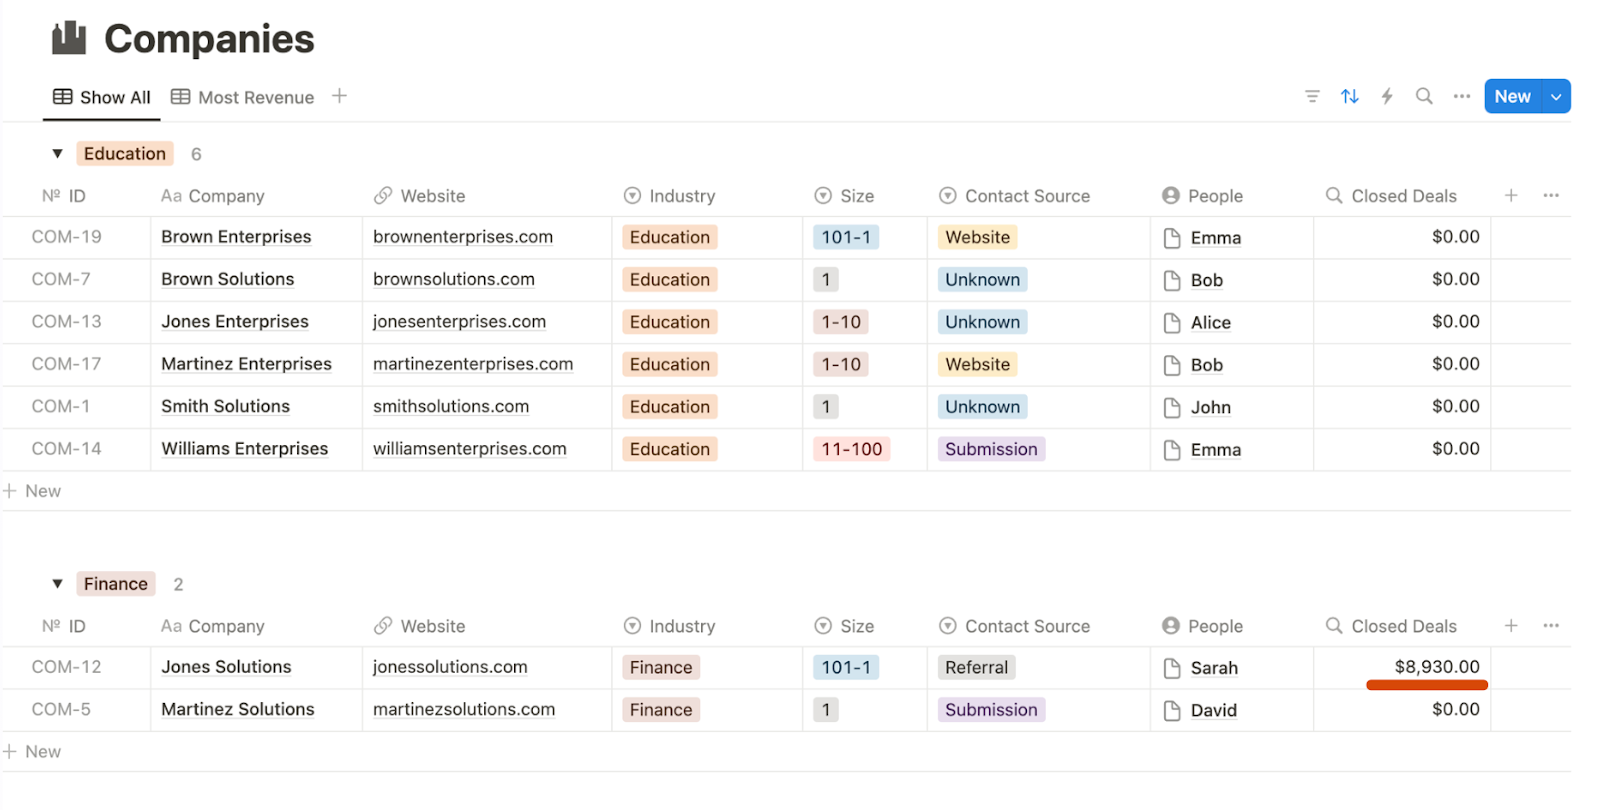
For our CRM, we’ve started by setting up the Companies, People, Deals and Company & Updates pages with some sample data. For columns such as Deal Description & Last Names we used the text property. For the website we used a URL property and so on. Properties like the Select type can be particularly useful for organizing data, allowing you to create single or multi-select dropdowns, to ensure users only select the correct option. You may use the example above as a guide, while choosing to pause on relations and rollups, as this will be addressed later on.
3. Creating varied database layouts & customizing views
Once you’ve created your desired database structures, it’s time to decide how you’d like to present your data in different ‘Views’.
Traditional database tables aren’t the only way to view database data within Notion. Depending on your needs, you have the option to display your data in a table, board, timeline, calendar, list, gallery, or chart. The good news is that you don’t have to reenter your data each time you want to change the view type, you can create new views as tabs within your database that adapt to the existing data.
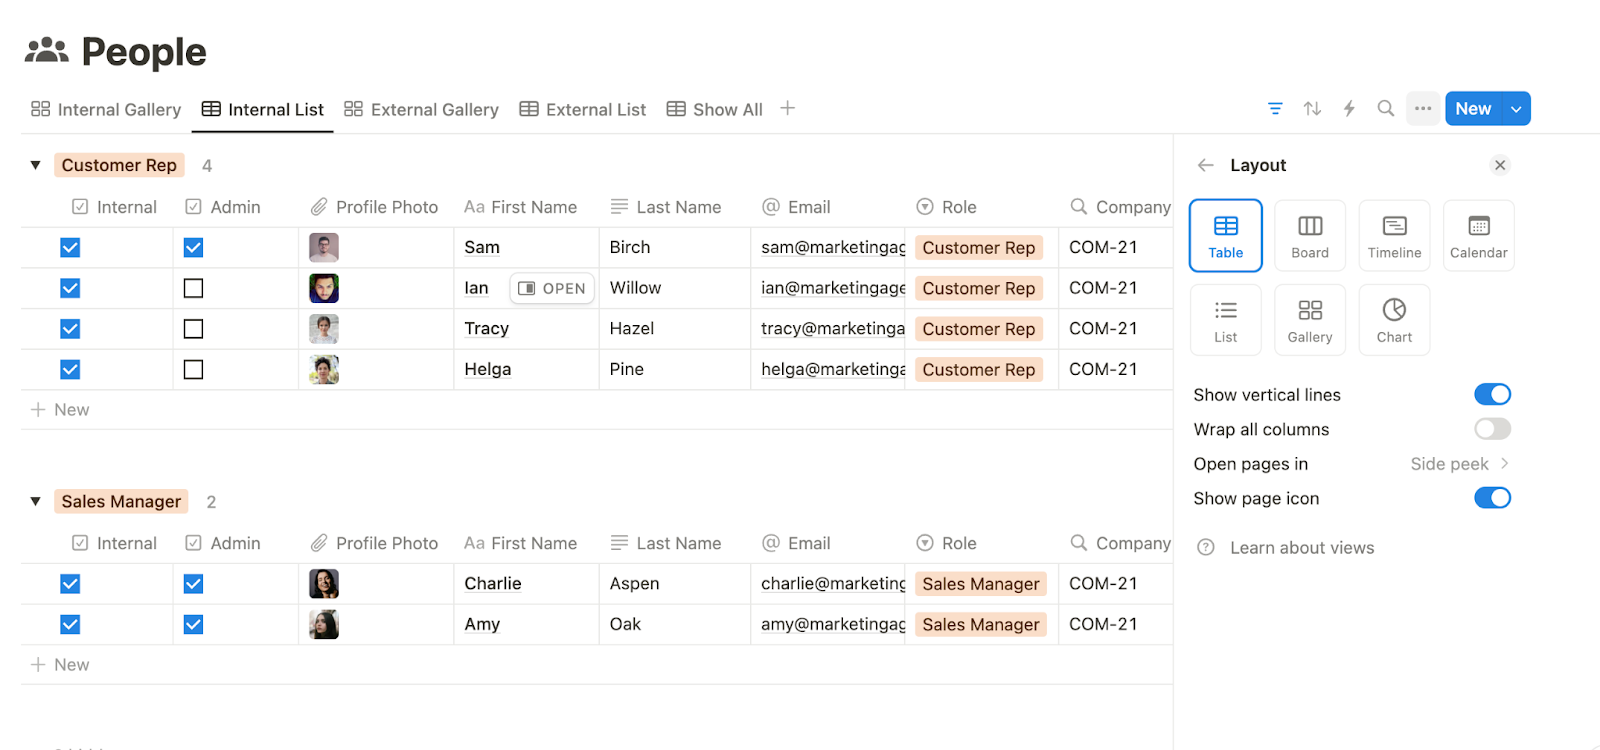
Once you’ve changed the layout of your View, you can also adjust the visible properties to suit this format best. Think of views as "contexts”. The internal gallery shown below displays the same data as the previous example but in a gallery view with an image focus. You can customize each view by clicking on the three dots that appear when you hover over your data.
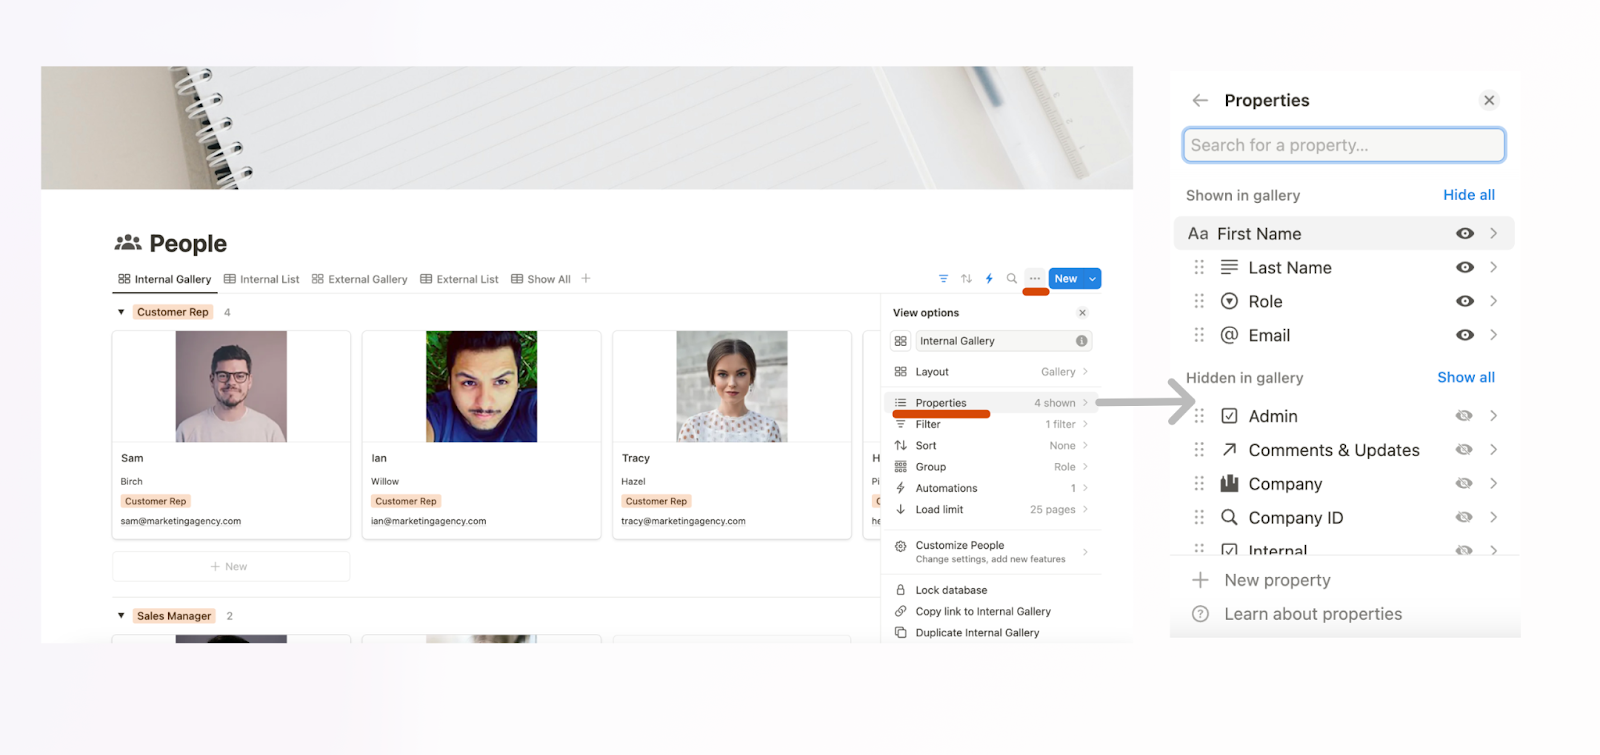
Basic customization options include layout, shown properties, sorting, filtering, grouping, and load limit (the maximum number of entries shown when you first load the page, after which a "Load more" message appears). More advanced options, hidden in the "Customize" menu, include sub-tasks/pages, dependencies, and AI properties. As a rule of thumb, systematically review each option in the database menu to ensure you're satisfied with each view.
Using filters to present different information views
As well as different layouts, filters are a great way to create snapshots of your data, allowing you to quickly assess only relevant information. In the example below, filters have been set up in each view: the "Internal" checkbox is ticked for the Internal Gallery, whereas the opposite condition is set for the External Gallery. Other examples where filters could be useful in your system could be filtering out completed deals from your pipeline or displaying contacts from a specific industry or region.
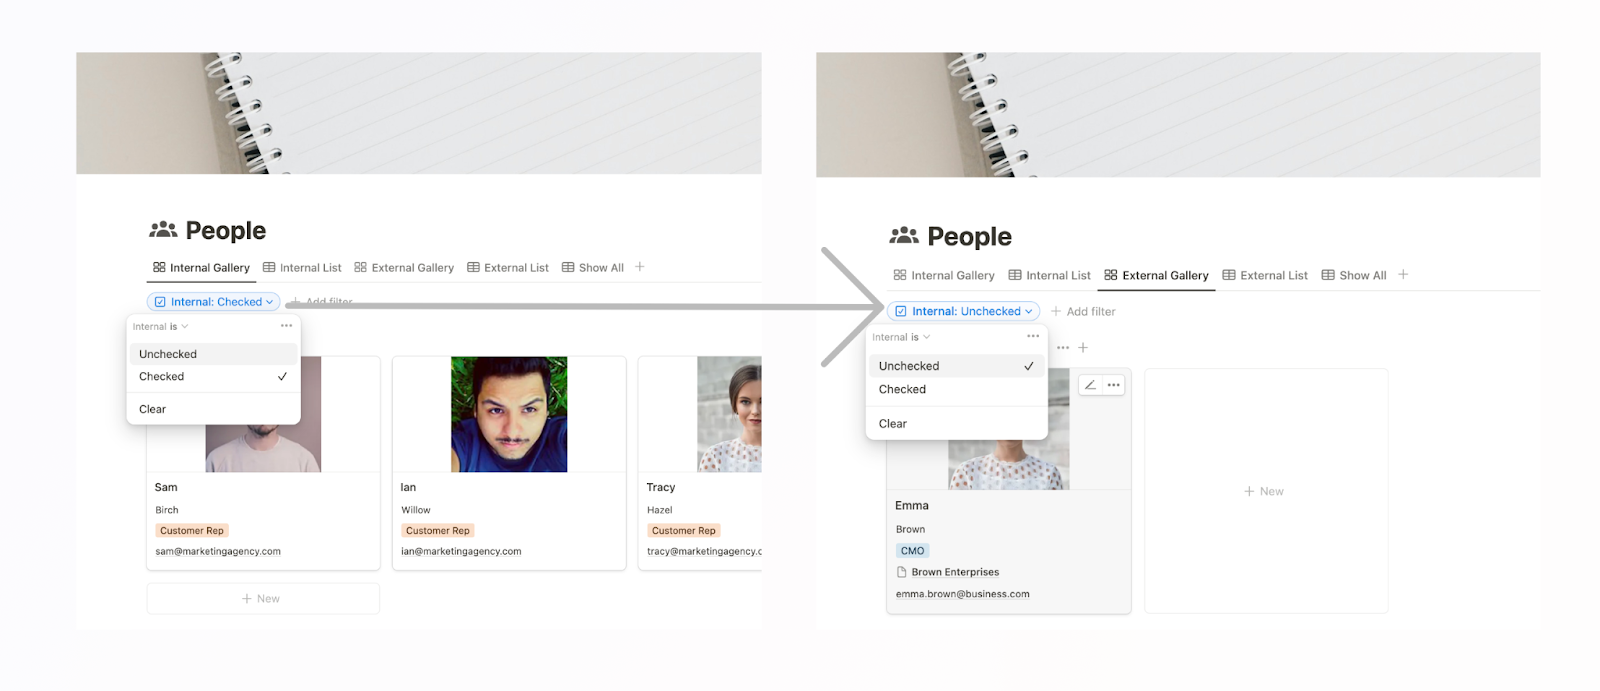
It's worth noting that making new entries in a filtered view will automatically adopt the filter's value. For instance, any new entries made in the internal view will have their "Internal" property automatically ticked. This means if you're wondering why an entry is missing from a filtered view, double-check if its properties match the filter conditions.
Grouping data
To help you view and summarize your data easily, Notion allows you to create groups in different ways. For our deals flow, this is a great way to visualize the sales pipelines by the status of each deal, or other categories.
Grouping Vertically: Boards
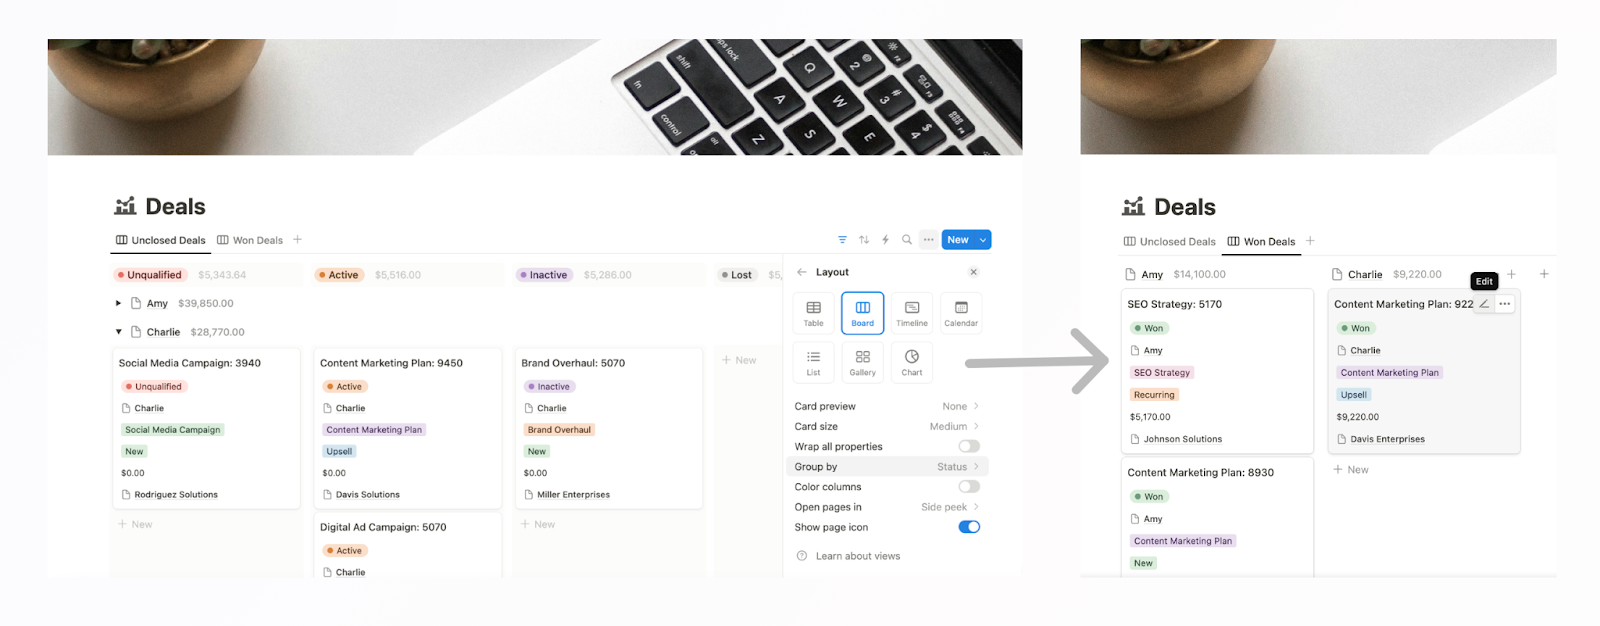
You may group vertically using the Board layout. This layout might be more suited to those who are more visual and want to see cards move through a process - you may edit if there’s an image preview, the card size, the option to show color columns (background), or remove the page icon. You’re also able to edit your shown properties directly on each card.
Traditionally, boards are grouped by Status, however, you may choose to group by any property. In the example above, Deals have been grouped by Account Manager.
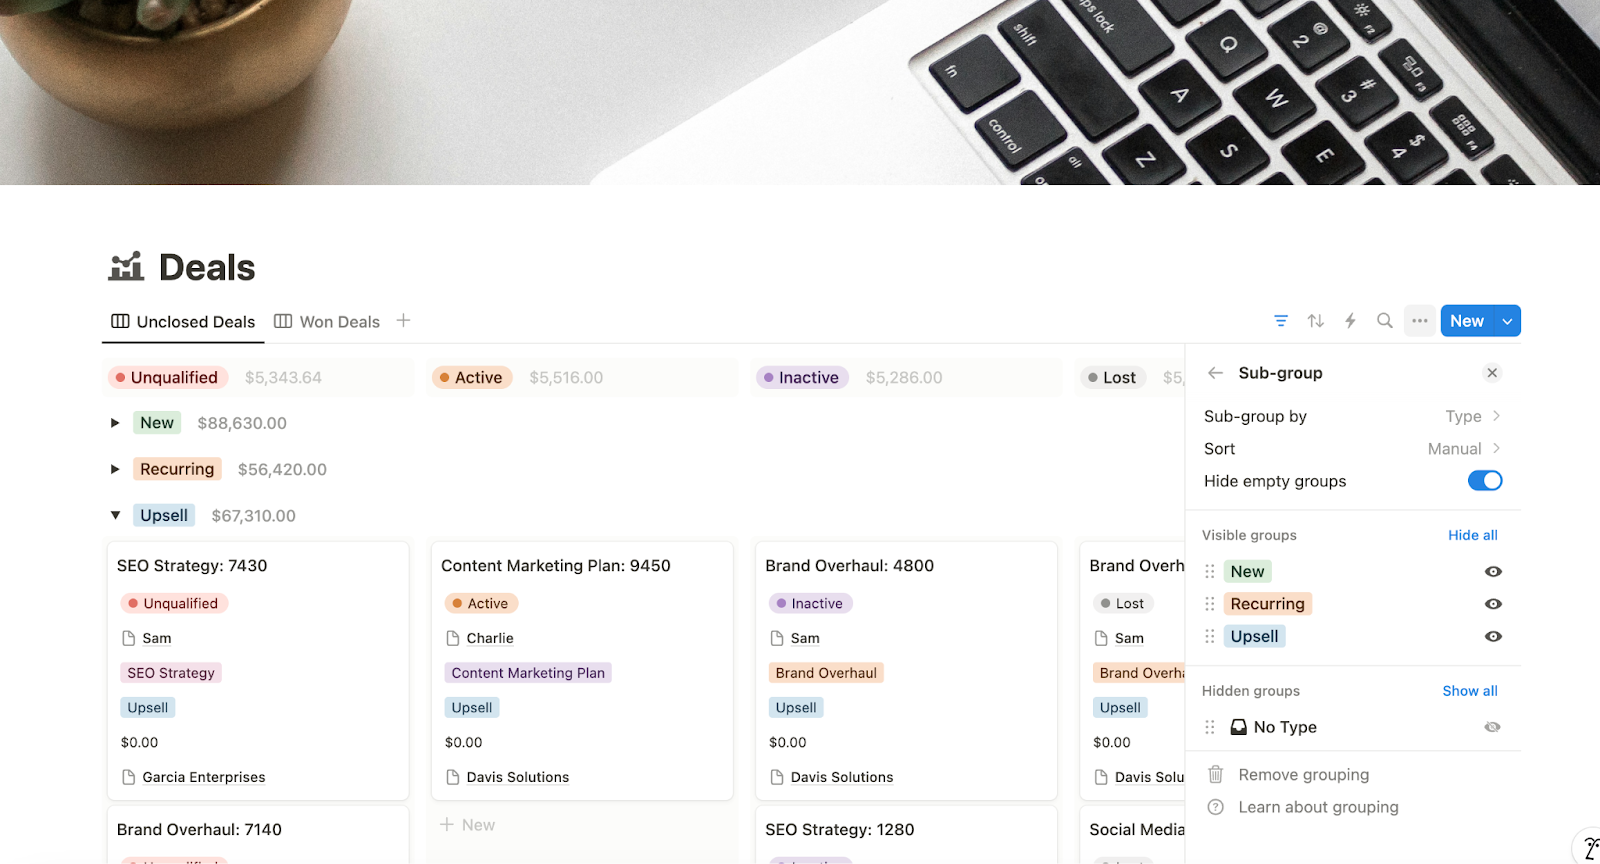
Grouping horizontally: Sub-groups
As well as the columns, you can group the cards underneath them too by using the "sub-group" functionality in your database menu. In the menu, you can choose which property to use as your sub-group, how to sort your groups, and whether to hide any empty groups. Horizontal toggled groups will then appear on your database view based on your selections.
In the example above, Deals are sub-grouped by "Type" of deal. "Type" is a static tag-based property (a limited number of inputs to choose from). It's worth noting that for dynamic properties where the inputs are limitless (i.e. numbers or dates), automatic sub-groups would be created, such as by week or by month.
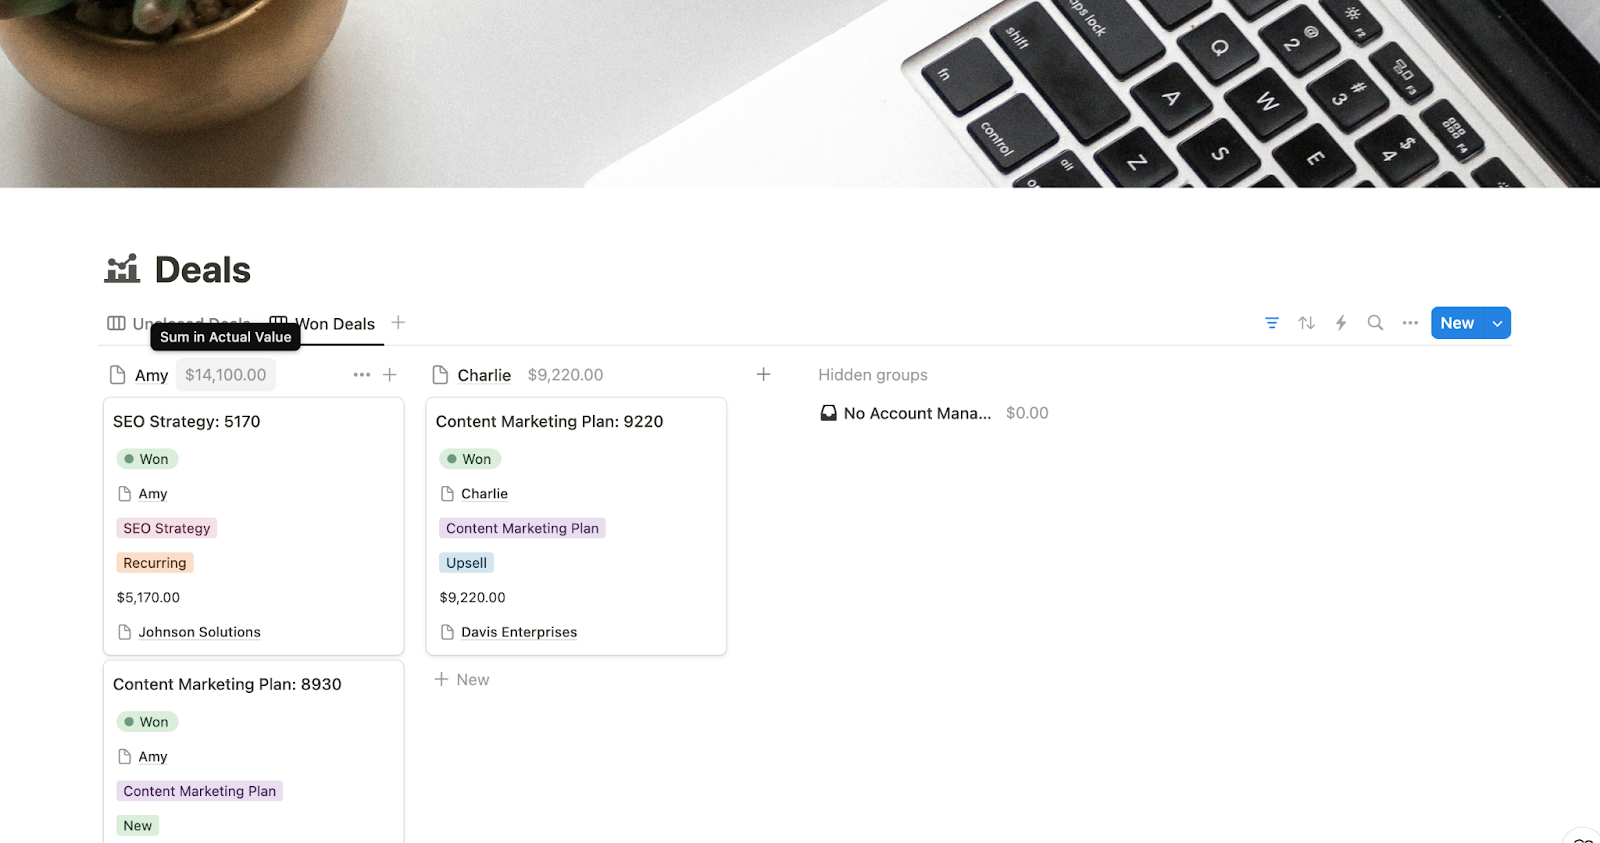
Using sub-groups to perform calculations
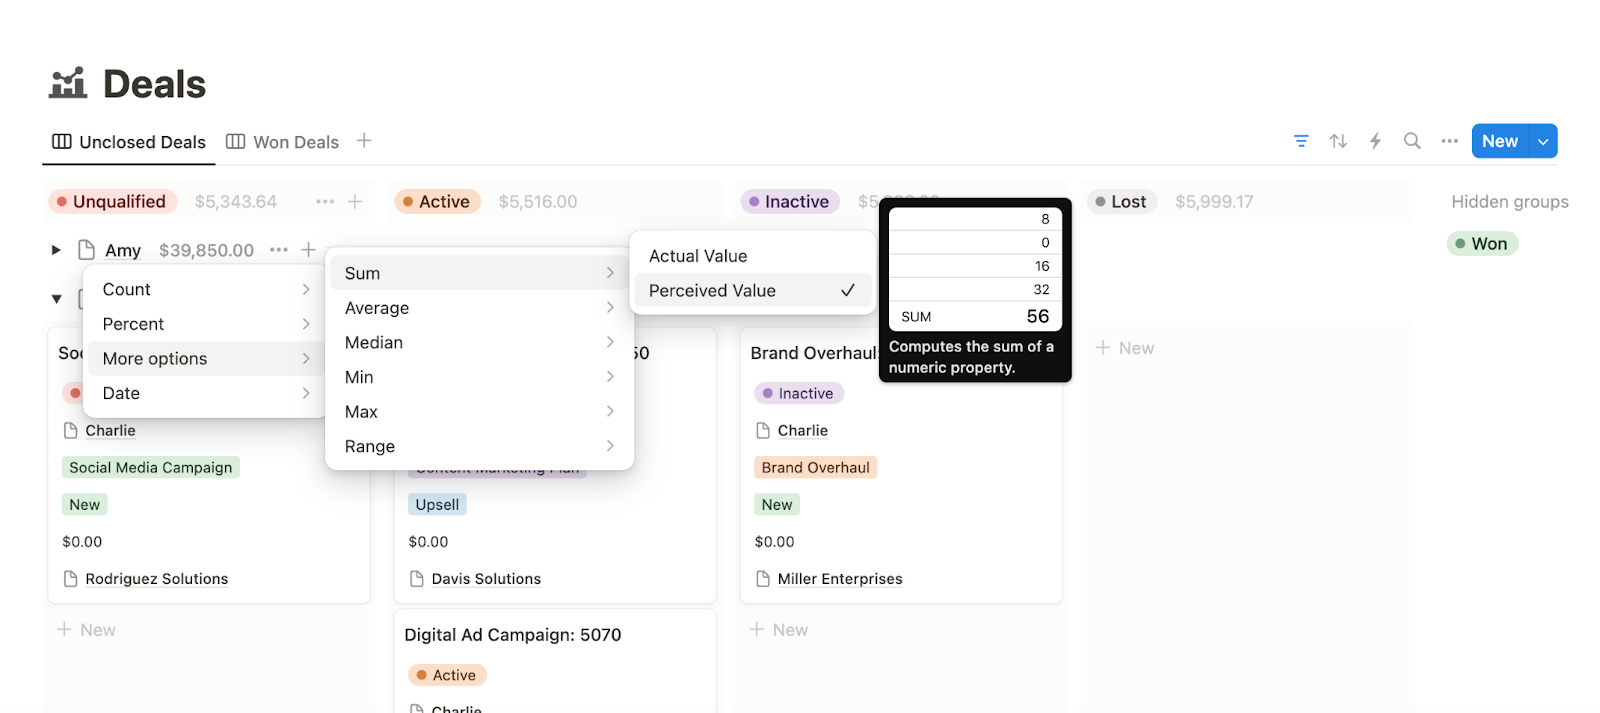
You can also perform calculations on each vertical group or horizontal sub-group by clicking the number next to the label to reveal the calculation menu. By default, it counts the items in each group/sub-group, but you can also calculate date ranges, percentages of a status/checkbox, or numerical averages for specific properties. This is a great way to get a quick overview of data.
In the example above, the sub-group calculates the sum of "Perceived Value" in the "Unclosed Deals" view, per account manager. Alternatively, you might calculate "Actual Value" in the "Won Deals" view. Depending on your needs, you can use sub-groups to quickly analyze segmented data. Other examples include grouping companies by industry, categorizing deals by their stage in the sales pipeline, or organizing contacts by their role or department.
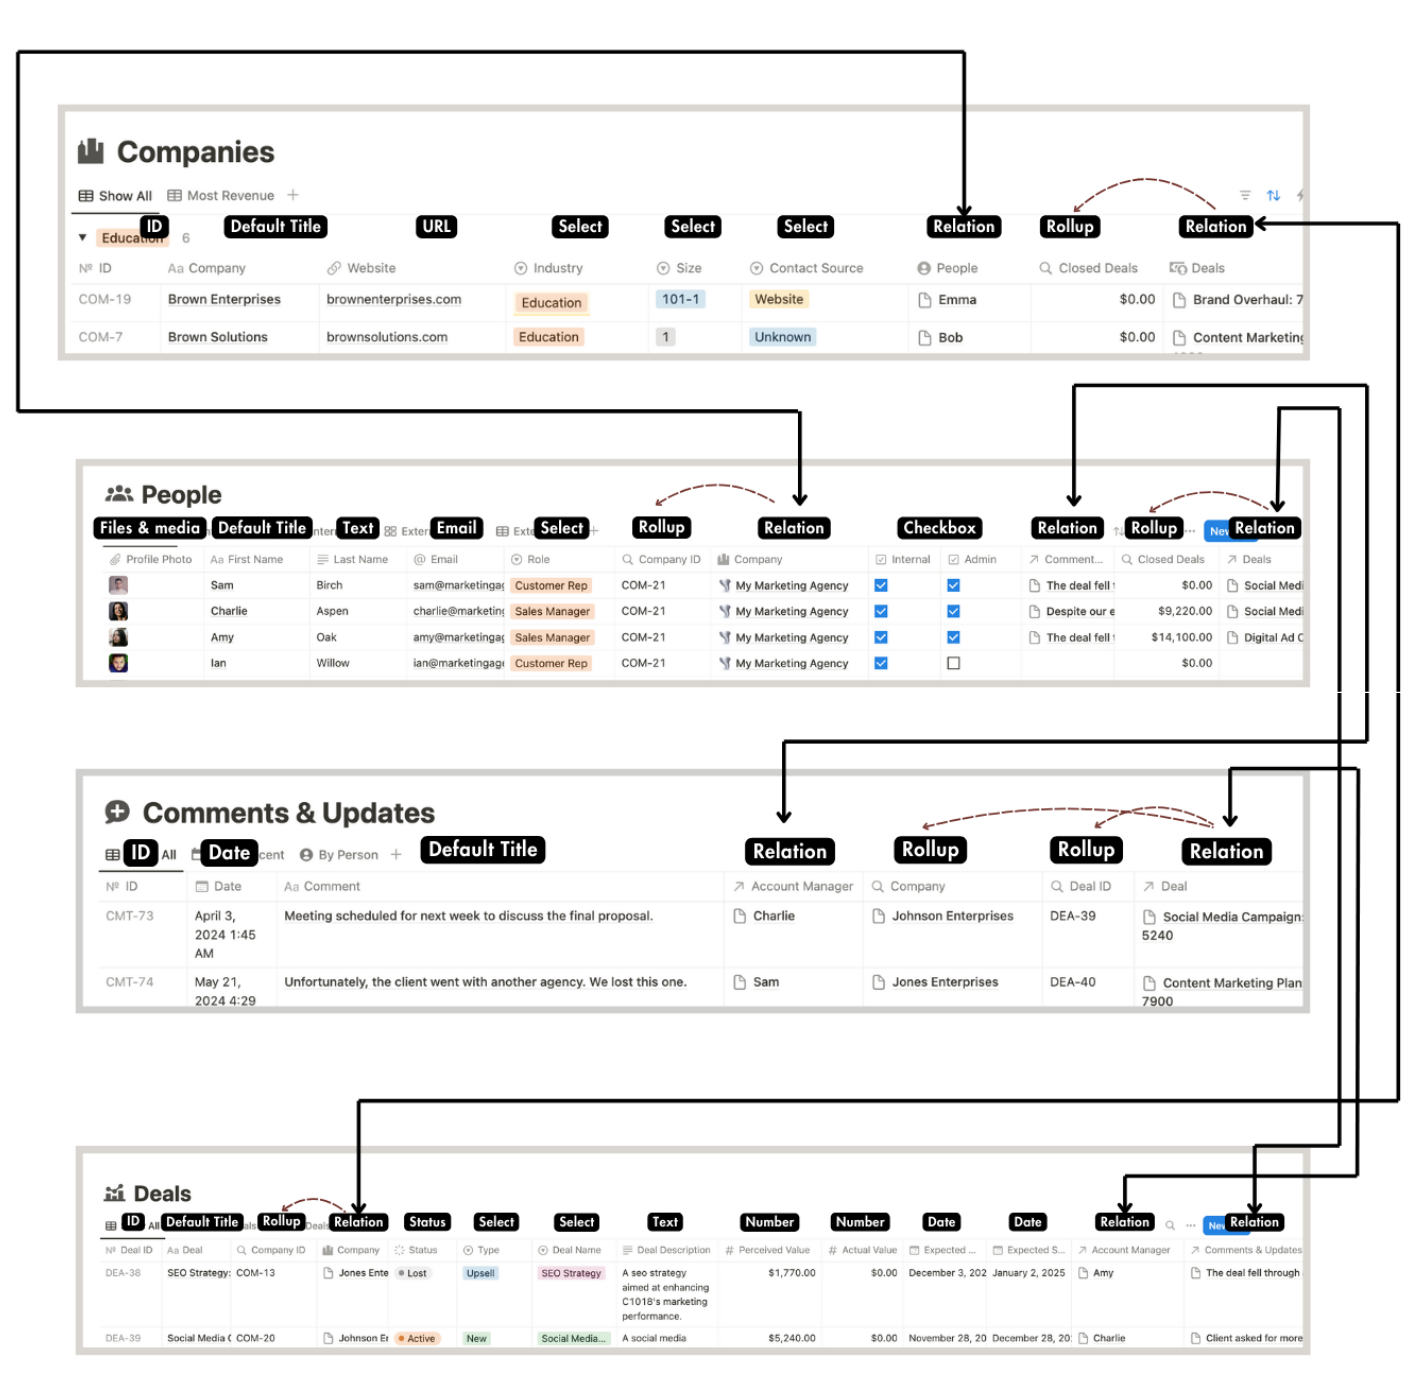
4. Connecting your Notion databases using Relations & Rollups
Now we’ve spent some time setting up our databases in different views, let’s connect this data across these different datasets to make this CRM even more useful. To do this, we’re going to use options called relations and rollups.
As you define each database, you’ll notice that some properties could be pulled or calculated from information in your other databases.
For instance, a useful relationship in a CRM might be contact details for people belonging to companies we work with—which we stored in two separate databases. Instead of manually filling in columns for each database and duplicating data, you can pull live information directly across using a relational property. This method not only saves time but also reduces human error.
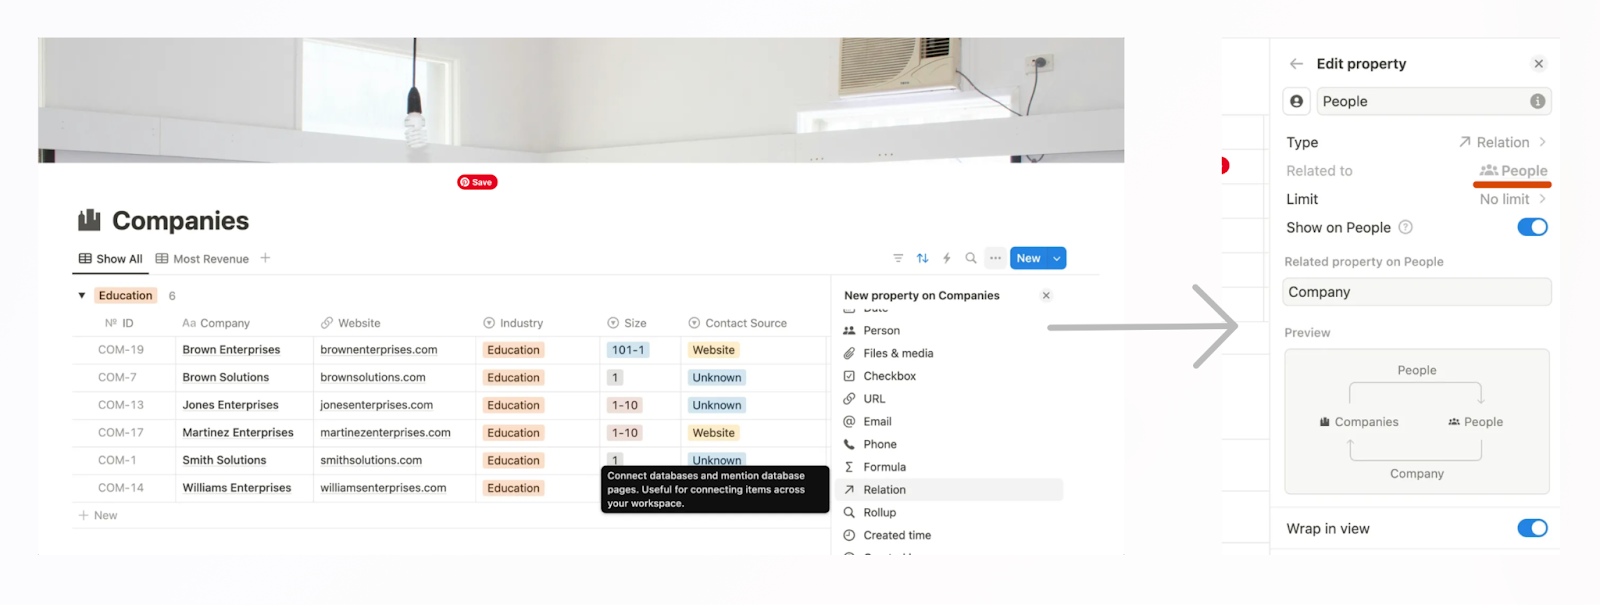
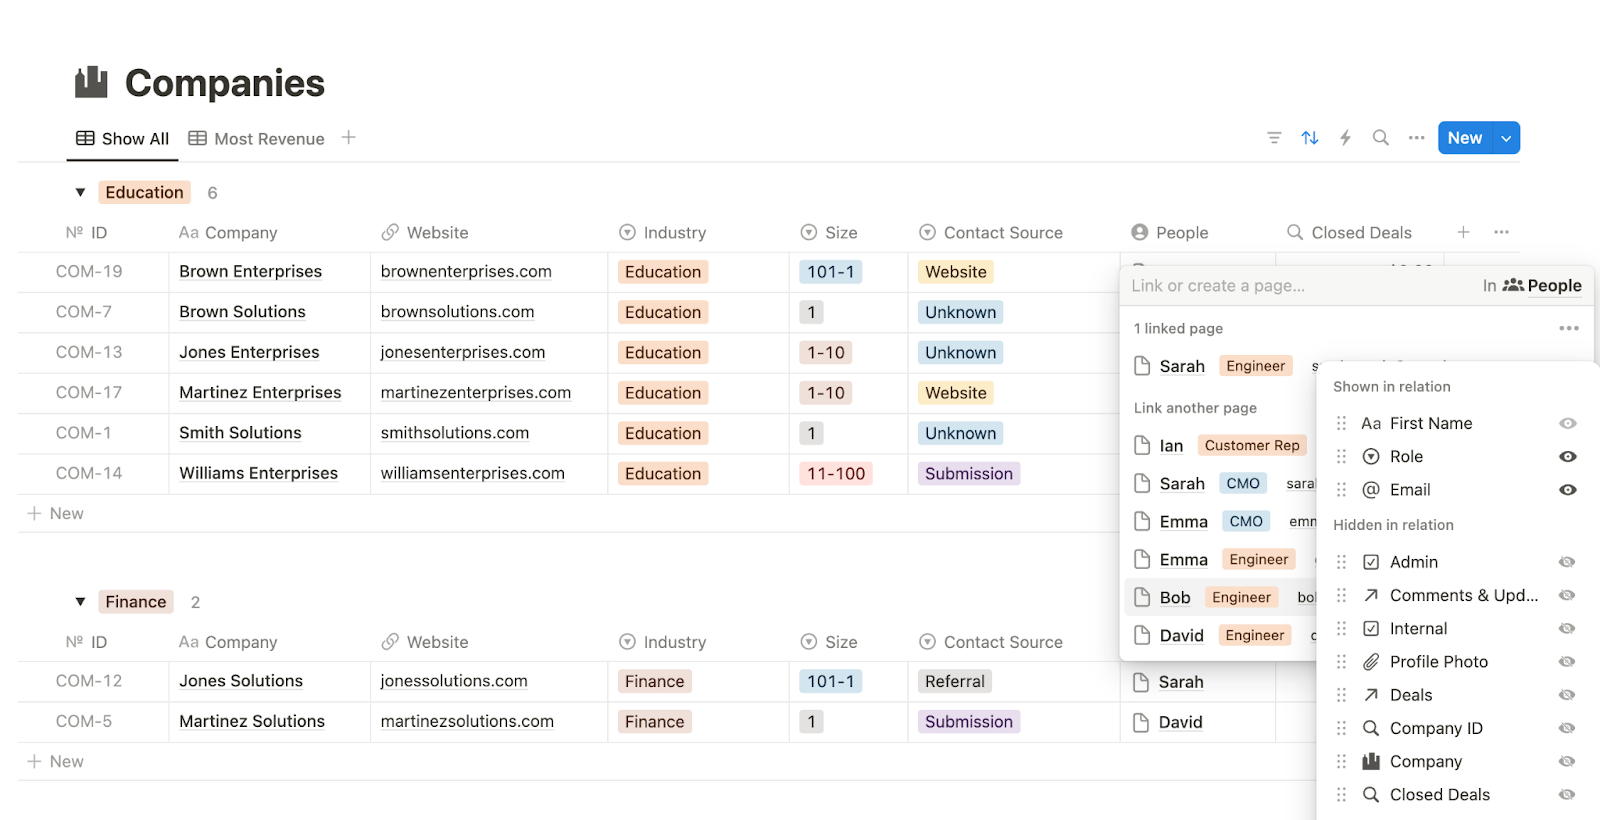
To create a relational property (called a Relation in Notion), first add a new property in your database and then select "Relation". You'll see a menu where you can name the property and select which database to pull from. In this example, we're working originally on the "Companies" database and pulling from "People".
Next, you'll be asked if you want to "Limit" the number of items that can be attached at once. In most cases, you'll likely choose "No limit". However, in certain scenarios, you might want to add a "1 page" limit—for instance, when assigning one account manager per company.

After defining your limit, you'll be asked if you want to "Show on [chosen database you're pulling from]" and what you'd like this column/property on the other database to be called. By default, this is toggled off, allowing you to access new items in that database when they're added or even add new entries. Think of this as a "live-updating tag" that everyone can access.
Alternatively, if you want to create a two-way relationship, toggle this setting on, as shown in this example. This two-way relationship allows users to select or add "People" from the "Companies" database and vice versa. The system property map above is an example of what an end product would look like.
While Relations help you connect pages/records from different databases together, Rollups are really useful for performing calculations on the connected pages/records.
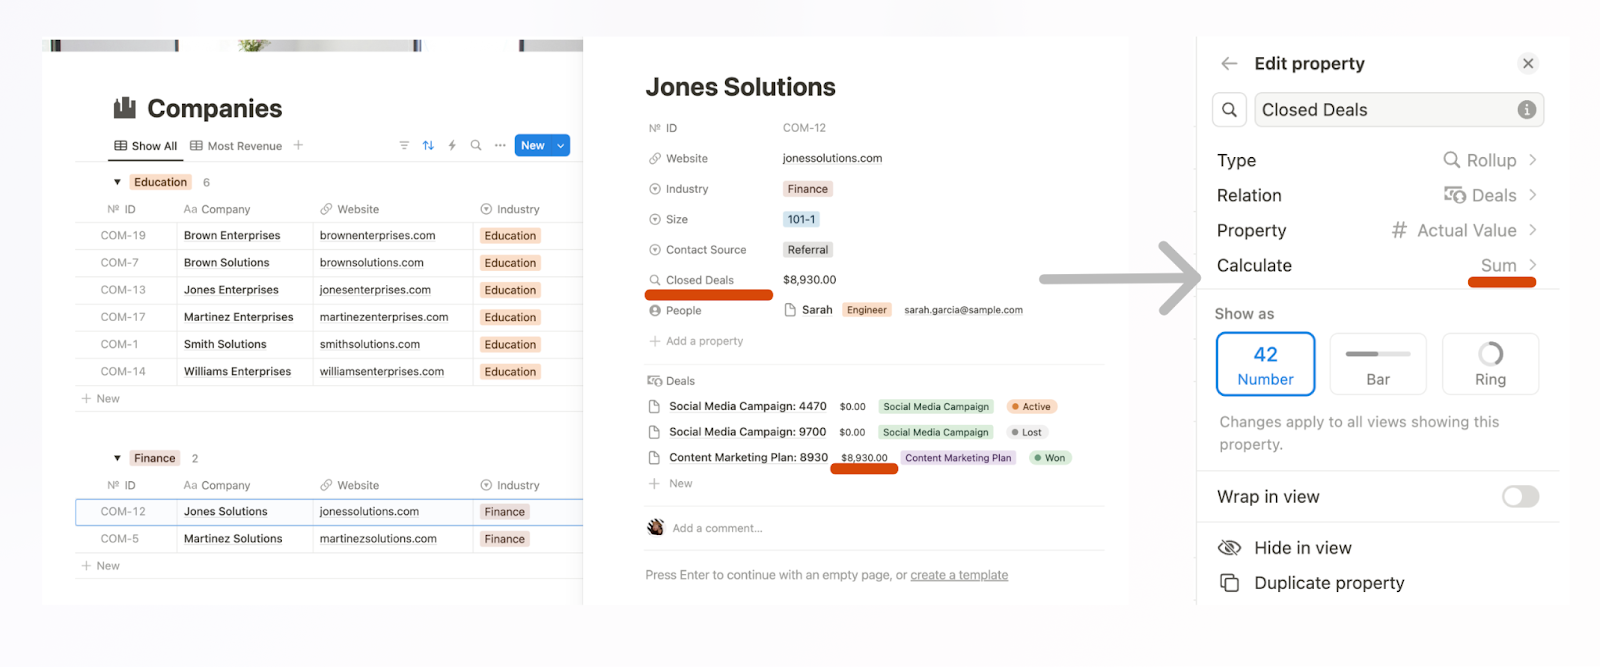
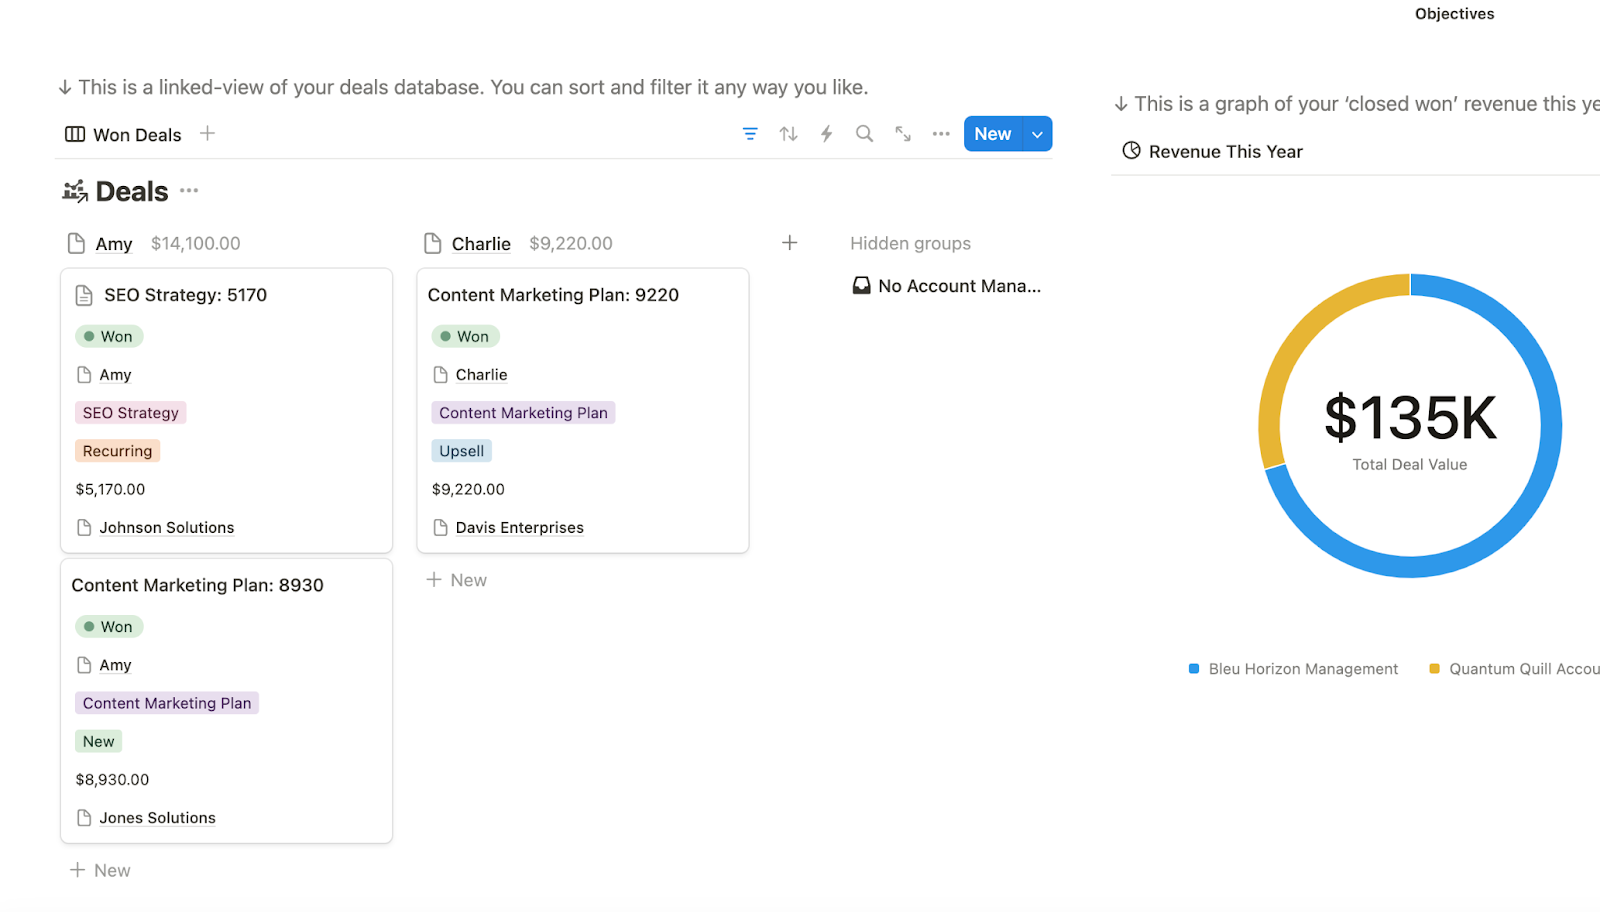
In the example above, the relational property "Deals" is calculated by the rollup property "Closed Deals." This rollup calculates the total sum of the "Actual Value" (a property in "Deals") for all deals related to the company. The sum updates automatically whenever a new deal is linked to a company or when the "Actual Value" of a connected deal changes.
Having this kind of dynamic data enables intuitive sorting, such as the "Most Revenue" view tab shown above.
The other properties in the Deals database allow for various rollup calculations that can be incredibly useful in a CRM. For instance, based on the properties in Deals that you can see in the example above, you could count the number of deals per company or calculate the percentage of deals won.
Relations and rollups in Notion create powerful connections between databases and enable calculations based on these connections. This approach not only saves time by reducing manual data entry but also ensures data consistency and enhances reporting capabilities.
By linking data across databases, you can establish intuitive relationships throughout your system. Once you get the hang of setting up Relations and Rollups the options are almost endless. Other examples that will empower your users with better data overviews include connecting projects to tasks and calculating total project hours, or linking products to reviews, and computing average product ratings.
5. Handling comments & updates in Notion databases

By default, Notion offers native commenting functionality making it really easy to collaborate with your team. You can start a comment thread at the top of each page or add comments directly to page content and database properties.
Creating a database for comments
It’s important to note that since native comments can be made anywhere across Notion, allowing users to comment anywhere can get a little disorganized. For a more structured approach to tracking comments and updates across deals, that also enables transparency for the whole team, you can consider creating a separate database for comments and updates. You can then use the Relation property to link this database to your People database (where your Account Managers are stored) and to each individual deal.
Alternatively, you could integrate Notion with a third-party software such as General Collaboration, which tracks comments across Notion, as well as other apps, such as GSuite, Figma and Jira.
6. Creating & customizing database templates in Notion
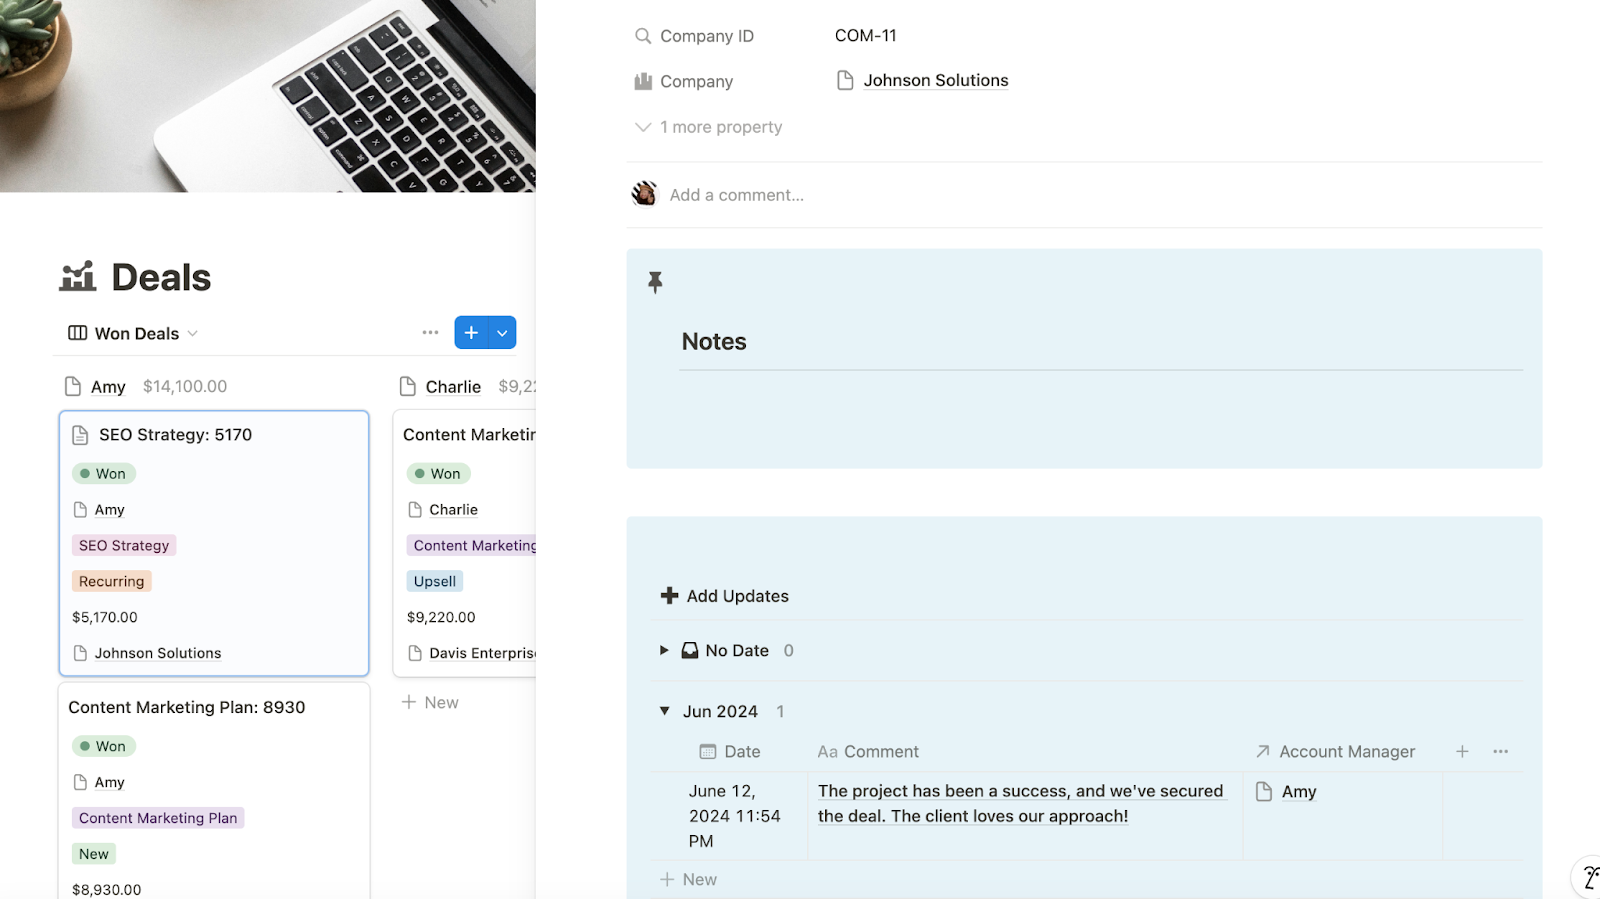
Now that you’ve got your databases together and presented beautifully, it’s time to start leveraging some of Notion’s features to enrich this dashboard with more functionality. A key advantage of Notion is its ability to populate each database page or record with rich custom content and layouts — including notes, text, embeds, other linked databases, and more.
Thanks to Notion's database template functionality, you can also create templates for any pre-existing content you need on a page. This saves significant set-up and admin time compared to creating pages from scratch each time.
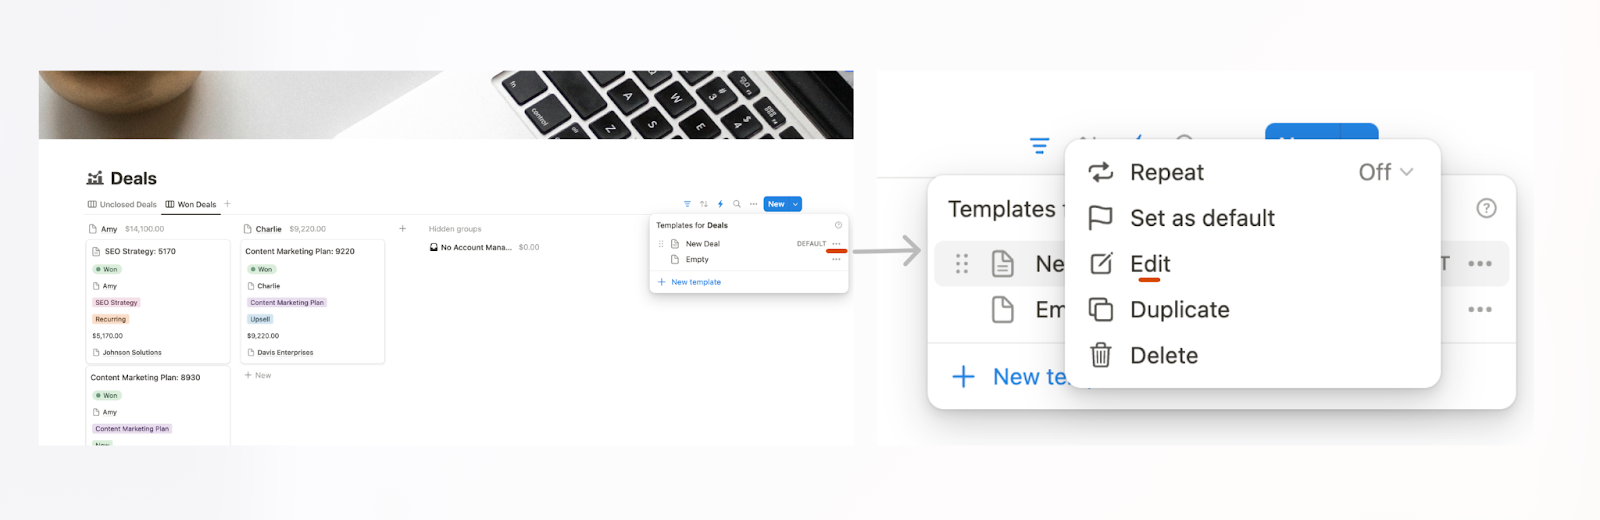
You may even have multiple types of templates. In the example above, we are working within the Deals database. In this case, you might have different page templates for one-time deals or recurring deals where you detail the exact confines of the project. You can find and manage all your Notion database templates in the top-right corner of your database by clicking the dropdown arrow of the blue "New" button. To edit a template, click the three dots next to your target template to access the settings. To generate an actual new page/record within your database, click on the template label itself.
Once you select "Edit", you can input all the content blocks needed to create your desired layout. The "/" symbol is your friend here for discovering all the opportunities in Notion - start a line by hitting the backslash on your keyboard and search through the list of content blocks.
An example for this use case is we could create a content block with a list of intake questions that you need to ask each time. You'll always know you're in edit mode when you see the yellow editing banner at the top of the screen.
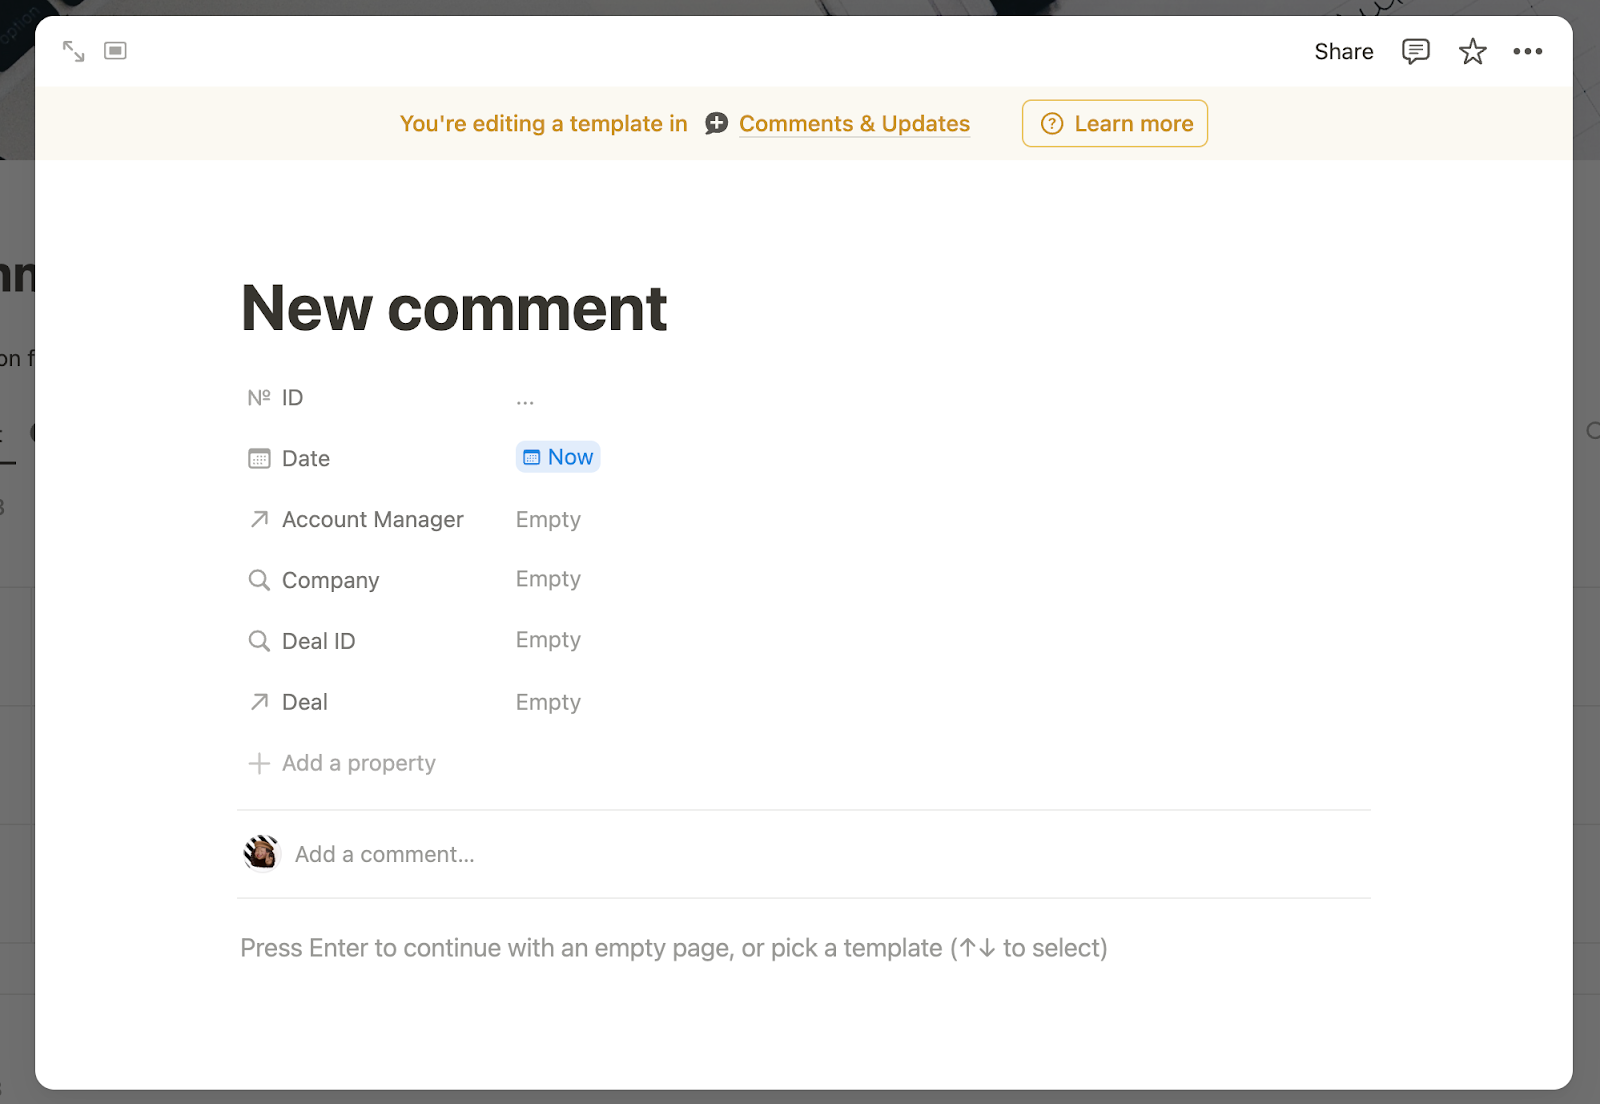
As well as content, you can also pre-fill properties in templates. It’s worth noting that you can also pre-fill properties with dynamic data. In the case of date properties, you can pre-fill this with “Date” is “Today” (date the template is activated) or “Now” (including the time of activation), instead of fixed dates. This is particularly useful in cases where you want to automatically capture the time updates or comments are generated as above, or the start date of a project, once it’s moved through your pipeline and entered a project database.

Additionally, if using a Person property, you can set this dynamically by choosing “Person who duplicated page”, instead of a fixed person. This is useful when you want people to automatically own the information they’re putting in Notion.
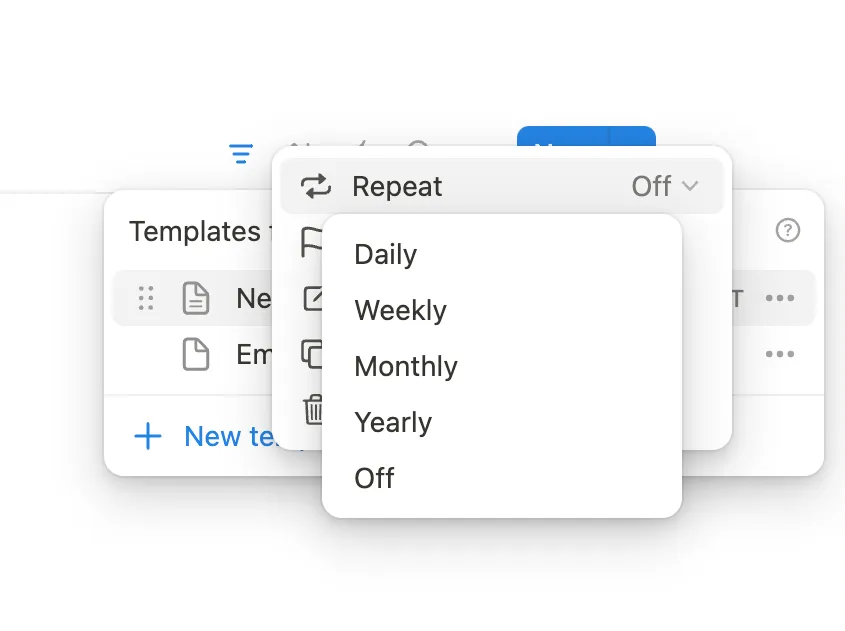
For action-based templates that should recur on a schedule—such as team recap meetings—you can create recurring templates within the same template editing menu that auto-generate according to the time chosen.
The template editing menu also offers the option to create default templates. This feature is useful when you have a single template that should automatically be the default when you create a new page. You can even set a different default template for when you create a page from within a specific view.
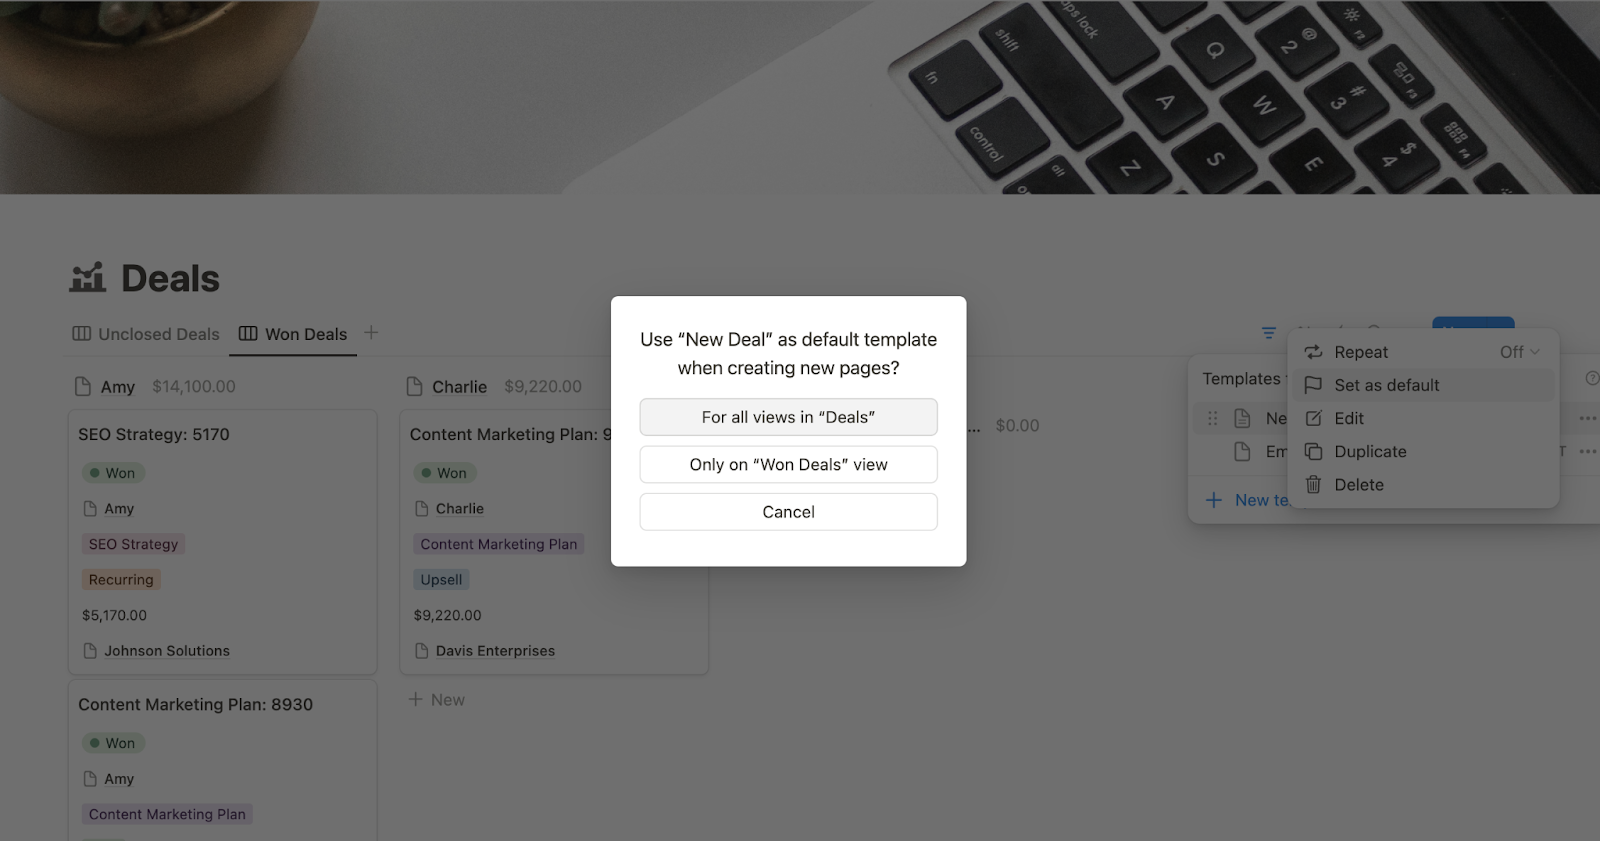
This setup allows you to begin with a pre-formatted page rather than a blank one, saving time and ensuring consistency.
If you don't want templated content to automatically populate a new page, ensure that the "Empty" template is set as the default in your database's template menu. This way, you'll have the option to manually apply a template after creating a new page.
This is most effective in processes where there is value for a human to pre-select whether a template is needed (or not).

7. Self-referencing database filters in templates
Now that you’ve set up some template pages for your database, you might want to create some dynamic options for templates that change according to the Relations between data you set up earlier. For our use case, we’ll set up a template page that automatically generates for each Deal entry and links to the Comments & Updates data that we have for this deal.
In Notion, you can achieve this through "self-referencing database filters”. In this instance, when you click into a deal, it will show you a subset of filter. This follows on from knowing how to build a database template but you must first understand the principle of linked database views, which we'll explain below.
Linked Database Views
Linked database views allow you to place a synchronized view of an existing database elsewhere in your system. Any changes made to a linked database view will automatically update all instances of that database across the system. This is a great way to ensure that everyone is looking at the most up-to-date version of information.
It's important to note how permissions interact with linked database views in Notion. If you place a linked database view on a shared page, users without access to the original database won't be able to see it on the shared page. Additionally, if you place a filtered view of a linked database on a shared page—intending to "hide" some information—and grant access to the initial database, there's no way to prevent the end user from removing the filter on the linked database view and seeing the "hidden” information.
To create a linked database from scratch, use the "/" key on your keyboard and search for "linked view of database." Select this option when it appears. You'll then see a list of recently used databases to choose from. If your desired database isn't listed, simply search for it until it appears.
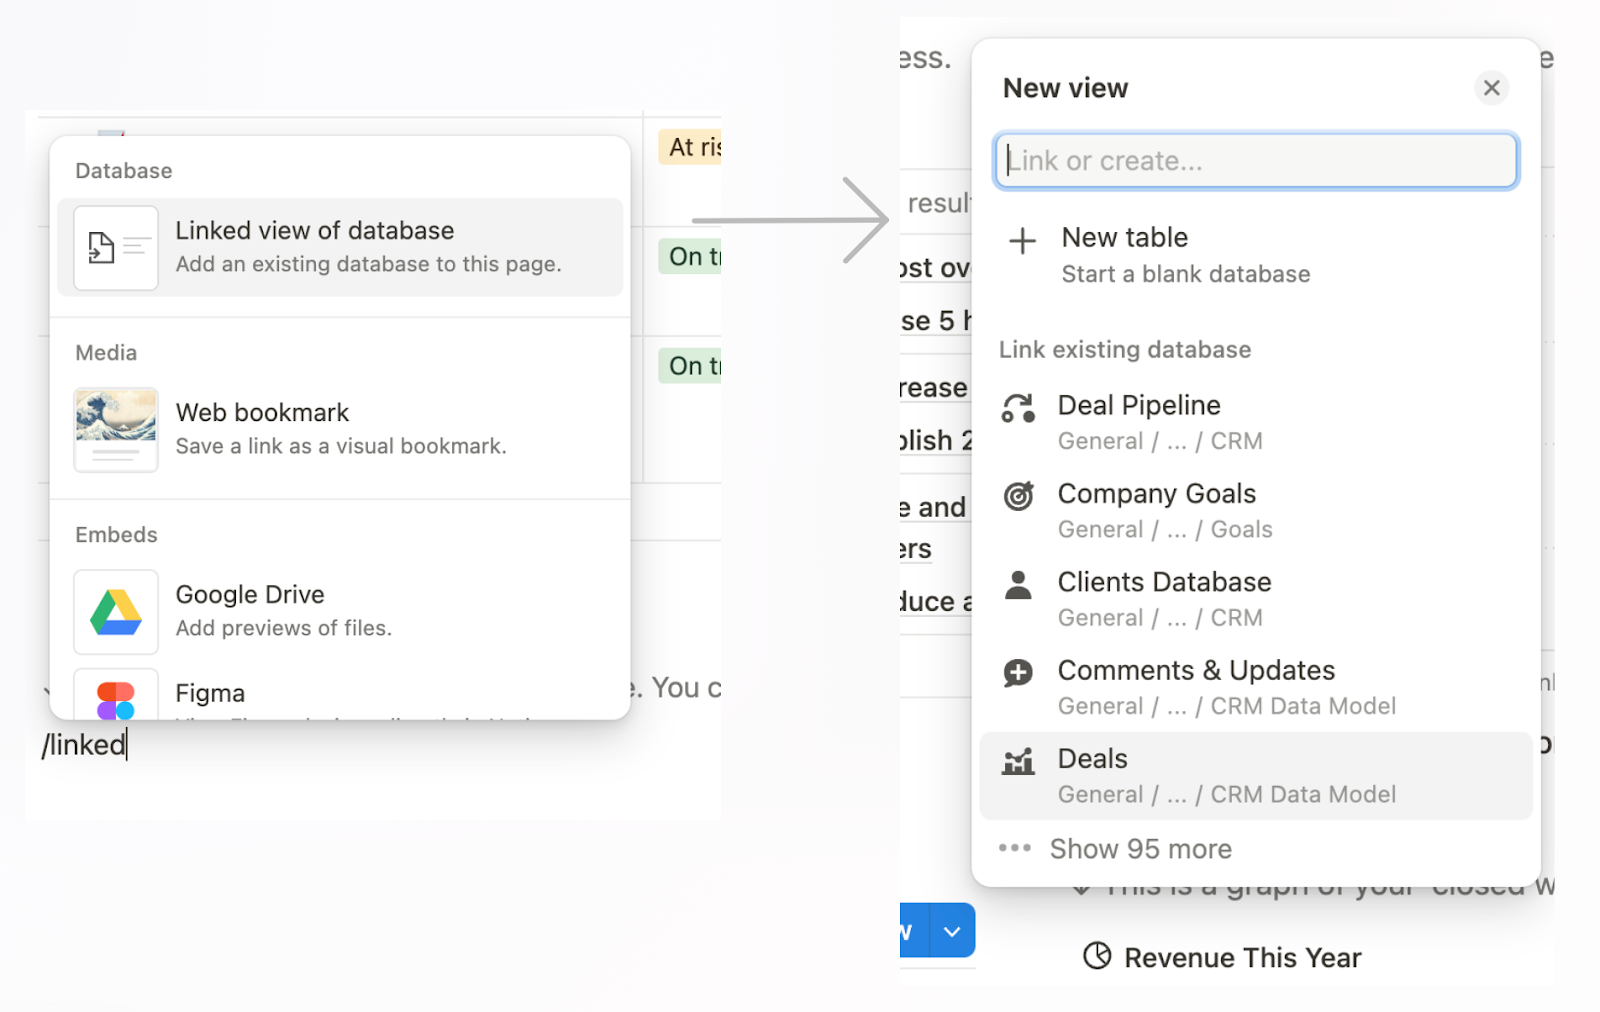
Once you've chosen your desired database, Notion will show you a list of views you've already created on the original database. These act as "starter templates" and can be formatted to better suit your needs once activated—for example, by changing the filter or sort settings. For this reason, it's best practice to create all the starter views you’ll need on your original database, as they will go on to serve as quick-access templates.
Choose the view that most closely matches your desired format.
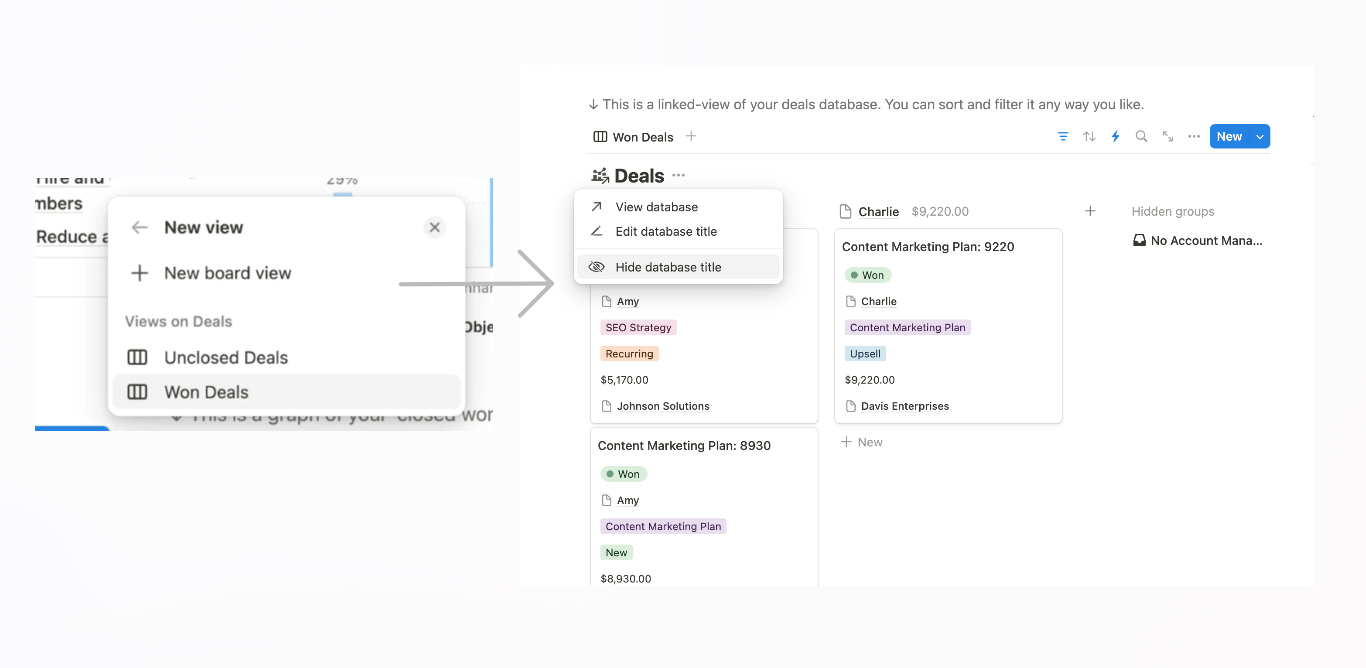
Once created, you'll see that the live view is now embedded in the page and has the original database name with an arrow over the top of the page icon. This arrow always indicates that you're looking at a linked database view, not the original. Clicking the database title will redirect you back to the original database. You can hide the title, should you wish, by clicking the three dots next to the database name.
Security tip: It's important to note that deleting a linked database view does not delete the data itself—just the view. However, if you delete an entry or change a piece of data on the original database, this change is reflected everywhere. For this reason, for better security, you might choose to store all your original databases in a single location, provide access to each one as necessary, and then create dashboards made up of linked database views. This way, if someone deletes a linked database view, it doesn't matter, whereas deleting an original database would delete it across the entire system.
Self-referencing databases
Now that you understand how to create a linked view of a database, we can add one simple step which allows us to create a database template that will automatically link data across our datasets.
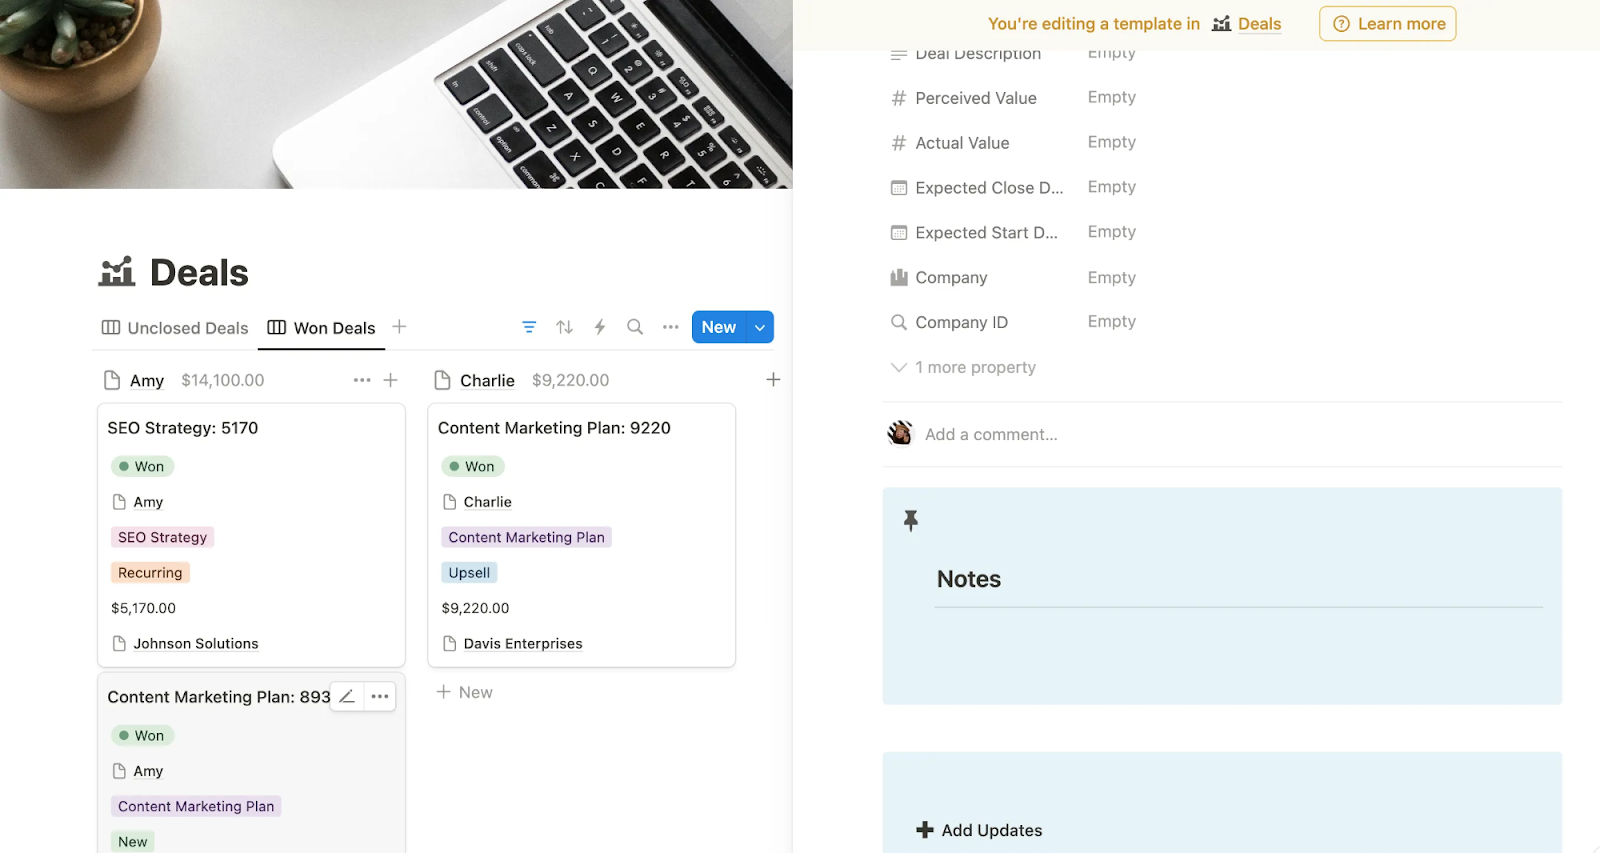
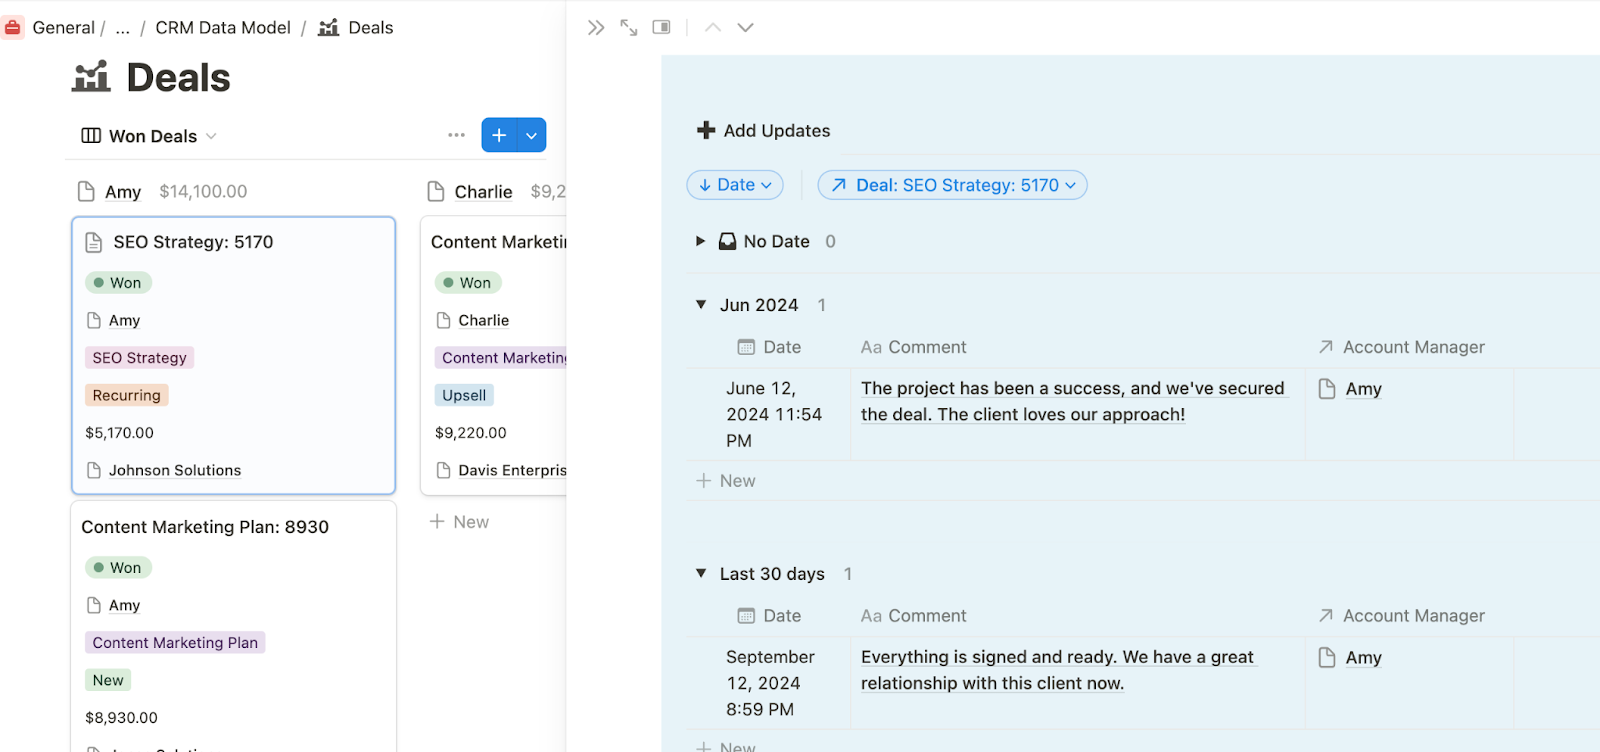
On your chosen database template, assess your Relation properties and create a linked database for a Relation property that a record/page in your database would have “many of”. In the example above, the database we’re starting with is "Deals" and the thing that it has many of is "Comments & Updates".
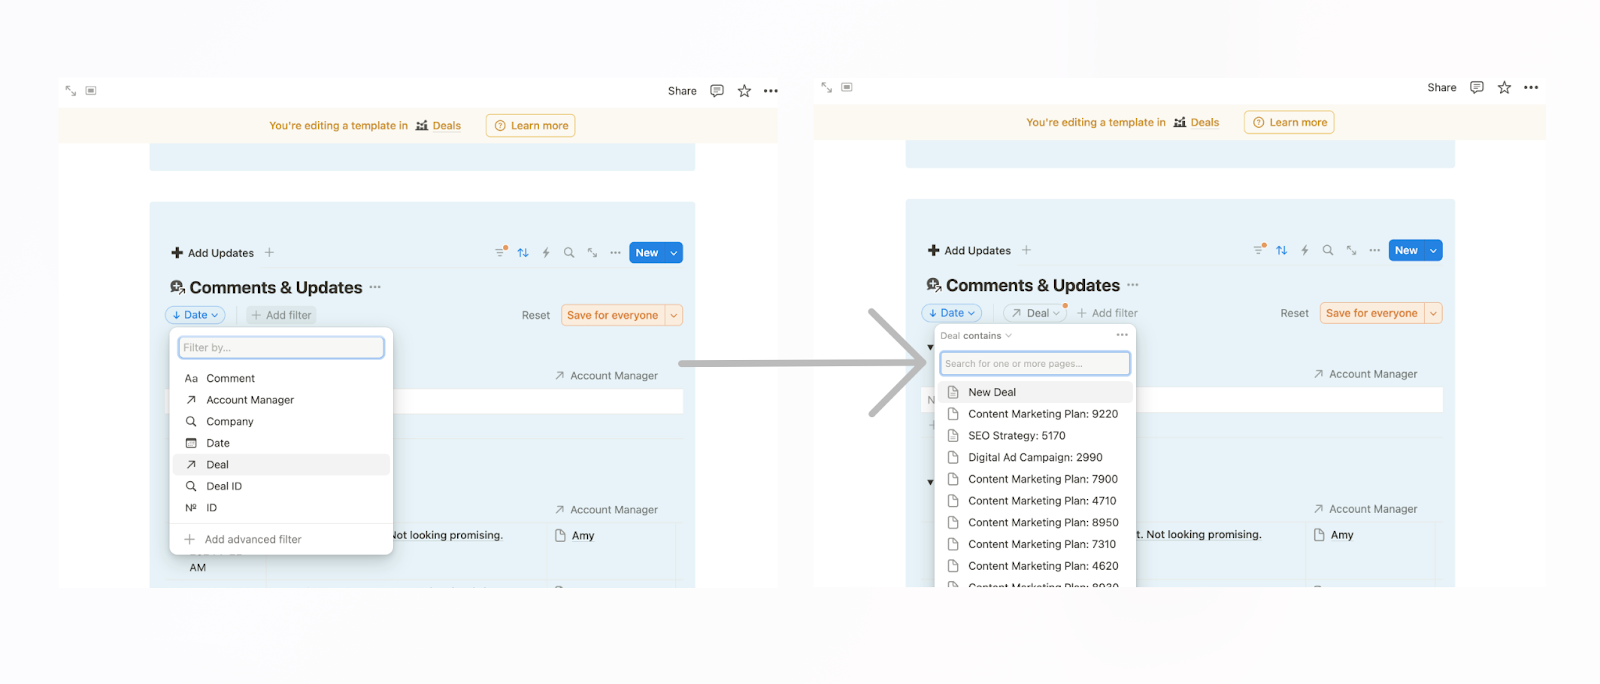
You’d imagine that if you wanted a snapshot of related comments and updates per deal, you might create a linked database view of ‘Comments & Updates’ inside the deal template and manually filter it each time a new deal page is created. This is a lot of manual work and Notion instead allows you to use the template name as a placeholder and replaces this with the actual name of the page, once it’s created.
After assessing your Relation properties and creating your linked database view, open the filter menu for your linked view and locate the corresponding database property that represents the database of the template you’re working from—in this case, "Deal". You'll see a list of pages/records from the parent database. Select the top page, which is also the name of the template you're working on. This tells Notion that this is a placeholder, which it will replace with the actual parent page when activated. Don't forget to "save for everyone".
The result is an automatic summary page of all comments & updates related to the deal page you have open!
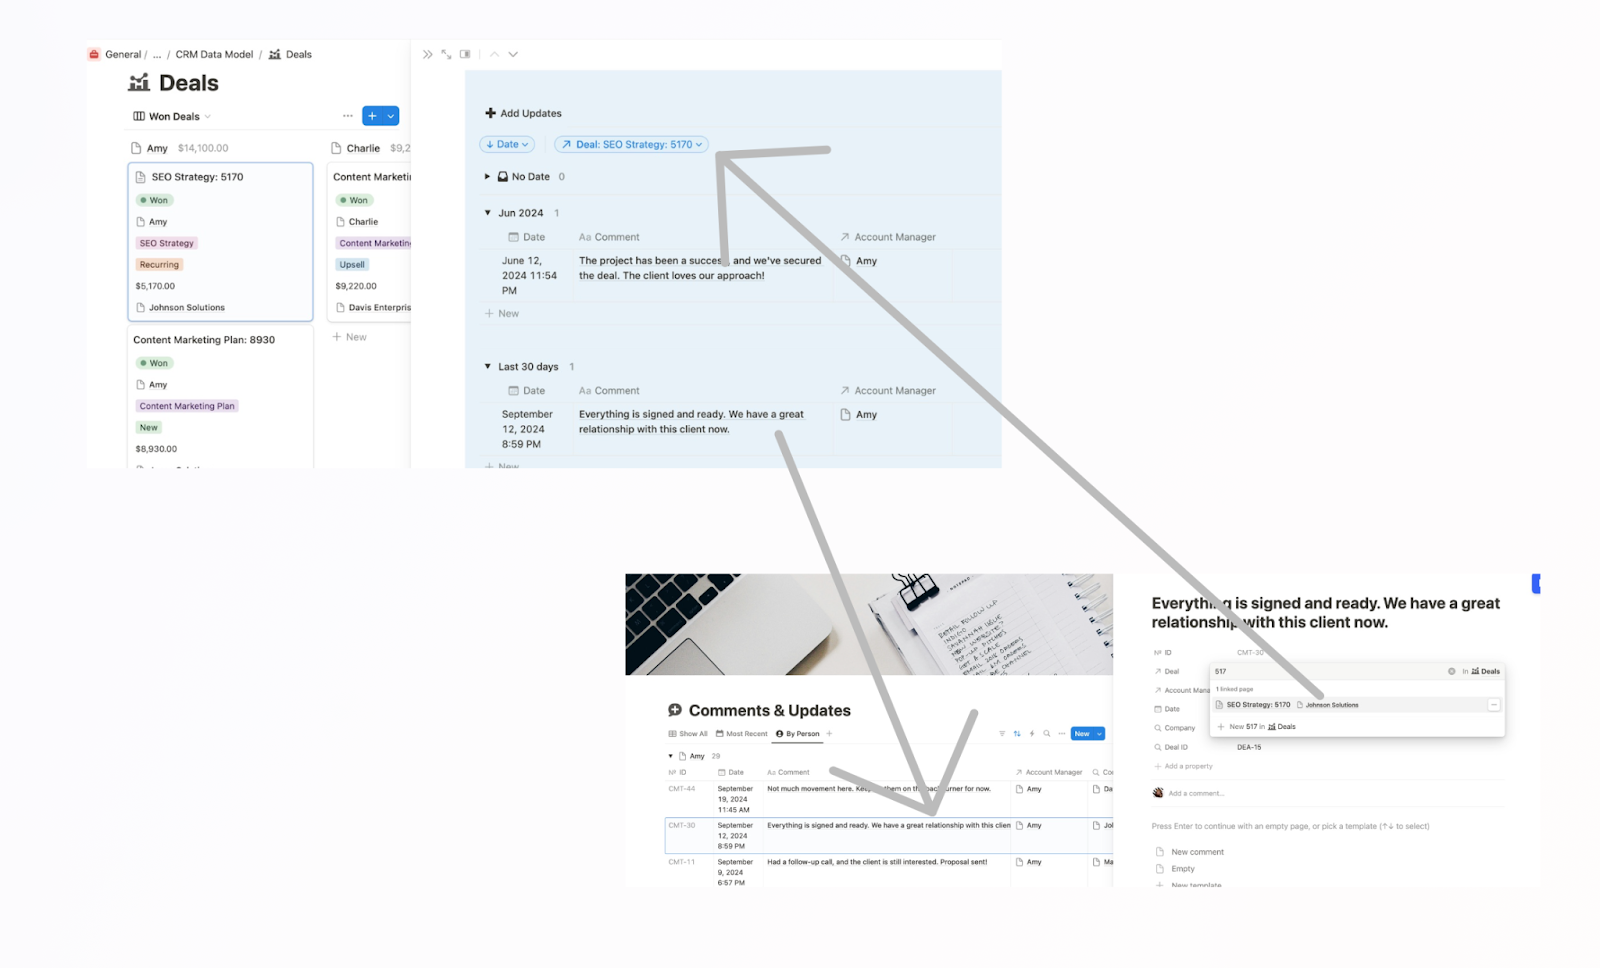
When the self-referencing template is activated by creating a new page, Notion automatically replaces the name of the template with the actual page name in the filter.
It’s worth remembering that any pages added from a filtered view will inherit the values of the filter. In this instance, all comments and updates are filtered by deal “SEO Strategy: 5170”. Any new comments and updates added in this view from the deal’s page will automatically be linked to this deal.
Likewise, if a comment or update was linked to the deal from elsewhere (e.g. the main dashboard), it will automatically show on the linked view on the deal’s page given it matches the conditions of the filter.
Self-referencing databases are a great way to create dynamic and contextual pages within your workflow.
8. Creating database automations in Notion
Automating repetitive processes significantly reduces your administrative time. In Notion, you can create native database automations where a condition in a database either triggers a response in the same or another database, or sends a notification (to Slack, for example).
Notion's native integrations are currently relatively basic and aren’t yet able to perform conditional branches. For more complex automations, you can integrate your Notion databases with no-code automation tools such as Make or Zapier.
In the example below, we will create an automation that triggers a notification to a specific workspace member (the one responsible for Education companies) when a company from the Education industry is added to the Companies database. This would be useful if there were subject matter experts on your team who can do further research into these companies, and this would ultimately reduce the time needed to manually notify this member via email or in a meeting.
Note that native automations are only available on paid plans. The best way to approach automations is to first refine and familiarize yourself with a manual system and identify the repetitive tasks before implementing numerous automations. This approach helps you avoid the need to untangle complex automated processes later on, should your processes change.
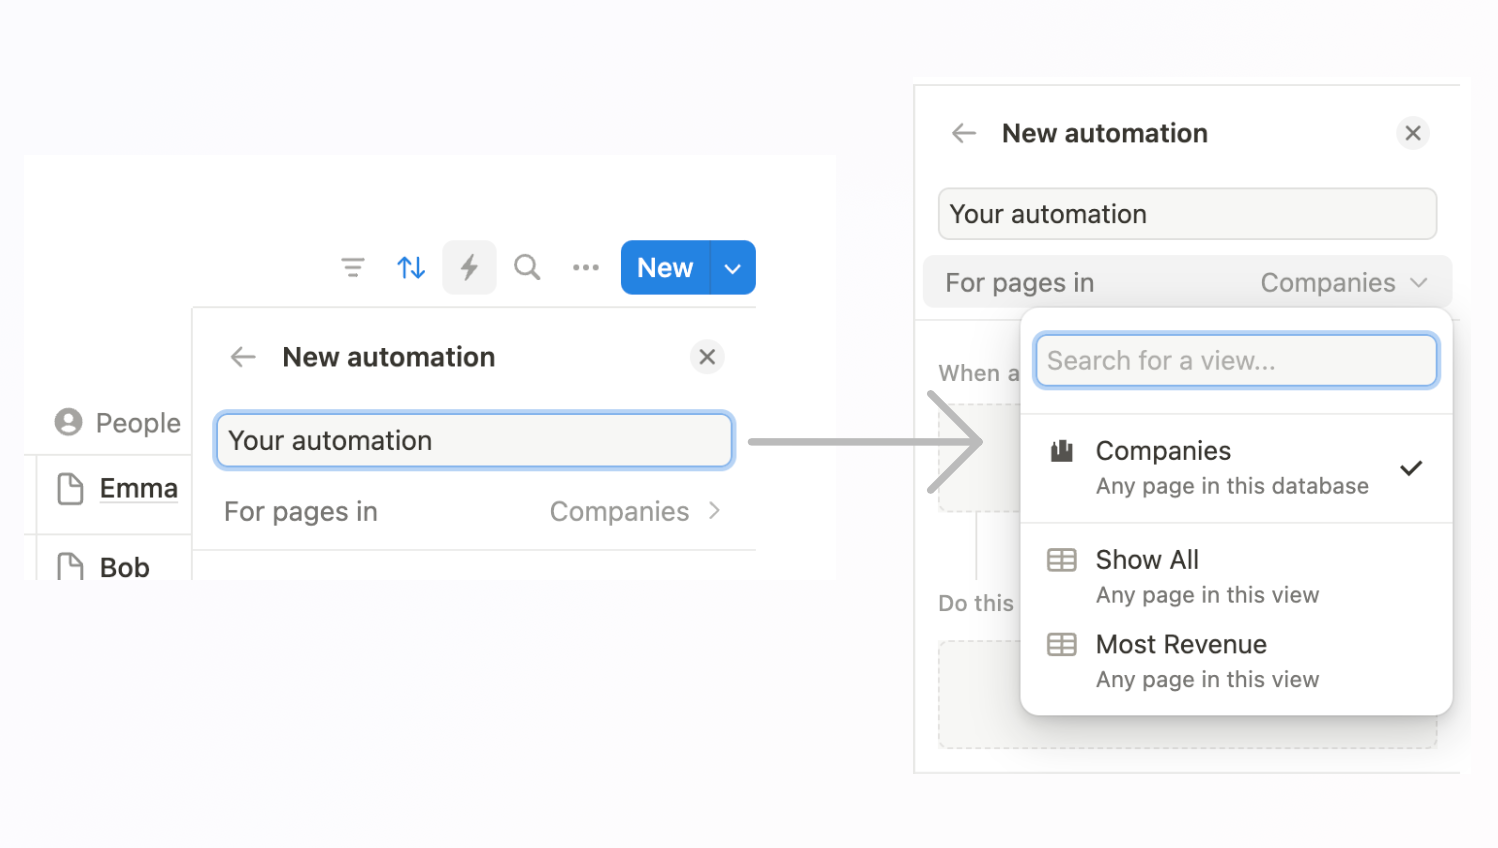
To create a new database automation, click the lightning bolt symbol in the top-right corner of your database view and name it. To choose whether to set the automation at the database level or just when you’re in a particular view, click the database name to reveal these options, as shown in the example above. This feature is especially useful for status or date-based views—for example, "Complete" (based on Status tags) or "Overdue" (based on due dates). You can trigger actions, such as sending notification messages, when entries meet the conditions required to appear in the relevant view.
You can choose between two types of automations using the conditional switcher. For one-to-many automations, where you want the action to occur if any of multiple scenarios happen, set your automation to "When any of these occur". For specific automations, where you want the action to occur only when all conditions are met, set your automation to "When all of these occur". Once you set your conditions, select “Add trigger” to open the trigger menu.
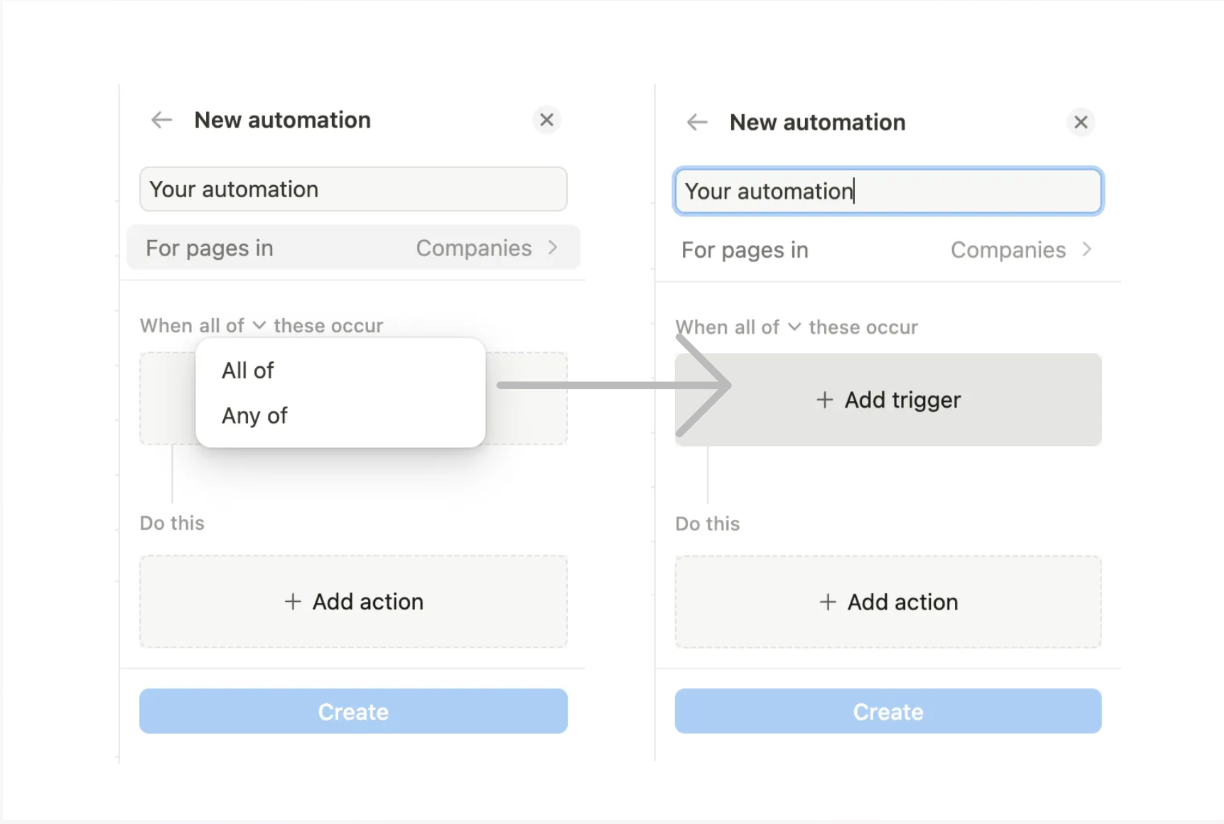
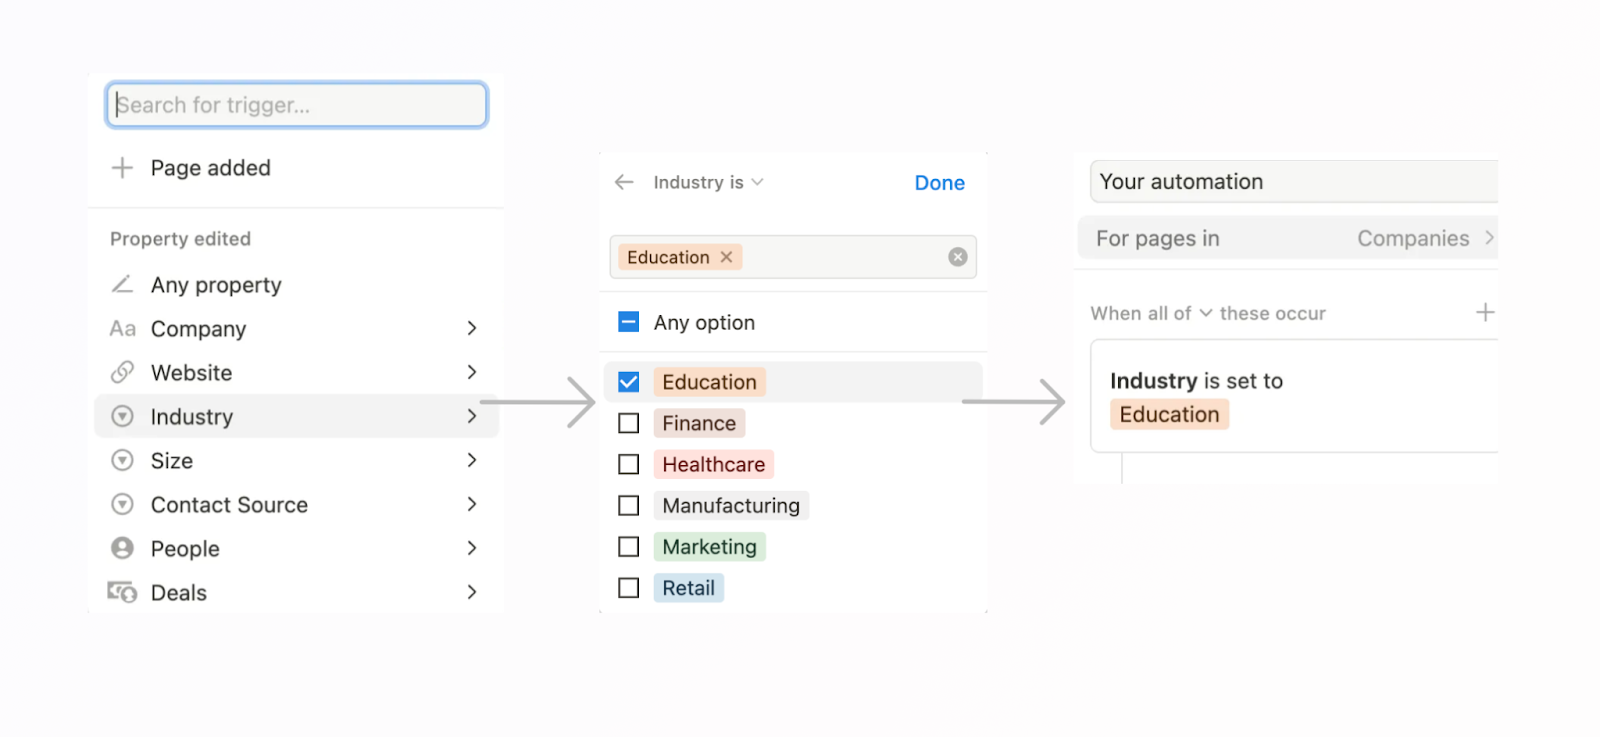
Setting up your automation trigger
When setting up an automation, a "trigger" is the event that initiates your automation. Notion offers two trigger options: when a new page is added to your database or view, or when a property meets a specific condition. In our example, we set the trigger to activate when the "Industry" property is "Education".
The final step in setting up your automation is defining the action — the action you want to occur after your trigger event. Notion offers several action options: editing an existing property in the same database, adding a page to another database, editing pages in another database, sending an in-app notification, or notifying a Slack channel. You can create either a single or multi-step action.
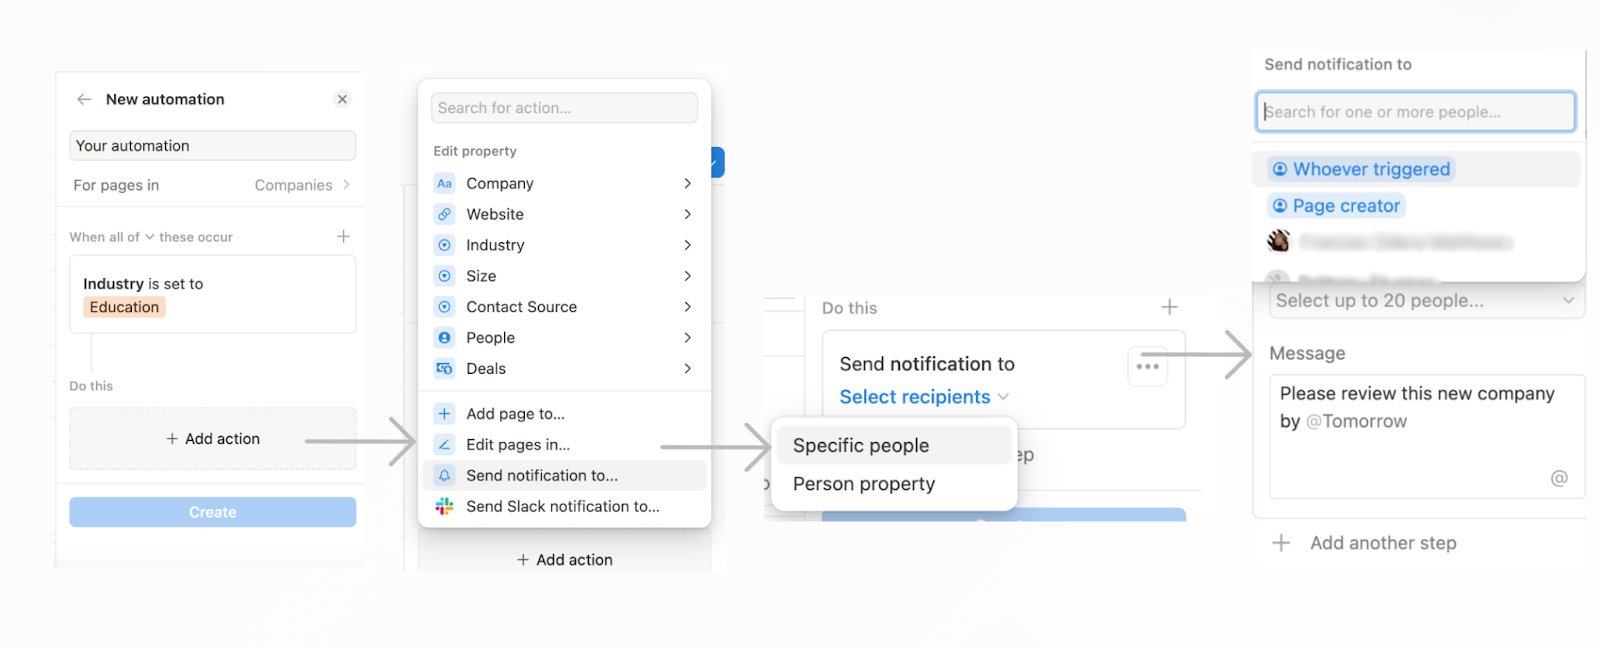
The example above shows an action that notifies a specific person when a company in the education industry is added to the company database with a custom message. Other possible actions could include adding a research task to your task database, automatically relating certain contacts from your "People" database, or announcing the new company to the Sales Slack channel.
Summary
In this tutorial, we built a simple CRM that would enable a small team to manage their contacts and deals more effectively.
Ultimately, a well-designed Notion CRM can significantly improve your customer management processes, leading to better customer relationships, increased productivity, and more informed business decisions. Thanks to Notion's versatility, you can easily change and expand your CRM as your business grows.

