


When it comes to boring, repetitive business tasks, generating PDFs is up there with some of the worst. We’re talking contracts, invoices, customer reports, SOWs, and more (snooze cruise). Good news (the poetry ends there) - there are plenty of tools out there for generating reports automatically. Today, we’re talking about Carbone - a newer player in the space, with huge potential and a ton of great features.
What is Carbone PDF Generator?
Carbone is a lightweight, open-source reporting engine that takes your existing data, drops it into a template, and turns it into a clean text file: this can be a professional PDF, Word doc, or even HTML without any extra work on your end. You set up the template and integration once, and from then on, generating reports is as simple as feeding in new data.
Unlike other tools that force you to reshape your data to fit its structure, Carbone lets you define the structure yourself. Your data stays exactly how you’ve organized it, and it’s the template that adapts - not the other way around. This makes it a lot easier to update a report when things change, without having to overhaul your entire data setup.
Carbone also plays well with other tools. It works with Make, Zapier, Retool, and more. Plus, it has an open API (and a generous free plan), so you can connect it to whatever system you’re already using.
In this guide, we’ll show you how to integrate Glide with Carbone to automate report generation, using invoices as an example. We’ll use the Glide order management app we built in one of our previous tutorials as a starting point. But once you’ve got the basics down, you can apply the same process to any tool with an API and any document your business needs.
Two quick notes, before you begin:
- If you’re not at all familiar with JSON, this tutorial might be a bit tricky to follow. But if you’ve at least dabbled in it and vaguely understand how to structure JSON payloads, you should be just fine.
- You’ll need a Glide Business plan to follow this tutorial because calling external APIs from Glide is only available from the Business plan up. That said, this tutorial is really about generating Carbone reports from your existing data. If you’re using Glide with Zapier or Make, or if you’re using a different backend tool like Airtable, you can probably get away with a cheaper Glide plan while still applying everything here to work with Carbone.
Let’s get started!
First, you’ll need to get your head around the core Carbone syntax…
Quick masterclass on core Carbone syntax
Carbone placeholders, known as tags, are markers within your document templates that indicate where data should be inserted during report generation. These tags are enclosed in curly braces { } and follow a specific structure to bind data from your JSON dataset to the template.
The most common placeholders
Basic
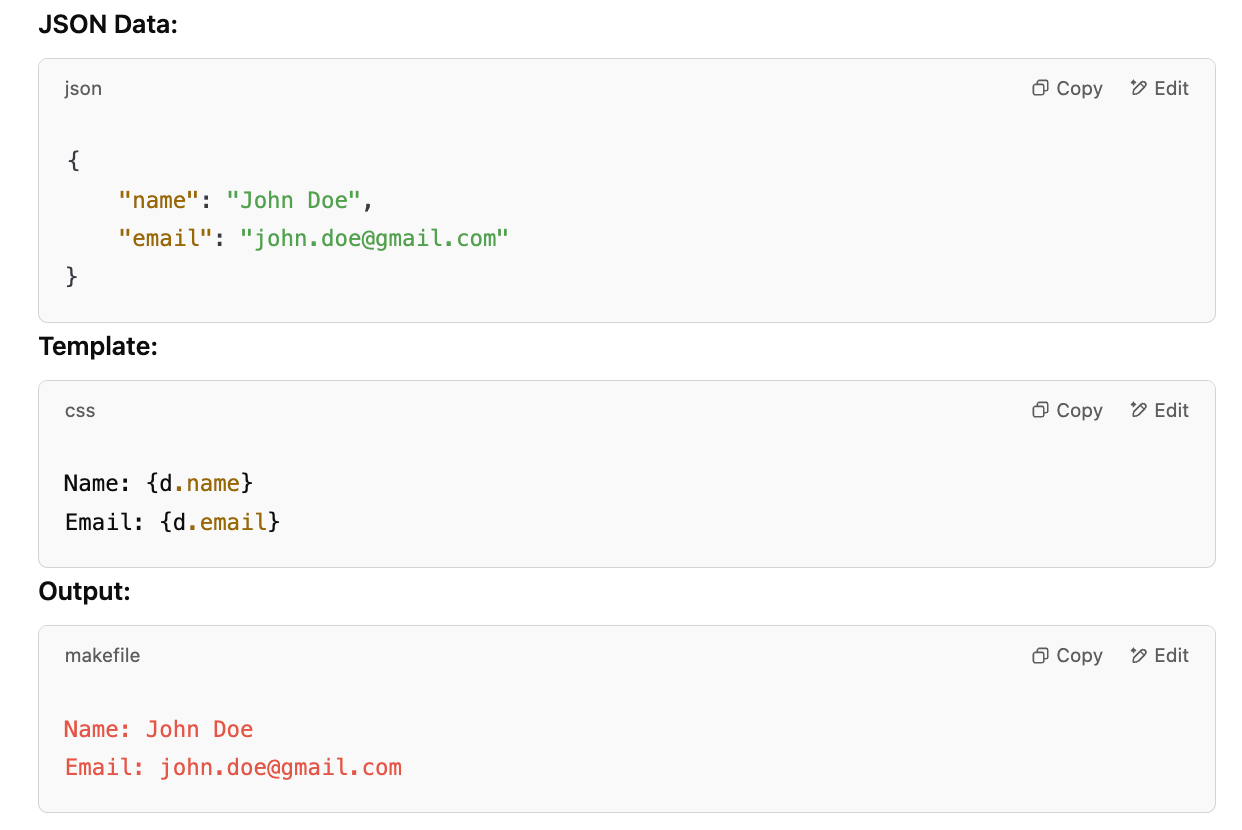
Pulls in a single value from your data using a d. prefix: {d.fieldName}. This will be the placeholder type you’ll use most frequently in your documents.
Sub-objects (nested data)
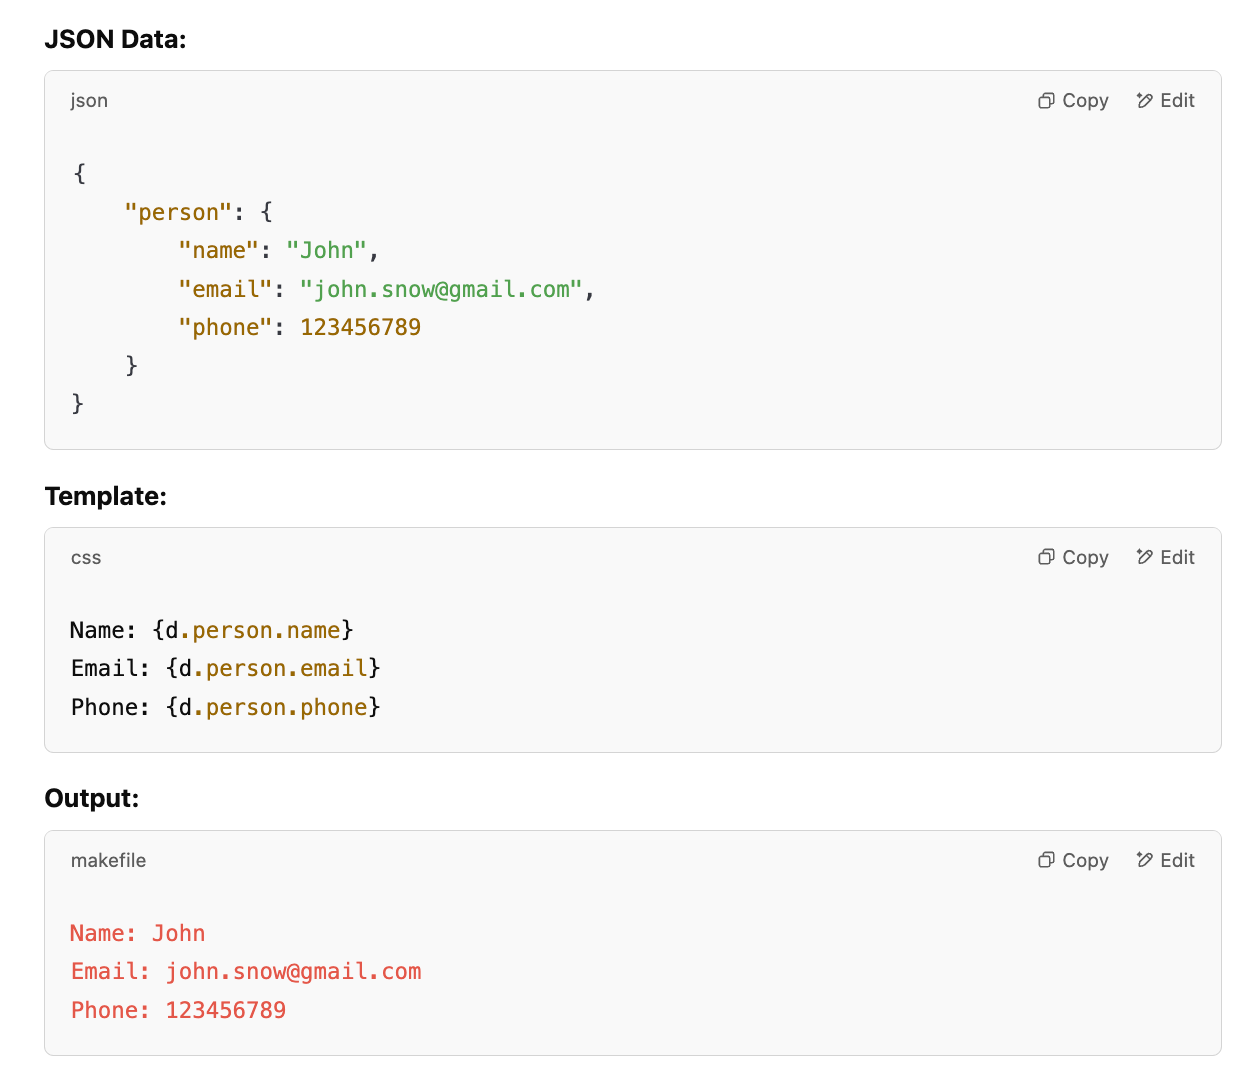
If your data is structured into objects within objects, you can use dot notation (for example person.name) to access nested fields. This is useful when your data is grouped inside an object, like customer details inside a person object.
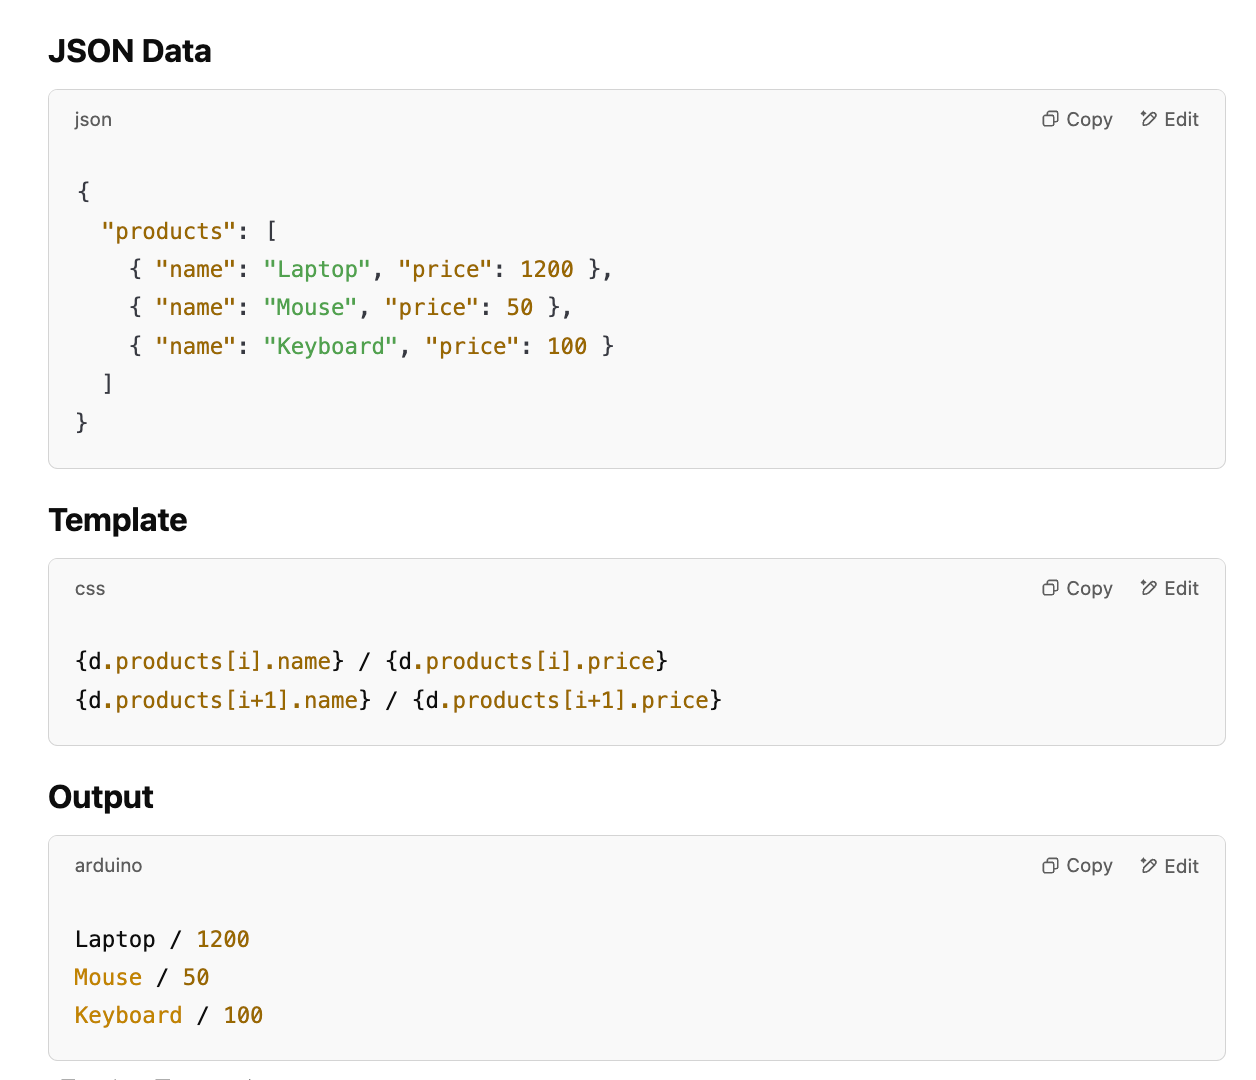
Arrays (lists of data)
Arrays group multiple items with the same structure—perfect for things like invoice line items, order lists, or tables. When working with arrays in Carbone, you can loop through each item using i, which represents the index of the item in the array.
Since array values are typically nested, you’ll need to combine sub-object notation with array indexing:
- First item in the array: {d.array[i].fieldName}
- All of the following items in the array: {d.array[i+1].fieldName}
This method allows you to dynamically reference items within an array, making it easy to structure reports with line items. In concrete terms, this means that instead of manually writing each item in an invoice, the system will automatically go through each item and insert it into the invoice.
Formatting
Carbone allows you to format various data types, including numbers, text, dates and currency. The two formatting functions you'll use the most are decimal precision and date formatting.
Decimal precision uses the :formatN formatter to control the number of decimal places in a number. For example, {d.price:formatN(2)} displays the price with two decimal places.
Date formatting uses the :formatD(patternOut, patternIn) function to format dates. The output format (patternOut) defines how the date should appear, and the input format (patternIn) is optional, defaulting to ISO 8601. For example, {d.invoiceDate:formatD(L)} formats the invoice date using the L pattern (MM/DD/YYYY). You can read more about date formats here.
Other placeholders and functions
The syntax we’ve run through is enough to get you started, but Carbone’s syntax can do a lot more. From filtering, grouping, and sorting to computations, and even charts, which is pretty wild! We’re not going deeper into that in this tutorial, but if you're curious, their documentation has all the details.
Getting started with Carbone
Setting up a Carbone account
You’ll need a Carbone account. Head over to their website and click sign up. This will create a profile and you’ll land on your account page.
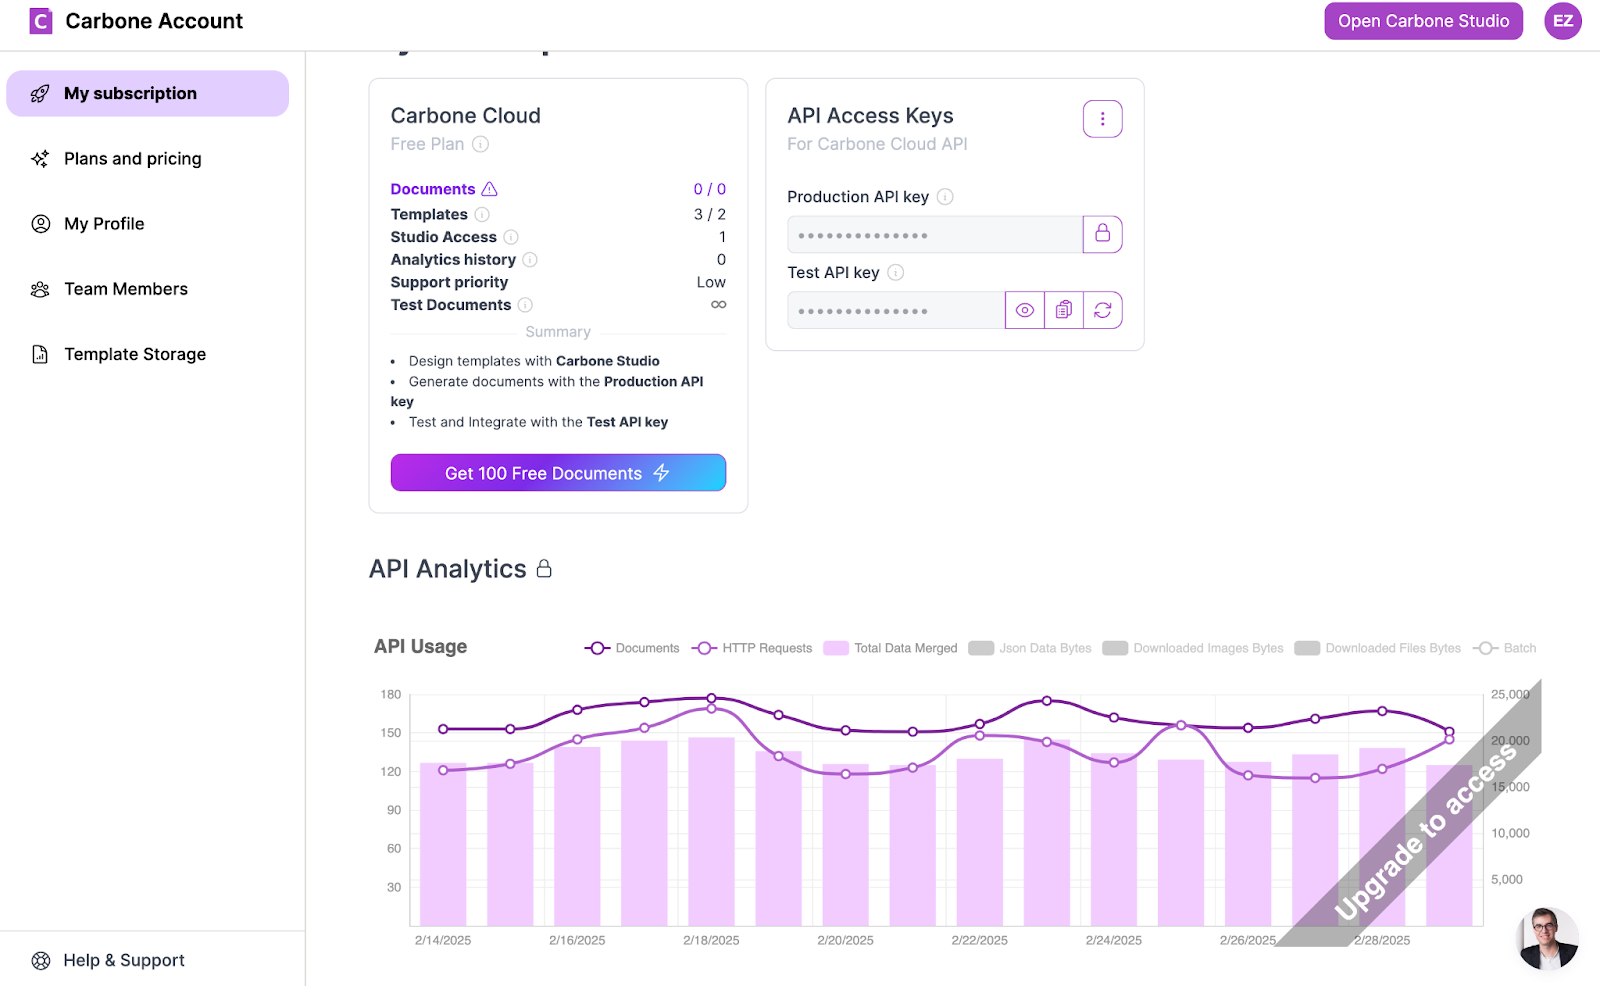
To access a Free plan, you’ll need to add payment details. Subscribe to the Free plan and use the production API key on the My Subscription page. For this tutorial, we’ll just use the test API key instead which doesn’t require adding billing details. With this plan, you’ll be able to generate 100 documents per month and store 100 templates for free.
Preparing the PDF template
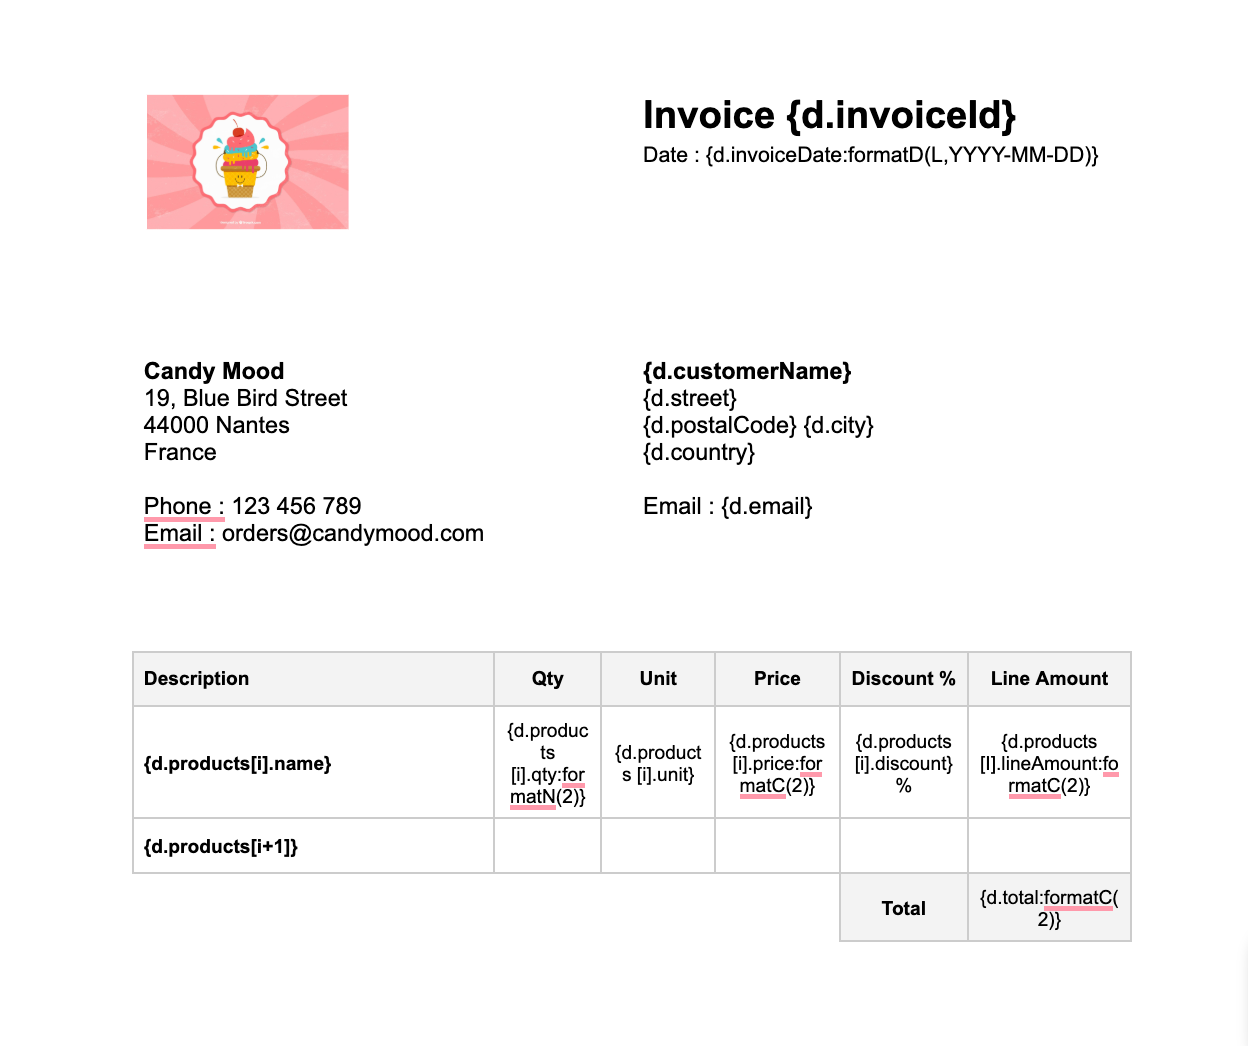
We’ve got a sample template ready to help you get started faster - just open the link and download the document. If you’d rather build your own, check out our guide on Carbone syntax above and dive into their documentation.
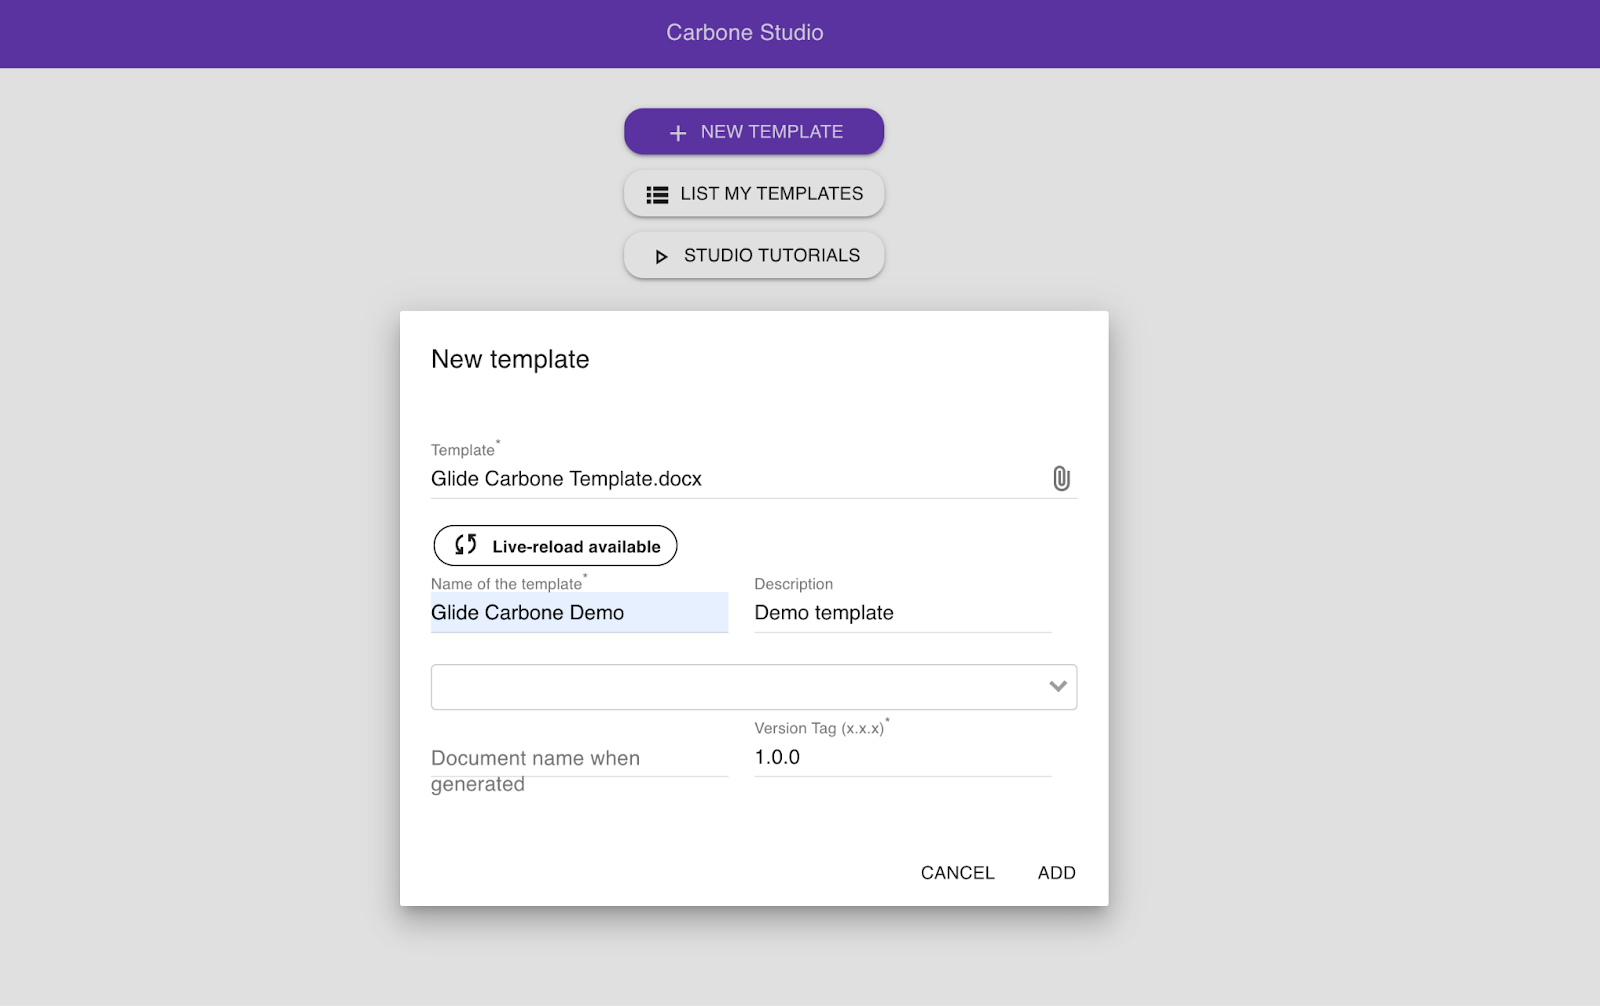
Once you have a template, head to your Carbone account and click Open Carbone Studio in the upper right corner.
This takes you to the Carbone Studio template setup, where you can add a new template by clicking the purple + NEW TEMPLATE button. Carbone will ask you to upload your template and give it a name. Once that’s done, hit Add.
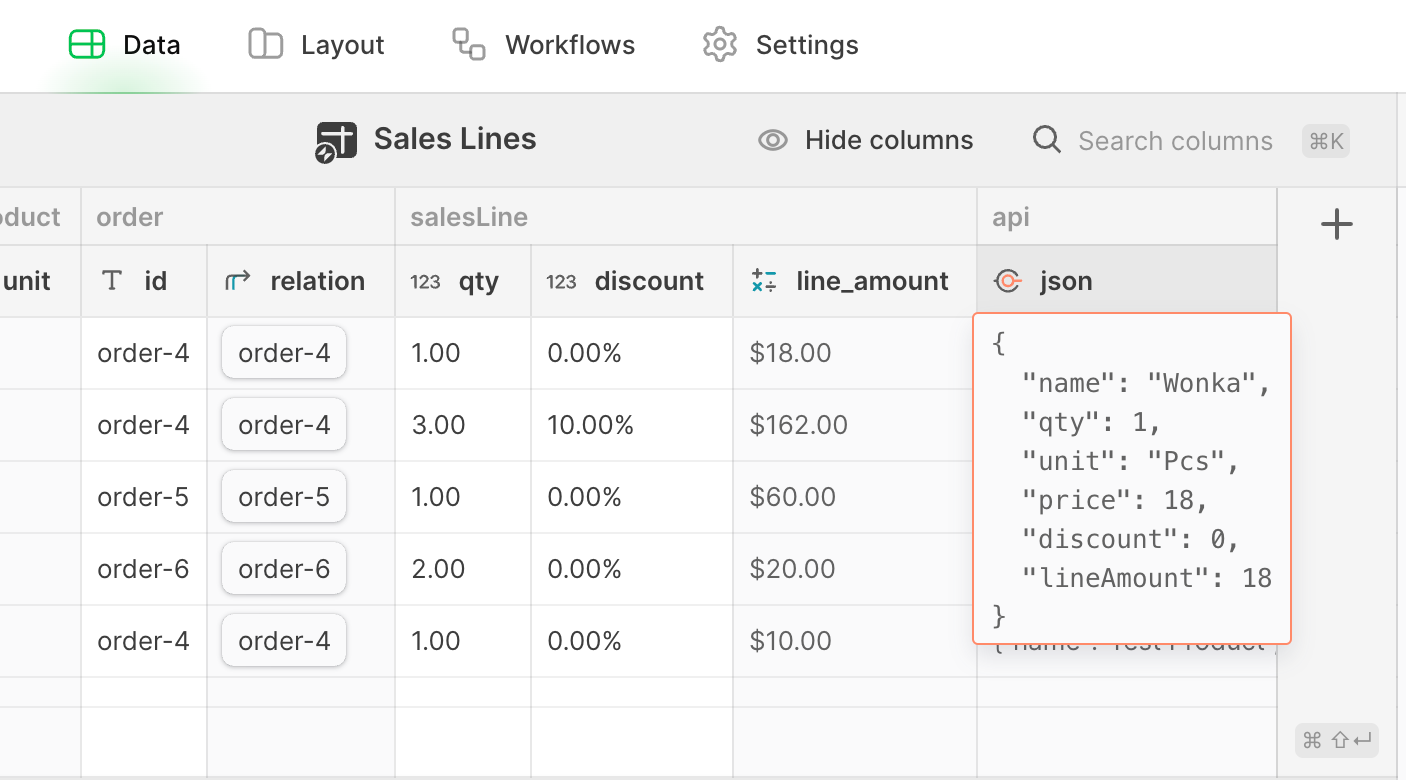
Now you’re in the Carbone Studio main page, where you can test and see how your data will look once you send a JSON payload through API. On the left side, you can add your JSON data. On the right side, you’ll see your invoice rendered as a preview. You can even download the rendered document in 15 different formats by clicking the Download Preview button just above the document preview.
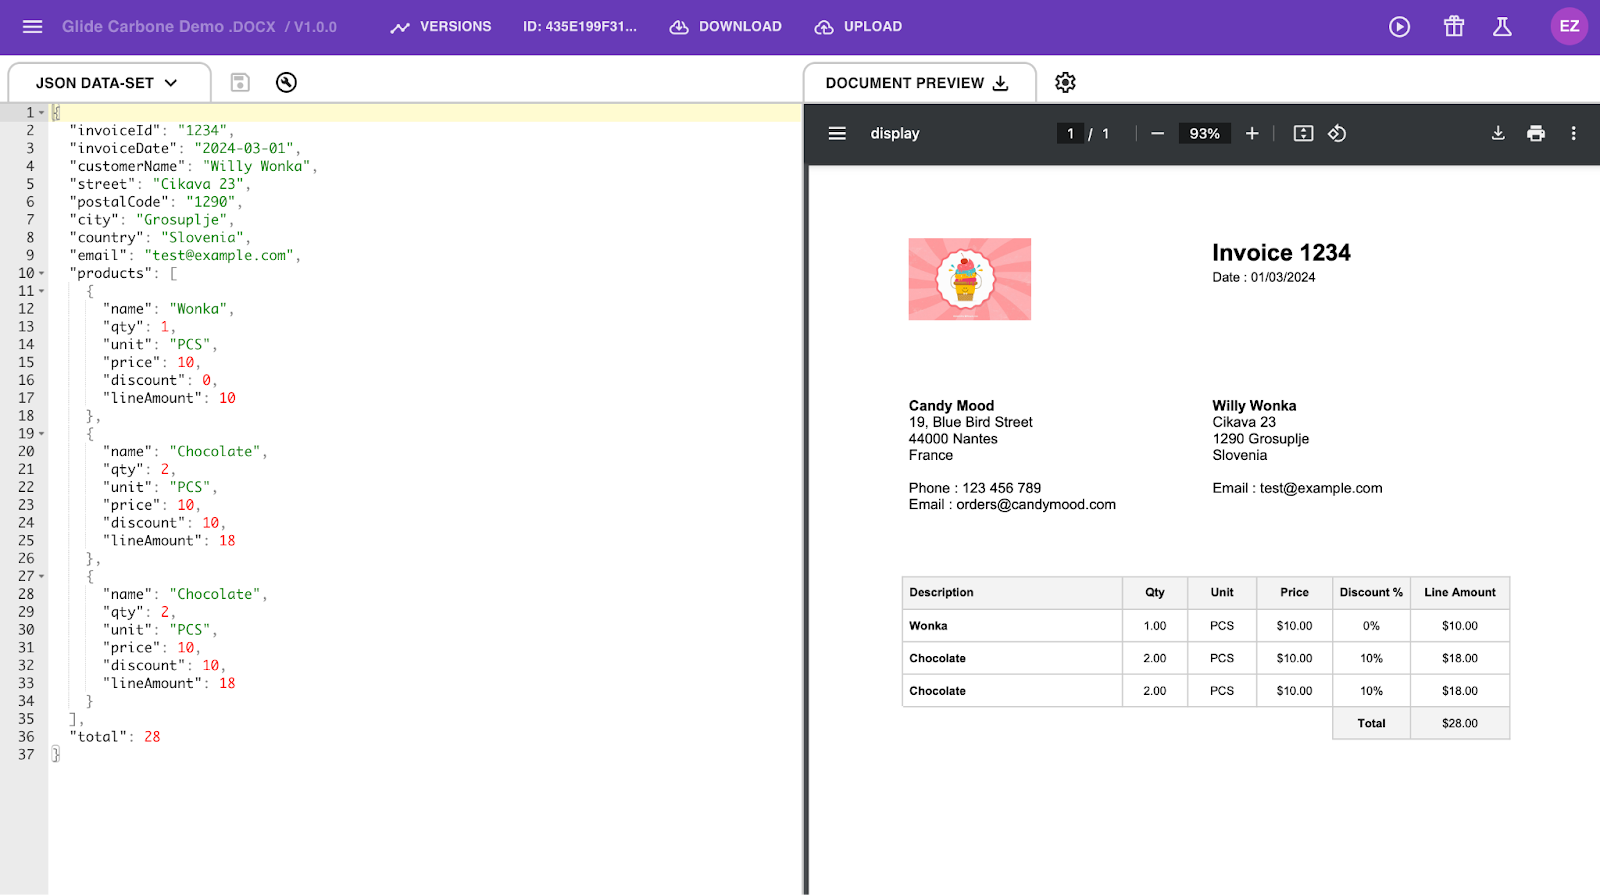
If you’re using our template and want to test it out, just copy and paste this JSON snippet into the JSON editor on the left and see how it renders.
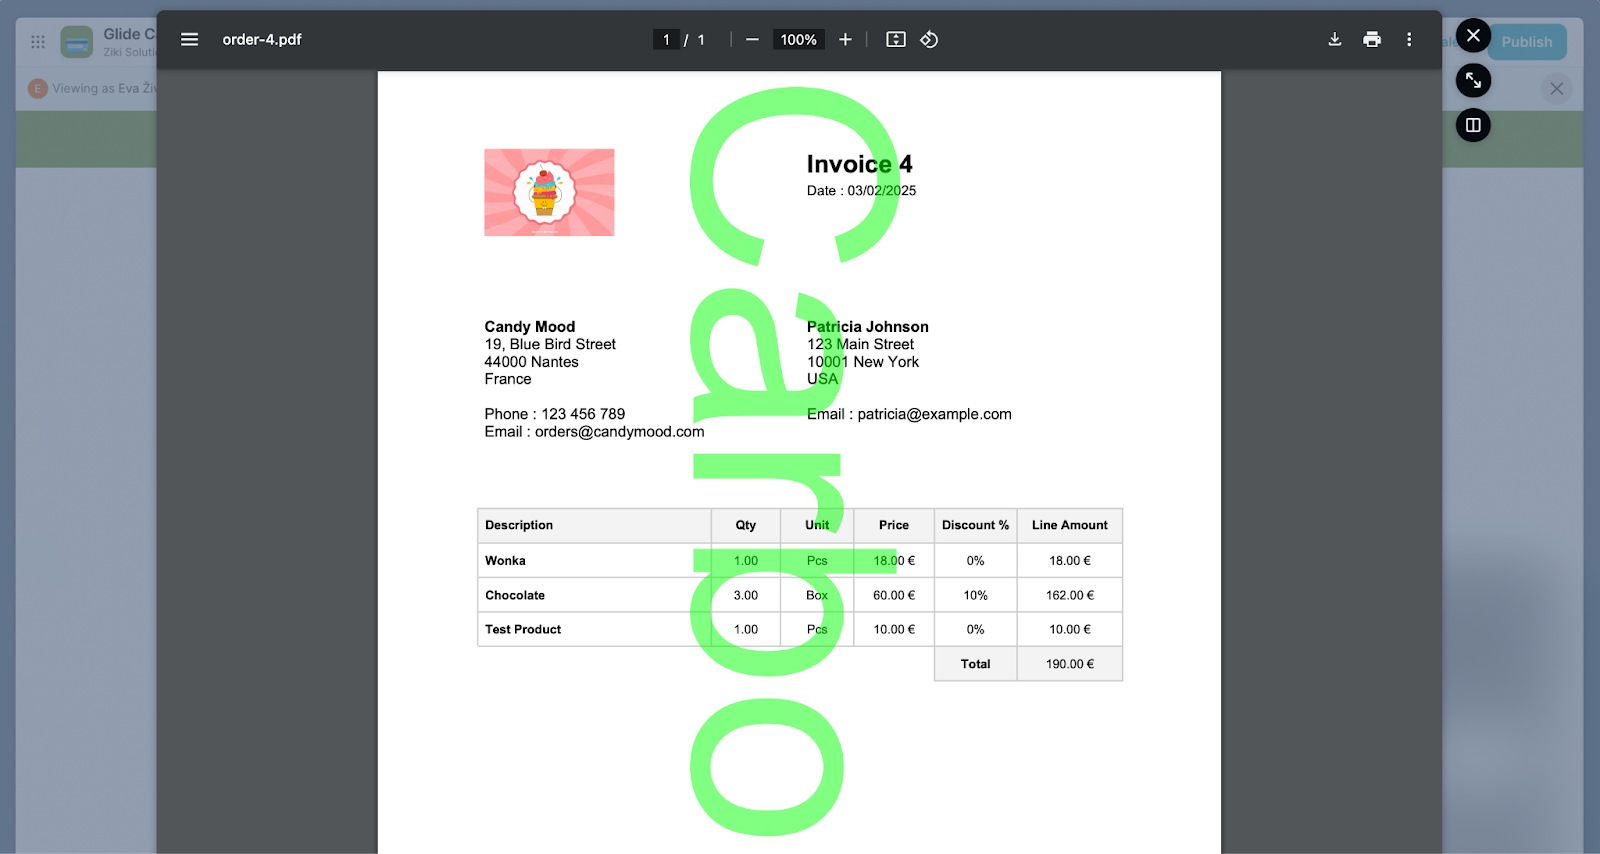
{
    "invoiceId": "order-4",
    "invoiceDate": "3/1/2025, 8:08:46 PM",
    "customerName": "Patricia Example",
    "street": "Street 123",
    "postalCode": "1000",
    "city": "New York",
    "country": "USA",
    "email": "patricia@example.com",
    "products": [
        {
            "name": "Wonka",
            "qty": 1,
            "unit": "Pcs",
            "price": 18,
            "discount": 0,
            "lineAmount": 18
        },
        {
            "name": "Chocolate",
            "qty": 3,
            "unit": "Box",
            "price": 60,
            "discount": 10,
            "lineAmount": 162
        },
        {
            "name": "Test Product",
            "qty": 1,
            "unit": "Pcs",
            "price": 10,
            "discount": 0,
            "lineAmount": 10
        }
    ],
    "total": 190
}
Once you’ve tested the template and everything looks good in the preview (i.e. all data from your JSON payload is rendered), it’s time to set up the source app - in our case, Glide - to make sure we’re sending the data in the right format.
Generating an invoice from Glide
In our Glide Intermediate tutorial, we built on top of our basic Glide order management app, adding a Products and Sales Lines database to support multiple products per order. In this tutorial, we’ll use that same structure to format a JSON payload that will render our invoice in Carbone. We’ll also download the invoice and attach it to our Glide order for easy access.
Preparing your line item data
In your Glide app, go to the Sales Lines database, add a new JSON Template column and name it api / json.
Under Data, in the JSON Template field, add the following JSON template:
{
      "name": $name,
      "qty": $qty,
      "unit": $unit,
      "price":$price,
      "discount": $discount,
      "lineAmount": $lineAmount
}Then, under Values (just below the JSON Template field), we’ll use the UI like in the image below to bind each placeholder to the right field:
- $name → The field that holds the product name
- $qty → The field that holds the quantity of the product
- $unit → The field that holds the unit (like pcs)
- $discount → The field that holds the discount amount
- $lineAmount → The field that holds the line amount
- $price → The field that holds the price of the product
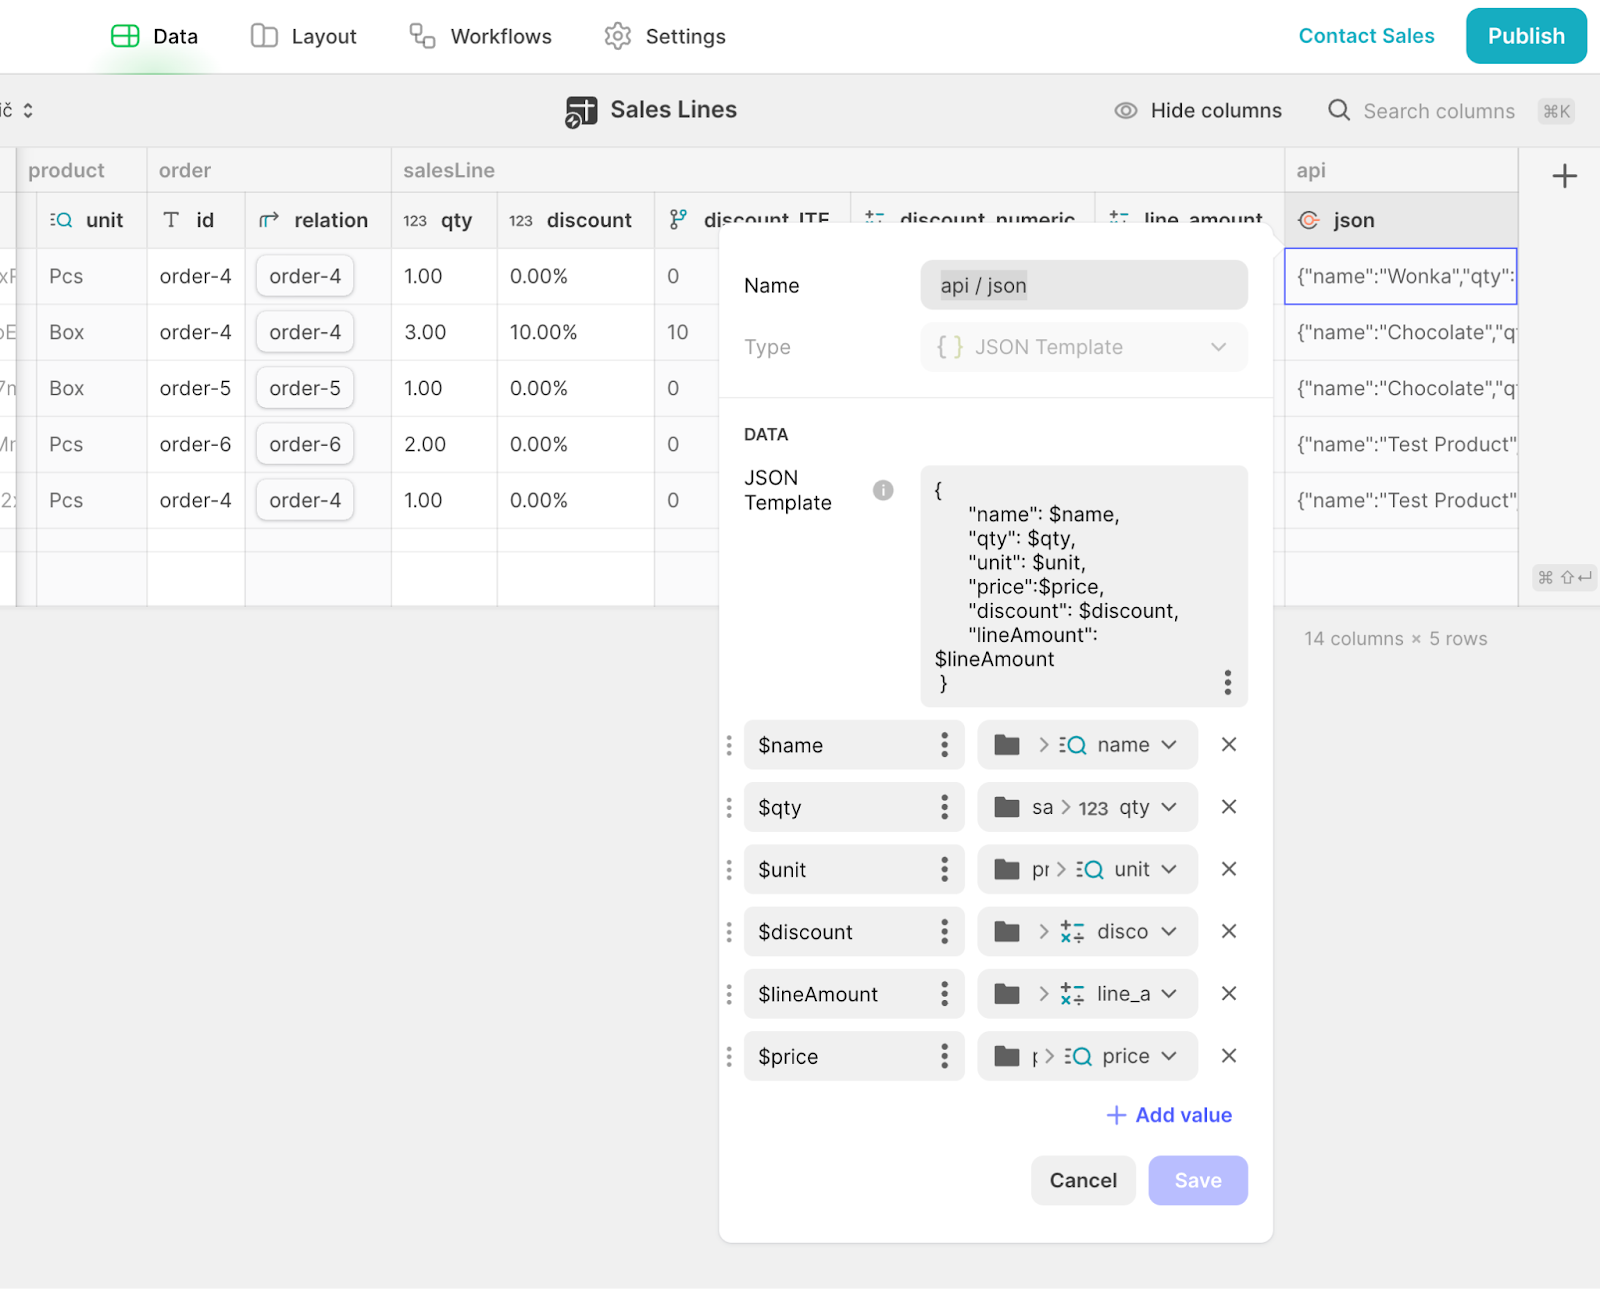
Make sure everything except name and unit is a numeric value.
- If the column is a basic column (like qty or discount), you’ll see a 123 icon left of the column name.
- If the value is a lookup from the Products database (magnifying glass icon), go to Products and check the column type there (like price).
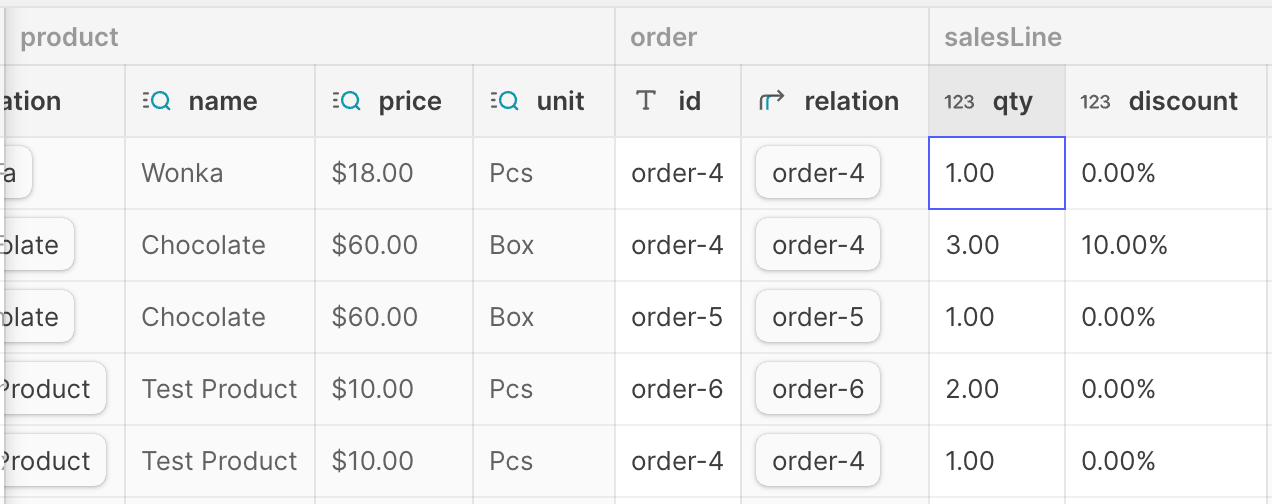
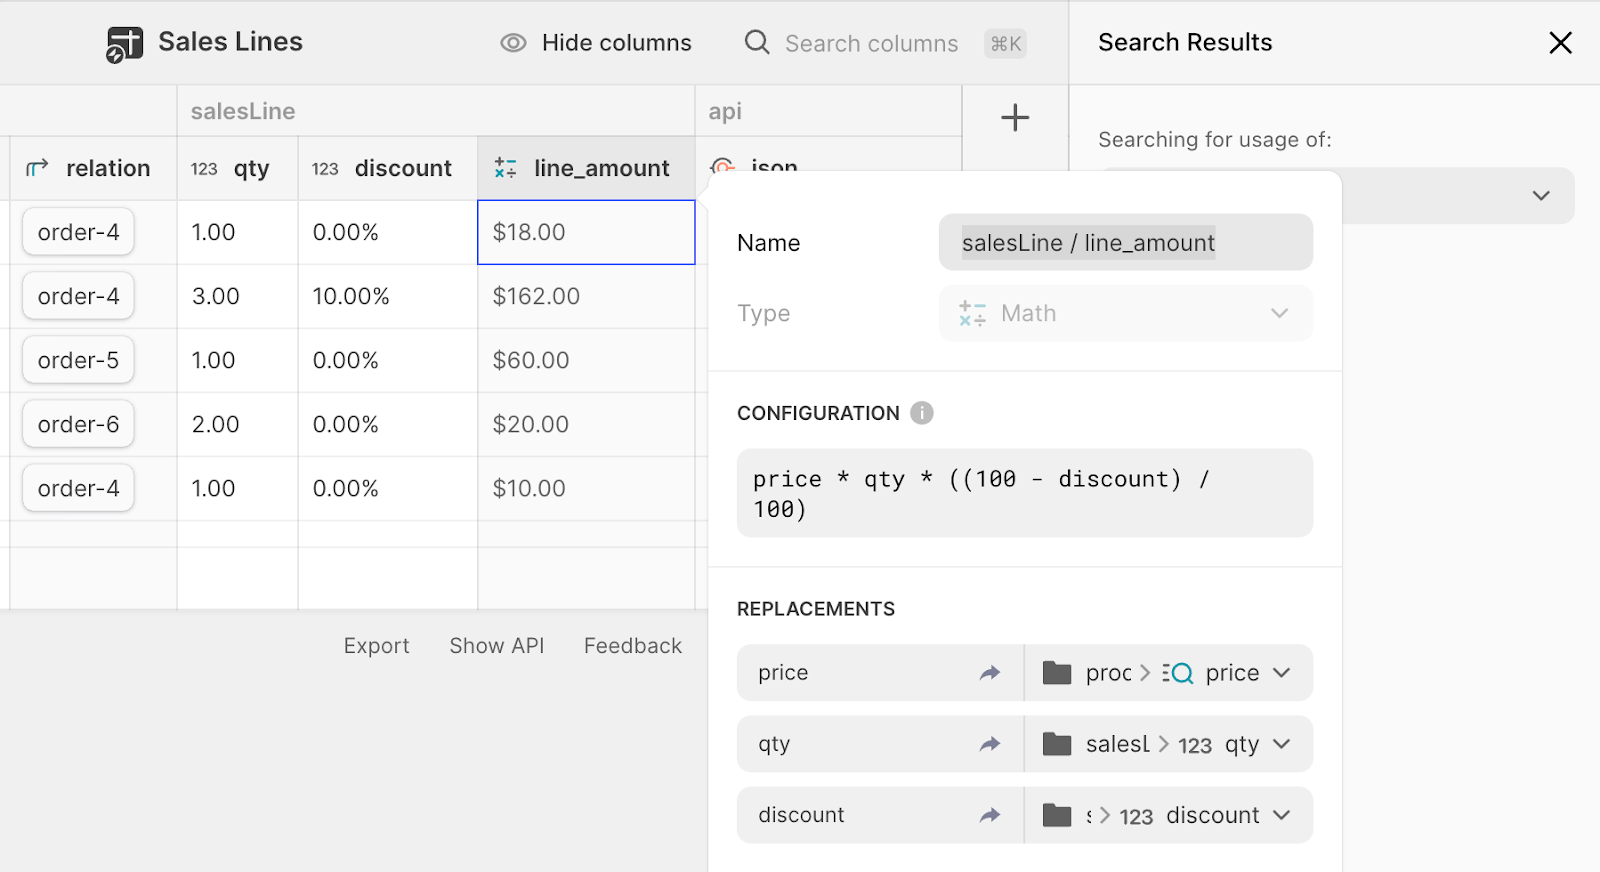
The line_amount column is a Math column (a column designed for performing calculations), which you can spot by the math symbols icon.
Your JSON should look something like the one in the screenshot below.
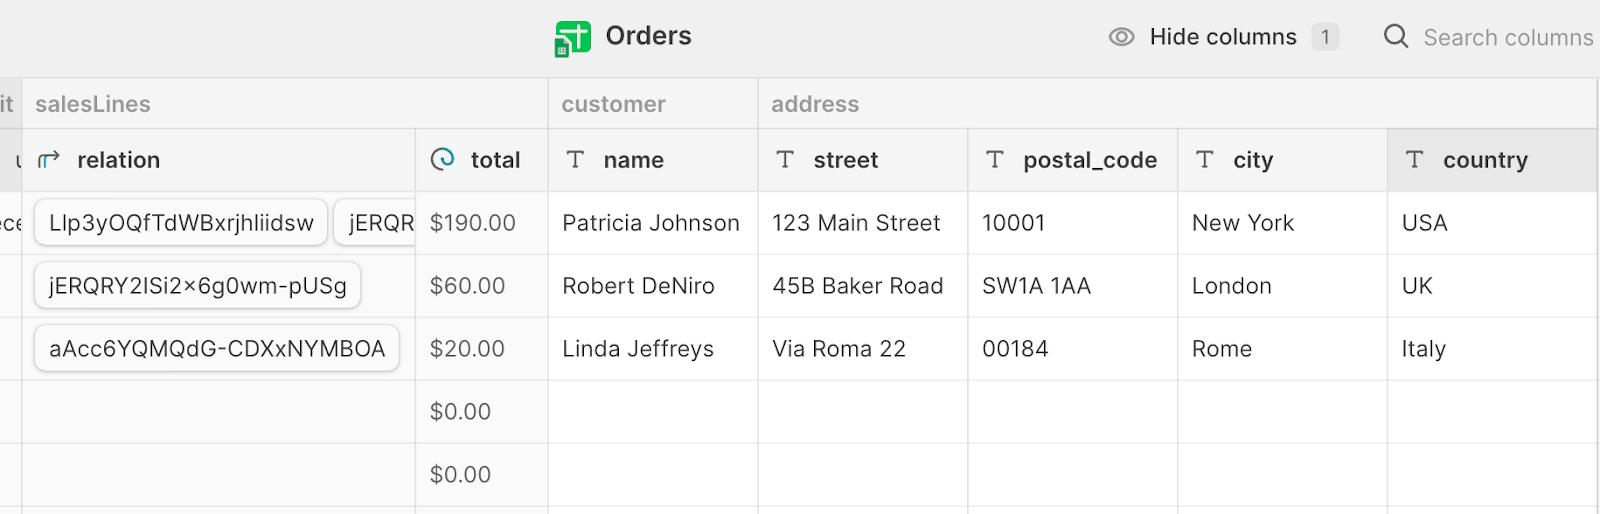
Now that the line items JSON is set up, we need to pull it into the Orders table to structure the full payload for our integration. Since each order can have one or more line items, we’ll look up all related sales lines from the Sales Lines database and roll them up into a single field in Orders. That way, when we generate the invoice, we’re grabbing all the line items for that order in one structured JSON payload.
Preparing the JSON payload in the Orders database
In our Orders database, we have some customer info, but not everything we need for the invoice. Specifically, we’re missing the customer's name and address details. Let’s quickly add those:
- customer / name
- address / street
- address / postal_code
- address / city
- address / country
All of these should be text fields.

Add some sample name and address details into the orders that have at least one line item - these are the ones we’ll use for testing our integration later on.
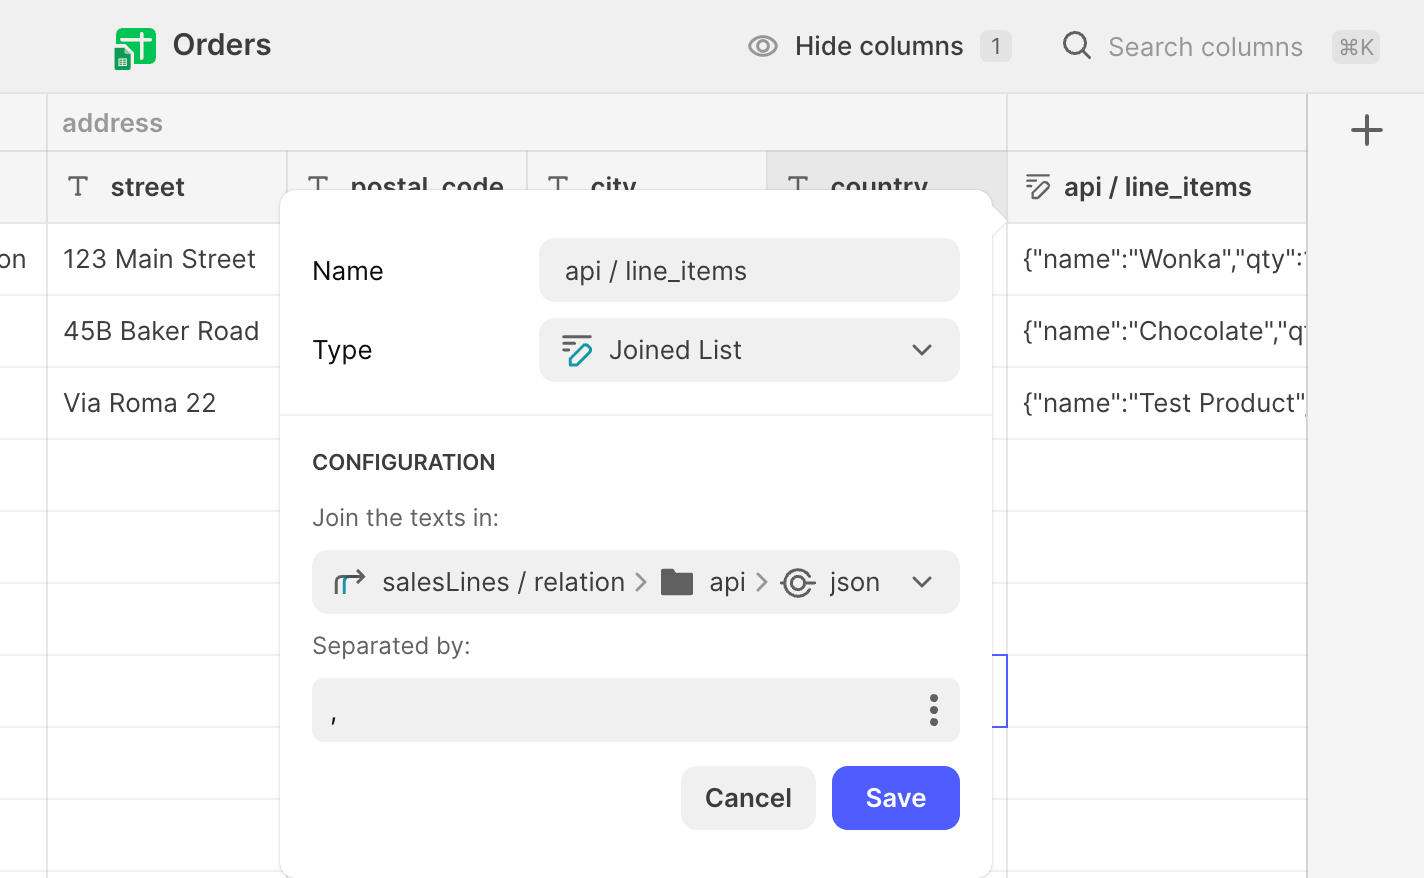
Now it’s time to structure our payload. First, let’s bring in the Sales Lines JSON by adding a Joined List column. The Joined List computed column joins or concatenates multiple values into a single text value. This function is exactly what we need since we’re pulling all sales lines for an order and merging them into a single JSON payload.
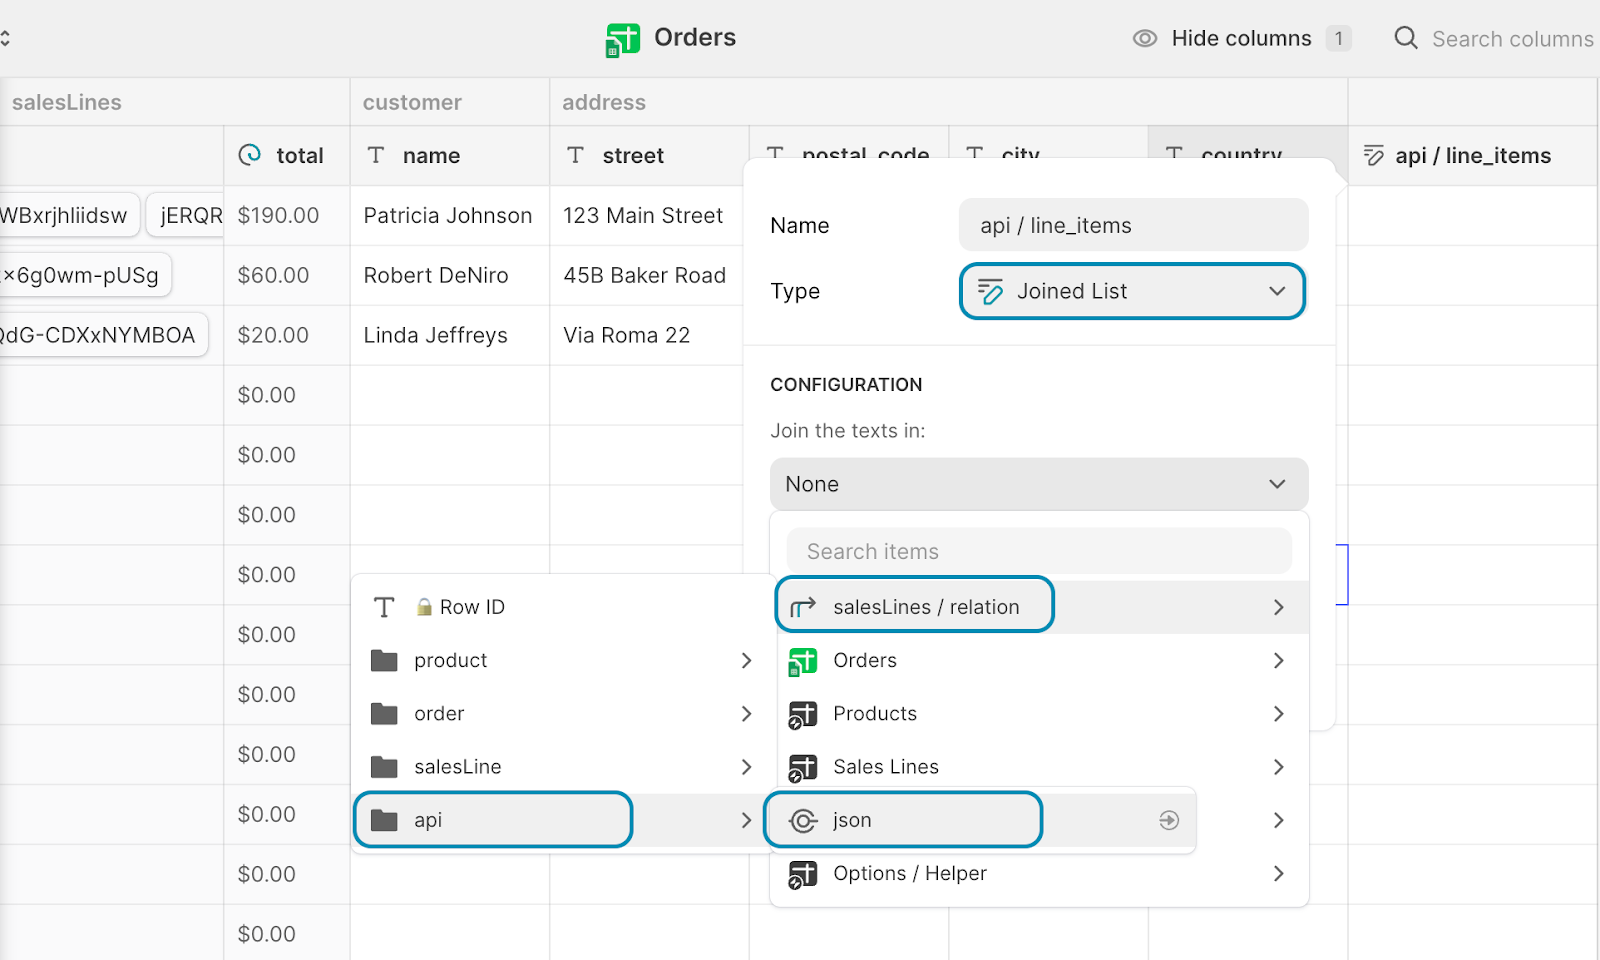
For the delimiter (the Separated by field just below the Join the texts in), add a comma to make sure the structure follows proper JSON syntax. Click Save.
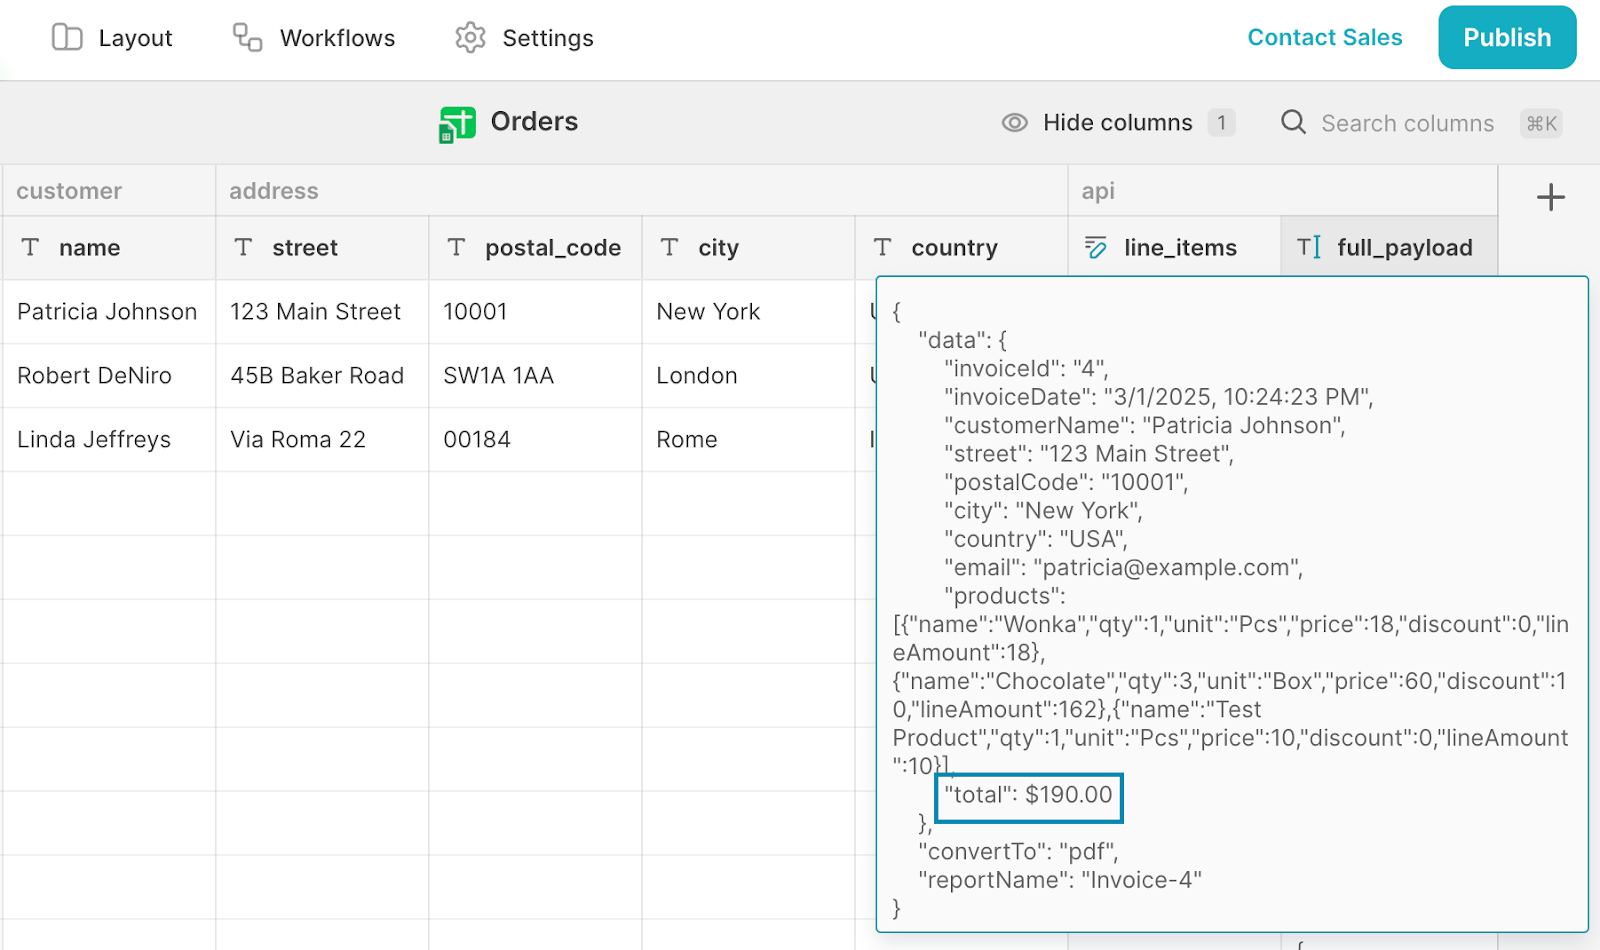
Now, we’ll structure the final payload. Add a new Template (not JSON Template) column and paste the following JSON:
{
    "data": {
        "invoiceId": "$invoiceId",
        "invoiceDate": "$invoiceDate",
        "customerName": "$customerName",
        "street": "$street",
        "postalCode": "$postalCode",
        "city": "$city",
        "country": "$country",
        "email": "$email",
        "products": [$lineItems],
        "total": $orderTotal
    },
    "convertTo": "pdf",

   "reportName": "$documentTitle"
}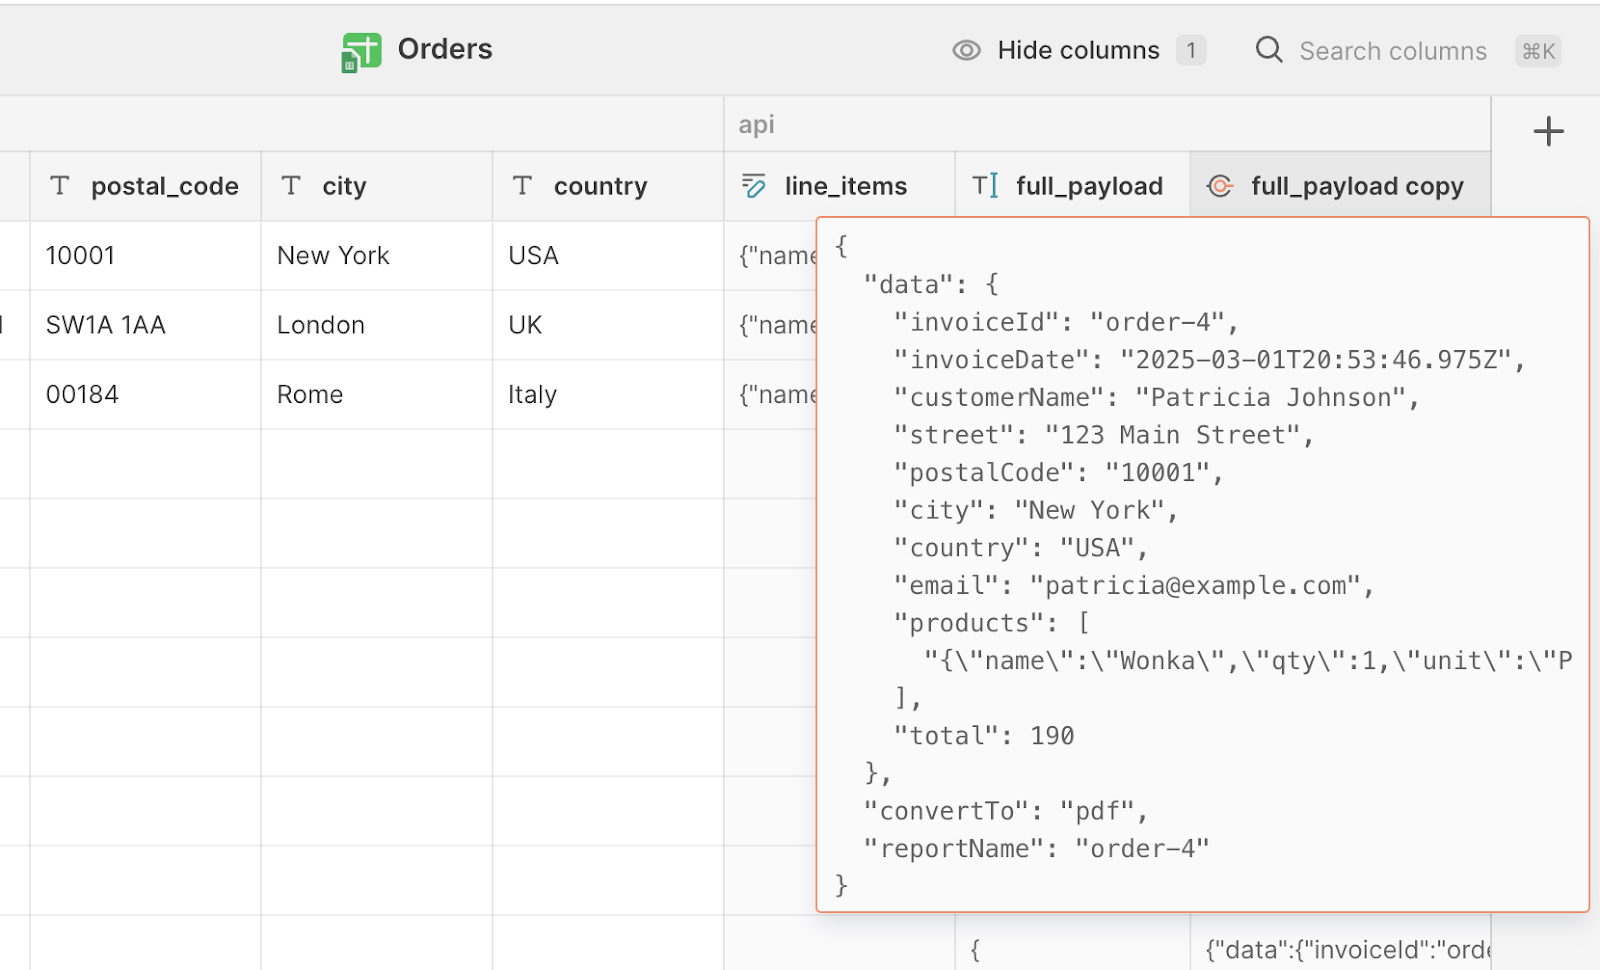
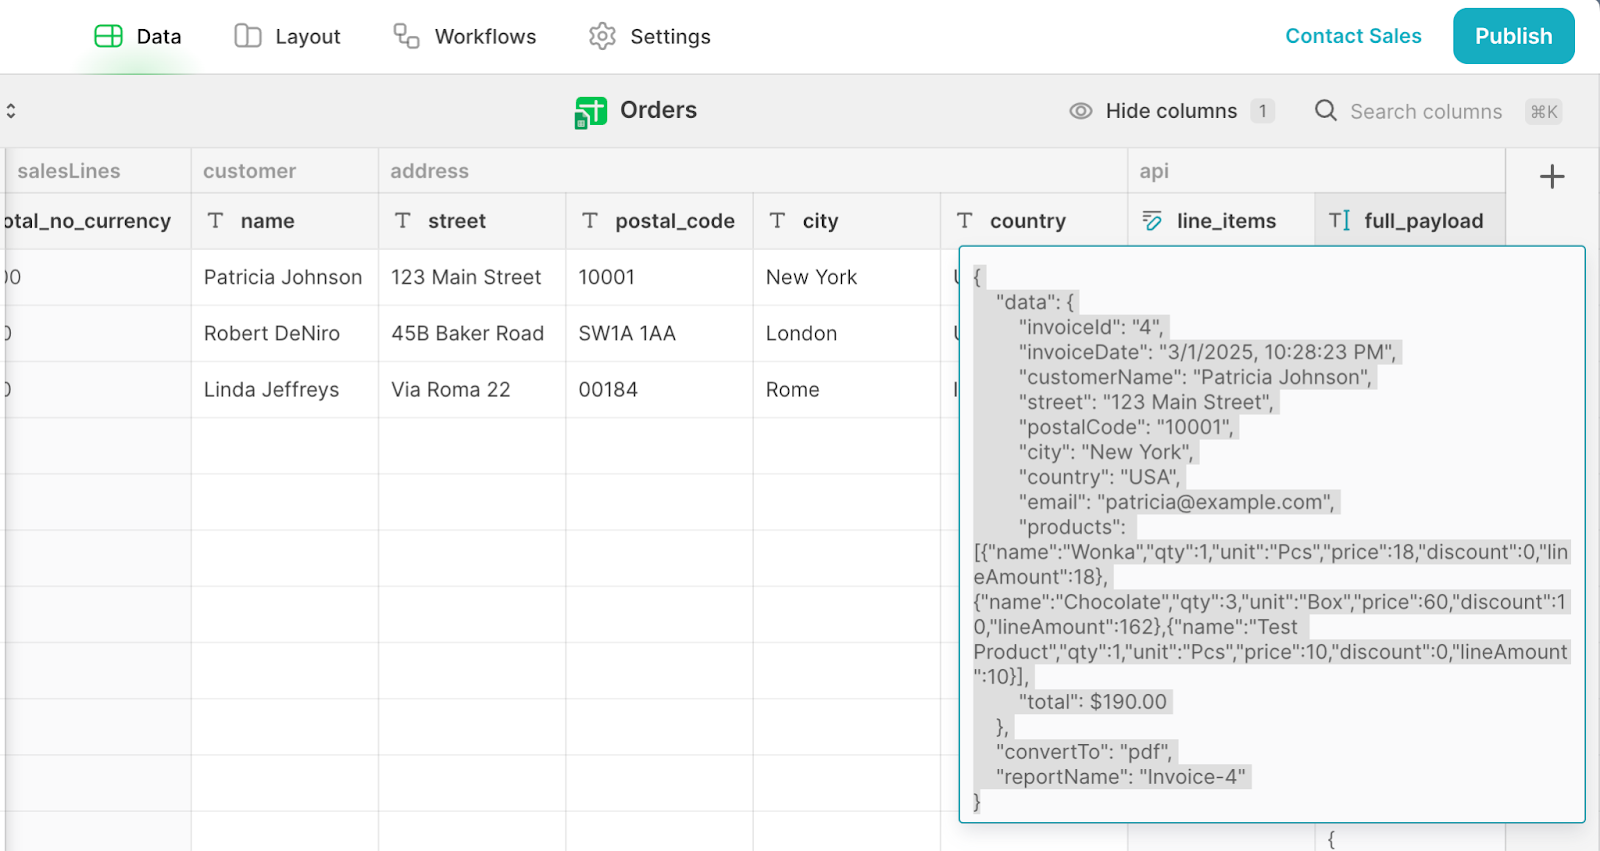
By using the Template column, we avoid the syntax error and have full control over how we structure the final payload. The only catch is that we need to manually add quotes around strings to keep the JSON valid. Once everything is set up, you can still validate the JSON using tools like JSONLint to make sure it's formatted correctly before you send the test API call to Carbone.
Before we replace the placeholder values in our Template column, there’s one important thing we need to fix. The invoice total is calculated from sales line items, and when we roll up the sales line totals, sum them, and format them with currency, the result in the Template column includes the currency symbol. But for our JSON payload, we need it as a pure number - no symbols, just the raw numeric value.
To ensure that when we send the JSON, the total is recognized as a number, not a string, we’ll create a Math column. This takes the rolled-up total and converts it into a numeric value without formatting. To do this:
- Add a new Math column and name it “sales_lines / total_no_currency”.
- Under Configuration write “total”.
- Under Replacements, replace total with the total rollup from the sales lines.
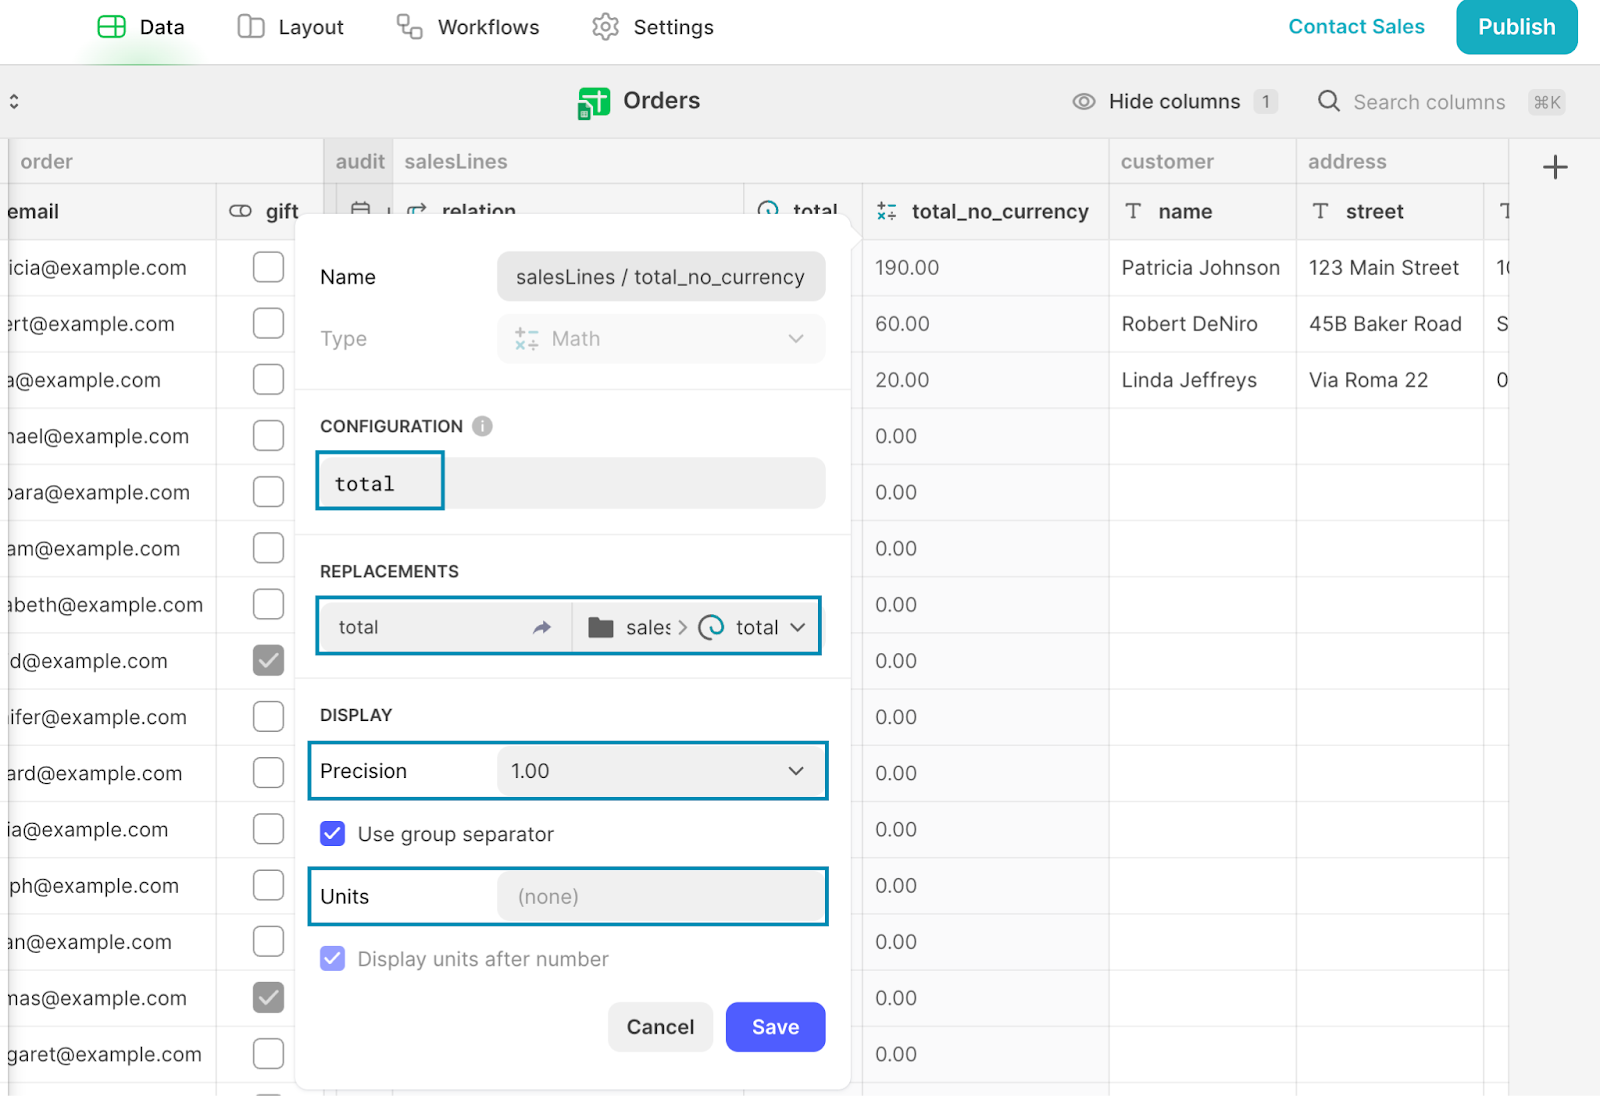
Now, instead of a formatted string with currency symbols, we’ll have a clean numeric value that can be used in our JSON payload.
Then, in the Template column under Values (just below the JSON Template field), bind each placeholder to the correct field in your Orders table:
- $invoiceId → The field that holds the increment ID
- $invoiceDate → Use the Current time dynamic value
- $customerName → The field that holds the customer's name
- $street → The field that holds the street address
- $postalCode → The field that holds the postal code
- $city → The field that holds the city
- $country → The field that holds the country
- $email → The field that holds the customer's email
- $lineItems → The Joined List column that holds the merged sales lines JSON
- $orderTotal → The field that holds the total amount for the order without the currency
- $documentTitle → The field that holds the name of the generated PDF
This makes sure that when we send the API request, all the placeholders get replaced with the right order and customer data, and the final JSON payload is structured correctly.
Now let’s validate our payload and test it with JSONLint. Go to the payload field of an order that has sales lines, select everything with your mouse, and copy the payload.
Open JSONLint, paste the payload into the input field, and click Validate JSON. If everything is correct, you’ll see a green banner below the buttons confirming that your JSON is valid.

If something’s off, compare your JSON with the snippets we provided earlier and double-check that you’ve bound the right values in your template. Mistakes usually come from missing quotes, incorrect field names, or formatting issues, so go through it carefully!
Setting up columns for rendering the PDF report
When you generate a report with Carbone, the API response gives you a one-time URL. In other words, the moment you open it, Carbone deletes it from their servers. This feature is great for security, since your data isn’t stored long-term, but it also means we need to set up our own system to make sure we can continue to access the report.
First, we’ll store the API response from Carbone in Glide. Add a Text column to keep the full response Carbone sends back after generating the report. Name it “api / generation_response”.
This will store the entire JSON response, which includes the renderId (the unique identifier for our generated report) we’ll use to save the PDF to Glide’s storage.
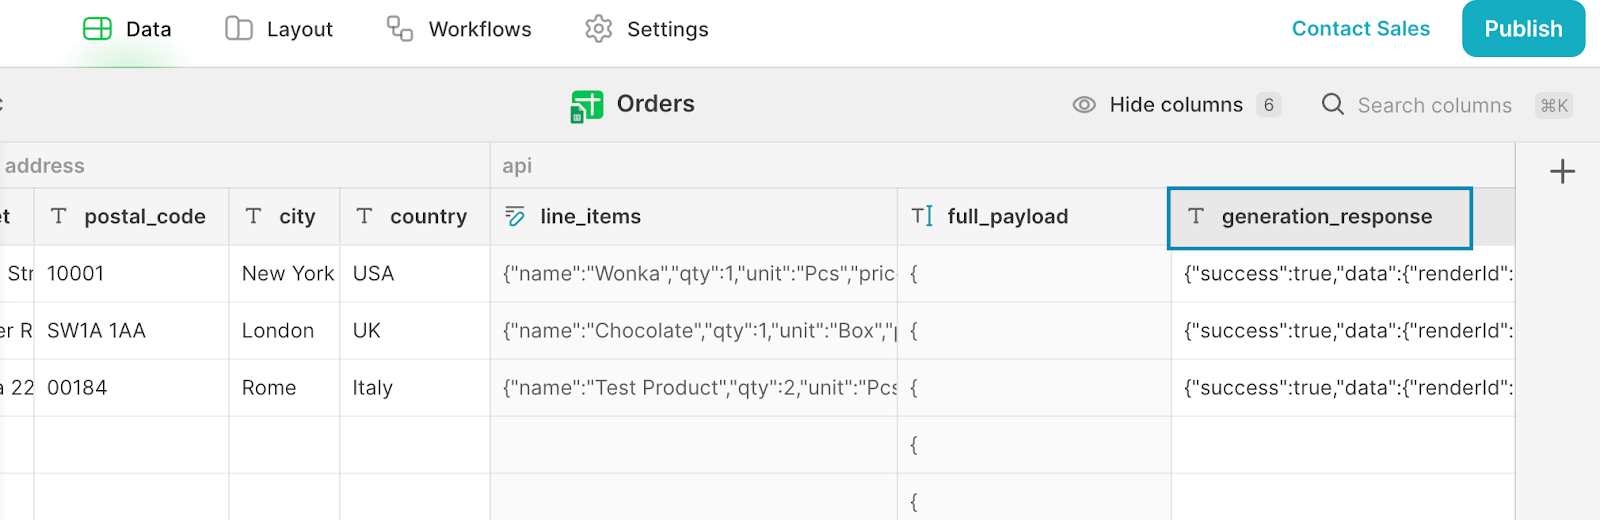
This is a sample response from the API call:
{
    "success": true,
    "data": {
        "renderId": "MTAuMjAuMTEuNDIgICAgxzU0qOVbMta_TSk7UUQQeQSW52b2ljZS00.pdf"
    }
}
To extract the renderId from the JSON response:
- Add a Query JSON column and name it “api / render_id”.
- In the JSON field, bind it to the api / generation_response column.
- In the field below, write: “data.renderId” (we’re using dot notation to pull the renderId value nested inside the data object).

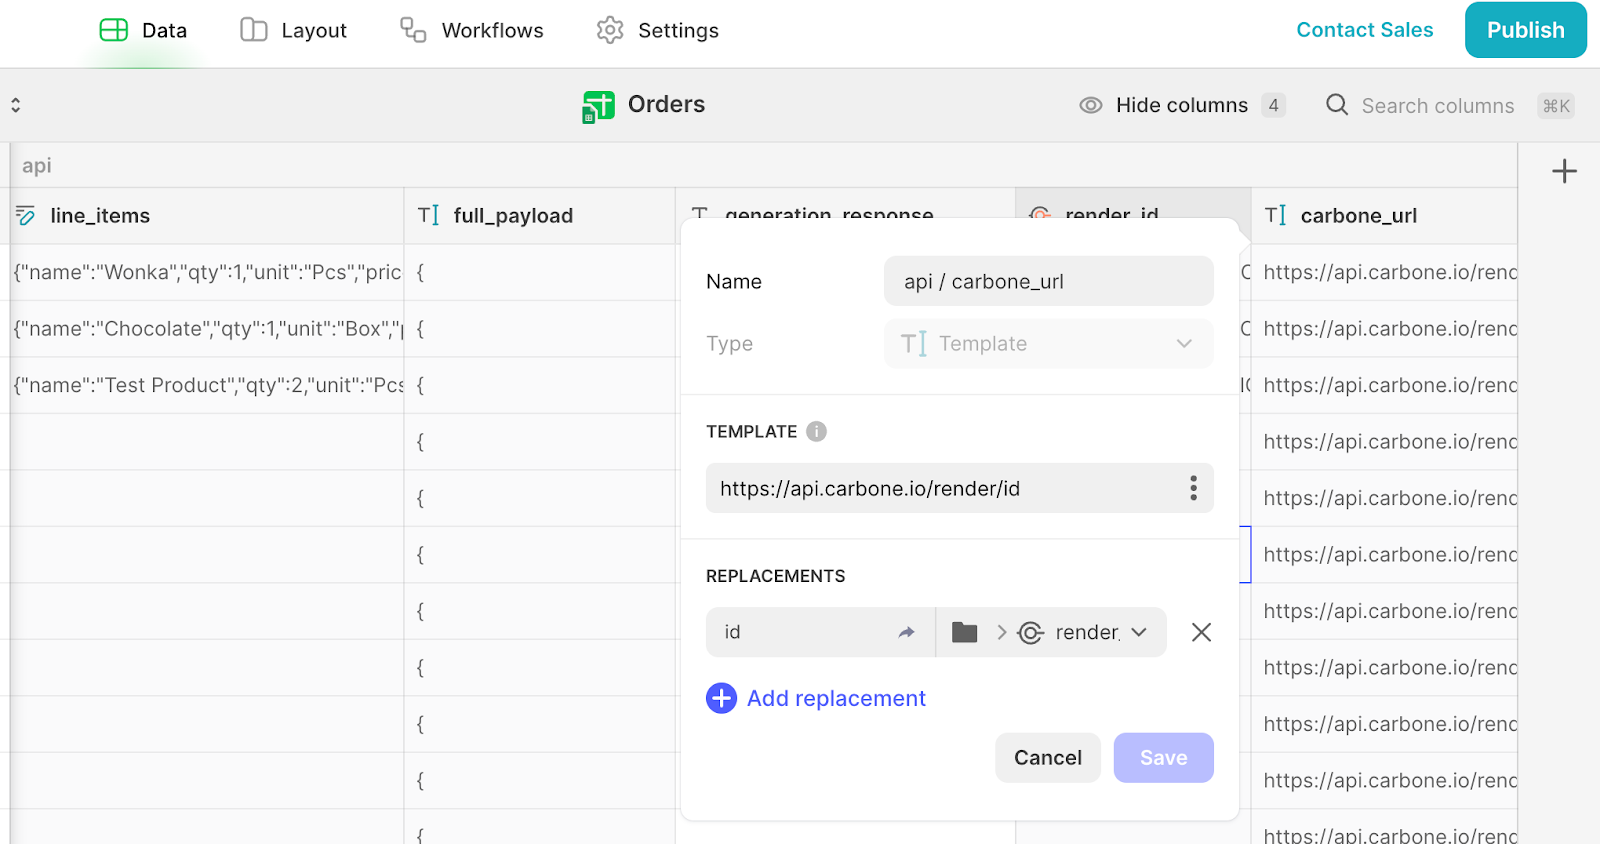
Now that we have the renderId, we need to build the URL to access the report. Add a Template column and name it “api / carbone_url”. Set it up like this:
- Template: https://api.carbone.io/render/id
- Under Replacements, bind api / render_id to replace the id placeholder.
This will generate a valid Carbone report URL that we can use to download the PDF before we upload it to Glide.
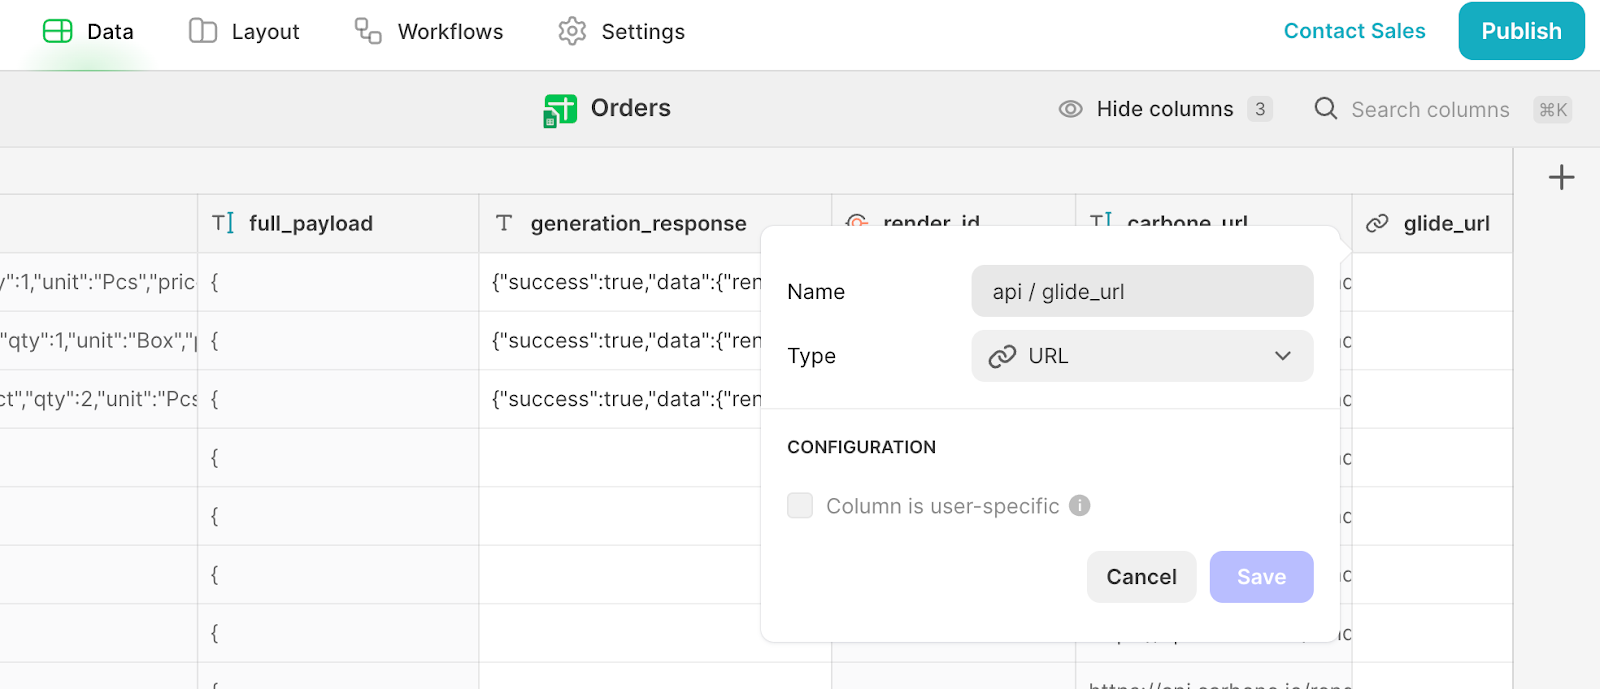
Since Carbone deletes reports after they’re accessed (or downloaded) for the first time, we need to store the PDF directly in Glide. Add a URL column to store the uploaded file link in Glide.
Now that we’ve structured our data, let’s set up the Glide automation to generate and store these PDFs in our app.
Integrating Glide with Carbone
First, head over to Workflows in Glide (top menu, next to Layout) and create a new one.
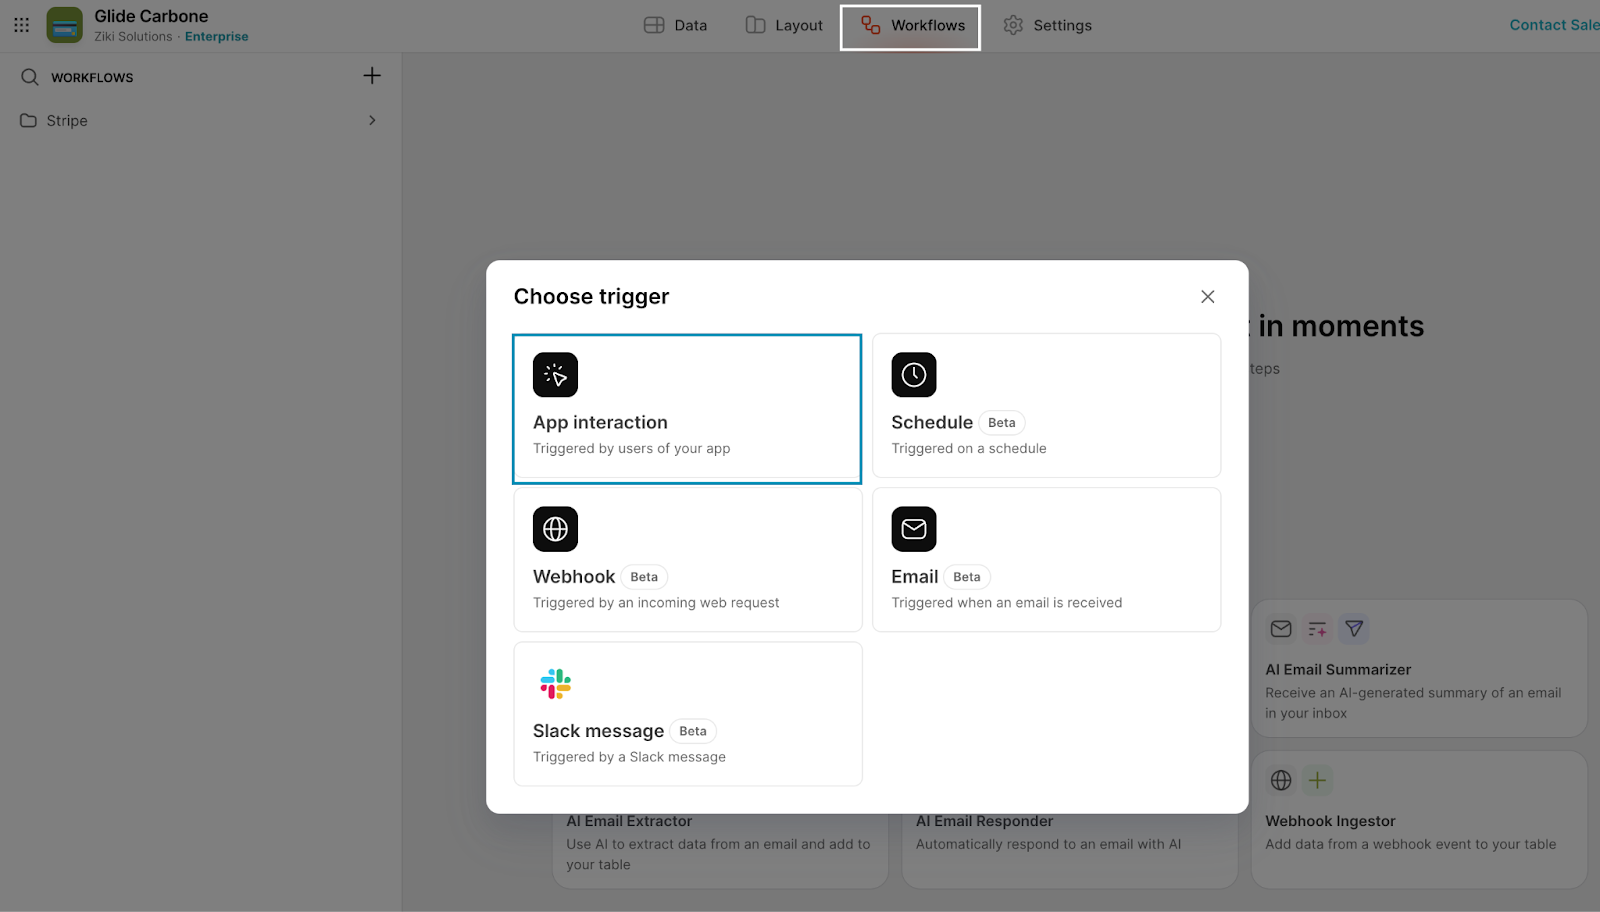
Set the trigger to App interaction and give it a clear name, like “Carbone / Generate Report”.
Once named, link the trigger to the Orders table, since that’s where we’re storing the JSON payload.
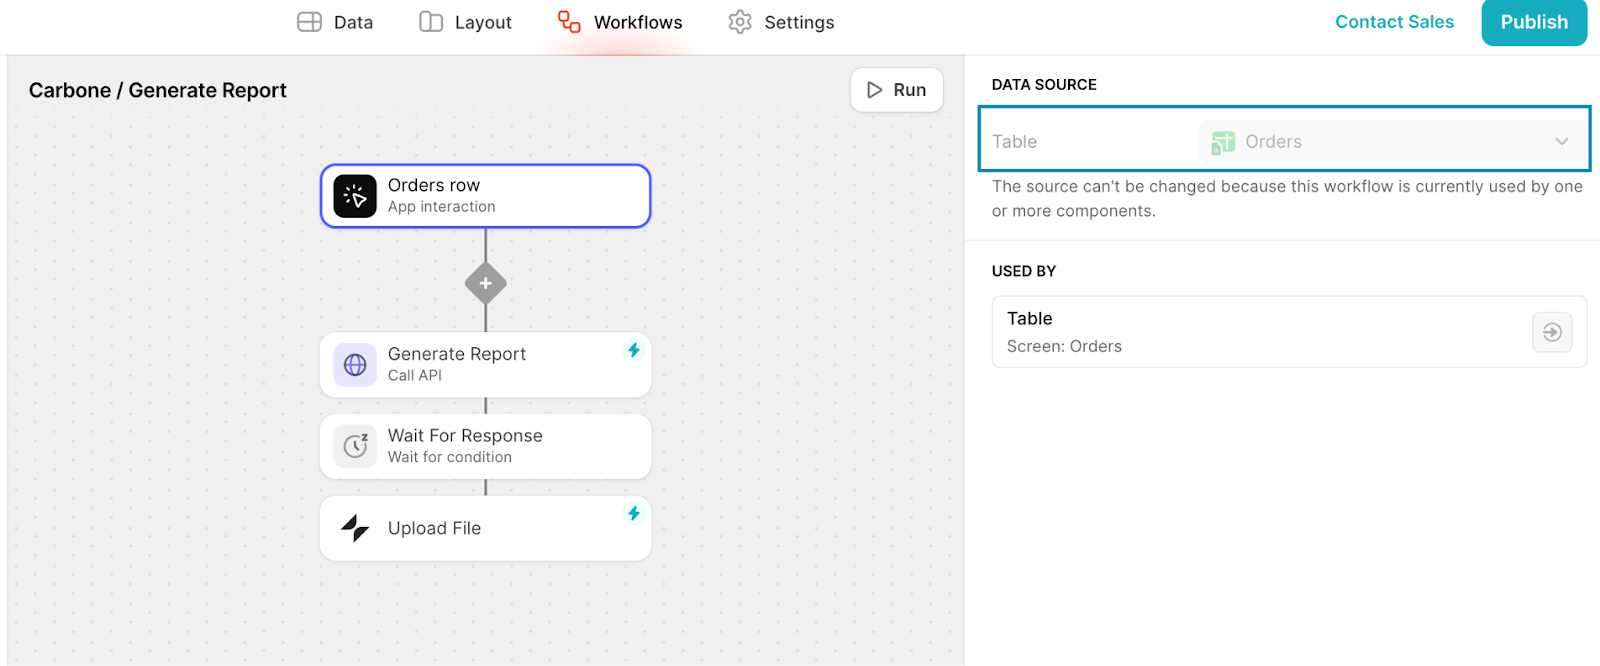
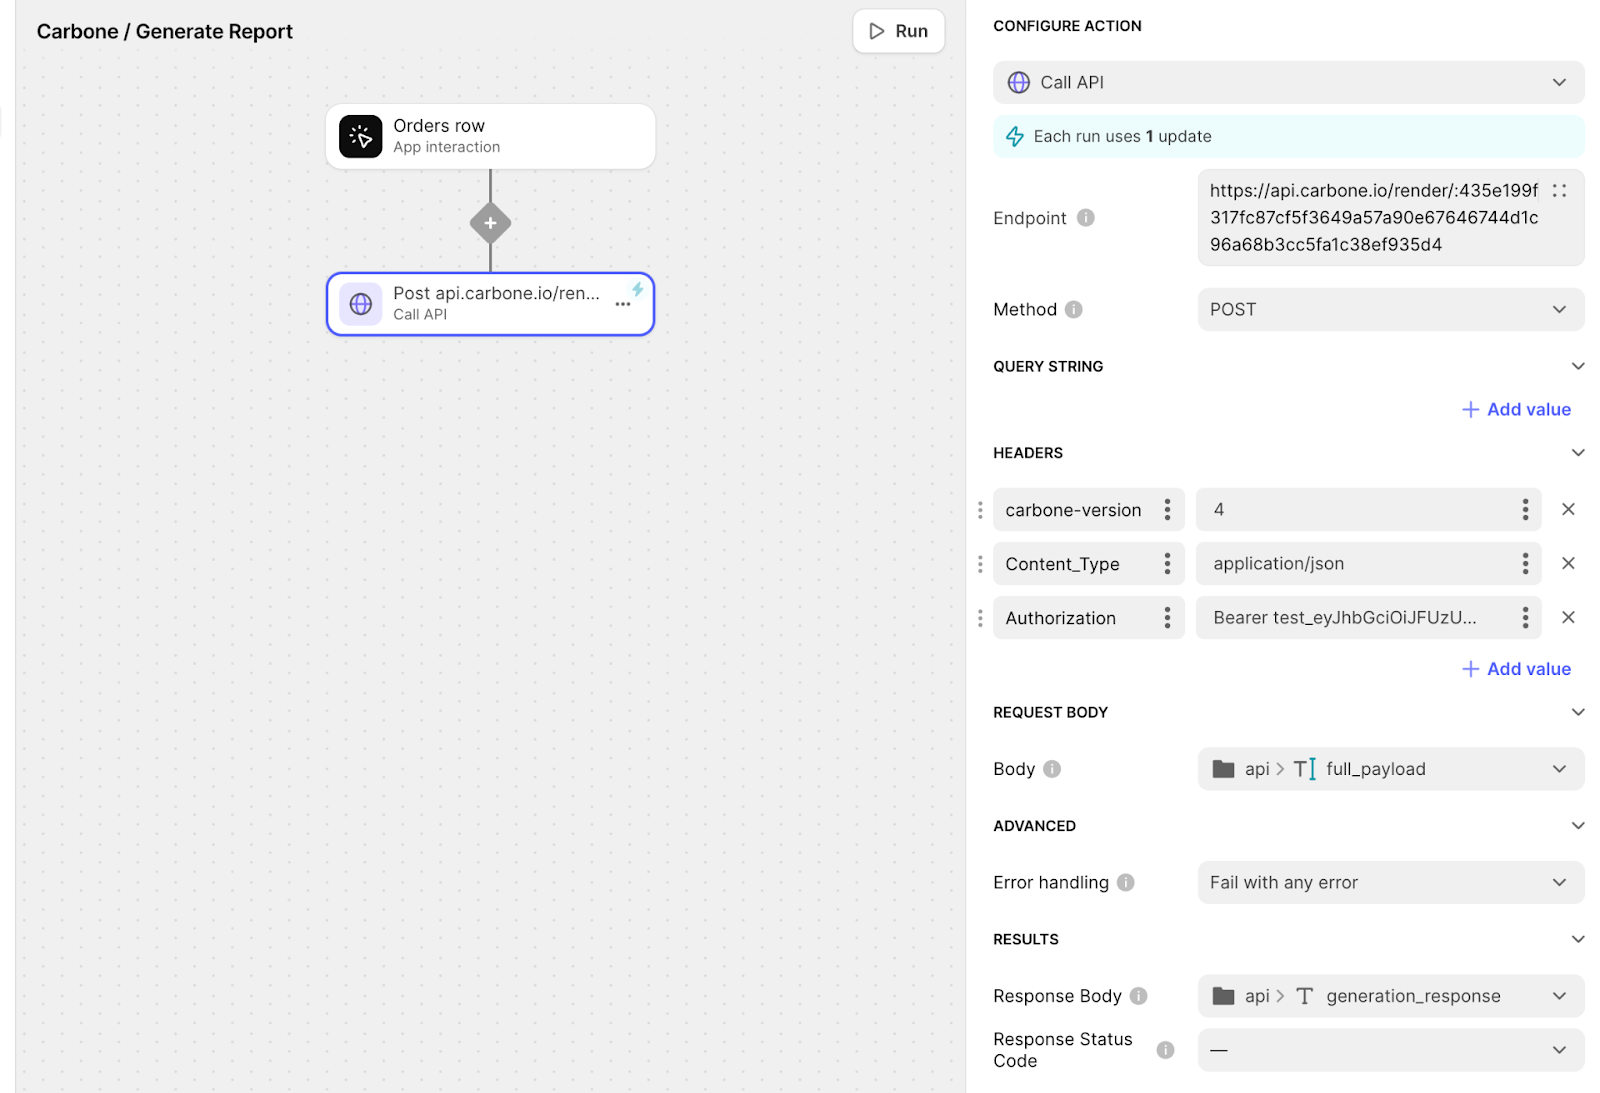
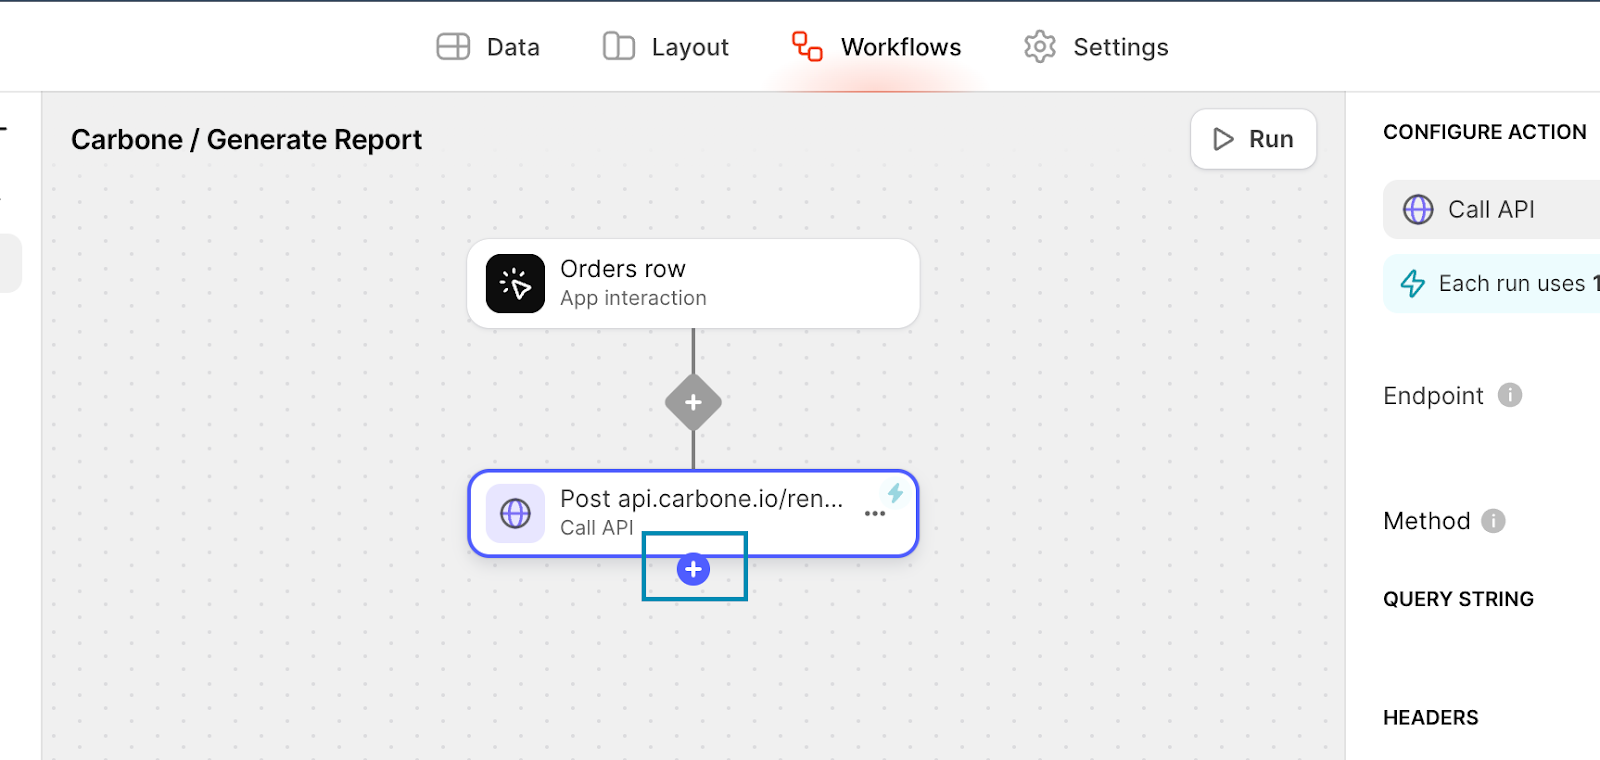
Next, add a Call API action. Click on the trigger to add a new action, then click on the new action to open its settings. In the upper right corner of the configuration, change the action to Call API.
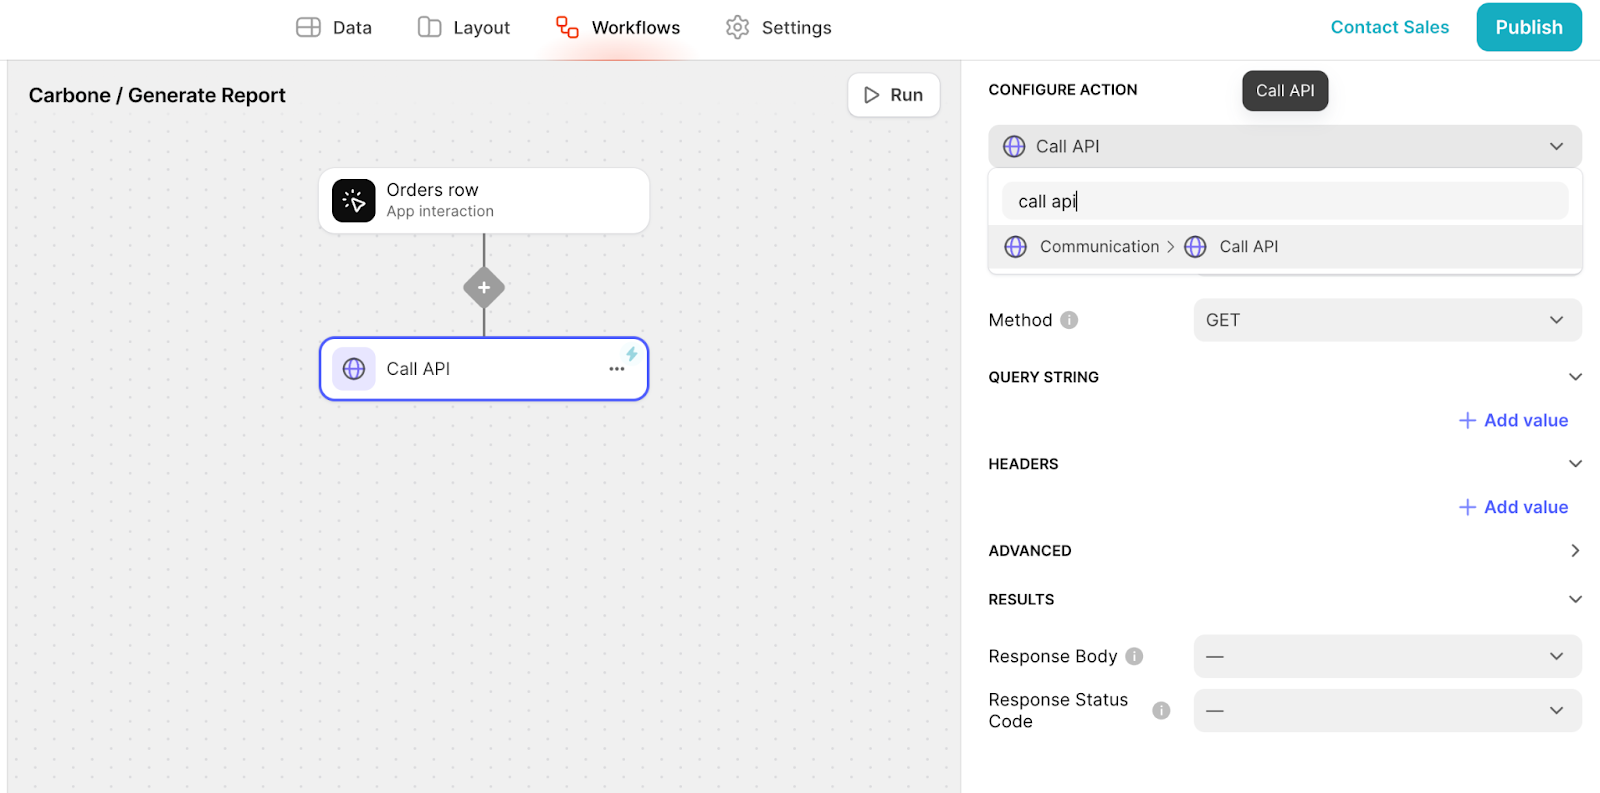
Now, set up the API request:
- Endpoint: https://api.carbone.io/render/:yourtemplateId
- Method: POST
- Headers:
- Carbone-version: 4
- Content_Type: application/json
- Authorization: Bearer yourAPIKey
- Body: bind the full_payload column from the Orders database
- Response Body: bind the generation_response column from the Orders database
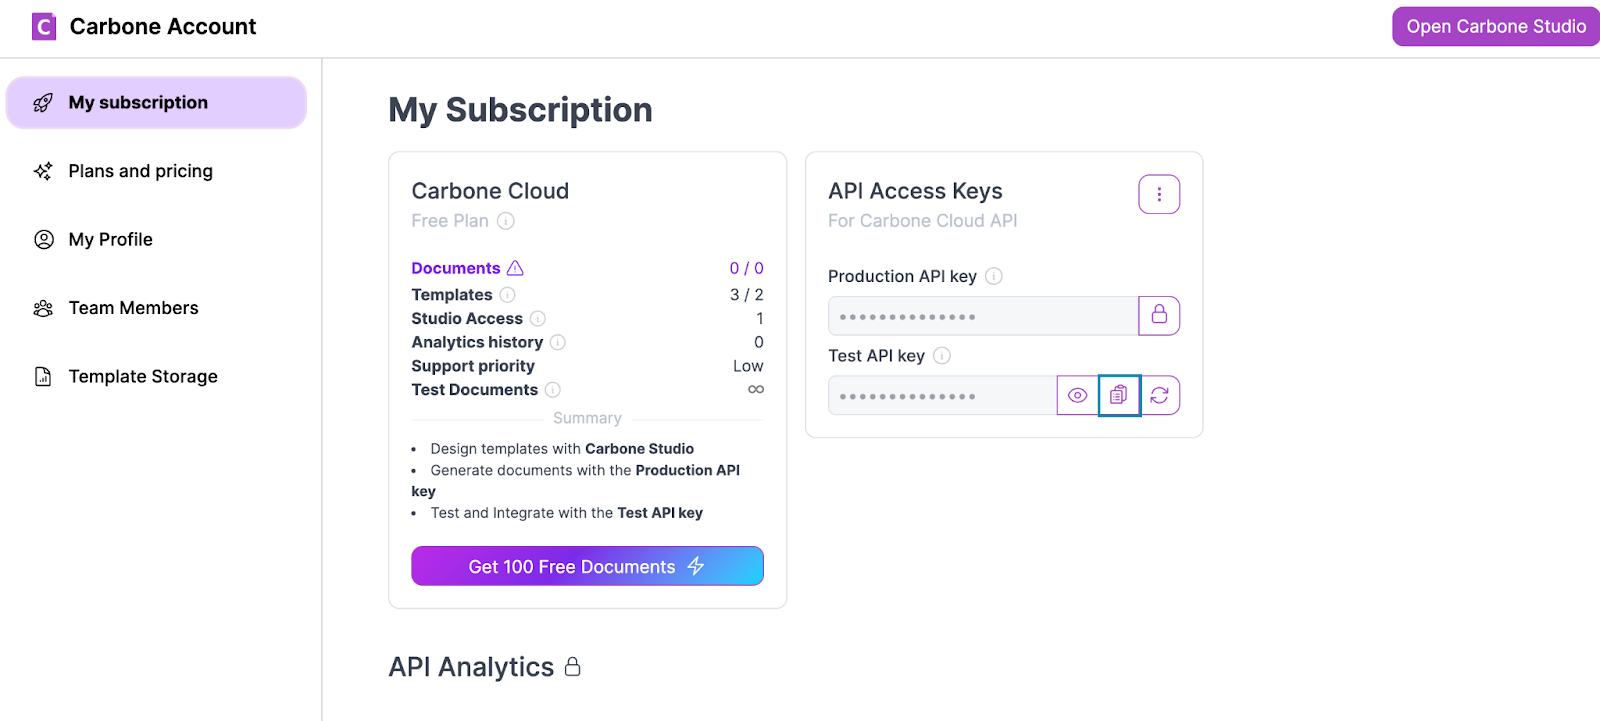
To get your API Key, go to Carbone > My Subscription and copy the key under Test API key. Replace yourAPIKey placeholder in the Authorization header with the actual key.
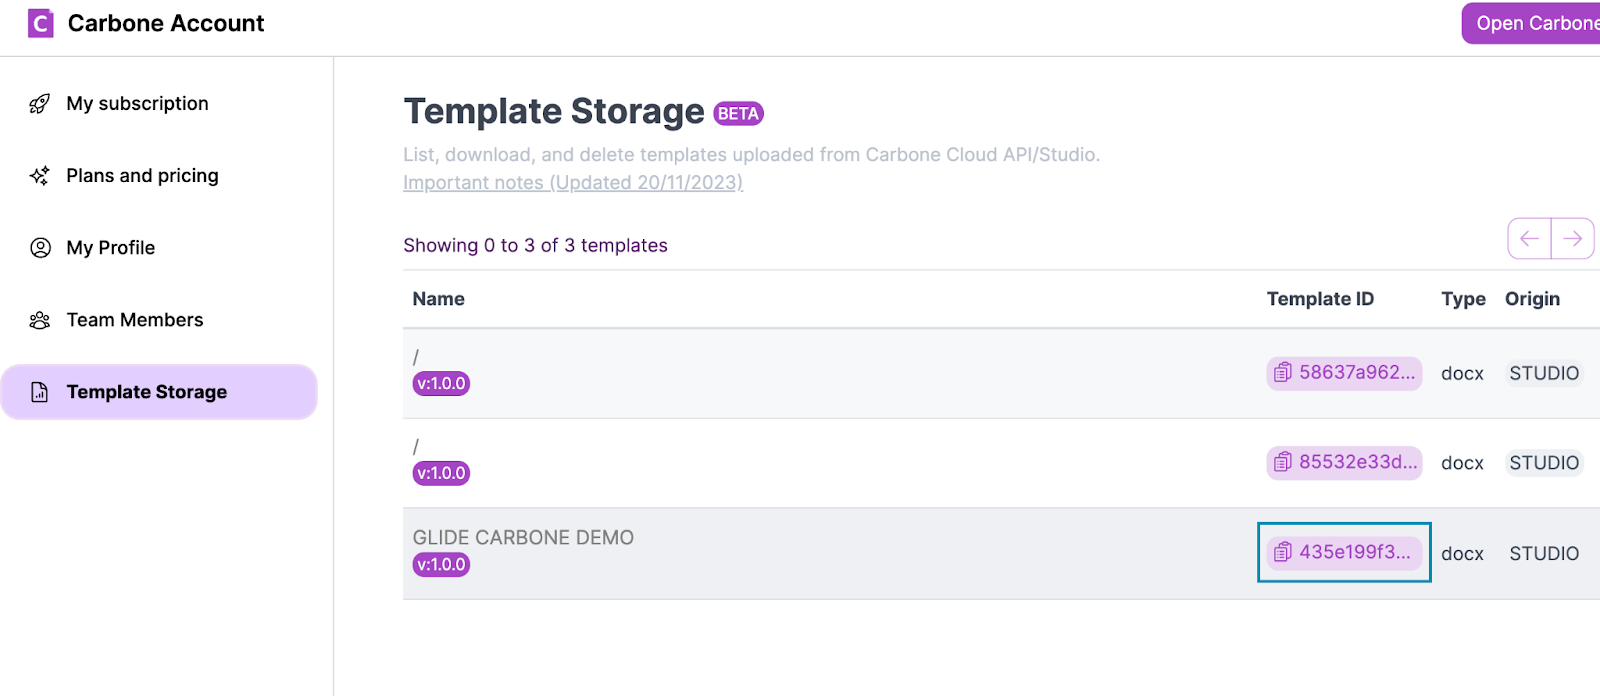
To get your Template ID, go to Carbone > Template Storage, find your template, copy its ID, and replace “yourtemplateId” in the Endpoint with the real one: https://api.carbone.io/render/:yourtemplateId
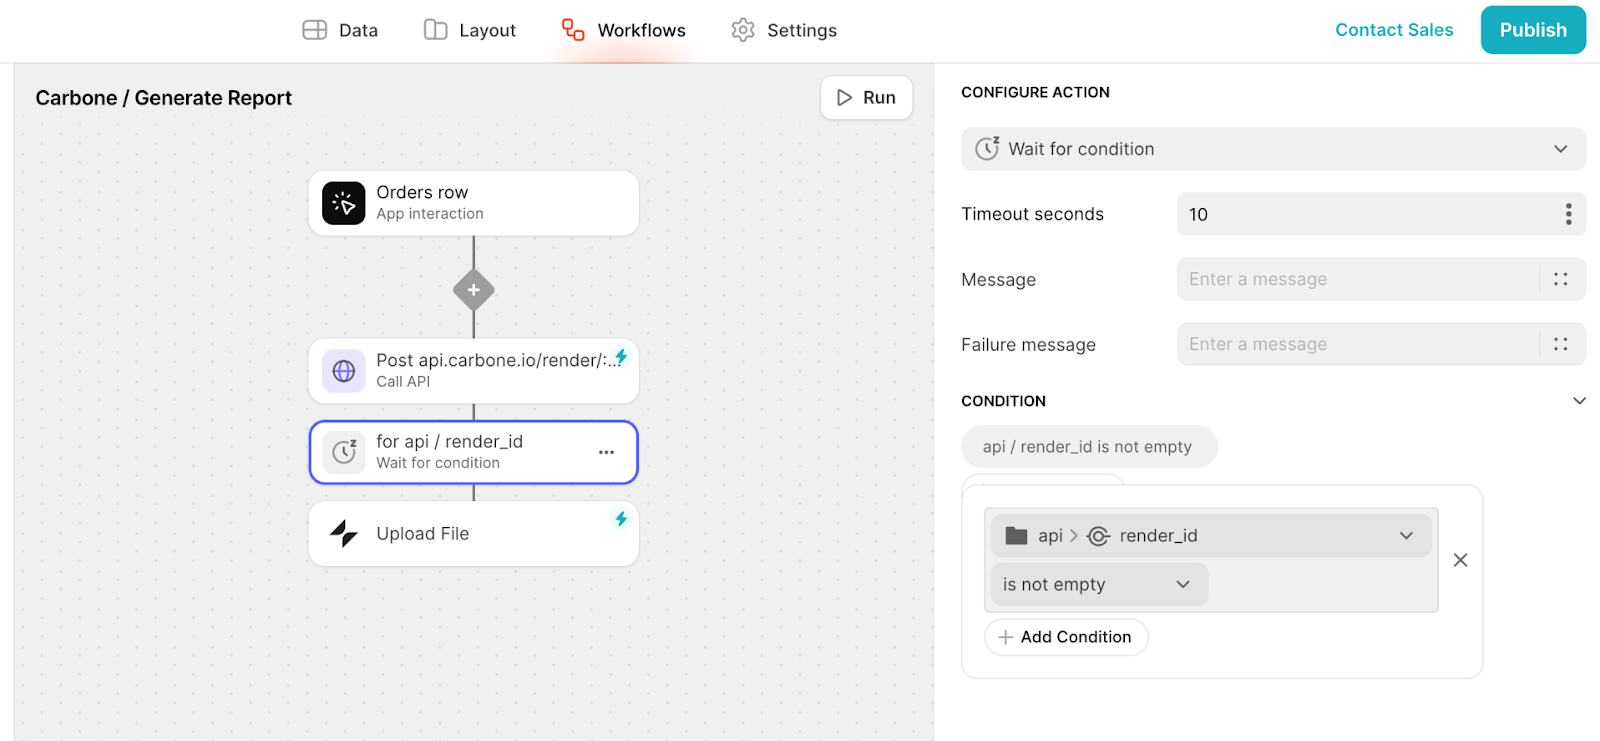
Before we try to upload the PDF to Glide, we need to make sure Carbone has processed the request and the Carbone URL that we’re using as the input is ready. To do this, add a Wait for Condition step. Hover over the bottom of the Call API action, click + to add a new action, then search for wait and select Wait for Condition.
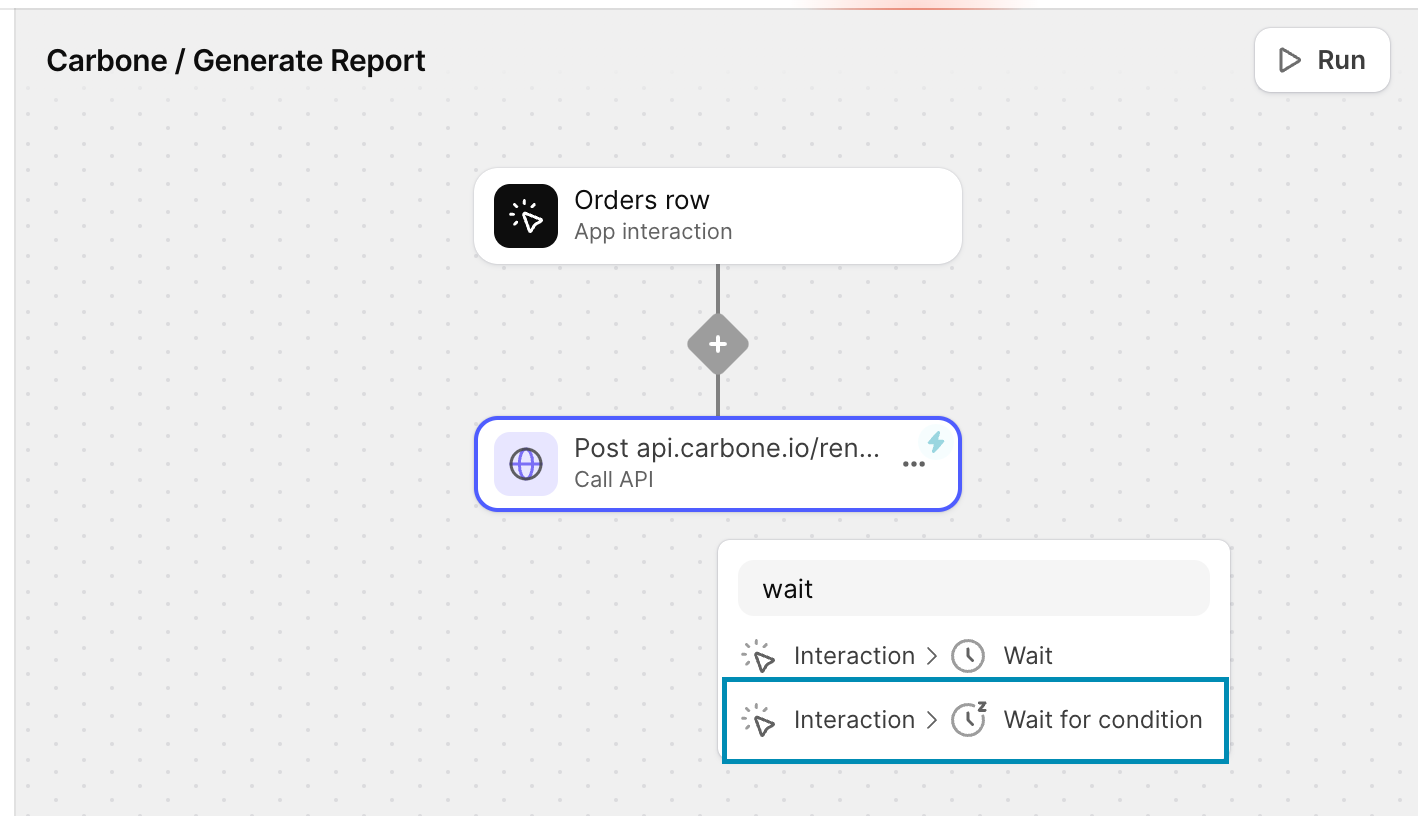
Increase the Timeout to 10 seconds (default is 3) to give Carbone enough time to return the response and Glide to extract the render id. For the Condition, set it to api / render_id is not empty. This makes sure we’re not trying to upload the file before the render id (which enables us to form the access URL) is fully formed.
Now we need to store the generated PDF in Glide so we can access it whenever we need. Add an Upload File action by hovering over the Wait for Condition step and clicking + to add a new action.
Set it up like this:
- URL: bind the api / carbone_url (this is what we’re uploading)
- File Name bind the order / order_id column
- Glide URL: bind the api / glide_url (which is where Glide will store the uploaded file).

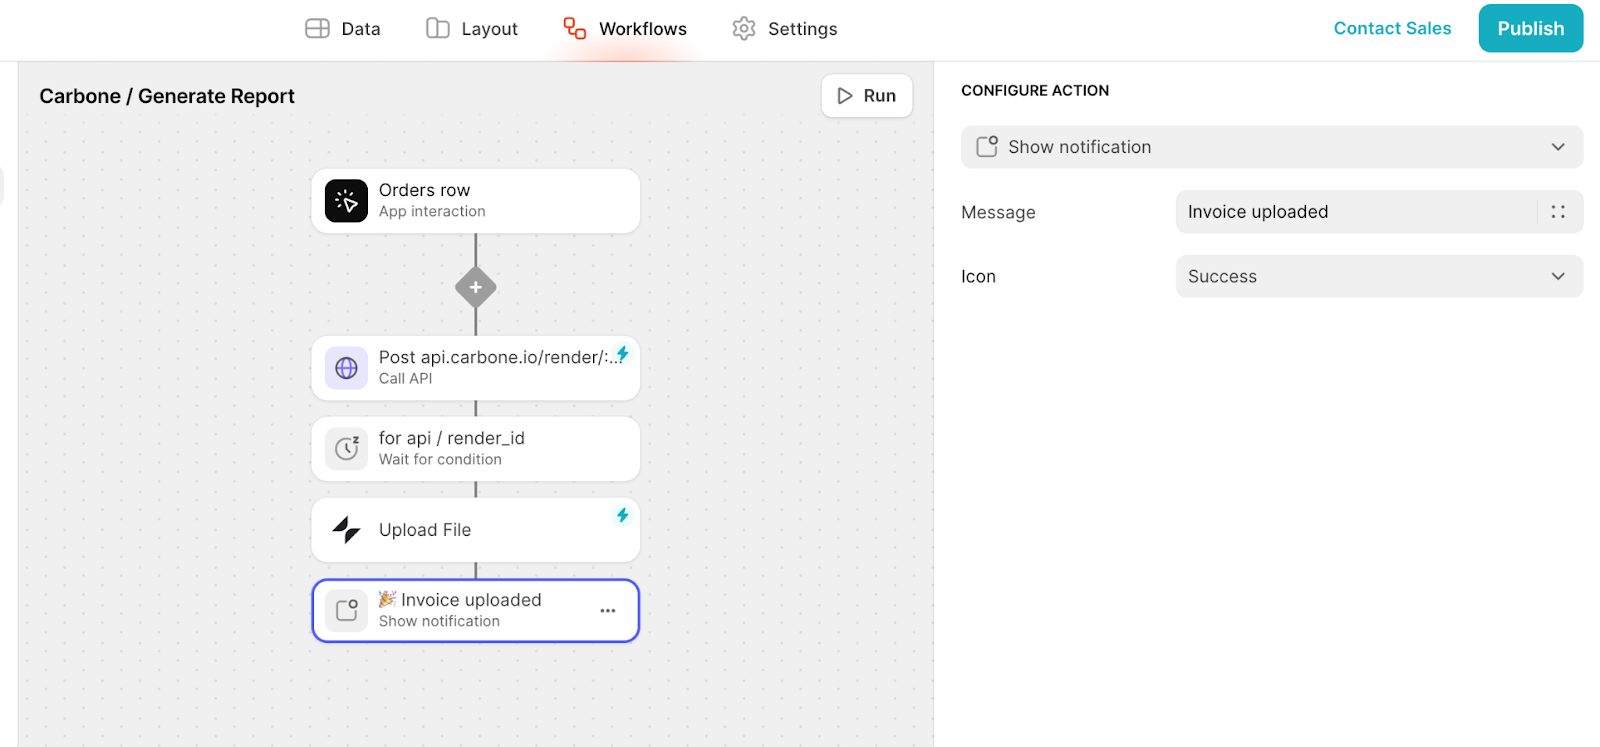
Finally, add a Show Notification action to confirm that the file has been successfully uploaded to Glide and is accessible.
Go to your Workflow Editor and hover over the bottom border of the Upload File action. Click + to add a new action, then select Show Notification from the list.
Set the message to something clear, like “Invoice uploaded”.
Now that the logic is in place, let’s make it easy for users to generate and view invoices directly from Glide.
Setting up the action buttons in the Glide UI
Back in your Order app, go to the Layouts tab, select the Table component where your orders are listed, and open the settings panel. Under Columns on the right, click + Add item, choose Button, and name it "Generate Invoice". If you want, add an icon (a document or invoice icon works well).
Now, we need to hook up the button to the workflow. Set it to trigger the Carbone / Generate Report action when clicked.
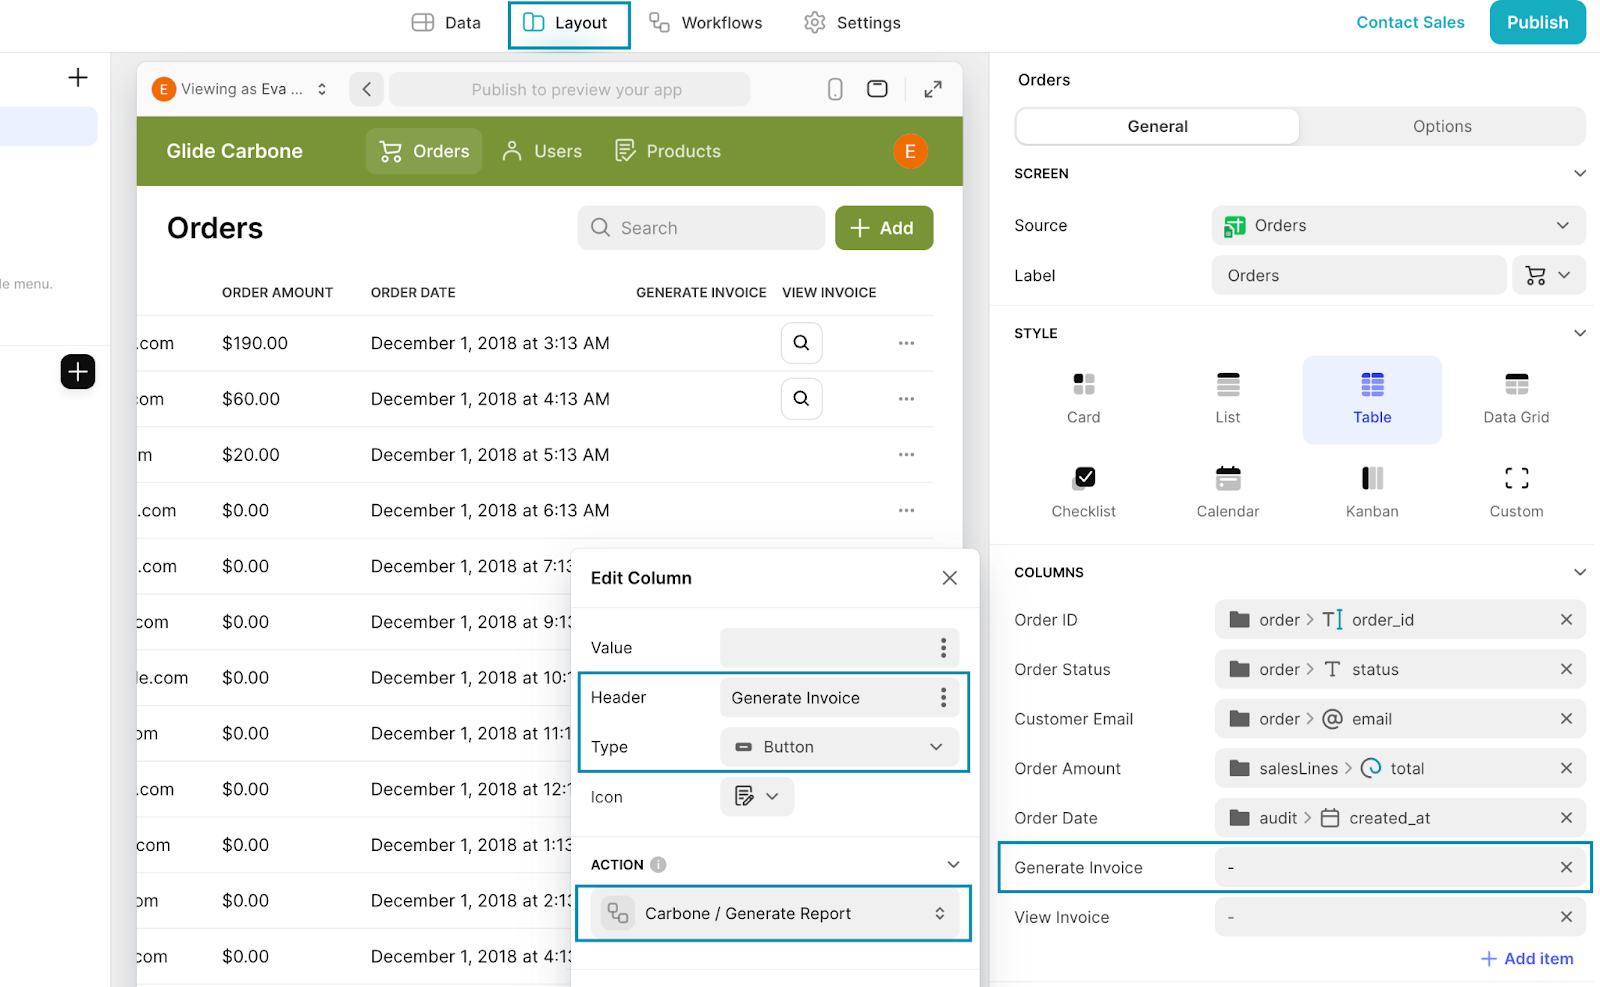
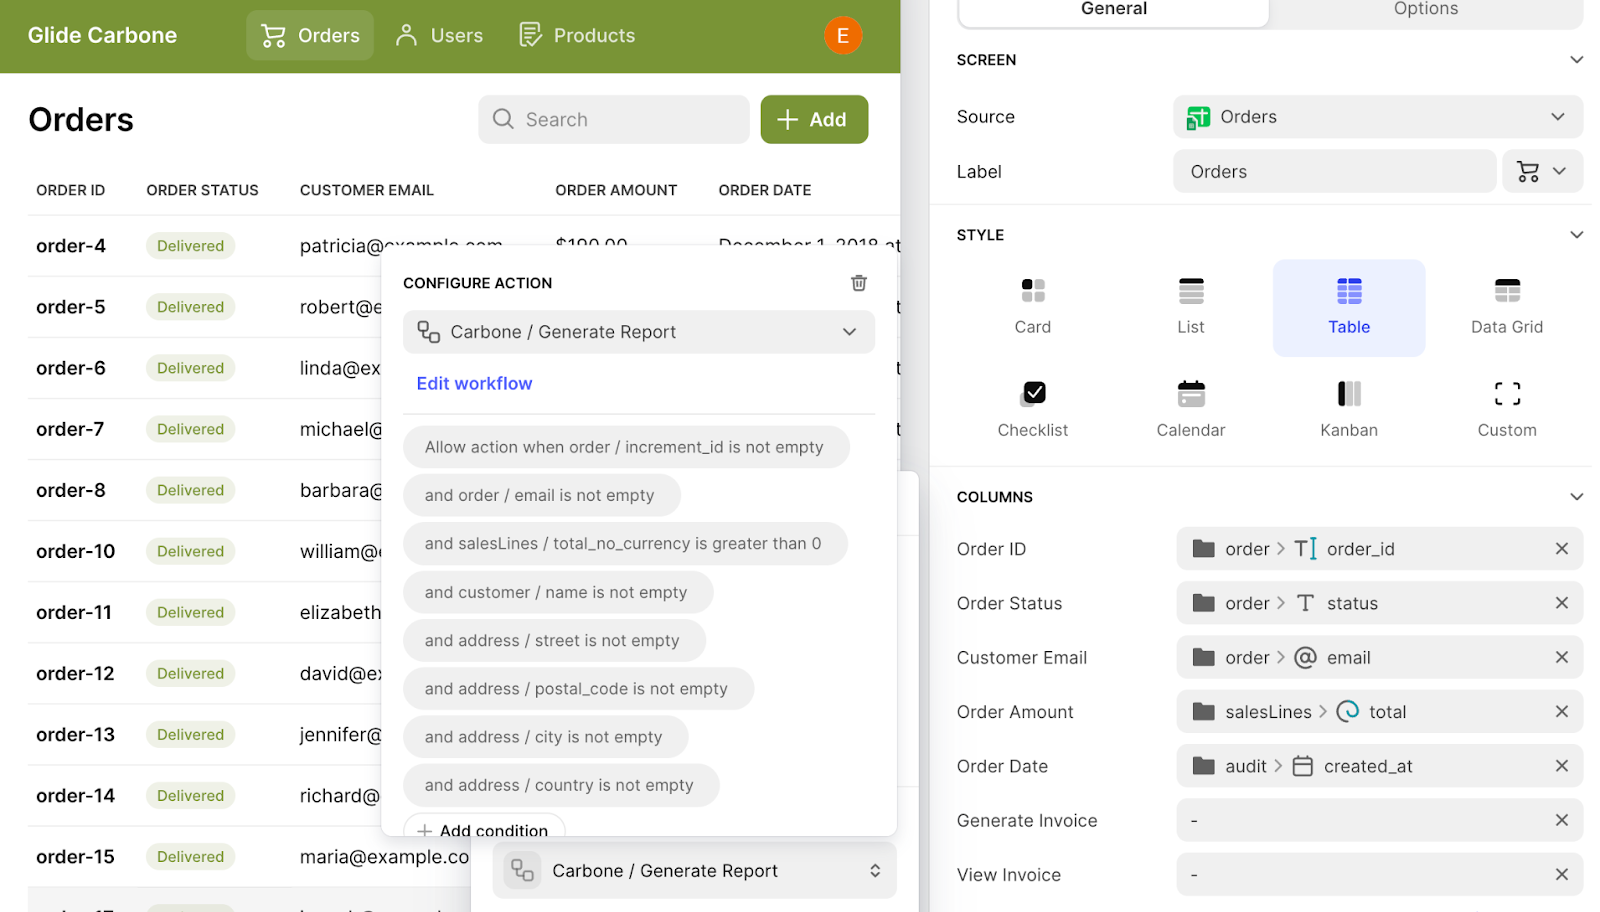
To make sure users don’t generate invoices when they shouldn’t, we’ll add some conditions. Click Add Condition and set it up so the button is only clickable when all required fields used in the JSON payload are filled in. Click on the Carbone / Generate Report action and set the following conditions:
Once an invoice is generated, we need a way for users to open it directly in Glide. Under Columns, click + Add item, select Button, and name it "View Invoice". For the action, select Open Link and under URL, select the column that stores the invoice link (api / glide_url).
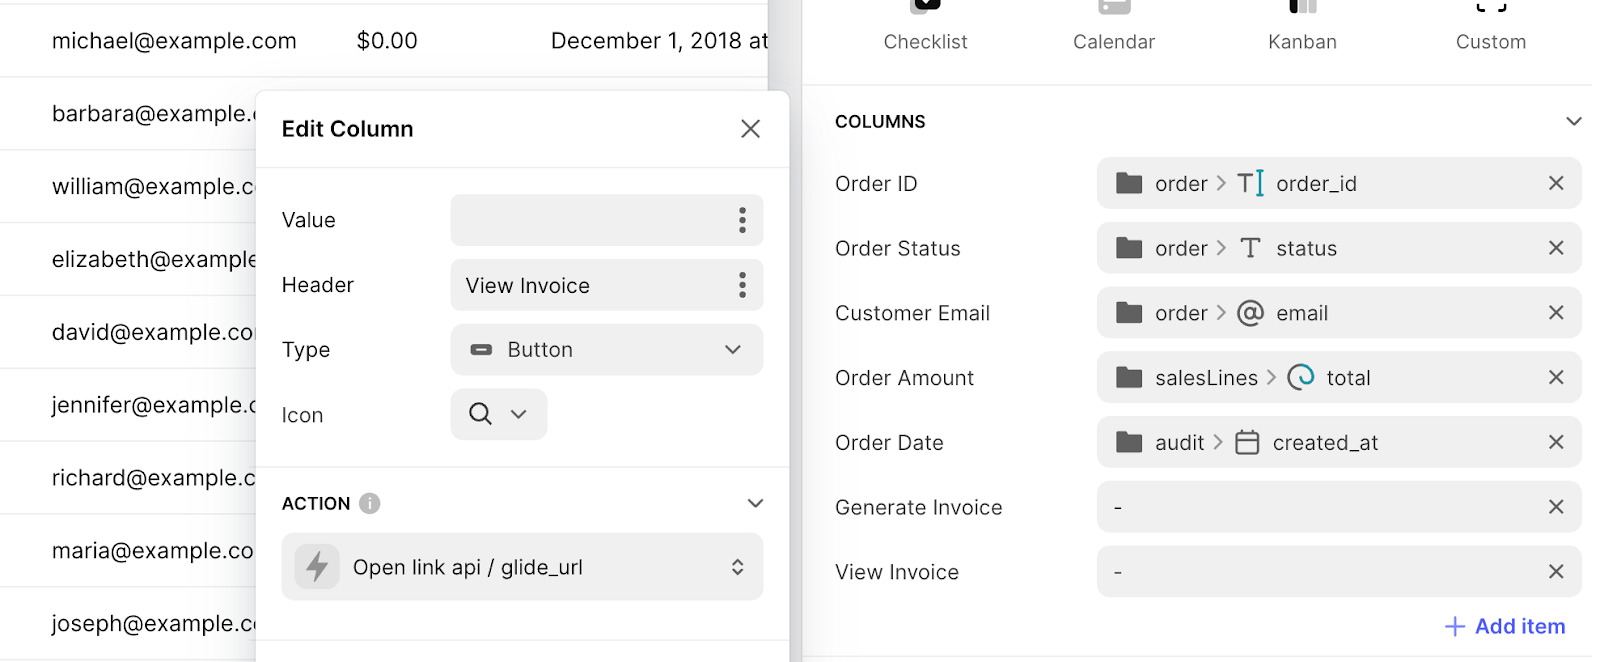
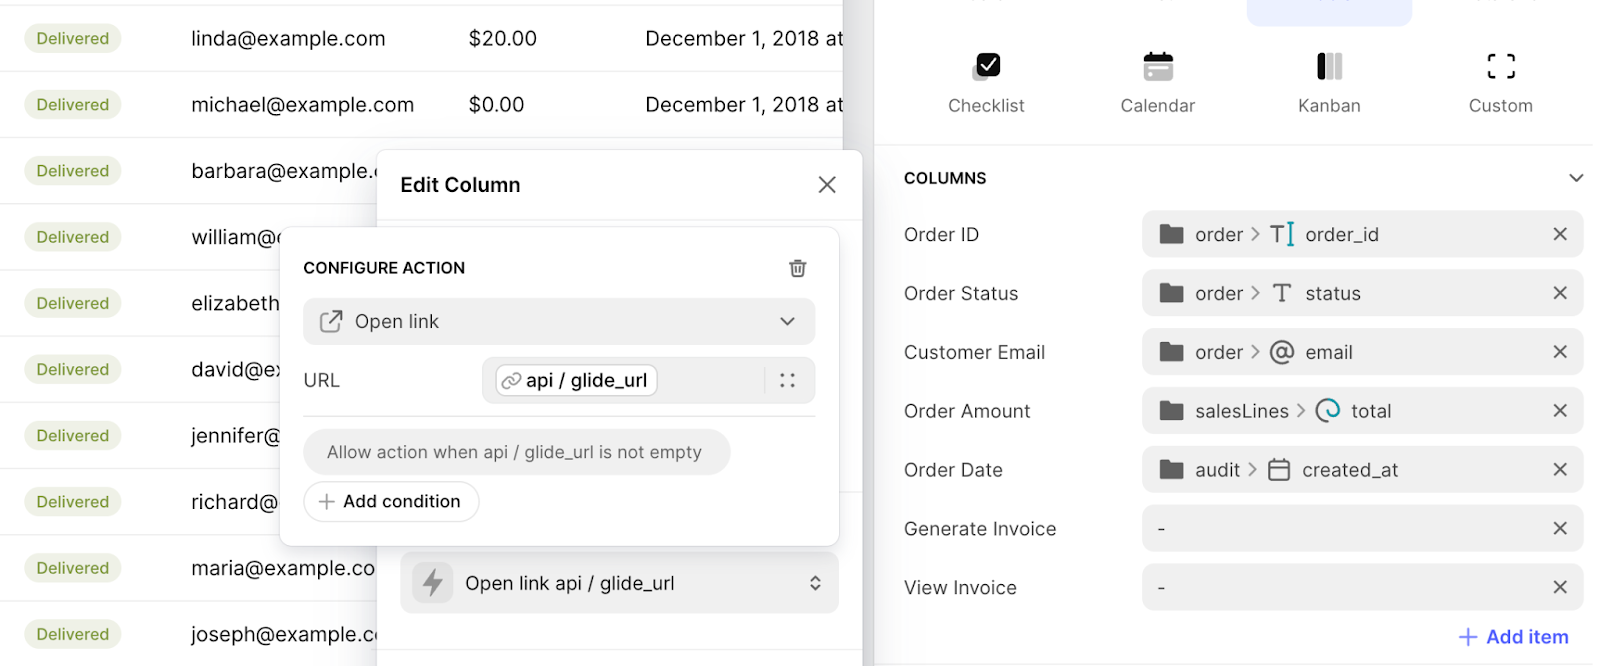
To keep the UI clean, we’ll only show this button when there’s actually an invoice to view. Click Add Condition and set it so the button only appears when api / glide_url is not empty.
Now, the View Invoice button will only show up when the invoice is ready.
Testing the integration
Time to test our integration! Click Generate Invoice on an order that has the Generate Invoice visible (meaning all the data we need for the report is there). This should trigger the workflow, send the request to Carbone, and generate the invoice.
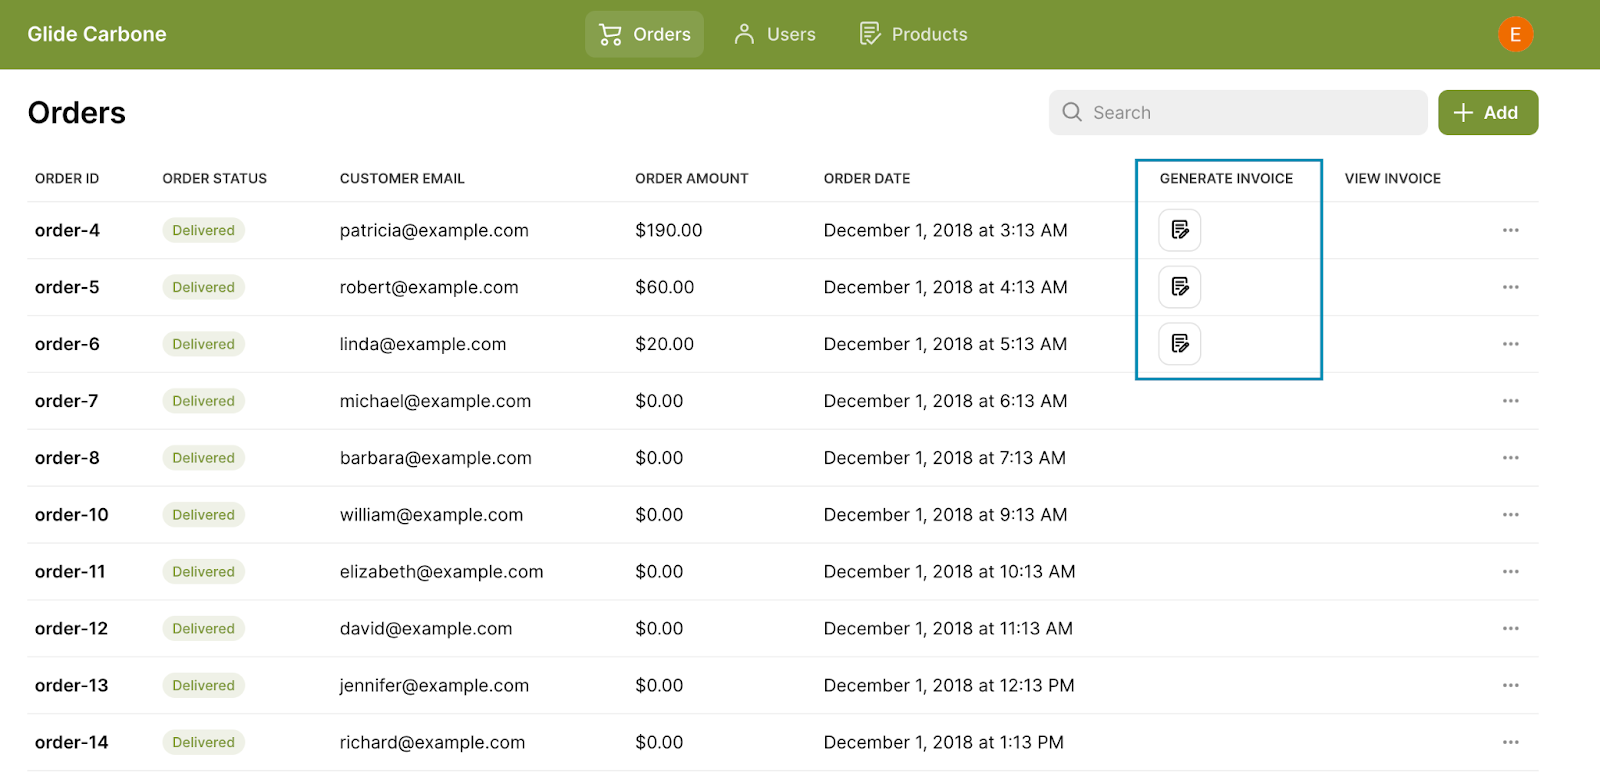
Once it’s done, you’ll receive a success message and the View Invoice button will show up next to the Generate Invoice button.

When you click the View Invoice button, the PDF should open in a new tab, where you can then download it directly to your device. Since we set up the invoice to save to Glide as soon as Glide receives the URL, this is now neatly stored inside your database!
You did it! Here’s what you can do next…
Now that your Glide + Carbone integration is up and running, you can use what you’ve learned to automate even more of your invoicing process or extend it to other document generation workflows.
As such, here are a few ways to build useful features onto what you've already set up:
- Automated Customer Emails – Instead of manually sending invoices, set up an automation that emails invoices to customers the moment they’re generated.
- Payment Reminders. If you run a service-based business, automate reminders for unpaid invoices, so customers get a reminder before the due date.
- Automated Reporting. Schedule weekly or monthly sales reports to be sent to your team, so everyone stays informed without having to pull the data themselves (or you having to do it for them).
- Stripe Payment Links. If you generate invoices before collecting payment, integrate Glide with Stripe to automatically generate and attach payment links.
- Beyond Invoices... Why stop at invoicing? You can use this automation to generate contracts, proposals, inventory sheets, or any other document based on your data - eliminating manual document prep entirely.
At the end of the day, the more you automate (and the more strategic you are about it!), the more time you have to redirect away from admin tasks and towards the work that uses your expertise, that you value and that you enjoy. Because let’s be real, nobody actually likes manually creating documents.
Head to our Blueprints section for more ways to increase your business productivity!
If you want to learn more about how Glide scrubs up next to other tools, check out our Glide comparison article.

