


Retool is a great option for developers to build frontends on top of their data much faster than they could with traditional code. Whether you have a Postgres database, MongoDB, Firebase, or another, Retool is a scalable platform for building secure solutions for your teams to interact with their data.
Retool is truly designed for developers who can leverage their JavaScript and SQL expertise to build out complex internal applications within a drag-and-drop interface. For many developers, Retool is one of the best platforms to build out their CRUD apps. Nevertheless, for those new to Retool, there are still some platform-specific nuances that builders must familiarize themselves with first.
If you are interested in using Retool and curious as to whether it would work for you, this tutorial will walk you through the basics of the platform and how you would use it to build a CRUD on top of your data.
For this step-by-step walkthrough, we’ll use Retool’s built-in SQL database for our data, but Retool natively integrates with almost all database options for simple connection and authentication.
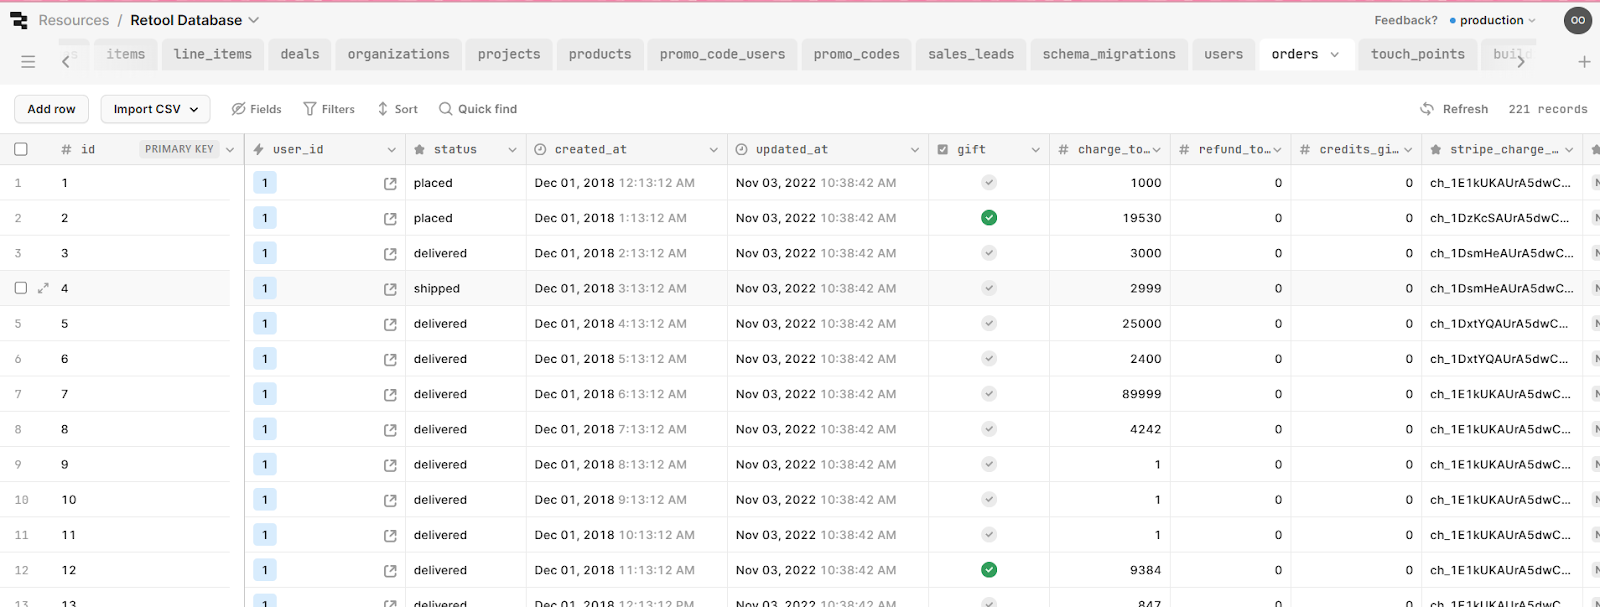
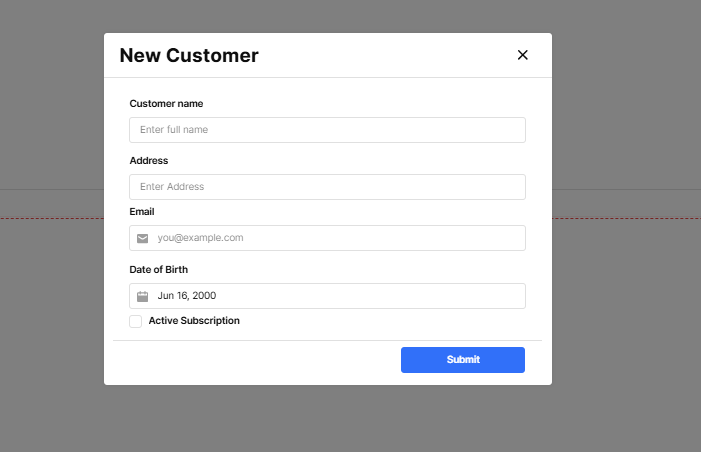
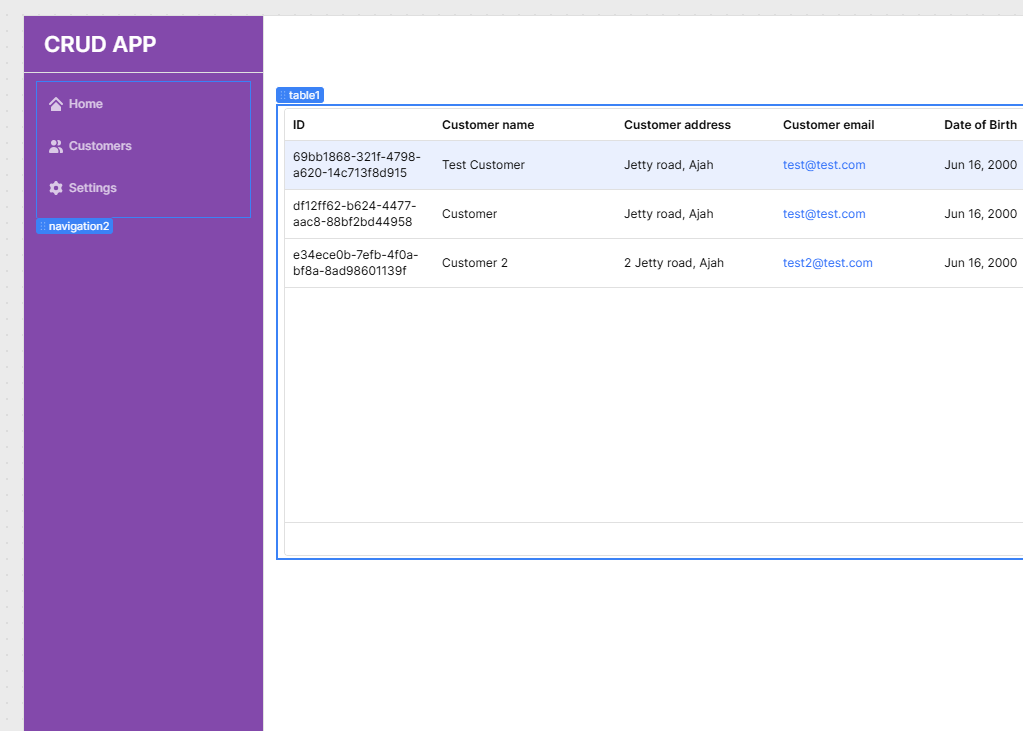
Here’s a preview of what our final app will look like:
Set up your Retool database or connect to a resource
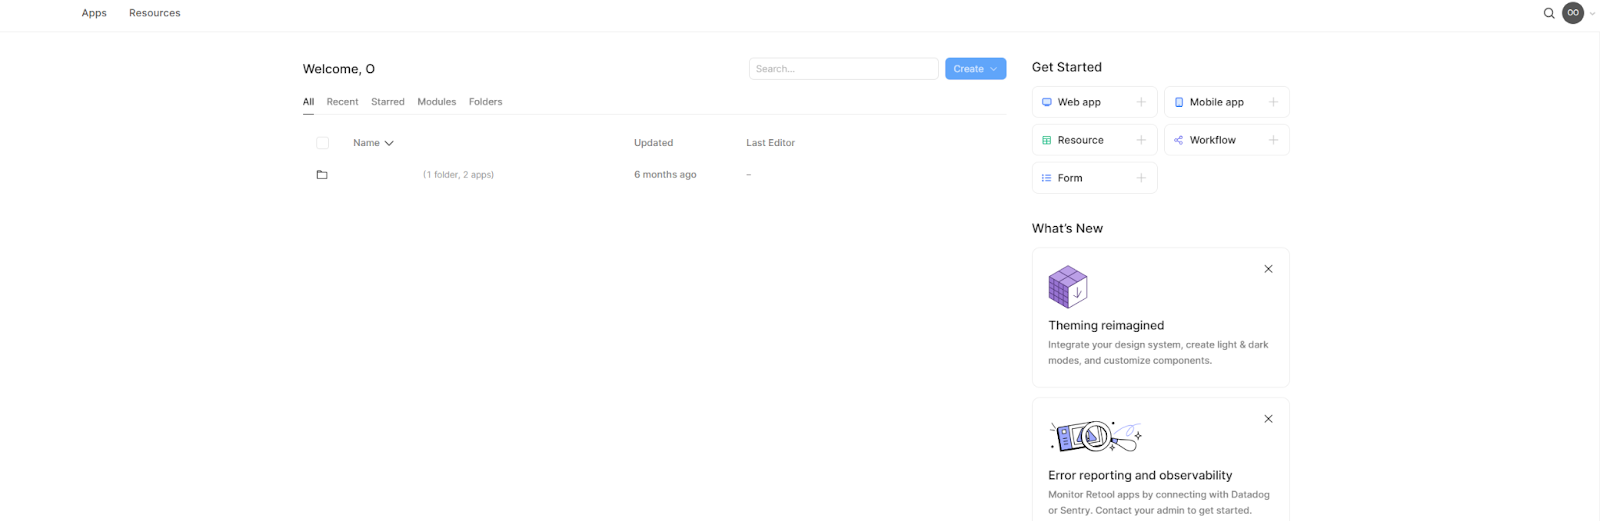
Visit Retool and sign up if you don’t already have an account. Registration is straightforward—you can use your email or log in with your Google account for quick access and get started on the Free plan.
After signing in, you’ll land on the homepage. Here you can access the application root folders, workflows, resources, environment settings and get started with building.
Let’s start with our data layer and head to resources. Here, you’ll have access to Retool Database and Storage which are built-in storage options available on all plans. You can also configure Retool Email, as well as AI and Vectors.
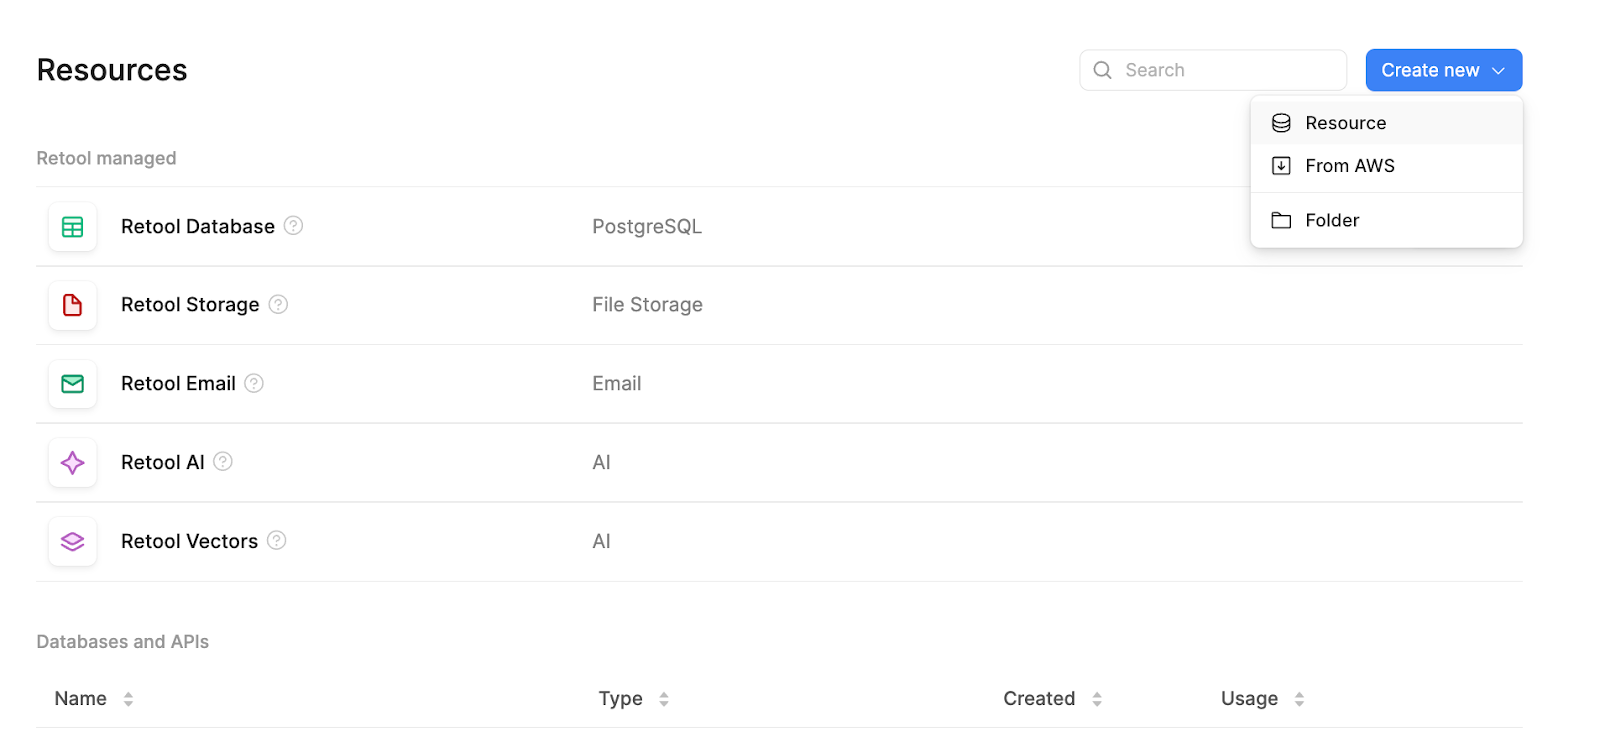
From this page, you can click on the Create new dropdown button and select Resource.
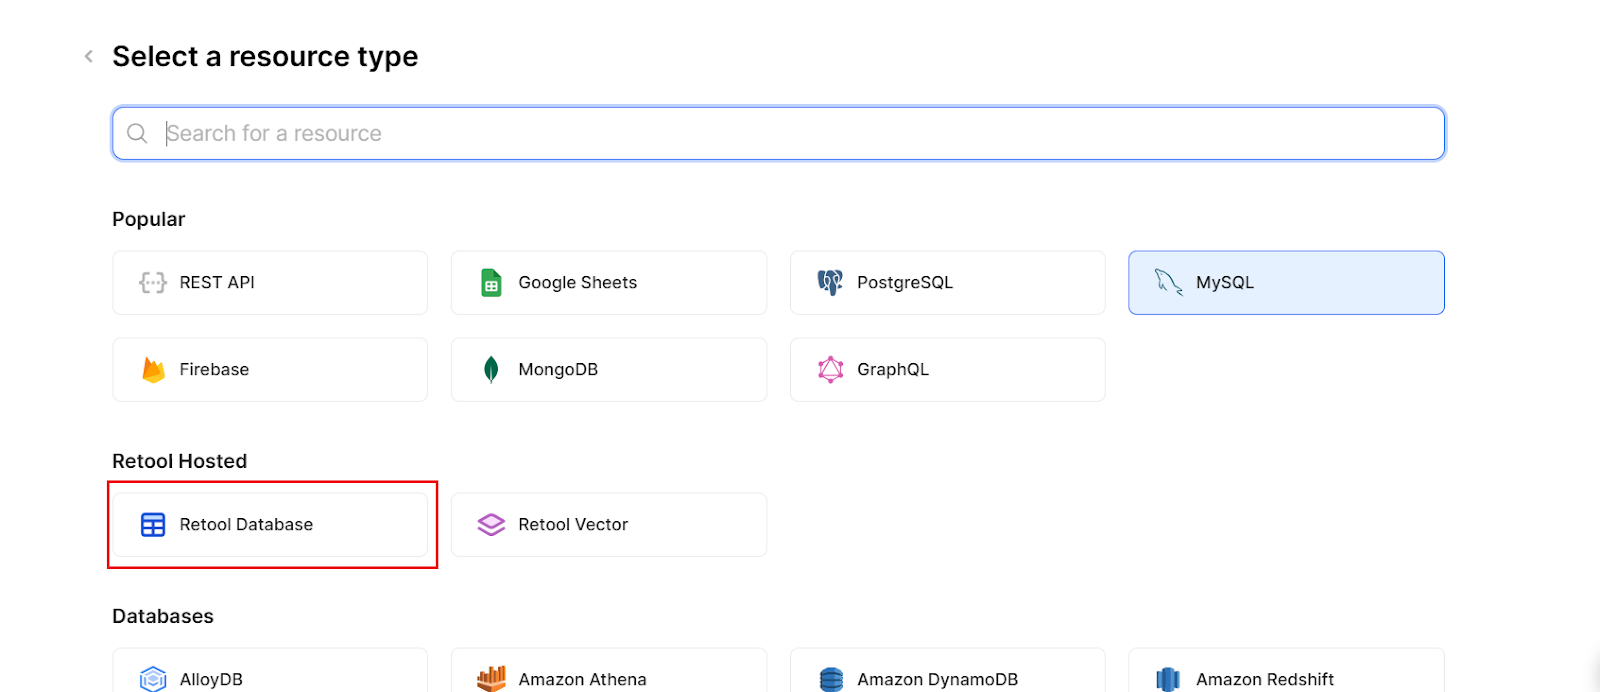
On the next page, you’ll see some of the most common resources Retool connects with. From here, it’s super simple to connect to integrated resources or configure a REST API for anything they don’t support.
If you’ll be starting with a Retool-hosted DB, click on Retool Database to proceed.
Set the advanced options to ‘Read connection’ for now, then click Test Connection and Save Changes once everything is working.
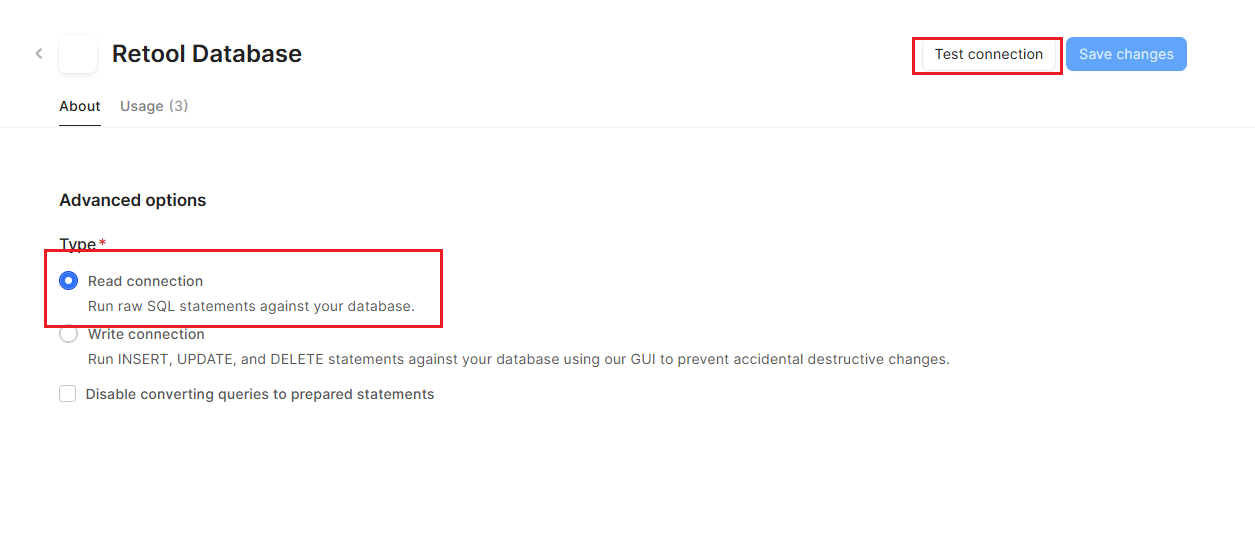
Congratulations! You now should have successfully connected to the Retool Database.
Once in Retool's DB, you will typically find a variety of pre-generated tables with demo data. These tables are designed to help users quickly prototype and explore their applications and are a great place to get started with the platform.
If you want to use your own data, you can create a new table tailored to your needs. Click the + button option within the Retool Database interface. In the modal, you can choose to upload via CSV, generate a schema with AI or start from scratch.
- First, name the table. We called ours customer_details.
Define Fields (Columns):
Use the Fields section to add the columns needed for your table. Here is the schema we used:
- id (UUID - Primary Key): A unique identifier for each row, automatically set as the primary key.
- customer_name (Text): Stores customer names.
- customer_address (Text): Holds customer addresses.
- Date (Date): Records when the row is created; default value can be set to NOW().
- active_subscription/subscription_status (Boolean/text): Indicates if the customer has an active subscription.
- customer_email (Text): Stores customer email addresses.
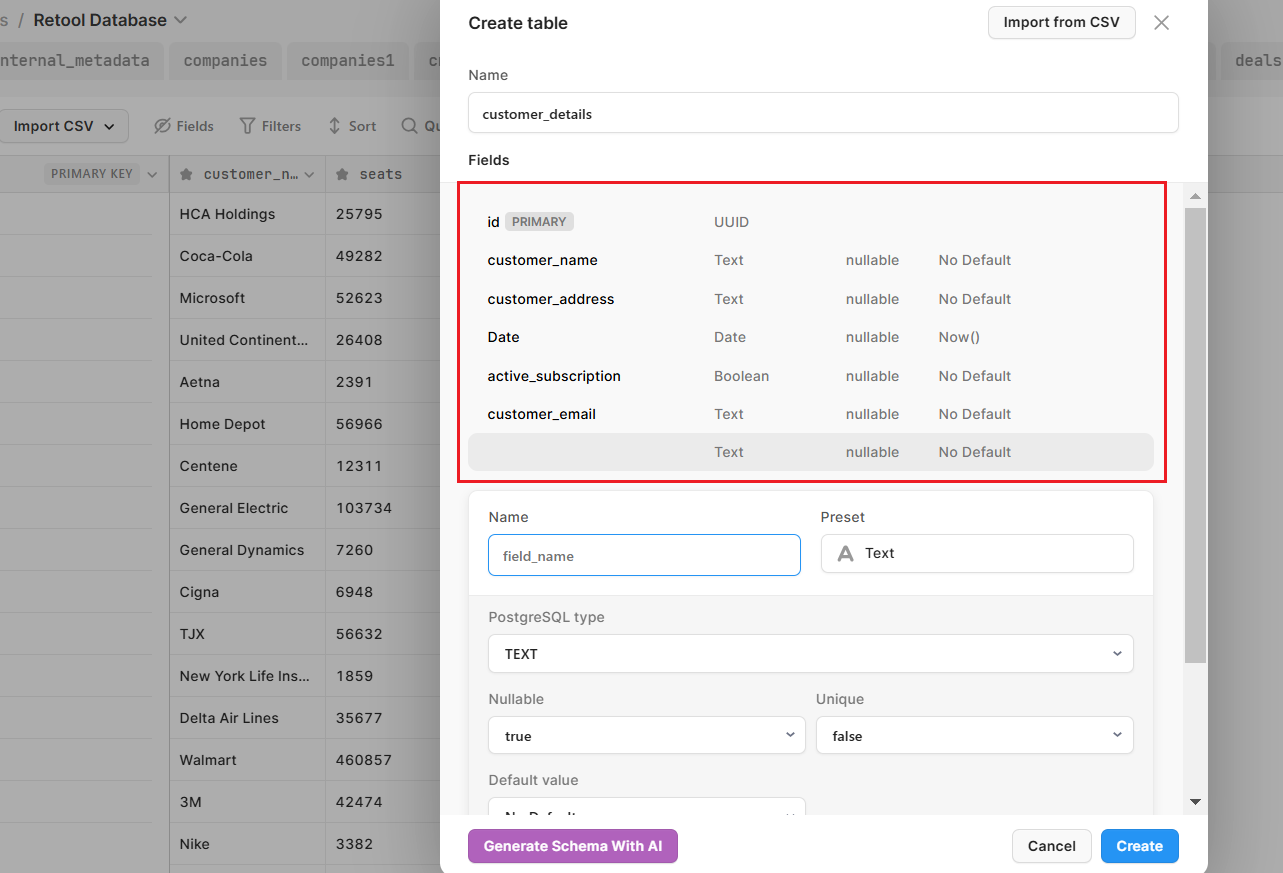
After defining all fields, click the Create button to finalize the table. You’re ready to go! From here you can choose to manually add a few lines of data or use the import CSV to populate it.
If you prefer to import our demo data csv instead, you can download it here.
Build the CRUD UI in Retool
Now let’s think about setting up our user interface.
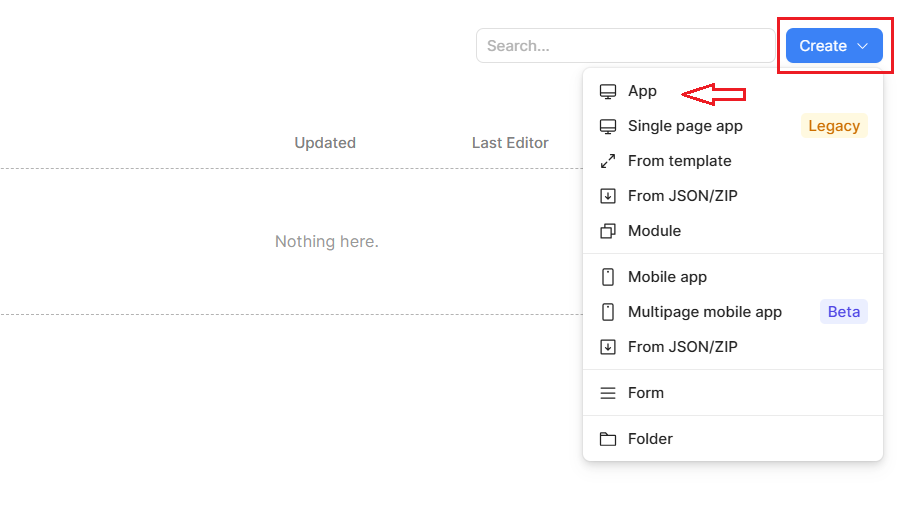
Head back to the Retool homepage and click the blue Create button. From here, you could start with a blank web or mobile app, use a template, or import an app from JSON/ZIP. Select App to start creating your CRUD interface!
When you open your Retool app you’ll land on the app canvas. Here, you can use the first tab to drag and drop components onto the canvas and configure them in the right-hand inspector. On the left you can also access the component tree, code, pages, release versions, and additional settings.
Now that we’ve got to know the Retool IDE a little better, let’s start setting up our app.
Read: Querying the Retool Database
To connect to Retool Database, open the code page in the left-hand panel (marked with a </> symbol) and click the + icon in the Code section to create a new query. For this example, we’ll add the query to the global scope, but it’s worth noting here that you can also add code to the page code to be used on a single-page basis.
Choose Resource Query as the query type and select Retool Database, or your own database.

In the SQL editor, type the following command to retrieve all rows from the customer_details table:
SELECT * FROM customer_details;
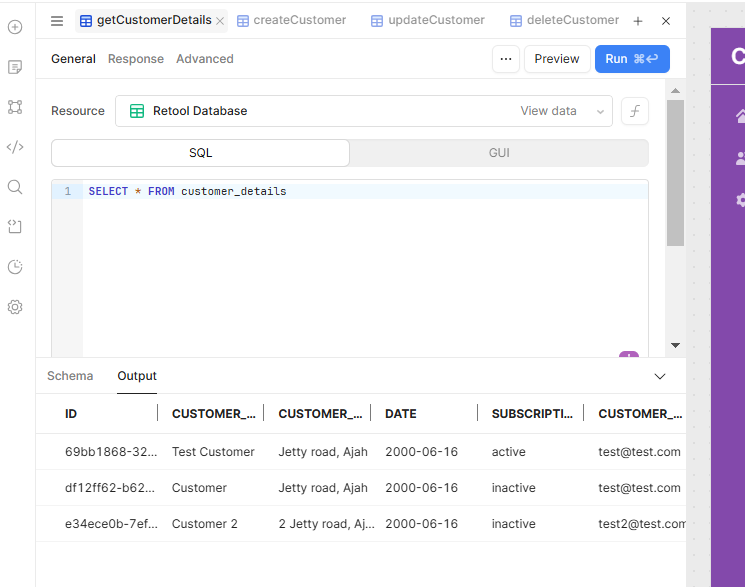
This query fetches all columns and rows from the table. Click the Run button to execute the query and the results will be displayed in the output panel below.
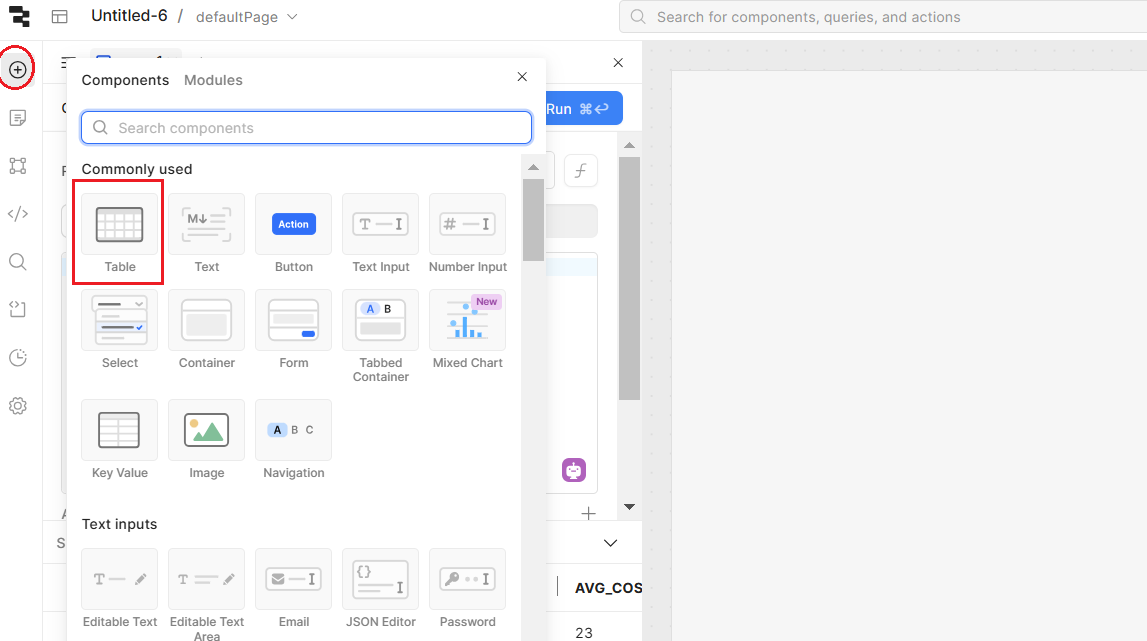
Now, let’s display this data in a table. In the Retool editor, click the Add Component icon (marked with a +) in the left-hand toolbar. From the Components panel, locate the Table option under the "Commonly Used" section. Drag and drop the Table component to your editor.
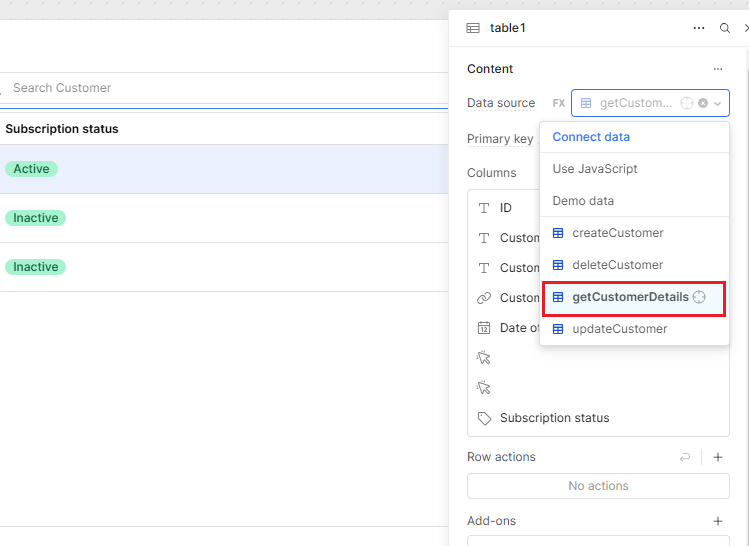
Most likely, the data source will default to your new query, but if not you can map the table to the results of your query by selecting getCustomerDetails as Data source from the dropdown.
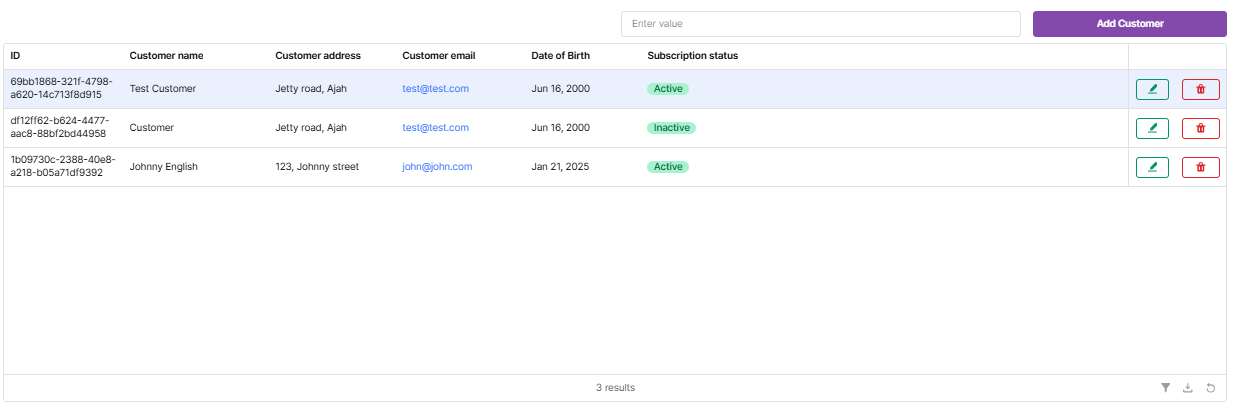
Here’s what your data will look like:
Let’s make our data as clear as possible…
Delete: Configuring your delete action
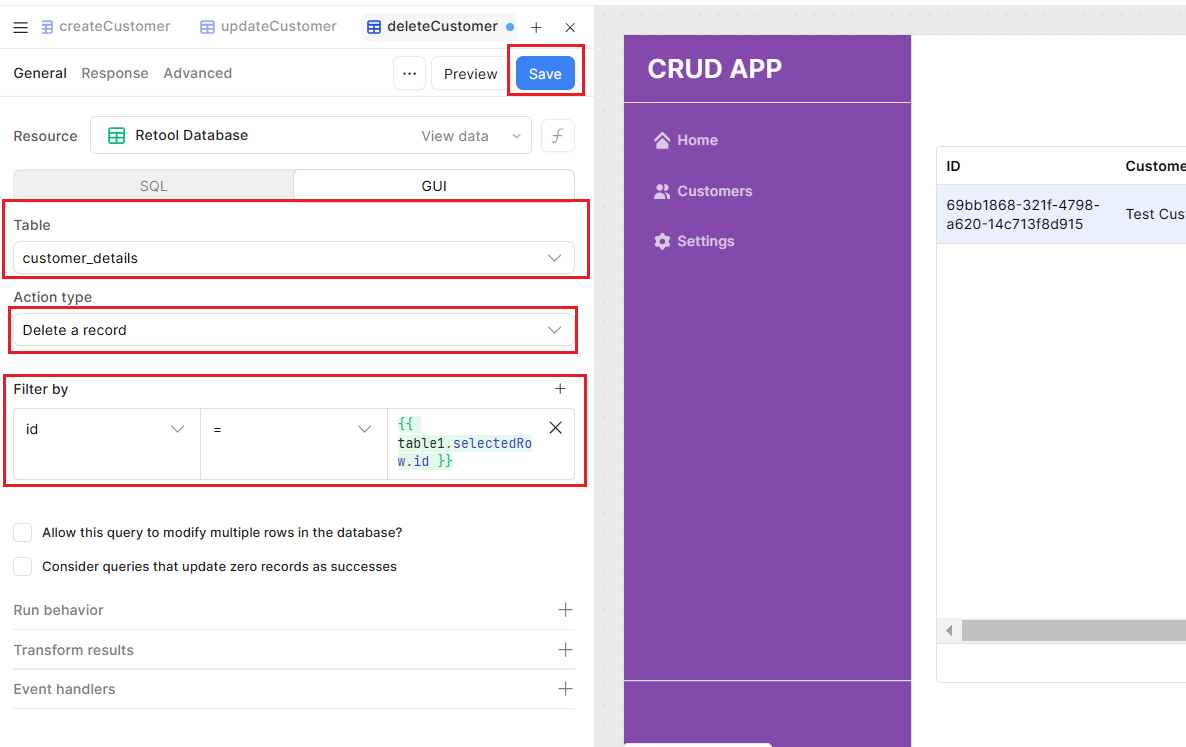
Head back to the Code tab and add a new query by clicking the </> in the left-hand menu. Click + to create a new query and this time name it (e.g., deleteCustomer).
Configure the Delete query:
- In the Table field, select the target table from the Retool Database (customer_details).
- In the Action Type field, choose Delete a record.
- Filter by: Select id (the primary key of the customer_details table).
- Operator: Set to = (equals).
- Value:{{ table1.selectedRow.data.id }} - this will insert the id of the selected row in the table
- Click the Save button.
Add an Event Handler to the button to refresh the table data after a record is deleted:
- On success: Re-run the getCustomerDetails query to update the table view.
Now let’s modify this deleteCustomer query to show a confirmation message before every run. Click on the Advanced tab and tick the confirmation modal checkbox. Here you can configure a message to run.
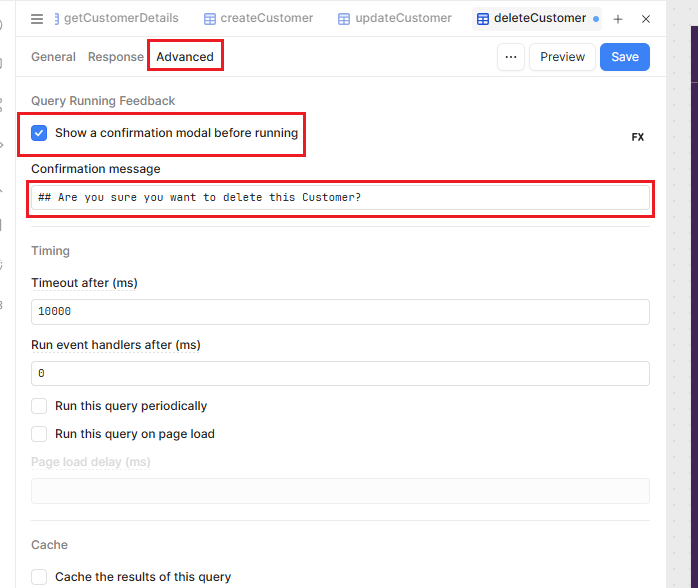
Note that you can use JavaScript escape hatches anywhere to configure more custom functionality. Here, for example, you could insert the customer name into the confirmation modal by using {{table1.selectedRow.customer_name}} to insert a dynamic value.
Now let’s set up a button to complete the delete action.
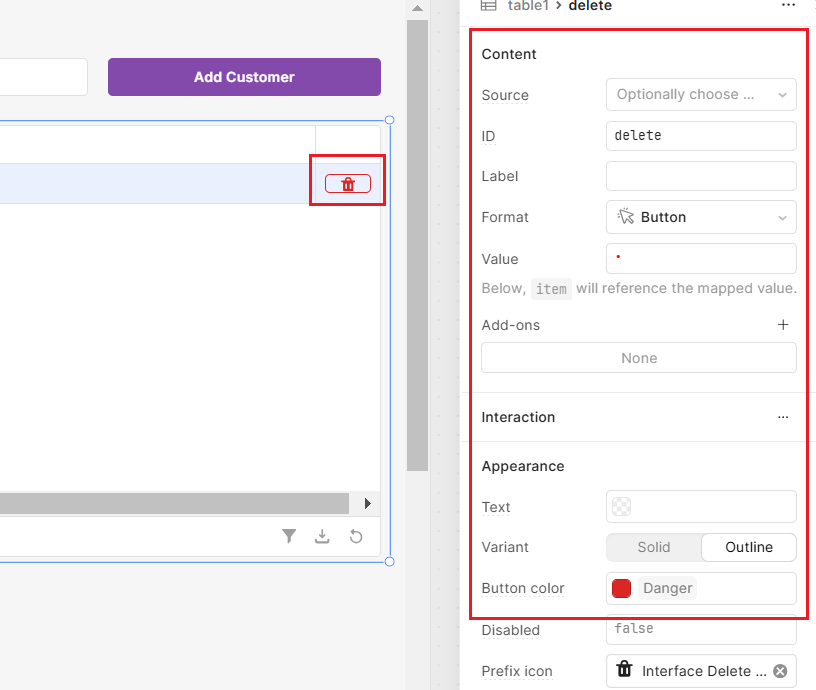
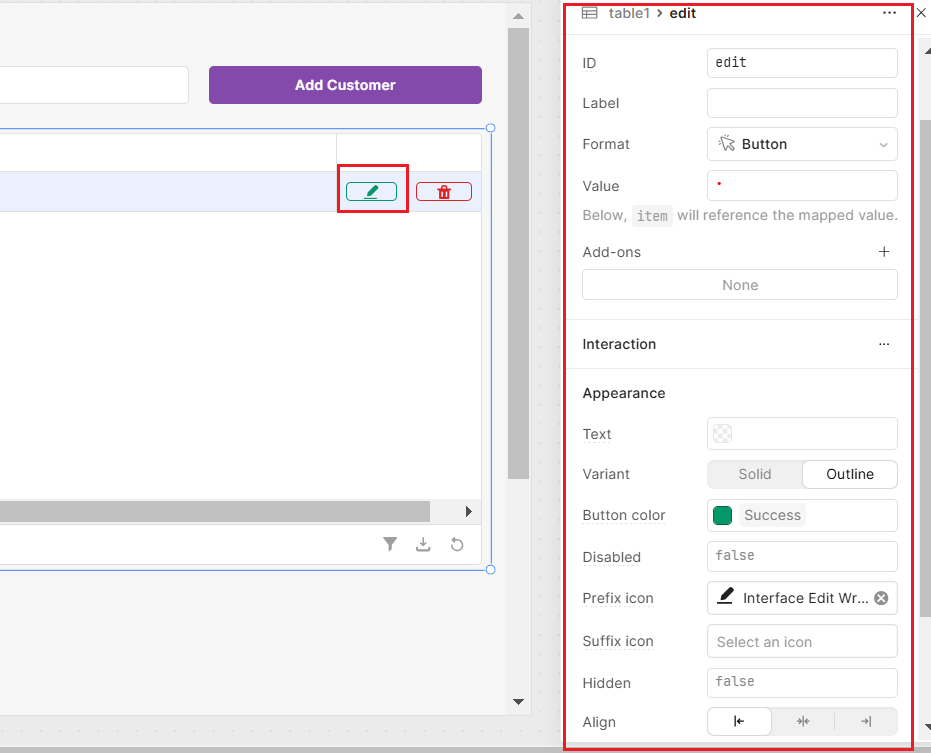
In the Table component, add a column with a Button. Name this button “delete”. You can leave the other fields blank and use a prefix icon ‘trashcan’ to keep the UI simple - don’t forget that users often respond best to familiar UIs, so take inspiration from the apps you use every day!
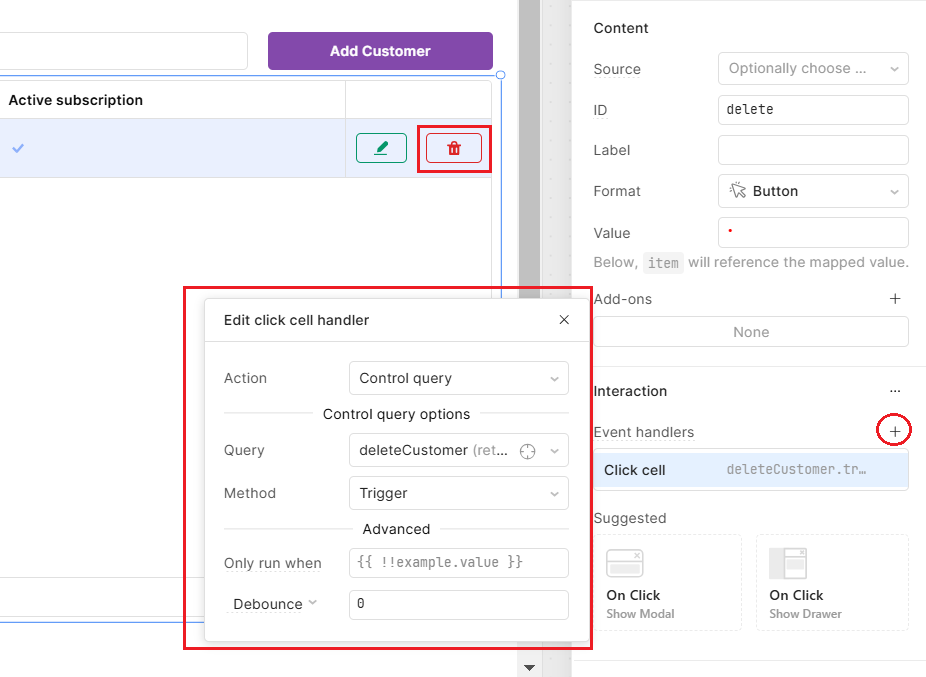
Next, in the column settings, add an Event handler to this button to trigger the deleteCustomer query.
Now you’re all set to delete rows in your table. Make sure to test this step to ensure the table refreshes with the updated data.
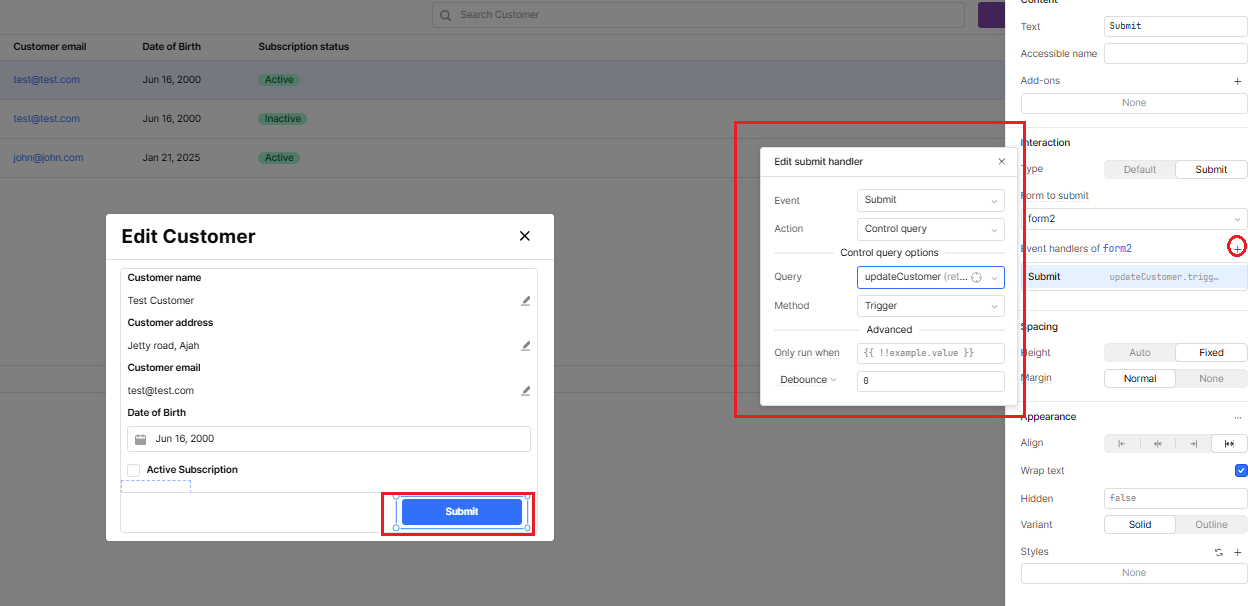
Update: setting up an edit form
Now let’s set up the Update query and edit form for our records.
Head back to the query tab and add a new query. Click + to create a new query and name it clearly (e.g., ‘updateCustomers’).
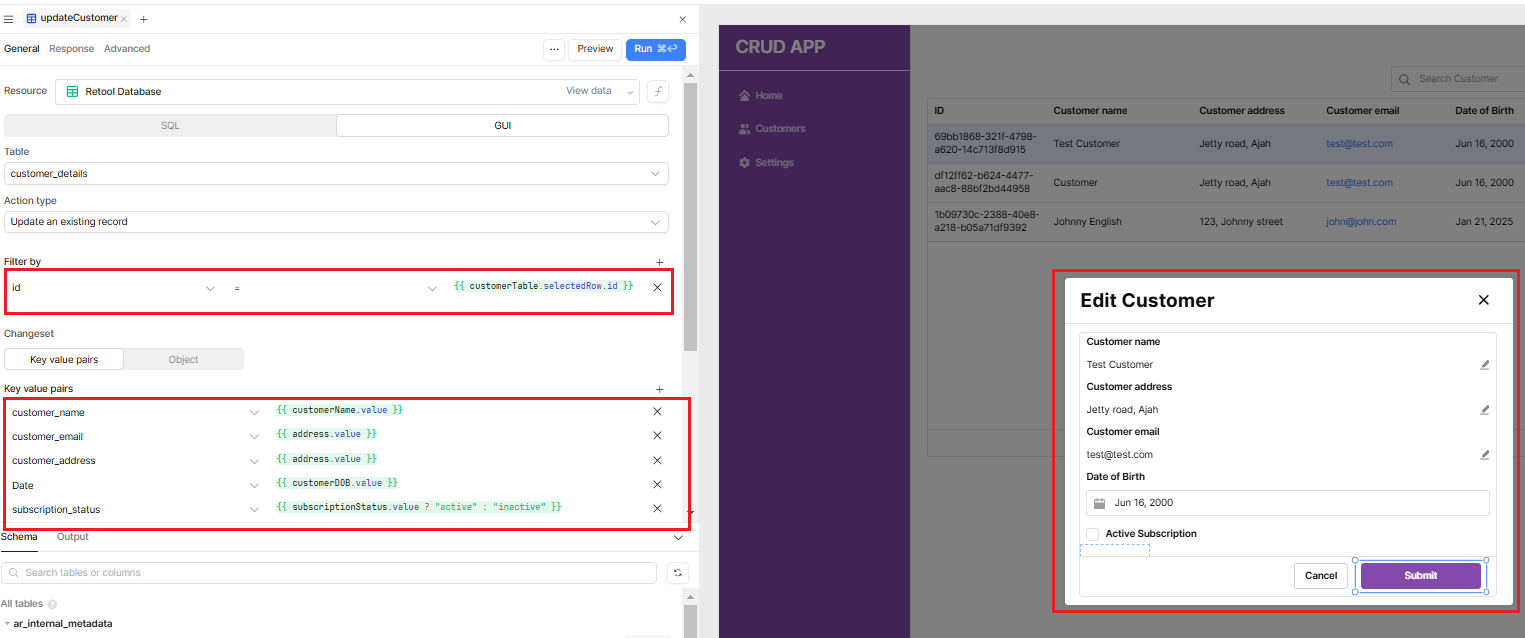
Configure the edit query:
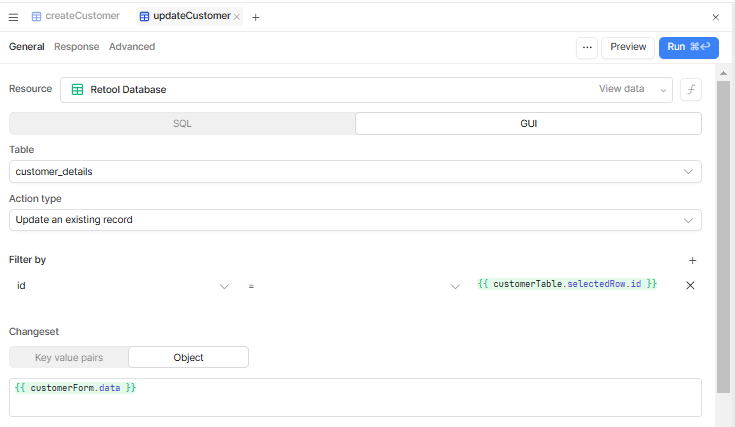
- In the Table field, select the target table from the Retool database (customer_details).
- In the Action Type field, choose Update an existing record.
- Filter by: Select id (the primary key of the customer_details table).
- Operator: Set to = (equals).
- Value:{{ table1.selectedRow.data.id }}
- Use the Object option and input {{ customerForm.data }} to edit existing customer details in your DB. You can also use the key-value toggle to enter your key-value pairs manually instead.
- Click the Save button.
Please note that your component names might differ to ours, so you should ensure that you are using the correct component names.
Just like we did with the delete button, let’s head back to the table component and add a new column for the Edit button. For our button, we will keep it simple with a green pen icon.
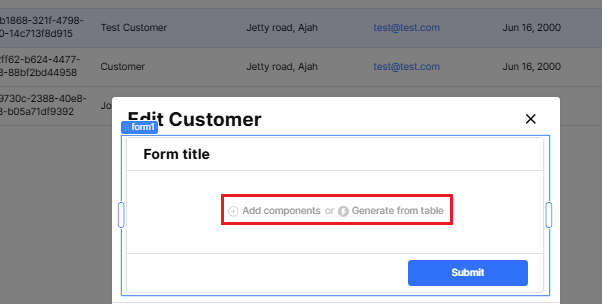
Now, let’s build our ‘update’ form. We’ll set this up in a modal so that the form pops out when we click the edit button. This ensures we’re less likely to make mistakes than when editing a table in-line.
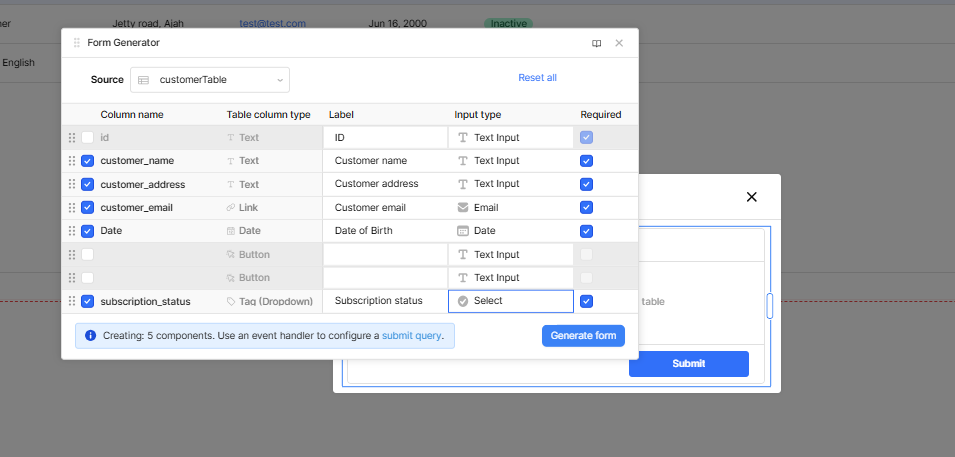
From the left-hand component menu, add a Modal component to your App. Next, add a form into your Modal and click on “Generate from table” to auto-generate your form.
Here, you can select the columns you want included in your form, the input type as well as the required status.
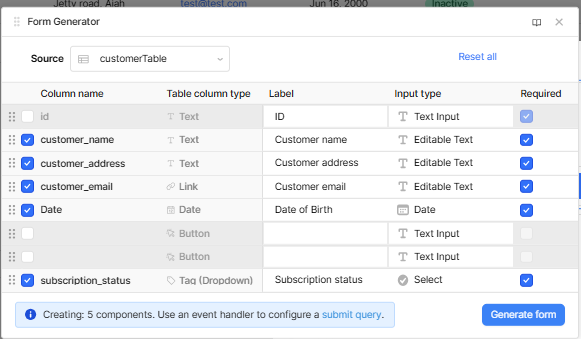
The form generator automatically maps the table fields to input components using the selectedRow attribute of the table component. That way, the fields will show the current values for the record by default.
Now, let’s configure the submit button to trigger the updateCustomer query.
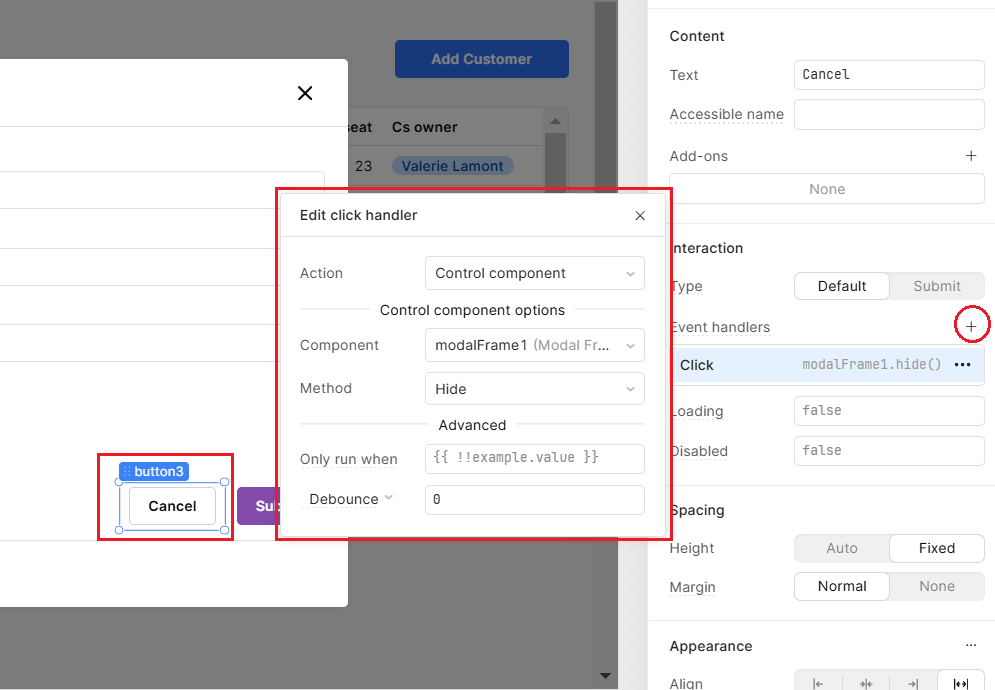
To keep our UI nice and tidy, let’s also add an Event Handler to the cancel button to close the modal. You can also set the modal to close onSuccess of the update query.
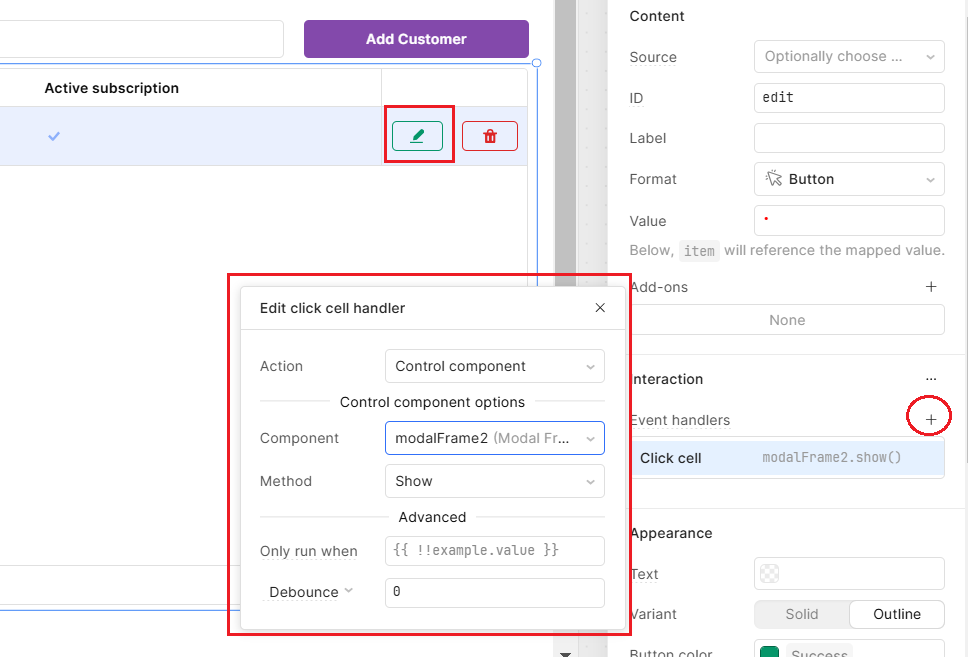
For our final step, let’s connect the modal to the Edit button in our table with another click handler. This would trigger the modal to open when clicked.
Now you can easily update the records in your table with a simple set of clicks.
Create: Add a new customer
For the final ‘Create’ step, we’re going to follow a lot of the same steps that we did for our Update action. Drag and drop another Modal Component onto your Retool canvas.
Next, drag a form component onto the modal frame. Click ‘generate from a table’ and set up your Create form just like your update one.
Once again, for our form we had the following input types:
- Text Input:
- Customer Name: For customer_name.
- Email: For customer_email.
- Address: For customer_address.
- Date Picker:
- Date of Birth: For Date.
- Checkbox/Select:
Active Subscription: For subscription_status.
Once again, open the code tab and create a new query. Configure the Create Action:
- In the Table field, select the target table (customer_details).
- In the Action Type field, choose Insert a record.
Use the Object option and input {{ customerForm.data }} to add a new customer to your DBClick the Save button.
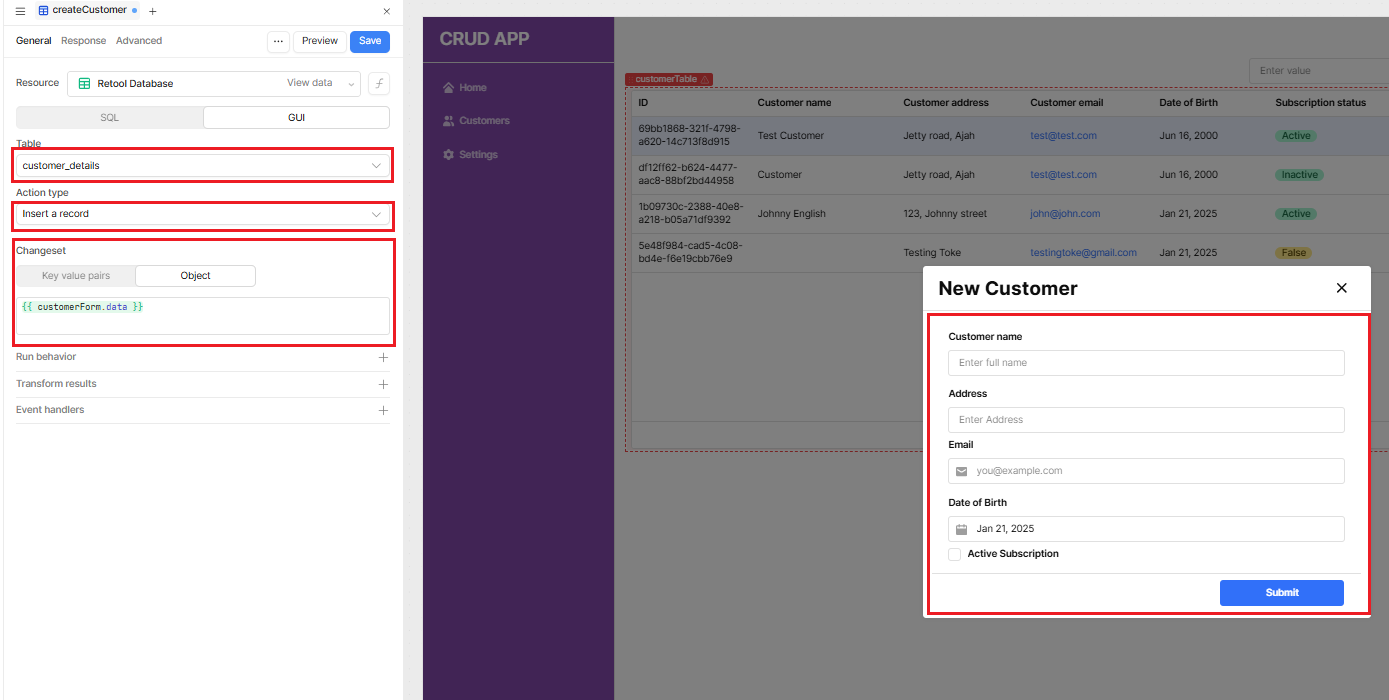
Finally, configure the submit button to trigger the createCustomer query to add a new record.

Optionally, add the cancel button to close the Modal.

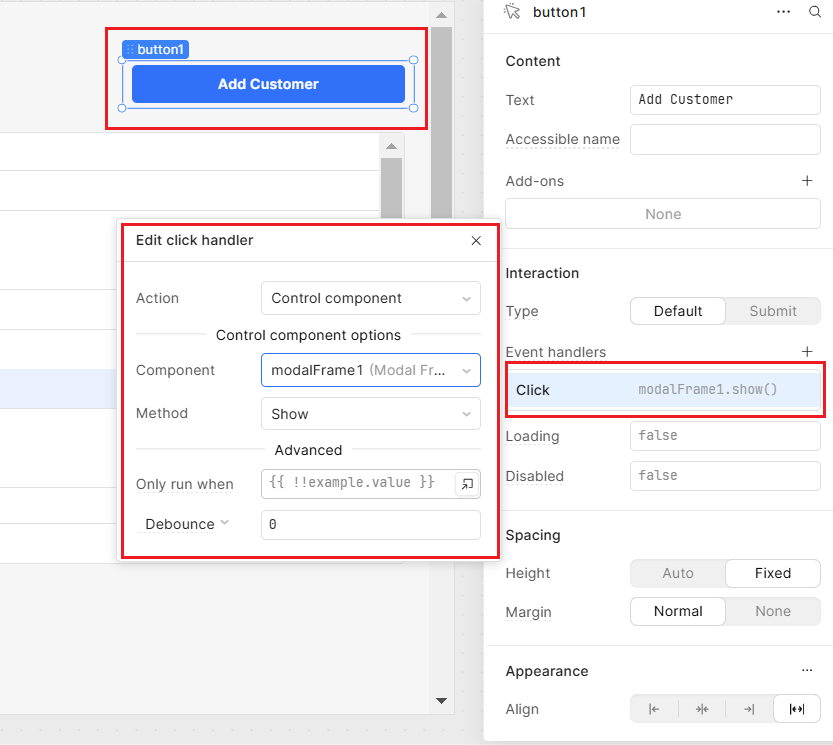
Finally, we need a button to open our Create form. Drag and drop a Button Component onto your Retool app interface and set the label to Add Customer.
Under ‘Event handlers’, add a click handler that triggers the modal to open.
Extra UI tips
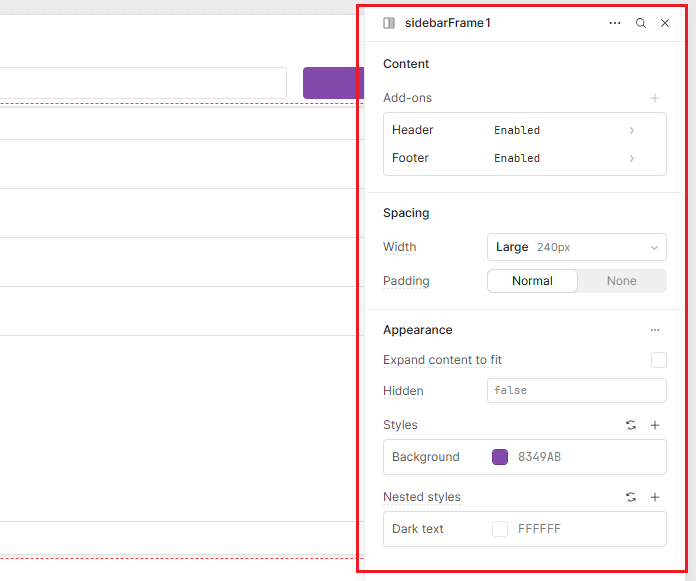
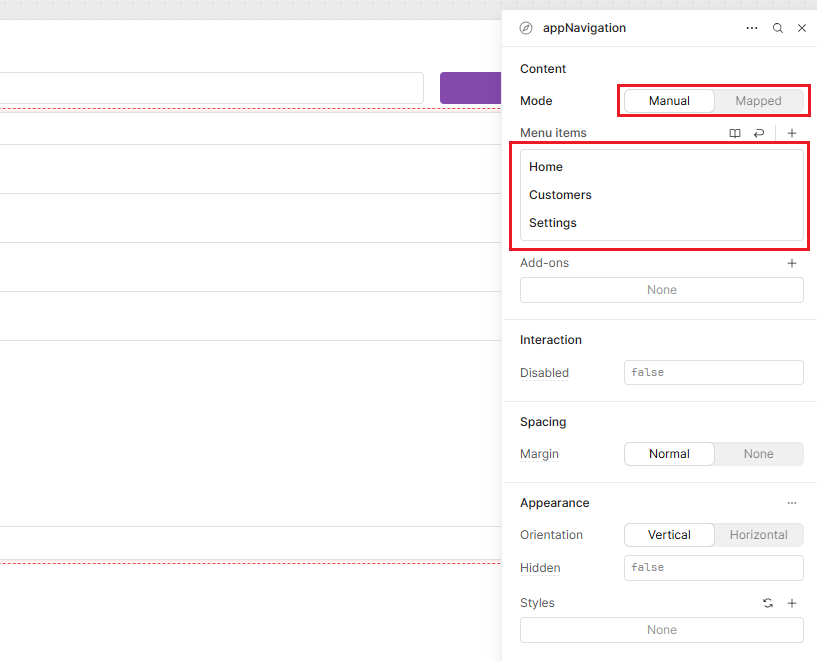
Sidebar for navigation
Now, before we move on, let’s spend a quick moment making this app look and feel like a polished product by setting up some navigation in a side panel.
Click the + icon in the left-hand toolbar to open the Components panel. In the global section of your app, click the + icon and select Sidebar.

The sidebar will default to have a title and a navigation component. You can change the appearance of the sidebar and configure the navigation bar in the inspector panel.
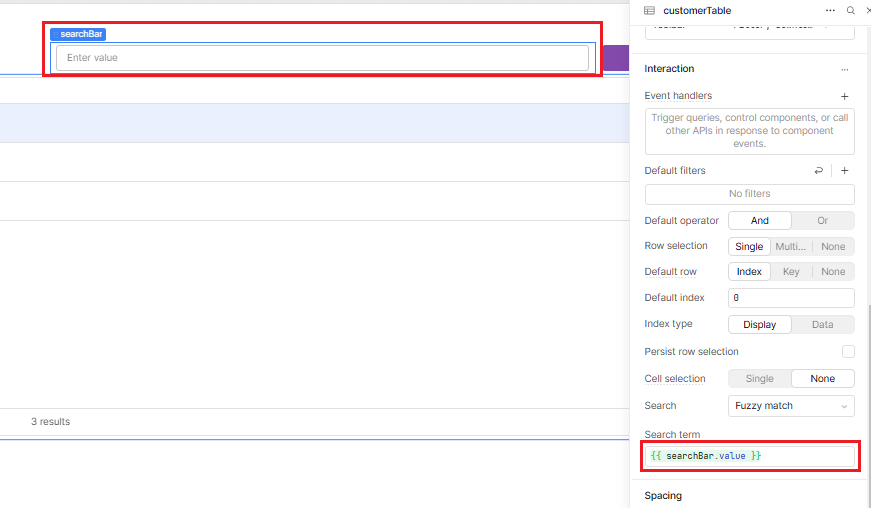
Set up a table search
Finally, let’s make sure our users can search our table. With just a few clicks we can add a Search Customer feature, allowing users to dynamically filter table data using a text input. Luckily, you can easily do this from the table component settings.
Drag and drop a Text Input component:
- Place a Text Input component above the table in your Retool app.
- In the Search section of the table settings:
- Set the Search mode to Fuzzy Match or Exact Match, depending on your requirements.
- Connect the Search Term: In the Search Term field, connect it to the Text Input’s value:{{ textInput5.value }}
- Test the Search is working correctly
In less than an hour, you now have your first simple app built on Retool. Stay tuned for more tutorials to learn more advanced functionality in Retool!

