

Windmill helps developers build internal tools faster by offering a script-driven app builder and automation engine. It’s a great place to put some of those disorganized scripts your engineers host on their respective computers and instead centralize processes and workflows for wider teams.
A common use case for developer tools like Windmill (or competitors like Retool or Appsmith) is to build out user interfaces for their less technical teams to safely access databases for simple tasks. Windmill is a great place to build these CRUDs. CRUD, an acronym for Create-Read-Update-Delete, is the general form of the interactions we perform on persistent storage. Whether that storage is a SQL database where you Insert-Select-Update-Delete or a REST API where you Post-Get-Put-Delete, the basic functionality is the same.
In this tutorial, we will be building an order management CRUD with Windmill. So that we can focus on the building process of the UI and Flows, we’ll be using Google Sheets as a simple database to get started. By the end, you will be able to build an app that performs all four basic CRUD actions on data in a Google Sheet, which acts as your persistent storage.
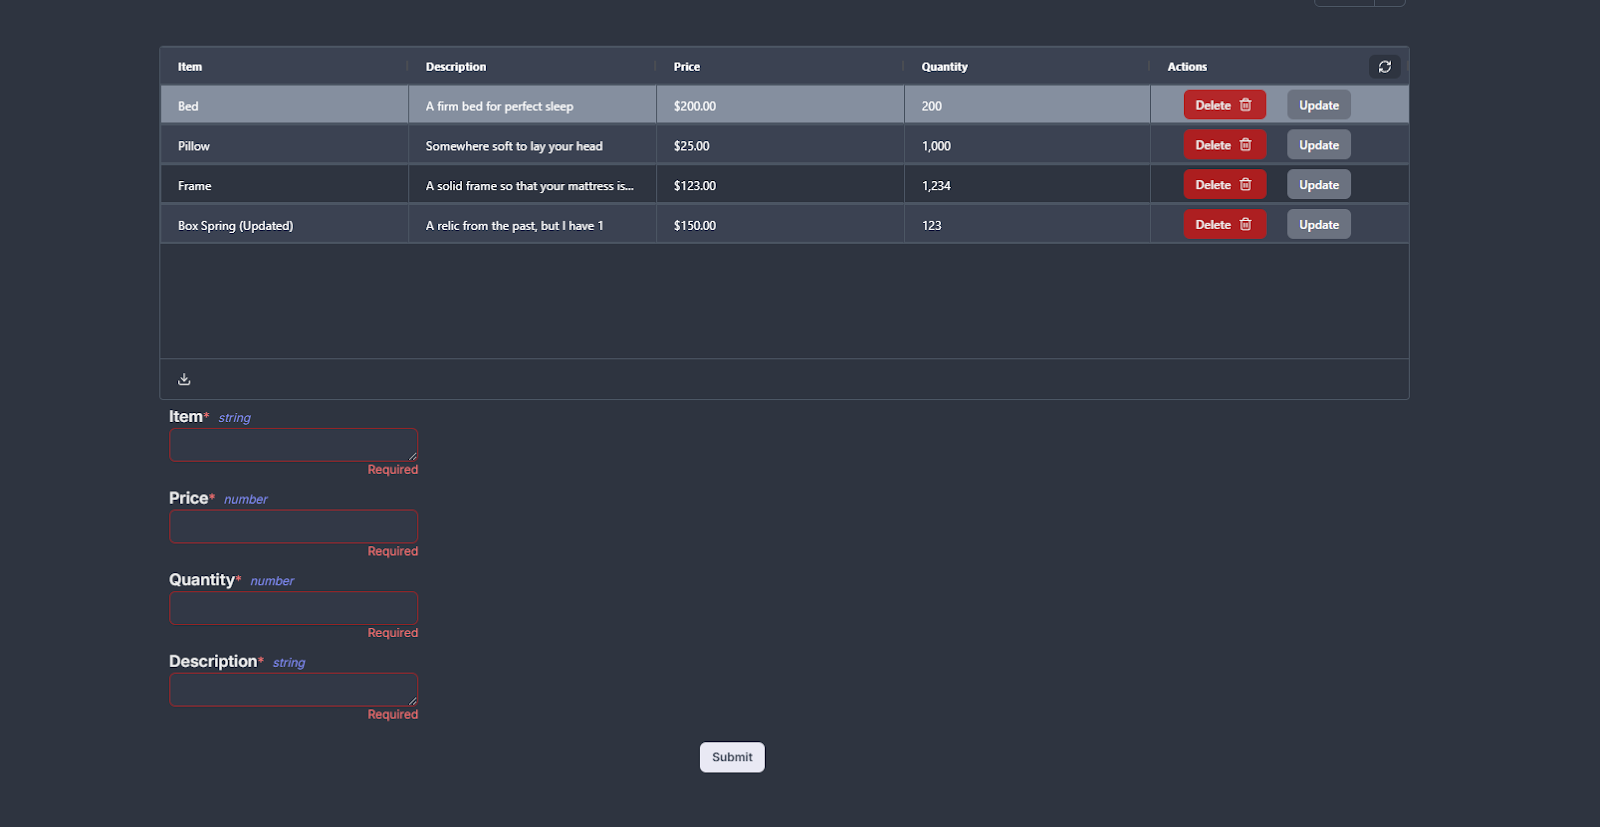
Here’s how the final app looks:
If you prefer to follow along via video, you can watch below.
Why use Windmill for CRUD apps?
There are many good options when choosing a platform to create a CRUD application and the choice first depends on your level of technical knowledge. Tools like Windmill, or similar platforms like Retool, Appsmith or Superblocks, are aimed at engineers to help them build faster. While they take a similar approach to low-code tools by simplifying certain processes with UI and certain levels of automation, they still offer extensive customization with code. For this reason, you’re much less likely to hit the kinds of roadblocks you often get with low-code tools that have clear limitations for customization.
Windmill in particular is excellent at managing data flows, particularly for developers who are used to managing their own scripts. Their granular permissioning and powerful flows make it much easier for developers to run these scripts and centralize processes and automations for wider teams. What’s more, as they manage much of the infrastructure around the scripts (maintaining API connections, offering cloud deployment, managing permissions, and more), it’s much easier to maintain these processes too.
Windmill stands out against competitors by being open-source, which is an essential feature for many companies choosing a platform. It also supports a wider range of languages than most others, from JavaScript and Python to Rust and Bash.
Nevertheless, compared to a platform like Retool that has been around since 2017 and already supports many large enterprise companies, features are much more limited. Having only launched in 2022, Windmill is still a fairly nascent platform and is still lacking in certain support and documentation options too. Given this lack of long-term established credibility, Windmill is perhaps best used for centralizing simpler procedures and workflows rather than mission-critical scripts.
That being said, Windmill has an extensive library of community written scripts, available on their Hub, which makes it incredibly fast to develop applications that rely on common procedures.
Tutorial: Build a CRUD with Windmill
Getting familiar with the platform
Once you’ve set up an account with Windmill, the next step is to head to the home page. From here, you’ll be able to create Scripts, Flows, and Apps; manage your resources, like API connections; or set up global variables. There are a couple of terms you’ll want to know right off the bat to understand the platform best:
- Script: An individual code file. This can include several functions or be as simple as one line.
- Flow: A directed-acyclic graph of steps. These steps can be Scripts, other Flows, or administration steps such as pausing for approval.
- Apps: Similar to Flows, these are collections of other pieces, but designed around a UI for user interaction.
- The Hub: Windmill’s Hub allows you to access community-written Scripts and Flows.
Connecting Windmill to Google Sheets
Now we know a little more about the Windmill environment, our first step is to connect Windmill to our Google Sheets account. Windmill provides easy integration with many external services, including the Google Suite, so establishing this connection just takes a few clicks.
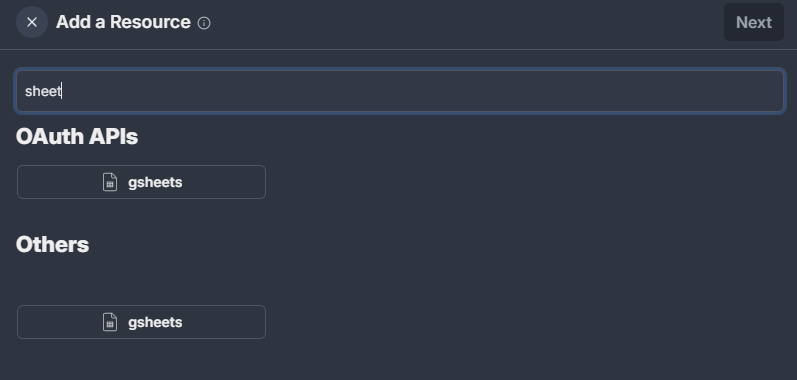
Navigate to the Resources tab using the navigation bar on the left, click Add Resource in the top right, and add a new gsheets resource.
If this is the first time you’re connecting your Google account to this workspace, you will have to grant some permissions. Read through the pop-up agreement and, if it all sounds ok to you, you can use SSO to finish the connection.
After connecting your Google Sheets, you should see the resource available in your workspace for use.
Read: Pulling data from our Sheet
Now that we have our Google Sheets connected, let’s start actually setting up our CRUD processes. While it may be out of order, let’s start where we usually do, with the R in CRUD: Read from our Google Sheet.
We’ve set up a simple products table in a Google Sheet titled “Order Management”. It looks something like this:
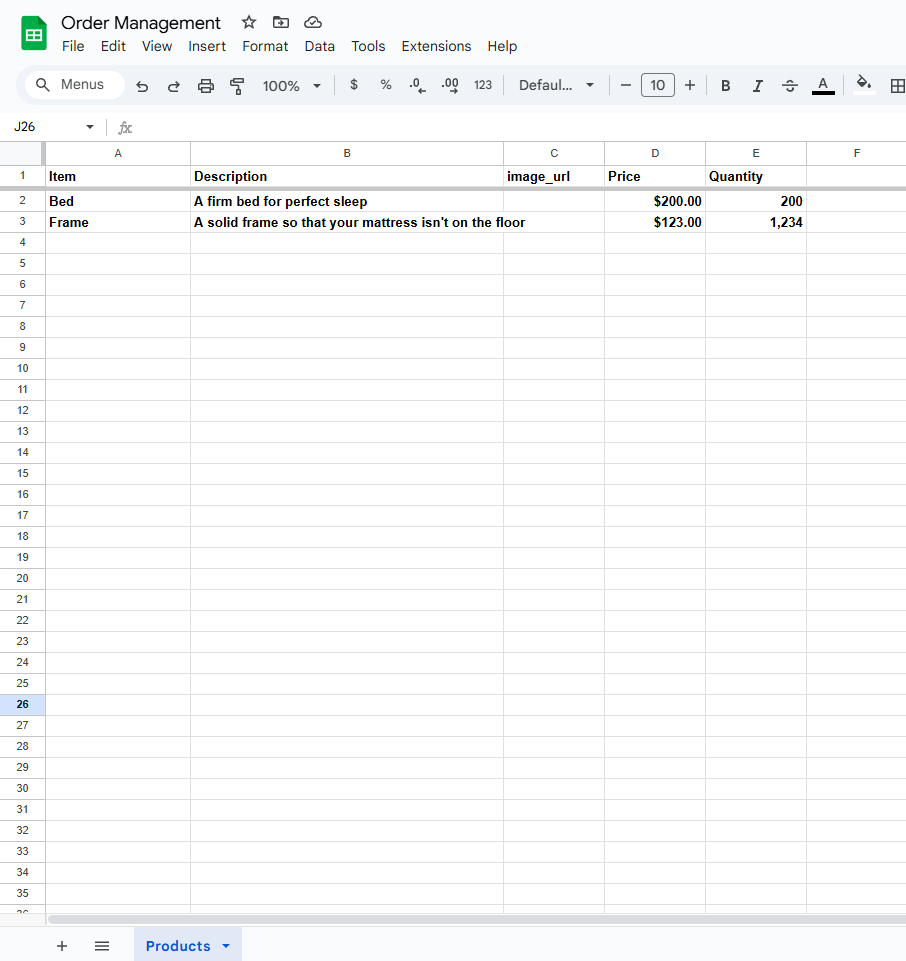
Our “Products” table has a title, description, image, price, and quantity columns and we’ve loaded in some sample data. Take a minute to set up a similar table or download a copy here.
Now we are going to use a Windmill Flow to read the data from our sheet. Once that’s set up we’ll do some data processing to make it more usable.
Flows are a directed acyclic graph of scripts, other flows, and management steps (pauses, loops, or branches). Essentially, they are an ordered sequence of steps that don’t repeat. This means that they are perfect for complex processing tasks that don’t require much user input, such as data processing.
To create your flow, go ahead and click +Flow in the top right of your home screen.

This will open a new flow automatically. When you open a new flow, you’ll see a screen like the one below. On this screen you can evaluate inputs, workflow results, add or test steps, and set up advanced settings. Your flow will first start very simple, with just the ‘Input’ and ‘Result’ steps.
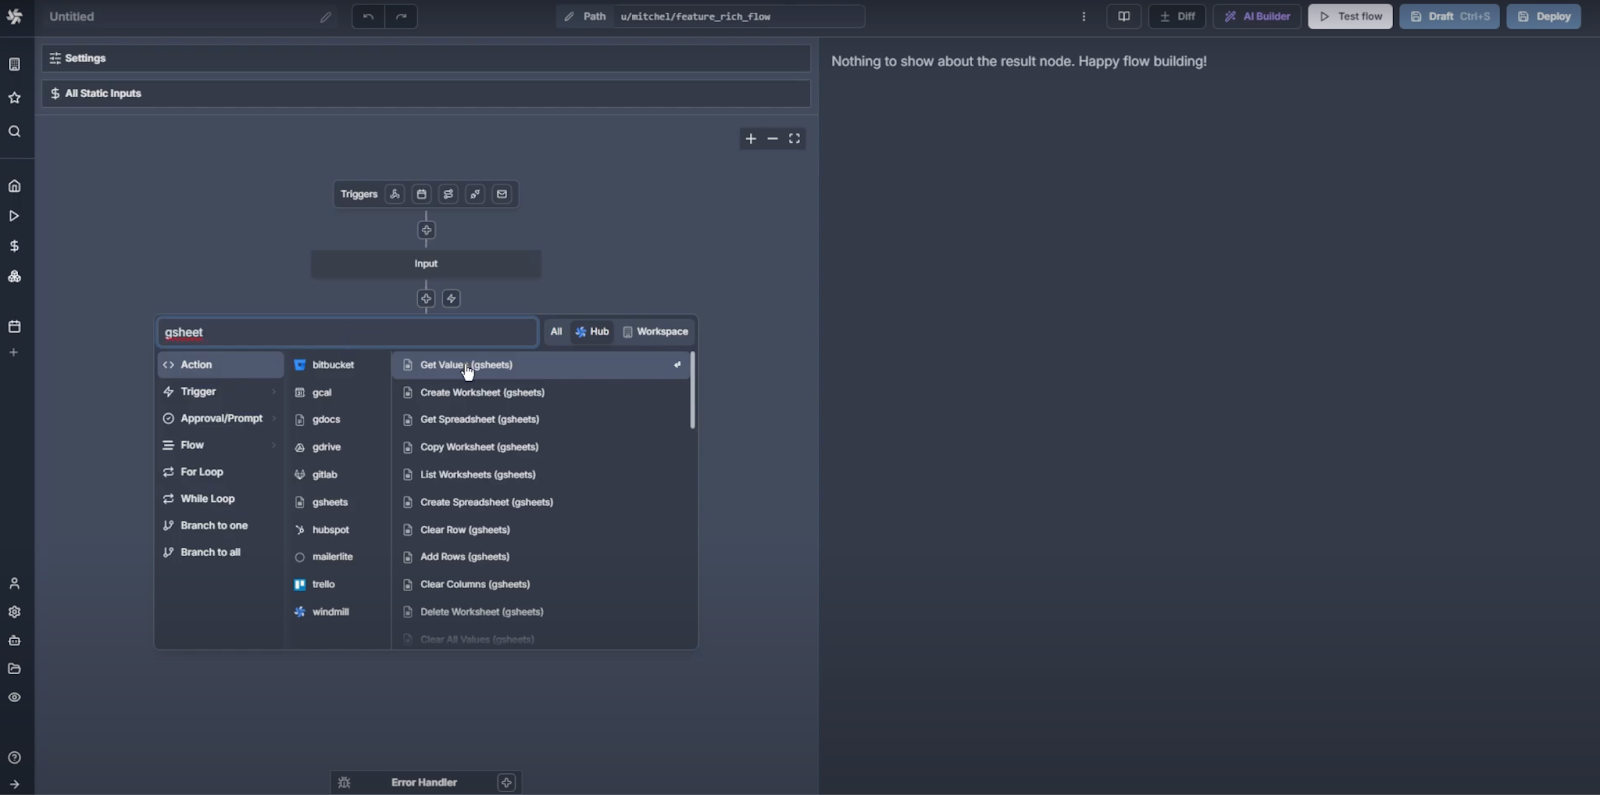
To create our ‘read’ Flow, we will add a step between input and results by clicking the + button. Here, we can leverage the vast library of scripts available through Windmill’s Hub to get the data from our sheet. Search for gsheets and select getValues.
You should have a script that looks something that looks like this:
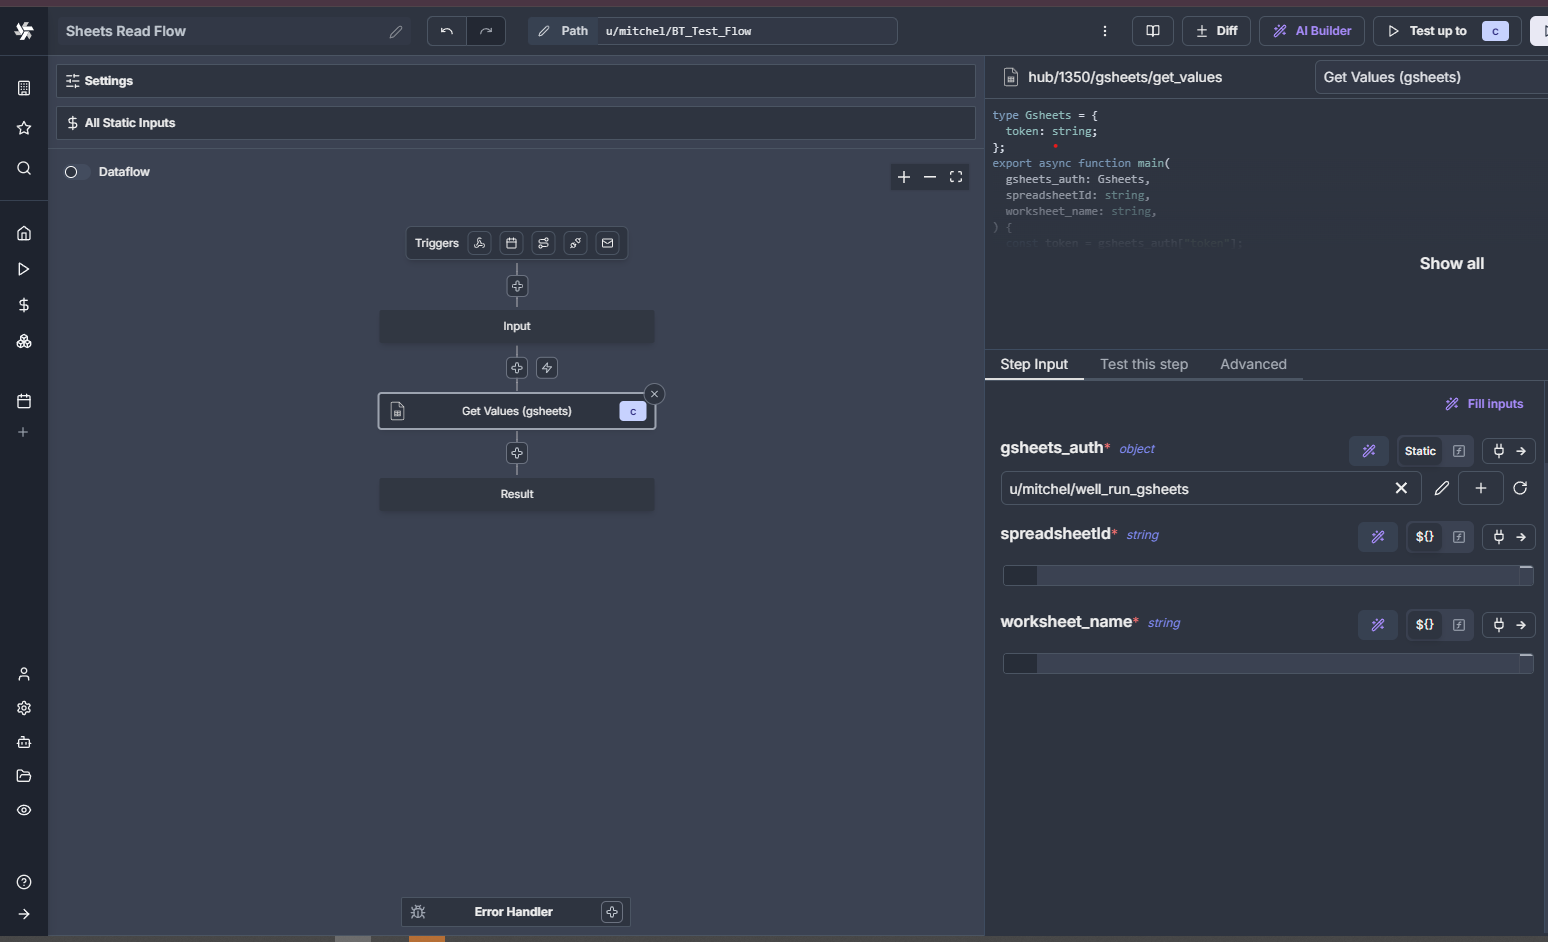
When we click into the getValues script step in the flow, we can see it expects several inputs on the right-hand panel.
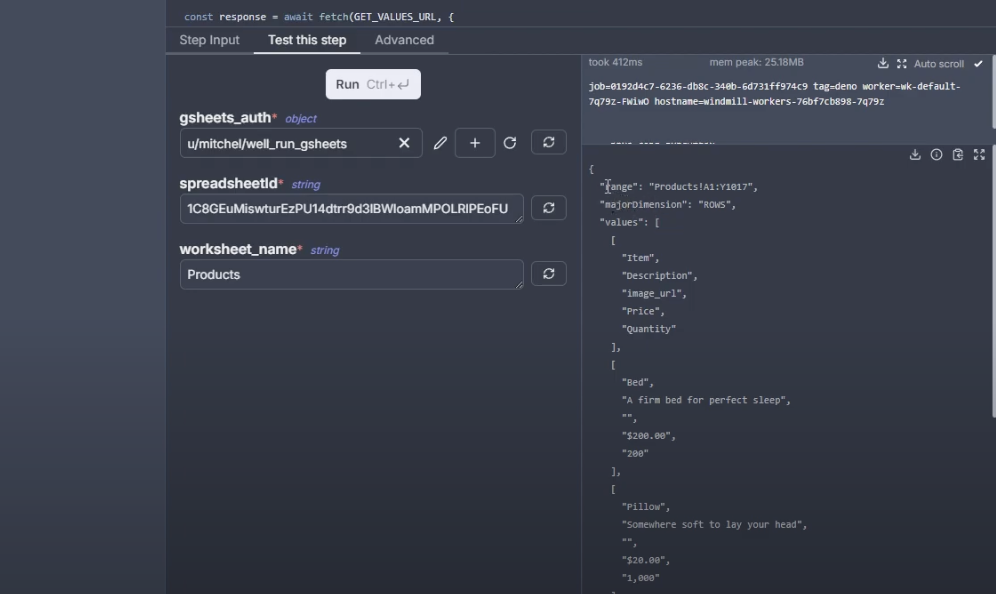
Next, let’s go ahead and hardcode some values for those inputs on the right-hand panel so that we can get an idea of what it does. To input this information, click the “test this step” tab in the right-side center of our screen and enter the information from your worksheet:
- The spreadsheetid is that long string of gibberish in the url when viewing your sheet (https://docs.google.com/spreadsheets/d/{spreadsheetID}/edit?gid=0#gid=0)
- The worksheet_name is the tab in the sheet you want to read, in our example sheet it’s “Products”.
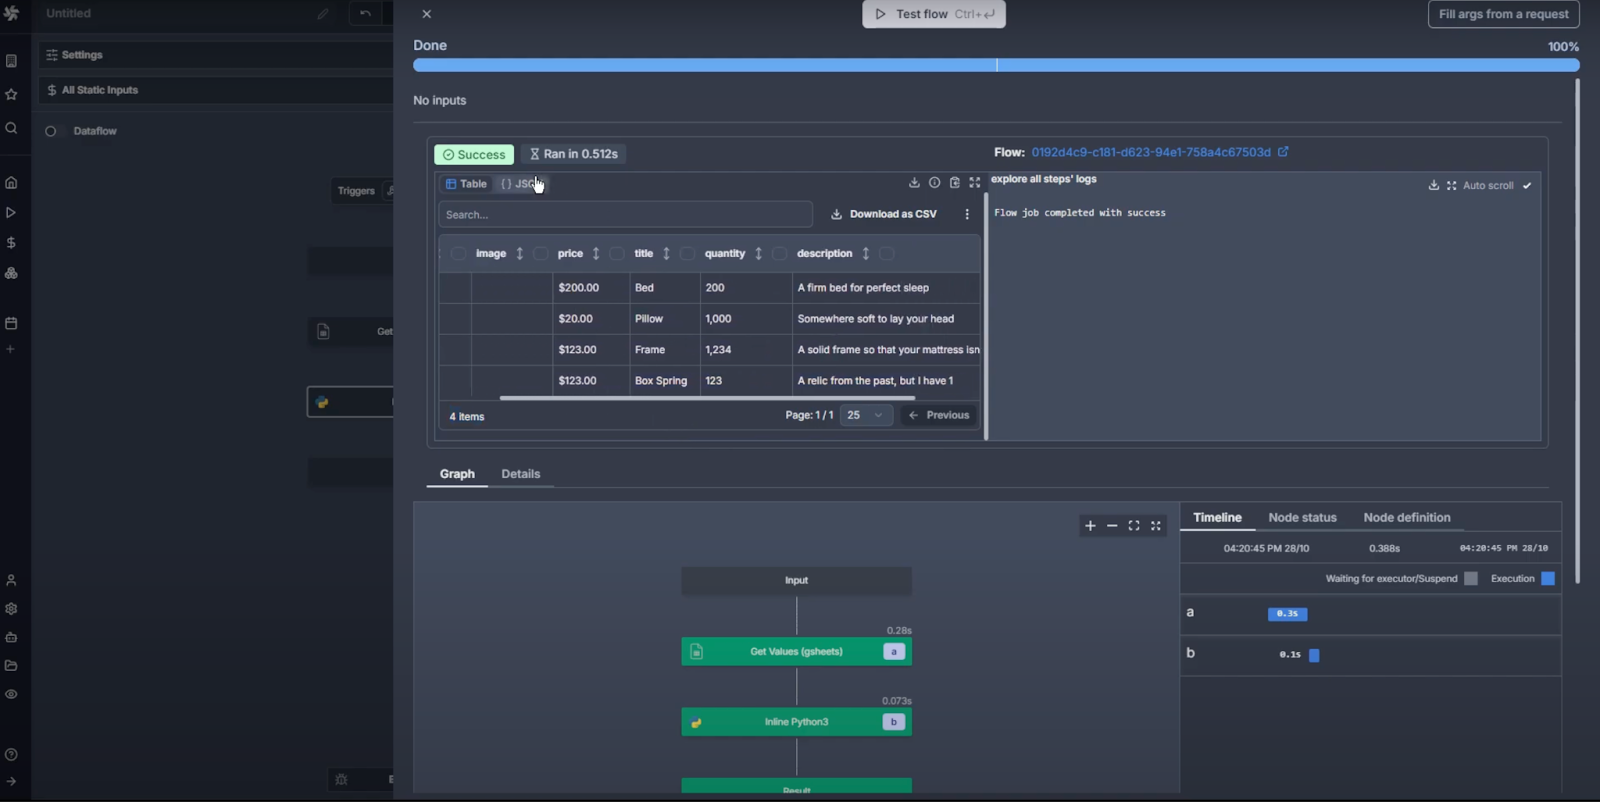
Enter these values and run the step to test it. The result should be a string of a JSON-like object, where the values we need are in the “values” portion of that object.
This won’t be very useful for our CRUD interface, so now we can take advantage of the fact that this is a Flow and do some additional processing of the data before returning it in the Results step.
Notice that the script we used to get the data from our Google Sheet is written in Javascript. If you prefer to use a different language for processing the data, that’s ok! One of the truly excellent features of Windmill is that the steps in a flow are agnostic of each other. Each step takes some inputs and provides an output that can be used in other steps. That means that even though we used a script written in Javascript for the first step, we can use whatever language we like for future steps.
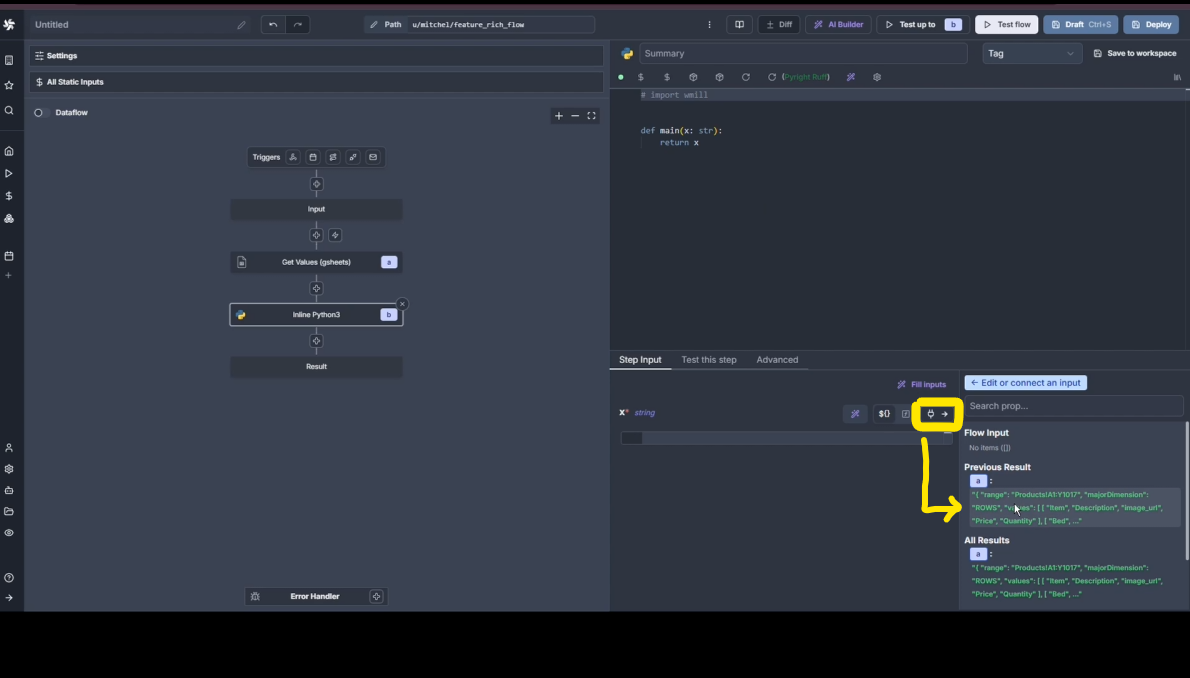
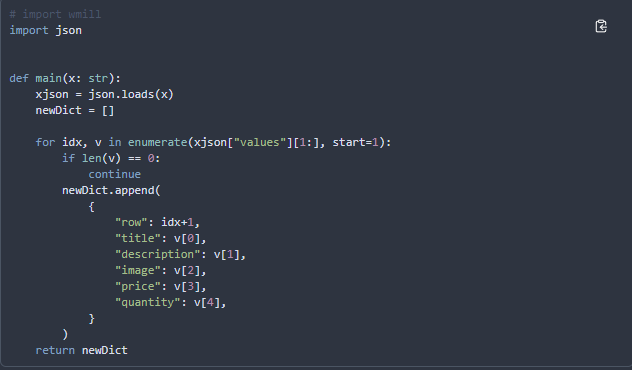
We like Python, so we’ll write a quick piece of code to convert the output from the “Get Values” step to a more usable format.
We’ll begin by adding a new step after Get Values by clicking the plus button in the main Flow inspector. We’ll select Python, as that’s the language we want to write the step in. You’ll see that this will open up a code inspector on the top right side of your screen and an autogenerated UI for that piece of code below it. By default, this code step expects an input string x. We can link this to the result of the previous step by clicking the plug icon on the right side of the UI inspector, and then clicking on the Previous Result to the right of that.
Next, we’ll convert the string to an actual object, then we’ll remove the extra information we don’t really need, in this case the meta information returned from the Get call and the column titles. We will include the row number we’re reading from so that we can refer to it later.
Finally, we’ll return this processed data in the Flow’s result block so we can use this information in the UI builder.
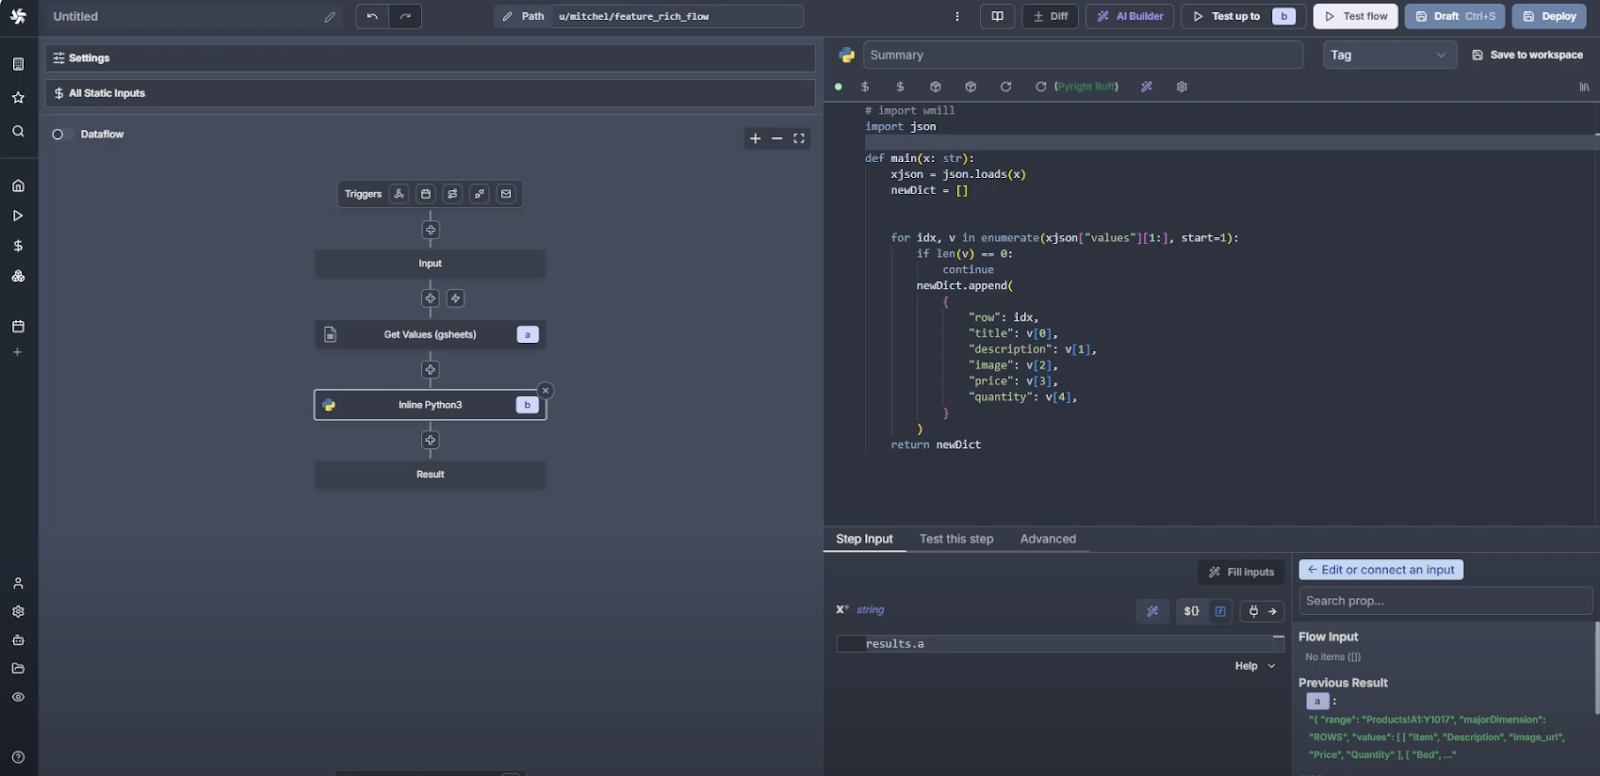
import json
def main(x: str):
    xjson = json.loads(x)
    newDict = []
    for idx, v in enumerate(xjson["values"][1:], start=1):
        if len(v) == 0:
            continue
        newDict.append(
            {
                "row": idx,
                "title": v[0],
                "description": v[1],
                "image": v[2],
                "price": v[3],
                "quantity": v[4],
            }
        )
    return newDict
Go ahead and test this step. You should get a screen that looks like this:
Next, before we actually start using this data in a full application, let’s take a moment to make this flow a little more reusable.
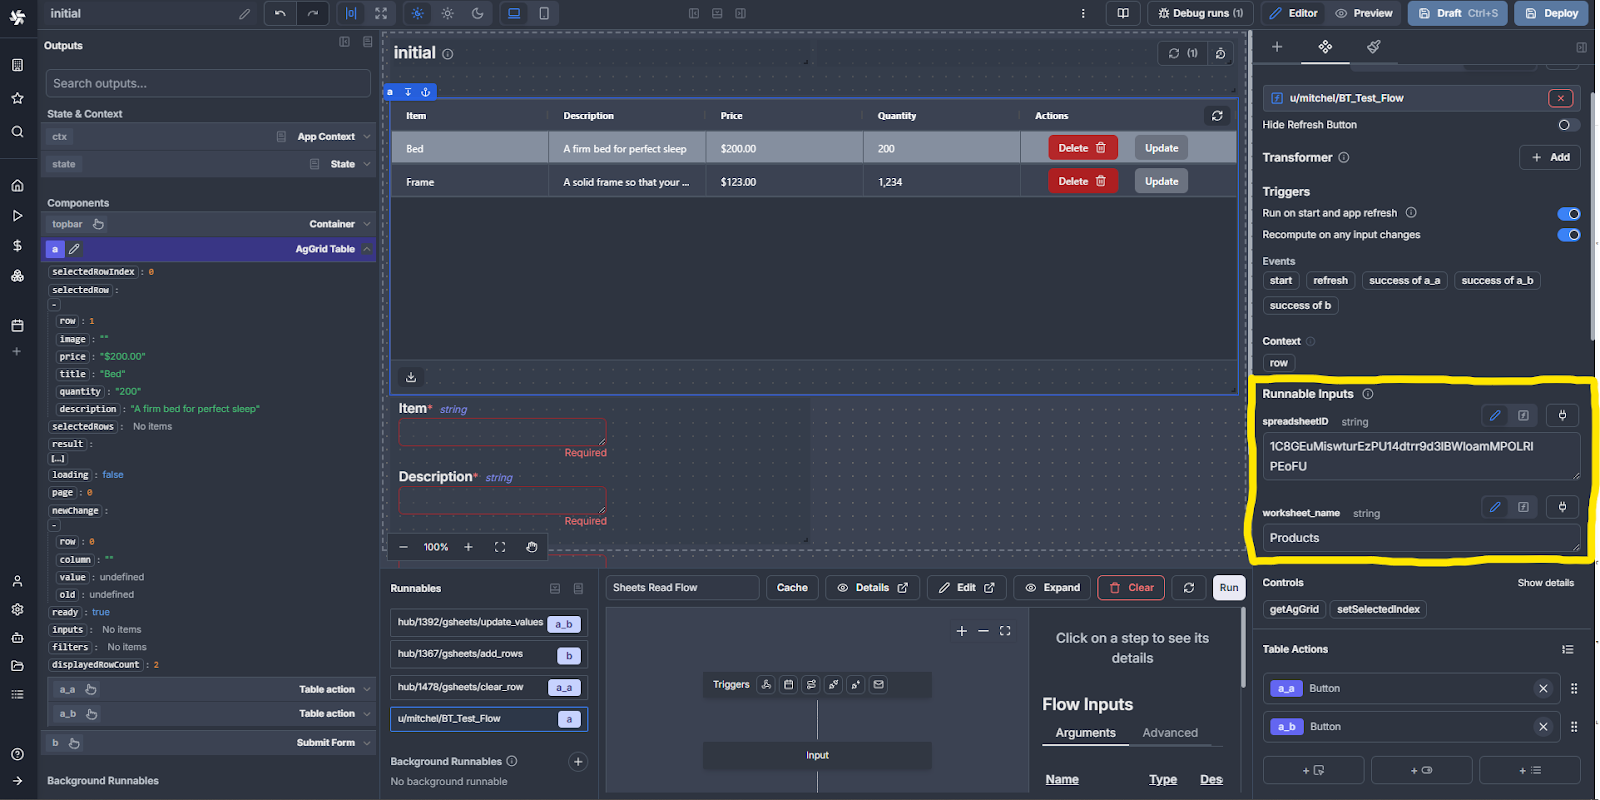
Back in the left-hand panel with our dataflow, select the input step and let’s add the two fields that are likely to change when running get_values as input variables: spreadsheetid and worksheet_name.
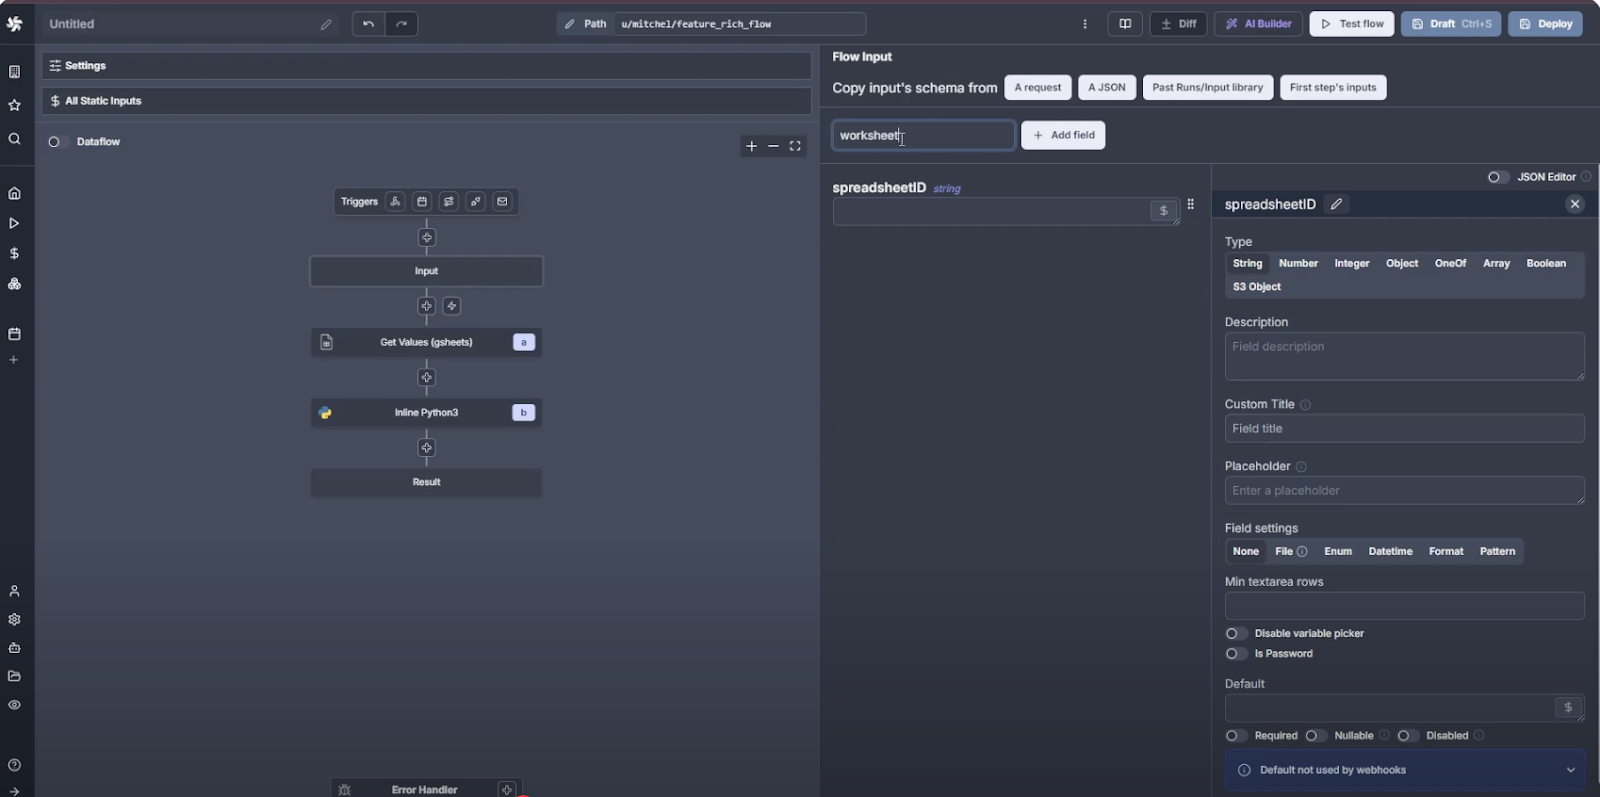
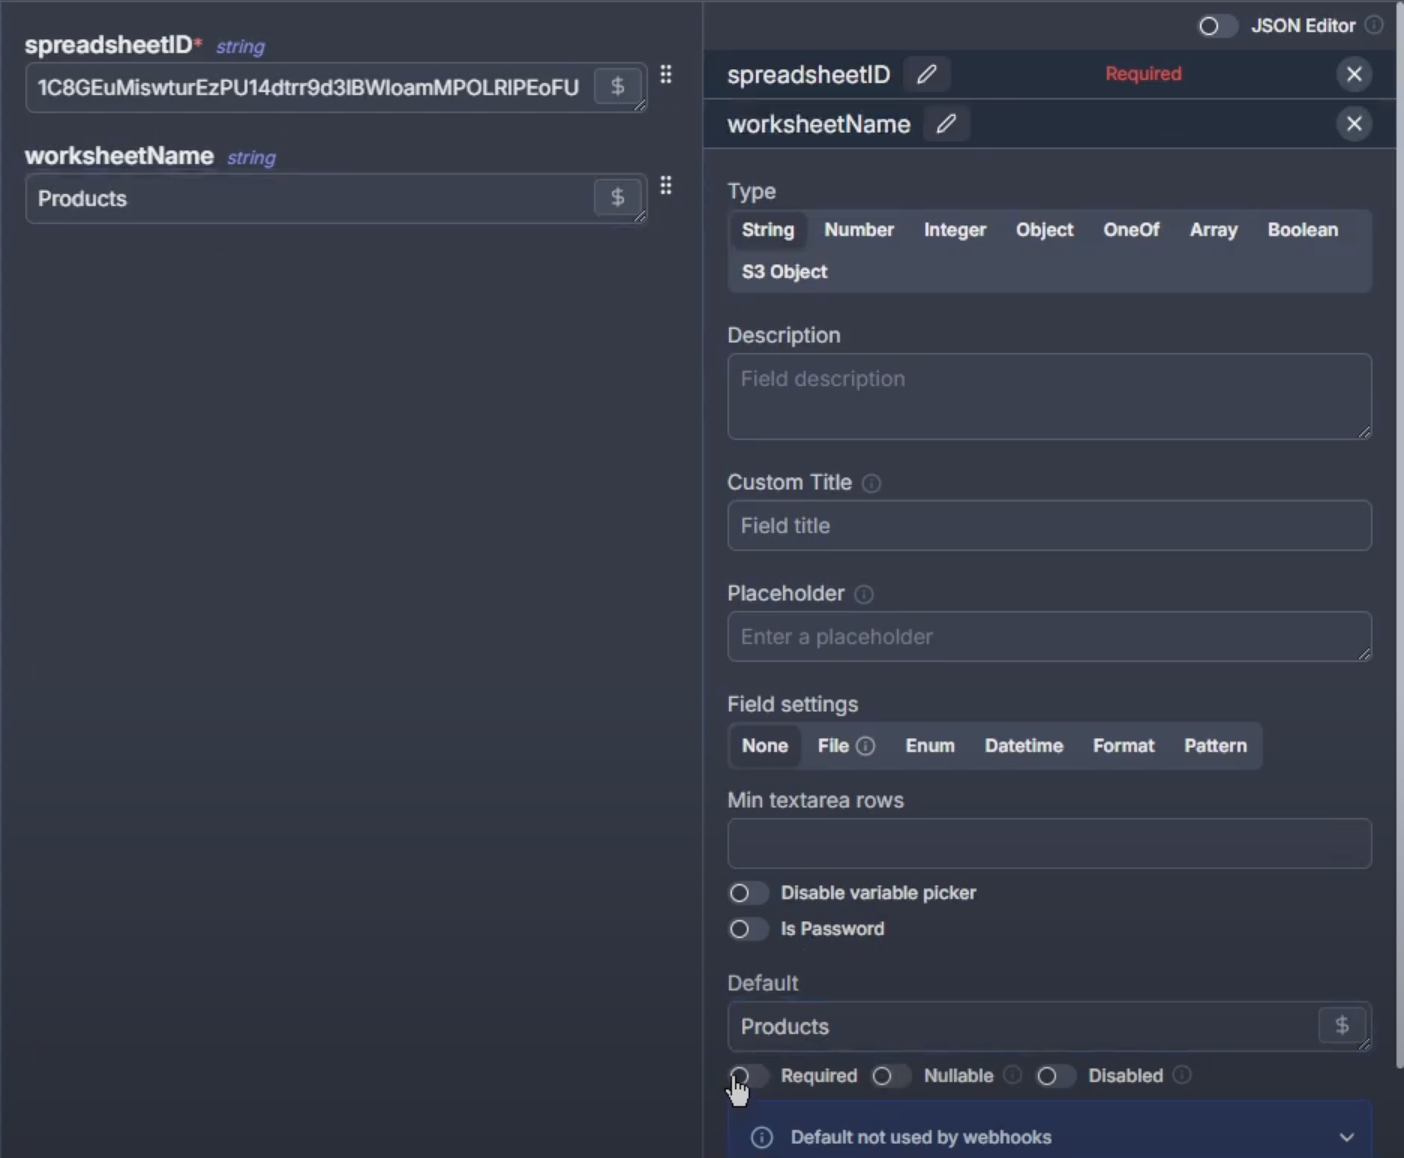
When we add an input variable, it defaults to a string, which is perfect for this script. As with most input variables in Windmill, you could change that to expect an object or number using the right-hand menu if needed. Here we can set the IDs we are currently using as the default option to make this easier to set up.
Now, we just need to connect these script inputs to our flow’s input. Select the get_values script step in our flow, click the plug icon to the right of each variable, and connect it to the corresponding variable in our input step by clicking on that variable name on the right hand panel. If you don’t want to use the UI, you can instead just type flow_input.{variable_name} to link the Flow’s input variables anywhere within the Flow.

Click the deploy button in the top right and that’s it, we are done with setting up our get_values flow to read our data and can use it in our applications! Once you deploy your Flow, you can set a title and description to help you find and maintain it later too.
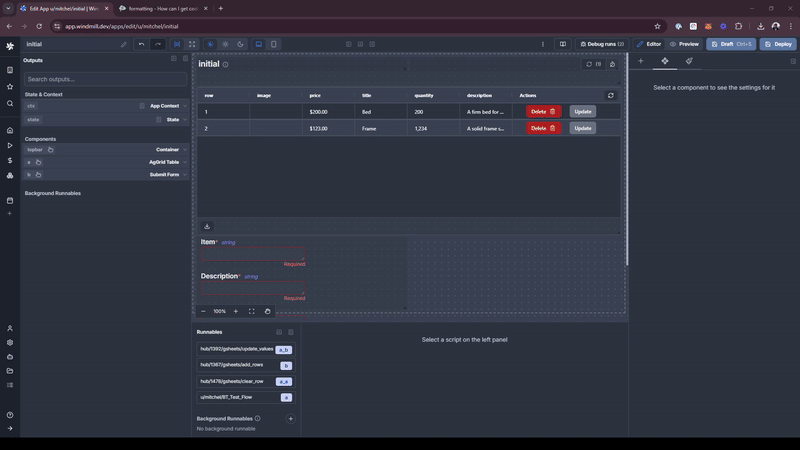
Building the UI: Creating our first table
We can now read from our Google Sheet, and that’s awesome! But nobody wants to go in and click the run button on a flow every time they want to see what’s in their Google Sheet. Let’s create a simple application where we can view the data from our Flow. From here, we’ll eventually accomplish all four CRUD actions on our sheet.
Creating an application is very similar to how you created a flow. Go to the home page, click +App, and you’re off to the races.
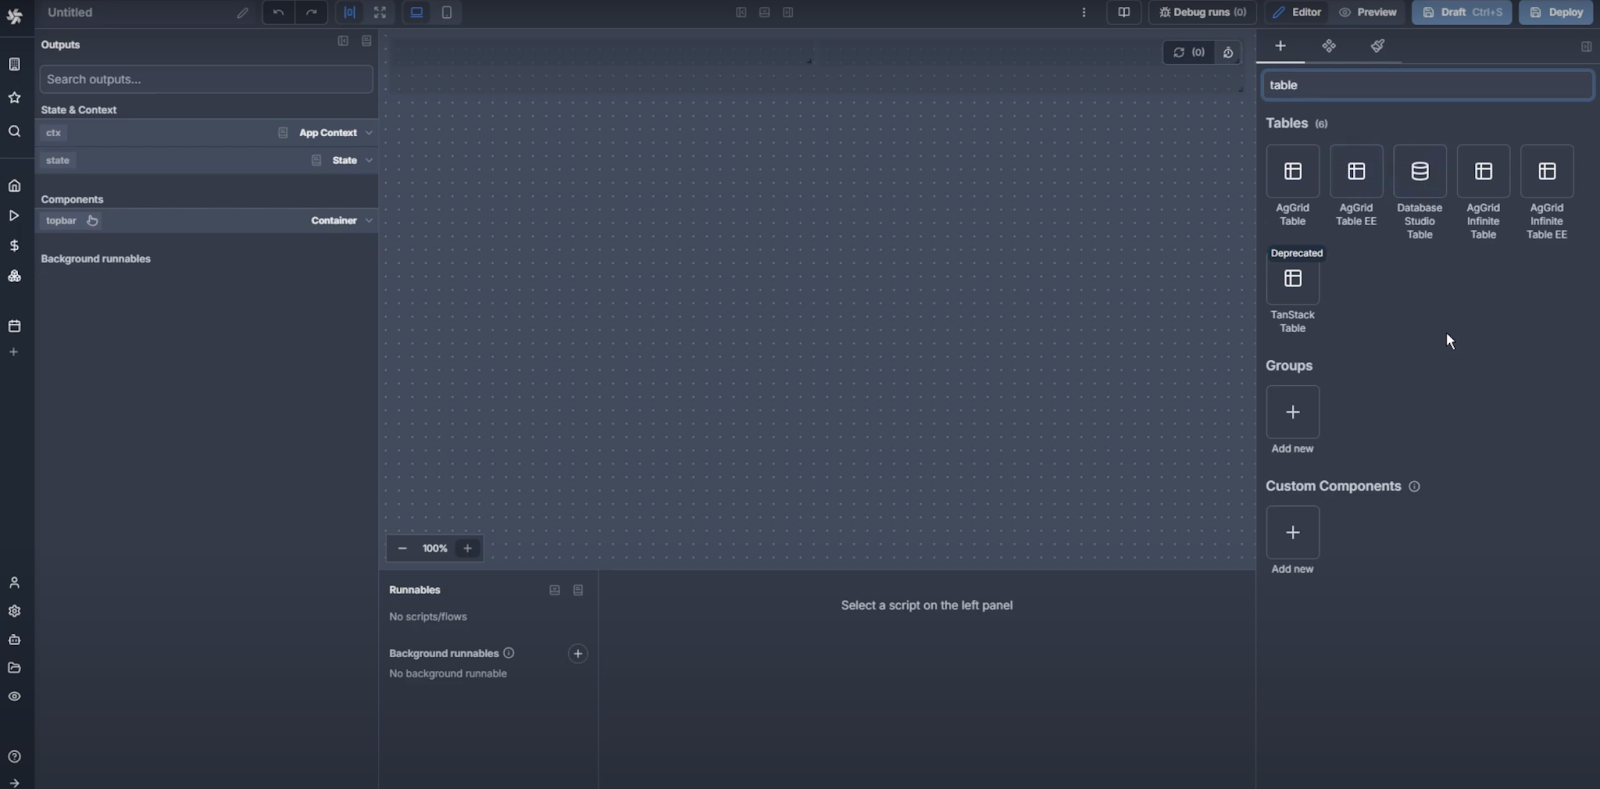
To begin, add an AgGrid Table from the + tab in the inspector on the right hand side of the screen. Windmill offers several different table components, but the AgGrid table is the most basic and perfect for our application.
Set its data source to Compute and select the flow that we just created under ‘Select a script or flow’ and then ‘Workplace flows’.
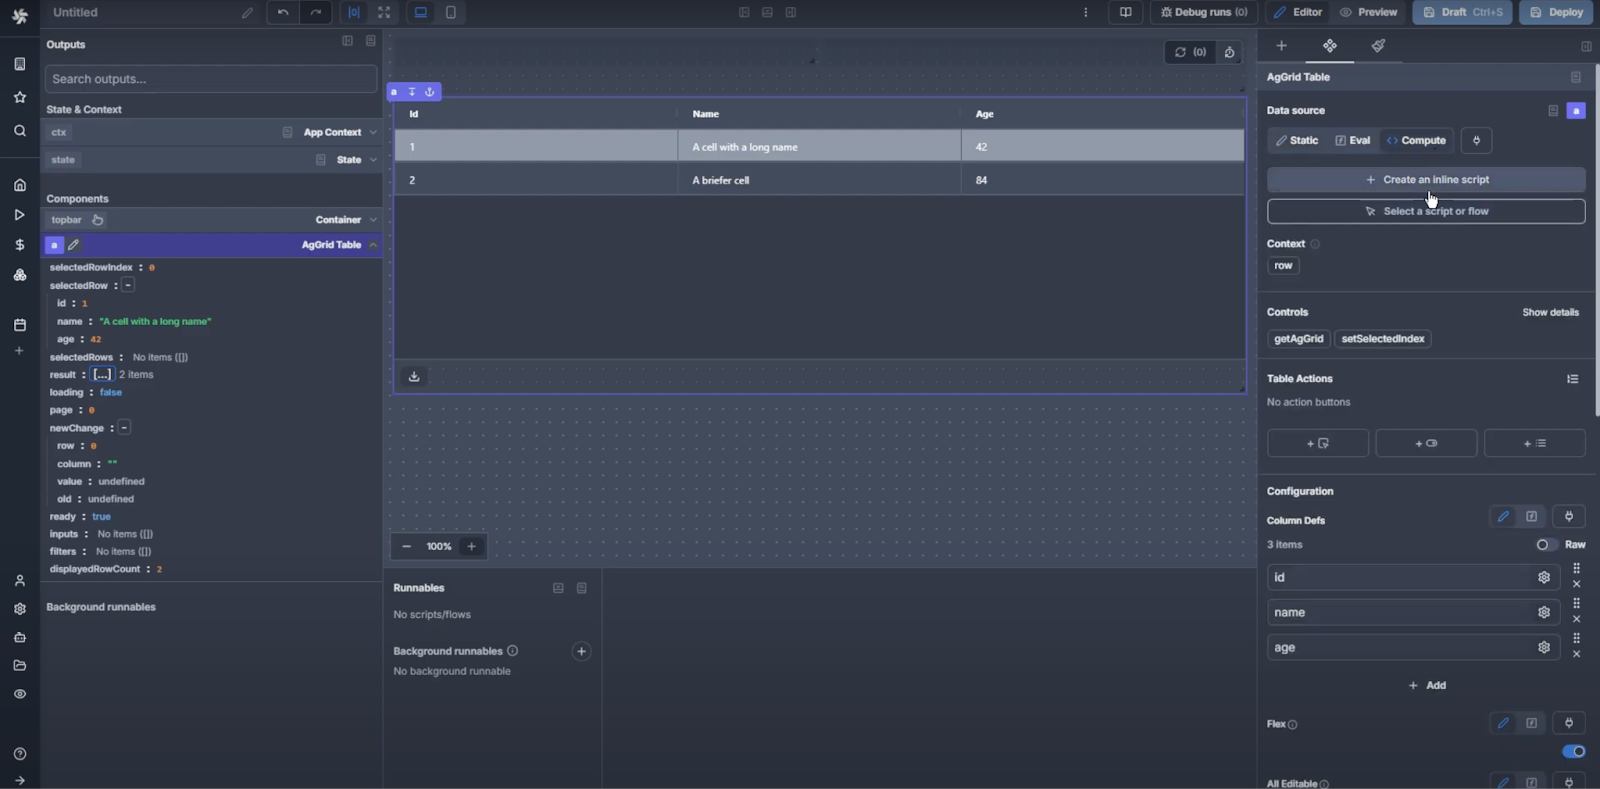
Remember when we added those input variables in our flow? This is where we will use them. Enter the appropriate strings in the ‘runnable inputs’ section of the data source.
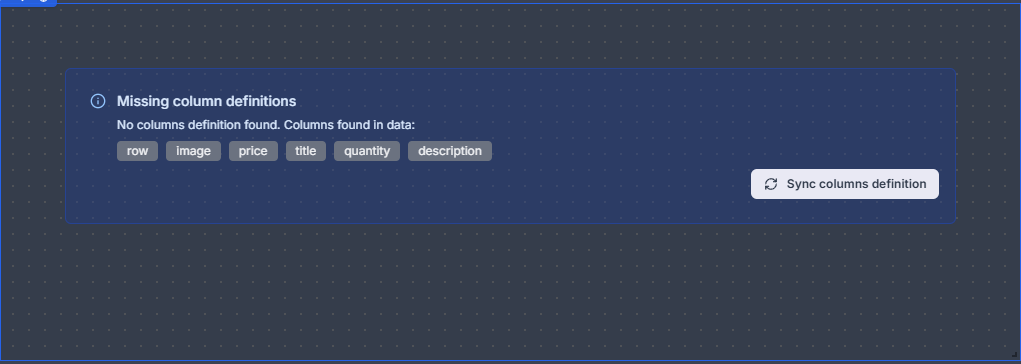
When you first connect this, you might see that the table looks like something went really wrong, because our column names are not yet defined correctly. Click the “sync columns definition” button and the columns that are appropriate for your data should autofill. For us, those are: item, description, price, and quantity. You may need to delete the column configurations first.
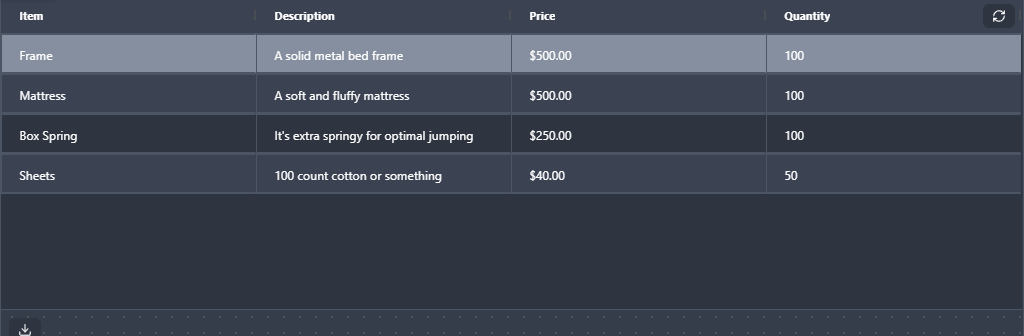
You should now have a table that looks something like this.
And with that we’ve managed to get our Flow data in our application. Congratulations, you’ve now successfully set up the first of our four CRUD operations.
Try adding a new line in your Google Sheet and hit refresh on the table in your application to see how it pulls in new changes.
Create: Adding a new record
Great, so we can read from our sheet, but for now we still have to manually add rows in our Sheet to add any new data. So now let’s go through the next step of being able to create a new row and add it.
To create a new row, we won’t need to create a new Flow but can instead link to a single script directly within our application. To do this, let’s add a submit form to our application from the inspector on the right.
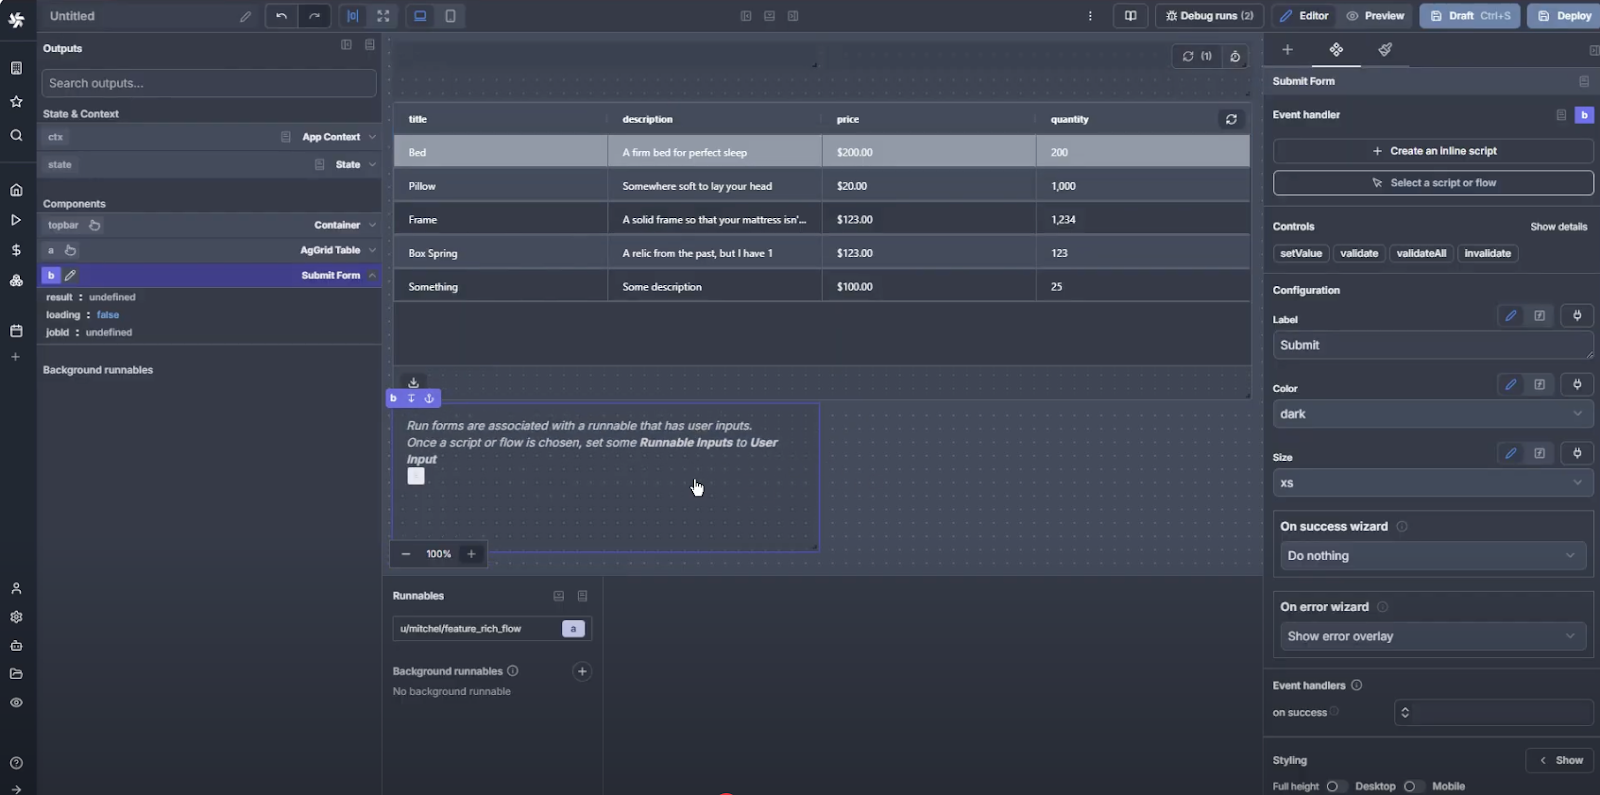
Submit forms allow us to enter one or more pieces of data and then use a button click to trigger something, often a script or a flow, to do something with that data. Once you drag the form from the inspector on the right to the editor window, you’ll see a prompt asking you to associate a “runnable” with the submit form.
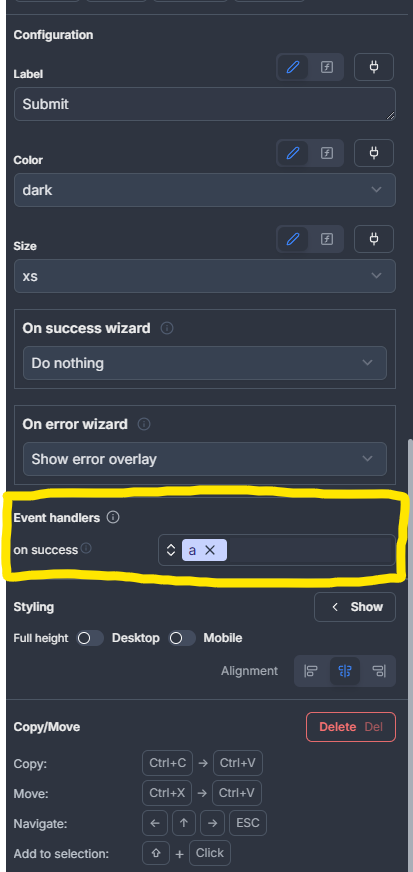
Select the form by clicking on it in the editor window, then use the inspector on the right to add a “click” event handler to trigger a script.
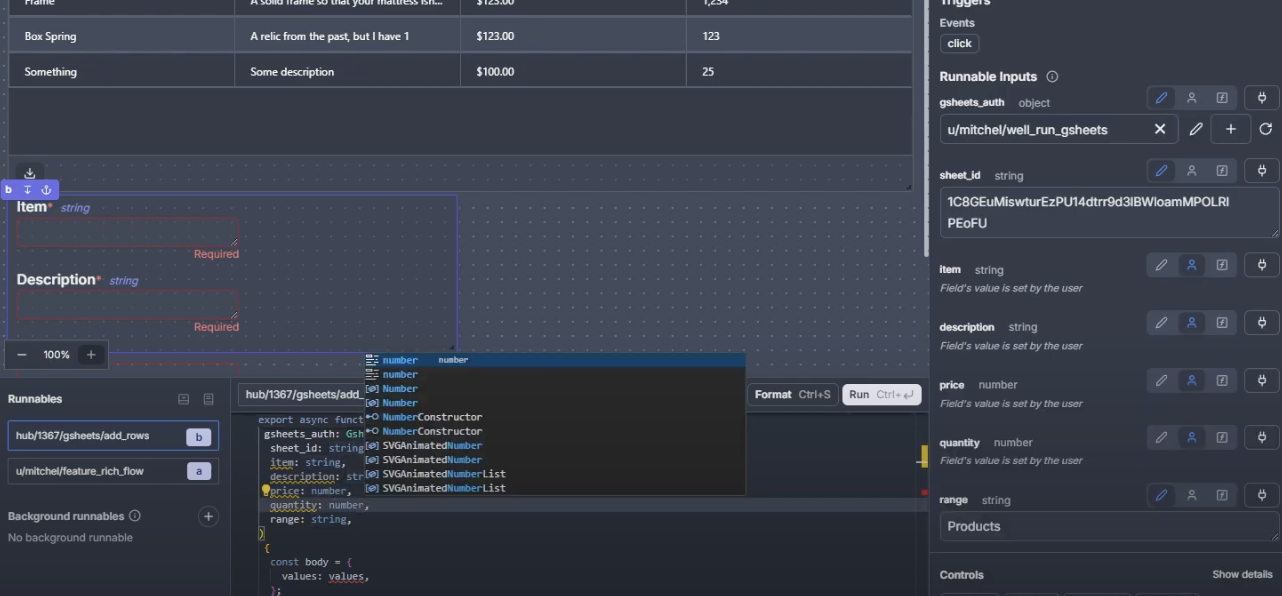
Rather than writing our own script, we will use the community-provided Hub script gsheets/add_rows. In the event handler of the submission form, go ahead and add that script by searching for it in ‘Hub Scripts’.
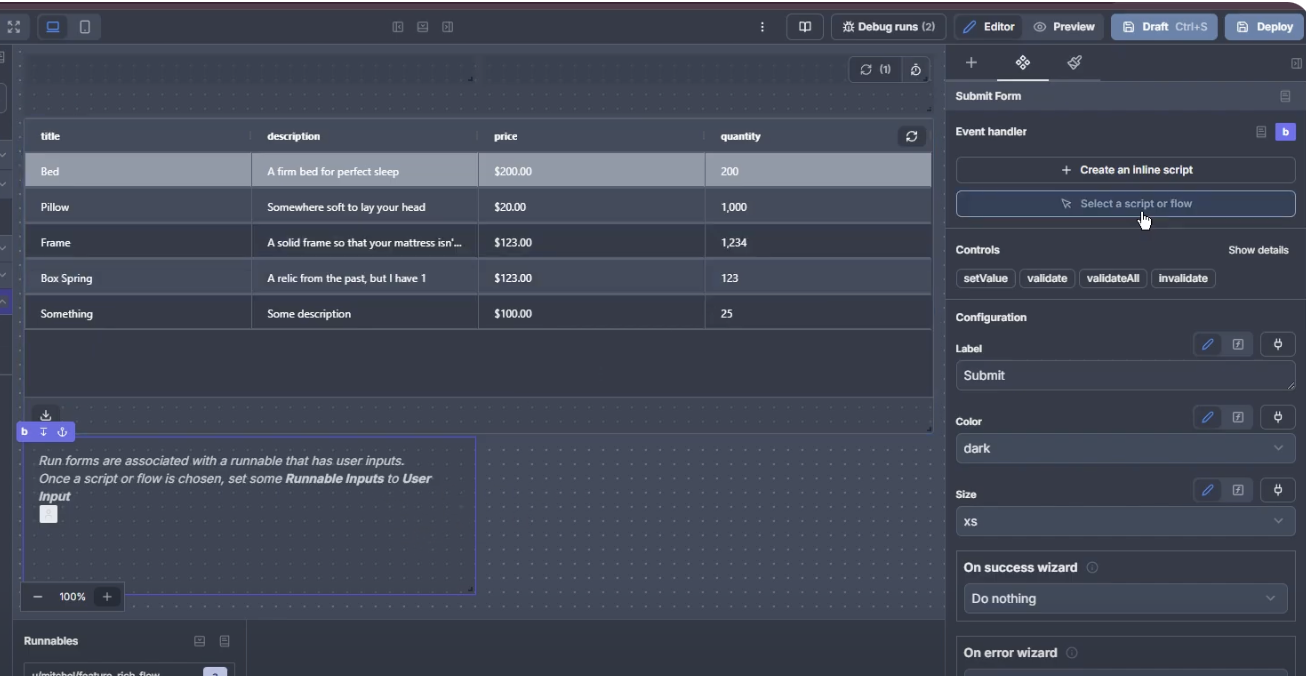
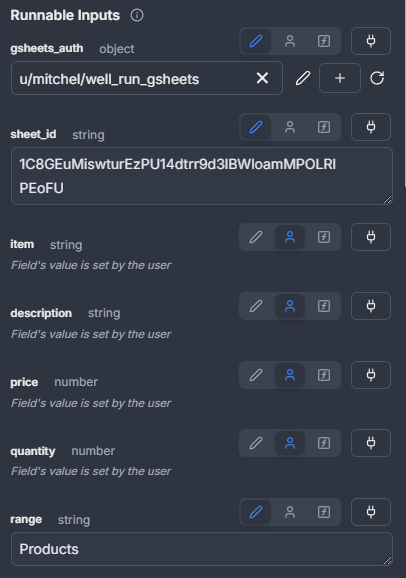
You will see several runnable inputs auto-populate in the form based on the inputs that the gsheets/add_rows script is expecting. Three of these - the gsheets_auth, sheet_id, and range - we will set as static values. These are the same three inputs we used in our Get(Read) request, so here you can use the same sheet_id, gsheets_auth, and range(worksheet name) here.
While we are already making changes in our inspector, let’s make sure that whenever we make one of these updates the data in our table stays up-to-date. Scroll down and add your table to the On success event handler. This will make sure our get_values function runs every time a new record is successfully created, so that the table data is refreshed.
Next up, we need to define the values field.
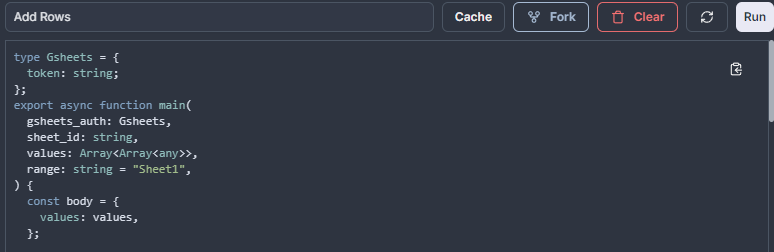
For this value, the Google API expects an array of strings, which Windmill abstracted to an object. In our example, we will always need the same four fields - title, description, price, and quantity - so, let’s use four strings rather than a single object. To make this change, we will first fork the script to allow us to edit it by clicking the fork button in the code editor in the bottom of the screen.
Let’s go ahead and change the main function to take in four strings rather than one array of arrays. The gsheets API call is still expecting an array of arrays, so we will manually create that where the “values” array was used before. You’ll notice that this also updates the submit form to have four fields for string inputs. It’ll look something like this once you’ve changed the ‘values’:
type Gsheets = {
token: string;
};
export async function main(
gsheets_auth: Gsheets,
sheet_id: string,
item: string,
description: string,
price: number,
quantity: number,
range: string,
)
{
const body = {
values: [[item,description,null,price,quantity]],
};
const valueInputOption = "USER_ENTERED";
const insertDataOption = "INSERT_ROWS";
const includeValuesInResponse = true;
const APPEND_URL = `https://sheets.googleapis.com/v4/spreadsheets/${sheet_id}/values/${range}:append/?valueInputOption=${valueInputOption}&insertDataOption=${insertDataOption}&includeValuesInResponse=${includeValuesInResponse}`;
const token = gsheets_auth["token"];
const response = await fetch(APPEND_URL, {
method: "POST",
body: JSON.stringify(body),
headers: {
Authorization: "Bearer " + token,
"Content-Type": "application/json",
},
});
const result = await response.json();
return { result: result };
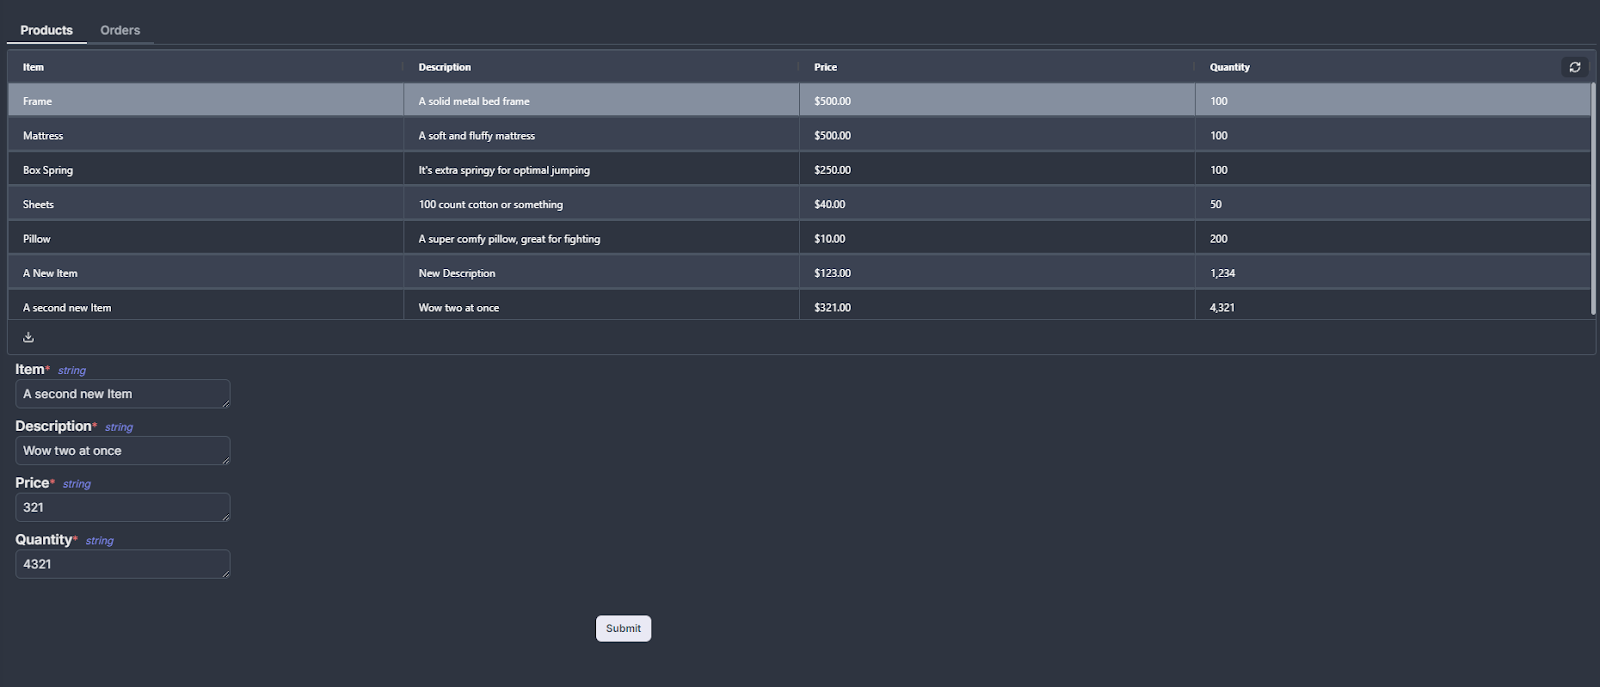
}Go ahead and enter some data and submit the form by clicking the submit button. And voila, that’s it, you can now add rows to your Google Sheet! As long as everything is set up correctly, you should now have an updated table too with this new data.
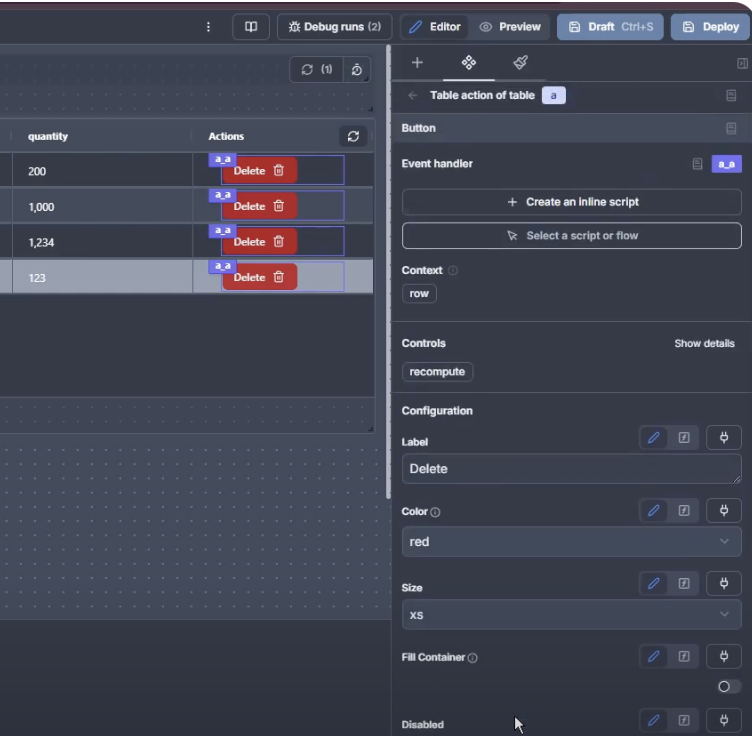
Delete: Removing a record
Ok, so now we can create and read records, but what happens if we add a record in and decide we no longer want it? Well, let’s take care of that now by setting up the ability to delete records.
Once again, we’ll use a script from Windmill’s Hub to accomplish this. This time we will use a row action on the table so that we can identify a specific row to delete.
To set this up, select the table in our application editor window and scroll down in the inspector until you see “Table Actions”. Click Add Button to create a new button action.
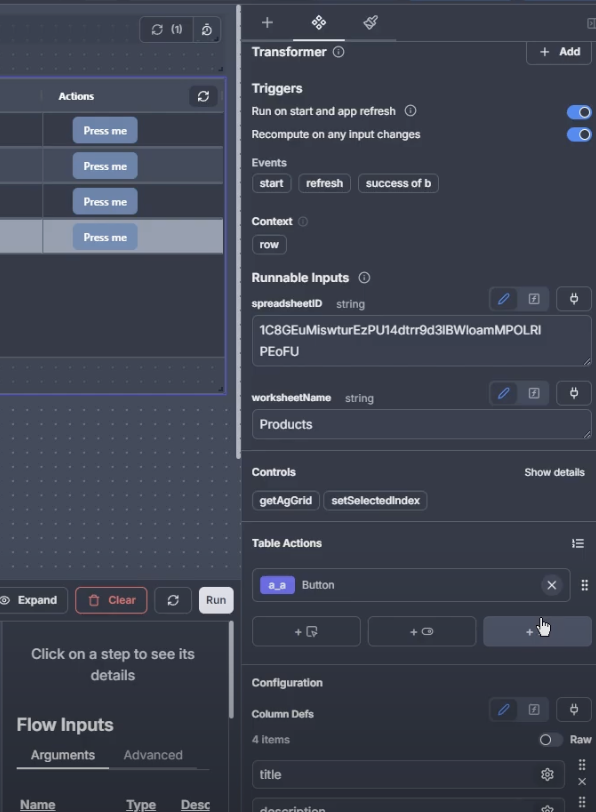
Select the newly created button in the inspector and you’ll see that you can configure some of the button’s appearance. From here click Select a script or flow once more to add gsheets/clear_row Hub script to it.
Some of the fields in this script are the same as in the add_rows script, specifically the gsheet_auth and spreadsheetID. Though, note that in this instance, the script wants a sheet_id, which is the number after gid= in the spreadsheet URL, rather than the name of the specific sheet.
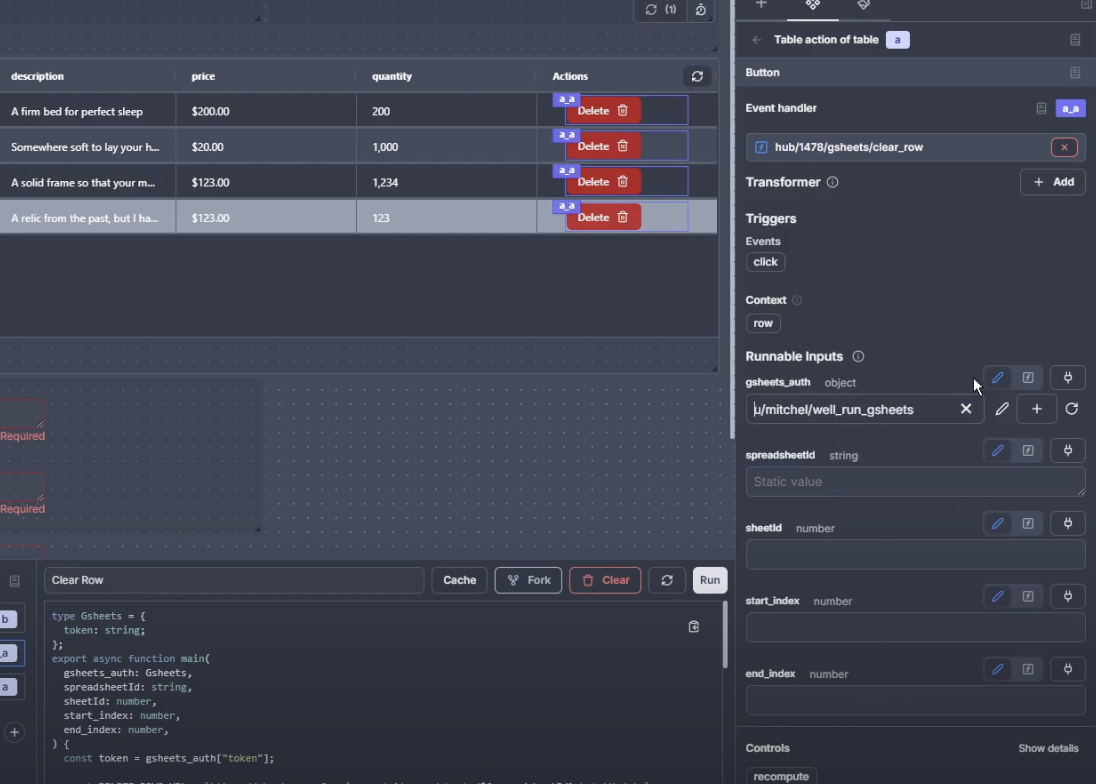
In order to delete a specific row (or later, update it) we need a row ID.
Unfortunately, we don’t have access to the row numbers as they are in Google Sheets, so we need to set up a row ID in the original script we used to read the data. To accomplish this, let’s go back and edit the flow where we get the data for the table so that it includes the row number for each row in our sheet.
To generate a row ID, you can just add the value idx+1, which will be the same as our row numbers in the Google Sheet. The +1 is accounting for the fact that python starts counting from 0 and Sheets starts from 1.
The response should look something like this when you are done.
Don’t forget to deploy the new version of the Flow by clicking deploy in the top right. We will also need to add that row number to the table in our app UI. Since users don’t need to know the row number, we can go ahead and hide that column in our table.
Now that we have the row ID available, let’s finish setting up the inputs on the delete button in our table
Navigate back to your delete button in the inspector and connect the start index to the selected row-> row number in our table by clicking the plug icon next to row in the right hand inspector and then the row tag in the left panel.
Use the same process to connect the end index to row + 1.
Like we did with our add_records script, we want to make sure our table updates with the most recent data, so we’ll add an onSuccess event handler to trigger the get_records script.
Now, you should be able to delete a record and see that reflected both in your Google Sheet and the updated table.
Update: Changing a Record
We’ve nailed three of the four CRUD operations, leaving just Update to complete. Luckily, to update rows in our Google Sheet we can use similar methods to setting up our other operations. Much like delete, we will use a row action button, so that we can reference the specific row we are working on.
Once we add that button, we can rename it to ‘Update’ and set its color. For this, we will select the update_rows event using the inspector on the right.
That event takes several inputs. The ones we’ve filled out several times before, like spreadsheetID and gsheet_auth. Next, we’ll replace the ‘values’ with the same string inputs that we did in our Create step in the add_records script.

The only value in this script that should be new, is the start cell value. Note that it will be written in what is called “A1 notation”, which is the default notation of Google Sheets.
Remember, that row number is 1 more than the row value we have in the ‘selected row value' of the table (since Google Sheets indexes from 1 but Python indexes from 0). For that reason, we will need to add one to our start cell’s value
Once we fill those values in, we should have something that looks like this in the runnable inputs:

Finally, let’s go ahead and add one more success handler to refresh our table after the update action is performed.
Summary
And voilà! Just like that we have built a complete CRUD application. It may not look so beautiful, but it was accomplished extremely quickly and is very functional. Nevertheless, it’s important to note that we COULD make it beautiful. Just select a component and click the paintbrush in the top right, and you will see that we can edit the CSS of individual components or whole classes of components.
Windmill did exactly what they say they do, they made building scripts much faster. Windmill allowed us to bypass the tedium of things like writing API calls by accessing the Hub, then allowed us to skip form creation by auto filling it based on the script it submits, finally all of that was accomplished via a straightforward drag-and-drop. Ta-da!

